35 Stunning Fall Nails for the Perfect Autumn Manicure
Fall nail art is one of the biggest Pinterest and Google search trends of the season, covering everything from short and almond shapes to acrylic, coffin, and French tip styles. Fall nails are trending because they let people carry the cozy, nostalgic feeling of autumn right on their fingertips, combining warm seasonal colors like burnt orange, espresso brown, and deep burgundy with textures such as chrome, marble, velvet, and hand-painted detail.
Whether the appeal is aesthetic, seasonal, fashion-forward, or simply a favorite social media trend, fall nail designs offer something for every nail shape and skill level.
This guide brings together 35 scroll-stopping fall nail ideas across short nails, general designs, acrylic, artistic nail art, almond, coffin, and French tip styles, so you can find the perfect inspiration for your next manicure.
Fall Nails Short: 5 Cozy Nail Designs for Autumn
Fall nails short designs are having a major moment this season, and it is easy to see why. Short nails are having a renaissance thanks to their practicality, and when paired with rich autumn colors, plaid textures, and warm metallics, they become the ultimate seasonal statement.
Fall nails short styles are trending on Pinterest because they combine low-maintenance wearability with high-impact aesthetics, making them perfect for anyone who wants cozy, sweater-weather nail art without the length.
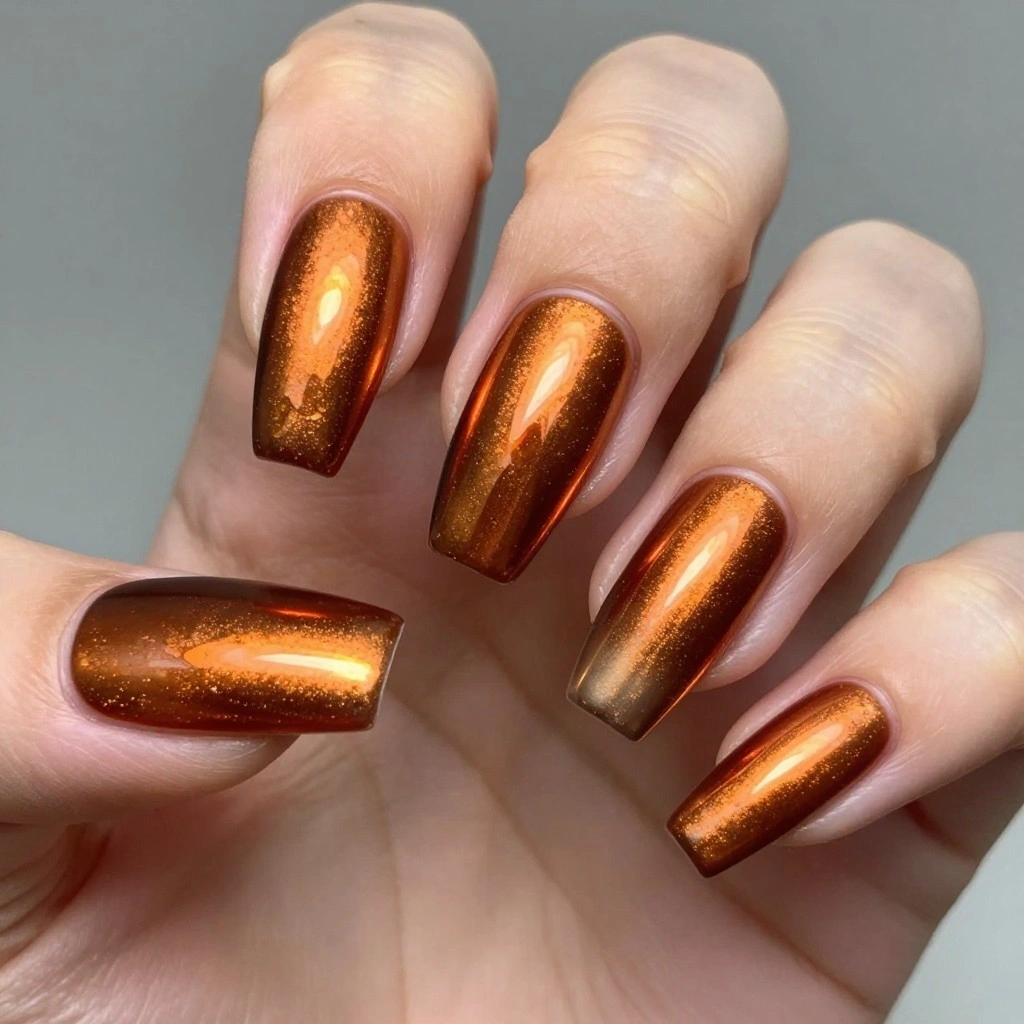
1. Burnt Orange Chrome Short Nails
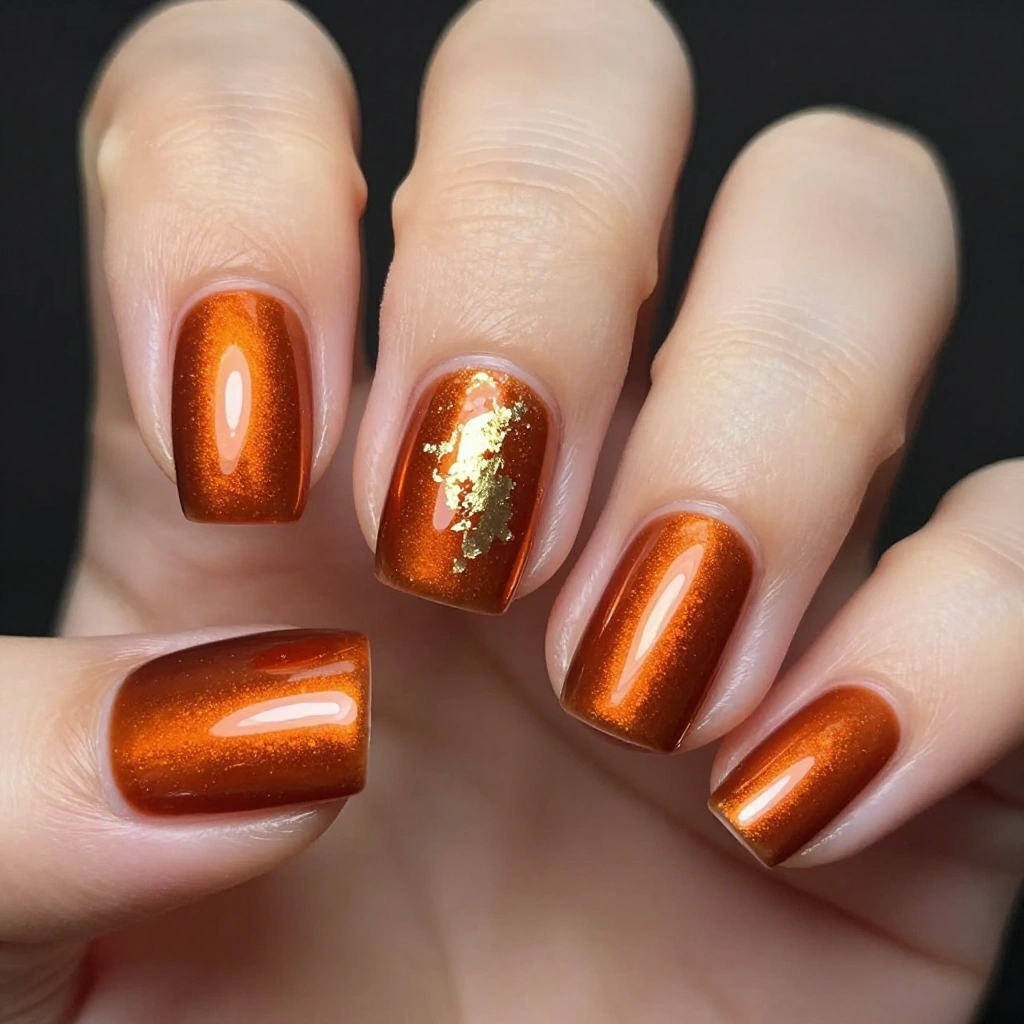
Short square nails coated in a deep burnt orange chrome polish with a mirror-like metallic finish. The chrome catches the light with warm copper and bronze undertones. One accent nail features a fine gold leaf foil fragment pressed into the center for extra shine. Glossy topcoat seals the look for a smooth, reflective surface.
Best For:
Everyday fall wear and casual outings. Aesthetic vibe: warm, modern, minimal-glam.
Difficulty:
Medium – chrome powder application requires a steady hand and a proper base gel, but no advanced artwork is needed.
Product Spotlight:
- Chrome powder in copper/bronze
- Gel polish base and top coat
- Gold foil flakes
2. Plaid Pattern Short Almond-Square Nails
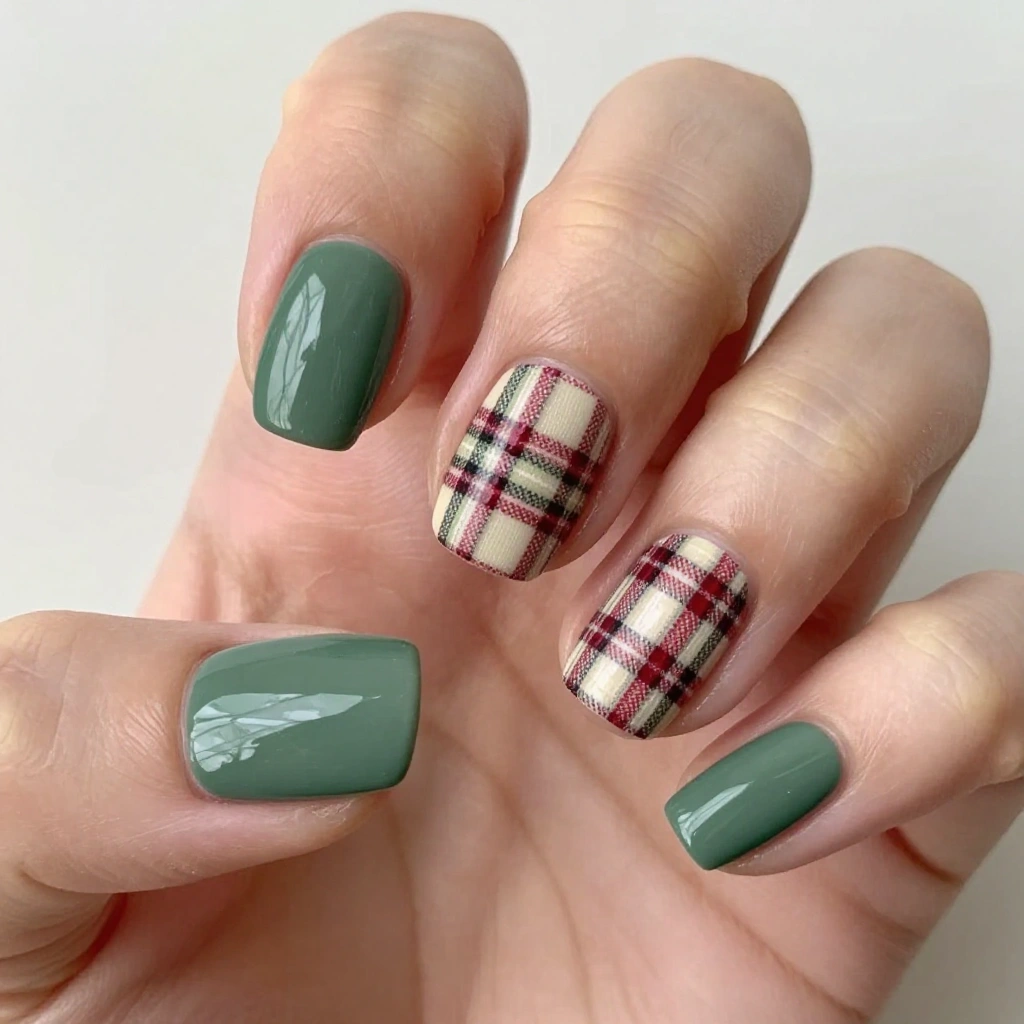
Short square nails painted in a muted forest green base, with two accent nails featuring hand-painted red and cream plaid lines crossing in a classic flannel pattern. Matte topcoat gives the plaid nails a cozy, fabric-like texture while the solid green nails stay glossy for contrast.
Best For:
Fall gatherings, pumpkin patch outings, and casual seasonal styling. Aesthetic vibe: cozy, cottagecore, autumn-classic.
Difficulty:
Medium – thin plaid lines require a fine detail brush.
Product Spotlight:
- Detail nail art brush
- Matte top coat
- Gel polish in forest green, red, and cream
3. Cinnamon Swirl Short Nails
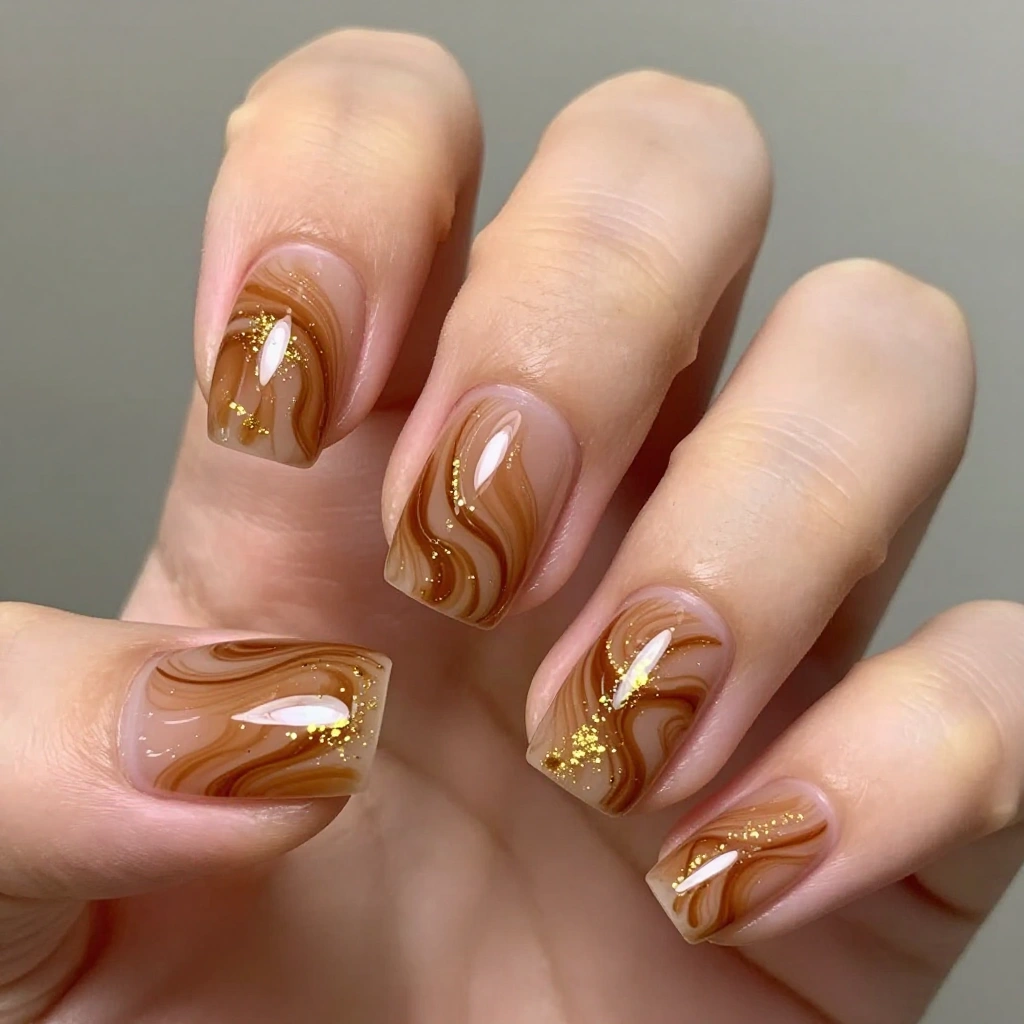
Short coffin-square nails in a warm cinnamon-brown base with soft caramel swirls painted in a marbled pattern across each nail. A light dusting of fine gold shimmer sits over the swirls for subtle sparkle. Glossy jelly-like finish gives the nails a rich, syrupy depth.
Best For:
Fall coffee dates and everyday wear. Aesthetic vibe: warm, soft, comforting.
Difficulty:
Medium – marbling swirls takes practice to blend smoothly.
Product Spotlight:
- Marbling dotting tool
- Gel polish in cinnamon-brown and caramel
- Fine gold shimmer powder
4. Mini Pumpkin Accent Short Nails
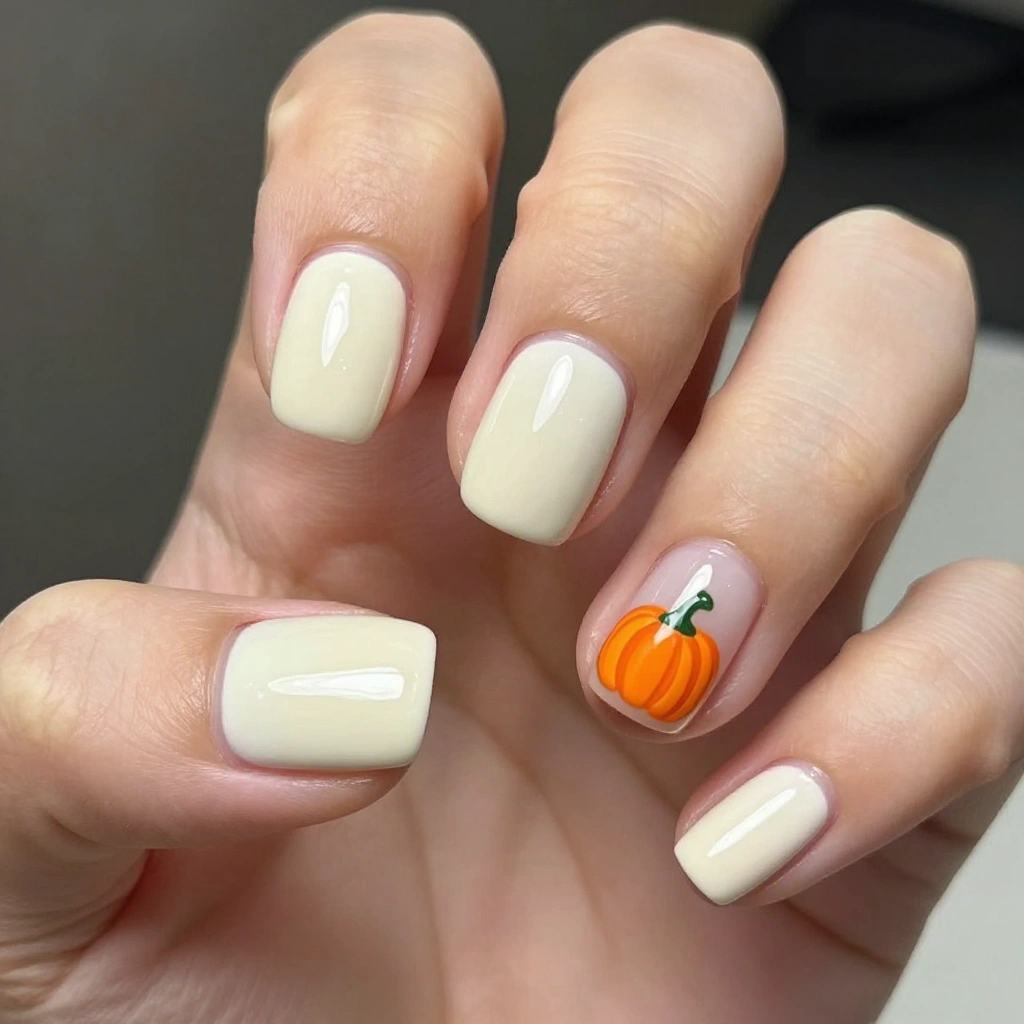
Short square nails in a creamy off-white base, with one accent nail on each hand featuring a tiny hand-painted orange pumpkin with a green stem and textured ridges. Remaining nails stay clean and glossy to let the pumpkin accent pop as the focal point.
Best For:
Fall festivals and family gatherings. Aesthetic vibe: cute, playful, seasonal.
Difficulty:
Easy – single accent design keeps the rest of the set simple.
Product Spotlight:
- Fine detail brush
- Gel polish in cream, orange, and green
- Glossy top coat
5. Deep Wine Ombre Short Nails
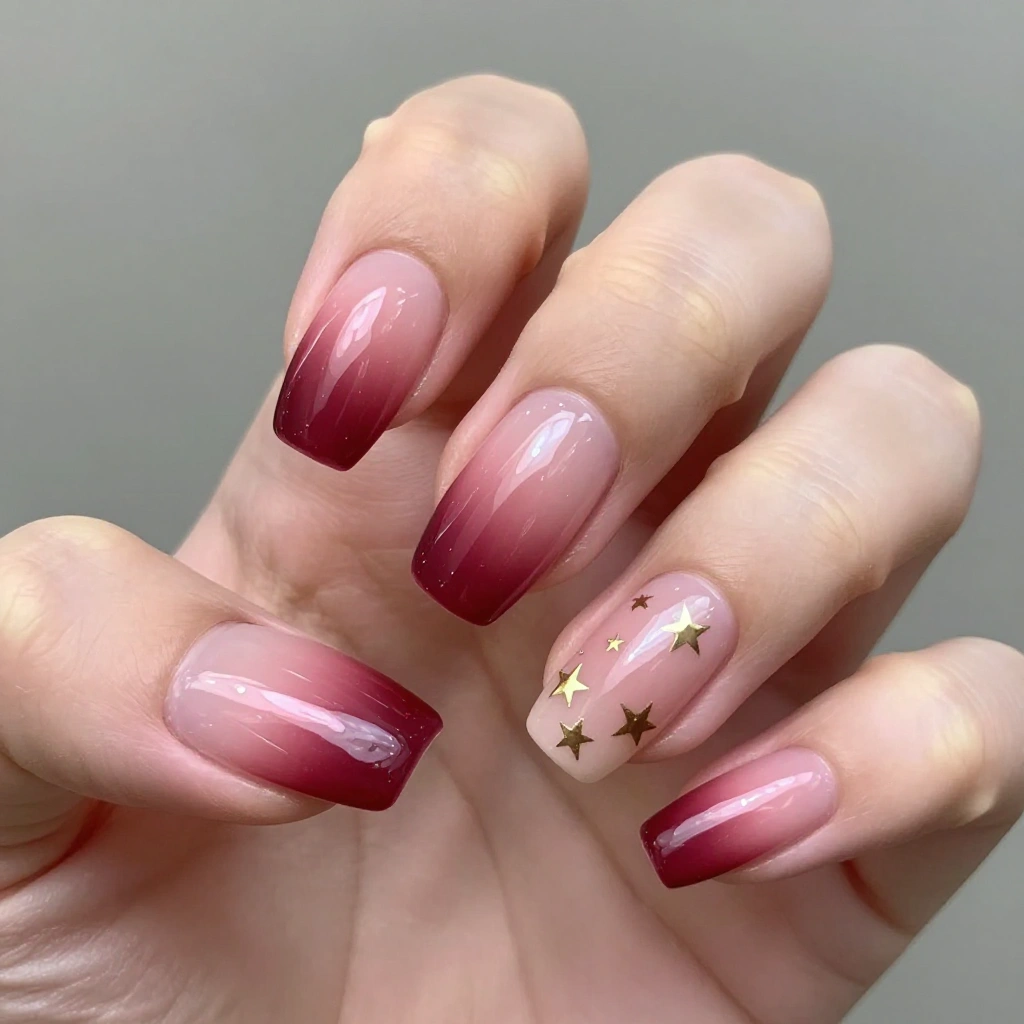
Short almond-square nails with a gradient ombre fading from deep wine red at the cuticle to a soft blush pink at the tip. A glossy finish enhances the smooth color transition, while one accent nail has delicate gold star decals scattered near the base.
Best For:
Date nights and fall weddings. Aesthetic vibe: elegant, romantic, luxury.
Difficulty:
Medium – gradient blending needs a makeup sponge technique for a seamless fade.
Product Spotlight:
- Makeup sponge for ombre blending
- Gel polish in wine red and blush pink
- Gold star nail decals
Fall Nails Designs: 5 Stunning Autumn Nail Art Ideas
Fall nails designs are taking over Pinterest boards this season, blending rich seasonal colors with creative textures and patterns. People love these designs because they capture the cozy, nostalgic feeling of autumn while staying fresh and fashion-forward.
From falling leaves to warm gradients, fall nails designs offer endless inspiration for anyone wanting their manicure to reflect the beauty of the season.
1. Falling Leaves Gradient Nails

Almond-shaped nails with a soft beige-to-caramel gradient base. Hand-painted golden and rust-colored leaves cascade diagonally across two accent nails, layered with fine black vein details for realism. Glossy topcoat finishes the set with a natural, sunlit shine.
Best For:
Everyday fall styling and nature-inspired outfits. Aesthetic vibe: earthy, romantic, sophisticated.
Difficulty:
Medium – leaf detailing requires a fine brush and layering technique.
Product Spotlight:
- Detail nail art brush
- Gel polish in beige, caramel, and rust
- Glossy top coat
2. Spiced Pumpkin Swirl Nails
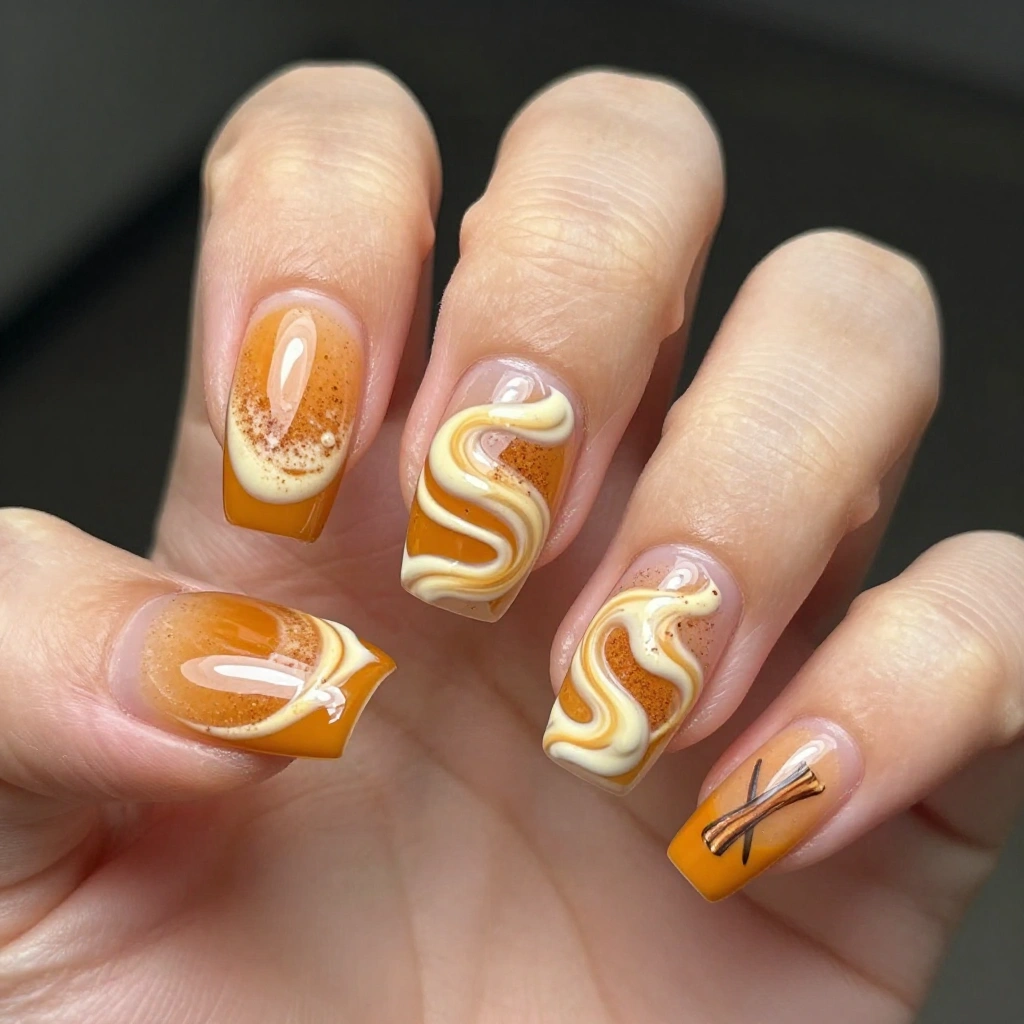
Coffin-shaped nails featuring a warm pumpkin-orange base with hand-painted cream swirls resembling whipped spice latte foam. A light cinnamon-brown dusting is layered near the cuticle for depth, and one accent nail has a tiny painted cinnamon stick design.
Best For:
Fall coffee shop aesthetics and casual outings. Aesthetic vibe: cozy, playful, trendy.
Difficulty:
Medium – swirl blending takes a steady hand.
Product Spotlight:
- Swirl marbling tool
- Gel polish in pumpkin-orange and cream
- Fine detail brush
3. Harvest Plaid and Gold Foil Nails

Square nails in a deep maroon base with two accent nails featuring hand-painted mustard and brown plaid lines. Gold foil flakes are scattered across the plaid pattern for a subtle metallic sparkle, sealed under a glossy topcoat.
Best For:
Fall festivals and holiday gatherings. Aesthetic vibe: classic, cozy, festive.
Difficulty:
Medium – plaid lines require precision, but foil application is beginner-friendly.
Product Spotlight:
- Fine detail striping brush
- Gel polish in maroon, mustard, and brown
- Gold foil flakes
4. Aura Sunset Fall Nails
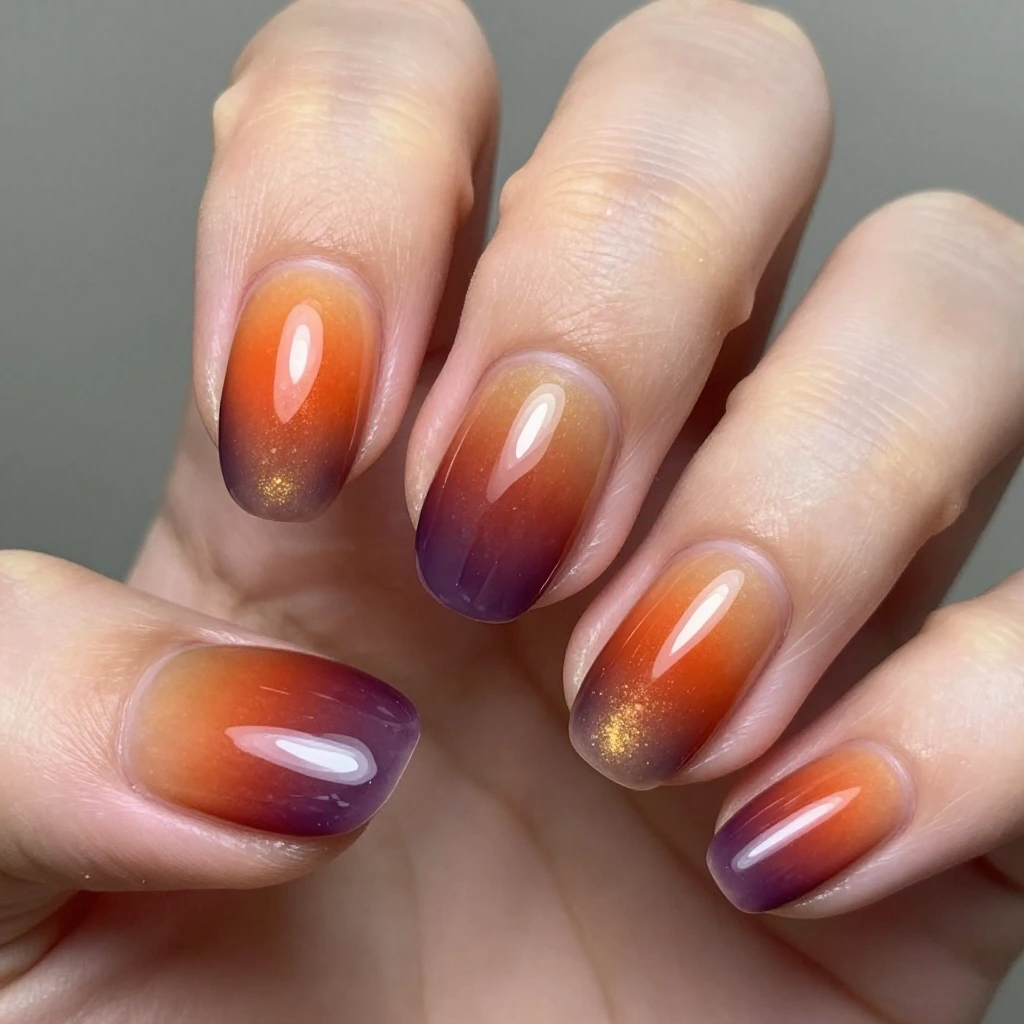
Oval nails with a soft airbrushed aura effect blending burnt orange, deep plum, and golden yellow across the nail bed. The colors blur softly into one another like a sunset sky, finished with a glossy, almost glass-like shine.
Best For:
Fashion-forward looks and fall photoshoots. Aesthetic vibe: dreamy, artistic, bold.
Difficulty:
Hard – aura blending requires an airbrush tool or sponge technique for a soft gradient.
Product Spotlight:
- Airbrush nail tool or makeup sponge
- Gel polish in orange, plum, and yellow
- High-shine top coat
5. Acorn and Berry Accent Nails

Almond nails in a warm taupe base, with one accent nail per hand featuring a hand-painted cluster of tiny acorns and red berries with fine green leaf details. Remaining nails stay a smooth matte taupe to let the accent art stand out.
Best For:
Casual fall days and nature-themed outfits. Aesthetic vibe: cute, rustic, minimal.
Difficulty:
Easy – single accent nail design keeps the set simple.
Product Spotlight:
- Fine detail brush
- Matte top coat
- Gel polish in taupe, brown, red, and green
Fall Nails Acrylic: 5 Bold Autumn Acrylic Nail Ideas
Fall nails acrylic designs are trending because acrylics offer the perfect canvas for bold seasonal color, texture, and dimension. Their durability and length make them ideal for showcasing intricate autumn-inspired art, from chrome finishes to 3D embellishments. People love acrylic fall nails for their long-lasting wear and the way they elevate a simple manicure into a true statement piece.
1. Copper Chrome Acrylic Nails
Long coffin-shaped acrylic nails coated in a high-shine copper chrome finish. The metallic surface reflects warm autumn light with a mirror-like glow. One accent nail features a subtle ombre fade from copper to deep bronze near the cuticle.
Best For:
Fall events and glam occasions. Aesthetic vibe: luxury, bold, modern.
Difficulty:
Medium – chrome powder needs a smooth acrylic base for even application.
Product Spotlight:
- Acrylic powder and liquid set
- Copper and bronze chrome powder
- High-shine top coat
2. 3D Pumpkin Acrylic Nails
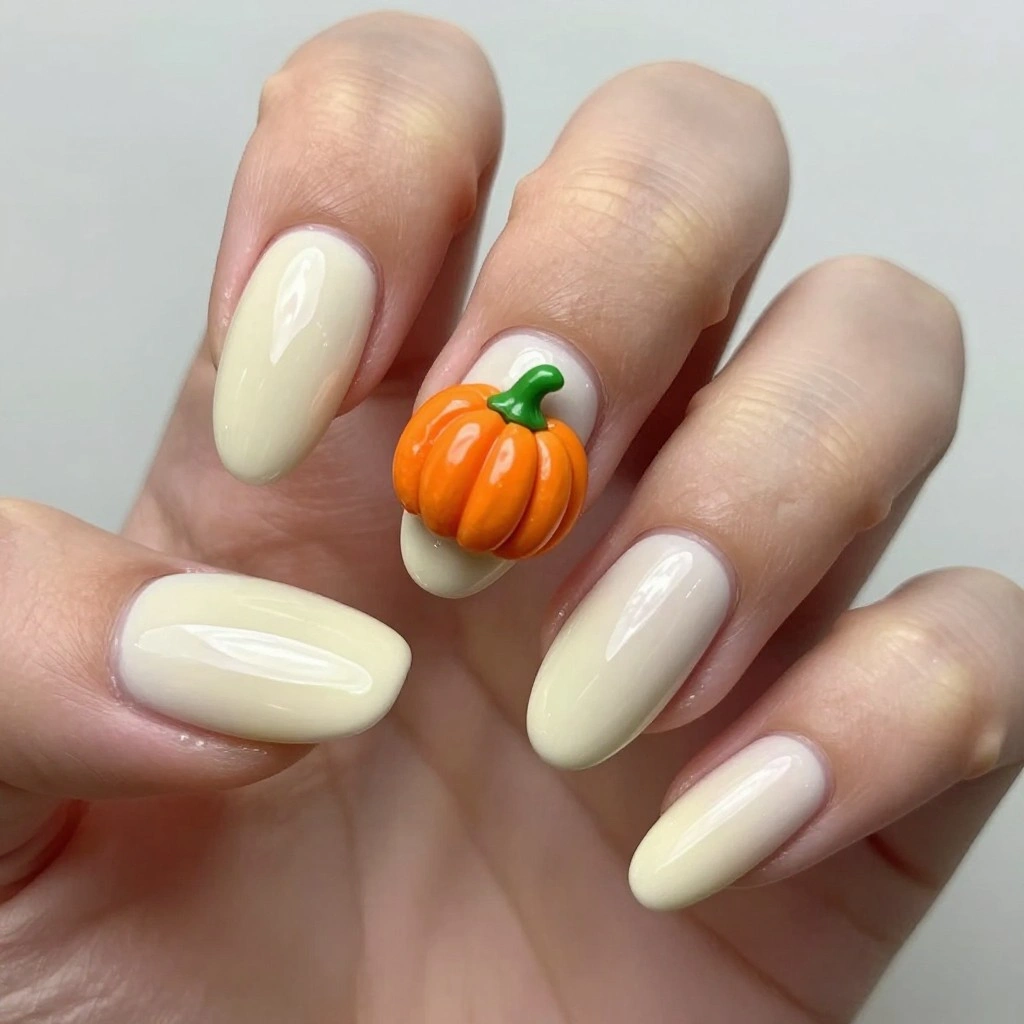
Almond-shaped acrylic nails in a cream base, featuring one accent nail with a hand-sculpted 3D acrylic pumpkin in orange with a textured ridged surface and a tiny green acrylic stem. Remaining nails stay glossy and clean to highlight the sculpted design.
Best For:
Fall festivals and statement styling. Aesthetic vibe: playful, artistic, eye-catching.
Difficulty:
Hard – 3D acrylic sculpting requires advanced technique and practice.
Product Spotlight:
- Sculpting acrylic powder in orange and green
- Acrylic nail brush
- Glossy top coat
3. Burgundy Marble Acrylic Nails
Coffin-shaped acrylic nails in a deep burgundy base with delicate black and gold marble veining swirled across each nail. The marbling mimics the look of polished stone, finished with a glossy, high-shine coat for a luxurious effect.
Best For:
Fall date nights and special occasions. Aesthetic vibe: elegant, dramatic, luxury.
Difficulty:
Medium – marbling technique requires practice for realistic veining.
Product Spotlight:
- Marbling dotting tool
- Acrylic gel polish in burgundy, black, and gold
- High-shine top coat
4. Plaid French Tip Acrylic Nails

Square acrylic nails with a classic French tip in a deep forest green, layered with thin red and cream plaid lines painted over the tip. The base of the nail stays a soft nude for contrast, finished with a glossy topcoat.
Best For:
Fall gatherings and cozy seasonal outfits. Aesthetic vibe: classic, cozy, chic.
Difficulty:
Medium – plaid tip detailing requires a fine striping brush.
Product Spotlight:
- Acrylic powder and liquid set
- Fine striping brush
- Gel polish in green, red, and cream
5. Golden Leaf Aura Acrylic Nails
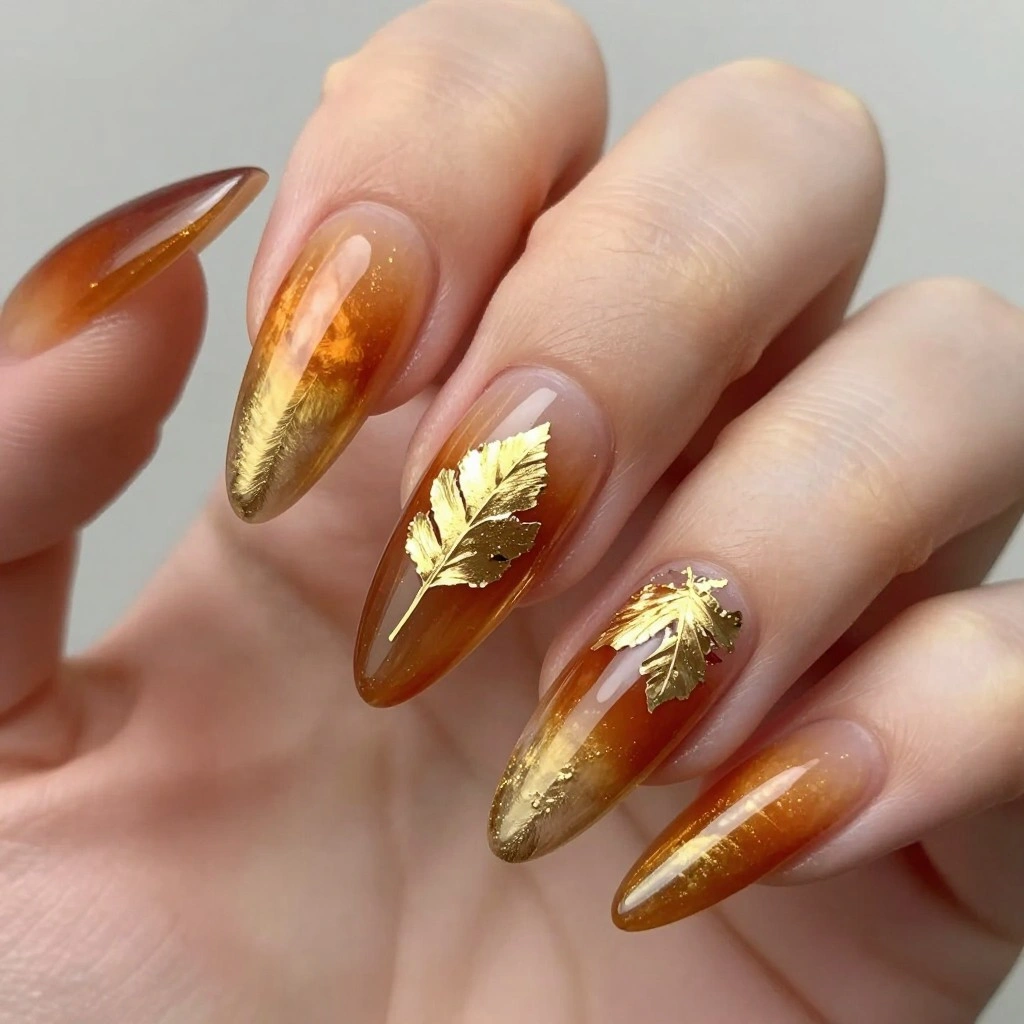
Stiletto-shaped acrylic nails with a soft airbrushed aura blending amber, rust, and gold across the nail bed. A single delicate gold leaf foil piece is placed near the base of each nail, catching the light against the blended aura background.
Best For:
Fashion-forward looks and fall photoshoots. Aesthetic vibe: dramatic, artistic, glamorous.
Difficulty:
Hard – aura blending and foil placement require advanced acrylic skills.
Product Spotlight:
- Airbrush tool or makeup sponge
- Gel polish in amber, rust, and gold
- Gold leaf foil
Fall Nails Art: 5 Creative Autumn Nail Art Ideas
Fall nails art is trending because it turns manicures into miniature canvases full of seasonal storytelling. From hand-painted florals to abstract autumn textures, this style of nail art celebrates creativity and detail. People love fall nails art for its artistic expression, allowing every set to feel unique, personal, and completely scroll-stopping on Pinterest.
1. Hand-Painted Maple Leaf Nails
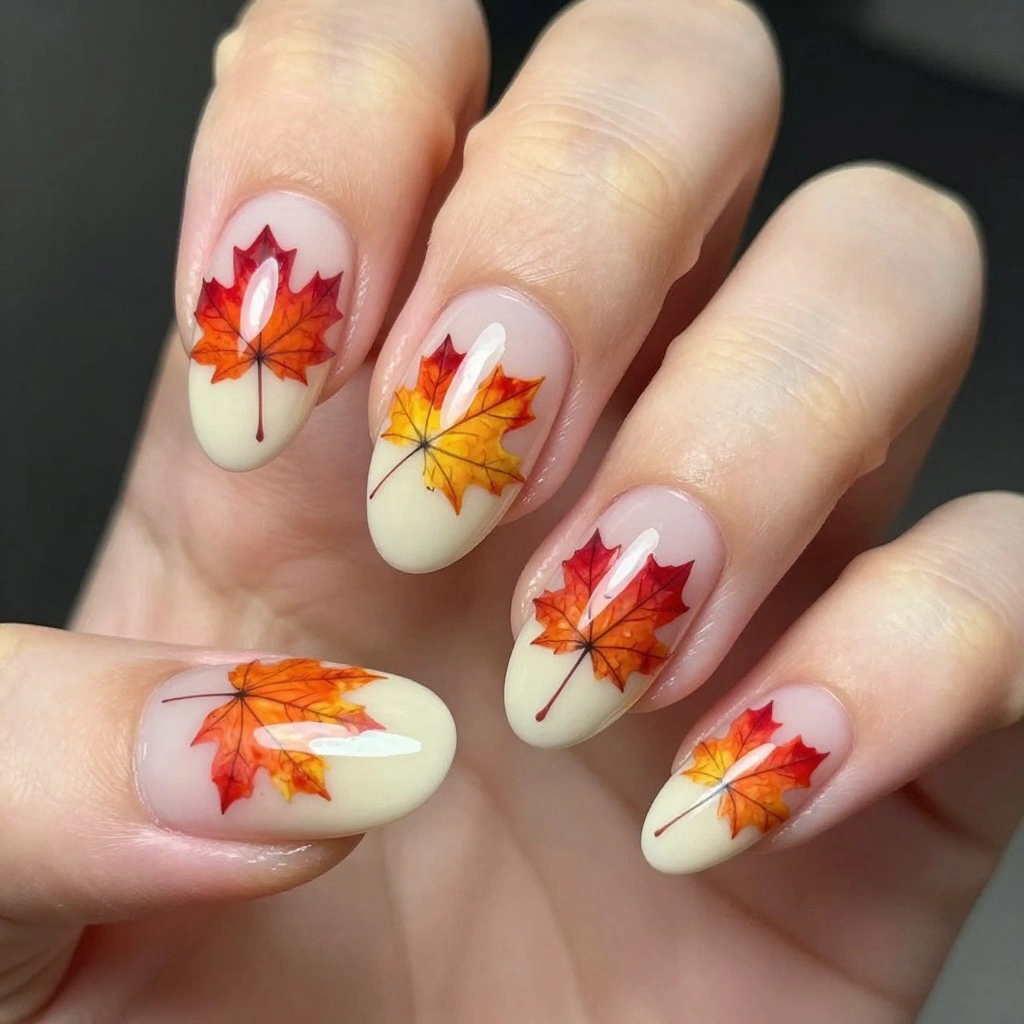
Almond-shaped nails in a soft cream base, featuring hand-painted maple leaves in shades of red, orange, and yellow scattered across two accent nails. Fine black linework adds leaf veins for a realistic touch, sealed with a glossy topcoat for a natural sheen.
Best For:
Everyday fall styling and artistic outfits. Aesthetic vibe: whimsical, nature-inspired, elegant.
Difficulty:
Medium – leaf detailing requires a fine brush and steady hand.
Product Spotlight:
- Fine detail nail art brush
- Gel polish in cream, red, orange, and yellow
- Glossy top coat
2. Abstract Autumn Swirl Nails
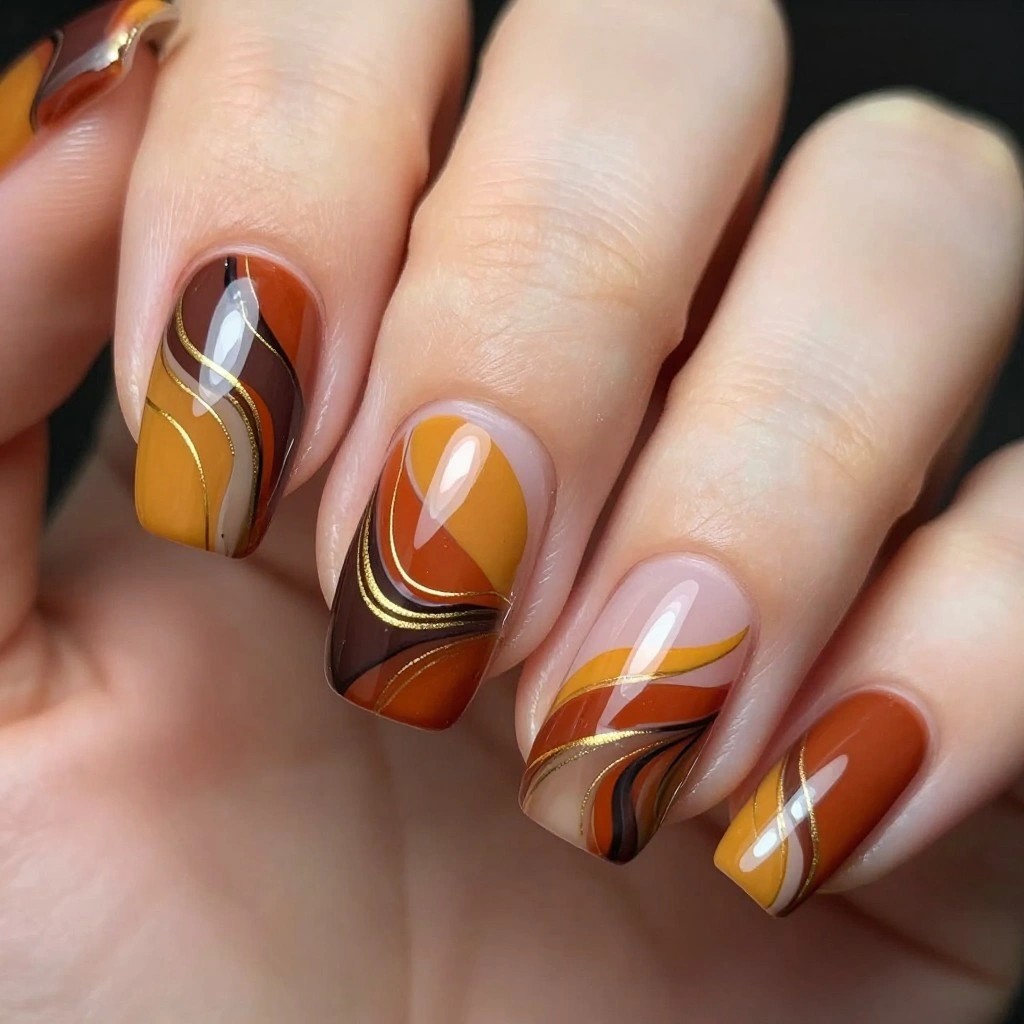
Coffin-shaped nails featuring an abstract design with bold swirls of rust, mustard, and deep brown blending across the nail bed. The swirls are layered with fine gold linework for added dimension, finished with a glossy, artistic shine.
Best For:
Fashion-forward outfits and artistic expression. Aesthetic vibe: bold, modern, abstract.
Difficulty:
Hard – abstract blending requires precise brush control for clean swirl lines.
Product Spotlight:
- Fine detail brush
- Gel polish in rust, mustard, and brown
- Gold striping polish
3. Textured Velvet Fall Nails
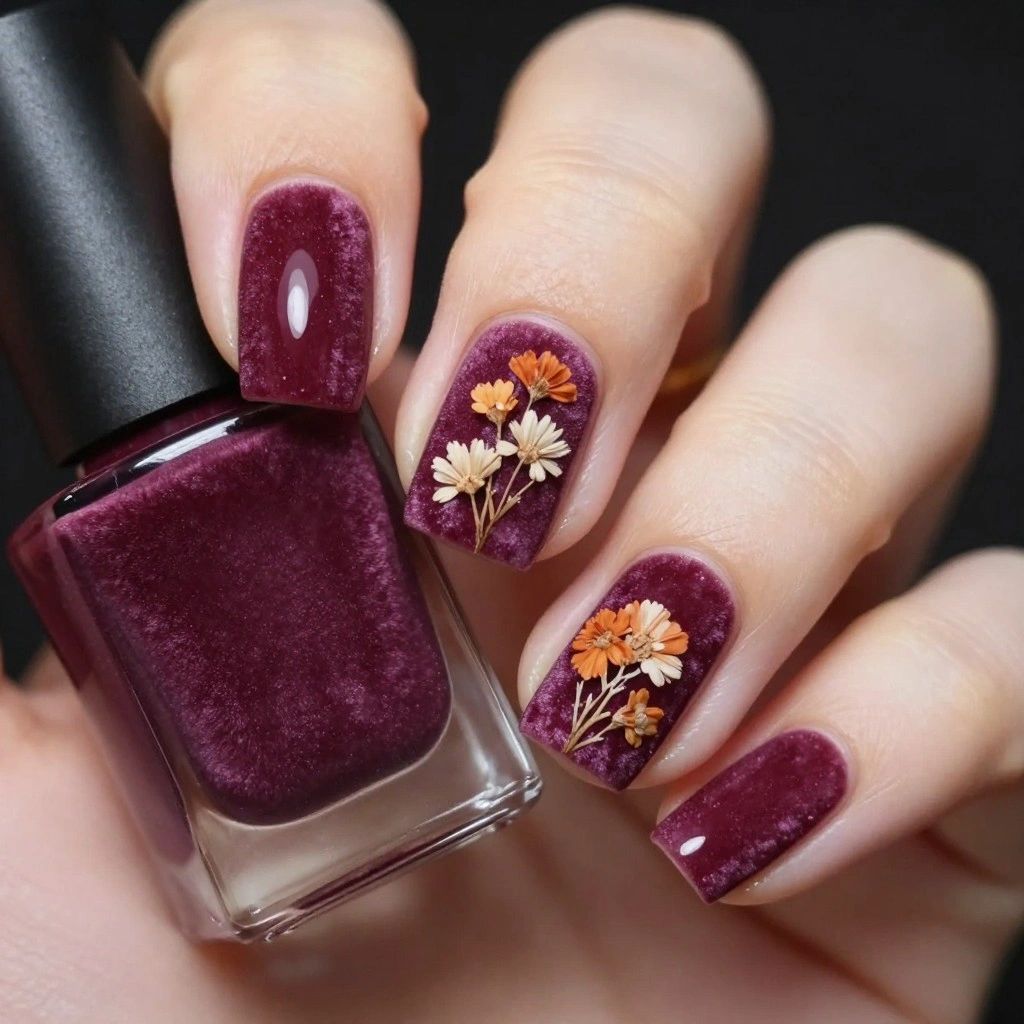
Square nails coated in a deep plum velvet-effect polish that creates a soft matte texture resembling fabric. One accent nail features a hand-painted small bouquet of dried autumn flowers in muted orange and cream tones.
Best For:
Cozy fall outfits and everyday elegance. Aesthetic vibe: soft, luxurious, romantic.
Difficulty:
Medium – velvet powder application requires quick, even coverage.
Product Spotlight:
- Velvet flocking powder
- Gel polish in plum, orange, and cream
- Fine detail brush
4. Watercolor Sunset Nails
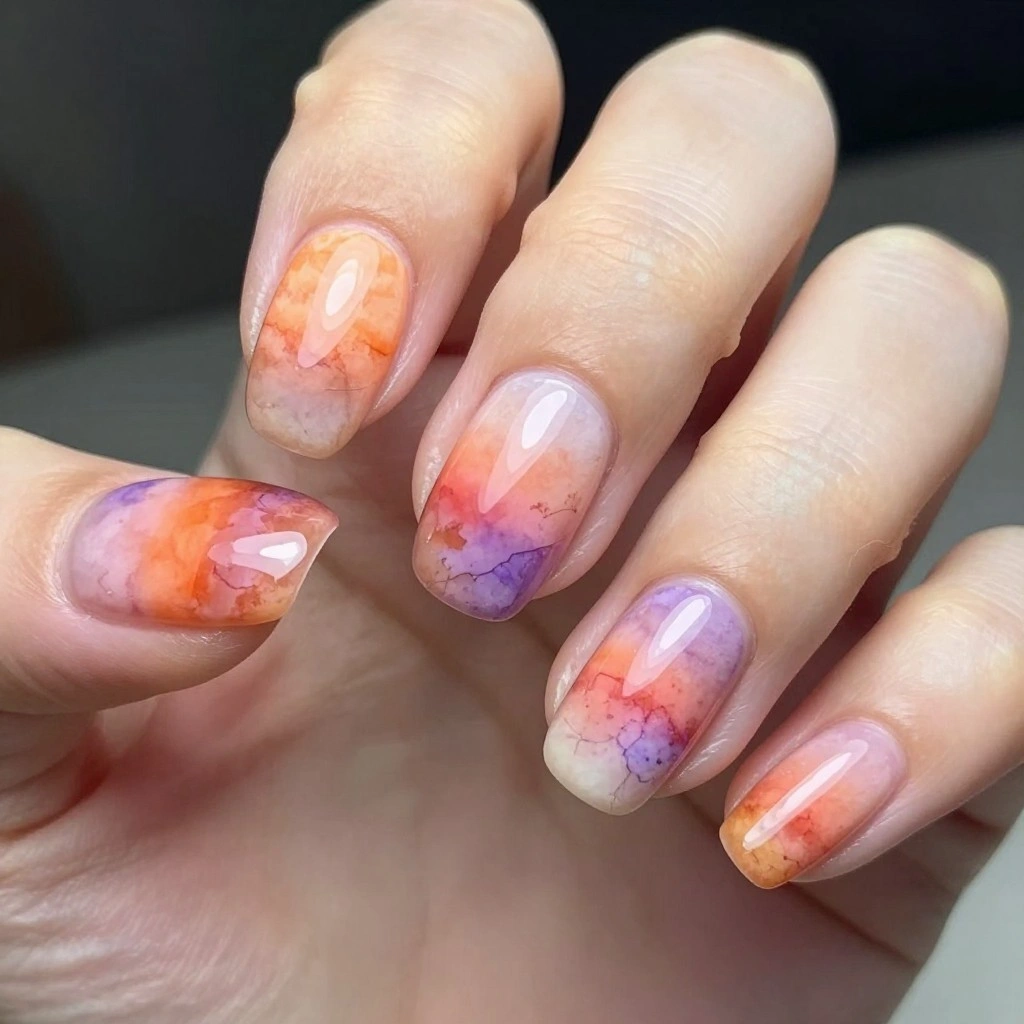
Oval nails featuring a watercolor-style blend of soft orange, pink, and purple hues resembling a fall sunset sky. The colors bleed softly into one another with a delicate, painterly texture, finished with a glossy topcoat for a glass-like shine.
Best For:
Fall photoshoots and artistic self-expression. Aesthetic vibe: dreamy, soft, artistic.
Difficulty:
Hard – watercolor blending requires a wet-on-wet painting technique.
Product Spotlight:
- Fine detail brush
- Gel polish in orange, pink, and purple
- High-shine top coat
5. Hand-Painted Acorn and Wheat Nails
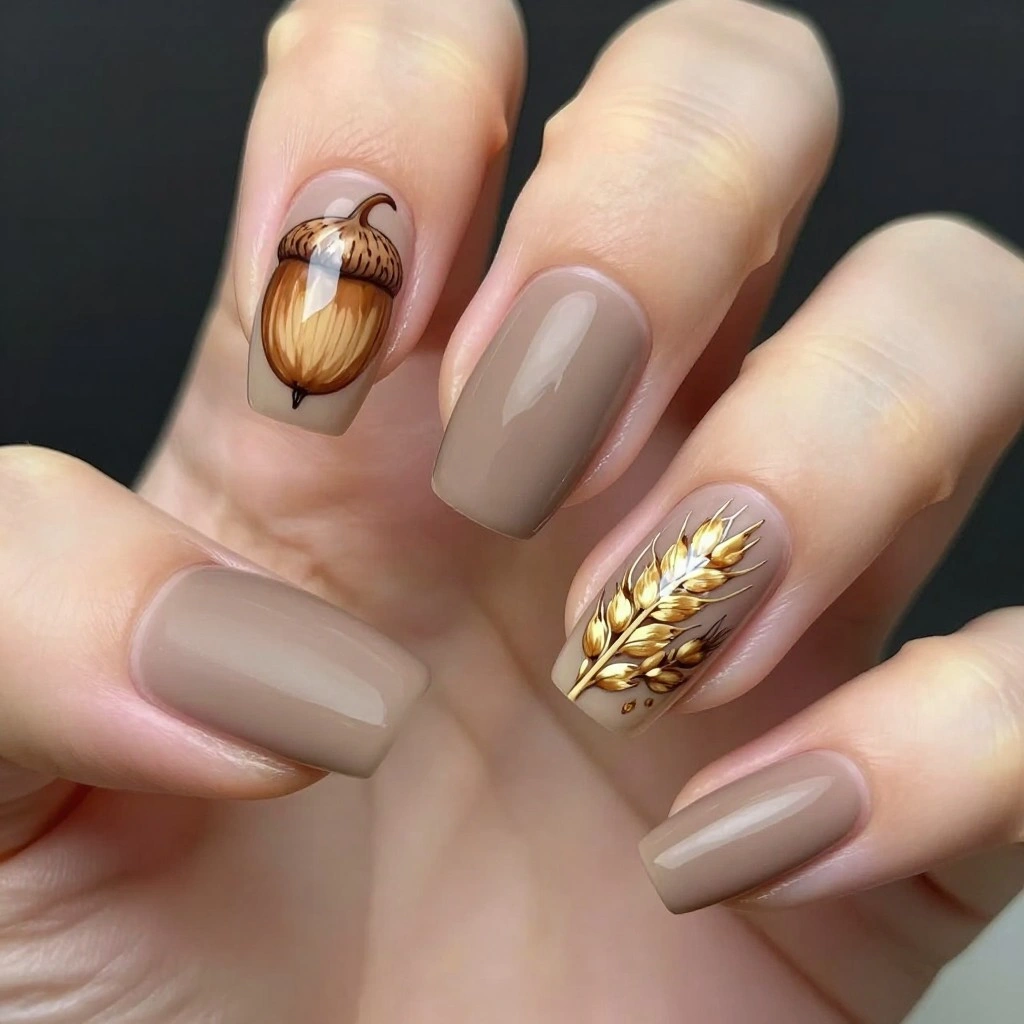
Almond nails in a warm taupe base, with one accent nail per hand featuring hand-painted acorns and delicate wheat stalks in golden brown tones. The remaining nails stay a smooth matte taupe to let the botanical art stand out as the focal point.
Best For:
Rustic fall outfits and casual everyday wear. Aesthetic vibe: earthy, cottagecore, minimal.
Difficulty:
Medium – fine wheat stalk details require a steady hand and thin brush.
Product Spotlight:
- Fine detail brush
- Matte top coat
- Gel polish in taupe and golden brown
Fall Nails Almond: 5 Elegant Autumn Almond Nail Designs
Fall nails almond shapes are trending because their tapered, elongated tip flatters nearly every hand while providing a graceful canvas for seasonal nail art. This shape blends softness with sophistication, making it a favorite for both minimal and elaborate designs. People love almond fall nails for their ability to feel elegant yet wearable, perfect for capturing the cozy glamour of autumn.
1. Espresso Ombre Almond Nails

Almond-shaped nails with a smooth gradient fading from deep espresso brown at the cuticle to a soft caramel at the tip. Glossy finish enhances the rich color transition, and one accent nail features tiny gold foil flakes scattered near the base.
Best For:
Everyday fall elegance and office wear. Aesthetic vibe: warm, sophisticated, minimal.
Difficulty:
Medium – gradient blending requires a sponge technique for a smooth fade.
Product Spotlight:
- Makeup sponge for ombre blending
- Gel polish in espresso brown and caramel
- Gold foil flakes
2. Burnt Sienna Floral Almond Nails
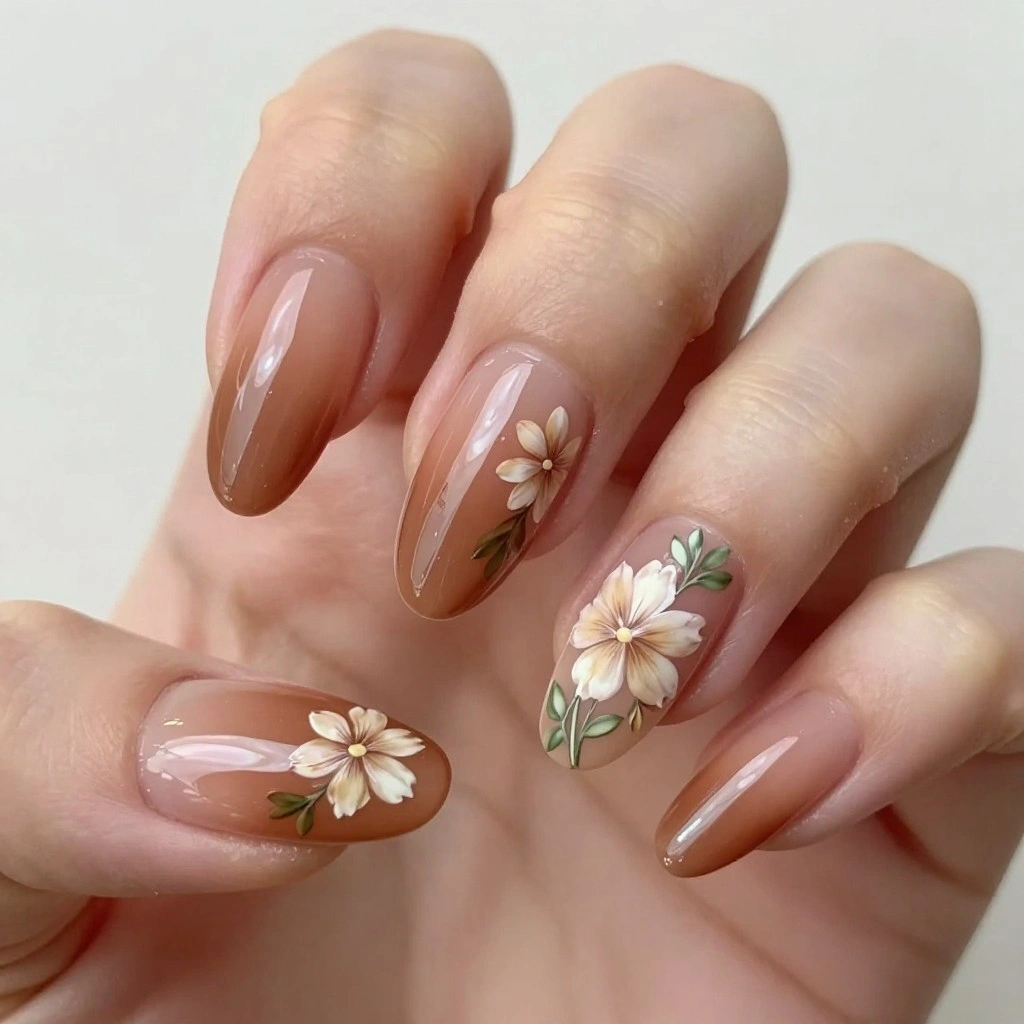
Almond nails in a burnt sienna base with delicate hand-painted cream florals trailing along the side of two accent nails. Fine green leaf accents complement the flowers, finished with a glossy topcoat for a soft, romantic shine.
Best For:
Fall weddings and romantic occasions. Aesthetic vibe: elegant, feminine, soft.
Difficulty:
Medium – floral detailing requires a fine brush and careful layering.
Product Spotlight:
- Fine detail nail art brush
- Gel polish in sienna, cream, and green
- Glossy top coat
3. Chocolate Marble Almond Nails
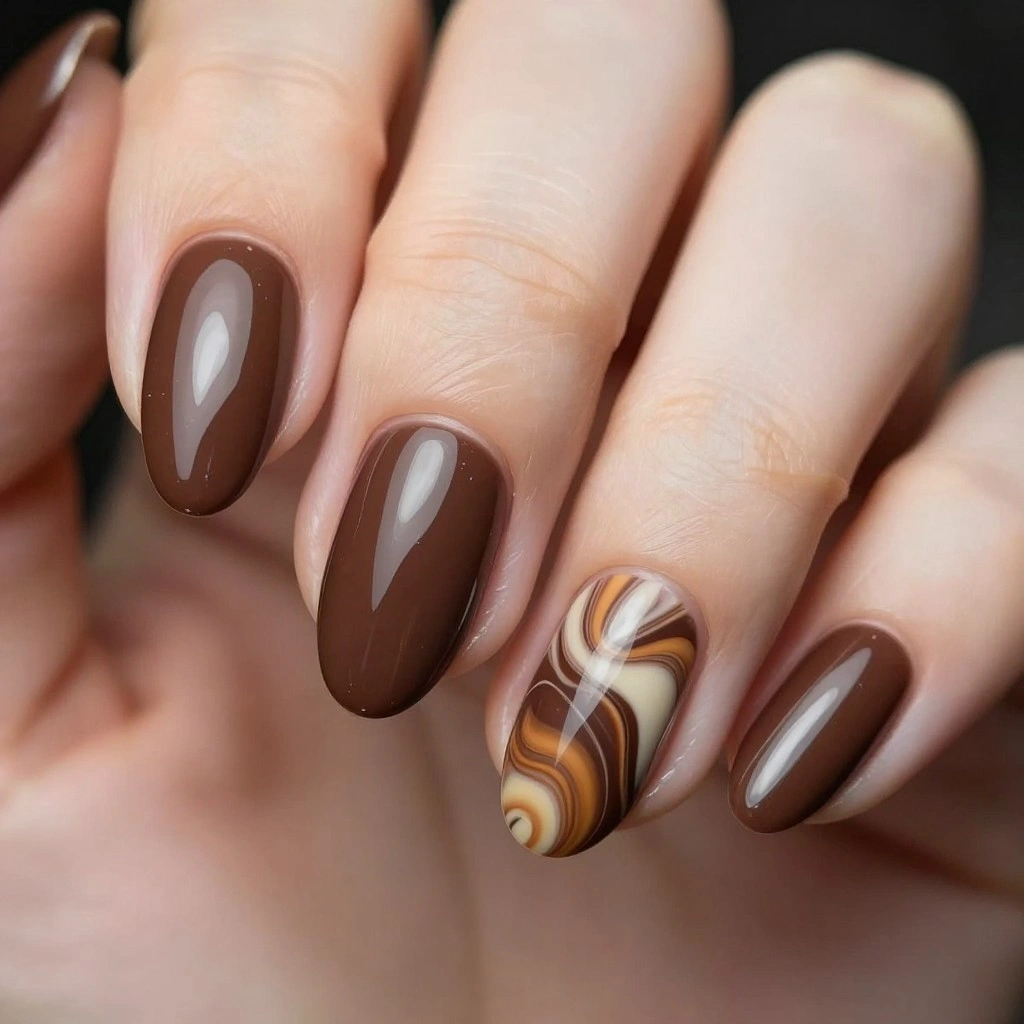
Almond-shaped nails in a rich chocolate brown base with soft caramel and cream marbled veining swirled throughout. The marbling creates a smooth, stone-like texture, sealed under a high-shine glossy topcoat for a luxurious finish.
Best For:
Fall date nights and elevated everyday looks. Aesthetic vibe: luxury, elegant, warm.
Difficulty:
Medium – marbling requires practice to achieve smooth, natural veining.
Product Spotlight:
- Marbling dotting tool
- Gel polish in chocolate brown, caramel, and cream
- High-shine top coat
4. Golden Leaf Accent Almond Nails

Almond nails in a soft nude base, with one accent nail per hand featuring a hand-painted golden leaf design layered with fine gold foil pieces. Remaining nails stay glossy and clean to let the golden leaf accent stand out beautifully.
Best For:
Fall office wear and understated elegance. Aesthetic vibe: minimal, chic, refined.
Difficulty:
Easy – single accent nail keeps the design simple and approachable.
Product Spotlight:
- Fine detail brush
- Gel polish in nude and gold tones
- Gold foil flakes
5. Deep Plum Aura Almond Nails

Almond-shaped nails with a soft airbrushed aura blending deep plum, burgundy, and dusty rose across the nail bed. The colors blur softly together for a dreamy, ethereal effect, finished with a glossy, glass-like shine.
Best For:
Fall date nights and evening events. Aesthetic vibe: romantic, dramatic, artistic.
Difficulty:
Hard – aura blending requires an airbrush tool or sponge technique for a soft gradient.
Product Spotlight:
- Airbrush nail tool or makeup sponge
- Gel polish in plum, burgundy, and dusty rose
- High-shine top coat
Nails Fall Coffin: 5 Bold Autumn Coffin Nail Designs
Nails fall coffin styles are trending because the flat, squared-off tip offers a wide, modern canvas perfect for bold seasonal art. This shape has become a Pinterest favorite for combining edge with elegance, giving autumn nail designs plenty of room for chrome finishes, marbling, and layered detail. People love fall coffin nails because they feel fashion-forward while still allowing for versatile styling.
1. Amber Chrome Coffin Nails

Long coffin-shaped nails coated in a warm amber chrome finish with a glass-like, mirrored shine. The metallic surface reflects golden and rust undertones, and one accent nail features a fine black linework swirl for contrast.
Best For:
Fall glam looks and evening events. Aesthetic vibe: bold, modern, luxurious.
Difficulty:
Medium – chrome powder requires a smooth base and even buffing for full shine.
Product Spotlight:
- Chrome powder in amber/gold tones
- Gel polish base and top coat
- Fine detail brush
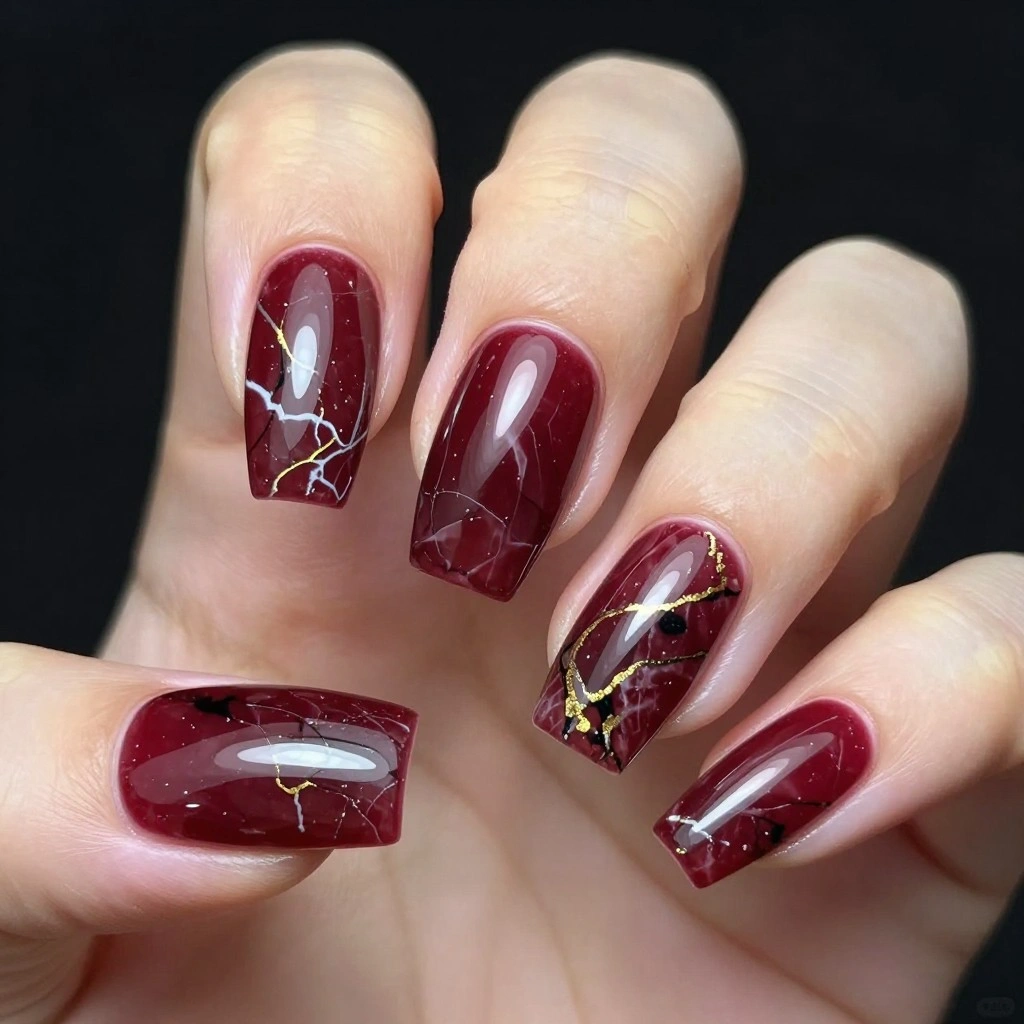
2. Deep Burgundy Marble Coffin Nails

Coffin-shaped nails in a rich burgundy base with black and gold marbled veining swirled across the nail bed. The marbling mimics polished stone, creating a dramatic, high-fashion look sealed under a glossy, high-shine topcoat.
Best For:
Fall date nights and special occasions. Aesthetic vibe: dramatic, elegant, luxury.
Difficulty:
Medium – marbling requires practice for smooth, realistic veining.
Product Spotlight:
- Marbling dotting tool
- Gel polish in burgundy, black, and gold
- High-shine top coat
3. Plaid French Tip Coffin Nails

Coffin nails with a classic French tip painted in deep forest green, layered with thin red and cream plaid lines across the tip. The base of the nail stays a soft nude, creating contrast between the plaid tip and clean base.
Best For:
Fall gatherings and cozy seasonal outfits. Aesthetic vibe: classic, cozy, chic.
Difficulty:
Medium – plaid detailing on the tip requires a fine striping brush.
Product Spotlight:
- Fine striping brush
- Gel polish in green, red, and cream
- Glossy top coat
4. 3D Acorn and Leaf Coffin Nails
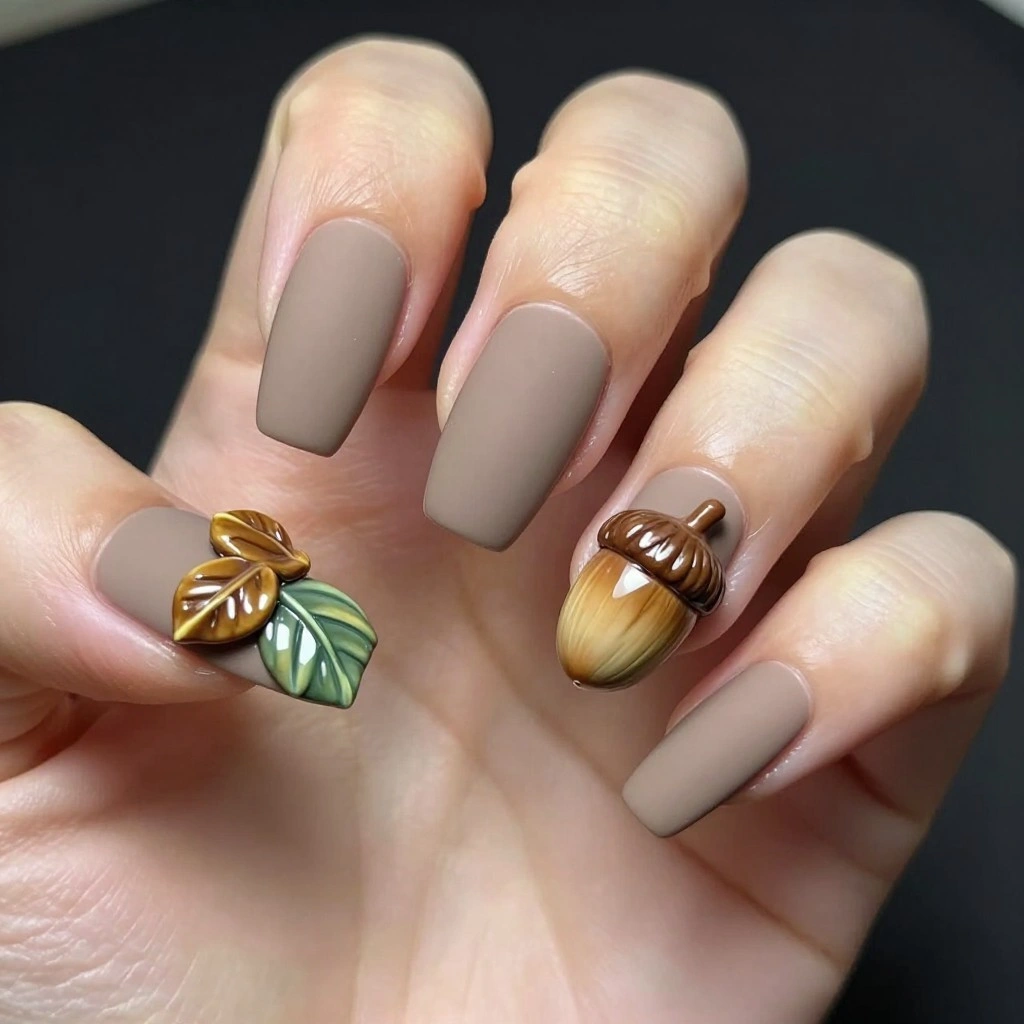
Coffin-shaped nails in a warm taupe base, with one accent nail featuring hand-sculpted 3D acrylic acorns and small leaves in golden brown and green tones. Remaining nails stay a smooth matte taupe to let the sculpted accent stand out.
Best For:
Fall festivals and statement styling. Aesthetic vibe: playful, artistic, eye-catching.
Difficulty:
Hard – 3D sculpting requires advanced acrylic technique.
Product Spotlight:
- Sculpting acrylic powder in brown and green
- Fine acrylic sculpting brush
- Matte top coat
5. Golden Aura Coffin Nails

Coffin nails with a soft airbrushed aura blending amber, rust, and golden yellow across the nail bed. The colors blend softly like a sunset, finished with a glossy, glass-like shine and a single gold leaf foil piece near the base of each nail.
Best For:
Fashion-forward looks and fall photoshoots. Aesthetic vibe: dreamy, artistic, glamorous.
Difficulty:
Hard – aura blending requires an airbrush tool or sponge technique for a soft gradient.
Product Spotlight:
- Airbrush nail tool or makeup sponge
- Gel polish in amber, rust, and golden yellow
- Gold leaf foil
Fall Nails French Tip Art Designs: 5 Chic Autumn French Tip Ideas
Fall nails french tip art designs are trending because they take a timeless, classic manicure and give it a seasonal twist. Instead of the traditional white tip, these designs swap in warm autumn hues, patterns, and textures for a fresh take on a beloved style. People love this trend because it feels sophisticated and modern while still nodding to the elegance of a classic French manicure.
1. Burnt Orange French Tip Nails

Almond-shaped nails with a soft nude base and a bold burnt orange French tip painted in a clean, curved line. One accent nail features tiny gold star decals scattered above the tip line, finished with a glossy topcoat for a smooth, polished shine.
Best For:
Everyday fall styling and office wear. Aesthetic vibe: chic, modern, warm.
Difficulty:
Easy – classic French tip technique with a seasonal color swap.
Product Spotlight:
- French tip guide stickers
- Gel polish in nude and burnt orange
- Gold star nail decals
2. Plaid French Tip Coffin Nails

Coffin-shaped nails with a soft cream base and a French tip painted in deep forest green, layered with thin red and mustard plaid lines across the tip. Glossy topcoat seals the design for a smooth, cozy autumn look.
Best For:
Fall gatherings and cozy seasonal outfits. Aesthetic vibe: classic, festive, cozy.
Difficulty:
Medium – plaid detailing on the tip requires a fine striping brush.
Product Spotlight:
- Fine striping brush
- Gel polish in cream, green, red, and mustard
- Glossy top coat
3. Chrome Ombre French Tip Nails
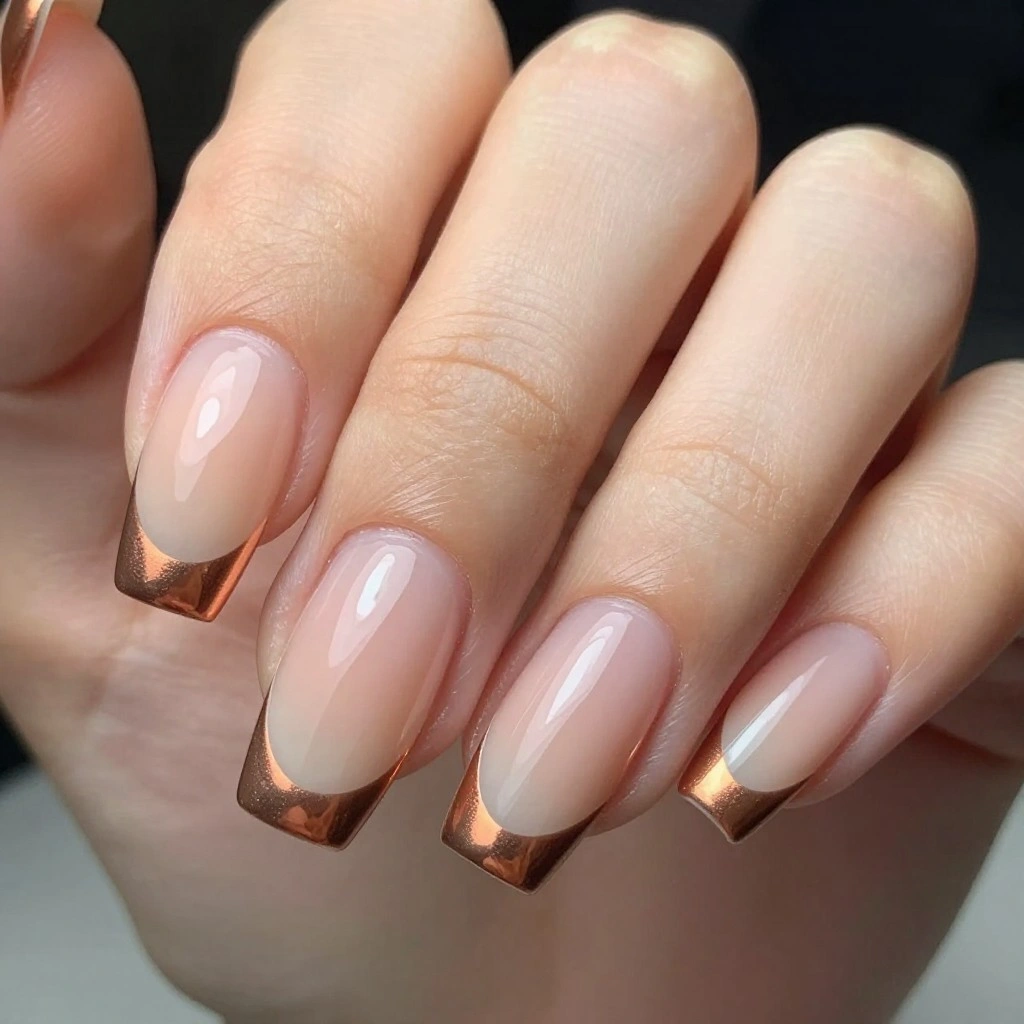
Square nails with a soft beige base and a French tip that fades from copper chrome at the edge into a soft bronze near the smile line. The chrome finish creates a mirror-like shine, giving the tip a modern, metallic glow.
Best For:
Fall glam looks and evening events. Aesthetic vibe: luxury, bold, modern.
Difficulty:
Medium – chrome application on the tip requires precise buffing for even shine.
Product Spotlight:
- Chrome powder in copper/bronze
- French tip guide stickers
- Gel polish in beige base
4. Leaf Vine French Tip Nails

Almond nails with a soft ivory base and a thin golden-brown French tip line, accented with a delicate hand-painted vine of small leaves trailing from the tip toward the center of two accent nails. Finished with a glossy topcoat for a natural, elegant shine.
Best For:
Fall weddings and romantic occasions. Aesthetic vibe: elegant, feminine, botanical.
Difficulty:
Medium – vine and leaf detailing requires a fine brush and careful placement.
Product Spotlight:
- Fine detail nail art brush
- Gel polish in ivory and golden-brown
- Glossy top coat
5. Double French Tip with Gold Line Nails

Coffin-shaped nails with a soft taupe base featuring a double French tip design, one deep espresso brown line and one caramel line stacked at the tip, separated by a thin hand-painted gold line. Glossy finish enhances the layered, dimensional look.
Best For:
Fall date nights and elevated everyday looks. Aesthetic vibe: sophisticated, warm, modern.
Difficulty:
Medium – double tip lines require precision for clean, even layering.
Product Spotlight:
- French tip guide stickers
- Fine gold striping polish
- Gel polish in espresso brown and caramel
Pros of Fall Nail Designs
- Wide variety of colors, textures, and patterns to suit any style
- Highly photogenic and perfect for Pinterest and social media
- Customizable for every nail shape, length, and skill level
- Reflects the season in a fashionable, on-trend way
- Works for everyday wear as well as special occasions
- Long-lasting when done with quality gel or acrylic products
Cons of Fall Nail Designs
- Detailed designs like marbling, aura blending, and 3D art can take longer to apply
- Some techniques require professional tools or salon-level skill
- Textured finishes like velvet or chrome may need extra care to avoid wear
- Costs can add up for intricate, multi-step designs
- Longer shapes like coffin and stiletto may need adjustment for daily tasks
FAQs
How long do fall nail designs last? Most gel-based fall nail designs last two to three weeks, while acrylic sets can last four to six weeks with proper fill-ins.
Are fall nail designs good for everyday wear? Yes, especially shorter shapes like square and almond, which balance seasonal style with daily practicality.
What nail shape is best for fall nail designs? Almond and coffin shapes are the most popular for showcasing detailed autumn art, though square, oval, and stiletto all work well depending on the design.
Can I do fall nail designs at home? Many designs, especially single-accent styles, plaid patterns, and ombre fades, can be done at home with basic detail brushes and practice. More advanced techniques like 3D sculpting and aura blending are often easier with professional help.
What tools do I need for fall nail art? A fine detail brush, gel or acrylic polish set, top coat, and a makeup sponge or marbling tool cover most of the designs in this guide. Chrome powder, foil, and sculpting acrylic are needed for more advanced looks.
Do fall nail designs work on short nails too? Yes, many patterns like ombre, plaid, and micro accents are specifically suited to shorter nail lengths without losing their visual impact.
Is chrome powder or foil hard to apply for beginners? Chrome powder takes some practice to buff evenly, but foil flakes are one of the easiest ways to add sparkle since they simply press onto tacky topcoat.
How often do acrylic fall nail designs need maintenance? Acrylic sets typically need fill-ins every two to three weeks to maintain their shape and prevent lifting.
Conclusion
From cozy short nails to bold coffin chrome finishes and elegant French tip twists, these 35 fall nail designs capture every side of the season, warm, playful, artistic, and glamorous.
Whatever your preferred shape or skill level, there is a design here to bring autumn to your fingertips. Save your favorites and get inspired for your next fall manicure.