15 Stunning June Nails That Feel Like Summer
Unlike most roundups that just show pretty photos, this guide gives you complete step-by-step tutorials for every single design, real product recommendations with prices and where to buy them, and honest talk about what can go wrong — and how to fix it.
You’ll also find a realistic wear timeline, a true pros and cons breakdown, and answers to the questions people actually search for before picking up a polish bottle.
How to Choose the Best June Nail Design for You
Not every design is right for every situation. Here’s a quick guide to narrow it down before you scroll:
- First time doing your own nails? Start with Peachy Cream Dream or Milky White Minimalism — both are one-color looks with no special tools required.
- Professional environment? Sage Green Serenity, Lavender Linen, or Soft Apricot Bloom all read polished without being distracting at the office.
- Special event (wedding, graduation)? Pearl Chrome French or Rose Gold Accent Elegance photograph beautifully and hold up all day.
- Comfortable with nail art and want a challenge? Holographic Glitter Tips or Pearl Chrome French require technique but deliver serious payoff.
- Short nails? Coral Crush, Sunshine Yellow, and Soft Steel Gray all look great on shorter lengths. Avoid glitter gradients — they need length to read properly.
- You change your mind often? Skip gel and go regular polish. You can remove and switch colors in 10 minutes instead of 20.
Minimalist & Nude June Nails
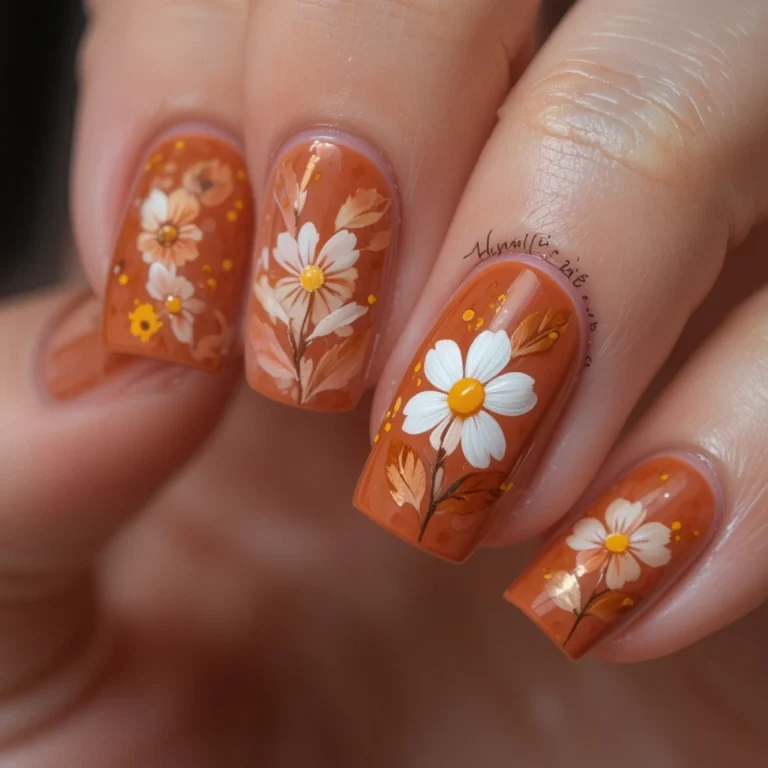
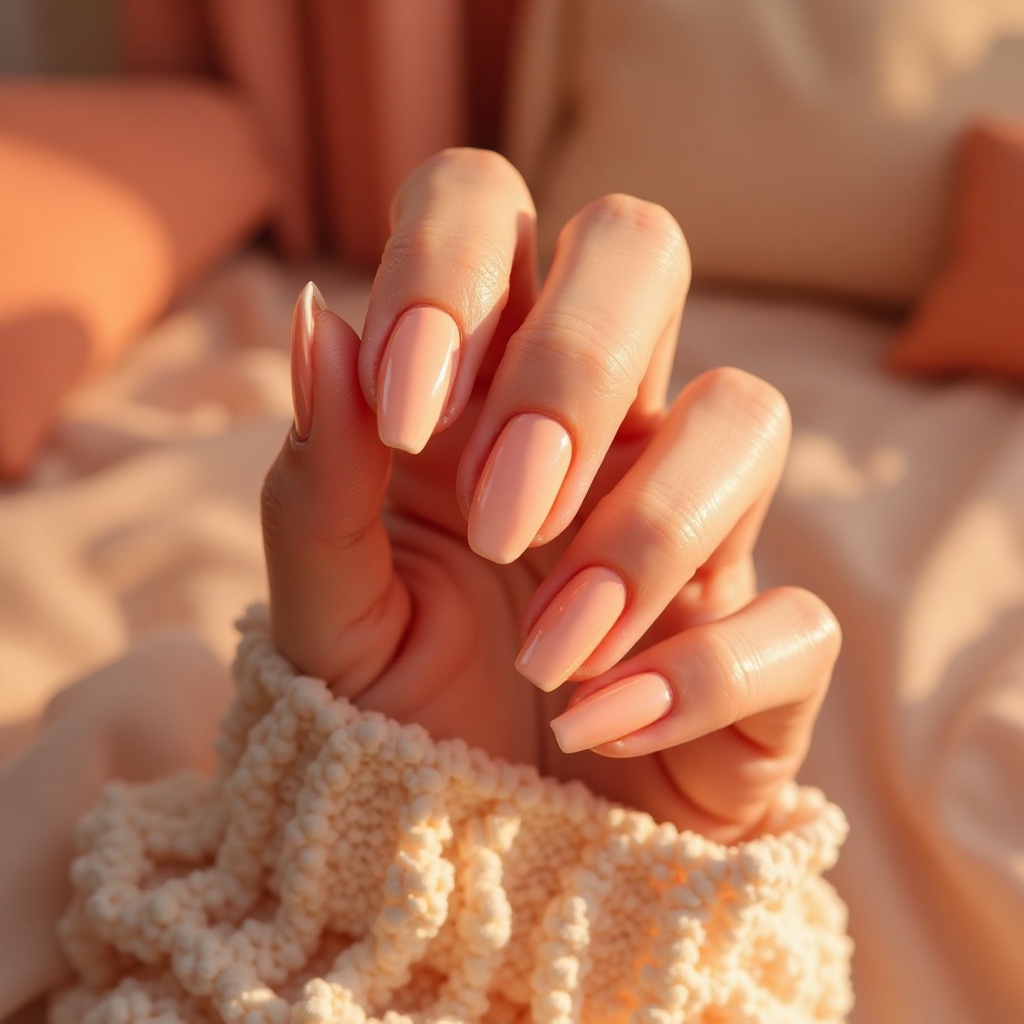
Peachy Cream Dream

A warm peachy-nude that flatters every skin tone with a glossy, glass-like finish that catches the light beautifully. This shade offers the perfect balance between natural and polished, creating an effortlessly chic look that works for any occasion. The creamy formula provides full coverage in two coats, giving your nails a healthy, sun-kissed glow without any shimmer or glitter.
Difficulty: Beginner
Time to complete: 20–25 minutes
Best for: Anyone wanting an everyday polish that works for the office, beach, and everything in between.
Why it works: Warm peachy nudes sit right between natural and noticeable — they enhance your nails without competing with anything you’re wearing.
What makes it different: The peach undertone adds warmth that most nudes lack, making it look intentional rather than just bare.
In my experience, this shade is the one I come back to most in June nails because it works with literally everything. Sun-kissed skin makes it look even better than it does in the bottle.
Recommended Products:
- OPI “Samoan Sand” ($11–13 at Ulta or salons) — one of the most universally flattering peachy nudes; the formula is smooth and doesn’t streak.
- Essie “Au Natural” ($9–11 at Target or Ulta) — slightly warmer than OPI, great for medium to deeper skin tones.
- Seche Vite Top Coat ($8–10 at most drugstores) — dries in 5 minutes flat and gives a glass-like finish that regular top coats don’t match.
Beginner Mistake to Avoid: Rolling the bottle instead of shaking it isn’t just a myth — shaking creates air bubbles that ruin the smooth finish. Always roll.
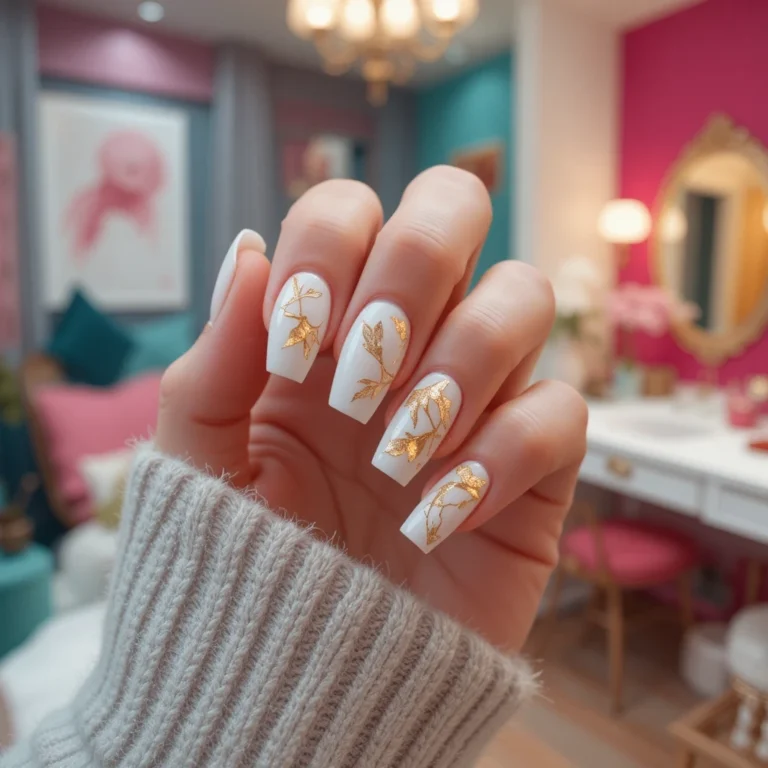
Milky White Minimalism
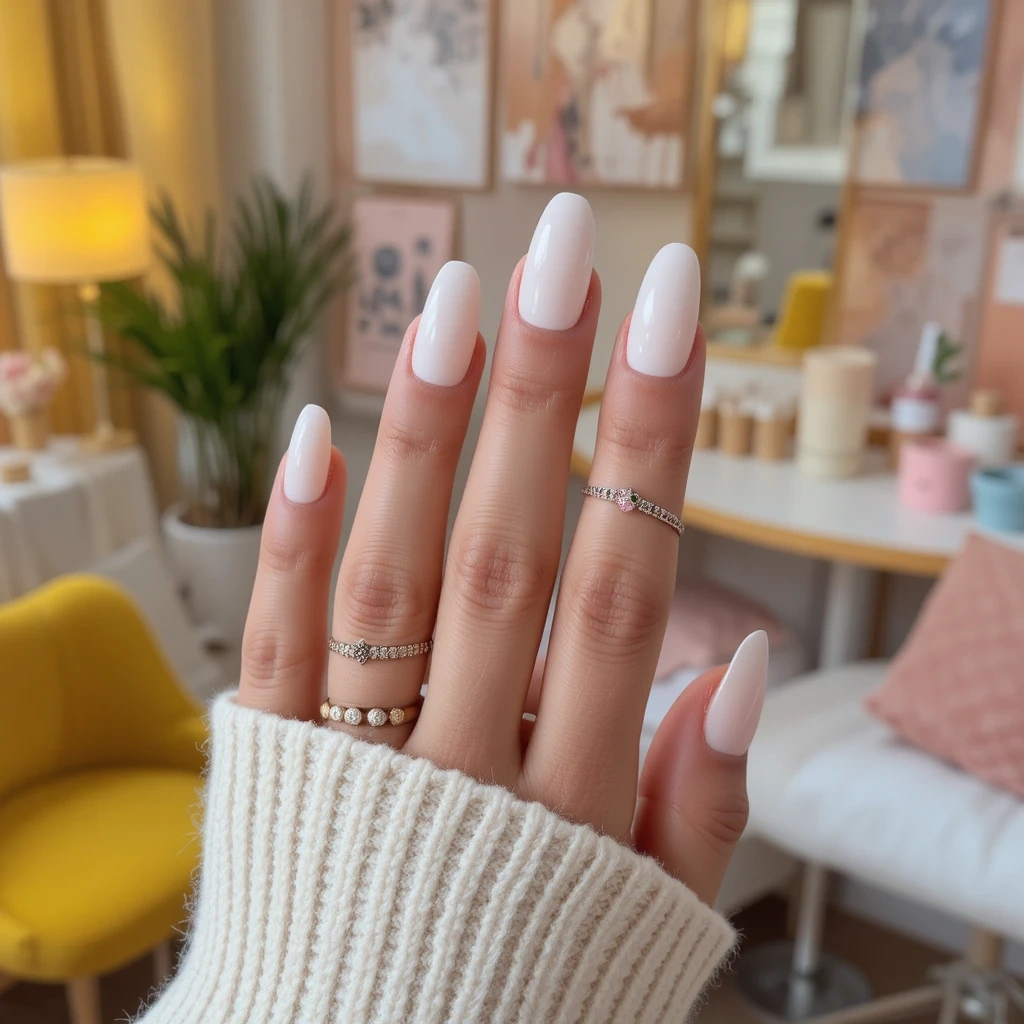
A pure, opaque milky white that delivers crisp, clean perfection without any sheerness or streaking. This modern neutral creates a striking canvas that makes your hands look refined and elongated instantly. The creamy, pigmented formula ensures even application without the frustration of multiple layers or visible nail lines.
Difficulty: Beginner Time to complete: 30–35 minutes Best for: Short to medium square nails looking for a fresh, editorial vibe without any fuss. Why it works: Opaque white makes hands look clean and elongated instantly — it’s one of the rare shades that photographs well under any light condition. What makes it different: Unlike sheer whites that look unfinished, a true opaque milky white reads as intentional and modern without the harshness of a stark bright white.
White is harder than it looks, but the payoff is worth the extra care. The rhinestone accent on the ring finger takes about 30 seconds and makes the whole manicure look far more considered.
Recommended Products:
- Essie “Blanc” ($9–11 at Target or Ulta) — the gold standard for white. Best formula for opacity in 3 coats.
- OPI “Alpine Snow” ($11–13 at Ulta) — slightly creamier, great if you prefer the milky effect over stark white.
- Swarovski flat-back crystals SS5 or SS7 ($6–10 for a pack on Amazon) — stay put and catch light far better than cheap rhinestones.
Beginner Mistake to Avoid: Trying to do white in 2 coats. It genuinely needs 3. Thick coats to compensate cause bubbling and an uneven finish.
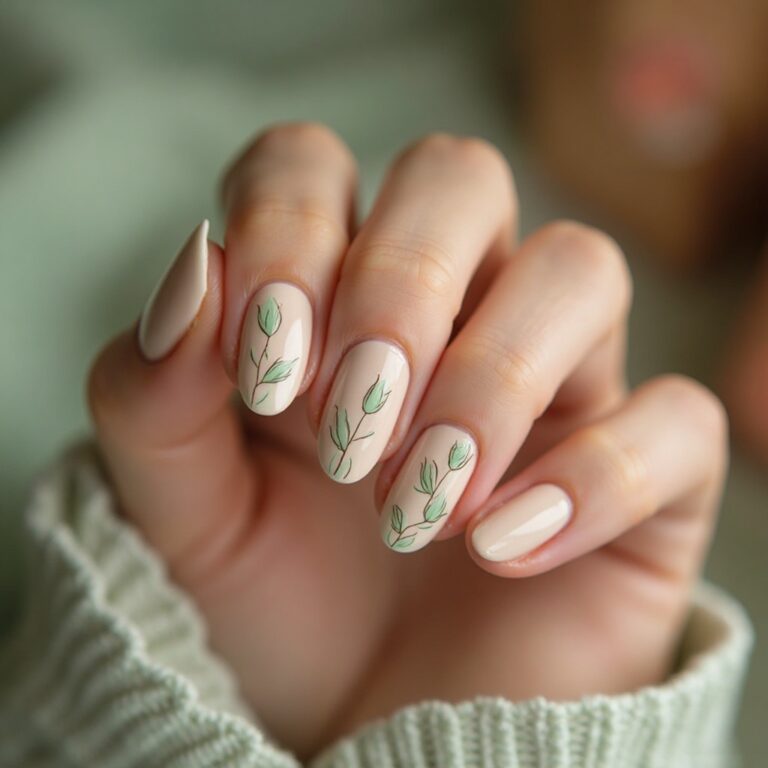
Icy Lavender Frost

A pale, cool-toned lavender with a subtle shimmer that evokes early morning dewdrops on summer flowers. This ethereal shade offers a dreamy, romantic quality that feels fresh and youthful without being overly sweet. The delicate shimmer particles create dimension and movement, catching light beautifully throughout your busy June nails days.
Difficulty: Beginner Time to complete: 25–30 minutes Best for: Medium to long oval nails wanting a sophisticated neutral that doesn’t look like every other nude. Why it works: The gray undertones in sage green make it read as a neutral — it pairs as easily with white linen as it does with florals. What makes it different: Unlike true greens that feel trendy, sage’s dusty, muted quality makes it feel timeless and genuinely year-round wearable.
Muted colors like sage tend to show texture more than bold ones, so nail prep matters more here. Take an extra minute buffing before you start.
Recommended Products:
- Essie “Social-Lights” ($9–11 at Target) — a slightly greener sage; pairs beautifully with gold jewelry.
- Zoya “Sage” ($10–12 at zoya.com or Amazon) — truer gray-green, more muted and sophisticated.
- Essie “Matte About You” ($9–11 at Target) — the most reliable matte top coat for darker muted shades without streaking.
Beginner Mistake to Avoid: Matte top coat makes colors look slightly darker than the bottle. Test on one nail before doing the whole hand.
Soft Steel Gray
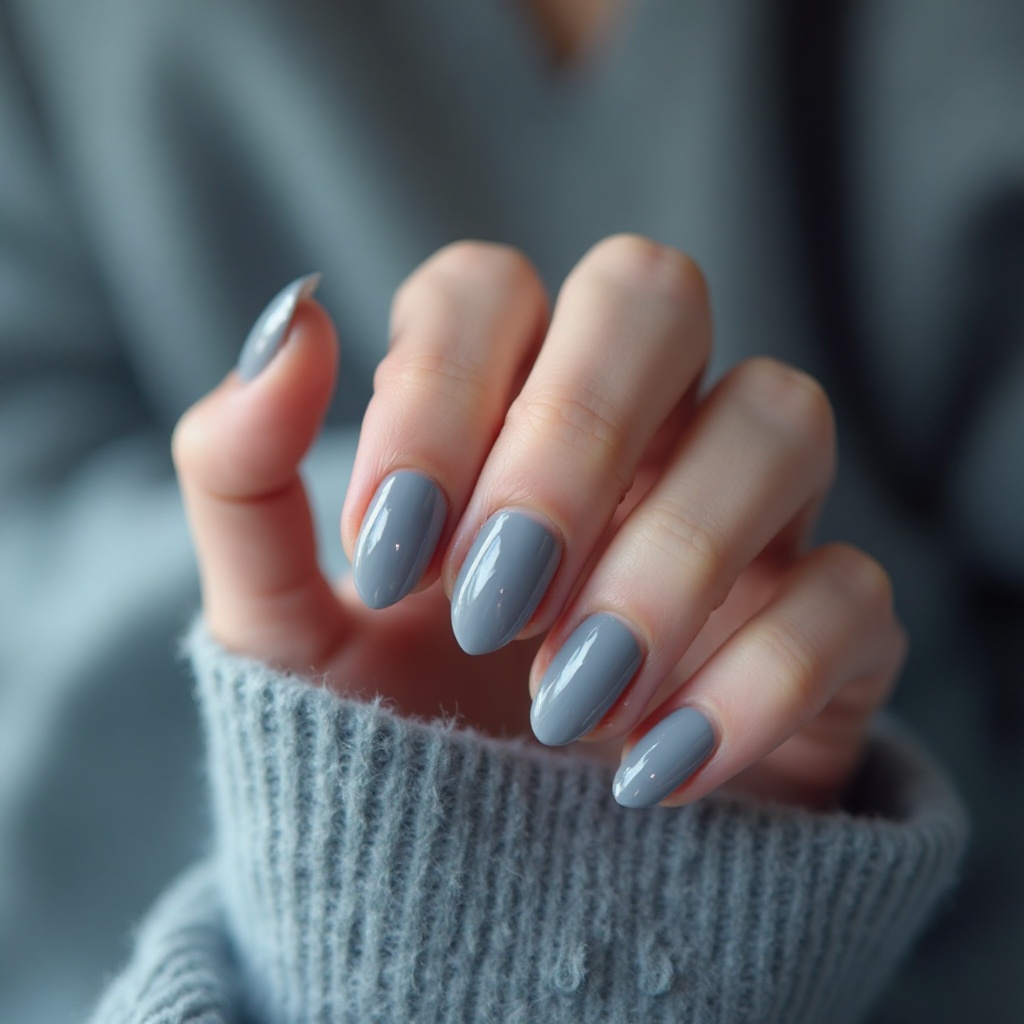
A cool, medium gray with subtle blue undertones that delivers modern minimalism with an unexpected edge. This sophisticated neutral reads as effortlessly chic rather than boring, offering a contemporary alternative to traditional nudes. The smooth, opaque formula creates a sleek finish that looks expensive and intentional on any nail length.
Difficulty: Beginner Time to complete: 25–30 minutes Best for: Short to medium square nails wanting a modern alternative to traditional nudes. Why it works: Gray reads as intentionally minimal rather than boring — the blue undertones prevent it from looking muddy or washed out. What makes it different: Most nudes lean warm; a cool-toned gray stands out without being loud, and it pairs with silver, gold, and everything in between.
Gray can streak if applied too thick. Three thin coats always beats two thick ones here.
Recommended Products:
- Essie “Cocktail Bling” ($9–11 at Ulta) — a true cool gray with subtle shimmer that adds dimension.
- OPI “Embrace the Gray” ($11–13 at Ulta or salons) — highly pigmented formula that reaches opacity in 2–3 thin coats.
- Zoya “August” ($10–12 at zoya.com) — slightly more blue-toned; great for fair and cool skin tones.
Beginner Mistake to Avoid: Square nails chip faster at the corners if you don’t cap the free edge with every layer of color and top coat. Don’t skip that step.
Deep & Moody June Contrast
Navy Blue Depth
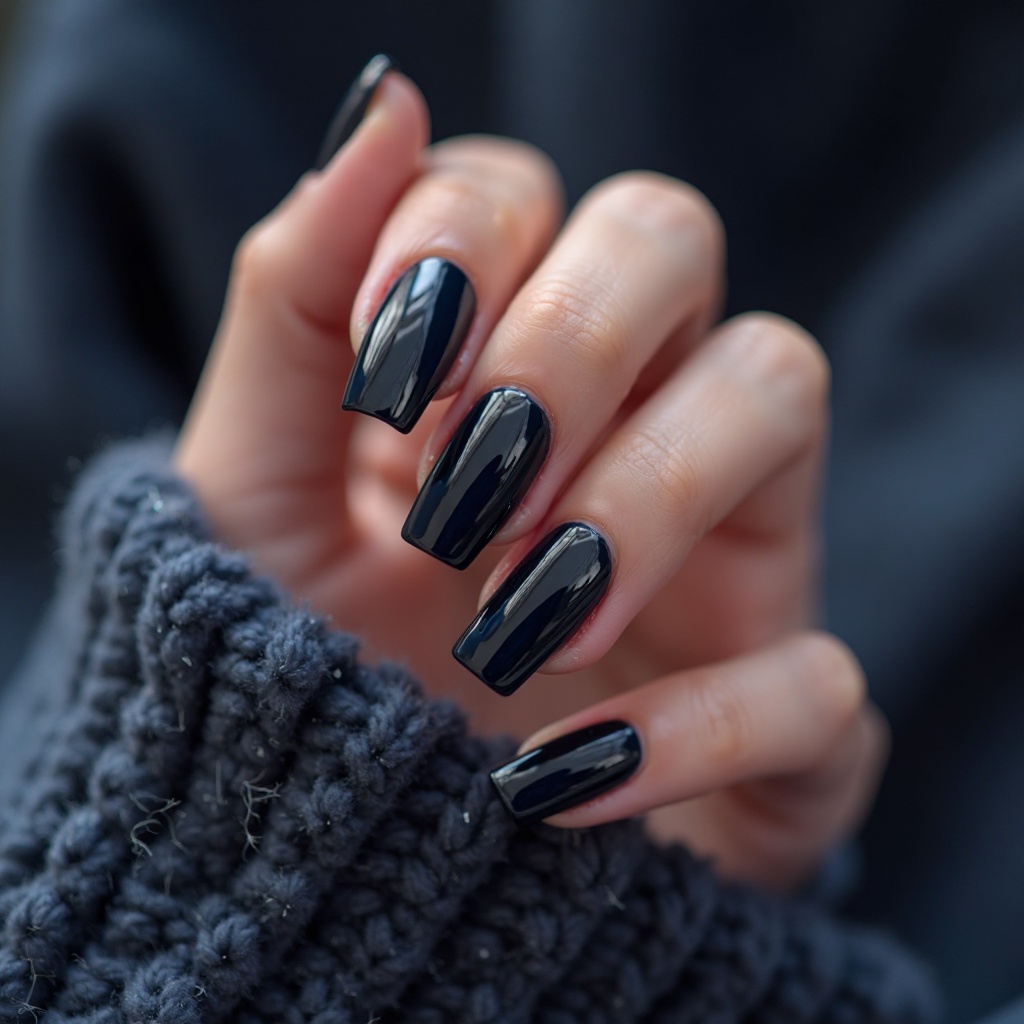
A rich, inky navy blue that provides striking contrast against sun-kissed summer skin with sophisticated appeal. This deep shade offers all the elegance of black but with more dimension and visual interest in natural light. The glossy finish intensifies the color’s depth, creating a polished look that transitions seamlessly from day to night.
Difficulty: Beginner (regular polish) / Intermediate (gel) Time to complete: 30–35 min regular polish; 45–50 min gel Best for: Anyone who wants vacation-level durability or loves the drama of a dark summer shade. Why it works: Dark colors against summer skin create contrast in a way lighter shades can’t — and navy has more dimension in sunlight than black does. What makes it different: Unlike black, navy shifts in different lighting — deep and dramatic indoors, almost jewel-like in natural sunlight.
In my experience, gel is genuinely worth it for this shade in summer. Regular navy chips noticeably faster than lighter colors, especially with frequent handwashing and outdoor exposure.
Recommended Products:
- Essie “After School Boy Blazer” ($9–11 at Target) — best regular polish navy for opacity without going gloopy.
- OPI GelColor “Lincoln Park After Dark” ($13–15 at salons or Amazon) — gel formula that holds for 2+ weeks.
- SUNUV LED Lamp ($25–35 on Amazon) — affordable, reliable, and widely used for home gel application.
Beginner Mistake to Avoid: Thick gel coats don’t cure properly all the way through and peel faster. Always thin layers.
Deep Plum Luxury
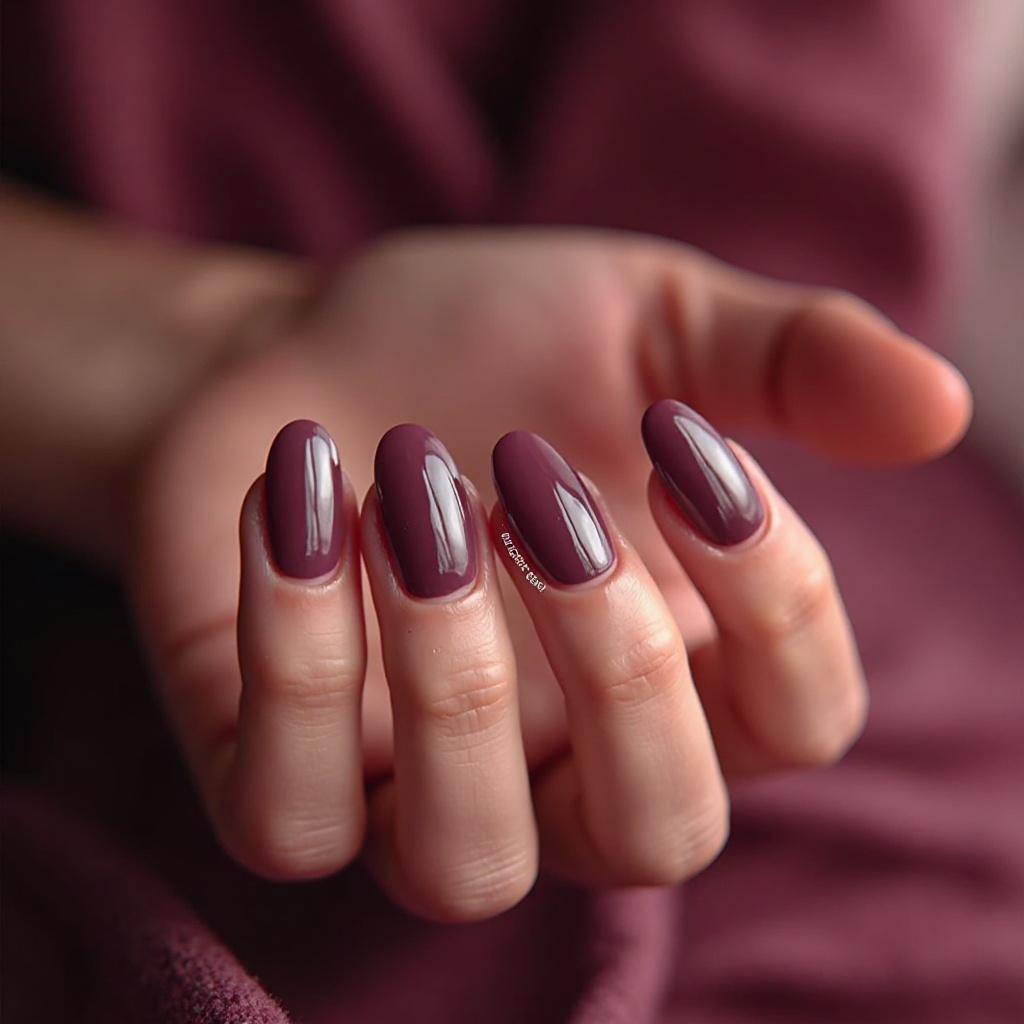
A luscious, wine-toned plum with subtle burgundy undertones that exudes confidence and timeless elegance. This rich berry shade offers depth and drama while remaining wearable and sophisticated for any occasion. The creamy, pigmented formula glides on smoothly, delivering full coverage that looks salon-perfect even with at-home application.
Difficulty: Beginner Time to complete: 25–30 minutes Best for: Evening events and formal summer occasions where you want polish without going all-black. Why it works: The burgundy undertones in this plum shade make it warmer and more dimensional than purple or black — dramatic without being harsh. What makes it different: Most plums skew either pink-purple or red; this shade sits right in between, which makes it flatter more skin tones than either extreme.
The key with plums is technique. Drop one bead of polish at the nail center, push toward the cuticle without touching skin, then sweep down. This prevents flooding the edges and keeps the line clean.
Recommended Products:
- Zoya “Casey” ($10–12 at zoya.com) — a true wine-plum with excellent formula and 5-free ingredients.
- Essie “Bahama Mama” ($9–11 at Target or Ulta) — slightly more berry-toned; great for warmer skin.
- OPI “Lincoln Park After Dark” ($11–13) — reads as deep plum in warm light, almost black in cool light.
Beginner Mistake to Avoid: Dark colors feel dry on the surface before they’re fully dry underneath. Wait 10 full minutes before touching anything.
Charcoal Matte Mystery
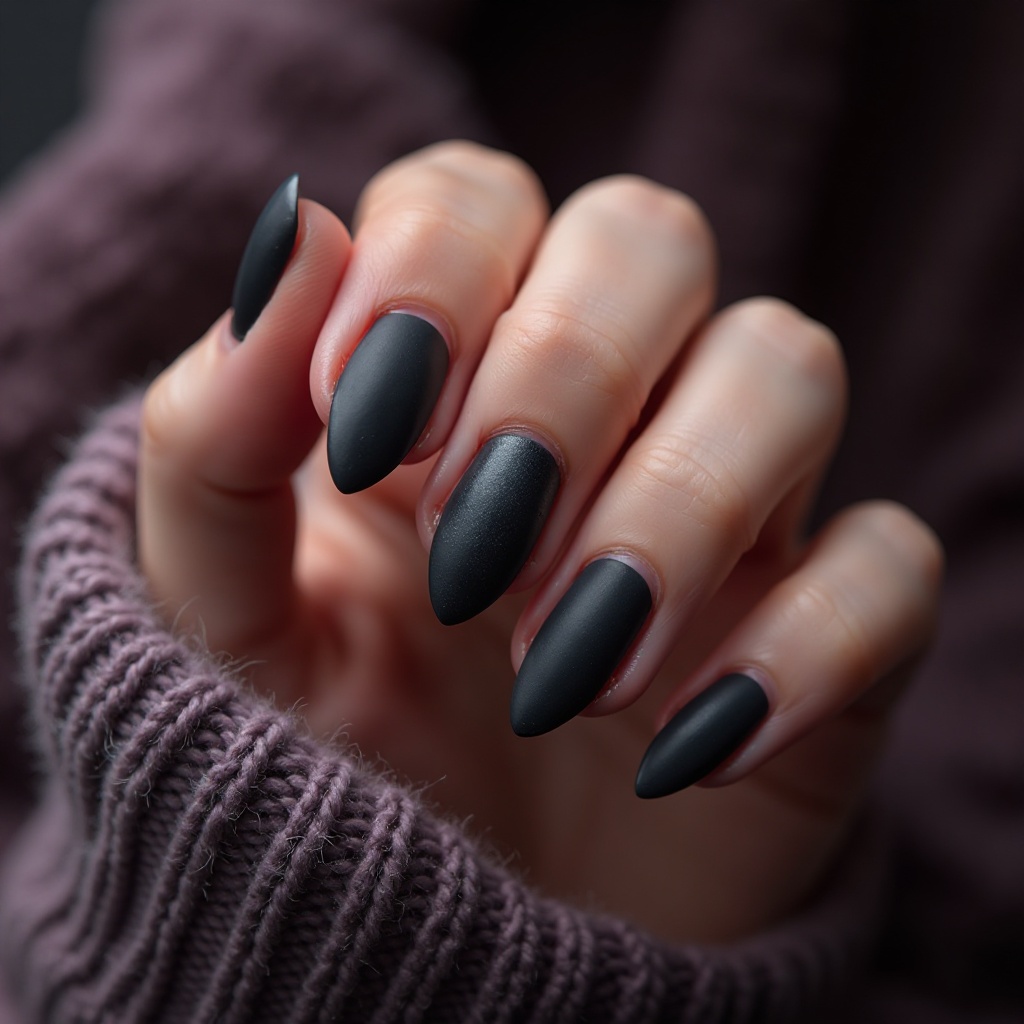
A deep charcoal gray with a velvety matte finish that delivers edgy sophistication without the harshness of black. This moody neutral creates a striking statement that feels modern, artistic, and deliberately understated all at once. The soft, touchable finish adds textural interest that makes your manicure feel intentional and fashion-forward.
Difficulty: Intermediate
Time to complete: 30–35 minutes
Best for: Medium nails in square or squoval shapes for anyone who wants a moody, fashion-forward look without committing to full black.
Why it works: Charcoal sits in that interesting space between gray and black — it reads as edgy and deliberate without the severity that full black can carry in summer.
What makes it different: The velvety matte finish adds a textural quality that glossy nails can’t replicate. The single glossy accent nail on the ring finger is what makes the look modern rather than just dark.
Many people find matte charcoal more wearable than they expected — it pairs surprisingly well with summer whites and bright accessories because the contrast is sharp without being costume-like.
Recommended Products:
- Essie “Sew Psyched” ($9–11 at Target or Ulta) — a true deep charcoal with a smooth formula that doesn’t streak.
- OPI “Dark Side of the Mood” ($11–13 at Ulta) — slightly cooler and more blue-toned charcoal; great for cool skin undertones.
- Zoya “Freja” ($10–12 at zoya.com) — the darkest of the three; almost black in low light with charcoal depth in natural light.
- Essie “Matte About You” ($9–11 at Target) — the most forgiving matte top coat for dark shades; doesn’t streak on the first pass.
Beginner Mistake to Avoid: Going over the same area twice with matte top coat causes streaks every time. One smooth stroke per nail — if it looks uneven, let it dry completely and apply a second fresh coat rather than going back over wet product.
Elegant Accent & Chrome Details
Pearl Chrome French
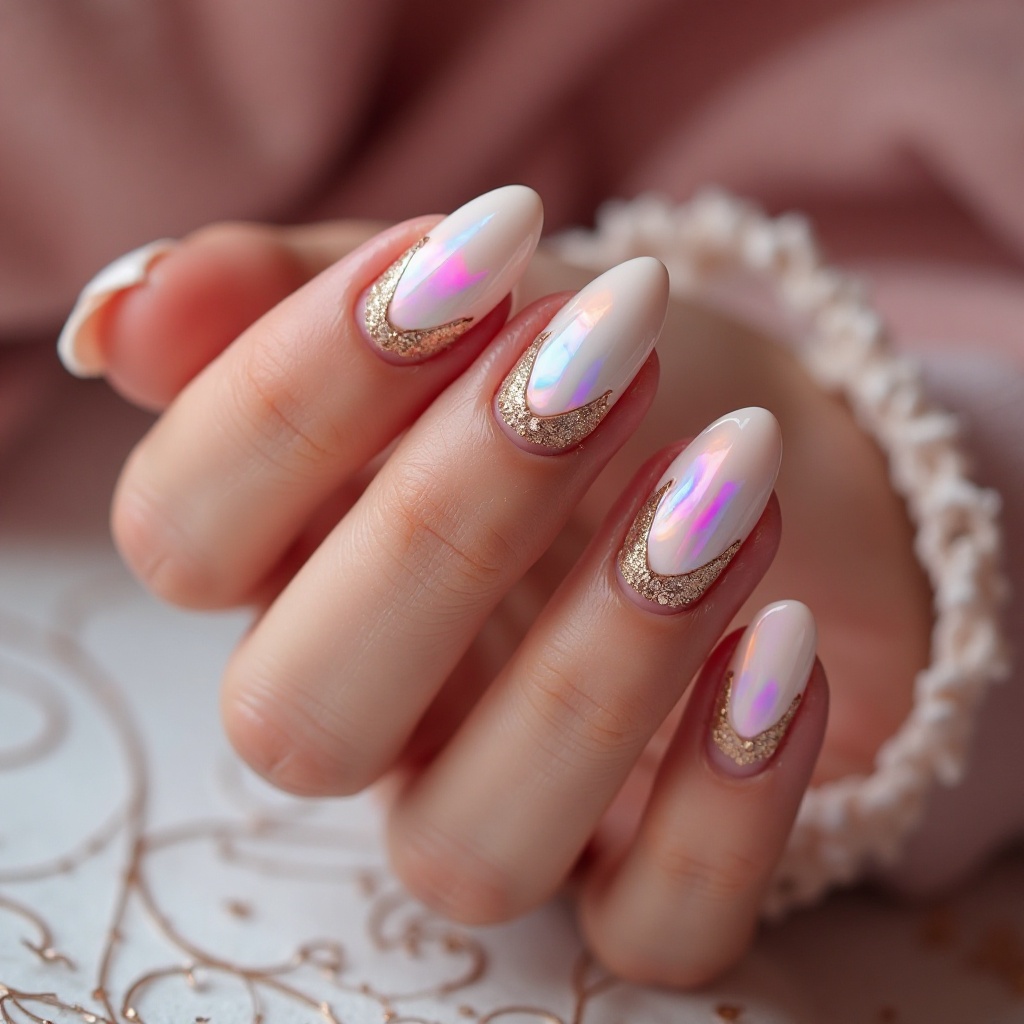
A classic French manicure reimagined with iridescent pearl chrome tips that shift between pink, blue, and gold. This modern twist on a timeless design brings dimension and luxury to the traditional French while maintaining its elegant simplicity. The chrome powder creates an eye-catching finish that feels special and celebratory without being over-the-top or costume-like.
Difficulty: Advanced
Time to complete: 50–60 minutes
Best for: Weddings, graduations, or any formal June event where your nails need to photograph beautifully.
Why it works: Chrome powder catches outdoor light in a way regular polish can’t — the iridescent pearl shift between pink, blue, and gold gives this French tip real dimension.
What makes it different: Traditional French tips look the same in every photo. The pearl chrome version shifts with movement and light, making the manicure look different depending on where you’re standing.
This one requires a gel lamp. Without that tacky gel layer, the chrome powder won’t adhere properly. If you don’t have one, the simplified version below gives a pretty pearlescent effect instead.
Simplified version (no lamp): Apply nude base and white tips with regular polish. While tips are still slightly wet, dab with iridescent eyeshadow mixed into clear polish. Seal with glossy top coat. Less mirror-like, but still pretty.
Recommended Products:
- Born Pretty Pearl Chrome Powder ($6–9 on Amazon) — most consistent pearl shift at this price.
- Beetles White Gel Polish ($8–11 as part of their gel kits at beetlesnailgel.com) — opaque in 2 coats and cures cleanly.
- Modelones No-Wipe Top Coat ($8–10 on Amazon) — essential; regular top coat over chrome kills the mirror effect.
- Nailene French Manicure Guide Stickers ($4–6 at Walmart or Amazon) — worth using if freehand smile lines aren’t your strength yet.
Beginner Mistake to Avoid: Applying chrome to fully-cured gel won’t work — it needs that tacky layer. If yours dried too much, apply a thin coat of no-wipe top coat and cure only 20 seconds before trying again.
Rose Gold Accent Elegance
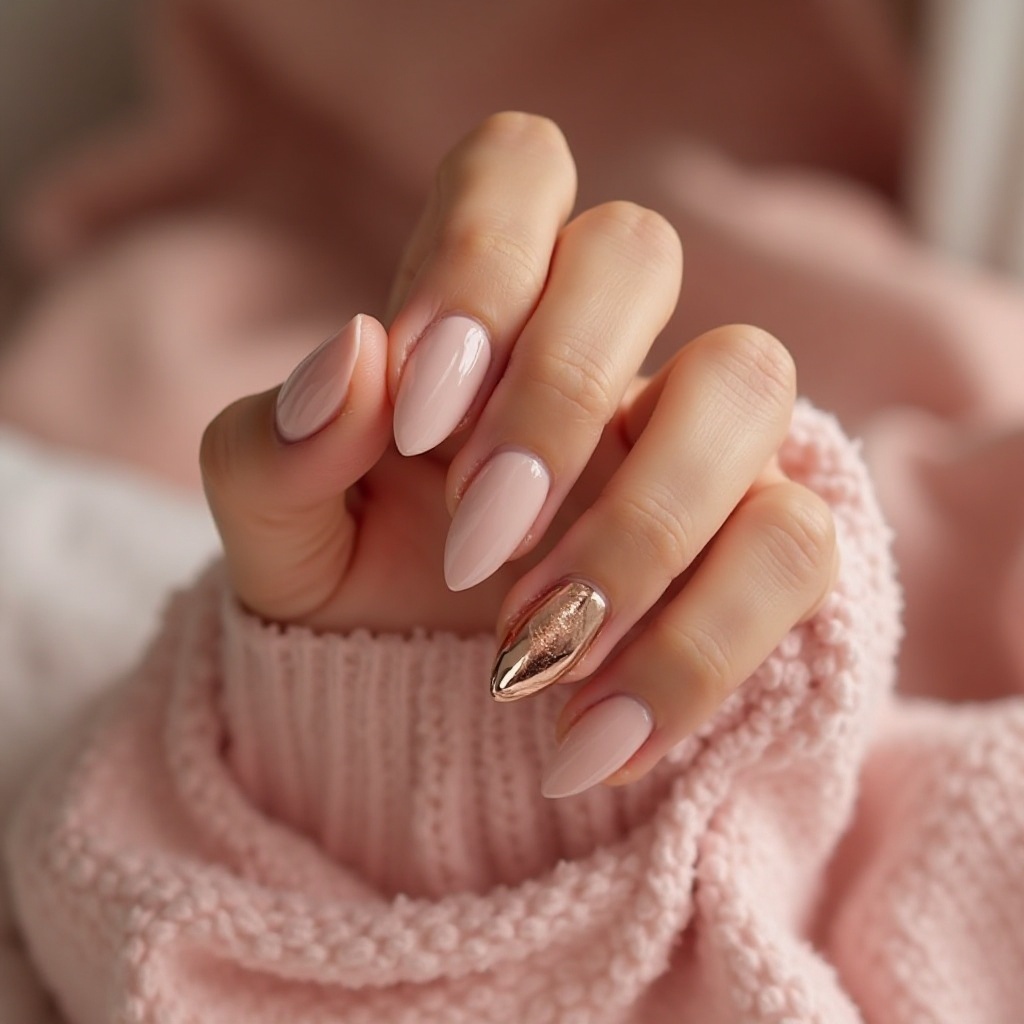
A sheer nude base with a single rose gold chrome accent nail that delivers maximum impact with minimal effort. This sophisticated design lets you embrace metallic trends without overwhelming your hands or competing with your outfits. The strategic placement on the ring finger creates a focal point that draws the eye and adds intentional style.
Difficulty: Intermediate
Time to complete: 40–50 minutes
Best for: Everyday summer wear when you want something special without committing to a full statement nail.
Why it works: One chrome accent nail on each hand is the highest-impact, lowest-effort nail art there is — and rose gold flatters warm undertones beautifully.
What makes it different: Most chrome looks cover all ten nails. One accent nail on each ring finger creates a focal point that draws the eye without overwhelming — it’s more intentional than going all-over chrome.
The sheer nude base is what makes this work. A bright or opaque base competes with the chrome accent. Stay with something skin-tone or sheer pink for the other eight nails.
Recommended Products:
- Beetles Rose Gold Chrome Powder ($8–11, often included in Beetles gel kits at beetlesnailgel.com) — warm, rich rose gold tone.
- OPI “Bubble Bath” ($11–13 at Ulta) — best sheer pink nude for fair-to-medium skin tones.
- Essie “Au Natural” ($9–11 at Target) — slightly warmer undertone, great for medium-to-deep skin.
- Essie “Penny Talk” ($9–11 at Target) — if skipping gel entirely, this metallic rose gold gives a similar accent effect with just regular polish.
Beginner Mistake to Avoid: Using regular top coat over chrome powder removes the mirror finish. Chrome must be sealed with gel top coat.
Holographic Glitter Tips
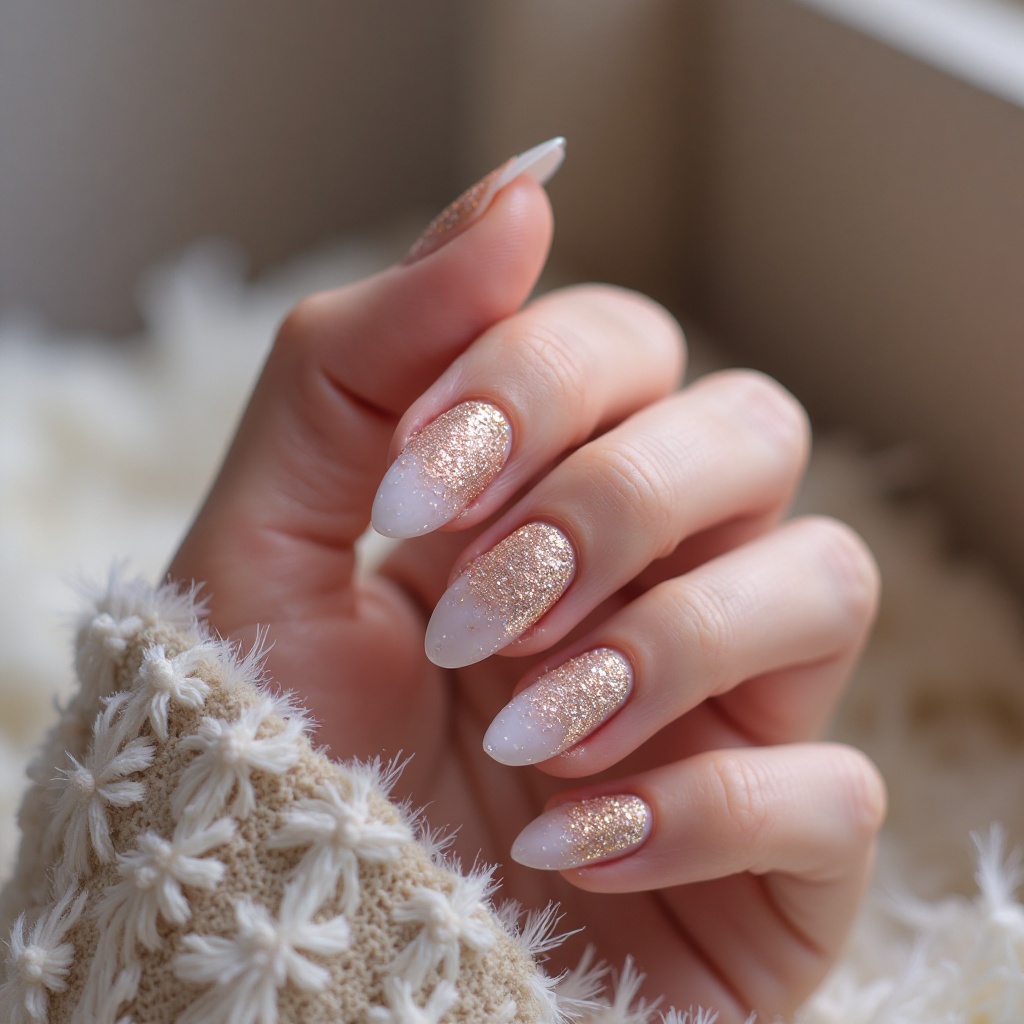
Clear or nude nails with fine holographic glitter concentrated at the tips, creating a subtle sparkle gradient. This playful design captures light beautifully, giving your nails a magical, dimensional quality that shifts with movement. The concentrated placement keeps the look wearable for everyday while still delivering that special occasion sparkle.
Difficulty: Intermediate
Time to complete: 40–50 minutes
Best for: Beach trips and outdoor festivals — sunlight makes the holographic shift genuinely magical.
Why it works: Holographic glitter concentrated at the tips gives you the sparkle payoff of full glitter nails with a fraction of the effort and removal time.
What makes it different: Full glitter nails require 6+ layers of top coat to smooth, take forever to remove, and look heavy. Tip concentration lets you stay wearable while still getting real sparkle.
Before you start, apply liquid latex or Elmer’s glue around each nail onto the skin — it makes glitter cleanup take 30 seconds instead of 10 minutes.
Recommended Products:
- Twinkle Dust ultra-fine holographic glitter ($6–9 on Amazon) — finer than craft glitter, looks far more mirror-like.
- ILNP “Juliette” glitter polish ($10–13 at ilnp.com) — if you prefer the polish route, this has the best holographic shift I’ve seen in a bottle formula.
- SuperChic Lacquer Marvel Liquid Macro Top Coat ($12–15 on Amazon) — thick, self-leveling formula that smooths glitter texture in 2–3 coats rather than 5–6.
Beginner Mistake to Avoid: Thin top coat over loose glitter won’t smooth the texture — you’ll feel every piece. You need a thick, self-leveling top coat and multiple layers.
Bright & Bold June Statements
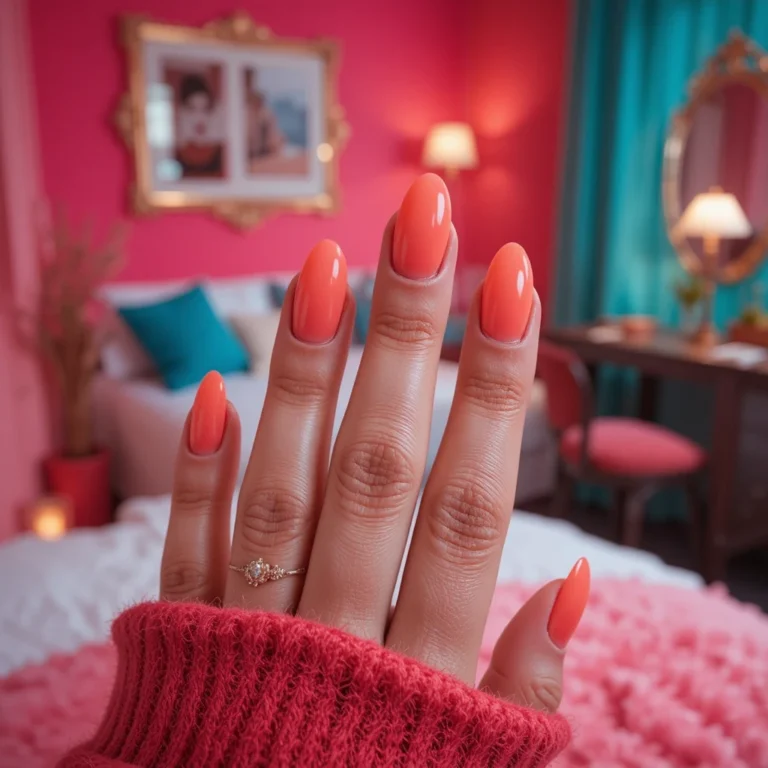
Coral Crush
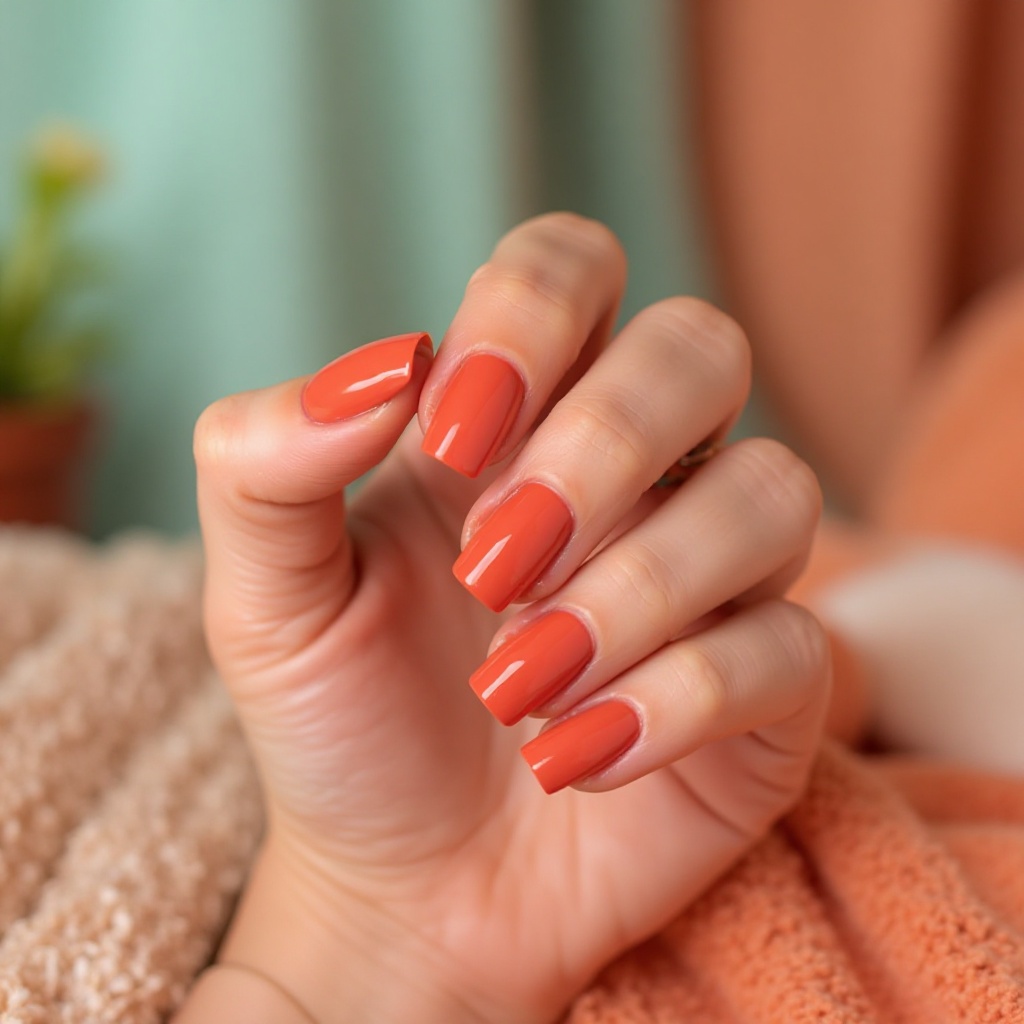
A vibrant, warm coral with subtle orange undertones that instantly brightens your mood and your manicure. This energetic shade captures the essence of summer sunsets, tropical flowers, and warm beach days in a single color. The creamy, highly pigmented formula delivers bold color payoff in just two coats, ensuring rich, even coverage.
Difficulty: Beginner
Time to complete: 20–25 minutes
Best for: Short to medium oval nails wanting an energetic pop that works from daytime errands to evening plans.
Why it works: Warm coral picks up the orange tones in bronzed summer skin and looks richer as you tan — it bridges spring pastels and full summer brights perfectly.
What makes it different: This shade sits right in the June sweet spot: not as soft as April pastels, not as intense as true orange in July.
Bright colors tend to chip faster than muted ones. A white base coat underneath makes the color pop AND helps the polish adhere better — worth the extra two minutes.
Recommended Products:
- Essie “Tart Deco” ($9–11 at Target or Ulta) — bright coral-orange with a cream finish that pops in outdoor light.
- OPI “Coral-ing Your Spirit Animal” ($11–13 at Ulta) — warmer and more orange-leaning; great for medium and deep skin tones.
- Zoya “Arizona” ($10–12 at zoya.com) — a cleaner, more pink-leaning coral for fair and neutral undertones.
Beginner Mistake to Avoid: Thick coats of bright polish cause bubbling and take longer to dry than you’d expect. Thin to medium coats every time.
Sunshine Yellow Glow
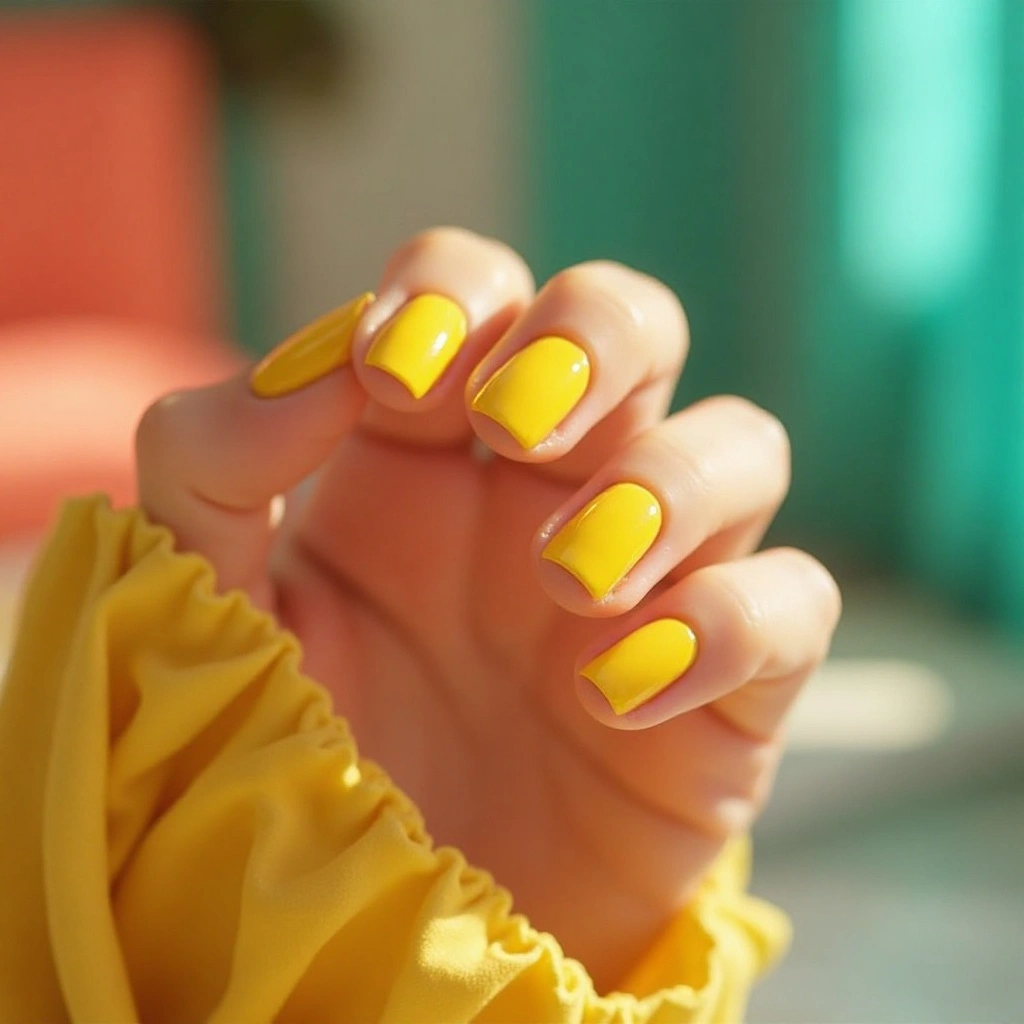
A pure, happy yellow that radiates optimism and perfectly captures June’s sunny, carefree energy in color form. This bold shade makes an unapologetic statement while remaining playful rather than overwhelming or harsh on the eyes. The opaque, creamy formula ensures even application without streaking, delivering sunny perfection in two smooth coats.
Difficulty: Beginner (with patience)
Time to complete: 30–35 minutes
Best for: Short to medium nails in round or squoval shapes — yellow works best when nail length isn’t competing for attention.
Why it works: Yellow genuinely creates a mood lift in a way other colors don’t. There’s a reason it’s associated with summer joy — it looks warm and happy against almost any skin tone.
What makes it different: Most people avoid yellow because of bad experiences with streaking and staining. Both problems are solvable with prep, and the payoff is worth learning.
Yellow stains nails and streaks on the first coat — both are expected and normal. The white base coat solves the staining. Thin layers solve the streaking.
Recommended Products:
- Essie “Aim to Misbehave” ($9–11 at Target or Ulta) — one of the few yellows with a consistent formula that doesn’t go patchy.
- OPI “Exotic Birds Do Not Tweet” ($11–13 at Ulta or Amazon) — more expensive but the best yellow formula available in regular polish.
- Essie “Blanc” ($9–11 at Target) — your white base layer. Don’t skip it.
Beginner Mistake to Avoid: Skipping the white base coat. Without it, yellow stains the nail a dull green-yellow that no amount of extra coats fixes.
Turquoise Tropical Dream
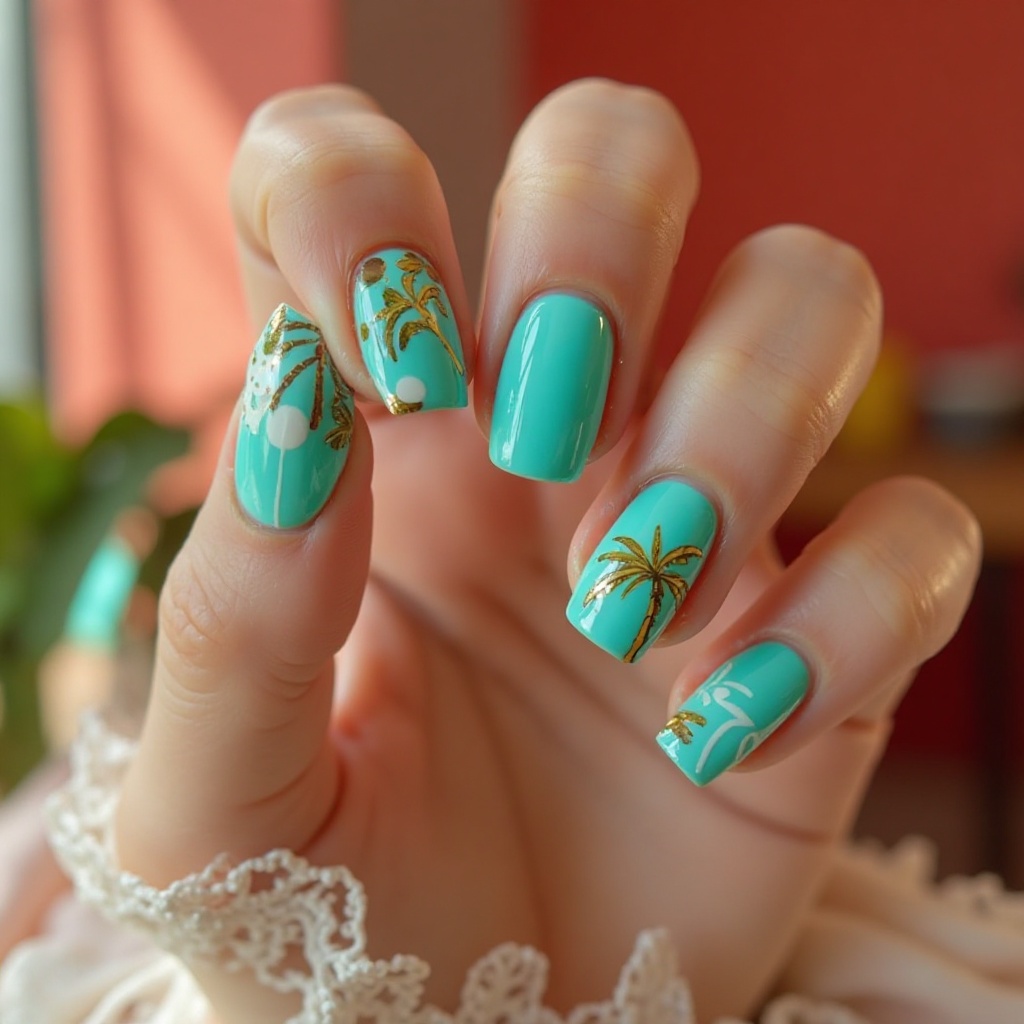
A bright, clear turquoise blue with slight green undertones that instantly transports you to crystal-clear Caribbean waters. This vacation-worthy shade delivers maximum summer vibes while remaining sophisticated enough for any setting beyond the beach. The vibrant, jewel-toned formula creates a stunning pop of color that looks expensive and intentional.
Difficulty: Beginner (3 thin coats required)
Time to complete: 25–30 minutes
Best for: Medium to long almond nails heading on vacation or wanting that instant ocean-side feeling.
Why it works: Turquoise is one of the few colors that looks better outdoors than in photos — the blue-green shift catches natural light in a way that feels alive and dimensional.
What makes it different: Most blue-greens lean too far one direction (either teal or mint). A true bright turquoise sits right in between and reads as unmistakably vacation-ready.
Like yellow, turquoise needs three thin coats. The urge to go thicker to save a step always backfires with bubbling and dragging. Thin and patient wins.
Recommended Products:
- China Glaze “For Audrey” ($8–11 at Ulta) — the cult-favorite turquoise for a reason: perfect blue-green balance.
- Essie “Turquoise & Caicos” ($9–11 at Target or Ulta) — slightly more blue-leaning; great for cool undertones.
- Zoya “Robyn” ($10–12 at zoya.com) — the most vivid of the bunch; really lives up to the tropical promise.
Beginner Mistake to Avoid: Two thick coats instead of three thin ones. Turquoise in thick layers bubbles and drags. Three thin coats take 5 extra minutes total and look completely different.
Soft & Romantic June Florals
Lavender Linen
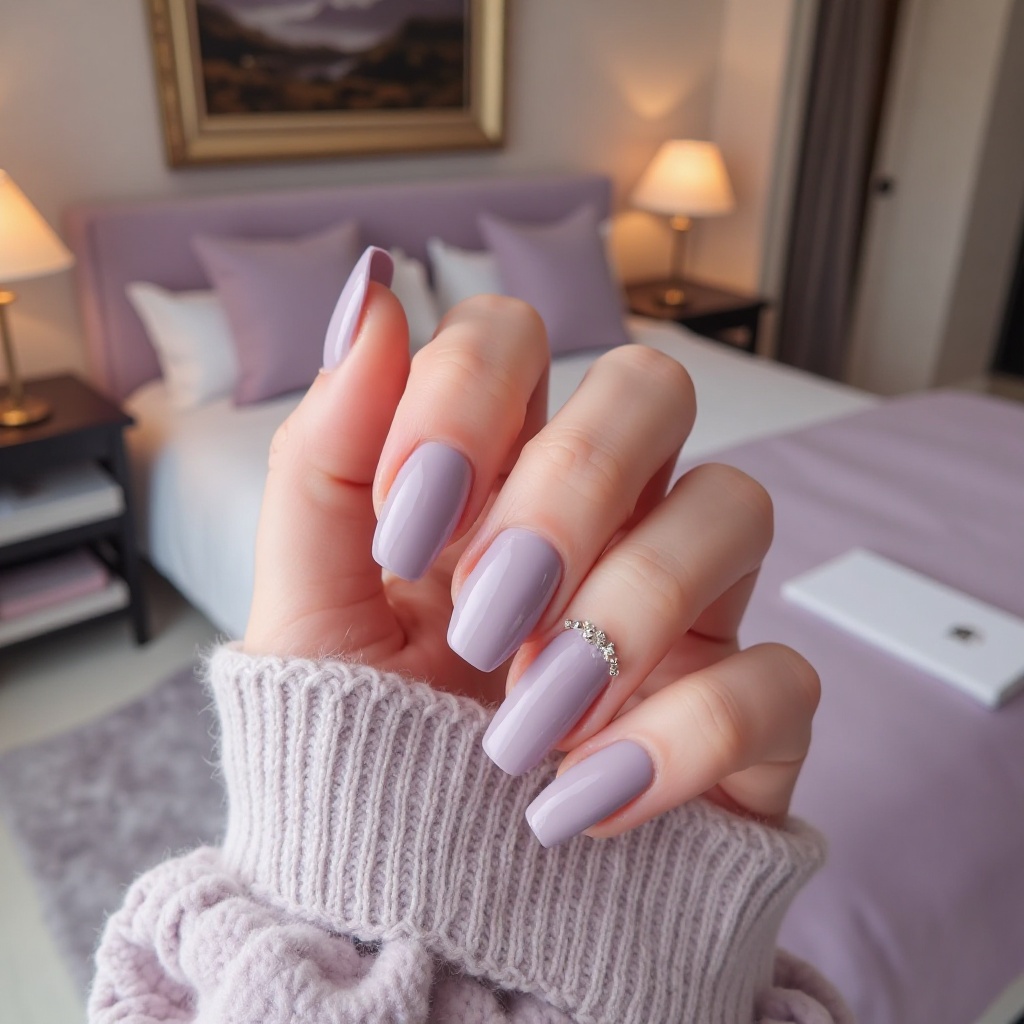
A muted, dusty lavender with cool gray undertones that feels elegant, refined, and perfectly suited for June. This sophisticated pastel reads as mature and intentional rather than childish, offering subtle color without overwhelming boldness. The creamy, opaque formula provides full coverage that looks polished and expensive with minimal effort required.
Difficulty: Beginner
Time to complete: 25–30 minutes
Best for: Any occasion — this dusty lavender reads as elegant enough for events but calm enough for everyday work wear.
Why it works: The gray undertones prevent this lavender from looking childish or overly sweet — it sits in that rare zone between a neutral and a color.
What makes it different: Most lavenders are either too pink-purple (reads as girly) or too blue (reads as periwinkle). This dusty, gray-toned version stays wearable across settings.
Muted, dusty shades show texture more than bold ones. Take an extra 30 seconds buffing before you start.
Recommended Products:
- Essie “Lilacism” ($9–11 at Target or Ulta) — the dustiest, most gray-toned lavender in the Essie line.
- OPI “Do You Lilac It?” ($11–13) — slightly more purple-leaning; better for warm and neutral undertones.
- Essie “Matte About You” ($9–11 at Target) — most reliable matte top coat for light muted colors.
Beginner Mistake to Avoid: Applying matte top coat over wet color polish — it pills and streaks immediately. The color must be completely dry first.
Soft Apricot Bloom
A delicate peachy-apricot with warm undertones that brings a sun-kissed glow to your fingertips instantly and naturally. This fruit-inspired shade captures summer’s warmth while remaining soft enough to wear daily with any outfit. The sheer-to-opaque buildable formula lets you control the intensity, from barely-there tint to full coverage.
Difficulty: Beginner
Time to complete: 20–30 minutes depending on desired opacity
Best for: Short to medium round nails wanting a natural, approachable look that still counts as “wearing polish.”
Why it works: A buildable formula lets you decide how much color you want — 2 coats gives a tinted gloss, 4 coats gives full color. That flexibility is rare.
What makes it different: Most polishes force you into either bare or bold. This shade’s buildability means total control over how much color you’re wearing on any given day.
The beauty of a buildable sheer is the process — check after each coat before adding more. Two coats works beautifully for casual days; four coats for evenings.
Recommended Products:
- Essie “A Crewed Interest” ($9–11 at Target or Ulta) — a peach-apricot that looks natural at 2 coats and defined at 4.
- OPI “Stop It I’m Blushing” ($11–13) — slightly more pink-leaning; beautiful if you prefer a blush-peach effect.
- Zoya “Carly” ($10–12 at zoya.com) — warm and peachy without any shimmer; great for a clean natural finish.
Beginner Mistake to Avoid: Trying to rush a sheer formula to opacity in one thick coat. It goes gloopy and uneven. The whole point of a buildable formula is the build.
Maintenance Tips: Day-by-Day
The difference between a manicure that lasts a week and one that lasts two usually comes down to what you do in the first 24 hours — and then every few days after.
Days 1–3
- Avoid hot water and cleaning products for the first 12 hours. Heat and chemicals soften top coat before it’s fully cured. If you must wash dishes, wear gloves.
- Skip cuticle oil on the nail surface for the first 4 hours if you used matte top coat — oils break down the finish before it’s fully set.
- Cap chips immediately with a thin drop of matching polish, then top coat. Catching chips in the first 2 days prevents them from spreading and becoming a full break.
Days 4–7
- Reapply top coat every 2–3 days. Apply a thin layer over your existing polish — no need to redo the color. This is the single most effective thing you can do for longevity.
- Apply cuticle oil morning and night. CND SolarOil ($10–13 at Ulta) or Sally Beauty Jojoba Oil ($7–10) absorb quickly and don’t leave a greasy film. Dry cuticles cause polish to peel at the edges.
- If swimming: rinse hands immediately after chlorine or saltwater. Both degrade polish faster than almost anything else. Pat dry, don’t rub.
Days 8–14 (Gel Only)
- Book your gel fill or removal by day 10–12 if you swim regularly, or day 14 if you don’t. Waiting longer increases the gap at the cuticle and the chance of water lifting the gel.
- If gel starts lifting at the edges: do not pick it. Picking removes layers of natural nail with it. A tiny drop of nail glue at the lift point can buy a few extra days if needed.
- Apply cuticle oil daily. Gel polish dries out the natural nail and surrounding skin faster than regular polish.
Common Mistakes & Exact Fixes
Mistake 1: Bubbles in the Polish
What it looks like: Tiny air pockets visible in the finish, especially visible under light.
Why it happens: Shaking the bottle (creates air), applying in a warm or humid room, or using coats that are too thick.
Fix: Roll the bottle between your palms instead of shaking. Apply in a cool, dry room. If bubbles are already there, let the coat dry completely, gently buff the surface with a 240-grit buffer to smooth, and apply a fresh thin coat. This won’t eliminate all evidence but minimizes it significantly.
Mistake 2: Chrome Powder Looks Dusty Instead of Mirror-Like
What it looks like: Chrome applied but the nail looks matte or patchy instead of reflective.
Why it happens: The gel top coat cured too long before applying chrome, so the tackiness is gone. Chrome needs a slightly tacky surface to adhere.
Fix: Apply another thin layer of no-wipe top coat and cure for only 20–25 seconds. Then immediately apply chrome powder while the surface is still tacky. Buff with firm pressure in small circular motions — timid rubbing is the number one reason chrome looks dull.
Mistake 3: Matte Top Coat Looks Streaky
What it looks like: Uneven texture with some areas matte and some still slightly shiny, often in streak patterns.
Why it happens: Going over the same area twice while applying, or applying over color that wasn’t completely dry.
Fix: Let the streaky coat dry completely (5 minutes). Apply a fresh thin coat of matte top coat in one smooth, continuous stroke from cuticle to tip per nail. Don’t go back over it. This usually fixes it in one pass.
Mistake 4: Gel Peels Off in Sheets Within Days
What it looks like: Gel lifting at the edges or coming off as a whole piece within 3–5 days of application.
Why it happens: Oil or moisture on the nail before application. The most common culprit is cuticle oil applied the day before — even a small residue prevents gel from bonding properly.
Fix for next time: Wipe each nail thoroughly with 91% isopropyl alcohol immediately before gel base coat. Don’t touch your nails after wiping. If this keeps happening, try a nail dehydrator solution ($5–8 on Amazon) before the base coat.
Mistake 5: Yellow or Coral Turns Greenish
What it looks like: Bright color looks muddy, greenish, or off-tone by day 2 or 3.
Why it happens: The base coat wasn’t fully dry, or the white base layer was skipped. Natural nail oils bleed into the color through porous layers.
Fix: This one requires a restart. Remove and redo with a white undercoat between base coat and color. There’s no way to correct it on top once it’s happened.
Real Wear Timeline: What Happens Week by Week
This is based on my own experience wearing these shades through a typical summer month — swimming twice a week, regular handwashing, top coat reapplied every 3 days.
| Week | Regular Polish | Gel Polish |
|---|---|---|
| Week 1 | Looks fresh days 1–4. Minor tip wear visible by days 5–7, especially on bright shades. | No visible wear. Looks exactly as applied. |
| Week 2 | Visible chips at tips and index fingers around day 10. Top coat reapplication extends this but doesn’t prevent it. | Still looks clean. Possible lift at cuticles if swimming frequently. Day 10: consider a fill. |
| Week 3 | Significant wear visible. Most people remove and redo around day 14–16. | Lift at the cuticle line becomes more noticeable. Don’t pick — book removal. |
| Week 4 | Would need a second or third full redo by this point. | Gel should be fully removed. Natural nail needs cuticle oil and a day or two of rest. |
The honest takeaway: regular polish at 7 days still looks fine with top coat reapplication. Gel at 14 days still looks fine if you haven’t been swimming daily. After those points, both start to look tired rather than polished.
FAQ
How long does a June manicure actually last?
Regular polish with proper prep and top coat reapplication every 2–3 days lasts about 7 days before noticeable chipping. Gel lasts 2–3 weeks, but summer swimming shortens this — if you’re in the pool or ocean regularly, expect lift to start around day 10–12 at the cuticle rather than day 14.
Can I do chrome nails without a UV lamp?
True mirror-chrome requires a gel lamp — there’s no real workaround that gets the same result. What you can do without a lamp: mix a tiny bit of metallic eyeshadow or loose chrome powder into clear polish and paint it over dry regular polish, then seal with top coat. It gives more of a sparkle effect than a mirror finish, but it still looks intentional and pretty.
What nail colors look best on tan skin?
Warm shades that pick up golden tones tend to work best: coral, peach, rose gold, warm nude, and turquoise. White and lavender also look striking as contrast colors. From what I’ve seen, colors with orange or warm undertones look the most natural against a summer tan, while cool pinks can sometimes look washed out.
Why does my matte top coat keep losing its effect after a day?
Two likely culprits: applying hand cream or cuticle oil too soon after application (oils break down the matte surface), or touching the nails before they’re fully set. Matte top coat needs about 4 hours before contact with oils. To restore a matte finish that’s gone shiny, apply another thin coat of matte top coat — it resets in one fresh layer.
June-Specific Tips Worth Knowing
Chrome and pearl finishes photograph better outdoors in June than they do indoors. If you’re going to a graduation, outdoor wedding, or beach event, rose gold and pearl chrome are genuinely the moves. They catch natural light in a way that registers beautifully in photos without looking too much in person.
Gel lifts faster in summer. Pool chemicals and salt water are rough on the seal at the free edge. If you swim often, either switch to regular polish you can touch up easily, or book gel fills at 10 days instead of waiting the full two weeks. The gap at the cuticle is where water gets in and peeling starts.
Matte actually works well in summer heat. It hides fingerprints and minor scratches better than gloss, and it gives bright shades like coral and sage green a more sophisticated edge. The one downside: sunscreen residue shows up on matte surfaces, so rinse hands after applying SPF before the top coat is fully set.
Cuticle oil is more important in summer than any other season. Sun, AC, chlorine, and salt water all dry out the nail and surrounding skin faster than normal. Apply morning and night — especially after swimming. Jojoba oil or CND SolarOil absorb quickly and don’t interfere with your polish.
A white base coat under bright colors is the single biggest upgrade most people aren’t making. If you’re doing yellow, coral, or turquoise, put down a thin white coat first. It makes the color vibrant, prevents staining, and gets you to full coverage faster.
Where to Start
If you’re new to nail art, a good place to start is Peachy Cream Dream or Sage Green Serenity — both are straightforward one-color looks with clear instructions and minimal supplies needed. If you want something with more payoff, consider beginning with Rose Gold Accent after you’ve done a couple of solid-color manicures. The chrome technique takes one or two attempts to get right, but once you do, it’s completely repeatable.
Bookmark the two or three designs that caught your eye. That’s enough to work with for the whole month.