7 Beach Nails Inspo – Coastal Designs for Your Perfect Summer Manicure
Beach nails capture that breezy coastal aesthetic we all crave in summer—think ocean blues, sandy neutrals, and sun-kissed metallics that make you feel like you’re on vacation even when you’re not. Unlike most beach nail articles that just show you pretty pictures, this guide walks you through exactly how to recreate each design at home with specific products, realistic timeframes, and honest troubleshooting for when things go wrong.
You’ll get complete step-by-step instructions for all seven designs, plus product recommendations with real prices and where to buy them.
How to Choose the Best Beach Nail Design
For your first time trying beach nails: Start with Sandy Nude with Gold Foil or Seafoam Green Glazed—both are simple one-color bases with minimal embellishment that forgive mistakes and don’t require artistic skills.
If you have a professional job: Milky White with Coral Swirls or Pearl White with Starfish Detail look polished enough for office settings while still having personality and coastal charm.
If you want something for special events: Turquoise Chrome with Shell Accents or Sunset Gradient with Palm Silhouette make statements for beach weddings, tropical vacations, or summer parties.
If you’re comfortable with nail art: Ocean Wave Ombré or Sunset Gradient with Palm Silhouette let you practice gradient techniques and detailed work that build your skills.
If you have short nails: Turquoise Chrome, Sandy Nude with Gold Foil, and solid glazed finishes work best—bold colors and metallics don’t need length to make an impact.
If you change your mind often: Avoid designs with 3D charms or complex gradients that take 60+ minutes—stick with simple one-color looks you can remove and redo quickly without feeling like you wasted tons of time.
Here 7 Beach Nail Ideas
1. Ocean Wave Ombré
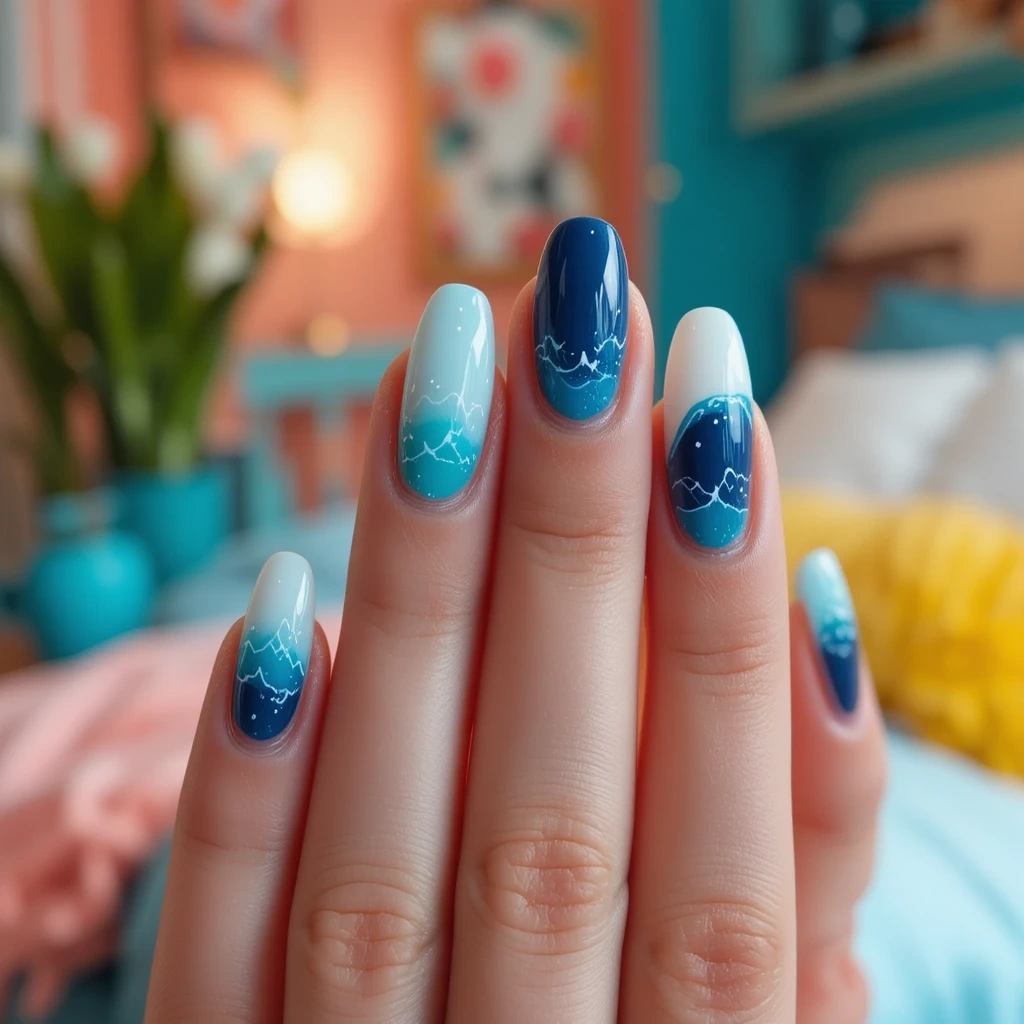
A gradient design that flows from deep navy blue at the base through turquoise to foamy white tips, mimicking actual ocean waves. The seamless color transition creates depth and movement, with optional white accent lines to enhance the wave effect. This stunning design works on any nail length and brings instant vacation vibes without being too literal or juvenile.
Difficulty: Intermediate
Time to complete: 45-60 minutes
Best for: People who’ve done basic gradients before and want to try multi-color blending
Why it works: The three-color transition mimics real ocean depth and photographs beautifully
What makes it different: Most gradients use two colors; this one uses three for more realistic water effects
Products I recommend:
- OPI “Yoga-ta Get This Blue” ($10.50) – This navy has blue undertones instead of purple, so it reads as ocean water rather than night sky
- China Glaze “For Audrey” ($8) – Perfect turquoise that’s not too green or too blue
- Beauty blender sponge ($5 for 2-pack at Target) – The rounded shape makes dabbing easier than flat makeup wedges
- Seche Vite topcoat ($10) – Dries in 5 minutes and creates that wet-look glossy finish that makes the gradient pop
2. Sandy Nude with Gold Foil

A warm sandy beige base adorned with irregular gold foil flakes that catch light like sun reflecting off beach sand. The neutral foundation keeps the look grounded while metallic accents add luxury and dimension without overwhelming the design. This combination feels both minimalist and special—perfect for those who want subtle glamour with coastal inspiration.
Difficulty: Beginner
Time to complete: 25-30 minutes
Best for: Anyone wanting a neutral base that works with everything but still has visual interest
Why it works: Foil placement is random and forgiving—there’s no “wrong” way to apply it
What makes it different: Most foil designs use transfer sheets; this uses loose flakes that give more organic, natural-looking placement
Products I recommend:
- Essie “Sand Tropez” ($9) – This has warm peachy undertones that look natural on most skin tones instead of gray or yellow
- Born Pretty Gold Foil Flakes ($6.99 on Amazon) – Comes with tweezers and enough foil for 20+ manicures
- Essie Gel Couture Top Coat ($11.50) – Thicker than regular topcoat so it actually seals foil edges instead of leaving them exposed to catch and peel
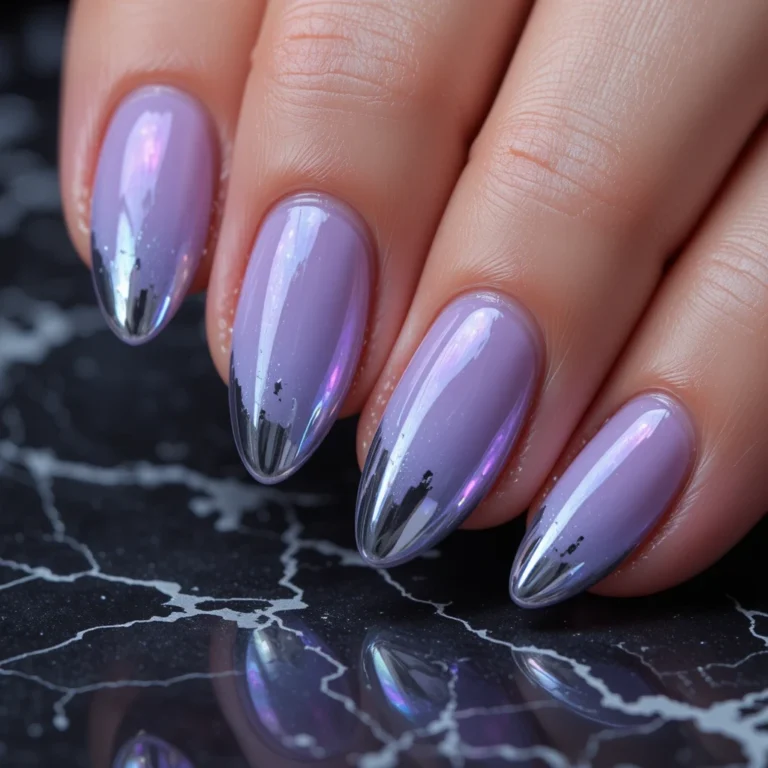
3. Turquoise Chrome with Shell Accents
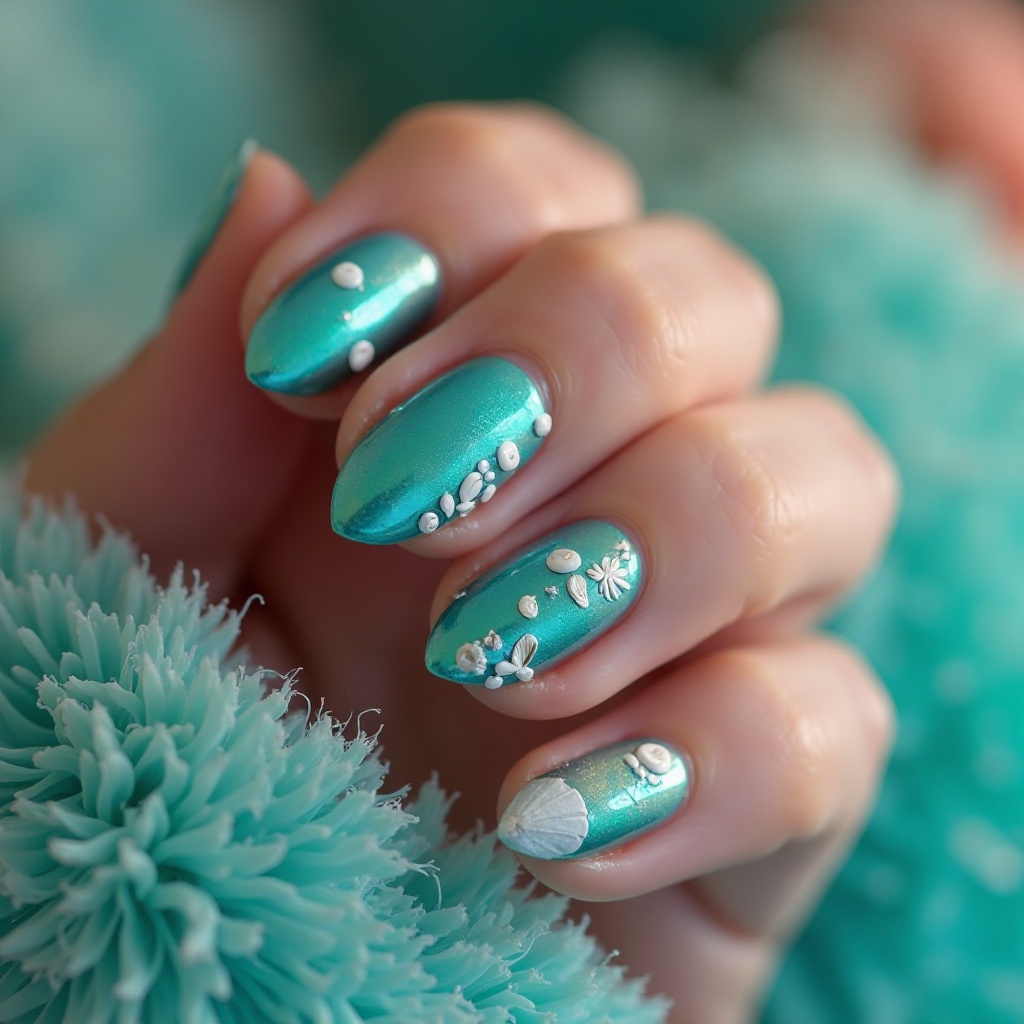
A vibrant turquoise chrome base that shimmers with iridescent, mirror-like finish, accented with tiny white shell details on one or two nails. The metallic finish shifts between blue and green depending on lighting, creating that magical mermaid effect. Delicate shell art adds whimsy without making the design feel childish or overly themed.
Difficulty: Intermediate
Time to complete: 35-45 minutes
Best for: People comfortable with steady hand details who want an eye-catching but wearable design
Why it works: Chrome polish (not powder) is much easier to apply at home than traditional chrome techniques
What makes it different: Uses polish chrome instead of powder chrome, so no gel lamp or special application needed
Products I recommend:
- Sally Hansen Chrome Nail Polish in “Mermaid’s Tale” ($7.99) – Actual chrome polish formula instead of regular polish with shimmer, so it gives that mirror effect without powder or gel
- Liquitex Basics White Acrylic Paint ($4.50) – Stays opaque over chrome better than white nail polish which can look transparent and streaky
- Nail art liner brush size 00 ($3 for set of 3 on Amazon) – The ultra-fine tip makes tiny shell details possible
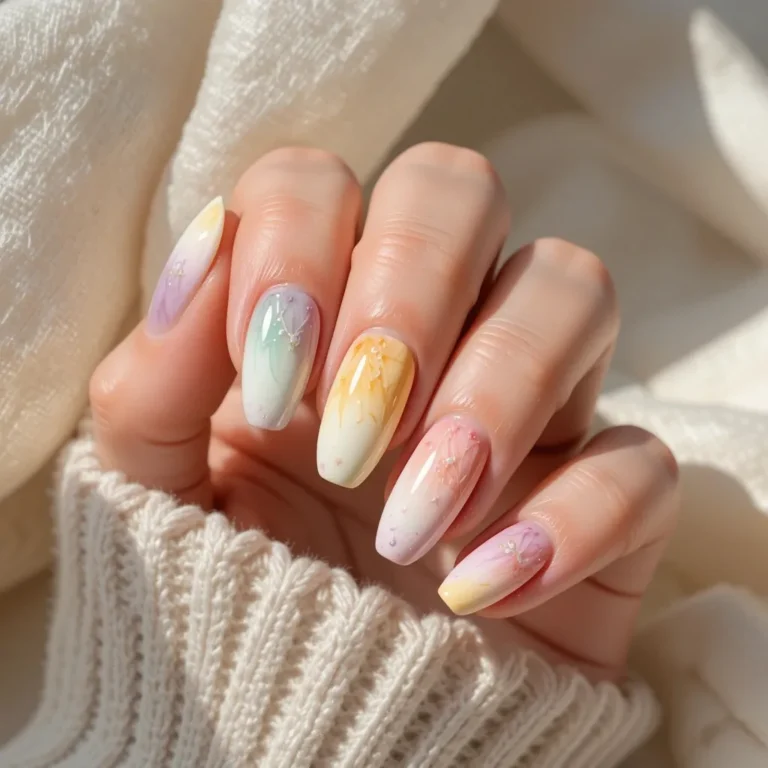
4. Milky White with Coral Swirls
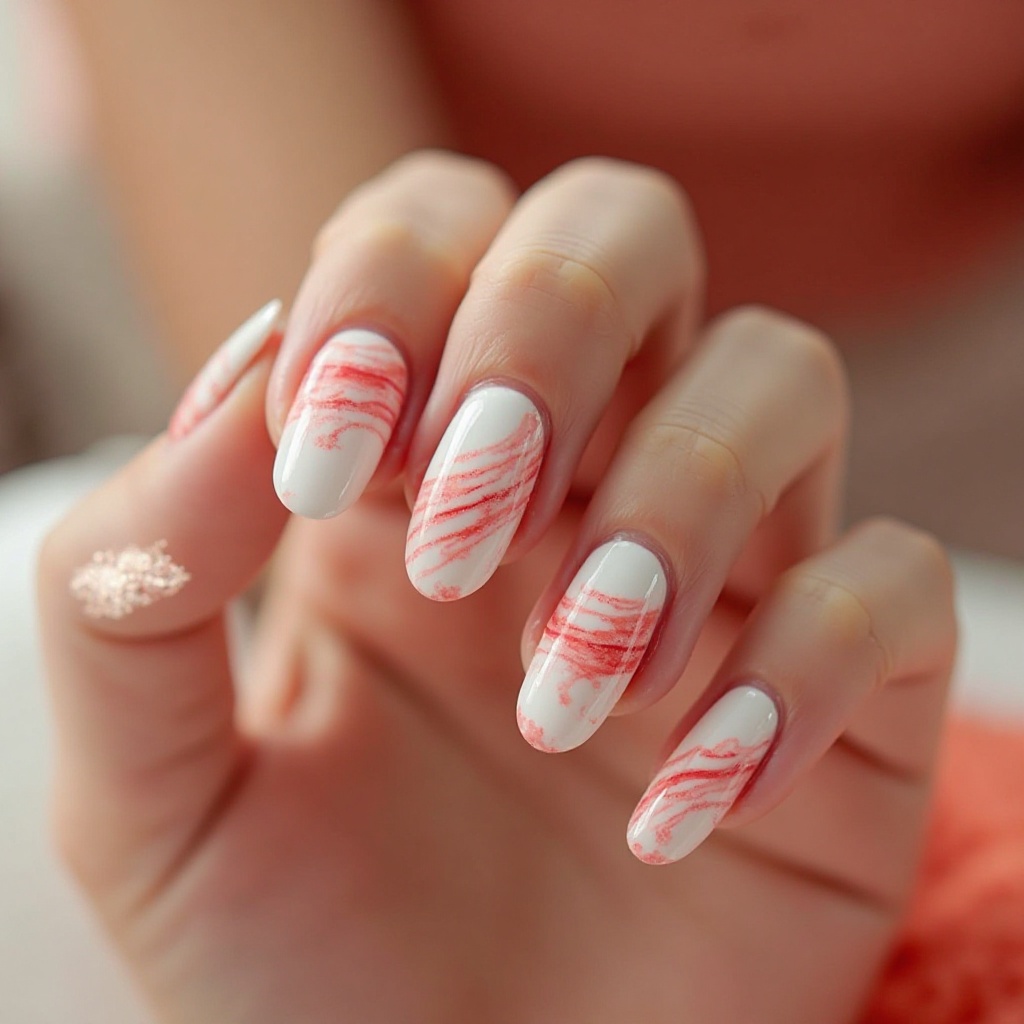
An opaque milky white base featuring freehand coral pink swirls that resemble ocean currents or watercolor brush strokes. The soft, organic lines create movement and artistry while keeping the overall look clean and fresh. This design feels contemporary and Instagram-worthy without requiring salon-level skills to recreate at home.
Difficulty: Beginner to Intermediate
Time to complete: 30-40 minutes
Best for: People who think they can’t do nail art but want to try something creative
Why it works: Swirls are supposed to look organic and random, so there’s no pressure for perfection
What makes it different: Uses thinned polish for fluid swirls instead of thick polish that creates bumpy lines
Products I recommend:
- OPI “Alpine Snow” ($10.50) – True opaque milky white in 2 coats instead of 4 like most whites
- OPI “Coral-ing Your Spirit Animal” ($10.50) – Peachy-coral that’s not too orange or too pink
- Striping brush from Winstonia ($2.50) – The 2mm tip creates flowing lines without being so thin it splits or so thick it looks clunky
- OPI Matte Top Coat ($10.50) – Doesn’t show brush strokes like cheaper matte topcoats that look streaky
5. Seafoam Green Glazed
A pale minty seafoam green with a glossy glazed finish that creates a translucent, glass-like appearance reminiscent of sea glass. The jelly-like quality allows your natural nail to show through slightly, creating depth and dimension. This dreamy shade is calming and coastal without being too sweet or overpowering for everyday wear.
Difficulty: Beginner
Time to complete: 20-25 minutes
Best for: Anyone wanting a low-maintenance color that looks more interesting than plain nude
Why it works: The translucent formula is forgiving and hides application mistakes
What makes it different: Glazed finish creates depth instead of flat color
Products I recommend:
- Essie “Mint Candy Apple” ($9) – Has that perfect jelly consistency instead of being too opaque or too sheer
- Seche Vite topcoat ($10) – Creates that wet-look glossy finish that’s essential for the glazed effect; regular topcoats don’t have enough shine
6. Pearl White with Starfish Detail
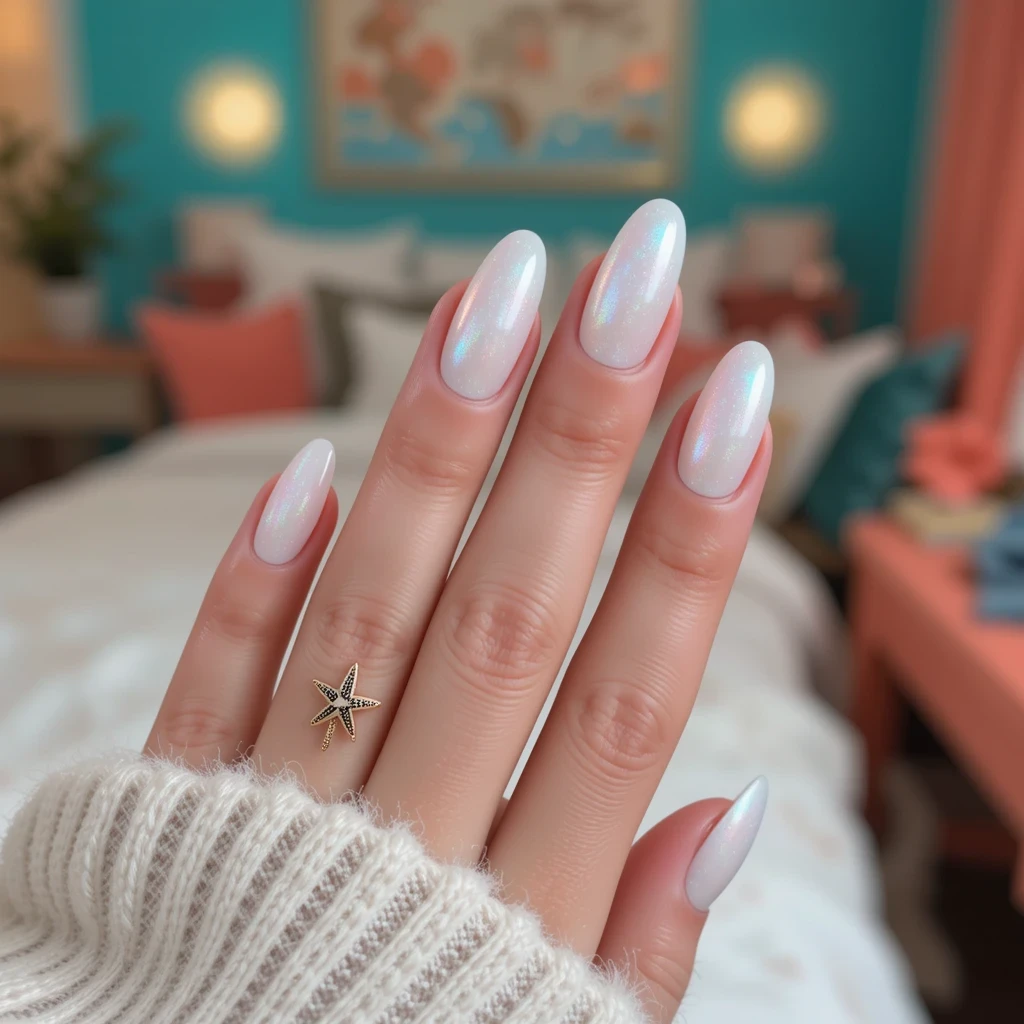
A shimmering pearl white base with subtle iridescence, featuring a small gold or rose gold starfish charm on the accent nail. The luminous white has delicate pink and blue undertones that shift in different lighting conditions. This elegant design balances beachy theme with refined taste—it’s celebratory without being costume-like.
Difficulty: Beginner
Time to complete: 25-30 minutes
Best for: Special occasions like beach weddings or anyone wanting elegant beach nails without obvious themes
Why it works: Pre-made charm does all the work—no artistic skill needed
What makes it different: Uses real metal charm instead of hand-painted starfish that look amateur
Products I recommend:
- Essie “Pearly White” ($9) – Has actual pearl shimmer instead of just being white with glitter
- Metal starfish charms 5-6mm ($6.99 for 50-piece set on Amazon) – Small enough to be sophisticated but large enough to see; metal lasts longer than plastic
- Modelones Nail Glue ($5.99) – Dries clear and bonds stronger than using just topcoat which lets charms fall off
7. Sunset Gradient with Palm Silhouette
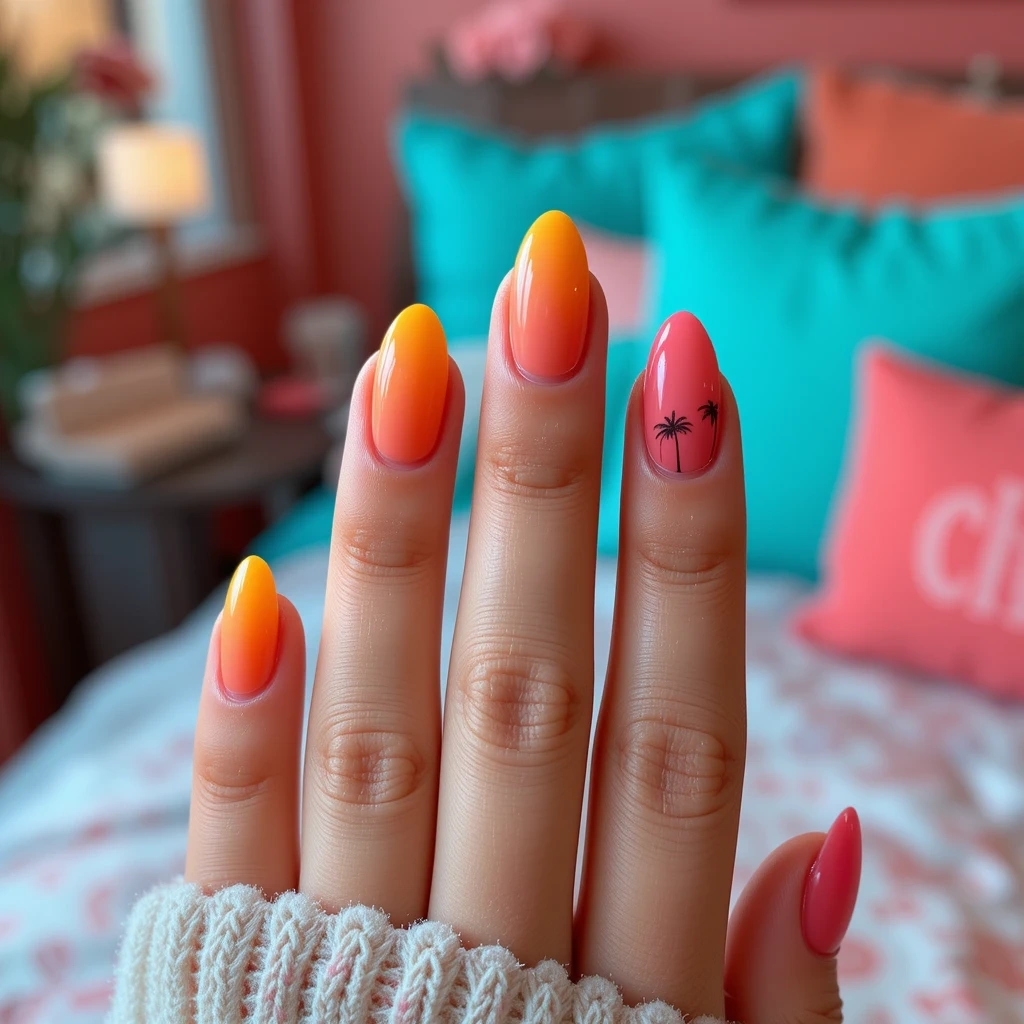
A warm gradient that transitions from golden yellow through peachy orange to deep pink, topped with a single black palm tree silhouette. The color blend mimics those breathtaking beach sunsets where the sky becomes a canvas of warm hues. The palm silhouette adds a graphic element that’s recognizable yet stylish—not tacky or overly tropical.
Difficulty: Advanced
Time to complete: 50-70 minutes
Best for: People confident with gradients who want an Instagram-worthy vacation manicure
Why it works: Warm sunset colors flatter all skin tones and evoke emotional beach memories
What makes it different: Uses stamping plate for crisp palm tree instead of shaky hand-painted attempts
Products I recommend:
- China Glaze “Sun Worshiper” ($8) – Golden yellow that’s not neon or too muted
- OPI “Crawfishin’ for a Compliment” ($10.50) – Perfect peachy-orange for sunsets
- Essie “Cute as a Button” ($9) – Deep pink with slight coral undertone
- Maniology MXM033 stamping plate ($12.99) – Has multiple palm tree sizes and designs; the etching is deep enough for clean transfers
- Black stamping polish ($6.99) – Regular polish is too thin for stamping; stamping polish has thicker consistency that transfers clearly
Pros and Cons of Beach Nail Designs
Pros
✅ Work with any nail length – Beach designs look good on short natural nails or longer extensions, unlike some styles that only work on specific lengths
✅ Complement tanned skin beautifully – The color palette of blues, corals, and neutrals makes summer tans pop instead of washing them out
✅ Range from super simple to complex – You can do a one-color seafoam manicure in 20 minutes or spend an hour on sunset gradients depending on your skill level
✅ Appropriate for most settings – Designs like sandy nude or milky white work in professional offices while still feeling summery and beachy
✅ Easy to coordinate with summer wardrobes – Beach colors are neutrals or classics that don’t clash with swimwear, sundresses, or casual outfits
✅ Don’t require expensive products – Most beach designs work with drugstore polishes; you don’t need high-end brands to get good results
Cons
❌ Gradient designs take 45-60 minutes – Multi-color blending requires multiple sponge applications and cleanup time, which is frustrating when you’re in a hurry
❌ Chrome finishes show scratches and dents easily – Any impact on chrome nails creates visible marks that regular polish hides better; can’t be buffed out without redoing entire nail
❌ 3D charms fall off within 3-5 days – Even with nail glue, starfish and shell embellishments catch on towels and hair, and you’ll likely lose at least one or two during a week-long vacation
❌ Light colors stain from certain activities – White and nude bases can turn yellowish from sunscreen, self-tanner, or even some foods like turmeric
❌ Require frequent topcoat reapplication – To maintain chip resistance through swimming and sun exposure, you need to reapply topcoat every 2-3 days, which is annoying to remember
❌ Complex designs are hard to fix when they chip – If a gradient or detailed design chips, you can’t just touch up one spot—you usually have to redo the entire nail for it to match
What Happens After 7 Days?
I wore the Ocean Wave Ombré design for two weeks during a beach vacation to see how it actually holds up. Here’s the honest timeline:
Days 1-3: Nails looked perfect and glossy. The gradient stayed vibrant and the white wave details were crisp. I got tons of compliments and they photographed beautifully in all my vacation pics.
Days 4-7: Started seeing minor tip wear on my dominant hand (right thumb and index finger). The glossy finish dulled slightly from constant sunscreen application and swimming in saltwater. I reapplied topcoat on day 5 which brought back some shine, but it wasn’t quite as mirror-like as the first few days.
Days 8-10: Noticeable chips appeared on the tips of my index and middle fingers where I handle my phone most. The gradient colors were still vibrant but the white wave details started wearing off on nails I used for opening bottles and cans. One nail (left ring finger) had a small chip on the side that I couldn’t really fix without redoing the whole gradient.
Days 11-14: By day 12, I had visible tip wear on 6 out of 10 nails. The gradient base still looked decent, but the white accent waves were mostly gone. Growth at the cuticle was obvious (about 2-3mm). I removed everything on day 14 because while the design was still recognizable, it looked worn enough that I felt self-conscious about it in photos.
Bottom line: For regular polish, 7-10 days is realistic for beach nails if you’re actively swimming. Gel would have easily made it the full two weeks.
Maintenance Tips
Days 1-3: Protection Phase
Apply cuticle oil twice daily—once in the morning and once before bed. I use CND Solar Oil ($8) because the dropper makes it easy to apply precisely along the cuticle line, which is where lifting usually starts first. This keeps your nails flexible so they don’t crack when you’re gripping beach chairs or opening bottles.
Wear gloves when applying sunscreen. The oils in sunscreen break down nail polish faster than anything else, and I’ve had manicures ruined in 2 days from applying SPF 50 with bare hands. Keep a pair of cheap vinyl gloves in your beach bag specifically for sunscreen application.
Days 4-7: Refresh Phase
Reapply topcoat on day 4 or 5. Your nails will have lost some shine from sun exposure and swimming, and a fresh layer of topcoat seals everything and adds 3-5 more days of wear. Seche Vite ($10) dries in 5 minutes so you can do this poolside and jump back in the water within 10 minutes.
Rinse hands with fresh water immediately after swimming. Don’t wait until you get back to your room—use the beach shower to rinse off saltwater and chlorine right away. These chemicals sit on your polish and eat away at the topcoat, causing it to look cloudy and peel faster.
Days 8-14: Damage Control
File down any rough edges or small chips immediately. Carry a small glass nail file in your bag and smooth out any snags as soon as you notice them. If you let rough edges catch on things, they turn into full nail breaks that ruin the entire design.
Touch up visible chips on simple designs only. For solid colors like the seafoam glazed or sandy nude, you can dab a tiny bit of color over a chip, let it dry, and seal with topcoat. Don’t attempt this on gradients or designs with multiple colors—it never matches and looks worse than just leaving the chip alone.
When to Remove
Remove polish when you have visible growth at the cuticle (usually 10-14 days) or when chips cover more than 30% of your nails. Trying to push polish beyond this point makes you look like you don’t take care of your nails. It’s better to remove and either go bare or do a fresh simple design.
Common Mistakes
Mistake 1: Flooding the Cuticle with Polish
What it looks like: Polish is sitting on the skin around your nail edges and cuticles, creating a thick rim that lifts within 24 hours.
Why it happens: You’re applying polish too close to the cuticle (closer than 1mm) or using too much polish on the brush, which causes it to flow onto skin.
Exact fix:
- Before polish dries, dip a small cleanup brush in acetone
- Carefully trace along the cuticle line to remove excess polish from skin
- Wipe the brush on a paper towel after each swipe
- Let the nail dry completely before applying topcoat
How well it works: This completely fixes the issue if you catch it while polish is still wet. If polish has already dried, you’ll have to peel it off the skin which often pulls your actual manicure with it—not fixable at that point.
Mistake 2: Making Gradients Too Thick
What it looks like: The gradient has visible texture bumps and takes 20+ minutes to dry, then dents or smudges easily for hours.
Why it happens: You’re applying too much polish to the sponge or doing too many dabbing layers (more than 3), which creates thick buildup that never fully dries through to the bottom layers.
Exact fix:
- Unfortunately, once it’s applied thick, you can’t thin it out—you have to remove completely and start over
- Use less polish on the sponge (just enough to saturate it, not dripping)
- Mist sponge with water before applying polish to prevent absorption
- Do maximum 3 sponge applications, letting each dry 2 minutes between
How well it works: Prevention is the only real solution here. Once you’ve applied it too thick, removing and redoing is faster than trying to fix it.
Mistake 3: Placing 3D Charms While Polish Is Still Wet
What it looks like: The charm is tilted, sunk into the polish, or has polish smudged around the edges.
Why it happens: You didn’t wait for the base color to fully dry before adding the charm, so it sinks into wet polish or pressing it down smears the color.
Exact fix:
- Remove the charm immediately with tweezers
- Use acetone on a small brush to clean up the smudged area
- Touch up the base color and let dry completely (10 minutes minimum)
- Reapply charm with nail glue on fully dry polish
How well it works: If caught immediately, this works perfectly. If the polish has already dried around the tilted charm, you’ll have visible edges and it looks messy—better to remove the charm entirely at that point and skip the embellishment.
Mistake 4: Not Capping the Free Edge
What it looks like: Tips of your nails start peeling or chipping within 1-2 days, even though the rest of the nail looks fine.
Why it happens: You didn’t swipe polish across the very tip edge of your nail, leaving it exposed to water that seeps underneath and causes lifting.
Exact fix:
- When first applying: With each layer (base coat, color, topcoat), hold the brush flat against the nail tip edge and swipe across to seal it
- If already applied without capping: Carefully apply topcoat to just the tip edges, swiping across horizontally
- This gives temporary protection but won’t last as long as capping from the beginning
How well it works: Capping from the start prevents 80% of tip chips. Adding it after the fact helps but only extends wear by 1-2 days versus preventing chips altogether.
Frequently Asked Questions
How do I remove beach nails with 3D charms without damaging my natural nails?
Gently pry off any 3D charms with tweezers first before soaking in remover—trying to dissolve nail glue takes forever and you’ll be sitting there for 30+ minutes with cotton balls on your nails. Once charms are off, soak a cotton ball in regular acetone remover, place it on your nail, wrap with aluminum foil, and wait 5-10 minutes. The polish should slide off easily without scraping or filing that damages your nail surface.
Can I swim immediately after painting my nails or how long should I wait?
Wait at least 2 hours for regular polish and preferably 4-6 hours before swimming for the best longevity. Even though polish feels dry to the touch after 30 minutes, it’s not cured all the way through the layers—jumping in water too soon causes bubbling, wrinkling, or sheet peeling. If you’re doing nails specifically for a beach trip, paint them the night before and give them overnight to fully cure.
What’s the easiest beach design for someone who’s never done nail art?
Sandy Nude with Gold Foil is the absolute easiest because there’s no technique required—you just paint a nude base, tear foil randomly (imperfection looks intentional), and press it on while polish is tacky. Seafoam Green Glazed is a close second since it’s literally just applying jelly polish and glossy topcoat with no artistic skill needed whatsoever.
Do chrome nails scratch more easily than regular polish?
Yes, chrome finishes show scratches, dents, and pressure marks way more than regular polish because the mirror-like surface reflects light differently when it’s damaged. Regular polish chips cleanly while chrome shows every tiny impact mark as a dull spot.
There’s no way to buff out chrome scratches without removing the entire mirror finish, so you just have to accept that chrome is high-maintenance and won’t look perfect for as long as regular polish would.
Conclusion
Beach nails are totally doable at home if you start with simpler designs like the glazed seafoam or sandy nude with foil before jumping into complex gradients. A good place to start is picking one design from this guide, gathering the exact products listed, and giving yourself plenty of time without rushing.
Don’t forget to reapply topcoat every few days during your beach vacation, and remember that even if your first attempt isn’t perfect, you’re building skills that make the next manicure.