15 Nashville Nails Ideas You’ll Love
Nashville nails capture the perfect blend of Southern charm and modern sophistication that defines Music City’s unique aesthetic. These designs work beautifully whether you’re exploring Broadway, attending a rooftop concert, or simply want nails that reflect Nashville’s vibrant, creative energy.
From country-inspired neutrals to bold statement shades, these looks are not only stunning but also achievable at home with the right techniques and products.
This comprehensive guide will walk you through exactly how to recreate each design in your own space, making professional-quality Nashville nails ideas accessible to everyone.
Why These Designs Represent Nashville’s Soul
Nashville isn’t just a city—it’s a feeling, a lifestyle, and a cultural melting pot where cowboy boots meet Louboutins on the same sidewalk. The nail designs in this collection reflect the city’s unique character: warm metallics echo the golden glow of neon signs on Lower Broadway, earthy browns pay homage to Tennessee whiskey barrels aging in nearby distilleries, and strategic rhinestone placement mirrors the iconic rhinestone-studded Nudie suits worn by country music legends at the Grand Ole Opry.
Each design tells a story about Nashville’s evolution from its country music roots to its current status as a cosmopolitan destination. You’ll notice warm undertones dominate this collection—that’s no accident. Nashville’s aesthetic leans warm and welcoming, never cold or austere.
The designs balance practical wearability with special-occasion glamour because that’s exactly how Nashvillians live: ready for a spontaneous night at the honky-tonks while still looking polished enough for Monday morning meetings.
These aren’t just pretty nails—they’re wearable expressions of Nashville’s spirit: authentic, bold when necessary, rooted in tradition yet constantly evolving, and always approachable despite the glamour.
My Top Pick: Whiskey Barrel Brown Matte
Why This Is My Personal Favorite for Nashville
If I could only recommend one design that truly encapsulates Nashville’s essence, it would be Whiskey Barrel Brown Matte (#3). This design isn’t just beautiful—it’s Nashville distilled into a single shade. Here’s why it’s my top pick:
It honors Nashville’s heritage. Tennessee whiskey is as much a part of Nashville’s identity as music itself. Distilleries like Jack Daniel’s, George Dickel, and newer craft operations have been aging whiskey in charred oak barrels for generations. This rich cognac brown with warm caramel undertones is a direct visual reference to those iconic barrels, connecting your nails to centuries of Tennessee tradition.
The matte finish is perfectly on-trend yet timeless. While glossy finishes will always have their place, the matte texture adds that contemporary, editorial quality that resonates with Nashville’s current renaissance as a design-forward city. It’s sophisticated without trying too hard—very Nashville.
It works for absolutely everyone. Whether you’re a Broadway bartender, a Music Row executive, a Vanderbilt student, or a tourist visiting for CMA Fest, this shade flatters all skin tones and works in every setting. It’s the ultimate “I woke up like this” nail color—effortless elegance that looks intentional without being precious about it.
It embodies Southern warmth without stereotypes. This isn’t costume-y or overly literal. It doesn’t scream “Look, I’m wearing Nashville nails!” Instead, it whispers sophistication with a knowing nod to those who understand the cultural reference. It’s insider knowledge rather than tourist attraction.
The versatility is unmatched. I’ve worn this shade to everything from casual coffee shops in East Nashville to upscale dinners at The Catbird Seat. It pairs with denim and cowboy boots as beautifully as it does with cocktail dresses and heels. That versatility mirrors Nashville itself—a city where you can wear whatever makes you feel good without judgment.
When friends ask me what nail color screams “Nashville” without being obvious, this is always my answer. It’s warm, grounded, sophisticated, and distinctly Southern—everything Nashville aspires to be.
15 Stunning Nashville Nail Ideas
1. Honky Tonk Gold Chrome
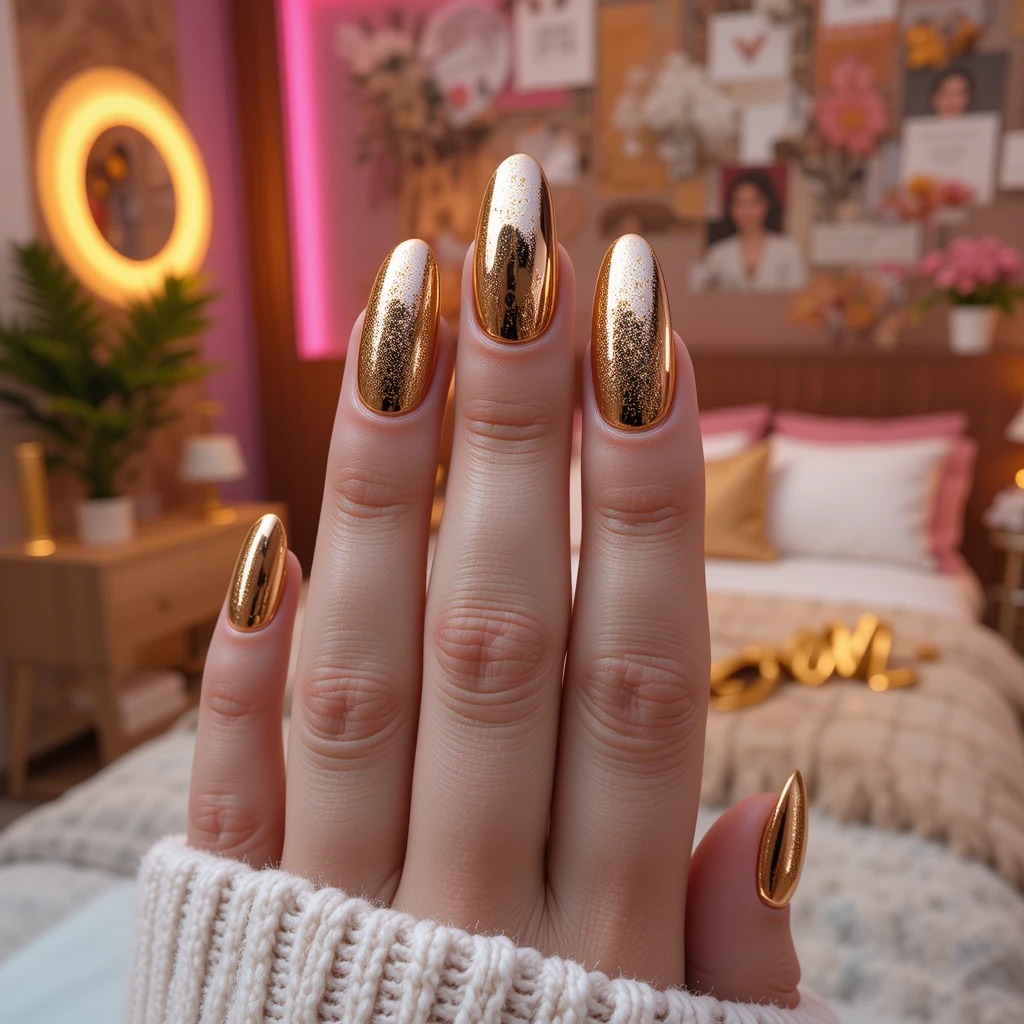
Warm champagne gold with a mirror-like chrome finish that catches light like the neon signs lining Lower Broadway at dusk. This liquid metal look delivers high-impact shine without feeling costume-y, creating an expensive, luxurious effect on your fingertips. The warm gold undertones complement virtually every skin tone while adding instant glamour to even the simplest outfits.
Why It Works: This metallic masterpiece transitions seamlessly from daytime brunch to evening concerts, offering versatility that busy Nashville lifestyles demand while maintaining an elevated, polished appearance that photographs beautifully.
The Nashville Connection: Broadway’s honky-tonks are legendary for their neon-lit facades that glow like beacons drawing music lovers from around the world. Tootsie’s Orchid Lounge, Robert’s Western World, and Legends Corner create a golden corridor of light that defines Nashville’s nightlife.
This chrome finish captures that electric energy—the way light bounces off guitar strings during a live performance, the shimmer of sequined stage costumes, and the unmistakable glow that makes Broadway visible from blocks away. When you wear this design, you’re carrying a piece of that iconic Nashville nightlife energy wherever you go.
How to Get This Look at Home:
Step 1: Prep Your Nails Start with clean, shaped nails and push back cuticles gently. Lightly buff the nail surface to create texture for better chrome adhesion, then wipe with rubbing alcohol to remove all oils.
Step 2: Apply Base Apply a thin layer of base coat and let dry completely. Then apply two thin coats of black gel polish, curing each layer under a UV/LED lamp for 30-60 seconds—black creates the deepest, most reflective chrome effect.
Step 3: Create the Design Once the final color coat is cured, wipe the sticky layer with rubbing alcohol. Using a silicone applicator or your finger, rub chrome powder onto the nail surface in circular motions until you achieve a mirror-like finish with no visible streaks.
Step 4: Seal and Finish Apply a gel top coat specifically designed for chrome (regular top coat can dull the effect), being careful not to drag the brush which can disturb the powder. Cure under the lamp for 60 seconds.
Time needed: 45-60 minutes Difficulty level: Intermediate
Products You’ll Need:
- Base coat: Gelish Foundation Base Coat or any gel base coat
- Black gel polish: OPI Black Onyx GelColor or Beetles Black Gel Polish
- Chrome powder: Makartt Champagne Gold Chrome Powder or Born Pretty Mirror Powder
- Silicone applicator: Dedicated chrome powder applicator or eyeshadow sponge
- Chrome-safe top coat: Modelones No Wipe Top Coat or Kiara Sky No Wipe Top Coat
- UV/LED lamp: 48W or higher for proper curing
Pro Tips & Tricks: Apply chrome powder immediately after wiping the sticky layer for best adhesion, and choose almond or stiletto shapes to elongate fingers and amplify the luxe effect—chrome shows imperfections, so ensure your nail surface is perfectly smooth.
2. Broadway Lights Glitter Ombré
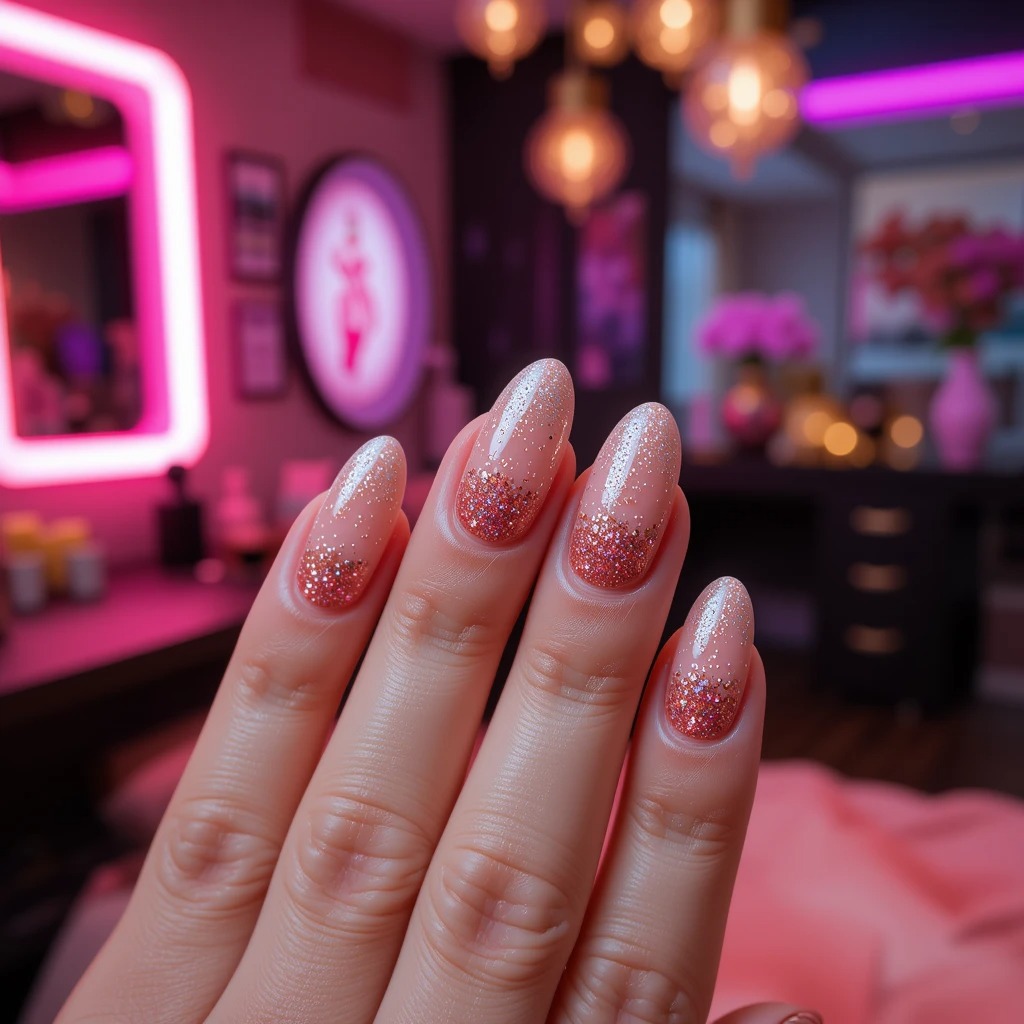
Transition from nude beige at the cuticle to densely packed rose gold glitter at the tips, mimicking the glow of Nashville’s famous Broadway district. This gradient effect creates dimension and visual interest without requiring intricate nail art skills or precision application. The sparkling tips add festive energy while the nude base keeps the look grounded and wearable for everyday activities.
Why It Works: The ombré technique is forgiving on various nail lengths and shapes, while the combination of neutral and sparkle makes this design appropriate for both professional settings and nighttime entertainment.
The Nashville Connection: Walking down Broadway after sunset feels like stepping into a different world—one where every surface sparkles with possibility. The gradient from subtle to spectacular in this design mirrors that exact experience: starting your evening at a quiet dinner in The Gulch before the energy builds as you make your way to Broadway’s electric heart.
The rose gold specifically references Nashville’s feminine side—the city where strong women like Dolly Parton, Loretta Lynn, and Taylor Swift built empires. This isn’t just glitter; it’s the visual representation of Nashville dreams coming to life as the sun sets and the stage lights come up.
How to Get This Look at Home:
Step 1: Prep Your Nails Shape nails to your desired length and push back cuticles. Apply a dehydrator or rubbing alcohol to ensure a clean surface for polish adhesion.
Step 2: Apply Base Apply base coat and let dry, then apply two coats of nude beige polish for an opaque base. Allow each coat to dry for 2-3 minutes between applications.
Step 3: Create the Design Cut a small piece of makeup sponge and apply rose gold glitter polish to the sponge. Starting at the tip, dab the sponge onto the nail, working your way toward the middle, concentrating more glitter at the tips and gradually lightening the application as you move down. Repeat 2-3 times for intensity.
Step 4: Seal and Finish Once completely dry (5-10 minutes), apply two thick coats of glossy top coat to smooth out the glitter texture and create a glass-like finish. Allow to dry thoroughly.
Time needed: 30-40 minutes Difficulty level: Beginner
Products You’ll Need:
- Base coat: Essie First Base or OPI Natural Nail Base Coat
- Nude polish: Essie “Ballet Slippers” or OPI “Bubble Bath”
- Glitter polish: China Glaze “Rose Gold Sparkle” or Essie “Summit of Style”
- Makeup sponge: Cut into small pieces for ombré application
- Top coat: Seche Vite Dry Fast Top Coat (two layers minimum for glitter)
- Cleanup brush: Small angled brush with acetone for edges
Pro Tips & Tricks: Use a makeup sponge to dab glitter polish from mid-nail to tip for a seamless gradient, seal with two layers of glossy top coat to prevent glitter from feeling rough or catching on fabrics, and clean up excess glitter on skin immediately with a brush dipped in acetone.
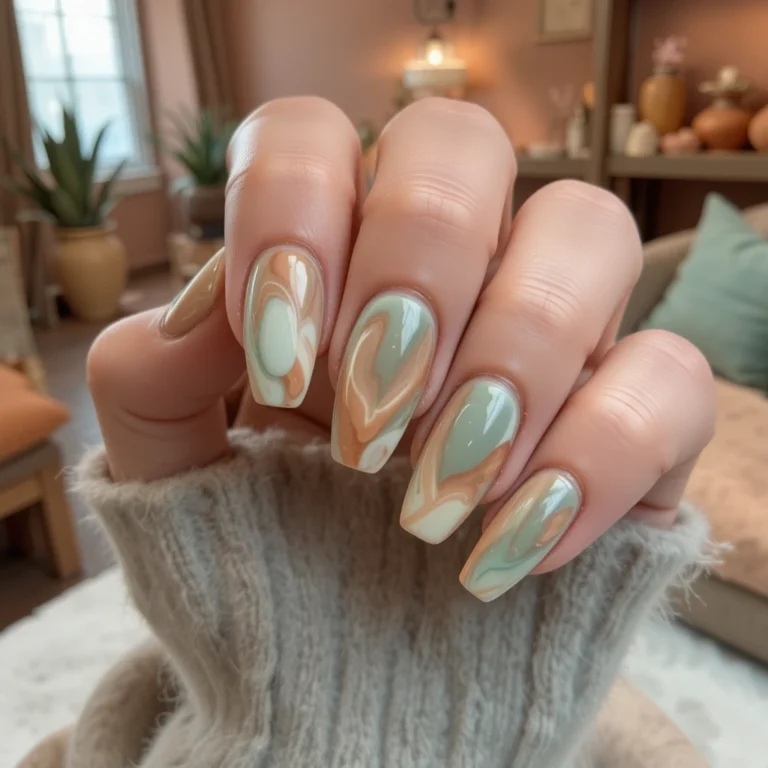
3. Whiskey Barrel Brown Matte
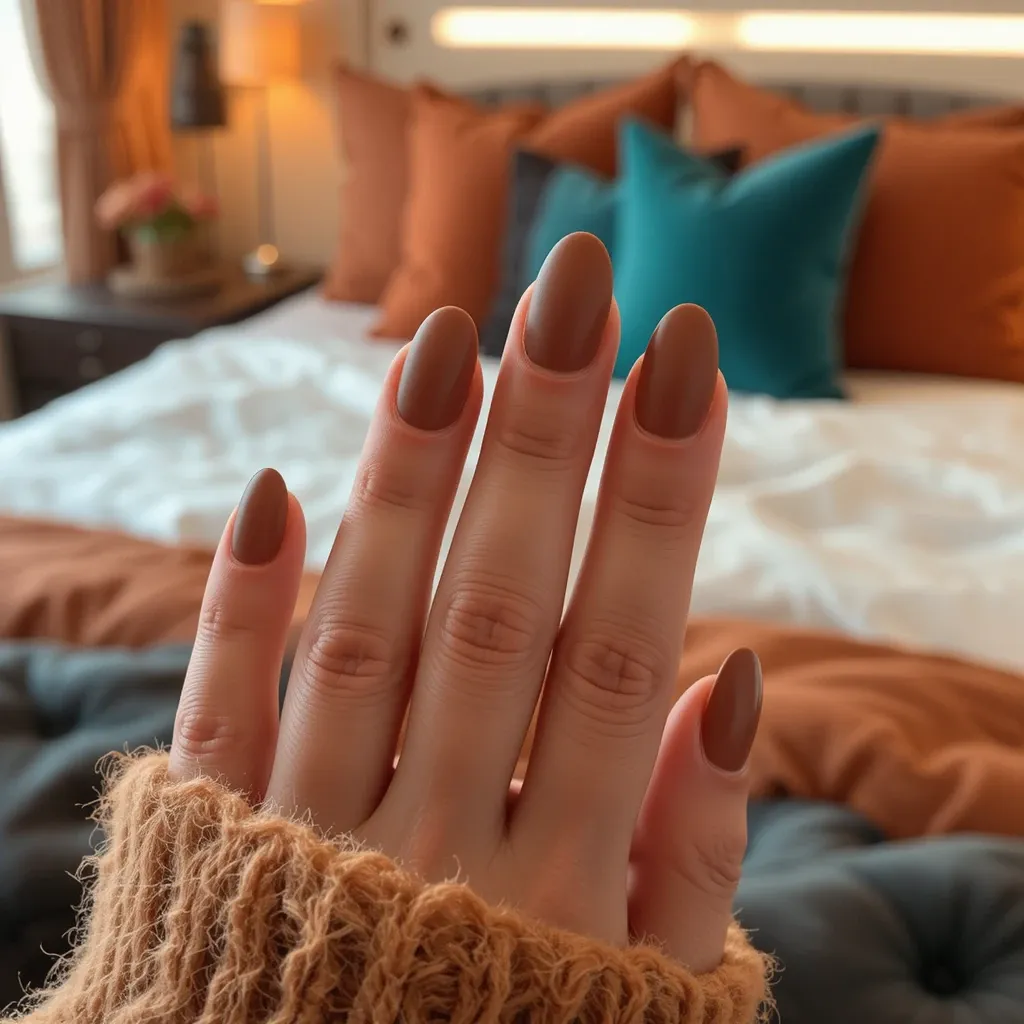
Rich cognac brown with warm caramel undertones and a velvety matte finish that evokes the aged oak barrels of Tennessee whiskey distilleries. This sophisticated earth tone delivers depth and richness without the heaviness of darker chocolates or blacks. The matte texture adds a contemporary, editorial quality that feels both grounded and fashion-forward.
Why It Works: This shade embodies Nashville’s authentic, down-to-earth roots while remaining current and stylish, complementing fall and winter wardrobes while working surprisingly well year-round as a neutral alternative to beige.
The Nashville Connection: Tennessee whiskey isn’t just a drink—it’s a cultural cornerstone that puts Nashville and the surrounding region on the global map. The Lincoln County Process that defines Tennessee whiskey involves charcoal filtering through sugar maple, then aging in new charred oak barrels that give the spirit its distinctive caramel color and smooth finish.
This nail color is a direct homage to those barrels, which line the rick houses of distilleries throughout Middle Tennessee. But it goes deeper: this warm brown represents Nashville’s unpretentious sophistication. Unlike cities that flaunt wealth and status, Nashville values authenticity—being real, being grounded, being accessible. This shade doesn’t shout for attention; it earns respect through understated elegance. It’s the nail equivalent of a well-worn leather jacket or perfectly broken-in cowboy boots—classic, comfortable, and undeniably cool.
The matte finish adds that modern Nashville edge, referencing the city’s design-forward restaurants, boutiques, and art galleries that have transformed neighborhoods like East Nashville and Germantown into cultural destinations.
How to Get This Look at Home:
Step 1: Prep Your Nails Ensure nails are clean, shaped, and buffed smooth. Push back cuticles and wipe nails with rubbing alcohol to remove any oils that could cause the matte finish to appear streaky.
Step 2: Apply Base Apply a thin base coat and allow to dry completely. The smoother your base, the better your matte finish will look.
Step 3: Create the Design Apply two to three thin coats of cognac brown cream polish, allowing each coat to dry for 3-4 minutes. Thin coats prevent bubbling and ensure an even color that looks flawless under matte top coat.
Step 4: Seal and Finish Once color is completely dry (10 minutes minimum), apply one even coat of matte top coat, being careful not to over-brush which can create streaks. Let cure fully for smooth, velvety texture.
Time needed: 25-35 minutes Difficulty level: Beginner
Products You’ll Need:
- Base coat: OPI Natural Nail Base Coat
- Brown polish: Essie “Hot Coco” or OPI “Going My Way or Norway?”
- Matte top coat: Essie Matte About You or OPI Matte Top Coat
- Cuticle oil: Apply 24 hours after application to maintain nail health
- Cleanup brush: For perfect edges
Pro Tips & Tricks: Apply matte top coat over fully cured color for the smoothest finish, choose short to medium squoval nails to showcase this shade’s sophisticated simplicity, and avoid touching nails for at least 30 minutes after matte top coat as it shows fingerprints easily when wet.
4. Music City Skyline Accent

Soft gray base with one accent nail per hand featuring a delicate black line drawing of Nashville’s iconic skyline including the AT&T Building. The neutral gray base provides a modern, urban foundation while the skyline art adds personalized Nashville pride without being overly literal. The minimalist line work keeps the design clean and sophisticated rather than touristy or cartoonish.
Why It Works: This design celebrates your love for Nashville in a subtle, tasteful way that sparks conversation without screaming “tourist,” making it perfect for locals and visitors alike who want meaningful nail art.
The Nashville Connection: Nashville’s skyline has transformed dramatically over the past decade, with the AT&T Building (affectionately called the “Batman Building” by locals due to its distinctive twin spires) remaining the most recognizable landmark.
This Art Deco-inspired structure has defined Nashville’s skyline since 1994 and appears in countless Instagram posts, postcards, and “I ♥ Nashville” merchandise. But including it on your nails isn’t about being touristy—it’s about acknowledging how Nashville has grown from a mid-sized Southern city into a major metropolitan area while maintaining its distinct personality.
The minimalist line art approach mirrors Nashville’s design aesthetic: clean, intentional, and unpretentious. It’s the same aesthetic you’ll find in trendy East Nashville coffee shops, modern boutique hotels in The Gulch, and the contemporary art galleries popping up throughout the city. This design says “I know Nashville”—not just as a visitor passing through, but as someone who appreciates the city’s visual identity.
How to Get This Look at Home:
Step 1: Prep Your Nails Clean and shape nails, then apply dehydrator or rubbing alcohol. Having smooth nail beds is especially important for detailed line art.
Step 2: Apply Base Apply base coat, then two coats of soft gray polish to all nails. Allow to dry completely—at least 10 minutes—before attempting any nail art.
Step 3: Create the Design On your ring finger, use a fine detail brush or nail art pen to draw simple building outlines representing Nashville’s skyline. Start with the tallest building (AT&T Building) in the center, then add smaller buildings on either side. Keep lines thin and deliberate—simplicity is key. Let dry for 5 minutes.
Step 4: Seal and Finish Apply matte top coat to all nails except the accent nail. On the accent nail, apply glossy top coat to make the skyline art pop and create dimensional contrast.
Time needed: 40-50 minutes Difficulty level: Intermediate to Advanced
Products You’ll Need:
- Base coat: Any quality base coat
- Gray polish: Essie “Chinchilly” or OPI “Cement the Deal”
- Black detail polish: Essie “Licorice” with thin brush or Ciate London Wonderpen in Black
- Fine detail brush: Size 00 or 0 liner brush for precise lines
- Matte top coat: For base nails
- Glossy top coat: For accent nail
- Practice paper: To sketch skyline before applying to nails
Pro Tips & Tricks: Use a fine detail brush or nail art pen for crisp skyline lines, practice the design on paper first to build confidence, place the design on your ring finger for balance, and seal the accent with glossy top coat to add dimension while the base stays matte.
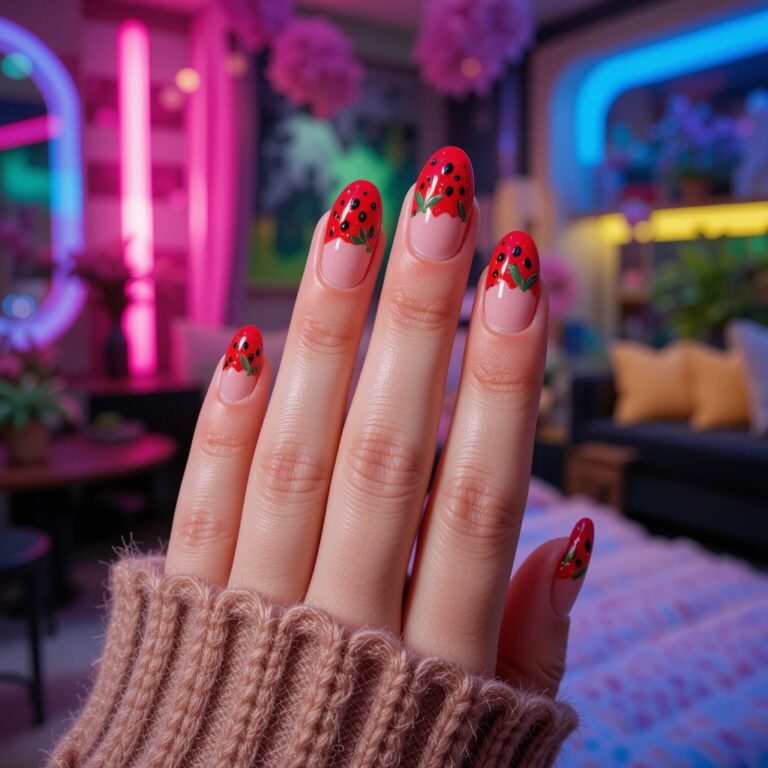
5. Hot Chicken Red Cream
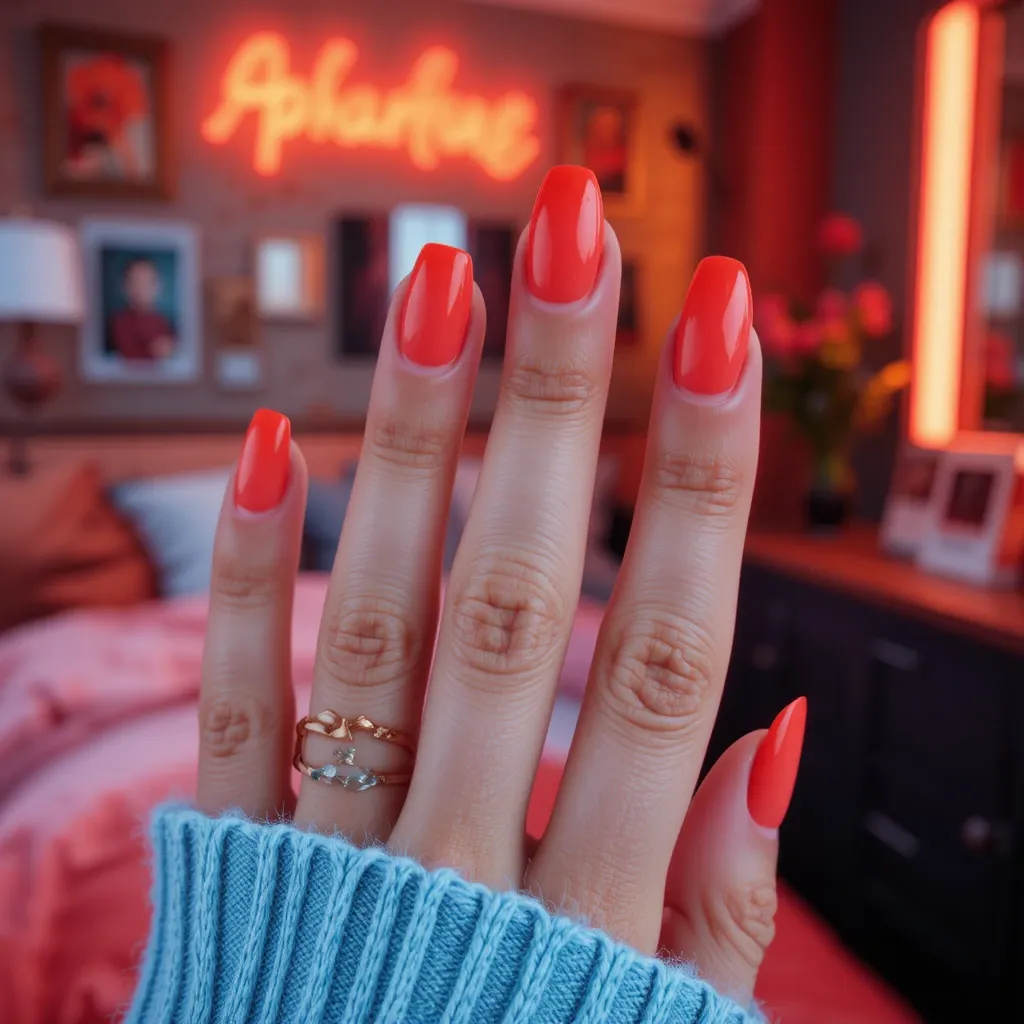
Vibrant red-orange with warm coral undertones and a creamy, opaque finish that channels the bold, spicy energy of Nashville’s legendary hot chicken. This fiery shade leans warm rather than cool, creating a universally flattering pop of color that energizes any look. The cream finish provides full coverage in two coats while maintaining a polished, salon-quality appearance.
Why It Works: This statement shade embodies Nashville’s fearless, fun-loving spirit and instantly elevates casual outfits, proving that Southern style isn’t always about playing it safe with neutrals.
The Nashville Connection: Nashville hot chicken is more than just a local dish—it’s a cultural phenomenon that’s spread nationwide, with Prince’s Hot Chicken Shack and Hattie B’s becoming pilgrimage destinations for food lovers. The story goes that hot chicken was created as an act of revenge (a woman tried to punish her cheating man by making his chicken unbearably spicy, but he loved it), which perfectly captures Nashville’s blend of Southern drama, humor, and unexpected outcomes.
The bright red-orange hue of cayenne-coated chicken is instantly recognizable and distinctly Nashville. But this color represents more than food—it embodies the city’s willingness to be bold, to take risks, to stand out. Nashville isn’t trying to be New York or Los Angeles; it’s confidently its own thing, spicy and unapologetic.
Wearing this shade is a statement: you’re not afraid to be noticed, you appreciate Nashville’s unique flavors (literal and metaphorical), and you understand that sometimes the best things come with a little heat.
How to Get This Look at Home:
Step 1: Prep Your Nails Clean, shape, and push back cuticles. Buff away any ridges for the smoothest cream finish, then wipe with alcohol.
Step 2: Apply Base Apply a thin layer of base coat to prevent staining—red-orange shades can stain natural nails. Let dry completely.
Step 3: Create the Design Apply three thin coats of red-orange cream polish rather than two thick coats. Thin applications prevent bubbling, streaking, and extended drying time. Allow 3-4 minutes between each coat for proper drying.
Step 4: Seal and Finish Finish with a glossy top coat, making sure to cap the free edges. This vibrant color benefits from top coat reapplication every 2-3 days to maintain shine.
Time needed: 25-30 minutes Difficulty level: Beginner
Products You’ll Need:
- Base coat: CND Stickey Base Coat or Orly Bonder
- Red-orange polish: Essie “Meet Me at Sunset” or OPI “Living on the Bula-vard”
- Top coat: Seche Vite or Sally Hansen Insta-Dri
- Cuticle oil: For post-application hydration
- Nail polish remover: Acetone-free for cleanup
- Cleanup brush: For perfect edges
Pro Tips & Tricks: Apply thin, even coats to prevent bubbling and maintain vibrancy, pair with shorter round or squoval nails for a retro-chic vibe that feels both classic and contemporary, and use a white base coat underneath if you want maximum color intensity in fewer coats.
6. Country Star White Tips

Classic French manicure reimagined with crisp white tips and tiny gold star decals placed randomly across the nail bed. This fresh take on the traditional French combines timeless elegance with playful Nashville personality through strategic star placement. The white tips stay clean and professional while the gold stars add just enough sparkle to reference Music City’s celebrity culture.
Why It Works: This design bridges the gap between conservative workplace requirements and personal style expression, making it ideal for professionals who want personality without sacrificing polish.
The Nashville Connection: Nashville’s nickname “Music City” comes with an asterisk—it’s also known as the place where stars are born. From the Grand Ole Opry stage to modern recording studios on Music Row, Nashville has launched countless careers and created legends. The gold stars in this design represent that star-making magic, the dreams that bring thousands of hopeful musicians to Nashville every year.
But they’re placed randomly and sparingly because Nashville’s relationship with fame is complicated and grounded. Success here isn’t just about being famous—it’s about respect from your peers, quality craftsmanship, and longevity.
The white French tips represent the classic, timeless foundation of Nashville’s music industry (think the Ryman Auditorium’s historic stage), while the gold stars add just enough contemporary sparkle to acknowledge today’s pop-country crossover stars. It’s tradition meeting innovation—very Nashville.
How to Get This Look at Home:
Step 1: Prep Your Nails Shape nails into a squoval or oval shape for the most flattering French tip appearance. Push back cuticles and buff the surface lightly.
Step 2: Apply Base Apply base coat, then two coats of sheer pink or nude polish for a natural nail bed color. Allow to dry for 5-7 minutes.
Step 3: Create the Design Using French tip guides or steady hands, paint white polish on the tips only. For crisp lines, use a flat brush and wipe excess on one side, then paint from one corner to the center, repeat from the other corner. Place 2-3 tiny gold star decals randomly on each nail while polish is still slightly tacky, or wait until dry and apply with top coat.
Step 4: Seal and Finish Apply gel top coat over entire nail, pressing down gently on star decals to ensure they’re fully embedded and won’t lift.
Time needed: 35-45 minutes Difficulty level: Intermediate
Products You’ll Need:
- Base coat: OPI Natural Nail Base Coat
- Sheer pink polish: OPI “Bubble Bath” or Essie “Ballet Slippers”
- White polish: OPI “Alpine Snow” or Essie “Blanc”
- Gold star decals: Born Pretty or Winstonia nail art stars
- French tip guides: Optional for cleaner lines
- Gel top coat: For secure star placement
- Small tweezers: For precise star placement
Pro Tips & Tricks: Place 2-3 stars per nail in asymmetric patterns for a modern, intentional look, use gel top coat to ensure stars stay secure for the entire wear period, and if you’re nervous about freehand tips, use French tip guides or reinforcement stickers for perfectly straight lines.
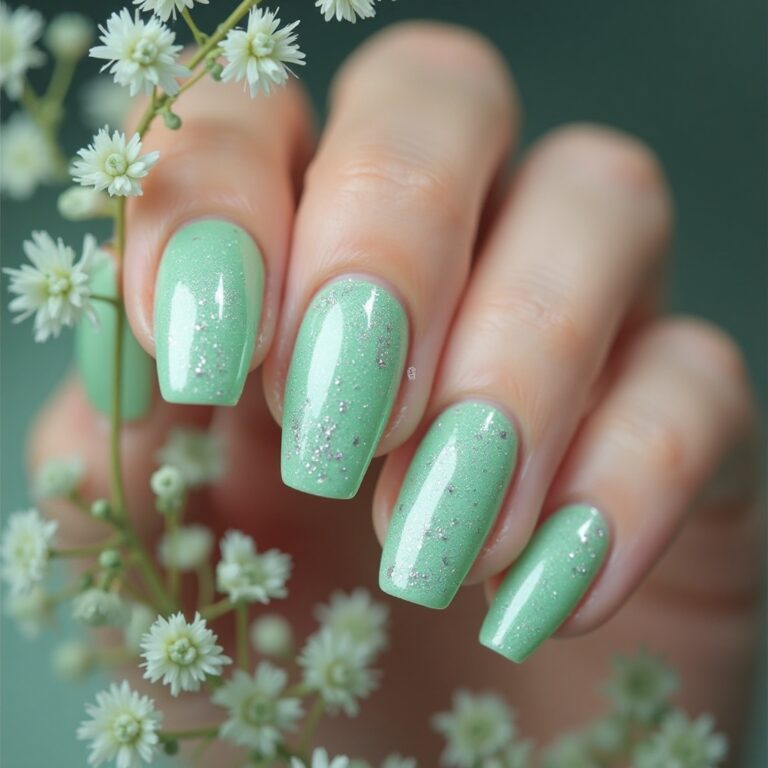
7. Bluebird Café Blue Cream

Soft dusty blue with subtle gray undertones and a smooth cream finish that captures the intimate, artistic atmosphere of Nashville’s legendary songwriter venue. This muted shade reads as sophisticated and calming without feeling cold or sterile like brighter blues. The gray notes add complexity that prevents this color from appearing juvenile or overly sweet.
Why It Works: This versatile shade works across all seasons and occasions, offering a refreshing alternative to standard neutrals while remaining professional enough for any environment.
The Nashville Connection: The Bluebird Café isn’t just a venue—it’s a Nashville institution where songwriters perform “in the round,” sharing the stories behind their hits in an intimate 90-seat room. This unassuming spot in a strip mall has hosted Taylor Swift, Garth Brooks, and countless others before they became household names.
The venue’s importance to Nashville’s music community cannot be overstated; it represents the songwriter craft that’s the true heart of Music City. The soft dusty blue of this design captures the Bluebird’s cozy, introspective atmosphere—the dimmed lights during performances, the hushed reverence of audiences listening to acoustic guitars and raw vocals, the creative magic that happens when talented people share vulnerable stories through song.
This isn’t the flashy side of Nashville; it’s the soul. Wearing this color shows you understand that Nashville’s real power isn’t in the neon lights of Broadway but in quiet rooms where words and melodies combine into something transcendent.
How to Get This Look at Home:
Step 1: Prep Your Nails Clean nails thoroughly and shape to your preference. Ensure cuticles are pushed back for a neat, professional appearance.
Step 2: Apply Base Apply a ridge-filling base coat if needed, or standard base coat for smooth nails. Let dry completely.
Step 3: Create the Design Apply three thin coats of dusty blue cream polish for full opacity. This shade can appear streaky if coats are too thick, so patience is key. Allow 3 minutes between coats.
Step 4: Seal and Finish Apply glossy top coat to enhance the color’s depth and add shine. Cap the free edges to prevent chipping.
Time needed: 25-30 minutes Difficulty level: Beginner
Products You’ll Need:
- Base coat: Essie Here to Stay Base Coat
- Dusty blue polish: Essie “Pret-a-Surfer” or OPI “Reach for the Sky”
- Top coat: OPI Top Coat or Essie Gel Couture Top Coat
- Nail file: For shaping
- Cuticle pusher: For neat application
Pro Tips & Tricks: Apply three thin coats for full opacity and pair with oval or almond nail shapes to create an elegant, elongated silhouette that showcases this color’s subtle sophistication—avoid thick coats as this shade shows streaking easily.
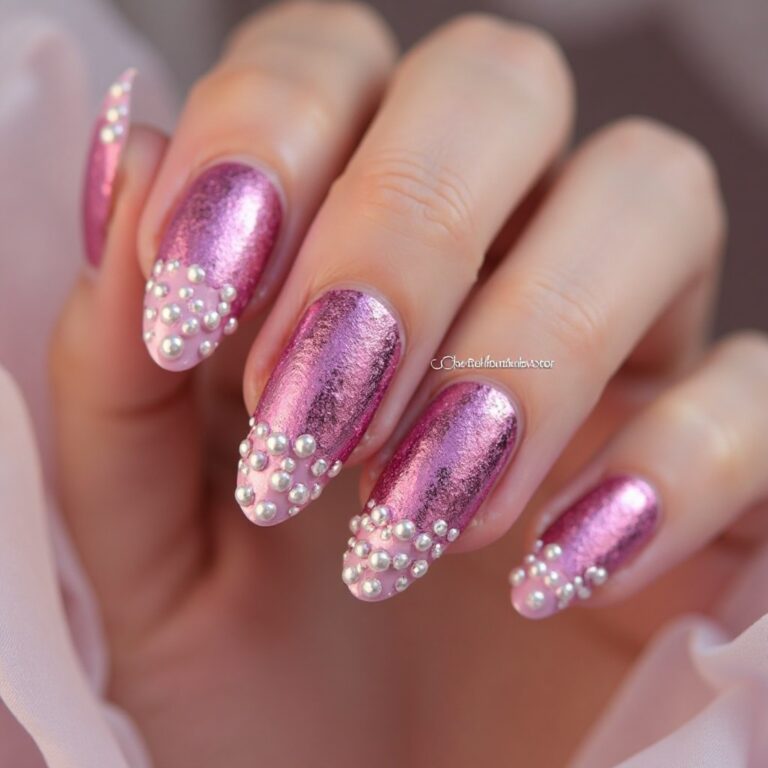
8. Rhinestone Cowgirl Glam
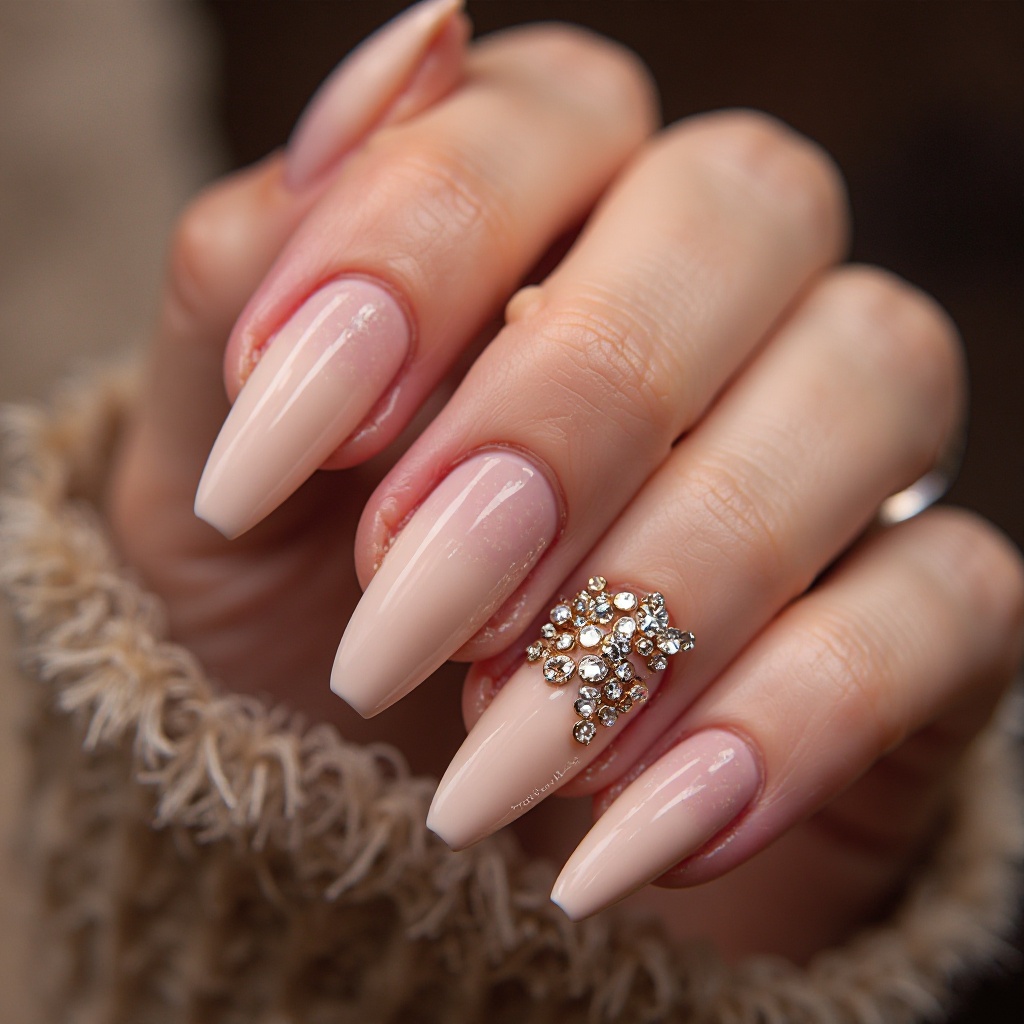
Nude pink base with a strategic rhinestone design featuring clear and gold crystals arranged in a delicate curved pattern on the ring finger only. The neutral base maintains wearability while the embellished accent nail delivers statement-making glamour worthy of Nashville’s rhinestone-studded country fashion heritage. The mixed crystal colors add dimension and catch light beautifully from every angle.
Why It Works: This look satisfies the desire for sparkle and special occasion glamour while keeping the overall design grounded enough for extended wear beyond just event nights.
The Nashville Connection: Rhinestones and country music have been inseparable since Nudie Cohn started creating his legendary rhinestone-covered suits for country stars in the 1950s. Porter Wagoner, Dolly Parton, Hank Williams, and Elvis Presley all wore Nudie suits that became as iconic as their music.
These weren’t subtle—they were elaborate, bedazzled works of art featuring thousands of rhinestones creating intricate Western scenes, musical instruments, and personal symbols. The suits represented the intersection of working-class roots and show business glamour that defines country music’s aesthetic. Nashville still honors this tradition; you’ll see rhinestones everywhere from Broadway honky-tonk performers to the Country Music Hall of Fame exhibits.
This nail design pays homage to that heritage without going full costume. The single embellished accent nail with mixed crystal colors captures the sparkle and craftsmanship of those legendary suits while keeping the look modern and wearable. It’s Nashville glamour with restraint—sparkle with purpose.
How to Get This Look at Home:
Step 1: Prep Your Nails Shape, buff, and clean nails thoroughly. Rhinestones require a very smooth surface for proper adhesion.
Step 2: Apply Base Apply base coat and two coats of nude pink polish to all nails. Allow to dry completely—at least 10 minutes—before adding rhinestones.
Step 3: Create the Design On your ring finger only, apply a small dot of clear gel polish or nail glue where you want each rhinestone. Using tweezers or a dotting tool, place rhinestones in a curved pattern from one corner to the opposite corner. Alternate between clear and gold stones for visual interest.
Step 4: Seal and Finish Apply thick gel top coat over all nails, being especially generous around rhinestones to encapsulate them fully. Cure under UV/LED lamp if using gel, or allow 10 minutes to dry if using regular polish.
Time needed: 45-60 minutes Difficulty level: Intermediate to Advanced
Products You’ll Need:
- Base coat: Any quality base coat
- Nude pink polish: Essie “Topless & Barefoot” or OPI “Samoan Sand”
- Rhinestones: Mixed size pack with clear and gold stones
- Nail glue or gel: For rhinestone adhesion
- Tweezers or dotting tool: For precise placement
- Gel top coat: Beetles Gel Top Coat or Modelones No Wipe Top Coat
- UV/LED lamp: If using gel products
Pro Tips & Tricks: Apply rhinestones to tacky gel base coat before curing for the strongest hold, use graduated sizes from large at the center to small at the edges for professional-looking dimension, and always encapsulate rhinestones fully in thick top coat to prevent snagging on clothing.
9. Smoky Quartz Gray
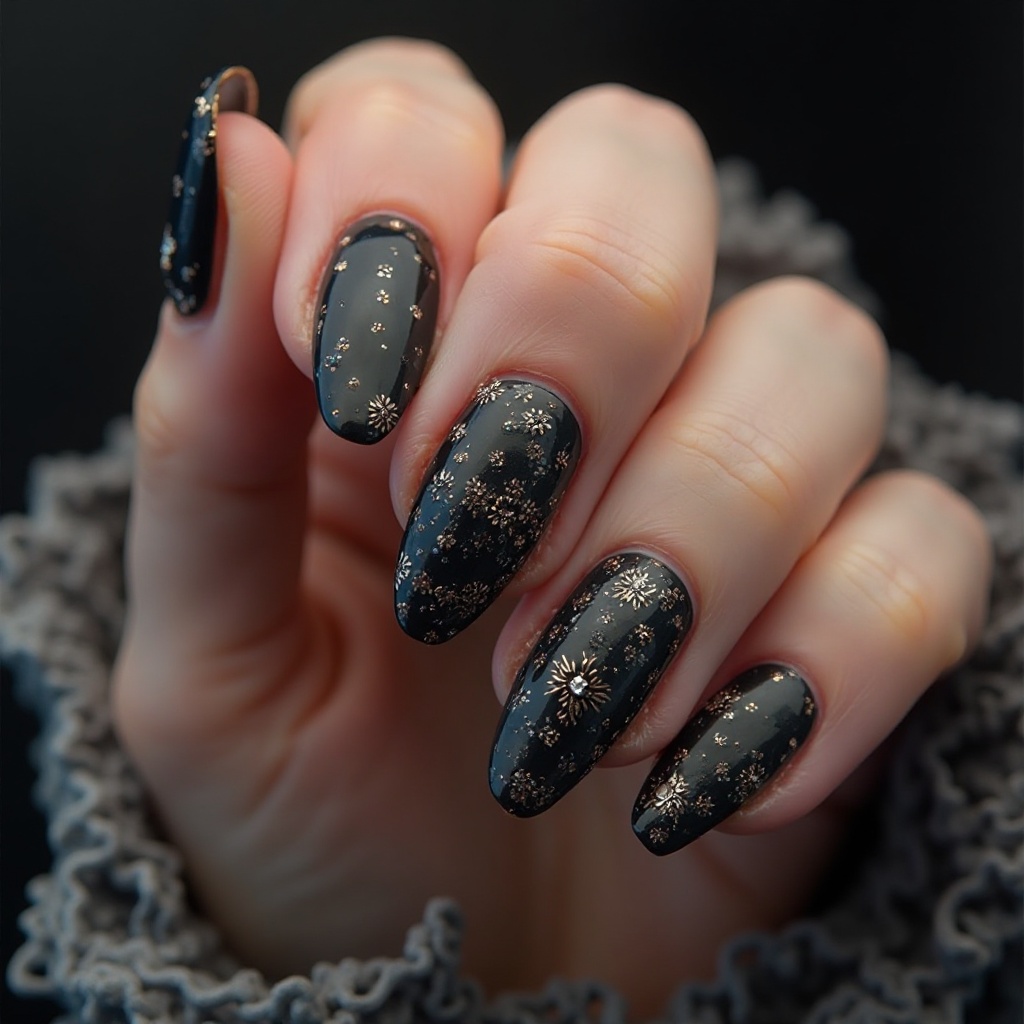
Deep charcoal gray with subtle brown undertones and a glossy finish that mimics the sophisticated, moody aesthetic of Nashville’s upscale rooftop bars. This near-black shade offers dramatic impact without the harshness of true black, creating depth that feels intentional and refined. The brown undertones warm up the gray, preventing it from reading as cold or severe against skin.
Why It Works: This color makes a bold statement while remaining surprisingly versatile, pairing beautifully with both casual denim and elegant evening wear for Nashville’s diverse social scene.
The Nashville Connection: Nashville’s rooftop bar scene has exploded in recent years, with venues like L.A. Jackson, ACME Feed & Seed’s rooftop, and The Bobby Hotel’s Rooftop Lounge offering sophisticated spaces where Nashville’s skyline becomes the backdrop for craft cocktails and sunset views.
These aren’t dive bars or honky-tonks—they represent Nashville’s evolution into a cosmopolitan destination that attracts young professionals, creatives, and tourists seeking upscale experiences. The smoky gray color captures that elevated atmosphere: the twilight sky as the sun sets over the Cumberland River, the moody sophistication of dimmed lighting and modern design, the urban chic that defines Nashville’s newer neighborhoods.
It’s Nashville after dark, dressed up and ready for anything. This shade acknowledges that Nashville is more than country music and barbecue—it’s also craft cocktails, contemporary architecture, and cosmopolitan style. It’s where you wear leather jackets instead of sequins, where cool beats cute, where sophisticated edge trumps sweet charm.
How to Get This Look at Home:
Step 1: Prep Your Nails Ensure nails are shaped smoothly and surface is buffed to remove any ridges—dark colors show every imperfection.
Step 2: Apply Base Use a ridge-filling base coat for the smoothest possible surface. Dark colors require flawless application to look professional.
Step 3: Create the Design Apply two to three thin coats of charcoal gray polish, allowing 3-4 minutes between coats. Thin applications prevent the polish from looking muddy or streaky.
Step 4: Seal and Finish Apply glossy top coat to create a mirror-like shine that enhances the color’s depth and sophistication.
Time needed: 30-35 minutes Difficulty level: Beginner
Products You’ll Need:
- Base coat: Orly Rubberized Bonder Base Coat
- Charcoal gray polish: Essie “Serene Slate” or OPI “Dark Side of the Mood”
- Top coat: Sally Hansen Miracle Gel Top Coat for ultra-gloss
- Lint-free wipes: Dark polish shows dust and lint
- Fast-dry drops: Optional for quicker finishing
Pro Tips & Tricks: Apply over a ridge-filling base coat to ensure a perfectly smooth, glossy surface, choose shorter lengths to prevent this dark shade from overwhelming smaller hands, and use a light hand with your brush as dark colors can appear streaky if applied too heavily.
10. Peach Sweet Tea Shimmer
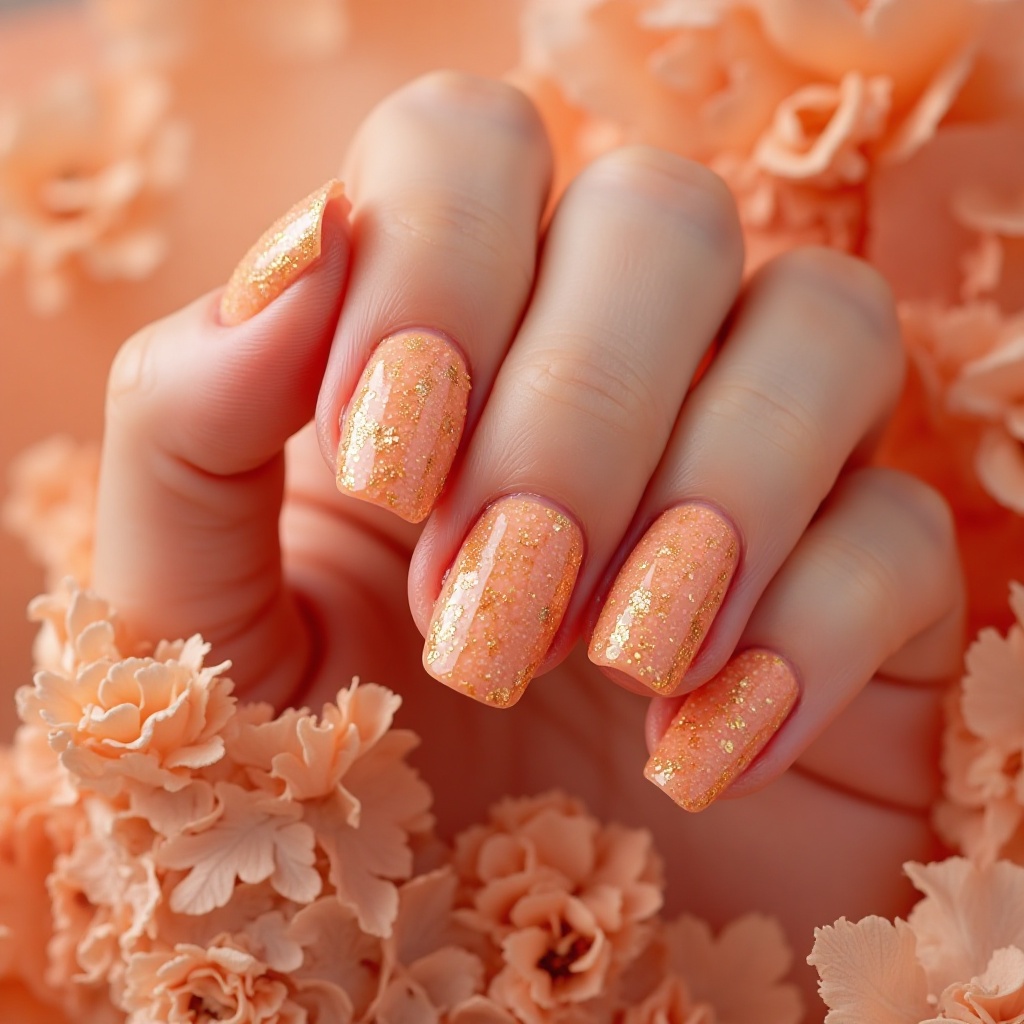
Soft peach with golden shimmer particles and a luminous finish that evokes the warm, welcoming essence of Southern sweet tea on a summer afternoon. This gentle shade offers just enough color to avoid looking bare while the shimmer adds subtle dimension and interest. The peachy-gold tone flatters all skin tones by enhancing natural warmth without appearing orange or artificial.
Why It Works: This understated beauty works for absolutely any occasion from job interviews to weddings, offering foolproof elegance that never feels boring thanks to the shimmering finish.
The Nashville Connection: Sweet tea isn’t just a beverage in the South—it’s a symbol of hospitality, comfort, and home. In Nashville, offering someone sweet tea is an act of welcome, whether you’re at a family gathering, a church potluck, or a front porch conversation.
The peachy-golden hue of this polish captures that warm, sun-drenched feeling of Southern summers—sitting on a porch swing with condensation dripping down a glass of sweet tea, the golden hour light filtering through trees, the unhurried pace of life that still exists beneath Nashville’s rapid growth.
This color represents Nashville’s Southern hospitality roots, the warmth and genuineness that makes visitors feel at home, the sweet kindness that coexists with the city’s ambition and growth. It’s not flashy or demanding; it’s simply lovely, like a smile from a stranger or an unsolicited “bless your heart.” It’s the Nashville that welcomes you before you even realize you’ve arrived.
How to Get This Look at Home:
Step 1: Prep Your Nails Shape nails and push back cuticles for a clean canvas. Wipe with alcohol to remove oils.
Step 2: Apply Base Apply base coat to prevent any shimmer migration and create smooth application surface.
Step 3: Create the Design Apply two coats for sheer, natural coverage or three coats for more opaque color. The shimmer means you don’t need perfect opacity—the light-reflecting particles disguise minor streaking.
Step 4: Seal and Finish Apply glossy top coat to amplify shimmer and create luminous glow. The top coat makes shimmer particles pop beautifully.
Time needed: 20-25 minutes Difficulty level: Beginner
Products You’ll Need:
- Base coat: Sally Hansen Double Duty Base Coat
- Peach shimmer polish: Essie “A Crewed Interest” or OPI “Crawfishin’ for a Compliment”
- Top coat: Essie Good to Go or CND Super Shiney
- Nail file: For shaping
- Cuticle oil: For finishing touch
Pro Tips & Tricks: Apply two coats for sheer coverage or three for more opaque color, pair with round or squoval shapes for a soft, feminine aesthetic that complements the delicate shade, and apply in natural light to see the true shimmer effect.
11. Guitar String Silver Accent
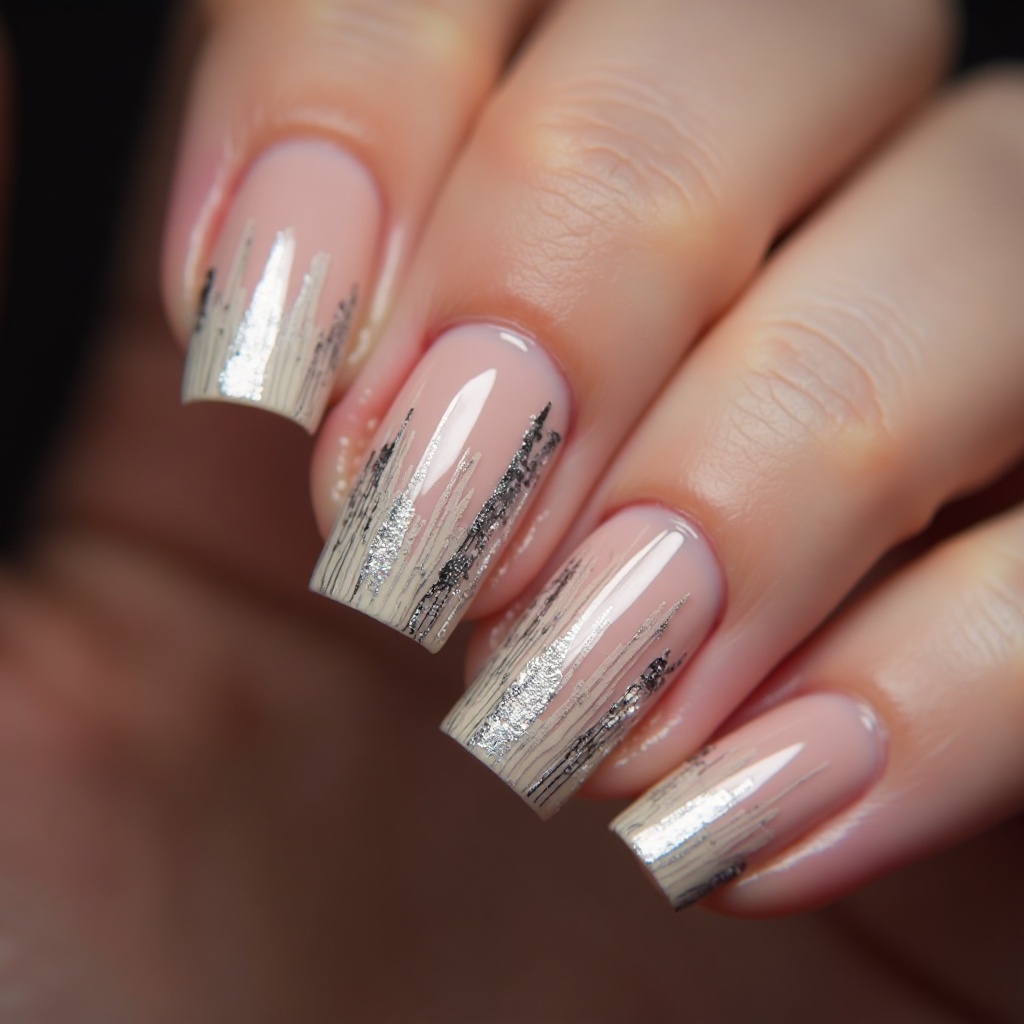
Clear or nude base with one accent nail featuring thin silver striping tape arranged to mimic guitar strings against the nail. This minimalist design celebrates Nashville’s musical heritage through subtle, artistic expression rather than literal imagery. The metallic stripes add linear interest and modern edge while the clear base keeps the overall look clean and sophisticated.
Why It Works: This creative design appeals to music lovers and minimalist enthusiasts alike, offering personalized style that sparks conversation without overwhelming your overall aesthetic.
The Nashville Connection: The guitar is Nashville’s most essential instrument, the tool through which countless songs have been written, performed, and recorded. Music Row is lined with recording studios where guitar strings have vibrated to create some of music’s most memorable moments.
But this design isn’t about playing guitar—it’s about appreciating the craft, the artistry, the technical precision that goes into making music. The thin silver lines represent the strings themselves: delicate individually but powerful together, creating harmony and melody through precise placement and tension.
This design is for people who understand that Nashville’s music isn’t just about the stars on stage—it’s about the session musicians, the songwriters, the studio techs, the instrument makers, and all the talented people whose names you might not know but whose work makes the magic possible. It’s minimalist because it doesn’t need to shout; the reference is clear to anyone who gets it. It’s insider knowledge presented with artistic restraint.
How to Get This Look at Home:
Step 1: Prep Your Nails Clean and shape nails, ensuring edges are smooth. Push back cuticles for neat tape placement.
Step 2: Apply Base Apply base coat, then two coats of clear polish or nude color to all nails. Let dry completely for 10 minutes minimum.
Step 3: Create the Design On one accent nail per hand (ring finger recommended), cut 4-5 pieces of silver striping tape to fit vertically across the nail. Space them evenly to mimic guitar strings. Press down firmly with tweezers or an orange stick for secure adhesion.
Step 4: Seal and Finish Apply gel top coat carefully over the tape, pressing gently to ensure full coverage and adhesion. Cure under lamp if using gel, or apply thick regular top coat and allow 10 minutes to dry.
Time needed: 30-40 minutes Difficulty level: Intermediate
Products You’ll Need:
- Base coat: Any clear base coat
- Clear or nude polish: Essie “Blanc” or OPI “Bubble Bath”
- Silver striping tape: Born Pretty or Winstonia nail striping tape
- Gel top coat: For best tape adhesion
- Tweezers: For precise tape placement
- Small scissors: For cutting tape to size
- Orange stick: For pressing down tape
Pro Tips & Tricks: Apply striping tape to fully dried polish, seal with thick gel top coat to prevent lifting, choose the middle or ring finger for accent placement to maintain visual balance, and press tape firmly with an orange stick before sealing for longest wear.
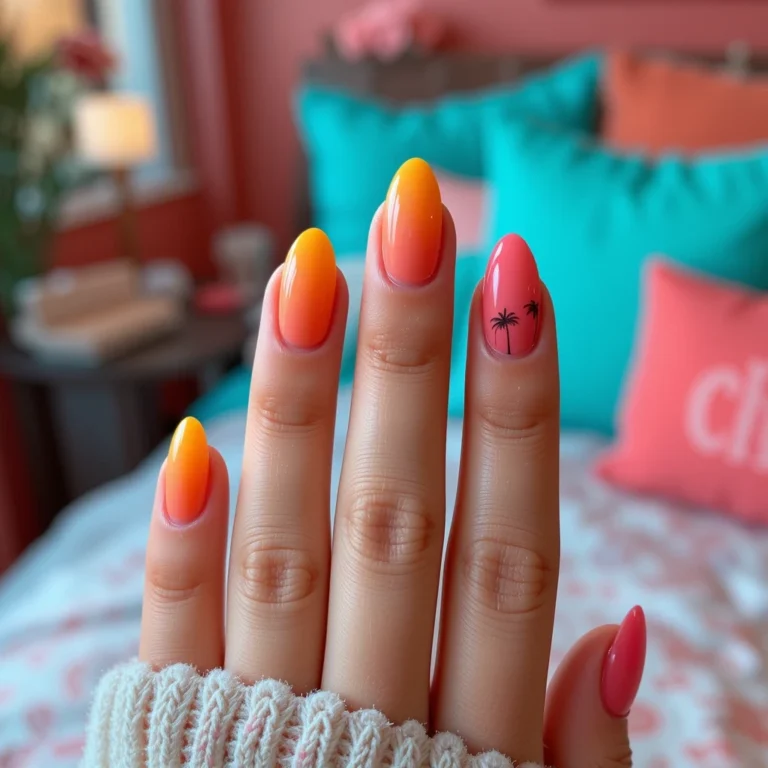
12. Tennessee Sunset Ombré
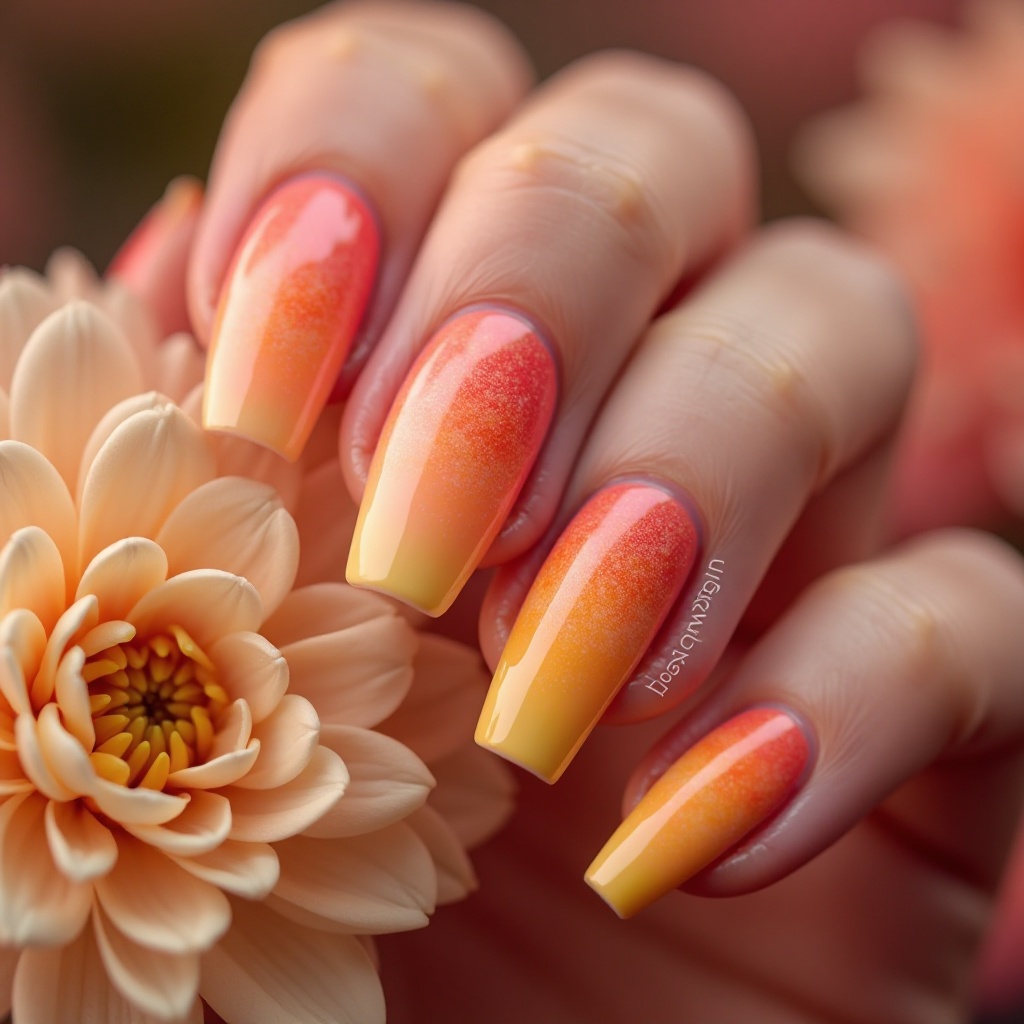
Gradient design transitioning from warm coral at the cuticle through peachy-pink to soft yellow at the tips, capturing the stunning color palette of Tennessee sunsets. This multi-tonal ombré creates a dreamy, romantic effect that feels artistic and intentional rather than trendy or temporary. The warm color family ensures the transition feels cohesive and natural rather than jarring or disconnected.
Why It Works: This eye-catching design brings joy and warmth to every hand gesture while remaining soft enough to complement rather than clash with your wardrobe choices.
The Nashville Connection: Tennessee sunsets are legendary, whether you’re watching from the pedestrian bridge over the Cumberland River, a rooftop bar in The Gulch, or a hillside outside the city. The sky transforms into layers of warm color—coral deepening to peach, bleeding into golden yellow, all reflected in the river’s surface.
These sunsets mark the transition from day to night in Nashville, that magic hour when the city shifts energy: when workers become concert-goers, when restaurants fill with diners, when stages prepare for evening performances. The gradient itself represents Nashville’s layers—it’s not one thing but many, blending together into something beautiful.
It’s country and rock, traditional and progressive, Southern and cosmopolitan, all existing simultaneously. This design captures that complexity in color, that sense of transition and transformation that defines both Nashville’s daily rhythm and its ongoing evolution as a city.
How to Get This Look at Home:
Step 1: Prep Your Nails Shape nails and ensure surface is smooth. Ombré shows imperfections, so buffing is important.
Step 2: Apply Base Apply base coat and let dry. A white base coat underneath can make colors more vibrant, though it’s optional.
Step 3: Create the Design Apply the lightest color (yellow) as your base. While still wet, apply coral to a makeup sponge, then dab onto the cuticle area. Immediately apply peachy-pink to the middle section. Dab repeatedly to blend colors together. Work quickly before polish dries. Repeat layering 2-3 times for intensity.
Step 4: Seal and Finish Clean up excess polish on skin with acetone and a brush. Apply three thin layers of glossy top coat to smooth the gradient texture and enhance color vibrancy. Let dry thoroughly.
Time needed: 45-60 minutes Difficulty level: Intermediate
Products You’ll Need:
- Base coat: White base coat optional for vibrancy
- Coral polish: Essie “Tart Deco” or OPI “Crawfishin’ for a Compliment”
- Peachy-pink polish: Essie “A Crewed Interest” or OPI “Passion”
- Soft yellow polish: Essie “Aim to Misbehave” or OPI “Bee Mine Forever”
- Makeup sponge: Cut into small pieces
- Top coat: Multiple layers needed for smooth finish
- Cleanup brush: With acetone for excess polish
Pro Tips & Tricks: Use a makeup sponge to blend colors while wet, work quickly before polish dries on the sponge, apply three thin layers of glossy top coat to smooth the gradient and enhance color vibrancy, and practice on paper first to perfect your color placement.
13. Cowboy Boot Brown Leather
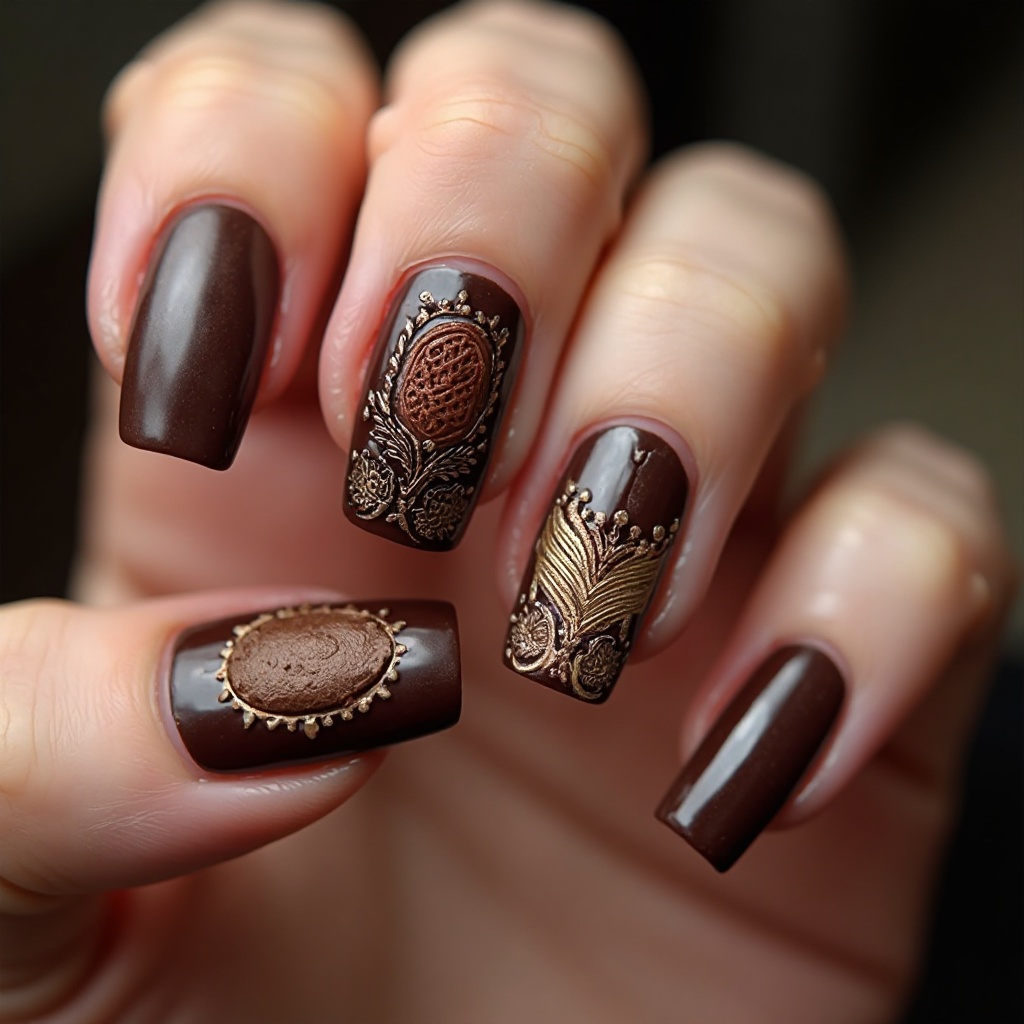
Medium brown with subtle texture created through strategic matte and glossy placement that mimics the rich, worn appearance of genuine leather cowboy boots. This creative finish combines a matte base with glossy top coat applied only to certain areas, creating dimensional interest. The brown shade feels organic and natural while the textured finish adds unique visual appeal.
Why It Works: This innovative design pays homage to Nashville’s Western heritage through sophisticated texture play rather than obvious imagery, appealing to those who appreciate subtle thematic nails.
The Nashville Connection: Cowboy boots in Nashville aren’t costume pieces—they’re legitimate footwear worn by actual working musicians, songwriters, and locals who’ve embraced Western style as part of their daily wardrobe. Walk into any Nashville venue and you’ll see boots paired with everything from sundresses to business suits, from distressed denim to designer labels.
The city’s boot stores like Lucchese and Boot Country are destinations, offering hand-crafted boots that last decades and develop character with wear. The worn leather texture of well-loved boots tells a story—of miles walked, stages performed on, honky-tonks danced in. This nail design captures that lived-in quality, that authenticity that comes from actually wearing and using something rather than keeping it pristine.
The mixed matte and glossy finish mimics how real leather develops shine in high-contact areas while staying matte elsewhere. It’s Nashville style at its most authentic: functional, beautiful, and earned through real use rather than just purchased for appearances.
How to Get This Look at Home:
Step 1: Prep Your Nails Clean and shape nails. Buff surface lightly for smooth application—texture will be added through top coat technique.
Step 2: Apply Base Apply base coat and two coats of medium brown cream polish. Allow to dry completely, about 10 minutes.
Step 3: Create the Design Apply matte top coat over the entire nail. Once dry (5 minutes), use a small detail brush to apply glossy top coat in random curved sections and patches to mimic leather’s natural sheen variations. Think of worn leather with some areas shinier than others.
Step 4: Seal and Finish No additional sealing needed—the mixed finishes create the final effect. Avoid touching nails for 20 minutes to allow full curing.
Time needed: 35-45 minutes Difficulty level: Intermediate
Products You’ll Need:
- Base coat: Standard base coat
- Brown polish: Essie “Hot Coco” or OPI “Going My Way or Norway?”
- Matte top coat: Essie Matte About You
- Glossy top coat: Seche Vite or similar
- Small detail brush: For precise glossy placement
- Inspiration photo: Of leather texture for reference
Pro Tips & Tricks: Apply matte top coat overall, then use a small brush to add glossy top coat in random curved sections that mimic leather’s natural variations, and stick to medium or long nail lengths to showcase the textured effect properly—short nails don’t have enough space for the texture to shine.
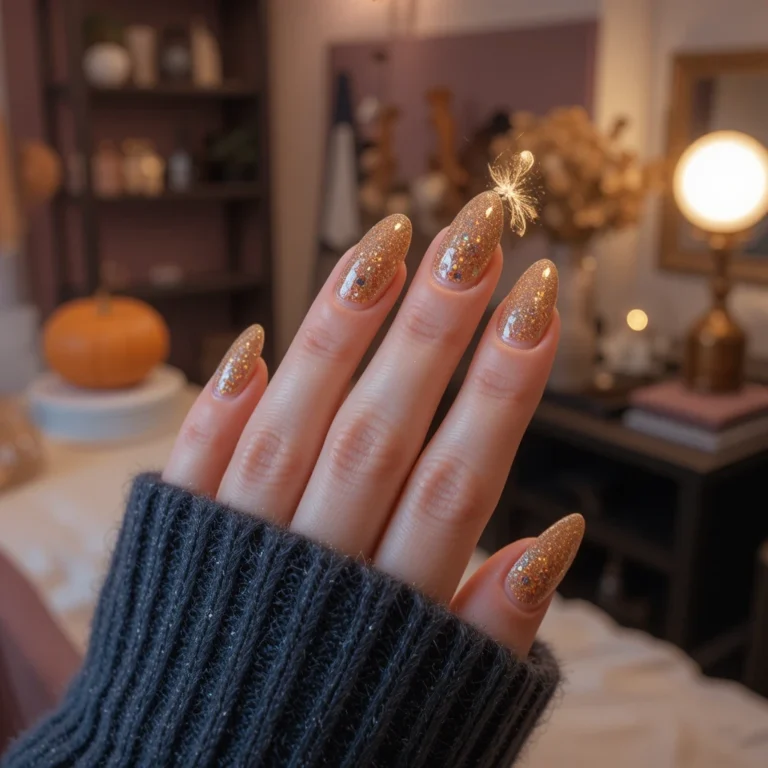
14. Grand Ole Opry Rose Gold
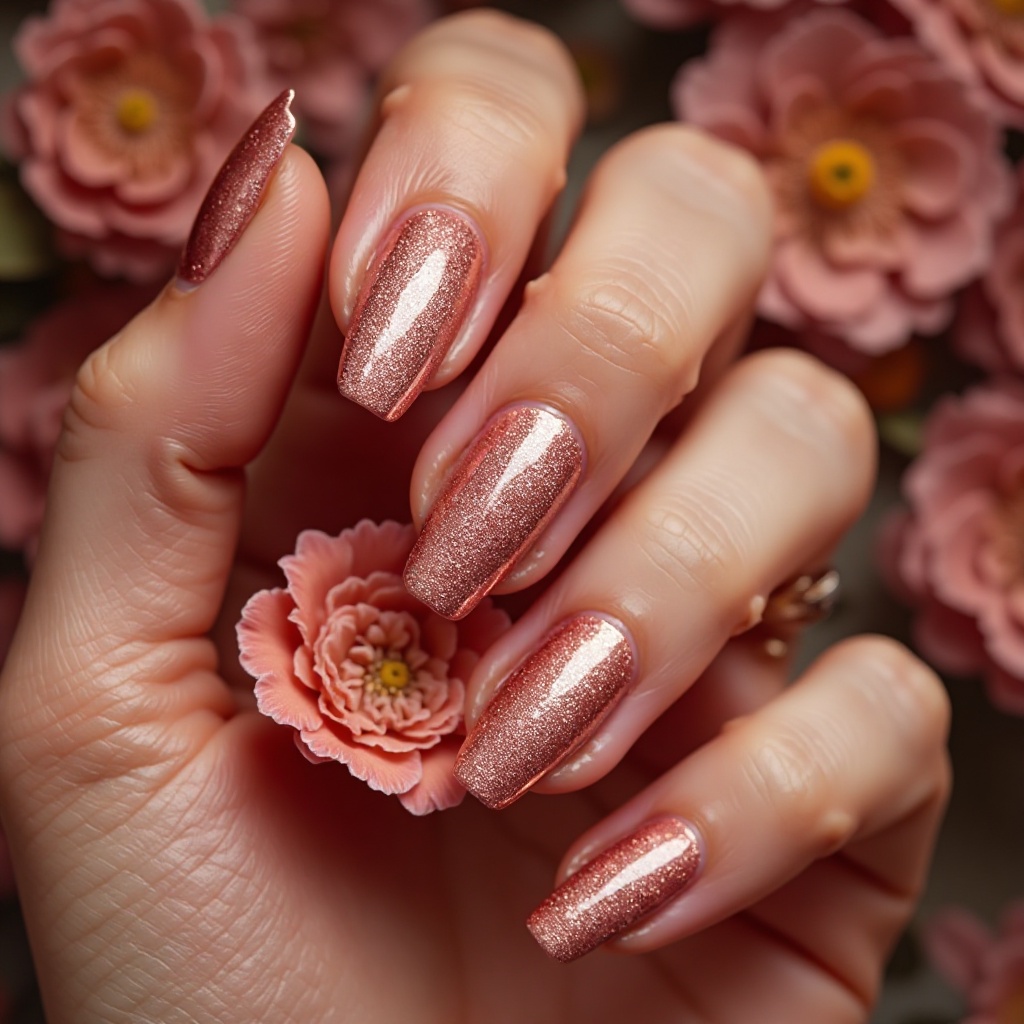
Warm rose gold metallic with fine shimmer particles and a brilliant shine finish that captures the glamorous, celebratory spirit of Nashville’s Grand Ole Opry. This feminine metallic strikes the perfect balance between gold and pink tones, creating universal flattery across all skin tones. The shimmer adds depth and movement while the metallic base delivers high-impact shine.
Why It Works: This versatile metallic transitions effortlessly from daytime elegance to evening glamour, offering the sophisticated shine of precious metals with added feminine softness from the rosy hue.
The Nashville Connection: The Grand Ole Opry is country music’s most sacred stage, a place where being invited to perform is considered the ultimate honor in the genre. Since 1925, the Opry has showcased country music’s biggest stars and launched countless careers. Performing there isn’t just about fame—it’s about joining a tradition, earning respect from your peers, and becoming part of country music history.
The rose gold color captures the Opry’s blend of tradition and femininity, honoring the strong women who’ve graced that stage: Patsy Cline, Loretta Lynn, Dolly Parton, Reba McEntire, Carrie Underwood, and countless others who’ve proven that country music isn’t a boys’ club. The metallic shine references the glamour of Opry performances—the sequined gowns, the stage lights, the special occasion feeling of being in that historic venue.
But the rose tone softens it, making it approachable rather than intimidating. It’s celebration without arrogance, glamour without pretension, femininity without weakness—everything the Opry’s female legends represent.
How to Get This Look at Home:
Step 1: Prep Your Nails Shape and buff nails smooth. Metallic shows every imperfection, so ensure surface is flawless.
Step 2: Apply Base Apply white or light pink base coat to maximize the rose gold’s vibrancy and metallic reflectivity.
Step 3: Create the Design Apply two to three thin coats of rose gold metallic polish. Metallic formulas can be streaky, so thin coats with adequate drying time (3-4 minutes) between layers ensures even, opaque coverage.
Step 4: Seal and Finish Apply glossy top coat to protect the metallic finish and enhance shine. Metallics benefit from top coat reapplication every 2 days to maintain brilliance.
Time needed: 30-35 minutes Difficulty level: Beginner
Products You’ll Need:
- White/pink base coat: For color vibrancy
- Rose gold polish: Essie “Penny Talk” or OPI “Cozu-Melted in the Sun”
- Top coat: Sally Hansen Insta-Dri for extra shine
- Lint-free wipes: Metallics show dust
- Cuticle oil: For aftercare
Pro Tips & Tricks: Apply over a white base coat to maximize color vibrancy and metallic reflectivity, choose almond or coffin shapes to create an elongated, elegant silhouette that amplifies the luxe effect, and apply thin coats as metallics can appear streaky when applied too heavily.
15. Music Note Minimalist Art
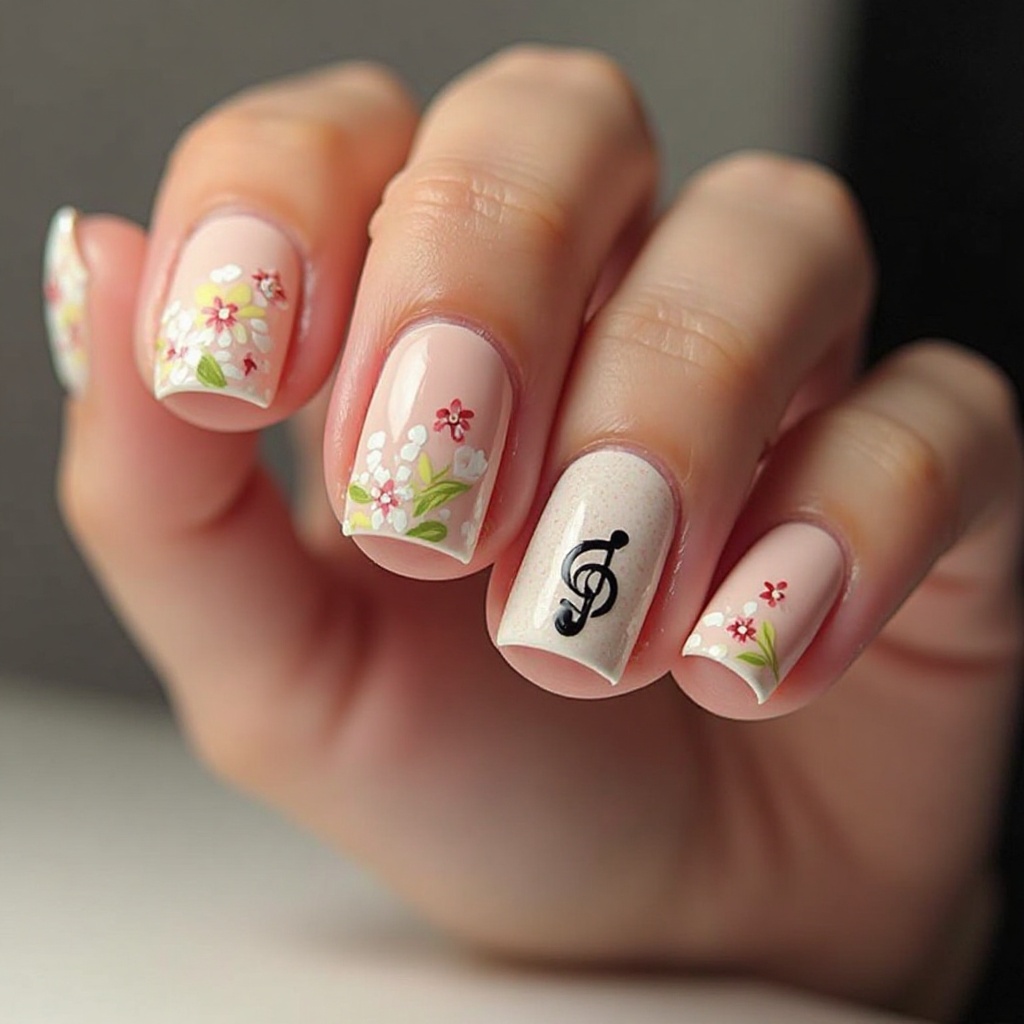
Soft beige nude base with a single black music note delicately hand-painted on one accent nail per hand. This understated design celebrates Nashville’s musical identity through refined, artistic expression rather than busy patterns or overwhelming imagery. The single note keeps the design intentional and sophisticated while the nude base maintains professional wearability.
Why It Works: This design allows music lovers to express their passion subtly and tastefully, making it appropriate for any setting while adding personal meaning to your manicure.
The Nashville Connection: In Nashville, music isn’t background noise—it’s the language everyone speaks. Songwriters work in coffee shops, musicians jam in parks, and you’re as likely to hear about someone’s publishing deal as their new job. Music notes are everywhere in the city: on murals, in logos, as architectural details.
They’re visual shorthand for “this is Nashville.” But a single music note says something more specific: it’s about the individual contribution, the one voice in harmony, the simple beauty of a single perfect note. Nashville understands that great music often starts with one note, one lyric, one idea.
This design honors that simplicity and focus. It’s not trying to show every aspect of Nashville’s music scene; it’s distilling it to its essence. One perfect note, placed intentionally, creating beauty through restraint. That’s Nashville songwriting philosophy applied to nail art: say what you need to say, nothing more, nothing less, and trust that the right people will understand.
How to Get This Look at Home:
Step 1: Prep Your Nails Clean, shape, and push back cuticles. Smooth nail surface ensures clean line work.
Step 2: Apply Base Apply base coat and two coats of soft beige nude polish to all nails. Let dry completely—at least 10 minutes—before attempting nail art.
Step 3: Create the Design On one accent nail per hand (ring finger works best), use a fine detail brush or nail art pen to draw a single music note. Practice on paper first to perfect your design. Common options: eighth note, treble clef, or quarter note. Keep it simple and centered.
Step 4: Seal and Finish Once music note is completely dry (5 minutes), apply two layers of glossy top coat to all nails for protection and shine.
Time needed: 35-45 minutes Difficulty level: Intermediate to Advanced
Products You’ll Need:
- Base coat: Any quality base coat
- Nude polish: OPI “Samoan Sand” or Essie “Ballet Slippers”
- Black detail polish: Essie “Licorice” or Ciate Wonderpen in Black
- Fine detail brush: Size 00 or 000 liner brush
- Top coat: Two layers for protection
- Practice paper: To perfect your music note before applying
Pro Tips & Tricks: Use a fine detail brush or nail art pen for crisp lines, practice the music note on paper first to perfect your technique and build confidence, seal with two layers of glossy top coat for longevity and protection, and choose a simple music symbol rather than complex designs for best results.
Step-by-Step: Your First Nashville Manicure at Home
Before You Start
Setting up your workspace properly makes all the difference between frustration and success. Choose a well-lit area with a flat, stable surface—natural daylight is ideal for color accuracy, but a good desk lamp works too. Cover your workspace with paper towels or an old towel to catch spills and make cleanup easy.
Gather all your materials before you begin so you’re not scrambling mid-manicure with wet nails. This includes polish, tools, remover, and cotton rounds all within arm’s reach. Plan for at least 45-60 minutes of uninterrupted time for your first attempt—rushing leads to smudges and mistakes.
Pro move: Set up a small fan to help speed drying time between coats, and have Netflix or a podcast queued up to keep you entertained during drying time.
The Perfect Prep
Start by removing any existing polish completely with acetone-free remover—acetone dries out nails excessively. Use a gentle sawing motion with your nail file to shape nails, always filing in one direction from sidewall to center rather than back-and-forth which causes splitting. Choose your shape based on lifestyle: squoval for durability, oval for elegance, or round for a classic look.
Soak fingertips in warm water for 3-5 minutes to soften cuticles, then gently push them back with a wooden orange stick or rubber cuticle pusher—never cut cuticles as this causes infection risk. Lightly buff the nail surface with a fine-grit buffer to remove shine and create texture for better polish adhesion, but don’t over-buff which weakens nails.
Wash hands with soap and water, then wipe each nail with rubbing alcohol on a lint-free wipe to remove all oils, lotion residue, and moisture. This crucial step prevents lifting and extends wear time significantly. Your nails should feel slightly squeaky clean.
Mistake to avoid: Don’t skip the alcohol wipe step even if nails look clean—invisible oils from your skin are the number one cause of premature polish chipping.
Application Technique
Apply a thin layer of base coat to each nail, starting from the cuticle and pulling the brush toward the tip in smooth, even strokes. Cap the free edge by running the brush along the tip horizontally—this seals the edge and prevents water penetration. Allow base coat to dry for 60-90 seconds until it feels dry to gentle touch.
For color application, wipe excess polish off one side of the brush against the bottle neck so you have a thin, controlled amount. Place the brush slightly away from your cuticle, push gently toward the cuticle, then pull down in one smooth stroke to the tip. Apply polish in three strokes: center, left side, right side. Two to three thin coats always look better than one thick coat.
Allow 3-4 minutes drying time between color coats—this is crucial and worth the wait. Test dryness by gently touching nails together; if they stick, wait longer. Apply each coat slightly thinner than the previous one, building opacity gradually rather than flooding the nail with thick polish.
Time-saver: Use quick-dry drops or spray between coats to cut drying time in half without compromising quality.
Finishing Touches
Once your final color coat is dry to touch (5-10 minutes), apply a thin layer of top coat using the same technique as your color. Cap the free edges thoroughly with top coat—this is your main defense against chipping. Top coat should be applied slightly more generously than color to create a protective cushion.
For cleanup, dip a small angled brush in acetone-free remover and carefully trace around each nail to remove any polish on skin. Work slowly and precisely—rushing causes you to accidentally remove polish from the nail itself. A steady hand comes with practice, so don’t get frustrated if your first attempts aren’t perfect.
Allow nails to dry completely for at least 20 minutes before doing anything with your hands. Even if they feel dry after 10 minutes, the deeper layers are still curing. Avoid hot water, applying lotion, or any activities that could cause smudging during this critical time.
Pro move: Apply cuticle oil 30 minutes after your manicure is complete to hydrate surrounding skin without interfering with polish curing.
Cleanup & Aftercare
Remove any remaining polish residue around nails with a cotton swab dipped in remover for final cleanup. Wash hands with cool water and gentle soap to remove any oily residue from the polish or remover. Pat dry gently with a soft towel—avoid rubbing which can cause smudging on still-curing polish.
For the first 24 hours, treat your nails gently. Avoid hot showers, washing dishes without gloves, or submerging hands in water for extended periods. The polish continues to cure and harden during this time, and water exposure can cause premature chipping or bubbling.
Apply cuticle oil daily after the first 24 hours to keep surrounding skin hydrated and healthy. Reapply top coat every 2-3 days to refresh shine and add protective layers that extend your manicure’s lifespan. These simple maintenance steps can double how long your nails look salon-fresh.
Nashville Nail Trends to Know
Warm Metallics Reign Supreme
Gold, bronze, and rose gold chrome finishes dominate Nashville salons, offering sophisticated shine that photographs beautifully in both natural and artificial light. These warm metals complement Southern skin tones exceptionally well and add instant luxury to any outfit without the coolness of silver or platinum finishes.
The reflective quality of metallics creates dimension and visual interest on even the simplest nail shapes and lengths. Nashville nail artists report metallics being their most requested finish, especially for special occasions and weekend wear where impact matters.
Warm metallics pair beautifully with neutral wardrobes filled with creams, beiges, and earth tones, adding just enough glamour without overwhelming your overall aesthetic. The trend shows no signs of slowing as clients appreciate the versatility and elegance these shades provide.
Matte Finishes Add Contemporary Edge
The matte top coat trend continues transforming traditional glossy shades into modern, velvety statements that feel expensive and editorial. Browns, terracottas, burnt oranges, and deep plums especially benefit from this finish, creating depth and richness that glossy versions simply cannot achieve.
Matte nails hide minor imperfections and wear patterns significantly better than their shiny counterparts, making them ideal for busy professionals. This finish works particularly well on shorter nail lengths where it creates a sophisticated, minimalist aesthetic without requiring length.
The texture also prevents fingerprint smudges and maintains a fresh appearance throughout the entire wear period. Nashville salons report that once clients try matte, they often request it repeatedly as it offers a unique, modern alternative to traditional glossy finishes.
Minimalist Line Art Thrives
Simple, delicate line drawings and geometric patterns replace complex nail art, offering sophistication without overwhelming smaller nail beds. Nashville-specific designs like guitars, music notes, skylines, stars, and cowboy boots appear as subtle accent nails rather than full-hand busy statements.
This trend works beautifully for professionals who want personality without sacrificing workplace appropriateness or looking “over the top.” The key is choosing one meaningful symbol and executing it with precision and restraint rather than covering every nail with designs.
Single accent nails maintain the design’s impact while keeping the overall look wearable for everyday activities and various settings. Nashville nail artists note this trend appeals to minimalists and maximalists alike—it’s sophisticated expression without visual overwhelm.
Earthy Neutrals Dominate Color Palettes
Warm browns, caramels, toasted nudes, terracottas, and burnt oranges have overtaken cooler grays and taupes across Music City salons. These shades reflect Nashville’s connection to nature, authenticity, and its Southern roots while feeling contemporary and fashion-forward.
The earthy palette complements the region’s style aesthetic perfectly, working seamlessly with denim, leather, suede, and bohemian-inspired wardrobes that dominate Nashville fashion. These versatile shades transition effortlessly across all seasons without feeling dated, out of place, or too tied to a specific time of year.
Nashville nail artists note that clients specifically request “warm” versions of classic shades rather than cooler alternatives. This preference reflects the city’s overall aesthetic of approachable warmth and authentic Southern charm over stark minimalism.
Strategic Rhinestone Placement Stays Popular
The “less is more” philosophy continues with carefully placed rhinestones, crystals, or studs on single accent nails instead of overwhelming full-hand bling. Most Nashville nail artists recommend the ring finger for embellished accents, creating visual interest while maintaining everyday wearability and preventing snags.
This balanced approach prevents designs from feeling too busy, high-maintenance, or costume-like for regular wear and professional settings. Quality over quantity defines this trend—three to five well-placed crystals create more impact than dozens scattered randomly without intention.
Gel application ensures rhinestones stay secure for the entire 2-3 week wear period without lifting or falling off mid-manicure. The trend’s longevity speaks to Nashville’s practical approach to beauty—looks should be stunning but also functional for real life.
Short to Medium Lengths Remain Practical
Manageable nail lengths that don’t interfere with daily activities like typing, texting, playing instruments, or hands-on work continue dominating Nashville salons. Squoval and oval shapes in practical lengths provide the perfect canvas for both simple solid colors and detailed accent designs.
This trend reflects Nashville’s functional yet fashionable approach to beauty—looking polished shouldn’t compromise your ability to live your life normally. Musicians, office professionals, healthcare workers, and active individuals all appreciate lengths that combine style with practicality.
Shorter nails also allow for more frequent color changes without the commitment and maintenance schedule of longer extensions or acrylics. Nashville clients enjoy the flexibility to switch designs weekly without worrying about fill appointments or significant time investments.
Essential Tools & Products for Nashville Nails
Must-Have Polishes & Colors
- Champagne Gold Metallic: OPI “Love Angel Music Baby” or Essie “Penny Talk” – captures Broadway’s glittering essence
- Cognac Brown Cream: Essie “Hot Coco” or OPI “Going My Way or Norway?” – warm, sophisticated neutral
- Dusty Blue Cream: Essie “Pret-a-Surfer” or OPI “Reach for the Sky” – versatile cool-toned option
- Soft Nude Pink: OPI “Bubble Bath” or Essie “Ballet Slippers” – universally flattering base
- Rose Gold Metallic: China Glaze “Champagne Kisses” or Sally Hansen “Rose Glow” – feminine shimmer
- Red-Orange Cream: Essie “Meet Me at Sunset” or OPI “Living on the Bula-vard” – bold Nashville energy
- Soft Peach Shimmer: Essie “A Crewed Interest” – warm, glowing neutral
- Charcoal Gray: Essie “Serene Slate” or OPI “Dark Side of the Mood” – sophisticated depth
- Chrome Powder: Makartt Champagne Gold or Born Pretty Mirror Powder – for high-impact metallics
- Matte Top Coat: Essie “Matte About You” or OPI Matte Top Coat – contemporary finish
Essential Tools for At-Home Application
- Glass nail file: Provides smooth, sealed edges that prevent splitting and last longer than emery boards
- Rubber cuticle pusher: Gently pushes back cuticles without causing damage or cuts
- Fine buffer block: Smooths nail surface for flawless polish application without over-filing
- Striping brush (size 00): Creates thin, precise lines for nail art and detail work
- Dotting tools (various sizes): Perfect for placing rhinestones, creating dots, or detailed designs
- Makeup sponges: Cut into small pieces for ombré and gradient techniques
- Angled cleanup brush: Small brush for removing excess polish with precision
- Tweezers (pointed tip): Places rhinestones, decals, and striping tape accurately
Recommended Product Brands
| Product Type | Budget-Friendly | Mid-Range | Professional |
|---|---|---|---|
| Base Coat | Sally Hansen Double Duty | Essie First Base | OPI Natural Nail Base |
| Color Polish | Wet n Wild | Essie, China Glaze | OPI, Zoya |
| Top Coat | Sally Hansen Insta-Dri | Essie Good to Go | Seche Vite, CND Super Shiney |
| Gel Polish | Beetles Gel | Gelish, Kiara Sky | OPI GelColor, CND Shellac |
| Chrome Powder | Born Pretty | Makartt | Mitty Professional |
| Nail Art Tools | Amazon Basics Sets | Winstonia, Twinkled T | Kokoist, Mitty |
| Cuticle Oil | CND Solar Oil | Burt’s Bees Lemon Butter | OPI Pro Spa |
| Remover | Cutex Non-Acetone | Zoya Remove+ | Ella+Mila Soy Polish Remover |
How to Choose the Right Nashville Design
Match Color Tones to Your Skin’s Undertones
Understanding whether you have warm, cool, or neutral undertones is the foundation of choosing flattering nail colors. Warm undertones (golden, peachy, yellow cast to skin) look stunning in champagne golds, cognac browns, coral-oranges, peach shimmer, and rose golds that enhance your natural glow and warmth.
Cool undertones (pink, red, blue cast to skin) shine in dusty blues, true reds, certain grays, and cooler metallics like silver or platinum. These shades complement the pink tones in your skin rather than clashing with them.
Quick test: Check your wrist veins in natural light—greenish veins indicate warm undertones, bluish veins suggest cool undertones, and veins that appear both blue and green indicate neutral undertones (lucky you—most colors work!). You can also consider which jewelry flatters you most: gold typically suits warm undertones while silver complements cool.
Choose Based on Nail Length and Shape
Short nails (at or just past fingertip) benefit from lighter, brighter colors like soft peach, dusty blue, nude pink, and light metallics that don’t overwhelm small nail beds. Avoid very dark colors or busy designs that can make short nails appear even smaller or stubby.
Medium nails (1-3mm past fingertip) offer maximum versatility and can handle virtually any Nashville design from bold red-orange to deep charcoal gray without looking disproportionate. This length is ideal for accent nails, ombré, and moderate rhinestone placement.
Long nails (4mm+ past fingertip) can carry darker, bolder shades like smoky quartz gray, dramatic metallics, and complex multi-nail art without overwhelming your hands. Longer lengths showcase detailed designs and provide ample canvas for creative expression.
Shape considerations: Oval and almond shapes showcase colors beautifully by creating an elongated, feminine appearance. Squoval offers a modern, edgy canvas for bold shades. Round suits classic, understated designs. Choose based on your lifestyle—pointed shapes chip more easily than rounded ones.
Consider Your Skill Level
Beginner-friendly designs from this collection include solid colors like Whiskey Barrel Brown Matte (#3), Hot Chicken Red Cream (#5), Bluebird Café Blue (#7), Peach Sweet Tea Shimmer (#10), and Smoky Quartz Gray (#9). These require only steady polish application without any nail art skills.
Intermediate challenges include Broadway Lights Glitter Ombré (#2), Country Star White Tips (#6), and Tennessee Sunset Ombré (#12). These involve gradient techniques or strategic embellishment placement but remain achievable with practice and patience.
Advanced techniques include Honky Tonk Gold Chrome (#1), Music City Skyline Accent (#4), Guitar String Silver Accent (#11), and Music Note Minimalist Art (#15). These require special products, steady hands for detail work, or gel application experience.
Practice progression: Start with solid colors to master thin coat application and proper drying. Graduate to simple accent nails with rhinestones or tape. Finally, attempt detailed line art or chrome finishes once you’re confident with basics.
Factor in Your Lifestyle and Activities
High-activity lifestyles (gym enthusiasts, hands-on workers, parents with young children) require durable finishes and chip-resistant colors. Darker shades like cognac brown and charcoal gray hide wear better than light colors, while matte finishes camouflage minor chips. Gel formulas offer superior durability for those who can’t manage weekly touch-ups.
Office professionals in conservative corporate environments should gravitate toward sophisticated neutrals like cognac, nude, dusty blue, soft gray, or peach shimmer with minimal or no accent designs. Keep finishes classic—glossy or subtle shimmer rather than bold metallics or heavy matte.
Creative professionals with flexible dress codes can experiment freely with metallics like rose gold and champagne chrome, bold colors like hot chicken red, intricate designs, and statement finishes. Your workplace culture determines how adventurous you can be.
Musicians and typists benefit from shorter lengths that don’t interfere with playing instruments or keyboard work. Durable finishes like gel prevent the frequent chipping that comes with repetitive hand movements.
Select for Specific Occasions
Conservative professional settings (corporate offices, law firms, finance, healthcare) call for sophisticated neutrals with minimal embellishment—think Whiskey Barrel Brown (#3), Bluebird Café Blue (#7), or Peach Sweet Tea Shimmer (#10) without accent nails. Keep finishes classic and understated.
Casual everyday wear benefits from versatile colors that work across multiple settings and activities like mid-tone neutrals, soft metallics like rose gold, and simple single-accent nails. These look intentional without requiring special occasions to justify them.
Special events and parties (weddings, concerts, galas, nights out) are your opportunity to embrace dramatic choices like Honky Tonk Gold Chrome (#1), Broadway Lights Glitter Ombré (#2), Rhinestone Cowgirl Glam (#8), or Tennessee Sunset Ombré (#12). Match design complexity to event formality—more elaborate for formal events, fun and playful for casual celebrations.
Weekend activities (brunch, shopping, casual concerts) pair perfectly with approachable designs that have personality like Country Star White Tips (#6) or Guitar String Silver Accent (#11)—polished but not trying too hard.
Troubleshooting Common Issues
Why does my polish bubble?
Bubbling occurs when you apply polish too thickly or shake the bottle vigorously before application, trapping air that rises to the surface. Thick coats prevent solvents from evaporating properly, causing bubbles as they try to escape. Roll the polish bottle between your palms instead of shaking to mix, and always apply multiple thin coats rather than one or two thick layers.
How do I fix smudged polish?
For minor smudges while polish is still wet, dip your finger in polish remover and gently smooth over the smudge to blend it in. For more significant damage, remove the smudged area completely with remover and a cotton swab, let dry, then carefully reapply thin coats to rebuild the area—it blends better than you’d expect.
Why won’t my design turn out like the picture?
Professional nail photos often show ideal conditions, perfect lighting, and sometimes photo editing that makes results appear more flawless than reality. Set realistic expectations for your first attempts—practice improves results dramatically. Start with simpler designs to build confidence and technique before attempting complex looks, and remember that even slightly imperfect nails still look polished and intentional from normal viewing distance.
What if I don’t have a specific tool mentioned?
Most nail art tools have everyday alternatives: use a toothpick instead of a dotting tool, a thin paintbrush instead of a striping brush, or bobby pins for creating dots. A makeup sponge works perfectly for ombré even though professional nail artists use special sponges. Creativity and resourcefulness often produce results just as beautiful as expensive professional tools.
How do I remove glitter polish easily?
Soak cotton pads in acetone (not non-acetone remover—it’s not strong enough), place on nails, wrap each finger in aluminum foil, and wait 10-15 minutes. The acetone dissolves the glitter polish, and the foil prevents evaporation while keeping the cotton pressed against your nail. After soaking, the glitter should wipe off easily with gentle pressure—no scrubbing required.
Why is my top coat shrinking away from my edges?
Top coat shrinkage happens when you apply it over polish that hasn’t fully dried, when you use too thick a layer, or when the top coat formula is too old and has thickened. Ensure color is completely dry (10+ minutes), apply thin top coat layers, and replace top coat every 18-24 months as formulas degrade over time.
How do I prevent polish from getting on my cuticles?
Apply cuticle oil or petroleum jelly around your nails before polishing to create a barrier—polish won’t adhere to oily surfaces. Alternatively, use liquid latex peel-off barriers (like Liquid Palisade) that you paint around nails, let dry, then peel off after polishing. For precision, leave a tiny gap between polish and cuticle rather than trying to get right against the skin.
Why do my nails chip after just one day?
Premature chipping usually stems from skipping base coat, not capping free edges with each layer, applying polish too thickly, or exposing nails to water too soon after application. Ensure you’re following all prep steps including the alcohol wipe, applying thin coats, capping edges thoroughly, and avoiding water for the first 12-24 hours while polish fully cures.
Nail Maintenance & Longevity Tips
Protect Against Nashville’s Humidity and Heat
Tennessee’s humid climate causes polish to lift at the cuticles faster than in drier environments because moisture softens the bond between polish and nail plate. Always push back and thoroughly clean cuticles before application, and apply a dehydrator or rubbing alcohol to the nail plate immediately before base coat to remove oils and moisture.
Finish with a quality gel top coat that seals the free edge completely, preventing water from seeping underneath and causing premature lifting. The climate also means your hands sweat more, so washing hands with cool water and patting dry gently extends manicure life. Avoid hot water which expands the nail plate and creates microscopic gaps for moisture.
Pro move: Keep a small fan running during application to speed drying and prevent humidity from interfering with proper curing, especially during summer months when air conditioning alone isn’t enough to control moisture.
Combat Seasonal Dryness with Consistent Hydration
While Nashville stays relatively humid, indoor air conditioning and heating can severely dry out cuticles and surrounding skin, leading to painful hangnails, peeling, and cracked skin. Apply cuticle oil at least once daily—preferably twice (morning and night) for optimal nail health and flexibility.
Jojoba, vitamin E, sweet almond, and argan oils penetrate deeply and absorb quickly without leaving greasy residue on hands. Keep a rollerball cuticle oil pen in your purse, at your desk, and on your nightstand for convenient application throughout the day without excuses.
Mistake to avoid: Never apply cuticle oil directly onto fresh polish during the first 24 hours, as it can break down the formula and cause premature chipping or bubbling. Wait until polish is fully cured, then oil the surrounding skin only.
Hydrated cuticles and nail beds also prevent polish from cracking or peeling along the edges where dry skin meets the nail, extending your manicure’s lifespan significantly.
Time Your Salon Appointments Strategically
Gel manicures last 2-3 weeks before requiring fills or complete removal, so book appointments on the same day each cycle to establish a consistent maintenance routine that becomes part of your schedule. Schedule early in the week (Monday or Tuesday) so you enjoy fresh, pristine nails throughout weekends when you’re most likely attending events, concerts, or social gatherings.
Regular polish needs refreshing every 5-7 days for optimal appearance, making weekly appointments ideal for those who prefer frequent color changes and variety. This schedule prevents you from wearing chipped, worn polish that looks unkempt.
Avoid scheduling nail appointments immediately before major events like weddings or important presentations—give yourself a buffer day or two for any necessary touch-ups or adjustments in case you’re not completely satisfied with the result.
Pro move: Book your next appointment before leaving the salon to secure your preferred time slot and maintain consistent nail health without gaps in care that allow damage or neglect to accumulate.
Nashville’s event-packed calendar (festivals, concerts, honky-tonk nights) means planning appointments around these activities keeps your nails looking their best when it matters most for photos and social occasions.
Invest in Quality Base and Top Coats
Professional-grade base coats create a smooth surface, prevent staining (especially important under dark colors), and improve polish adhesion significantly compared to bargain drugstore options. Look for base coats with ridge-filling properties if your nails have texture, and strengthening ingredients like keratin, calcium, or protein if your nails are weak or prone to peeling.
Quality top coats should be quick-drying, chip-resistant, and formulated to add significant gloss and protection that lasts. Look for products containing UV filters to prevent color fading and yellowing from sun exposure, especially important in sunny Nashville. The difference in wear time between quality and bargain top coats can be 3-5 days—worth the investment.
Product recommendations: OPI Natural Nail Base Coat (strengthening), Orly Rubberized Bonder (maximum adhesion), Seche Vite Dry Fast Top Coat (professional favorite), Essie Gel Couture Top Coat (gel-like shine without UV lamp), and CND Super Shiney Top Coat (long-lasting gloss).
Reapply top coat every 2-3 days to refresh shine and add protective layers that can genuinely double your manicure’s lifespan with minimal effort and time investment.
Avoid These Polish-Destroying Elements
Hand sanitizer contains 60%+ alcohol that breaks down polish quickly, causing dullness, chipping, and premature wear. Allow sanitizer to dry completely and evaporate before touching anything, and wash hands with soap and water when possible instead—it’s gentler on both nails and polish.
Chlorine from pools and hot tubs causes severe fading, yellowing, and lifting within hours of exposure. Apply an extra thick layer of top coat before swimming to create a protective barrier, or better yet, wear waterproof gloves during extended water exposure.
Hot water from showers, dishwashing, and cleaning softens polish and causes premature chipping by expanding the nail plate. Wear rubber gloves for household chores, keep shower water lukewarm rather than hot, and limit hand submersion in water whenever possible.
Harsh cleaning products with ammonia, bleach, or strong acids damage both polish and natural nails, causing brittleness, yellowing, and rapid deterioration. Gloves are non-negotiable when using these products—protect your manicure investment.
Acetone-based products used on other surfaces (nail polish remover spills, cleaning solutions) can accidentally contact nails and remove polish instantly. Be mindful when using acetone for any purpose around freshly polished nails.
Direct sunlight and UV exposure cause certain colors—especially reds, purples, and pinks—to fade noticeably over time, losing vibrancy. Use top coats with UV filters and consider this when choosing colors for outdoor-heavy schedules.
The prevention rule: Treat your manicure like an investment worth protecting—spending 30 seconds to put on gloves saves hours of reapplication time and product costs.
Know When to Remove and Start Fresh
Signs it’s time for removal: Visible lifting at cuticles (even just at corners), significant tip wear exposing natural nail, cracking or peeling polish, or when you’ve had gel polish on for more than 3 weeks straight without a break. Continuing to wear damaged polish invites moisture underneath, potentially causing nail fungus, bacterial infections, or greenish discoloration.
Proper removal technique for gel: Soak pure acetone (not regular polish remover) for 10-15 minutes using the foil wrap method—saturate cotton pads, place on nails, wrap each finger in aluminum foil. Then gently push off softened gel with a wooden orange stick—never peel, scrape aggressively, or force removal which damages nail plates.
Proper removal for regular polish: Use acetone-free remover to minimize nail dehydration and damage. Press saturated cotton pad on nail for 10 seconds to dissolve polish, then wipe away in one smooth motion—no scrubbing needed.
Break schedule: Give natural nails a 3-5 day break between gel applications every 2-3 months to allow nail plates to breathe and recover from UV exposure and product application. During breaks, apply strengthening treatments like nail hardener and cuticle oil liberally to restore moisture and flexibility.
Nails that have worn acrylics or hard gel extensions need 4-6 weeks of recovery time with intensive strengthening treatments before applying any enhancements again to prevent long-term damage.
Common Mistakes to Avoid
Applying Polish Too Thickly
The problem: Thick polish layers trap solvents that can’t evaporate properly, leading to bubbling, wrinkling, shrinking, smudging, and extended drying times that often result in accidental damage before the polish fully sets. Thick application also chips faster because it doesn’t flex with your nail’s natural movement.
The fix:
- Apply three to four thin coats instead of one or two thick layers—thin coats dry faster and create smoother, more durable results
- Wipe excess polish off one side of the brush against the bottle neck before each stroke
- Allow each thin coat to dry for 2-3 minutes before applying the next layer
- Use patience—the extra 5-10 minutes creates results that last days longer
Pro tip: If you accidentally apply a thick coat, remove it immediately with remover and start over rather than trying to fix it—attempting to thin it out or smooth it only makes the problem worse and creates an uneven surface.
Skipping Base Coat Application
The problem: Applying color directly to bare nails causes deep staining, especially with darker or highly pigmented shades like reds, browns, oranges, and deep purples that can leave yellow or colored tints for weeks. Base coat also creates a smooth surface that helps polish adhere better and significantly extends wear time by filling microscopic ridges and imperfections.
The fix:
- Always apply a thin layer of base coat as your first step after nail prep, even when rushed for time or doing “quick” manicures
- Choose ridge-filling base coats if your nails have visible texture or vertical lines that show through polish
- Allow base coat to dry completely (about 60-90 seconds) before applying color—wet base coat causes color to drag and streak
- Consider it non-negotiable insurance for your nails and manicure longevity
Pro tip: Keep a quick-dry base coat in your collection for those times when you’re tempted to skip this crucial step due to time constraints—it dries in 30 seconds and still provides full protection.
Neglecting to Seal the Free Edge
The problem: Failing to “cap” or seal the tips of your nails with base coat, color, and top coat allows water to seep underneath the polish through the exposed nail edge, causing rapid chipping and lifting at the tips where nails experience the most wear and contact with surfaces. This is the number one cause of “next day chipping” that frustrates home manicurists.
The fix:
- After applying polish to the nail surface, run your brush horizontally along the free edge (tip) of each nail with base coat, every color coat, and top coat
- This creates a waterproof seal that prevents water penetration and dramatically extends wear time
- Pay extra attention to your dominant hand which experiences more wear from opening doors, typing, texting, and daily activities
- Think of it as creating a protective barrier around the entire nail, not just the visible surface
Pro tip: Capping the free edge is the single most effective technique for preventing chips and can add 3-5 days to your manicure’s lifespan—it takes 5 extra seconds per nail but makes all the difference.
Using Old or Separated Polish
The problem: Old polish that has separated into distinct layers, thickened to goopy consistency, or become stringy applies unevenly, creates streaks and bubbles, and chips much faster than fresh formula. Expired polish also loses its original color vibrancy, appearing dull or murky, and takes much longer to dry properly because solvents have evaporated.
The fix:
- Check polish consistency before application by rolling the bottle between your palms and examining the brush—it should flow smoothly off the brush without being watery or clumpy
- Add 2-3 drops of polish thinner (never nail polish remover which breaks down the formula) to restore consistency if polish has thickened slightly
- Discard polish that has separated into distinct layers, smells unusual or chemical-heavy, has visible lumps, or has been open for more than 2 years
- Store polish upright in a cool, dark place away from sunlight and heat sources to maximize shelf life
Pro tip: Write the opening date on the bottom of new polish bottles with a permanent marker so you know when it’s time to replace them—most polish lasts 18-24 months after opening.
Peeling Off Gel Polish
The problem: Removing gel by peeling or picking strips away layers of your natural nail plate along with the polish, causing severe weakness, painful thin spots, peeling that takes months to grow out, white spots from dehydration, and increased breakage. This damage is cumulative—each time you peel, you remove more of your nail’s protective layers.
The fix:
- Always soak off gel properly with pure acetone using the foil wrap method for 10-15 minutes minimum—shortcuts cause damage
- Gently push off softened gel with a wooden orange stick or cuticle pusher—if it doesn’t slide off easily with minimal pressure, soak longer rather than forcing it
- Visit a professional for safe removal if you’re unsure about proper technique or don’t have the
right supplies
- Be patient—gel is designed to be durable, so proper removal takes time and cannot be rushed
Pro tip: The 30 minutes required for proper gel removal is significantly less time than the 3-6 months needed for damaged nails to completely grow out and recover—protect your investment in nail health.
Choosing Colors That Don’t Suit Your Undertones
The problem: Wearing colors that clash with your skin’s undertones makes hands look washed out, sallow, aged, or artificially colored rather than polished and healthy. The wrong shade can draw attention to skin imperfections, veins, or discoloration that the right shade would minimize. It’s the difference between “those nails are beautiful” and “her nails look okay, I guess.”
The fix:
- Determine your undertones accurately using the wrist vein test—greenish veins indicate warm undertones, bluish indicates cool, both indicates neutral
- Warm undertones should choose champagne golds, cognac browns, coral-oranges, peach, warm reds, and rose golds that enhance natural warmth
- Cool undertones look best in dusty blues, true reds, certain grays, berry shades, and platinum or silver metallics that complement pink tones
- When unsure, neutral undertones can wear most shades but should still pay attention to which colors make skin appear radiant versus flat
Pro tip: When in doubt about a color, bring nail polish bottles outside in natural daylight and hold them against the skin on the back of your hand—the right shade will make your skin glow and look healthy while the wrong one will look jarring or make skin appear dull.
Impatience Between Coats
The problem: Applying the next coat before the previous one has dried sufficiently causes smudging, dragging, streaking, and bubbling as wet polish mixes with semi-dry polish underneath. This creates an uneven, lumpy surface that looks unprofessional and chips quickly because layers haven’t properly bonded.
The fix:
- Wait a full 3-4 minutes between color coats and 5-10 minutes before applying top coat—set a timer if needed
- Test dryness by gently touching nails together; if they stick or feel tacky, wait longer
- Use the time productively—scroll social media, watch TV, catch up on emails—making waiting less tedious
- Consider quick-dry drops or spray between coats to cut waiting time in half if you’re genuinely time-pressed
Pro tip: The extra 10-15 minutes of waiting throughout your entire manicure creates results that last 5-7 days longer—that’s an incredible return on such a small time investment.
Frequently Asked Questions
Will Nashville nail designs work on short nails?
Absolutely—many Nashville designs actually look best and most sophisticated on short to medium lengths that prioritize wearability. Solid colors like Whiskey Barrel Brown Matte, Hot Chicken Red Cream, Bluebird Café Blue, Peach Sweet Tea Shimmer, and Smoky Quartz Gray create polished impact without requiring length or elaborate designs.
Single accent nails with minimal embellishments like Country Star White Tips or a simple music note work beautifully on shorter nail beds without overwhelming them.
Focus on flattering shapes like round, squoval, or short oval to maximize the appearance of your nail beds, and stick to lighter colors or strategic metallics that enhance rather than visually shrink smaller surfaces.
How long do Nashville-inspired nail designs typically last?
Gel manicures featuring Nashville designs last 2-3 weeks with proper care, quality application, and following maintenance guidelines like wearing gloves and avoiding harsh chemicals. Traditional polish versions require refreshing after 5-7 days depending on your activities, lifestyle, and how well you follow aftercare instructions.
Chrome and glitter finishes may show tip wear slightly faster (1-2 days sooner) due to their textured surfaces and tendency to catch on fabrics, but sealing with quality gel top coat and reapplying fresh top coat every 2-3 days significantly extends longevity.
Proper prep work including the alcohol wipe, capping free edges with every layer, and avoiding polish-destroying elements makes the biggest difference in wear time regardless of which design you choose.
Can I recreate Nashville nail designs at home without professional training?
Yes—most Nashville designs are achievable at home with practice, patience, and the right products. Solid colors like cognac brown, hot chicken red, and dusty blue are highly beginner-friendly and require only steady hands, thin coat application, and patience for salon-quality results.
Ombré glitter and simple accent nails with rhinestones or stars are achievable with practice and inexpensive tools like makeup sponges and tweezers. Chrome finishes and intricate designs like skylines or detailed line art have steeper learning curves but become manageable after watching tutorial videos and practicing on fake nails or practice wheels first.
For your first attempts at complex designs, consider purchasing nail stickers, decals, water slide transfers, or stamps for professional-looking results without requiring advanced freehand skills—there’s no shame in using tools that make beautiful nails accessible.
What nail shape works best for Nashville designs?
Squoval and oval shapes are most versatile for Nashville designs, offering the perfect canvas for both minimalist solid colors and detailed accent nails while remaining practical for daily activities like typing, cleaning, and hands-on work. Almond shapes beautifully showcase metallics and create flattering finger-lengthening effects that amplify glamorous looks like Honky Tonk Gold Chrome or Grand Ole Opry Rose Gold.
Shorter round nails suit understated designs like solid creams and matte finishes perfectly, offering maximum durability with minimal maintenance. Choose based on your lifestyle and priorities—longer shapes like almond and stiletto require more maintenance, care, and repair but offer maximum visual impact, while shorter shapes like round and squoval offer durability and practicality for active, busy lifestyles.
Most Nashville nail artists recommend medium-length squoval as the ideal balance between style, versatility, and function for clients who want options without commitment.
Are Nashville nails appropriate for professional office settings?
Yes—many Nashville designs are specifically ideal for professional environments when you choose sophisticated neutral options. Whiskey Barrel Brown, Bluebird Café Blue, Peach Sweet Tea Shimmer, soft nude pink, and muted gray with minimal or no accent designs work beautifully in conservative corporate environments like law firms, finance, healthcare, and traditional offices.
The key is choosing sophisticated earth tones and muted colors rather than bright, loud shades, and keeping accent nails subtle and tasteful (single music note, small star decal) rather than bold, glittery, or distracting with multiple rhinestones. Many Nashville professionals wear these styles daily without issue or comments from management, as the earthy, neutral-leaning palette reads as polished, intentional, and put-together rather than attention-seeking or inappropriate.
Save dramatic metallics like full chrome, bold reds, heavy rhinestone work, and complex multi-color designs for weekend wear, special occasions, and after-work social events where self-expression is celebrated.
What’s the best season for wearing Nashville nail colors?
Nashville nail colors work beautifully year-round due to their versatile, neutral-leaning, earthy palette that transcends seasonal trends, though certain shades feel especially appropriate during specific seasons. Warm metallics like champagne gold and rose gold along with earthy browns feel perfectly suited for fall and winter months when they complement cozy sweaters, leather boots, and seasonal wardrobes beautifully.
Dusty blues, soft peaches, nude pinks, and shimmer finishes shine during spring and summer when lighter colors feel fresh and appropriate for sundresses and sandals. Hot chicken red adds energizing warmth during any season—it’s equally stunning with winter burgundies or summer corals.
The true beauty and appeal of Nashville-inspired nails is their timeless versatility and adaptability—you’ll never feel seasonally out of place or “off” wearing these classic, sophisticated shades regardless of the calendar date or weather outside.
Embrace Music City Style on Your Fingertips
These Nashville nail ideas bring Southern charm and modern sophistication together in wearable, stunning designs that celebrate Music City’s unique character while remaining accessible for at-home recreation. Each design tells a story about Nashville—from the whiskey barrels aging in distilleries to the neon glow of Broadway, from the intimate songwriter venues to the grand stages of the Opry. These aren’t just pretty nails; they’re wearable expressions of what makes Nashville special.
My personal favorite, Whiskey Barrel Brown Matte, perfectly encapsulates everything I love about Nashville: warm, authentic, sophisticated without pretension, and rooted in tradition while feeling entirely contemporary. But the beauty of this collection is that there’s something for everyone, whether you’re drawn to bold statement shades or subtle neutrals, intricate designs or simple solids.
Start with beginner-friendly solid colors to build your confidence and technique, then gradually work your way up to more complex designs as your skills improve. Remember that even professionals didn’t achieve perfection on their first try—practice, patience, and persistence make all the difference. Save your favorite looks to your Pinterest boards or screenshot them for your next salon appointment, and don’t be afraid to customize these designs with your own personal touches that reflect your individual style.
Share this guide with fellow Nashville lovers who appreciate nail art that’s both beautiful and refreshingly authentic, and tag us in your Nashville nail recreations on social media—we’d love to see how you make these looks your own and celebrate your manicure successes! Whether you’re a Nashville native, a frequent visitor, or someone who simply loves the city’s aesthetic, these designs help you carry a piece of Music City with you wherever you go.