10 Fruit Nails Designs That Look So Cute
Fruit nails are manicure designs that feature fruit-inspired elements—anything from realistic painted strawberries and citrus slices to abstract fruit colors and minimalist berry accents. They can be as bold as full tropical scenes on every nail or as subtle as a single tiny lemon on your ring finger, making them surprisingly versatile for different styles and occasions.
Fruit nails are having a major moment, and I’ve spent the last few months testing different techniques to figure out what actually works at home. Unlike most fruit nail guides that just show pretty pictures, this article gives you complete step-by-step tutorials with specific products, real timeframes, and honest troubleshooting for the issues I ran into (and how I fixed them). You’ll also get my actual experience wearing these designs for two weeks to see how they hold up in real life.
How to Choose the Best Fruit Nail Design
For your first time: Start with Tiny Lemon Slice Tips or Cherry Stud Minimalism. These require minimal painting skills since you’re only adding fruit to 1-2 nails, and mistakes are easy to fix with a cleanup brush.
If you have a professional job: Go for Abstract Citrus Slices, Botanical Fruit Illustration, or Peachy Nude with Single Accent. These read as artistic and sophisticated rather than playful, and they work in conservative settings.
If you want something for special events: The Mixed Tropical Fruit Medley or Vibrant Watermelon Slices make serious statements. They’re conversation starters and photograph beautifully, but they’re not everyday looks.
If you’re comfortable with nail art: Try the Botanical Fruit Illustration or Blueberry Gradient—these require steady hands and patience but produce gallery-worthy results.
If you have short nails: Stick with Strawberry French Tips, Cherry Stud Minimalism, or simple gradients. Detailed fruit scenes get distorted on shorter nail beds and can look cramped.
If you change your mind often: Avoid elaborate hand-painted designs that take 90+ minutes. Go for simpler options or use peel-off base coat so you can remove them easily when you’re ready for something new.
Minimalist & Subtle Fruit Accents
1. Tiny Lemon Slice Tips
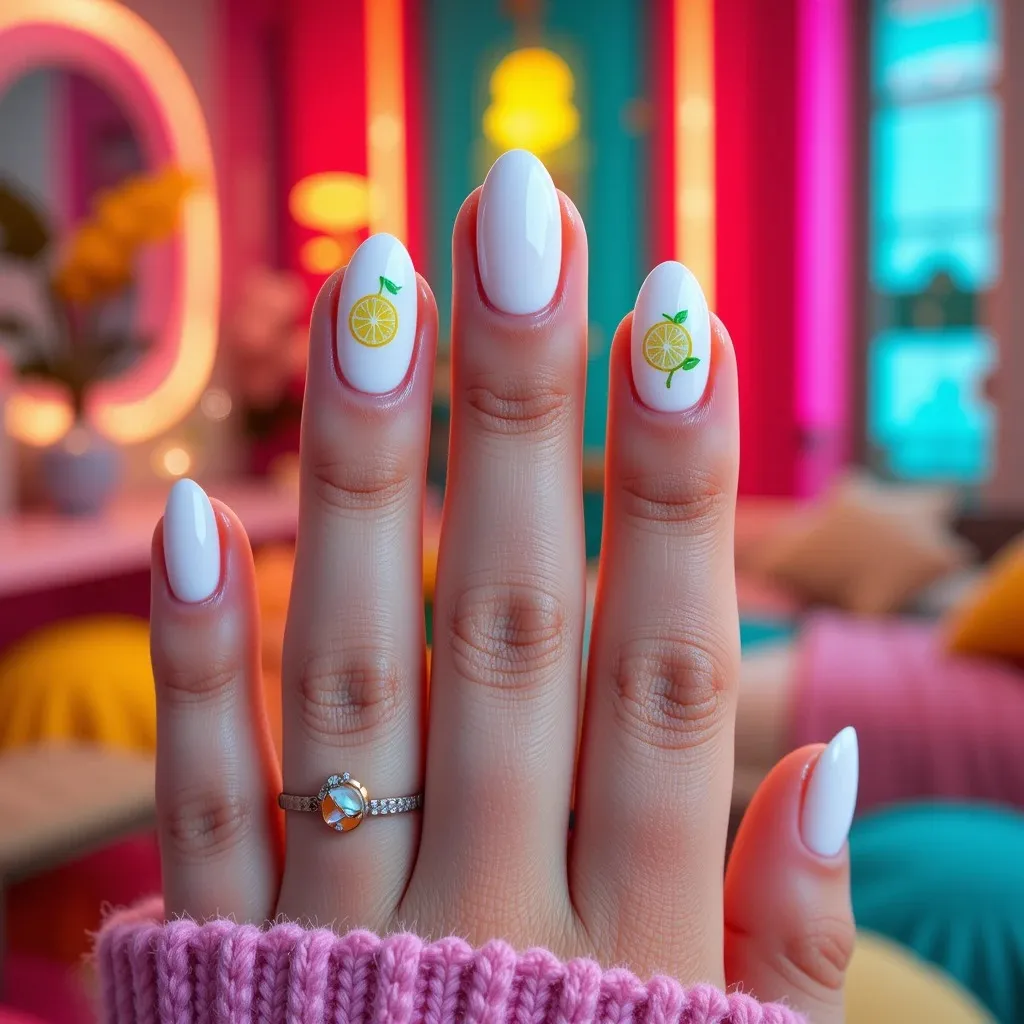
Soft milky white base with delicate hand-painted lemon slices on just your ring and middle fingers, using thin yellow outlines and a single green leaf detail. The rest of your nails stay clean and glossy, making this design feel modern and understated rather than overly themed. It’s fresh, citrusy, and perfect for anyone who wants fruit nails that don’t scream “look at me.”
Difficulty: Beginner
Time to complete: 25 minutes
Best for: People who want to try fruit nails without committing to a bold look
Why it works: Limiting fruit details to just 2 nails keeps things elegant and office-appropriate
What makes it different: Uses pale yellow instead of bright lemon color for a more sophisticated effect
Products I used:
- Makartt Nail Art Brushes Set (Amazon, $7) – The size 0 brush gives you control for thin lines
- Apple Barrel Acrylic Paint in Bright Yellow (craft stores, $1) – Thinner consistency than polish for detail work
- Beetles White Gel Polish (Amazon, $8) – Stays opaque in two coats
2. Peachy Nude with Single Accent
Warm peachy-nude base across all nails with one statement nail featuring a realistic watercolor peach complete with soft blush tones and a tiny green leaf. The watercolor effect keeps it artistic rather than cartoonish, blending beautifully with the nude base for a cohesive, elevated look. This is for the girl who wants fruit nails but keeps her style sophisticated and wearable.
Difficulty: Intermediate
Time to complete: 35 minutes
Best for: Anyone who wants sophisticated nail art that works in professional settings
Why it works: The monochromatic peachy palette feels cohesive and intentional rather than randomly fruity
What makes it different: Watercolor technique creates soft edges that look artistic, not illustrative
Products I used:
- OPI Matte Top Coat (Sally Beauty, $11) – The matte/glossy contrast is what makes this design special
- Modelones Gel Paint Set (Amazon, $13) – Pre-mixed peachy tones save time
- Small makeup sponge cut into pieces – Better control than full-size sponges
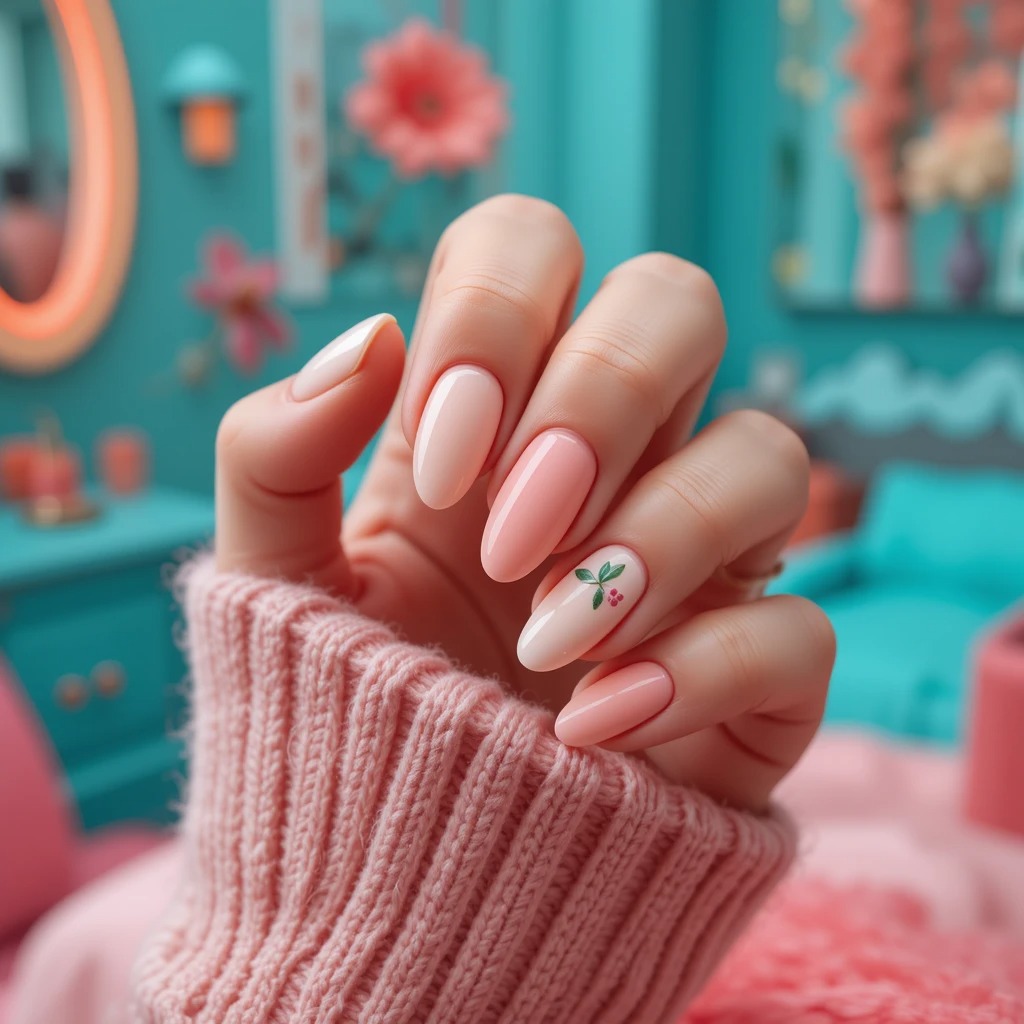
3. Cherry Stud Minimalism
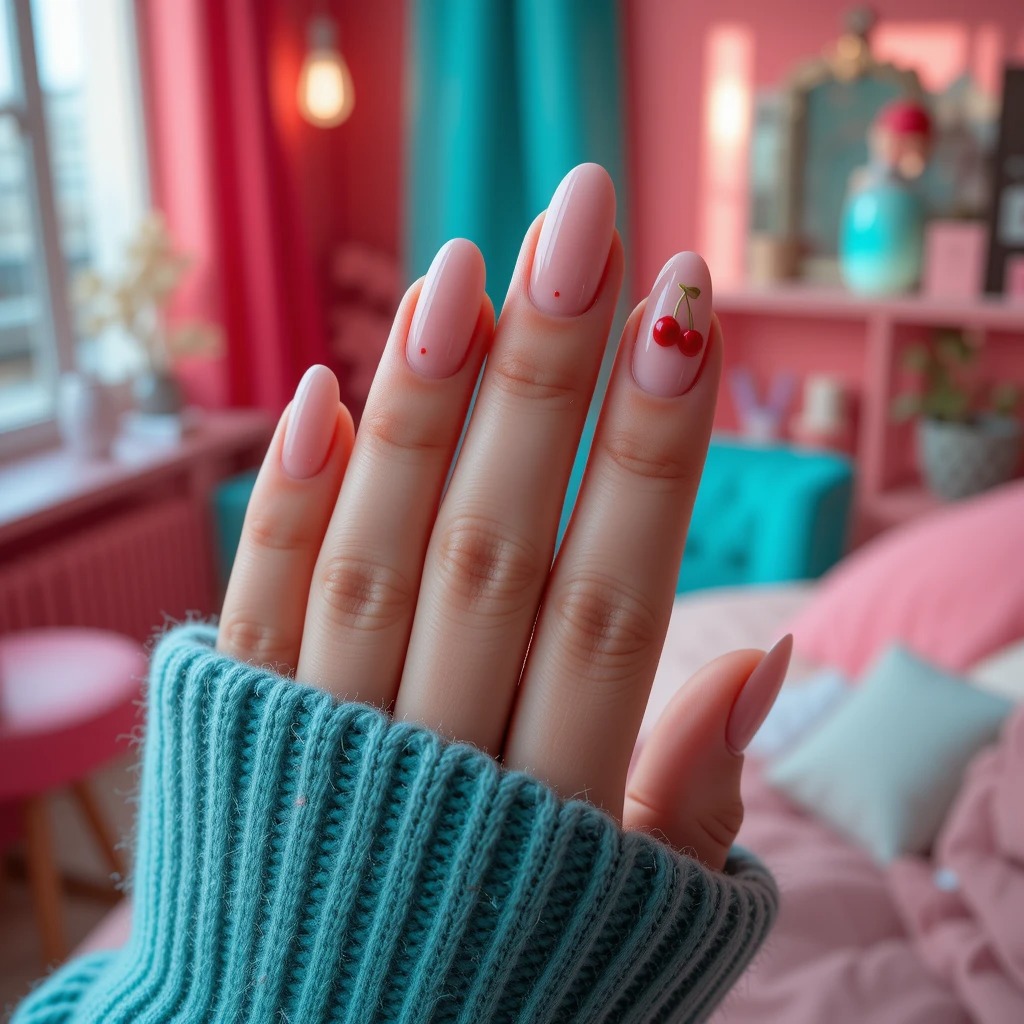
Soft pink or nude base with tiny 3D cherry studs or hand-painted mini cherries placed strategically on just one or two nails. The cherries are small—think delicate rather than bold—with simple red dots and thin green stems that feel more like jewelry than full nail art. Everything else stays clean, letting those little cherry accents be the main character.
Difficulty: Beginner (3D studs) / Intermediate (hand-painted)
Time to complete: 15 minutes (studs) / 25 minutes (painted)
Best for: Anyone who wants a retro-inspired look that still feels current
Why it works: Tiny scale keeps cherries from looking costume-y or too young
What makes it different: Strategic placement on just 1-2 nails instead of every finger
Products I used:
- 3D cherry nail charms from Amazon ($8 for 50-piece pack) – Enough for many manicures
- Born Pretty Store Black Stamping Polish (Amazon, $5) – Works better than regular polish for tiny details
Bold & Tropical Vibes
4. Vibrant Watermelon Slices
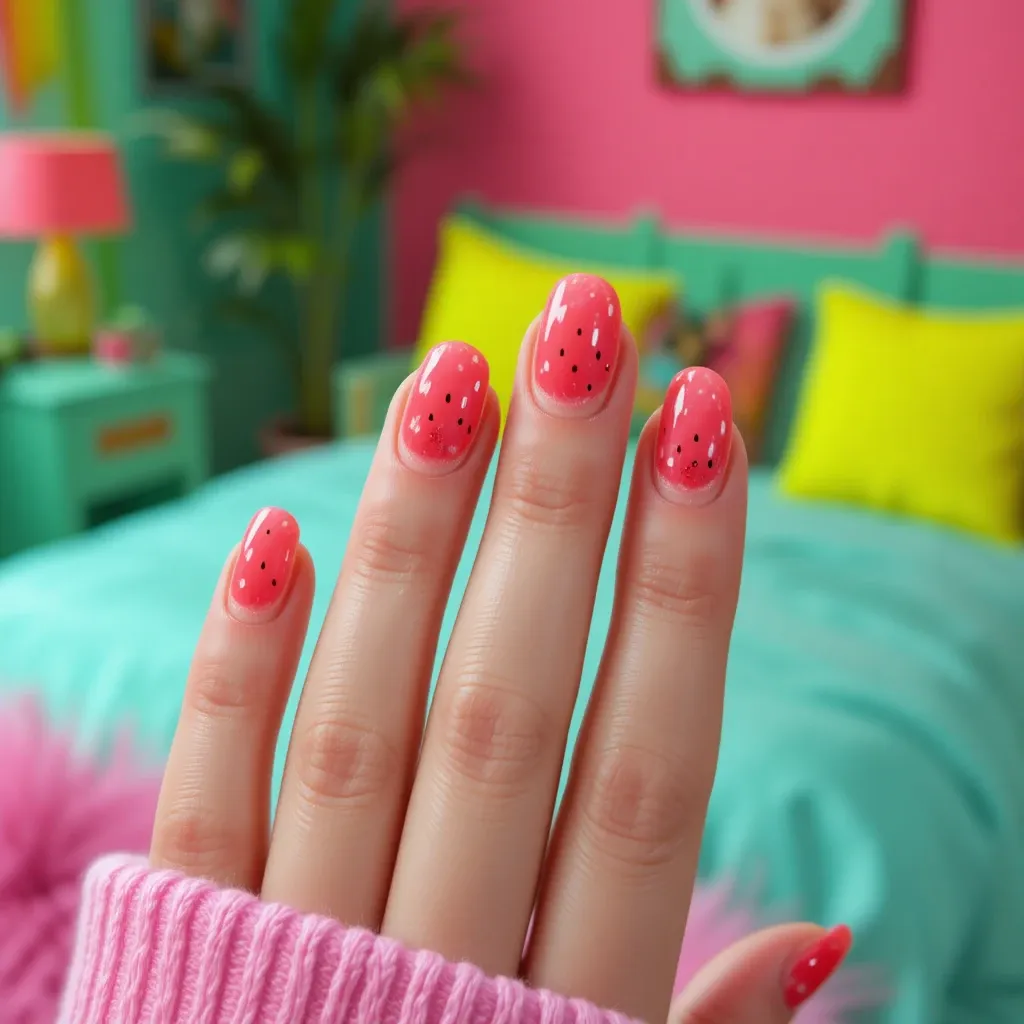
Bright coral pink base with bold watermelon slice designs featuring the classic red interior, white rind, green outer layer, and tiny black seed details. Each watermelon nail is carefully painted to look like a fresh summer slice, with colors so vivid they practically pop off your fingertips. This design is unapologetically fun and perfect for anyone who loves statement nails that spark conversation.
Difficulty: Intermediate
Time to complete: 40 minutes
Best for: Summer events, vacations, anyone who loves bold colorful nails
Why it works: The familiar watermelon shape is instantly recognizable even with slight imperfections
What makes it different: Uses coral-red instead of pure red for a more modern, sophisticated vibe
Troubleshooting:
- If curved lines aren’t smooth, use striping tape as a guide before painting
- If colors bleed, you’re applying next layer too soon—wait minimum 3 minutes
- If green looks muddy, use lighter lime green, not forest green
Products I used:
- China Glaze “Papaya Punch” ($7) – Perfect coral-red that’s not too orange
- Pure Color 7 Nail Striping Brush (Amazon, $6) – Makes clean curved lines possible
- Twinkled T Watermelon Nail Decals (Amazon, $6) – Shortcut if hand-painting feels intimidating
5. Mixed Tropical Fruit Medley
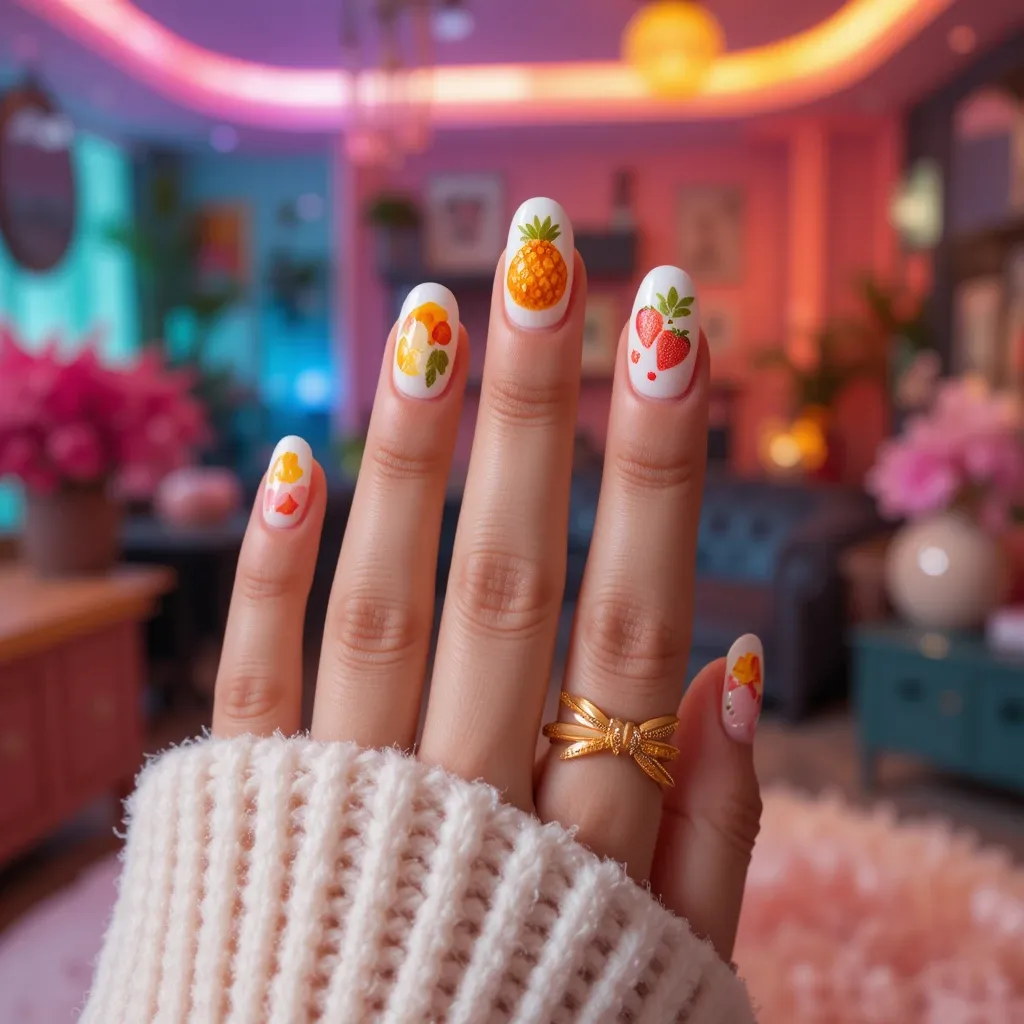
Each nail features a different tropical fruit—think pineapple slices, kiwi cross-sections, orange segments, strawberry halves, and papaya pieces—all painted on a white or cream base. The variety keeps things exciting, and the white background makes each fruit’s colors pop without competing with each other. It’s like a fruit salad for your fingertips, and it’s absolutely Instagram-worthy.
Difficulty: Advanced
Time to complete: 60 minutes first attempt, 40 minutes after practice
Best for: Special events, vacations, anyone comfortable with detailed nail art
Why it works: Different fruit on each nail means no single mistake ruins the whole design
What makes it different: Uses slightly abstract graphic style instead of hyper-realistic painting
Products I used:
- FolkArt Multi-Surface Acrylic Paint Set ($12 for 8 colors) – Enough for 20+ manicures
- Twinkled T Fruit Salad Nail Decal Set (Etsy, $8) – Use for 2-3 fruits, hand-paint the rest to save time
- Maniology Nail Stamping Kit with fruit plates (Amazon, $25) – Stamps base shapes, then hand-paint details
6. Neon Citrus Ombré
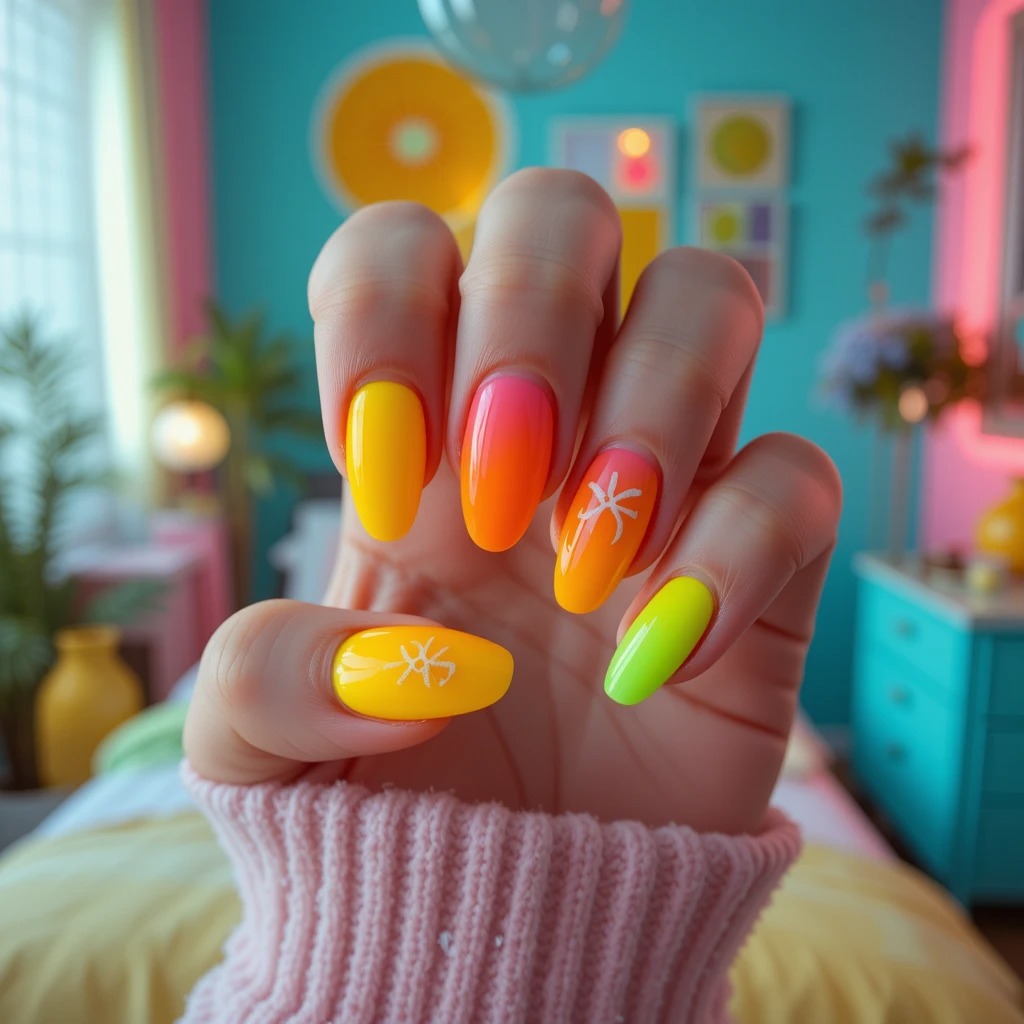
Bright gradient nails transitioning through neon citrus shades—electric yellow, hot pink grapefruit, vibrant orange, and lime green—with optional tiny citrus slice accents. The ombré can be vertical on each nail or horizontal across your whole hand, creating a rainbow effect that’s bold and summery. This design is for the maximalist who wants fruit-inspired color without traditional fruit artwork.
Difficulty: Intermediate
Time to complete: 45 minutes first time, 30 minutes after practice
Best for: Anyone who loves bold color and doesn’t mind a messy application process
Why it works: Reads as colorful nails first, fruit-themed second—surprisingly wearable
What makes it different: Matte finish makes neons feel sophisticated instead of ’80s highlighter
Alternative easier method (rainbow across hand):
Paint each nail a different neon citrus color over white base: thumb = yellow, index = orange, middle = pink, ring = magenta, pinky = lime green. On 1-2 nails, add simple citrus slice line art with white polish.
Products I used:
- Essie Neon Collection polishes ($9 each) – More expensive but better pigmentation than drugstore
- China Glaze Electric Nights collection ($7 each) – Budget option that still performs well
- Precision cleanup brush 5-pack (Amazon, $6) – Essential for neon cleanup
Important: Some top coats dull neons. Test on one nail first. Seche Vite works well without dulling color.
Sweet & Playful Designs
7. Strawberry French Tips
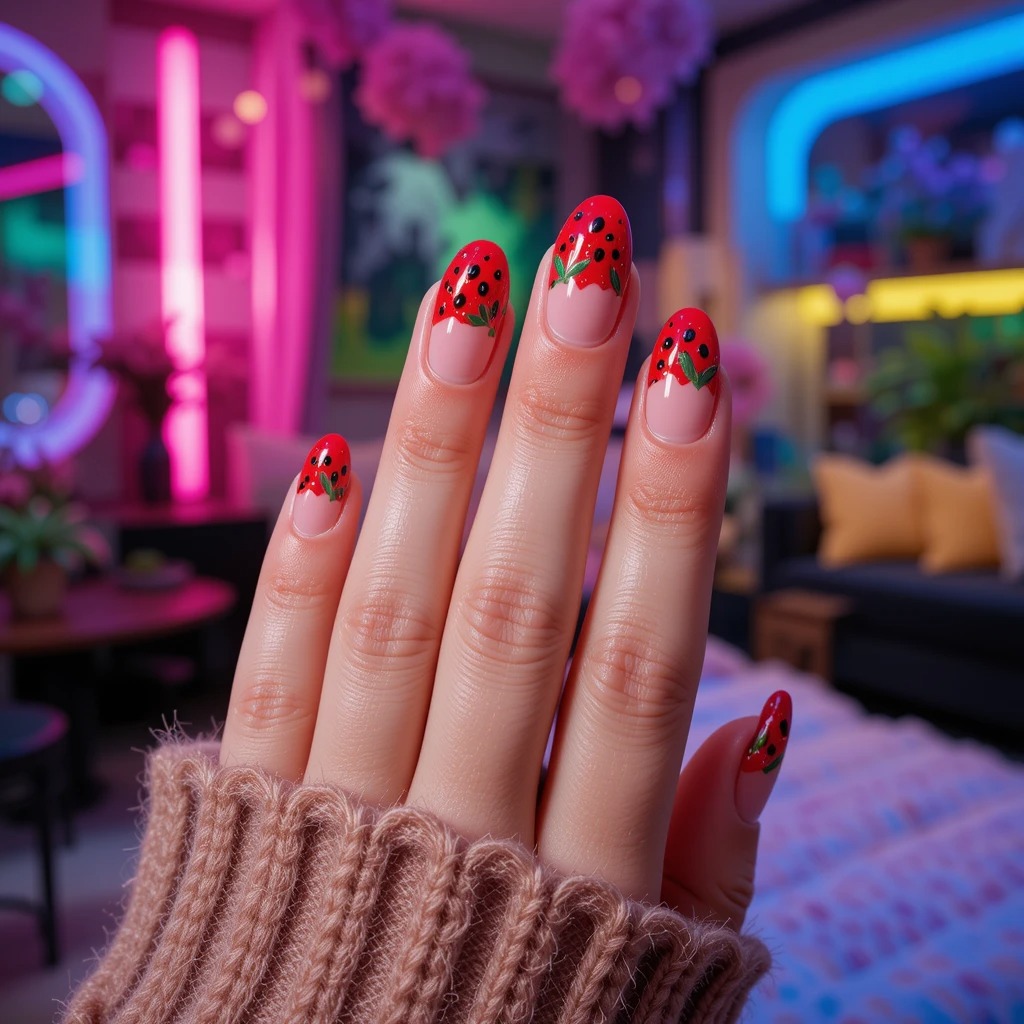
Classic French manicure reimagined with red tips instead of white, tiny black seed details dotting the red, and small green leaves painted at the base of each tip. The nude or light pink base keeps it grounded while the strawberry-inspired tips add that perfect touch of whimsy and summer sweetness. It’s familiar enough to feel wearable but creative enough to feel special.
Difficulty: Beginner-Intermediate
Time to complete: 35 minutes
Best for: People who love French manicures but want something more playful
Why it works: The French tip structure is universally flattering and familiar
What makes it different: Tips are slightly thinner than traditional French for a more delicate look
If you don’t have tape: Use a round hole punch to create guides from masking tape. Punch circles, cut in half—you have curved French tip guides.
Products I used:
- China Glaze “Italian Red” ($7) – Highly pigmented, opaque in one coat
- Scotch tape stuck to my hand first – Reduces stickiness so it doesn’t pull off base color
8. Blueberry Gradient
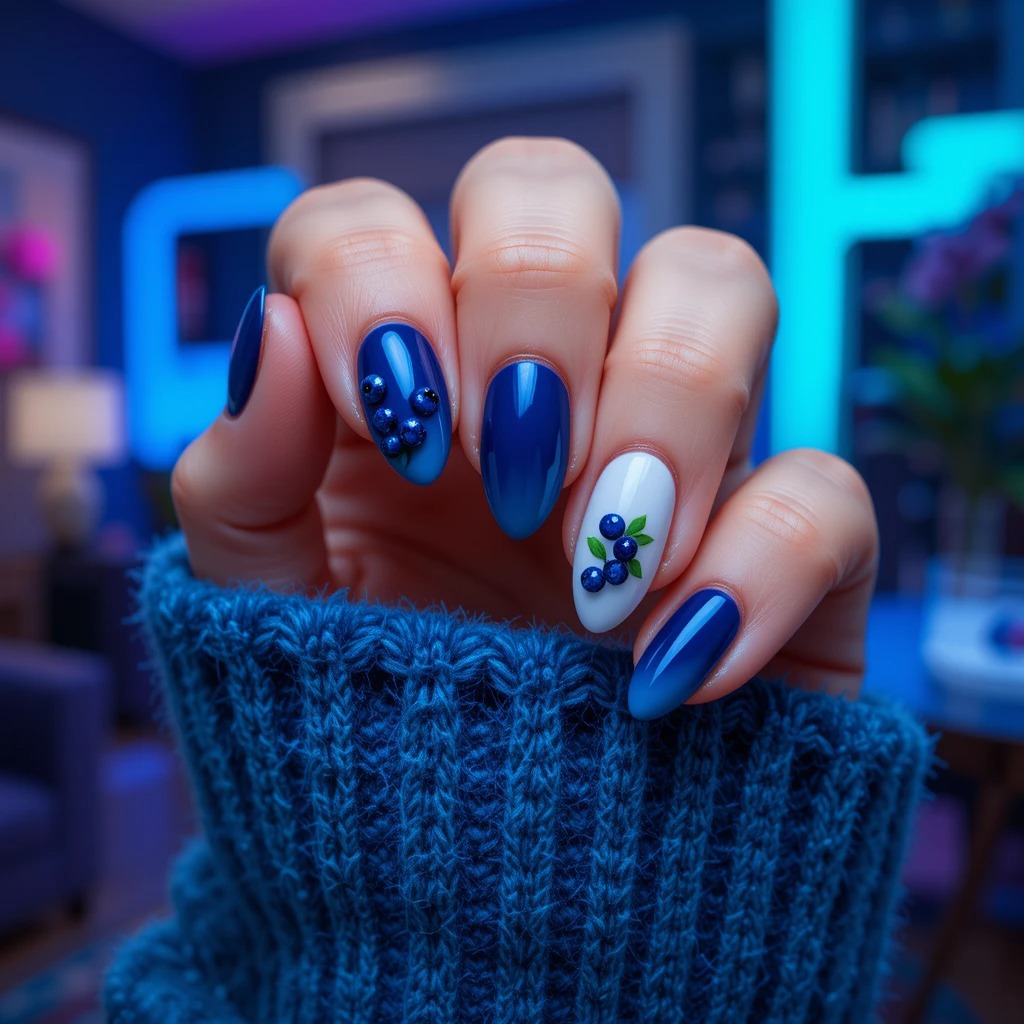
Deep blue to white gradient creating an ombré effect, with tiny hand-painted blueberries clustered on one or two accent nails and small green leaves. The gradient mimics the natural color variation of fresh blueberries, and the overall effect is surprisingly elegant rather than juvenile. The blue tones also make this unexpectedly versatile for cooler months when traditional fruit nails might feel out of season.
Difficulty: Intermediate-Advanced
Time to complete: 60 minutes
Best for: Anyone who wants fruit nails that work year-round, not just summer
Why it works: Blue-purple tones feel sophisticated and complement cool-toned wardrobes
What makes it different: Gradient mimics natural blueberry color variation for artistic effect
Products I used:
- Essie “After School Boy Blazer” (deep blue), Sally Hansen “Blue Me Away” (medium), Essie “Bikini So Teeny” (light blue) – About $24 total
- LA Colors Color Craze Blue Collection ($10 for 5 blues) – Budget alternative
Note: Blue pigments stain badly. Always use barrier cream before starting.
Elegant & Artistic Fruit Nails
9. Abstract Citrus Slices
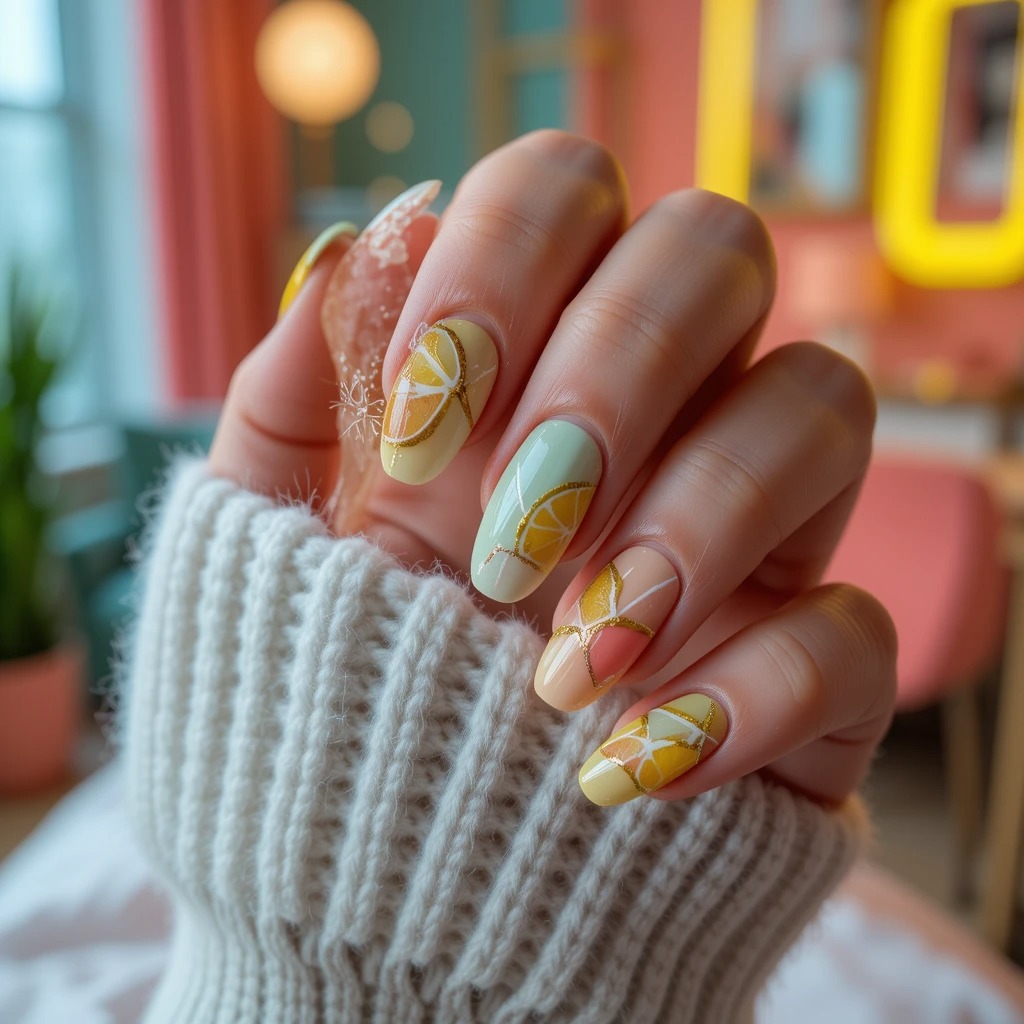
Modernist interpretation of citrus slices with geometric segments, thin gold or white lines, and a sophisticated color palette of sage green, pale yellow, soft coral, and cream. Instead of realistic fruit, think artistic line drawings and color blocking that evoke citrus without being literal or cutesy. This is fruit nail art for the design-forward minimalist who appreciates subtle references.
Difficulty: Intermediate
Time to complete: 50 minutes
Best for: Anyone who wants sophisticated nail art appropriate for any professional setting
Why it works: Abstract approach makes fruit nails feel elevated and age-appropriate
What makes it different: Mixed matte and glossy finishes add serious sophistication
Products I used:
- Mitty Gold Striping Polish (Amazon, $8) – Thin brush built into cap for control
- Whats Up Nails Straight Nail Vinyls (Amazon, $7) – Guide for perfect straight lines
- Essie Matte About You Top Coat ($9) – Essential for the matte/glossy contrast
10. Botanical Fruit Illustration
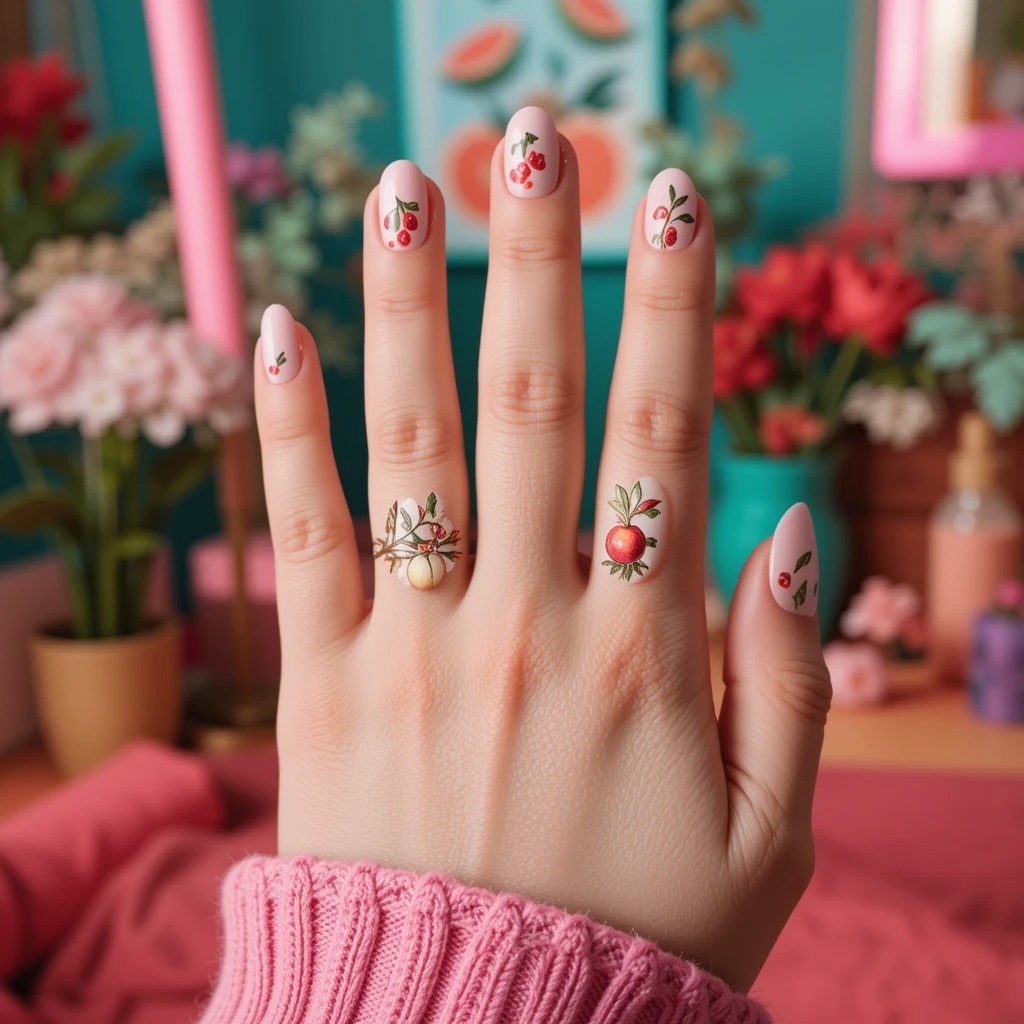
Delicate hand-painted fruit illustrations in a vintage botanical print style—think detailed berries, citrus blossoms, small fruit cross-sections, and thin vine details on a neutral background. Each nail can feature different fruit elements, or you can focus on one type of fruit rendered in this artistic, almost watercolor style. The result feels like wearable art that happens to be fruit-themed.
Difficulty: Advanced
Time to complete: 90 minutes first attempt, 60 minutes after practice
Best for: Anyone who appreciates art and wants truly unique, gallery-worthy nails
Why it works: Vintage botanical style bridges playful fruit motifs with genuine sophistication
What makes it different: Includes botanical details like plant structure, cross-hatching, even Latin names
Products I used:
- FolkArt Multi-Surface Acrylic Paint ($1-2 per bottle) – Better control than polish for fine details
- Princeton Aqua Elite Detail Brush Set ($12 for 3) – Worth it for the precision
- OPI Matte Top Coat ($11) – Creates that paper texture effect
Practice first: Try botanical elements on paper before nails. The line control takes practice.
Pros and Cons of Fruit Nail Designs
✅ Pros
Extremely versatile for different styles – You can make fruit nails minimalist and professional (abstract citrus, botanical) or bold and playful (watermelon, tropical medley) depending on your personal style.
Conversation starters – People notice fruit nails and comment on them constantly, which is fun if you enjoy that attention.
Seasonal flexibility – Unlike some nail trends tied to specific seasons, different fruits work year-round (citrus in spring, watermelon in summer, apples in fall, etc.).
Easier than they look – Many fruit designs use simple shapes (circles, triangles) that beginners can handle with basic tools.
Photograph beautifully – The bright colors and recognizable shapes make fruit nails very Instagram-friendly.
Can start simple and build skills – Begin with minimalist fruit accents on 1-2 nails, work up to complex designs as you improve.
Wide price range – Can do fruit nails for under $10 with drugstore polish or invest $50+ in gel setup and premium products.
❌ Cons
Time-consuming to create – Even simple designs take 25-35 minutes. Complex fruit art can take 60-90 minutes, which is a big time commitment.
Detailed designs chip visibly – When intricate fruit artwork chips, it’s very noticeable—unlike neutral nails where small chips blend in.
Requires steady hands and patience – If you struggle with hand tremors or get impatient easily, detailed fruit painting will frustrate you.
Limited wearability in conservative settings – Bold tropical fruits or bright watermelon slices don’t work in all professional environments, limiting when you can wear them.
Color matching is tricky – Getting fruit colors to look realistic (not muddy or neon) requires mixing and testing, which wastes product during learning phase.
3D elements snag on things – Cherry studs and raised embellishments catch on sweaters, hair, and fabric, which is annoying in daily life.
Touch-ups are difficult – Unlike solid color nails where you can touch up a chip easily, fruit designs require repainting the entire fruit element if damaged.
Removal can be lengthy – Gel fruit designs take 15-20 minutes to properly remove without damaging your natural nails.
Can look juvenile if not executed well – There’s a fine line between cute fruit nails and kindergarten craft project vibes—technique matters.
Expensive if using nail salon – Detailed hand-painted fruit nail art at salons runs $60-120, which is steep for a manicure that lasts 2-3 weeks.
Common Mistakes and How to Fix Them
Mistake #1: Fruit Colors Look Muddy Instead of Vibrant
What it looks like: Your strawberries are brownish-red, citrus slices are murky yellow-brown, colors lack the fresh, bright fruit vibe.
Why it happens: You’re mixing complementary colors (colors opposite on the color wheel) or adding too many different colors together. When you mix red + green, blue + orange, or purple + yellow, you get brown/mud.
The fix:
- Start over with fresh unmixed polish
- Mix colors that are neighbors on the color wheel (red + orange, blue + purple, yellow + green)
- Add white to any color to lighten without muddying—never add black to darken
- Use a white base coat under all fruit colors to make them pop brighter
How well it works: Complete fix if you catch it before drying. If already dried, you’ll need to remove and repaint that nail.
Mistake #2: Detail Lines Look Shaky and Uneven
What it looks like: Your citrus segment lines, leaf veins, or fruit outlines look wavy, different thicknesses, or generally wobbly instead of clean.
Why it happens: You’re moving the brush instead of moving the nail, your polish/paint is too thick, or you’re not resting your hand on a stable surface.
The fix:
- Thin your polish or acrylic paint with 1-2 drops of polish thinner or water
- Rest both hands on a table—move the nail, not your painting hand
- Use a striping brush (long thin bristles) instead of regular detail brush
- For straight lines, use striping tape as a guide
- Paint slowly—speed causes shaking
How well it works: Immediately improves line quality. Your first attempt with proper technique will look noticeably better. After 3-4 practice nails, you’ll have much more control.
Mistake #3: Colors Bleeding Into Each Other
What it looks like: Your watermelon’s white rind has red seeping into it, citrus segments blur together, gradient looks splotchy instead of blended.
Why it happens: You applied the next color before the previous layer dried, used too-wet polish/paint, or the base layer is still tacky.
The fix:
- Wait minimum 3 minutes between color layers for regular polish, 5 minutes for acrylics
- Test dryness by gently touching nail edge (not design area) with your finger
- Use a fan or quick-dry top coat between layers
- If bleeding already happened: dip cleanup brush in acetone and carefully remove the bleeding color while wet
- Let nail dry completely, then repaint the section that bled
How well it works: Prevention works 100% if you have patience. Fixing bleeding while wet works about 70% of the time—sometimes you’ll need to start over. Once dried, bleeding is permanent until you repaint.
Mistake #4: Design Looks Crowded or Busy
What it looks like: Too many fruits, colors, or details competing for attention. Your eyes don’t know where to look. Feels chaotic instead of artistic.
Why it happens: You’re trying to include too many elements on small nail space, or painting fruits too large for the nail size.
The fix:
- Follow the “less is more” rule: choose 1-2 accent nails for detailed fruit, keep others simple
- Scale down fruit size—they should take up 60-70% of nail space max, not 100%
- Use negative space (bare nail showing through) to give eyes a rest
- Limit to 3-4 colors maximum per design
- If already painted and looks too busy: add a neutral base color over some nails to simplify
How well it works: Prevention is easier than fixing. If design is already too busy, your options are limited—you can tone it down slightly with matte top coat or by painting over some nails, but usually you need to start over with a simpler plan
What Happens After Two Weeks? Real Wear Test
I wore the Blueberry Gradient and Strawberry French Tips for two weeks each to see how they actually hold up. Here’s what happened.
Days 1-7:
Both designs looked fresh and exactly as I painted them. The gradient stayed smooth, the strawberry seeds remained intact, and top coat still had full shine. No chips, no dulling. I was careful during this first week—wore gloves for dishes and didn’t do anything too rough with my hands.
Days 8-14:
This is where differences appeared. The Strawberry French Tips (gel) still looked great—minor tip wear on my pointer and middle finger from typing, but strawberry details stayed perfect. The Blueberry Gradient (regular polish) started showing wear around day 10. Top coat lost some shine, and I had one small chip on my thumb where the gradient met the cuticle. I reapplied top coat on day 11, which helped the shine issue.
Days 15-21:
The gel Strawberry French held up impressively well. Noticeable growth at cuticles (about 2-3mm gap) made it look like I needed a fill, but the actual strawberry tips looked exactly the same as week one. I could’ve easily worn these another week if not for the visible growth. The regular polish Blueberry Gradient didn’t make it this far—by day 14, I had chips on three nails and the gradient looked noticeably faded, so I removed it.
Honest assessment: Gel wins for longevity hands-down, but regular polish is better while you’re learning because mistakes are easy to fix. I messed up the blueberry crown details twice during application and could immediately wipe off and redo with regular polish—that would’ve been impossible with cured gel.
Maintenance Tips for Fruit Nails
Every 2-3 days: Reapply top coat
Add a thin layer of quick-dry top coat (I use Seche Vite, $10 at Sally Beauty) to refresh shine and add protection. This is especially important for regular polish fruit designs. Tip wear happens fastest at the free edge, so pay extra attention there—brush top coat over the tip and slightly under it to seal.
Daily: Apply cuticle oil morning and night
Use jojoba-based cuticle oil (Sally Hansen Vitamin E Cuticle Oil, $5 at drugstores) on the cuticle area and skin around each nail. Massage it in for 30 seconds per hand. This prevents the dry skin that causes polish to lift near cuticles. I keep a bottle on my nightstand so I don’t forget before bed.
Before showering: Apply thick hand cream
Hot water and soap break down polish faster. Before showering, apply a barrier of thick hand cream (Eucerin Advanced Repair, $8 at Target) especially around nail edges. This creates a protective layer. Sounds weird but it genuinely extends wear by 2-3 days.
When cleaning: Wear gloves always
Cleaning products, dish soap, and laundry detergent are polish killers. Keep cheap latex gloves (99 cents at dollar stores) under your sink and actually use them. Even “quick” dish washing without gloves will dull your fruit nail colors within days.
After 7-10 days: Check for lifting
Inspect where polish meets your cuticle. If you see any lifting or gaps forming, carefully apply a tiny amount of base coat under the lifted area with a toothpick, press down, and seal with top coat. Catching lifting early prevents it from spreading across the nail.
Why timing matters: These aren’t random suggestions. Cuticle oil works best when nails absorb it during sleep (8 hours of absorption time). Top coat needs reapplication every 2-3 days because UV exposure and hand washing gradually break down the protective layer—by day 4, protection is significantly compromised.
FAQs
How long do fruit nail designs typically last?
With gel polish and proper top coat sealing, detailed fruit designs last 2-3 weeks before needing fills due to nail growth. Regular polish fruit designs last 5-7 days before showing noticeable chips or fading. The limiting factor is usually growth rather than design wear—even if the fruit art looks perfect, the gap at your cuticles makes it obvious it’s time for a refresh.
Can I do fruit nails on short natural nails?
Yes, but choose designs wisely. Minimalist options like Tiny Lemon Slice Tips, Cherry Stud Minimalism, or Strawberry French Tips work beautifully on short nails. Avoid complex designs like Mixed Tropical Fruit Medley or detailed Botanical Illustrations—they need medium to long nail length to not look cramped or distorted.
What’s the easiest fruit nail design for complete beginners?
Start with Cherry Stud Minimalism using pre-made 3D cherry charms. You’re literally just gluing tiny charms onto 1-2 nails over a simple base color—no painting skills required. Takes 15 minutes and looks polished. Once comfortable with that, move to Tiny Lemon Slice Tips which teaches basic detail brush control without being overwhelming.
Do fruit nails work in professional office settings?
Depends on your office culture and which design you choose. Abstract Citrus Slices, Botanical Fruit Illustration, and Peachy Nude with Single Accent read as artistic and sophisticated—I’ve worn these to corporate meetings without issue. Vibrant Watermelon Slices and Mixed Tropical Fruit Medley are too playful for conservative offices. When in doubt, go minimalist with fruit on just 1-2 accent nails.
Conclusion
Fruit nails are surprisingly achievable at home once you have the right tools and realistic expectations about timing. Start with one of the beginner designs like Tiny Lemon Slice Tips or Cherry Stud Minimalism to build your confidence, then work toward more complex options as your detail brush control improves.
Remember that your first attempts will take longer and look less polished than subsequent tries—that’s completely normal. Consider trying the Strawberry French Tips next weekend as a good middle-ground design that builds skills without being overwhelming.