10 Fruit Nails Designs That Look So Cute
Fruit nails are having a major moment right now, and honestly, it’s not hard to see why. They’re playful without being too cutesy, they bring instant summer vibes no matter the season, and they’re surprisingly versatile for everything from brunch dates to beach vacations.
Whether you’re into minimalist citrus accents or full-on tropical nail art, there’s a fruity design that’ll make your manicure feel fresh and uniquely you.
Minimalist & Subtle Fruit Accents
1. Tiny Lemon Slice Tips
Soft milky white base with delicate hand-painted lemon slices on just your ring and middle fingers, using thin yellow outlines and a single green leaf detail. The rest of your nails stay clean and glossy, making this design feel modern and understated rather than overly themed. It’s fresh, citrusy, and perfect for anyone who wants fruit nails that don’t scream “look at me.”
Why It Works: The minimalist approach keeps things elegant while still giving you that playful fruit energy, making it appropriate for both casual weekends and professional settings where you want a little personality.
Pro Tip: Ask your nail tech to use a fine detail brush for the lemon outlines—crisp lines make all the difference. Almond or oval shapes work best to show off the delicate artwork.
How to Create This at Home:
Step 1 – Base Preparation (5 minutes): Apply your base coat and two coats of milky white polish (I love OPI “Funny Bunny” or Essie “Marshmallow”). Let each coat dry completely—patience here prevents smudging later. Cure under LED lamp for 30 seconds if using gel, or wait 5 minutes between coats for regular polish.
Step 2 – Sketching the Lemon (3 minutes): Using a thin detail brush and pale yellow acrylic paint (mix white + yellow for a soft shade), paint a small circle on your ring and middle finger near the tip. The circle should be about 4-5mm in diameter—smaller looks more elegant. Don’t worry about perfection; you’ll clean up edges later.
Step 3 – Adding Lemon Details (5 minutes): With your detail brush and brighter yellow, divide the circle into 6-8 triangular segments radiating from center (like pizza slices). Keep lines thin and slightly imperfect—it looks more natural. Add a tiny white highlight dot in one segment for dimension. Let this dry 2-3 minutes.
Step 4 – Green Leaf Accent (2 minutes): Mix a sage green (yellow + blue + tiny bit of white) and paint two small leaf shapes next to one lemon slice using your detail brush. Each leaf should be a simple oval with a pointed tip. Add a thin center vein with darker green if you’re feeling confident.
Step 5 – Seal Everything (2 minutes): Once completely dry (wait 10 minutes to be safe), apply two thin coats of glossy top coat over all nails. This seals your artwork and prevents chipping. Cure or dry thoroughly.
Troubleshooting Tips:
- Paint looks too thick? Thin your acrylic paint with a drop of water or mixing medium
- Lines aren’t straight? Dip a cleanup brush in acetone and gently correct edges
- Colors bleeding? You didn’t let the previous layer dry enough—wait longer next time
Recommended Products:
- Makartt Nail Art Brushes Set (Amazon, $7)
- Apple Barrel Acrylic Paint in Bright Yellow and White (craft stores, $1 each)
- Beetles White Gel Polish (Amazon, $8)
2. Peachy Nude with Single Accent
Warm peachy-nude base across all nails with one statement nail featuring a realistic watercolor peach complete with soft blush tones and a tiny green leaf. The watercolor effect keeps it artistic rather than cartoonish, blending beautifully with the nude base for a cohesive, elevated look. This is for the girl who wants fruit nails but keeps her style sophisticated and wearable.
Why It Works: The monochromatic peachy palette feels seasonally versatile and incredibly flattering on warm skin tones, while the single accent keeps the design from feeling too busy or young.
Pro Tip: Request a matte top coat on the accent nail and glossy finish on the rest for subtle dimension. Short to medium square nails showcase this design beautifully without overwhelming your hands.
DIY Watercolor Technique for Beginners:
Understanding Watercolor Nails: The “watercolor” effect isn’t actually watercolor paint—it’s about creating soft, blended edges that mimic watercolor art. This technique is surprisingly beginner-friendly because imperfections look intentional and artistic.
Step 1 – Perfect Peachy Base (7 minutes): Apply base coat, then two coats of peachy-nude polish. For the perfect shade, try OPI “Bubble Bath,” Essie “A Crewed Interest,” or Sally Hansen “Sheer Nirvana.” These have subtle peachy warmth without being obviously orange. Wait 5 minutes between coats for regular polish.
Step 2 – Creating the Watercolor Peach Base (4 minutes): On your accent nail (ring finger works best), apply a thin layer of no-wipe gel top coat or clear polish—this is your “wet canvas” for blending. While still wet, drop small amounts of peach, coral, and soft pink polish or gel paint onto the nail. Work quickly before it dries.
Step 3 – Blending for Watercolor Effect (3 minutes): Using a clean, slightly damp detail brush or small makeup sponge, gently blend the colors together with feather-light strokes. Don’t over-blend—you want visible color variation. The edges should fade softly into each other. Let this dry completely (8-10 minutes for regular polish).
Step 4 – Adding Peach Definition (5 minutes): With a thin brush and slightly darker peachy-coral shade, paint a soft curved line to suggest the peach’s characteristic center crease. Keep it subtle and slightly off-center. Add a small circular highlight with white or pale cream in the upper portion of the peach.
Step 5 – Leaf and Final Details (3 minutes): Paint one or two small sage green leaves at the top edge of your peach using your detail brush. Add a thin stem in brown or darker green. For extra realism, add a tiny yellow highlight to one leaf edge.
Step 6 – Strategic Top Coat (2 minutes): Apply glossy top coat to all nails except your peachy accent nail. On the accent, use matte top coat for that artistic, watercolor paper effect. This contrast is stunning.
Common Beginner Mistakes to Avoid:
- Using too much polish when blending—less is more with watercolor
- Not waiting for the base to be tacky before adding colors
- Over-blending until everything becomes muddy—stop while colors are still distinct
- Skipping the contrast between matte accent and glossy base nails
Product Recommendations:
- OPI Matte Top Coat (Sally Beauty, $11)
- Modelones Gel Paint Set in warm tones (Amazon, $13)
- Makeup sponge cut into small pieces for blending
Time-Saving Hack: Practice your watercolor peach on a piece of paper or nail wheel first. Once you’ve got the color placement and blending down, the actual nail takes only 5 minutes.
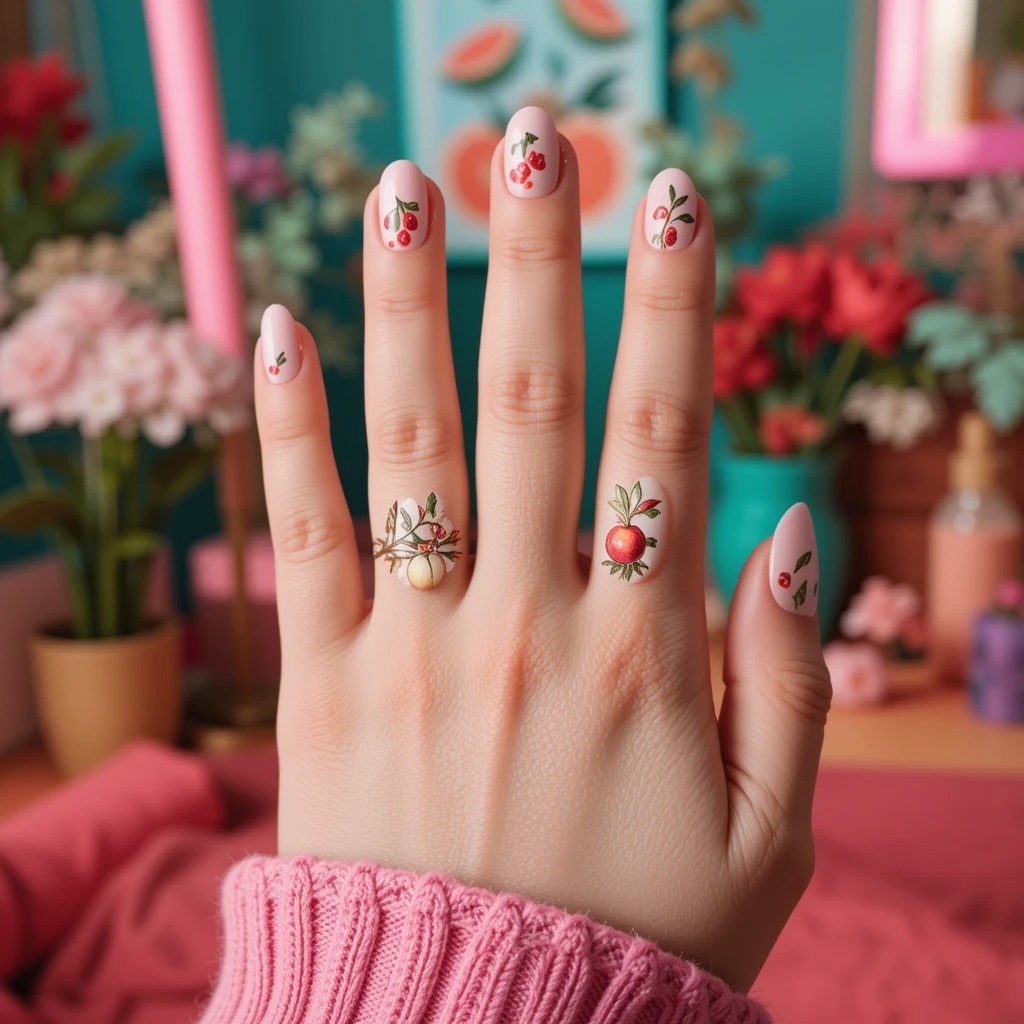
3. Cherry Stud Minimalism
Soft pink or nude base with tiny 3D cherry studs or hand-painted mini cherries placed strategically on just one or two nails. The cherries are small—think delicate rather than bold—with simple red dots and thin green stems that feel more like jewelry than full nail art. Everything else stays clean, letting those little cherry accents be the main character.
Why It Works: Cherries are having a retro resurgence right now, and keeping them miniature makes the trend feel current and intentional rather than costume-y or overdone.
Pro Tip: If you’re going the 3D stud route, make sure they’re securely embedded and sealed with extra top coat to prevent snagging. Round or almond shapes complement the playful-but-polished vibe.
Two Methods: 3D Studs vs. Hand-Painted (Choose Your Skill Level)
Method 1 – Using 3D Cherry Studs (Easiest for Beginners):
What You Need:
- 3D cherry nail charms or studs (find them on Amazon, Etsy, or Shein—search “cherry nail charms resin”)
- Nail glue or thick gel top coat
- Regular base and top coat
Step 1 – Base Application (5 minutes): Apply base coat and two coats of soft pink or nude polish (try Essie “Ballet Slippers” or OPI “Tickle My France-y”). Make sure base color is completely dry before adding charms—this is crucial.
Step 2 – Planning Cherry Placement (1 minute): Decide which nails get cherries—typically ring finger or ring + middle finger. Less is more with this design. Hold charms against nails to visualize placement before committing.
Step 3 – Securing Cherry Studs (3 minutes): Apply a small dot of nail glue or thick clear gel exactly where you want the cherry. Press the stud firmly for 20-30 seconds. If using gel, cure under LED lamp for 60 seconds. The stud should sit flat and secure.
Step 4 – Sealing for Longevity (3 minutes): Apply regular top coat to all nails without studs. For stud nails, carefully paint thick top coat around and over the charm, building up layers to fully encapsulate it. You may need 2-3 coats. Cure each layer if using gel.
Method 2 – Hand-Painted Mini Cherries (More Control, Still Beginner-Friendly):
Step 1 – Base Color (5 minutes): Same as Method 1—apply your soft pink or nude base and let dry completely.
Step 2 – Painting Cherry Bodies (4 minutes): Using a small dotting tool or the round end of a bobby pin dipped in bright red polish or acrylic paint, create two small circular dots side by side on your accent nail(s). These should be 2-3mm each—truly tiny. Let dry 3 minutes.
Step 3 – Adding Stems and Leaf (3 minutes): With your thinnest detail brush and dark green or brown polish, paint a thin curved line from each cherry dot upward, joining them at the top in a Y-shape. Add one tiny green leaf where the stems meet—just a simple oval with pointed tip.
Step 4 – Dimensional Details (2 minutes): Add a tiny white or light pink highlight dot to the upper right of each cherry using your detail brush or toothpick. This single highlight makes them look shiny and dimensional. Let dry completely.
Step 5 – Protection (2 minutes): Seal with two coats of glossy top coat. The multiple coats protect your detailed work from chipping.
Which Method Should You Choose?
- Choose 3D studs if: You want instant results, you’re nervous about hand-painting, or you love the texture and dimension
- Choose hand-painted if: You want more control over size and placement, you prefer flat nails, or you can’t find studs you like
Longevity Tips: 3D studs last 1-2 weeks with proper sealing. Hand-painted cherries can last 2-3 weeks with gel top coat. Avoid the first 24 hours after application when everything’s most vulnerable.
Budget Breakdown:
- 3D stud method: $8-12 for charm pack (reusable for many manicures)
- Hand-painted method: $3-5 if you already have basic polish colors
Bold & Tropical Vibes
4. Vibrant Watermelon Slices
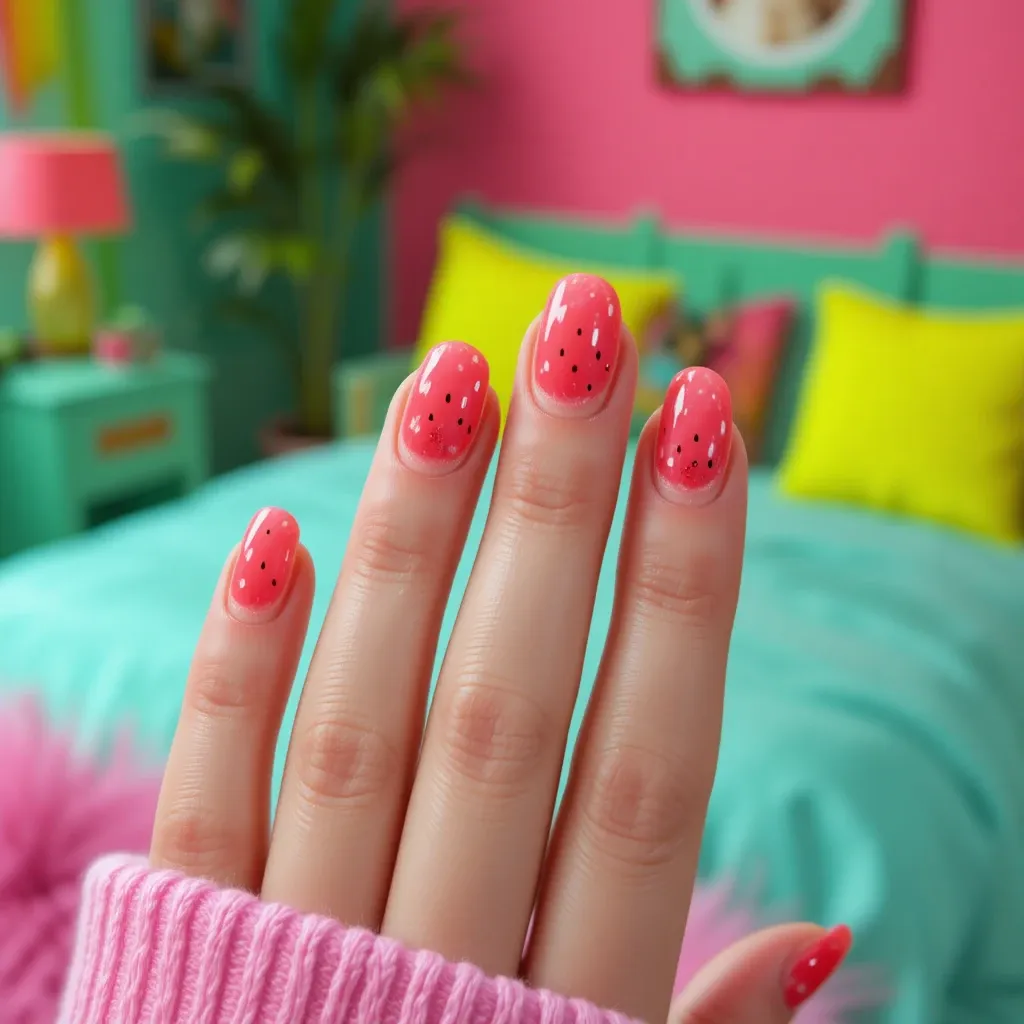
Bright coral pink base with bold watermelon slice designs featuring the classic red interior, white rind, green outer layer, and tiny black seed details. Each watermelon nail is carefully painted to look like a fresh summer slice, with colors so vivid they practically pop off your fingertips. This design is unapologetically fun and perfect for anyone who loves statement nails that spark conversation.
Why It Works: Watermelon nails scream summer energy and vacation vibes, making them ideal for warm weather, pool parties, tropical getaways, or anytime you need an instant mood boost.
Pro Tip: Go for shorter nail lengths with this design—too long and the watermelon slices can look distorted. A glossy top coat enhances the juicy, fresh-picked effect.
Complete Watermelon Nail Tutorial for Home:
Color Formula for Perfect Watermelon: Getting the right shades is 80% of success with this design. Here’s exactly what you need:
- Red interior: Bright coral-red (not burgundy or cherry red) – try China Glaze “Papaya Punch”
- White rind: Pure white, not cream – OPI “Alpine Snow”
- Green rind: Light to medium lime green – Essie “The More The Merrier”
- Seeds: Black or very dark green
Step 1 – Base Color Decision (7 minutes): You have two options: coral pink base on all nails with watermelon on 1-2 accent nails, OR make every nail a watermelon slice. For beginners, I recommend the accent nail approach—it’s less overwhelming and more wearable.
Apply base coat and two coats of coral pink to all nails. Let dry completely.
Step 2 – Creating the Watermelon Shape (5 minutes): On your accent nail(s), use a small piece of makeup sponge to dab bright coral-red on the lower 2/3 of the nail, creating a slightly curved top edge (this is the watermelon flesh). The curve should be gentle and centered. Let dry 3 minutes.
Step 3 – White Rind Layer (3 minutes): Using a thin brush or striping brush, paint a thin white curved line following the edge of your red section. This line should be 1-2mm thick. The white rind is thin in real watermelons, so resist making it too thick. Steady your hand by resting your pinky on the table.
Step 4 – Green Outer Rind (4 minutes): With your detail brush and lime green polish, paint another curved line above the white, about 2-3mm thick. You can leave a tiny gap between the white and green for dimension, or connect them—both look good. The green should extend to your nail tip or very close to it.
Step 5 – Adding Seeds (5 minutes – take your time here): This is where patience pays off. Using a toothpick, tiny dotting tool, or detail brush with black polish or acrylic paint, add 5-8 small seed shapes to the red area. Watermelon seeds are teardrop-shaped, not perfect circles—paint small ovals with one pointed end. Distribute them randomly, not in a pattern.
Step 6 – Glossy Finish (2 minutes): Apply two coats of glossy top coat to all nails. The extra shine makes the watermelon look fresh and juicy. Cure or dry thoroughly.
Advanced Technique – Textured Watermelon: For a more realistic effect, add subtle dimension to the red area before painting seeds. Mix your coral-red with a tiny bit of darker red or pink, and use a nearly dry brush to add soft, irregular patches in the red section. This mimics the natural color variation in real watermelon flesh.
Common Issues and Fixes:
- Curved lines aren’t smooth: Use striping tape as a guide, then paint along it. Remove tape before polish dries completely.
- Colors bleeding together: You’re applying the next layer too soon. Wait minimum 3 minutes between layers, 5 if using regular polish.
- Seeds look blobby: Your paint or polish is too thick. Thin with a drop of polish thinner or acetone.
- Green looks muddy: You’re using too dark a green. Watermelon rind is light, bright lime—not forest green.
Styling Variations:
- Vertical watermelon: Paint the stripes vertically instead of horizontally for an unexpected twist
- Watermelon tips: Create a French manicure with watermelon as the tip instead of white
- Mini watermelon accent: Paint tiny watermelon slices (3mm) scattered on a white base for a more minimalist approach
Time Investment: First attempt: 45 minutes total. After practice: 25-30 minutes.
Recommended Products:
- Twinkled T Watermelon Nail Decals if you want the look instantly (Amazon, $6)
- Pure Color 7 Nail Striping Brush for clean lines (Amazon, $6)
- Born Pretty Store Black Stamping Polish for perfect seed details (Amazon, $5)
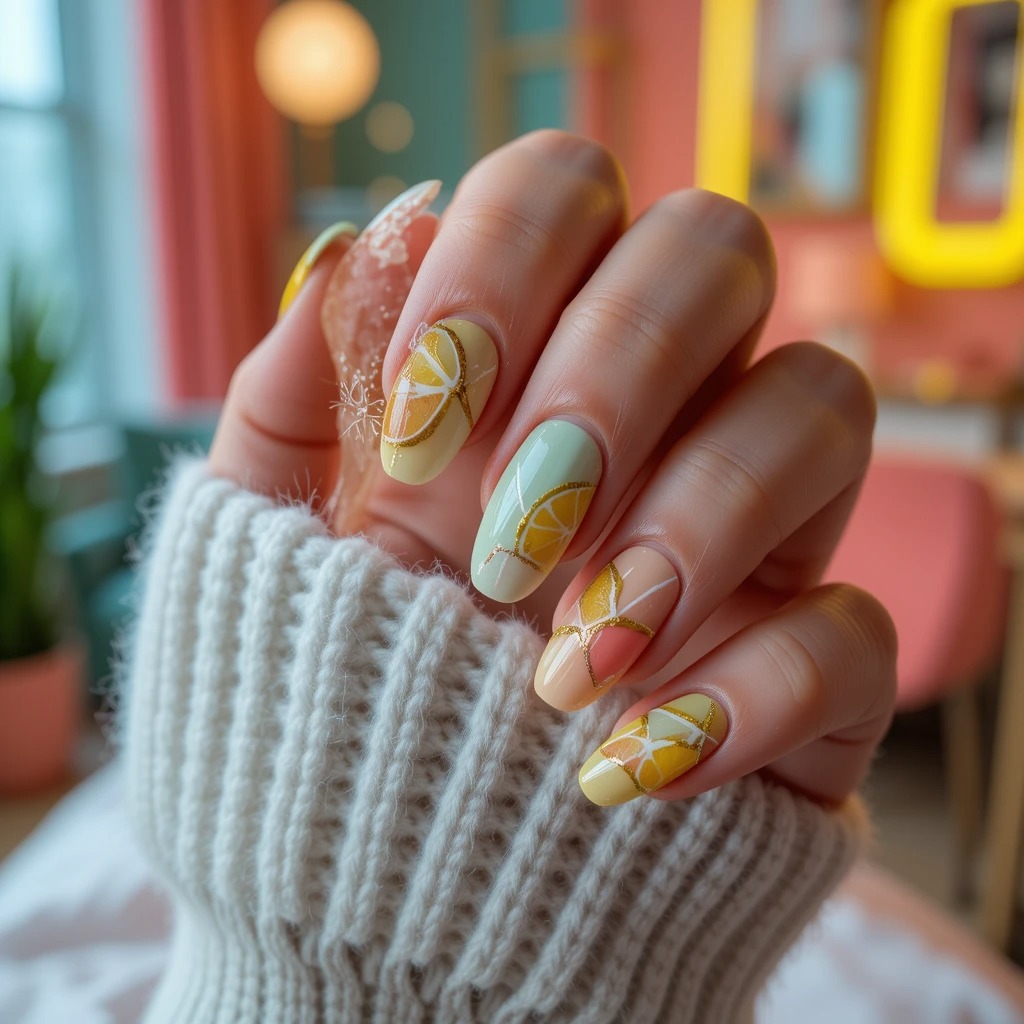
5. Mixed Tropical Fruit Medley
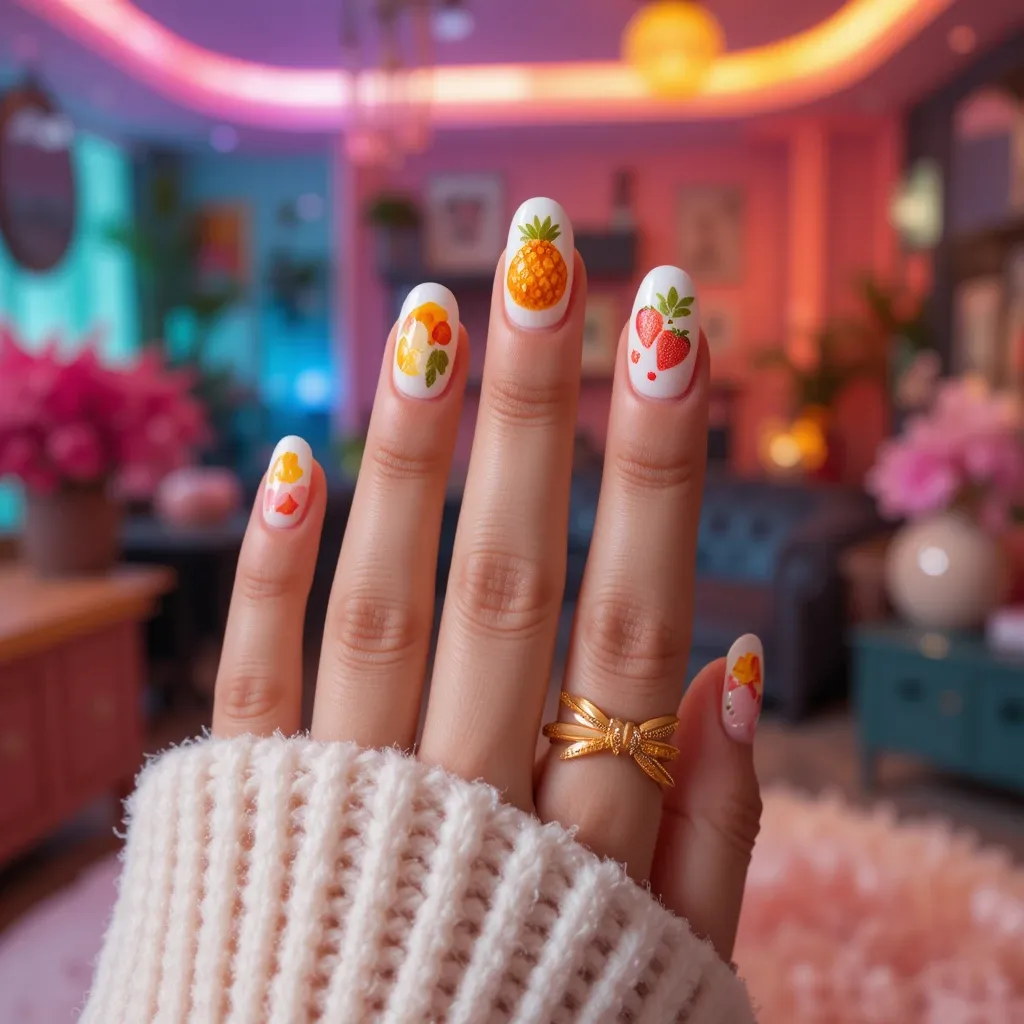
Each nail features a different tropical fruit—think pineapple slices, kiwi cross-sections, orange segments, strawberry halves, and papaya pieces—all painted on a white or cream base. The variety keeps things exciting, and the white background makes each fruit’s colors pop without competing with each other. It’s like a fruit salad for your fingertips, and it’s absolutely Instagram-worthy.
Why It Works: The mixed fruit approach gives you maximum visual interest and lets you showcase multiple favorite fruits without committing to just one design throughout your whole manicure.
Pro Tip: Keep the fruit illustrations slightly abstract and graphic rather than hyper-realistic for a more modern, editorial feel. Medium length coffin or square nails give you enough canvas space.
Master Tutorial: Creating 5 Different Fruits
This is the most advanced design in the collection, but I’m breaking it down fruit-by-fruit so you can tackle them one at a time. Start with the easiest (orange) and work up to the most detailed (kiwi).
Essential Preparation (10 minutes): Apply base coat and two coats of pure white or cream polish to all nails. This bright, clean canvas is crucial—it makes all fruit colors vibrant. Let dry completely (8-10 minutes).
FRUIT #1: Orange Slice (Easiest – Start Here)
Step 1: Using a detail brush and bright orange polish or acrylic paint, paint a circle in the center of your nail (about 6mm diameter). Don’t worry about perfect edges.
Step 2: With the same orange, paint 6-8 triangular segments inside the circle, all pointing toward center like pizza slices. Leave tiny white gaps between segments.
Step 3: With white polish, add a small circle in the very center. With light yellow or pale orange, add a thin curved highlight to one side of the circle.
Time: 5 minutes | Difficulty: Beginner
FRUIT #2: Strawberry (Simple But Impactful)
Step 1: Using bright red polish, paint an upside-down heart shape in the center of your nail. The pointed end should face your cuticle. Keep it medium-sized, not filling the whole nail.
Step 2: With lime green, paint 4-6 small leaf shapes at the top (wide end) of the strawberry. These can be simple pointed ovals.
Step 3: Using a toothpick or tiny dotting tool with yellow or white polish, add 10-15 tiny seed dots randomly across the red strawberry surface. Seeds should be scattered, not in rows.
Time: 6 minutes | Difficulty: Beginner
FRUIT #3: Pineapple Slice
Step 1: With golden yellow polish, paint a circle (5-6mm) in the center of your nail.
Step 2: Using a thin brush and slightly darker yellow or light brown, draw a diamond pattern inside the circle—create vertical lines and diagonal lines that intersect, forming small diamonds across the surface.
Step 3: With brown or dark orange, add a small dot in the center of each diamond. With white or pale yellow, add a tiny curved highlight on one edge of the circle.
Time: 8 minutes | Difficulty: Intermediate
FRUIT #4: Kiwi Cross-Section (Most Detailed)
Step 1: Paint a pale lime green circle (5mm) in the center of your nail.
Step 2: With pure white, paint a tiny circle (2mm) in the center of the green circle.
Step 3: Using a toothpick with black or dark brown polish, add 15-20 tiny dots radiating from the white center in a sunburst pattern. These are the kiwi seeds.
Step 4: With darker green, paint a very thin circle outline around the entire kiwi, then add 6-8 tiny lines extending from the white center to the outer edge (like spokes).
Step 5: With light brown or tan, add a thin fuzzy edge around the entire outside of the kiwi using tiny dots or a stippling motion.
Time: 12 minutes | Difficulty: Advanced
FRUIT #5: Papaya (Beautiful Color Payoff)
Step 1: With coral-orange polish, paint an oval shape (vertical orientation) taking up most of the nail.
Step 2: Mix yellow with a tiny bit of orange, and use a nearly dry brush to add a gradient effect from the outer edges toward the center, creating natural color variation.
Step 3: With dark gray or black, paint a small cluster of 5-8 tiny circular seeds in the center of the oval.
Step 4: Add a white highlight along one edge of the papaya for dimension.
Time: 7 minutes | Difficulty: Intermediate
Putting It All Together:
Recommended Finger Assignment:
- Thumb: Pineapple (large nail, can handle detail)
- Index: Strawberry (visible, recognizable)
- Middle: Kiwi (center stage, most detailed)
- Ring: Orange (simple but colorful)
- Pinky: Papaya (smaller nail, medium detail)
Sealing the Design (5 minutes): Once all fruits are completely dry (wait 15 minutes), apply two thin coats of glossy top coat. Don’t flood the top coat—too much can smudge your detailed work.
Total Time Investment:
- First attempt: 90 minutes
- After practice: 45-50 minutes
- Using nail decals for some fruits: 25 minutes
Smart Shortcuts Without Sacrificing Quality:
- Use water slide decals for 2-3 fruits and hand-paint the rest. This cuts time in half while you still get custom artwork. Search “fruit nail decals” on Amazon or Etsy.
- Stamp the base fruit shapes using a nail stamping kit with fruit designs, then hand-paint details like seeds and highlights. This ensures consistent sizing and shape.
- Work over 2 days: Paint base white and 2-3 fruits one day, finish remaining fruits the next day. Your hands won’t cramp and you’ll have more patience for details.
Product Shopping List:
- FolkArt Multi-Surface Acrylic Paint Set (craft store, $12 for 8 colors—enough for 20+ manicures)
- Twinkled T Fruit Salad Nail Decal Set (Etsy, $8)
- Maniology Nail Stamping Kit with fruit plates (Amazon, $25)
6. Neon Citrus Ombré
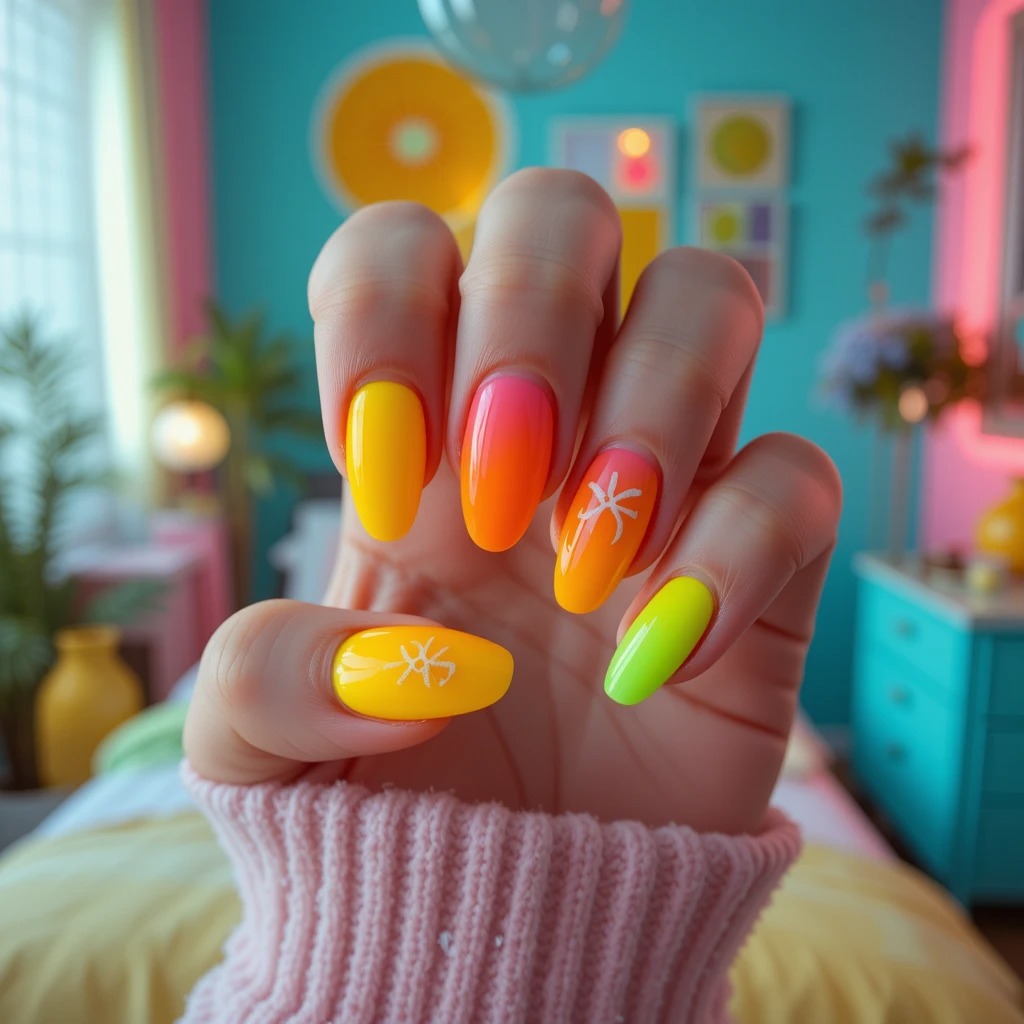
Bright gradient nails transitioning through neon citrus shades—electric yellow, hot pink grapefruit, vibrant orange, and lime green—with optional tiny citrus slice accents. The ombré can be vertical on each nail or horizontal across your whole hand, creating a rainbow effect that’s bold and summery. This design is for the maximalist who wants fruit-inspired color without traditional fruit artwork.
Why It Works: The citrus color palette feels energizing and fun while still being wearable since it reads more as colorful nails than explicitly “fruit themed” at first glance.
Pro Tip: Ask for a matte finish to make the neon colors feel more sophisticated and less ’80s highlighter. Long stiletto or almond shapes really showcase the gradient beautifully.
Ombré Techniques: Two Methods for Different Skill Levels
Method 1: Makeup Sponge Gradient (Beginner-Friendly)
This is the classic ombré technique that works beautifully for neon colors.
What You Need:
- 4-5 neon polishes in citrus shades (I recommend Essie Neon Collection or China Glaze Electric Nights)
- Small piece of makeup sponge (cut a triangular wedge)
- White polish base
- Alcohol or acetone for cleanup
- Liquid latex or petroleum jelly for easy cleanup
Step 1 – White Base (7 minutes): Apply base coat and TWO coats of pure white polish to all nails. This is crucial for neons—they’re transparent without a white base, and the white makes them glow. Let dry completely.
Step 2 – Prep for Mess (3 minutes): Neon ombré is messy—accept this now. Apply liquid latex (like Peel Off Base Coat) or petroleum jelly around your nails, covering the skin. This makes cleanup effortless. Skip cuticles and nail edges.
Step 3 – Create Color Stripe on Sponge (2 minutes per nail): On a small palette or piece of plastic, paint vertical stripes of your neon colors side by side—yellow, orange, pink, green. Make each stripe about 1cm wide. Paint them close together with just slight overlap where they meet.
Step 4 – Transfer to Nail (3 minutes per nail): Press the sponge onto the wet polish stripes, soaking up the colors. Then dab the sponge onto your nail with a bouncing motion—don’t drag or wipe. Dab 3-5 times per nail, reloading sponge with polish between nails. The colors will blend where they meet.
Step 5 – Build Intensity (5 minutes): Repeat Step 4 two more times per nail. Neons require multiple layers to reach full vibrancy. Let dry 2 minutes between layers.
Step 6 – Cleanup (5 minutes): Peel away the liquid latex or use a cotton swab dipped in acetone to clean polish off skin. Take your time—clean edges make the design look professional.
Step 7 – Matte Finish (2 minutes): Apply one coat of matte top coat for that sophisticated neon effect. Let dry completely.
Method 2: Rainbow Across Hand (Easier, Different Effect)
Instead of blending colors on each nail, paint each nail a different neon citrus color, arranged to create a gradient across your hand.
Step 1 – Plan Color Order: Thumb to pinky: Electric yellow → bright orange → hot pink → magenta → lime green
Step 2 – Application (15 minutes): Over white base coat, paint each nail its designated color. Two coats per nail for full opacity. This method requires less precision and no sponge technique.
Step 3 – Optional Citrus Slice Details (10 minutes): On 1-2 nails, add simple citrus slice line art using white polish and a thin brush. Keep it minimal—just a few curved lines to suggest citrus segments.
Neon-Specific Tips:
Why White Base Is Essential: Neon pigments are fluorescent and semi-transparent. Without white underneath, they look washed out and require 4-5 coats to be opaque. White base = two coats maximum.
Lighting Matters: Neon colors look different in natural sunlight vs. indoor lighting vs. UV blacklight. If you’re wearing these to a specific event, check the color in similar lighting beforehand.
Top Coat Can Dull Neons: Some top coats react with neon pigments and make them less vibrant. Test your top coat on one nail first, or look for neon-safe top coats (Seche Vite works well).
Cleanup Tool You Need: A precision cleanup brush (Amazon, $6 for 5-pack) makes cleanup 10x faster. Dip in acetone and trace around your cuticles for crisp edges.
Color Recommendations by Brand:
Budget Option ($3-5 per bottle):
- Sinful Colors: Neon Melon, Electric Yellow, Hazard
- LA Colors: Electric Coral, Shock, Radioactive
Mid-Range ($8-10 per bottle):
- Essie Neon Collection: Aim to Misbehave, Short Shorts, Leggy Legend
- China Glaze Electric Nights: Sunshine Pop, That’s Shore Bright, Splish Splash
Professional Quality ($12-15 per bottle):
- Lights Lacquer: The entire Neon collection
- ILNP: Neon Glow polishes
Time Breakdown:
- Sponge method: 45 minutes first time, 30 minutes after practice
- Rainbow across hand: 25 minutes total
Make It Last: Neon colors fade faster than regular polish, especially in sunlight and chlorine. Reapply top coat every 2-3 days and avoid extended sun exposure to maintain vibrancy for 7-10 days.
Sweet & Playful Designs
7. Strawberry French Tips
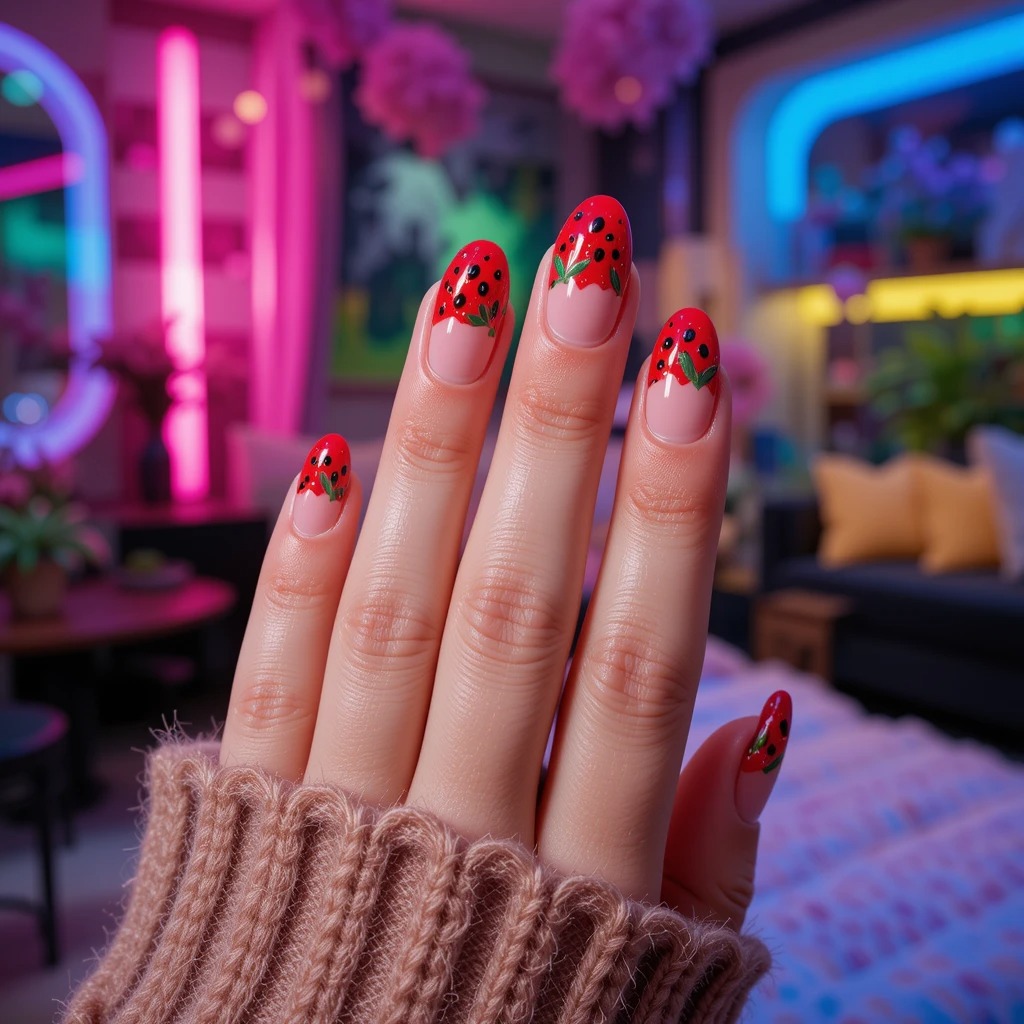
Classic French manicure reimagined with red tips instead of white, tiny black seed details dotting the red, and small green leaves painted at the base of each tip. The nude or light pink base keeps it grounded while the strawberry-inspired tips add that perfect touch of whimsy and summer sweetness. It’s familiar enough to feel wearable but creative enough to feel special.
Why It Works: This design takes the universally flattering French manicure and gives it a fruity twist that’s appropriate for virtually any occasion while still showcasing your personality.
Pro Tip: Keep the red tips slightly thinner than traditional French tips for a more delicate, refined look. Oval or squoval shapes work best for this feminine design.
Perfect French Tip Tutorial (Even If You’ve Never Done One Before)
French manicures intimidate a lot of people, but I’m going to teach you the tape method that makes it foolproof.
Tools You Need:
- French manicure tape guides OR regular scotch tape
- Bright red polish (not dark burgundy—think fresh strawberry)
- Nude or light pink base polish
- Thin detail brush
- Black and green polish or acrylic paint for details
Step 1 – Create Perfect Nude Base (7 minutes): Apply base coat and two coats of nude or light pink polish (OPI “Bubble Bath,” Essie “Ballet Slippers,” or any nude that matches your skin tone plus one shade lighter). Let dry completely—minimum 8 minutes. This is crucial; wet base will smudge when you apply tape.
Step 2 – Apply French Tip Guides (2 minutes): If using nail tape guides, peel and stick them across each nail where you want the strawberry red to begin. For strawberry tips, position them slightly lower than traditional French tips—about 3-4mm from your nail edge instead of 2mm. Press edges down firmly.
If using regular scotch tape: cut small pieces and stick them to your hand first (reduces stickiness so it won’t pull off your base color), then position carefully.
Step 3 – Paint Red Tips (5 minutes): Apply TWO thin coats of bright red polish over the exposed tip area and slightly overlapping the tape edge. Thin coats prevent the polish from seeping under the tape. Let dry 5 minutes before removing tape.
Step 4 – Remove Tape Carefully (1 minute): While polish is still slightly tacky (not fully dry), gently peel tape away at a 45-degree angle. If you wait until polish is fully dry, you risk peeling the red tip off with the tape. Remove slowly and carefully.
Step 5 – Cleanup and Perfect the Line (3 minutes): Use a cleanup brush dipped in acetone to perfect the curved line where red meets nude. This step transforms good French tips into salon-quality French tips.
Step 6 – Add Strawberry Seeds (8 minutes): Using a toothpick or tiny dotting tool with black polish or acrylic paint, add small seed dots across the red tip area. Place 6-8 seeds per nail randomly—not in straight lines. Seeds should be tiny (smaller than you think). Let dry 3 minutes.
Step 7 – Paint Green Leaves (5 minutes): With a thin detail brush and grass-green polish, paint 2-3 tiny leaf shapes right at the base of each red tip where it meets the nude. Each leaf is a simple pointed oval. Keep them small and delicate.
Step 8 – Seal Everything (2 minutes): Apply two coats of glossy top coat, making sure to cap the tip edge. This prevents chipping and gives that fresh, juicy strawberry shine.
No Tape? Alternative Guide Method:
Household Item Hack: Use a round hole punch to create your own guides. Punch circles from masking tape or painter’s tape, cut them in half, and you have perfect curved French tip guides.
Freehand Method for Steady Hands: Rest your painting hand on the table. Use a striping brush dipped in red polish to draw the curved French line freehand. Start from one corner, arc across the middle, end at the other corner. Fill in the tip area. This takes practice but gives you ultimate control.
Common Problems and Solutions:
Problem: Red polish seeped under the tape, creating fuzzy lines Solution: Your base wasn’t dry enough, or you applied red coat too thick. Wait longer and use thinner coats next time.
Problem: Tape pulled off the nude base color Solution: Tape was too sticky. Always stick it to your hand first, or use low-tack painter’s tape instead of regular scotch tape.
Problem: Seeds look too big and blobby Solution: Use less polish on your dotting tool. Touch the polish bottle rim to remove excess, then dot. Seeds should be barely-there dots.
Problem: Green leaves look clumsy Solution: Thin your green paint/polish with a drop of polish thinner. Thinner consistency = more control. Also use a size 0 or 00 detail brush.
Variation Ideas:
Reverse Strawberry French: Nude tips with red base and seeds on the base area instead Mini Strawberry French: Make the red tips very thin (2mm) for a subtle effect Glitter Seeds: Use gold or silver micro glitter instead of black seeds for a glam version Gradient Strawberry: Instead of solid red, create a pink-to-red gradient on the tips
Time Investment:
- First attempt: 45 minutes
- After 2-3 tries: 25-30 minutes
Best Polish Formulas for This Design:
- Base: Sheer to light coverage nude (you want to see nail through it slightly)
- Red tips: Highly pigmented, one-coat formula (China Glaze “Italian Red,” Essie “Really Red”)
- Top coat: Fast-drying formula (Seche Vite) to seal seeds without smudging
8. Blueberry Gradient
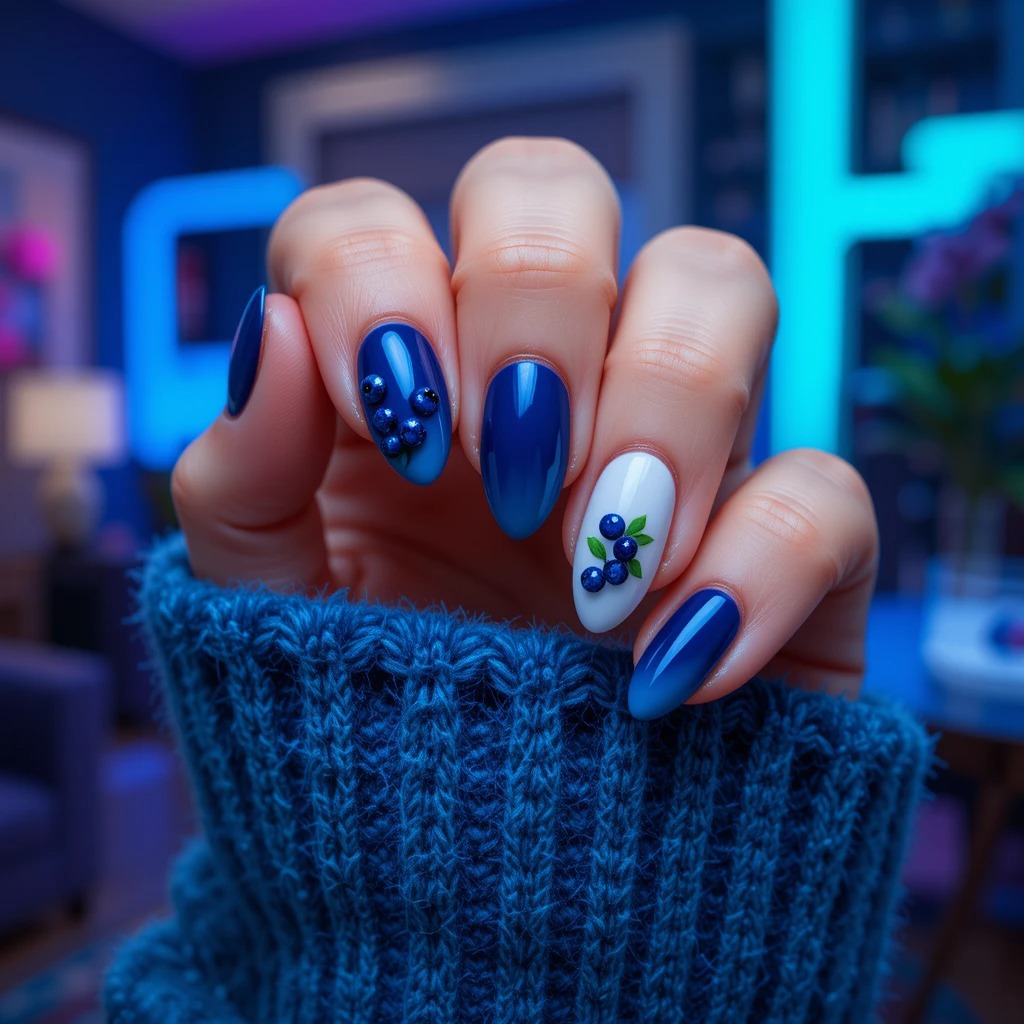
Deep blue to white gradient creating an ombré effect, with tiny hand-painted blueberries clustered on one or two accent nails and small green leaves. The gradient mimics the natural color variation of fresh blueberries, and the overall effect is surprisingly elegant rather than juvenile. The blue tones also make this unexpectedly versatile for cooler months when traditional fruit nails might feel out of season.
Why It Works: Blueberries translate beautifully to nail art because their deep purple-blue tones feel sophisticated and can complement both casual and dressier outfits without feeling too themed.
Pro Tip: Add a subtle shimmer to the gradient for extra dimension, and keep the blueberry clusters small and realistic. Short to medium round nails enhance the soft, berry-inspired aesthetic.
Creating the Perfect Blue-to-White Gradient
This gradient is unique because it uses cool tones, which blend differently than warm colors.
Color Selection Is Critical: You need THREE blue shades for a smooth gradient:
- Deep navy or indigo blue (darkest)
- Medium periwinkle or cornflower blue (middle)
- Soft sky blue or powder blue (lightest) Plus pure white for the lightest part
Recommended Color Combinations:
Option 1 – Cool Purple-Blue:
- Dark: Essie “After School Boy Blazer”
- Medium: Sally Hansen “Blue Me Away”
- Light: Essie “Bikini So Teeny”
- White: OPI “Alpine Snow”
Option 2 – True Blue:
- Dark: OPI “Russian Navy”
- Medium: China Glaze “Dorothy Who?”
- Light: Zoya “Sailor”
- White: Any pure white
Step-by-Step Gradient Tutorial:
Step 1 – White Base (7 minutes): Apply base coat and two coats of pure white polish. Let dry completely. This base helps all blue shades appear true to color.
Step 2 – Sponge Preparation (3 minutes): Cut a makeup sponge into a thin wedge shape. On a palette or piece of plastic, paint four vertical stripes of your colors in order: deep blue, medium blue, light blue, white. Each stripe should be about 1cm wide with slight overlap.
Step 3 – First Gradient Layer (10 minutes): Press sponge onto the polish stripes to load the colors. Dab onto your nail with a gentle bouncing motion, positioning the deep blue near your cuticle and white near your tip. Reload sponge and repeat for each nail. Let dry 3 minutes.
Step 4 – Build Gradient Depth (8 minutes): Repeat Step 3 two more times. Each layer intensifies the colors and smooths the gradient transitions. Blue gradients especially need multiple layers to look seamless. Wait 2 minutes between layers.
Step 5 – Clean Up Edges (5 minutes): Use a precision brush dipped in acetone to clean polish from your skin and cuticles. Clean edges make your gradient look professional.
Step 6 – Add Shimmer (Optional – 2 minutes): For extra dimension, lightly dab a silver or blue shimmer polish over the gradient using a barely-loaded sponge. This catches light beautifully.
Step 7 – Paint Blueberry Clusters (12 minutes): Choose 1-2 accent nails (ring finger and middle finger work well).
Using a small dotting tool and your darkest blue (or mix dark blue + tiny bit of purple), create clusters of 3-5 circular blueberries. Make them different sizes—some 3mm, some 2mm—for realism. Position clusters slightly off-center.
Step 8 – Blueberry Details (5 minutes): With a toothpick and black or very dark purple polish, add a tiny star or cross shape to the top of each blueberry (this is the characteristic blueberry crown). It should be barely visible.
Using the same dark color, add subtle shading to one side of each berry with a tiny curved line to create dimension.
Step 9 – Green Leaves (3 minutes): With a thin detail brush and sage or olive green, paint 2-4 small pointed oval leaves nestled between blueberries in each cluster. Add a thin center vein to each leaf with darker green.
Step 10 – Highlight for Realism (2 minutes): Using a toothpick with white polish, add a tiny highlight dot to the upper portion of each blueberry. This single detail makes them look dimensional and shiny.
Step 11 – Top Coat (3 minutes): Apply two thin coats of glossy top coat to all nails. The shine enhances the berry effect.
Troubleshooting Blue Gradients:
Problem: Gradient looks streaky, not blended Solution: You’re not dabbing enough. The sponge needs 10-15 gentle bounces per nail. Also ensure colors on your palette have slight overlap.
Problem: Blue stained my skin badly Solution: Blue and purple pigments stain more than other colors. Always use liquid latex or petroleum jelly barrier before starting. If already stained, soak in lemon juice for 2 minutes.
Problem: Gradient looks muddy in the middle Solution: Your medium shade is too dark or too similar to the dark shade. You need more contrast between shades. Try adding a lighter middle color.
Realistic Blueberry Painting Tips:
Study Real Blueberries: Look at actual blueberries before painting. Notice they’re not perfectly round, they have that characteristic crown top, and they have natural color variation with lighter and darker areas.
Size Matters: Real blueberries in a cluster are different sizes. Vary your blueberry sizes from 2mm to 4mm diameter for authenticity.
Cluster Composition: Paint berries overlapping slightly, not in a straight line or perfect circle. Natural clusters are organic and slightly irregular.
The Crown Detail: This tiny star or cross at the berry top is what makes them read as “blueberries” instead of generic blue circles. Don’t skip it.
Time Required:
- Gradient only: 35 minutes
- Gradient + blueberry details: 60 minutes first time, 40 minutes after practice
Make It Easier:
Shortcut 1: Use a blue-to-white ombré thermal polish that changes with temperature. Add blueberry details on top. (Recommended: Born Pretty Store thermal polishes)
Shortcut 2: Create gradient on only 2-3 nails; paint the rest solid medium blue. Less gradient work, still beautiful.
Shortcut 3: Use blueberry nail stickers for the berry clusters and hand-paint just the leaves and highlights.
Product Recommendations:
- LA Colors Color Craze Blue Collection (5 blue shades for $10)
- Twinkled T Blueberry Decals (Etsy, $6)
- Precision Cleanup Brush Set (Amazon, $7)
Elegant & Artistic Fruit Nails
9. Abstract Citrus Slices
Modernist interpretation of citrus slices with geometric segments, thin gold or white lines, and a sophisticated color palette of sage green, pale yellow, soft coral, and cream. Instead of realistic fruit, think artistic line drawings and color blocking that evoke citrus without being literal or cutesy. This is fruit nail art for the design-forward minimalist who appreciates subtle references.
Why It Works: The abstract approach makes fruit nails feel elevated and appropriate for any age, style, or occasion—you get the fresh fruit energy without the potential immaturity of literal designs.
Pro Tip: Request matte finish on some nails and glossy on others for added visual texture. Medium length square or coffin nails provide the perfect canvas for the geometric details.
Creating Abstract Citrus Art: A Modern Approach
This design requires a different mindset than traditional nail art. You’re creating ART, not illustrations.
Understanding Abstract Design Principles:
What Makes It “Abstract”:
- Simplified shapes and lines instead of realistic details
- Geometric interpretation of organic forms
- Limited, sophisticated color palette
- Emphasis on negative space
- Mixed finishes (matte + glossy)
Design Planning (Do This Before You Start):
Sketch your design on paper first. Decide:
- Which nails get citrus elements vs. staying solid color
- Whether your citrus slices are circles, half-circles, or quarter segments
- Color placement and blocking
- Where metallic lines will go
Color Palette Creation:
Mix these colors yourself for a custom, cohesive look:
- Sage green: Mix white + tiny forest green + tinier bit of black
- Pale yellow: Mix white + yellow (90% white, 10% yellow)
- Soft coral: Mix white + coral + tiny orange (should be very muted)
- Cream: Mix white + tiniest tan or beige
Step-by-Step Abstract Citrus Tutorial:
Step 1 – Base Color Blocking (15 minutes): Don’t make all nails the same color. Create visual interest with:
- Thumb: Cream
- Index: Sage green
- Middle: Pale yellow
- Ring: Soft coral
- Pinky: Cream
Apply two coats of each color. Let dry completely (10 minutes).
Step 2 – Planning Geometric Citrus Placement (2 minutes): Decide which nails get citrus elements. For sophisticated, modern look: only 2-3 nails maximum. I recommend middle and ring fingers.
Step 3 – Creating Geometric Citrus Shape (8 minutes per citrus nail):
Option A – Full Circle: Using a thin detail brush and slightly contrasting color (e.g., pale yellow circle on sage green base), paint a perfect circle in the center or off-center on your accent nail. Use a dotting tool to trace the circle outline first if needed.
Option B – Half Circle: Paint a semicircle starting at one edge of the nail, curving across the center.
Option C – Quarter Segment: Paint just a wedge shape in one corner, like you’re seeing the citrus from the edge.
Step 4 – Adding Geometric Segments (10 minutes): This is what makes it citrus instead of just a circle.
Using a thin striping brush or detail brush with white or gold polish, divide your citrus shape into 6-8 triangular segments. The lines should:
- All originate from the center point
- Be perfectly straight (use striping tape as a guide if needed)
- Be very thin (1mm or less)
- Extend to the edge of your citrus shape
For half-circles or quarters, adjust segment lines accordingly.
Step 5 – Metallic Line Accents (5 minutes): This is the modern, elevated detail.
Using gold striping polish or a gold nail art pen:
- Outline your citrus shape with a thin gold line
- Add 1-2 gold accent lines across other nails (diagonal, horizontal, or curved)
- Maybe add a thin gold frame around one whole nail
The gold ties the design together and adds luxury.
Step 6 – Negative Space Element (Optional – 3 minutes): For maximum modern aesthetic, leave strategic areas unpainted or use clear polish.
Example: Paint a citrus outline and segments but don’t fill in the segments—leave bare nail showing through. Super editorial.
Step 7 – Mixed Finish Application (5 minutes): This is KEY to the abstract, modern vibe:
- Citrus accent nails: MATTE top coat
- Solid color nails: GLOSSY top coat
- Or reverse: glossy citrus, matte solid colors
The finish contrast adds serious sophistication.
Advanced Techniques for Next-Level Abstract:
Texture Addition:
- Add linen or canvas texture to some nails using textured polish or fine nail powder
- Creates tactile dimension like actual artwork
Watercolor Wash Background:
- Before painting geometric citrus, create a very soft watercolor wash background in complementary colors
- Dilute polish with clear polish and lightly brush across nail
Layered Transparency:
- Use sheer polishes for your citrus shapes so the base color shows through
- Creates depth and complexity
Color Bleeding:
- Intentionally let colors bleed slightly into each other for an artistic, painterly effect
- Requires confidence and embracing imperfection
Common Mistakes in Abstract Design:
Mistake: Adding too many elements, making it busy instead of minimalist Fix: Less is more. If you’re unsure, remove one element.
Mistake: Using realistic citrus colors, making it look illustrative instead of abstract Fix: Mute your colors by adding white. Pastels and muted tones read as sophisticated.
Mistake: Perfect, identical elements on every nail Fix: Vary the size, placement, and orientation. Asymmetry is artsy.
Mistake: Overusing metallics Fix: Metallic accents should be sparse—thin lines only, not filled shapes.
Inspiration Sources:
Study these artists/styles before creating your design:
- Bauhaus geometric art
- Mid-century modern prints
- Mondrian color blocking
- Japanese minimalism
- Scandinavian design
Look at their use of line, color, shape, and negative space.
Product Recommendations:
For Perfect Thin Lines:
- Mitty Gold Striping Polish (Amazon, $8)
- Whats Up Nails Straight Nail Vinyls (Amazon, $7)
- Sally Hansen I Heart Nail Art Striper Brush ($4)
For Matte Finish:
- Essie Matte About You Top Coat ($9)
- OPI Matte Top Coat ($11)
For Geometric Precision:
- Nail art striping tape in gold and white
- Fine point nail art pen in gold
- Circle stencils for perfect citrus shapes (nail art supply stores)
Time Investment:
- First design: 75-90 minutes (includes planning time)
- After developing your style: 40-45 minutes
Styling Tip: Abstract citrus nails pair beautifully with minimalist jewelry, neutral clothing, and modern aesthetics. They’re conversation starters that work in creative professional settings.
10. Botanical Fruit Illustration
Delicate hand-painted fruit illustrations in a vintage botanical print style—think detailed berries, citrus blossoms, small fruit cross-sections, and thin vine details on a neutral background. Each nail can feature different fruit elements, or you can focus on one type of fruit rendered in this artistic, almost watercolor style. The result feels like wearable art that happens to be fruit-themed.
Why It Works: This design appeals to those who love both nail art and aesthetic sophistication, bridging the gap between playful fruit motifs and genuinely beautiful, gallery-worthy nail designs.
Pro Tip: Bring reference images of botanical illustrations you love to help your nail tech capture the specific artistic style you’re after. Almond or oval shapes complement the organic, flowing nature of botanical art.
Mastering Botanical Illustration on Nails
This is the most artistic, detailed design in the entire collection. It requires patience and a steady hand, but the results are absolutely stunning—legitimately art-quality.
Understanding Botanical Illustration Style:
Historical Context: Botanical illustrations were created by naturalists in the 17th-19th centuries to document plants scientifically. They’re characterized by:
- Extreme attention to botanical accuracy
- Delicate, precise linework
- Muted, natural color palettes
- Often includes plant at different life stages (bud, flower, fruit)
- Thin, controlled pen-and-ink style details
Modern Interpretation for Nails: We’ll adapt this style to be achievable on nails while maintaining its essence.
Essential References:
Before starting, find 3-5 botanical illustration images online. Search:
- “Vintage botanical strawberry illustration”
- “Botanical citrus print 1800s”
- “Pomology fruit illustration”
Save these to your phone for reference while painting.
Color Palette for Authentic Botanical Style:
Background: Cream, aged white, or soft tan (not pure white—botanical books yellowed with age)
Fruit Colors: Muted versions of natural fruit tones
- Strawberries: Dusty rose-red (not bright red)
- Citrus: Soft golden-yellow
- Berries: Deep blue-purple, burgundy
- Leaves: Sage green, olive, muted forest green
Detail Colors: Burnt umber or sepia brown for linework, shadows, and botanical details
Complete Botanical Fruit Tutorial:
Step 1 – Aging the Base (8 minutes): Create an authentic aged-paper background.
Mix a tiny bit of tan or beige polish into white to create “aged cream” color. Apply two coats to all nails. Let dry completely.
For extra authenticity, very lightly sponge random patches of slightly darker cream across some nails to mimic aged paper discoloration.
Step 2 – Design Planning Per Nail (5 minutes):
Decide composition for each nail. Mix these elements:
- Whole fruit
- Cross-section of fruit
- Flower or blossom
- Leaves and stem
- Small botanical notes (seeds, detail views)
Example Layout:
- Thumb: Strawberry plant with fruit, flower, and leaves
- Index: Lemon with one slice and blossoms
- Middle: Branch with berries and leaves
- Ring: Detailed fruit cross-section
- Pinky: Small botanical elements (seeds, single leaf)
Step 3 – Sketching Outline (10 minutes per nail):
This is crucial for botanical style—the line drawing comes first.
Using a very thin detail brush (size 00 or 000) and burnt umber or sepia brown acrylic paint (thinned with water), sketch your botanical elements.
Technique:
- Work in thin, continuous lines
- Include botanical details: leaf veins, stem textures, fruit seeds
- Add small cross-hatch shading under fruits and leaves
- Sign your work! Tiny initials in corner like real botanical artists did
Start with the largest element (the fruit) then add supporting elements (leaves, stems, flowers).
Step 4 – Base Color Washes (12 minutes):
Botanical illustrations use thin color washes, not solid color fills.
Thin your fruit-colored polish or acrylic paint with clear polish or water (50/50 ratio). Using a small brush, apply a light wash of color to your sketched fruits and flowers. Leave some areas lighter than others for dimension.
Let dry 5 minutes.
Step 5 – Building Color Depth (10 minutes):
Apply a second, more concentrated color wash to the darker areas of your fruits and flowers:
- Bottom and sides of fruits
- Underneath overlapping leaves
- Inside flower petals
This layering creates the characteristic depth of botanical watercolors.
Step 6 – Leaf and Stem Coloring (8 minutes):
Apply muted green washes to leaves and stems, varying the intensity. Real botanical illustrations show leaves in different conditions—some fresh and bright, some older and darker. Mimic this variation.
Add thin brown shading along leaf edges and stem sides.
Step 7 – Detail Reinforcement (15 minutes):
This is where your design becomes truly botanical.
Using your finest brush and brown paint, go back over your illustration adding:
- Crisp outlines around every element
- Individual seed details
- Leaf vein patterns (central vein plus smaller side veins)
- Texture on fruits (tiny dots for strawberry seeds, pores on citrus)
- Cross-hatching for shadows
- Small scientific notation lines (like botanical prints label parts)
Step 8 – Highlight and Dimension (5 minutes):
Using very thin white paint, add tiny highlights to:
- Top side of fruits
- Edges of petals
- Top of leaves
These should be delicate touches, not bold highlights.
Step 9 – Optional Latin Names (5 minutes):
For ultra-authentic botanical style, use a nail art pen to write tiny Latin names near your illustrations:
- Strawberry: “Fragaria × ananassa”
- Lemon: “Citrus limon”
- Blueberry: “Vaccinium corymbosum”
Use thin, script-style handwriting in brown or sepia.
Step 10 – Sealing (3 minutes):
Apply ONE thin coat of matte top coat. Matte finish is essential—it mimics paper and prevents the glossy look that would break the botanical illustration illusion.
Techniques for Authentic Botanical Details:
Cross-Hatching for Shadows: Draw tiny parallel lines, then draw another set of lines crossing them at an angle. This creates graduated shading. The closer together the lines, the darker the shadow.
Stippling for Texture: Create texture with tiny dots rather than solid color. Use a fine point or toothpick to add dots in varying density.
Leaf Vein Patterns: All leaves have a central midrib vein with smaller veins branching off at angles. Study real leaves and mimic this pattern exactly.
Controlled Linework: Rest both hands on table. Move the nail, not the brush. This gives you maximum control for thin, steady lines.
What Makes Botanical Different from Regular Fruit Art:
| Botanical Style | Regular Fruit Art |
|---|---|
| Includes scientific details | Focuses on aesthetics |
| Muted, natural colors | Bright, enhanced colors |
| Thin linework defining everything | Soft blended edges |
| Shows plant structure (stems, leaves, roots) | Shows just the fruit |
| Educational feeling | Decorative feeling |
| Matte finish | Usually glossy |
Skill Level and Time:
Beginner: Start with simple single element per nail (one berry, one leaf). Time: 90 minutes
Intermediate: Full fruit with leaves and flower. Time: 60-75 minutes
Advanced: Complex composition with multiple elements and Latin names. Time: 45-60 minutes
Practice Recommendation:
Before attempting this on your nails, practice botanical elements on:
- Paper
- Nail wheels
- Press-on nails you can discard
The line control and detail work requires practice. Don’t be discouraged if your first attempts look less botanical and more “illustration”—this is a true art form.
Recommended Products:
Paint (Better Control Than Polish):
- FolkArt Multi-Surface Acrylic Paint ($1-2 per bottle)
- Apple Barrel Acrylic Paint Set ($8 for 18 colors)
- Golden Fluid Acrylics for professional quality ($8 per bottle)
Brushes:
- Princeton Aqua Elite Detail Brush Set ($12 for 3 sizes)
- Kolinsky sable liner brush size 0 ($6)
Base Colors:
- OPI “Patience Pays Off” (aged cream)
- Essie “Topless & Barefoot” (warm cream)
Top Coat:
- OPI Matte Top Coat ($11)
- Essie Matte About You ($9)
Learning Resources:
Study real botanical illustrations:
- Browse the Biodiversity Heritage Library online (free, thousands of botanical prints)
- Look at Pierre-Joseph Redouté’s fruit illustrations
- Study pomology (fruit science) illustrations from the 1800s
Styling and Wearing:
Botanical fruit nails pair beautifully with:
- Vintage-inspired outfits
- Earthy, natural aesthetics
- Academic or intellectual settings
- Museum visits, art gallery openings
- Cottagecore fashion
- Natural fiber fabrics (linen, cotton)
They’re sophisticated enough for professional settings while being artistic enough for creative environments
The Fruit Nail Age Question Nobody Talks About
Is There an Age Limit for Fruit Nails?
Here’s the uncomfortable truth: some fruit nail designs look amazing on everyone, and some make you look like you borrowed your daughter’s press-ons. The difference isn’t your age—it’s the execution.
What Works at Any Age:
- Abstract fruit interpretations (geometric citrus)
- Single delicate accent (one watercolor peach)
- Monochromatic fruit tones (peachy nude palette)
- Botanical illustration style (vintage print aesthetic)
- Minimalist cherry studs (jewelry-like accents)
What Gets Tricky After 30:
- Cartoon-style fruit faces with eyes and smiles
- Full fruit salad with every bright color competing
- Giant strawberries covering your entire nail
- Overly literal designs with harsh outlines
The rule: If the fruit design could also work as kids’ wallpaper, reconsider.
Fruit Nail Durability Reality Check
Watermelon Slices Chip Weird
Those cute watermelon designs with the red interior, white rind, and green exterior? They chip in a specific, annoying pattern. The different colored layers peel at different rates, so by day 5 your watermelon looks like it got run over by a lawnmower. The fix? Gel polish only for multi-layer fruit designs, or accept that you’re getting 3-4 good days max.
3D Fruit Charms Don’t Last
Those adorable little 3D strawberries and cherries? One dishwashing session, one aggressive hand-drying with a paper towel, one vigorous hair-brushing—gone. If you’re doing 3D fruit embellishments, commit to treating your hands like they’re made of glass for the next week or just accept they’re decorative for a few days max.
Dark Fruit Colors Stain
Blueberry blues, deep strawberry reds, and grape purples can stain your natural nail if you skip base coat (or if your base coat isn’t thick enough). That stain takes weeks to grow out. Always use a white or opaque base coat under dark fruit colors, not a clear one.
The Seasonal Appropriateness Debate
Can You Wear Watermelon Nails in December?
Technically yes. Realistically? You’ll get looks. Here’s the seasonal breakdown:
Year-Round Fruit:
- Cherries (retro vibe works any season)
- Abstract citrus (geometric = seasonless)
- Blueberries (deep tones work for fall/winter)
- Botanical illustrations (artistic = timeless)
Seasonal-Specific Fruit:
- Watermelon (April-September, pushing it after)
- Tropical medley (May-August, vacation exception any time)
- Strawberries (March-October, cute in winter but feels off)
- Peaches (June-September, Georgia exception applies)
The Exception: Vacation. All fruit nails are acceptable when you’re on a beach somewhere, regardless of calendar date.
Nail Length and Fruit Design Success Rate
Short Nails (At/Below Fingertip):
- ✓ Single delicate fruit accent
- ✓ Minimalist cherry studs
- ✓ Thin strawberry French tips
- ✗ Mixed tropical medley (too cramped)
- ✗ Detailed botanical illustrations (not enough space)
- ✗ Watermelon slices (proportions look weird)
Medium Nails (1-2mm Past Fingertip):
- ✓ Everything works at this length
- This is the sweet spot for fruit nails
Long Nails (3mm+ Past Fingertip):
- ✓ Botanical illustrations (need the canvas)
- ✓ Abstract geometric fruit
- ✓ Mixed tropical medley
- ✗ Tiny accents (lost on long nails, need to scale up)
What Nail Techs Wish You Knew About Fruit Designs
Hand-Painted Fruit Takes 2+ Hours
If you book a regular 60-minute appointment and show up wanting intricate hand-painted strawberries on every nail, your tech is internally screaming. Detailed fruit art requires:
- 30 min: Base prep, base coat, color application
- 60 min: Actual fruit painting (minimum)
- 20 min: Drying, top coat, cleanup
Book accordingly or choose simpler designs.
Reference Photos Are Essential
“I want fruit nails” means nothing. Bring 3-5 photos of EXACTLY what you want:
- The specific fruits
- The style (realistic vs. abstract vs. cartoon)
- The color palette
- The placement
Don’t make your tech guess. They will guess wrong.
Not Every Tech Can Do Every Style
Some techs excel at fine detail work (botanical illustrations). Some are better at bold, graphic designs (watermelon slices). Some do beautiful abstract work (geometric citrus). Check your tech’s portfolio before booking. If their Instagram shows only solid colors and simple French tips, they probably can’t execute that intricate fruit medley you want.
DIY Fruit Nails: What Actually Works at Home
You Can DIY:
- Fruit-toned gradients (no actual fruit art needed)
- Single fruit decals/stickers (easier than hand-painting)
- Solid colors inspired by fruits (peachy nude, cherry red)
- Simple strawberry French tips (if you can do regular French)
Leave to Professionals:
- Multi-fruit medleys
- Botanical illustrations
- Watercolor effects
- 3D fruit sculptures
- Abstract geometric fruit
The Reality: Most people’s DIY fruit nails look like a 6-year-old’s art project. And that’s fine for wearing around the house, but if you’re going somewhere? Pay the professional.
When Fruit Nails Make Sense
Perfect For:
- Summer vacations and beach trips
- Outdoor brunch and garden parties
- Music festivals and casual concerts
- Weekend farmer’s market vibes
- Social media content creation
Questionable For:
- Corporate office settings (except minimalist versions)
- Formal events like weddings
- Job interviews
- Conservative family gatherings
- Anywhere you need to be taken seriously
The Test: Would you wear a shirt with this exact design to this event? If no, reconsider the nails.
Pick Your Fruit (Wisely)
Fruit nails are fun until they’re not. The difference between cute and cringe is knowing your own style limits, choosing designs that actually suit your lifestyle, and being realistic about maintenance.
Start conservative (single peach accent), see how it feels, then go bigger next time if you’re feeling it. Or go full tropical medley right out the gate—it’s your life. Just know what you’re signing up for before you’re stuck with cartoon strawberries for the next two weeks.