8 Stunning Country Concert Nails Ideas
There’s something magical about getting ready for a country concert—the outfit, the boots, and of course, the perfect nails to complete your look. Country concert nails need to strike that sweet spot between glamorous and down-to-earth, polished yet practical enough to last through hours of dancing, singing, and making memories.
Whether you’re heading to see your favorite artist at a honky-tonk or an outdoor amphitheater, these nail ideas will have you feeling confident and camera-ready from the parking lot to the encore.
Here Country Concert Nails Ideas
Rustic & Natural Vibes
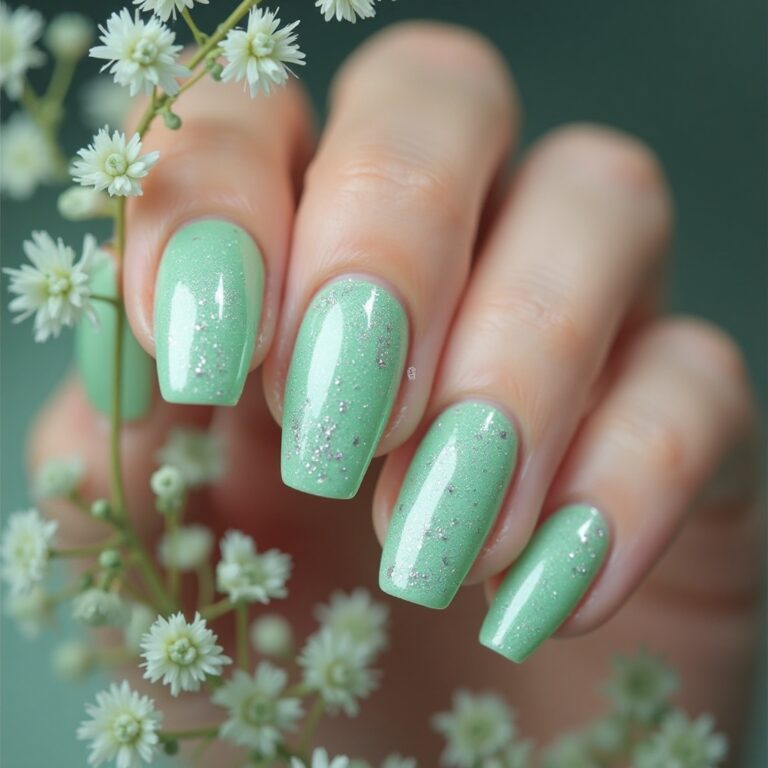
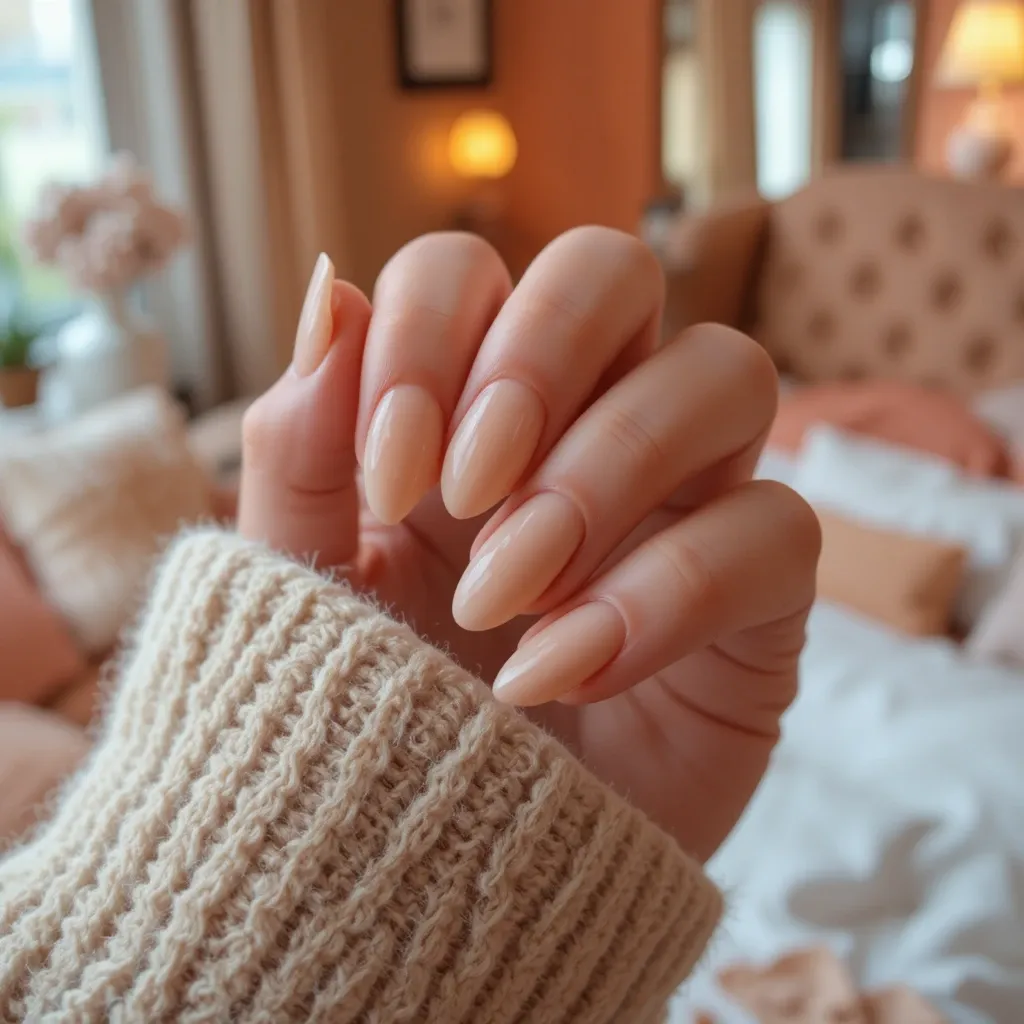
1. Honey Whiskey Nude
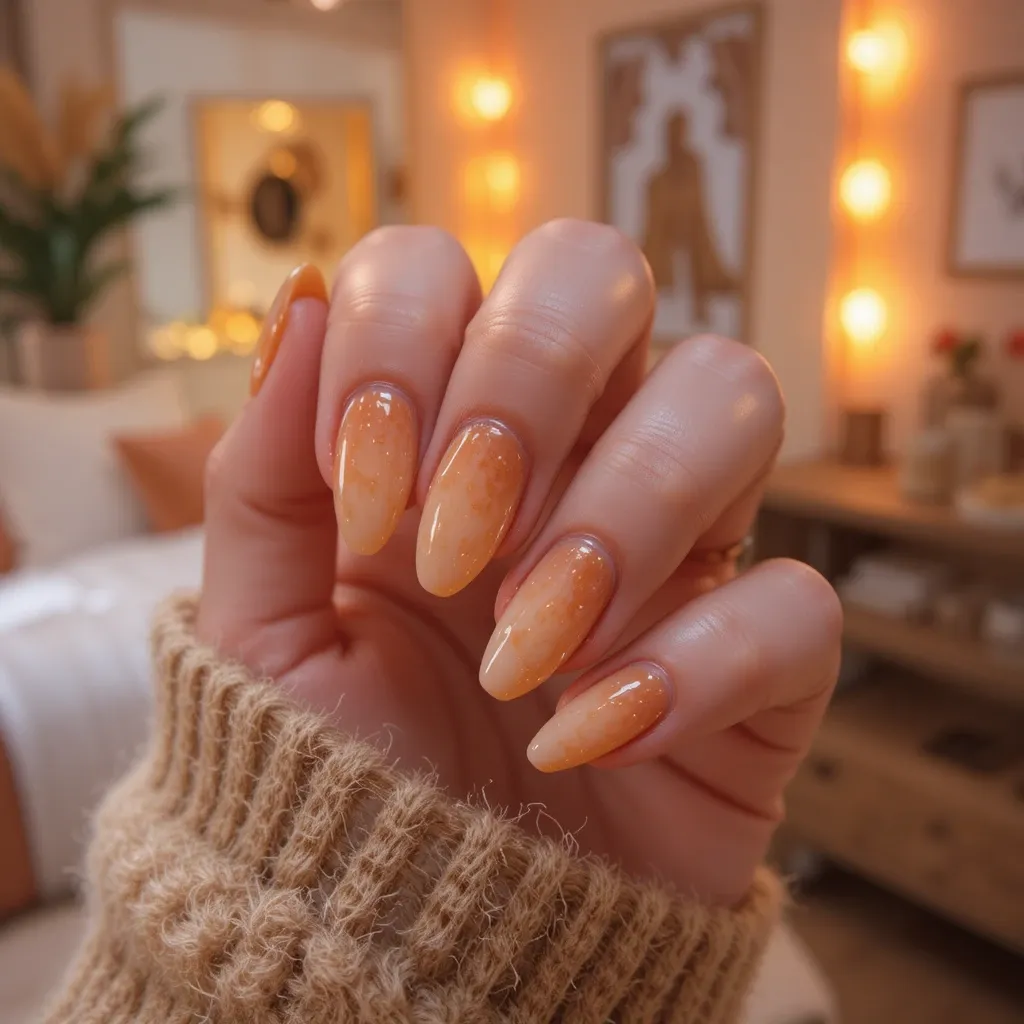
A warm, golden-toned nude with a creamy finish that catches the light like liquid amber in a glass. This versatile shade has peachy-bronze undertones that add depth without being too bold, creating an effortlessly polished look. The semi-glossy finish gives off that “my nails but better” vibe that pairs perfectly with denim and leather.
Step-by-Step Application: Start by applying a clear base coat to protect your natural nails. Once dry (about 2 minutes), apply your first coat of nude polish using three strokes—one down the center, one on each side. The key is to start slightly away from your cuticle to avoid flooding. Let this dry for 3-4 minutes, then apply a second coat for opacity. Finish with a glossy top coat, making sure to cap the free edge by running the brush along the tip of your nail.
Best Product Recommendations: OPI’s “Samoan Sand” is my go-to for this look, or try Essie’s “Au Natural” for a slightly cooler version. For drugstore options, Sally Hansen Complete Salon Manicure in “Buff and Tumble” hits this tone perfectly. If you want longer wear, Olive & June’s “AN” in their gel system is fantastic and lasts two weeks.
Common Mistakes to Avoid: Don’t shake your polish bottle—this creates air bubbles that ruin the smooth finish. Instead, roll the bottle between your palms. Also, resist the urge to apply thick coats thinking it’ll save time. Two thin coats always look better and dry faster than one thick coat. Wait at least 3 minutes between each layer or you’ll get smudging and denting.
2. Dusty Rose Western
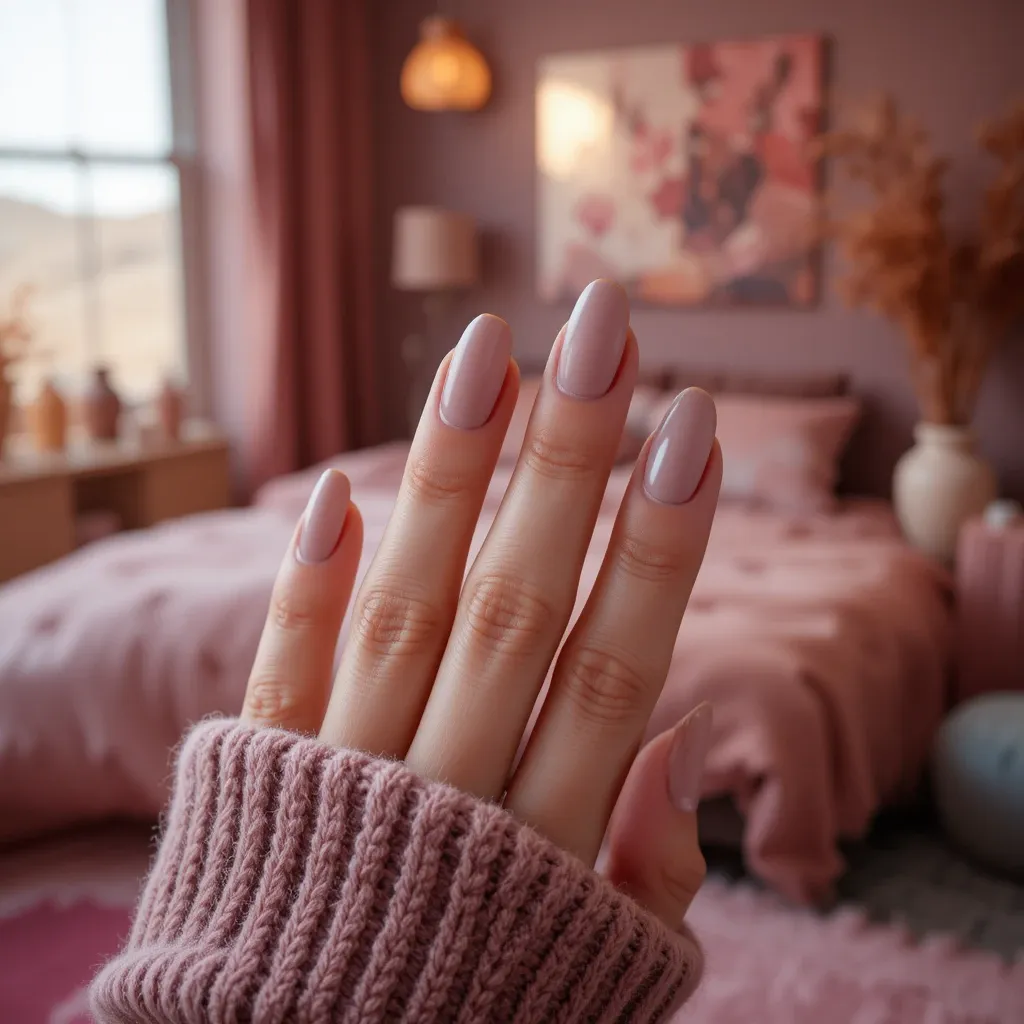
A muted mauve-pink with gray undertones that evokes dusty desert sunsets and vintage cowgirl aesthetics. This sophisticated neutral has just enough color to feel intentional while maintaining that understated elegance country concert nails style is known for. The soft matte finish adds a modern, velvety texture that feels expensive and curated.
How to Achieve the Perfect Matte Finish: Apply your dusty rose color exactly as you would for a glossy finish—base coat, two thin color coats, letting each dry completely. Here’s where it differs: instead of glossy top coat, use a matte top coat like Essie’s “Matte About You” or OPI’s “Matte Top Coat.” Wait until your color is COMPLETELY dry (at least 10 minutes) before applying matte top coat, or you’ll drag the color underneath and create bald spots.
Best Color Matches: Essie’s “Lady Like” or OPI’s “Taupe-less Beach” are perfect dusty rose shades. For a budget-friendly option, try Wet n Wild’s “It’s Sher-bert Day.” China Glaze “Dope Taupe” leans slightly more gray if you want a cooler tone. These colors apply smoothly and don’t streak, which is crucial for matte finishes that show every imperfection.
Adding Dimension: For extra visual interest, keep your matte finish on all nails except your ring finger—use glossy top coat on that one nail only. This creates subtle contrast that photographs beautifully. You can also try matte on the full nail with a glossy French tip for a modern twist. The texture variation makes simple colors feel intentional and designed.
3. Creamy Vanilla Latte
A soft, milky beige with warm undertones that resembles the foam on your morning coffee—clean, classic, and endlessly wearable. This shade has just enough pigment to avoid looking washed out while maintaining that fresh, natural appearance. The glossy finish gives nails a healthy, well-maintained look that feels polished without being overdone.
Perfecting Light Nude Application: Light colors are tricky because they show every streak. The secret is in your brush technique: wipe one side of the brush on the bottle neck, leaving polish only on one side. Place that loaded side on your nail and press gently—the polish will fan out evenly. Use very thin coats (thinner than you think you need) and build up to opacity with 2-3 layers. This prevents that streaky, goopy look that ruins light nudes.
Recommended Products for Beginners: OPI’s “Bubble Bath” is incredibly forgiving and applies like a dream. Essie’s “Ballet Slippers” is another classic that’s been a bridal favorite for decades because it’s so easy to work with. For gel, CND Shellac in “Negligee” is perfect. Avoid ultra-cheap formulas for light colors—they’re watery and require 4-5 coats, which ends up looking thick and unnatural.
The Single Rhinestone Accent: After your nails are completely dry (20+ minutes), add a small clear or gold rhinestone to your ring finger. Use a toothpick dipped in top coat to pick up the stone, then place it about two-thirds up your nail, slightly off-center. Press gently, then apply a dab of top coat over and around (not on top of) the stone to seal it. This subtle detail elevates the whole look without overwhelming the soft color.
Bold & Western-Inspired
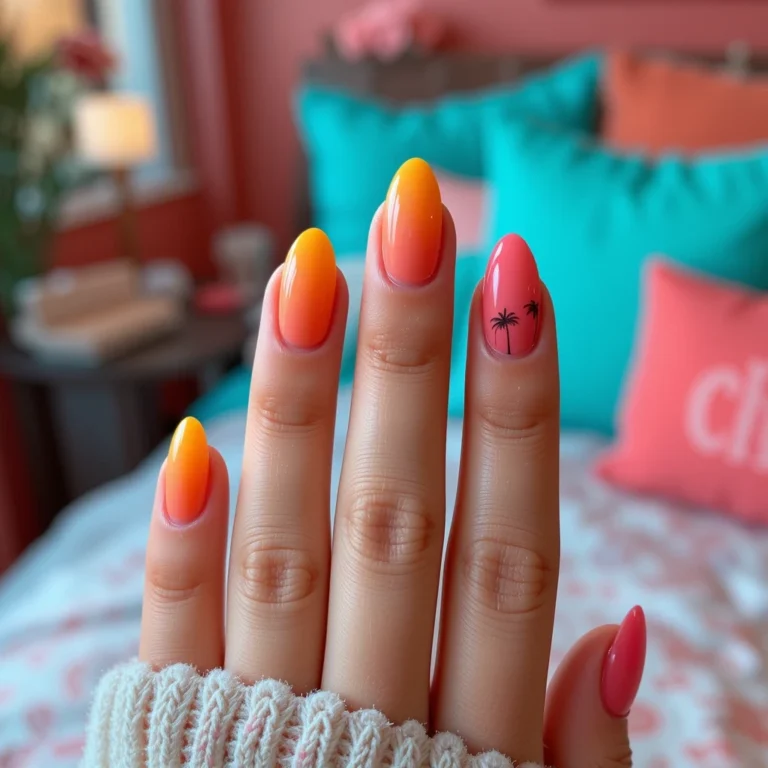
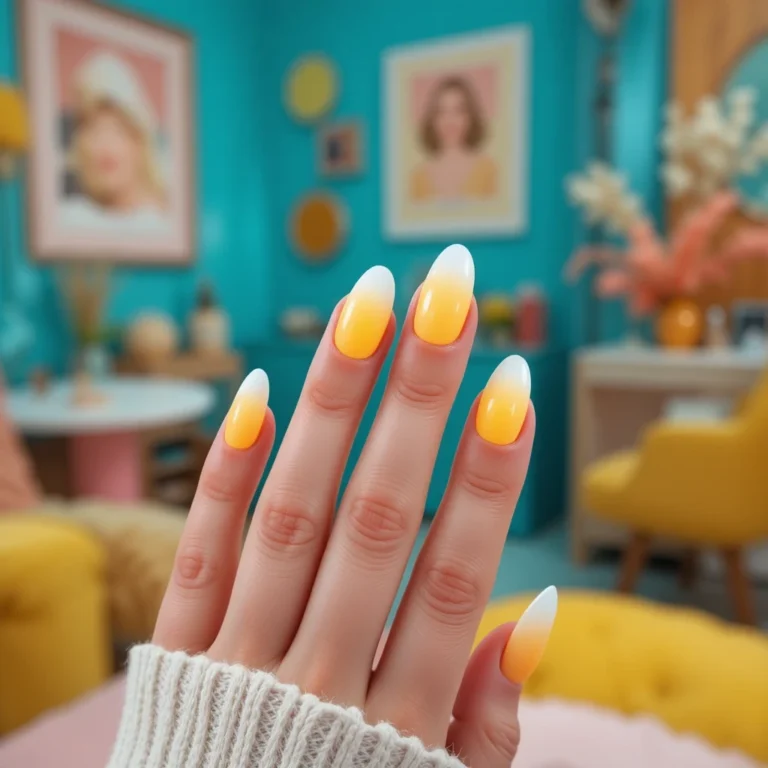
4. Burnt Orange Sunset
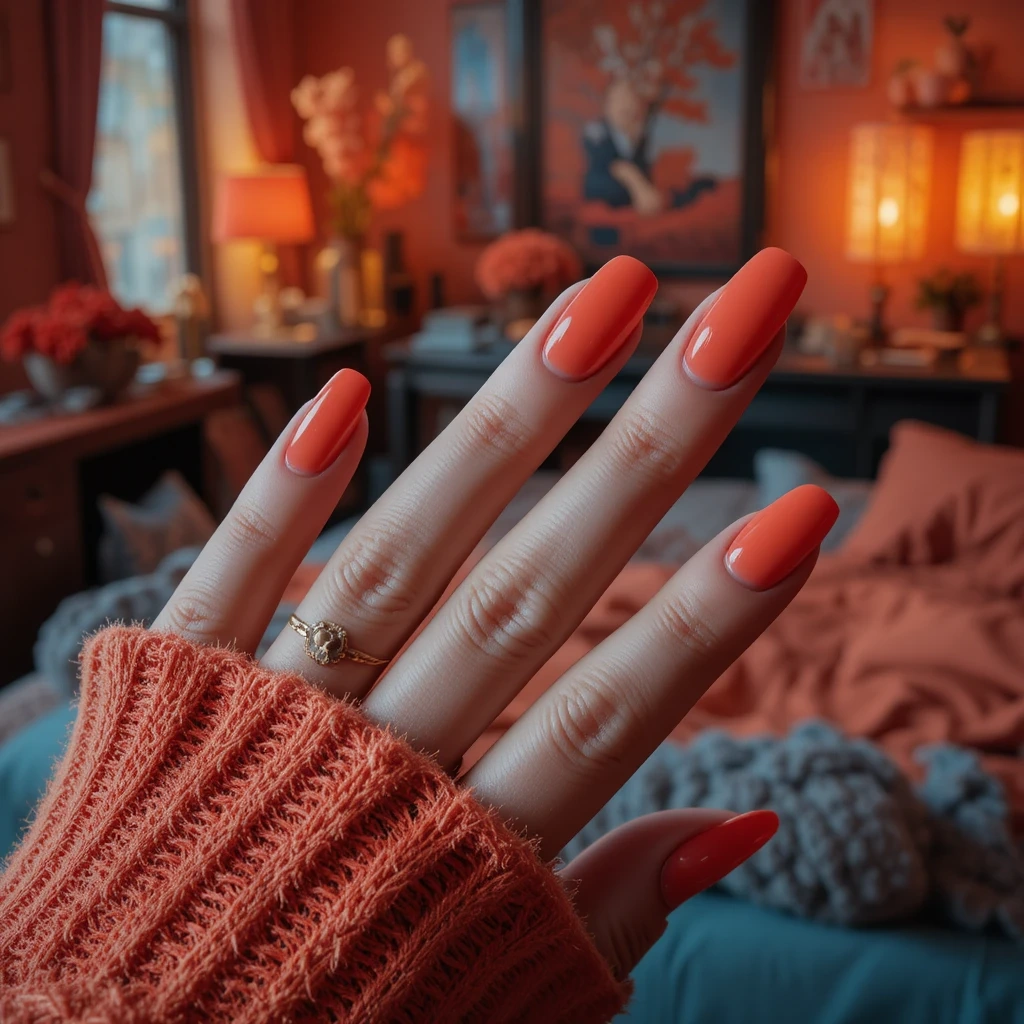
A rich, terracotta-inspired orange with warm red undertones that captures the essence of a Texas sunset over the open range. This bold yet earthy shade has enough depth to feel grounded rather than neon, making it surprisingly versatile. The cream finish provides solid, opaque coverage that looks intentional and statement-making.
Mastering Bold Color Application: Bold colors are actually easier than nudes if you know the tricks. Start with a white or nude base coat after your clear base—this makes the orange pop and reduces the number of coats needed. Apply burnt orange in thin, even strokes, and don’t go back over wet polish (this causes dragging and bald spots). Two coats is usually perfect for these saturated shades. Clean up around your cuticles with that acetone brush for crisp edges.
Color Recommendations: Essie’s “Playing Koi” is a gorgeous burnt orange that’s not too red. OPI’s “Freedom of Peach” is slightly softer if true orange feels intimidating. For a deeper terracotta, try China Glaze “Papaya Punch.” These formulas are creamy and opaque, meaning you won’t fight with streaks or transparency issues.
Making Bold Colors Wearable: If full-hand burnt orange feels like too much, try this beginner-friendly variation: paint all nails in your neutral nude from Design #1, then use burnt orange only on your ring fingers and thumbs. This gives you that pop of color without overwhelming your hands. You can also do burnt orange on all nails but keep them short (just past your fingertip) for a more subtle statement.
How to Make It Last: Bold colors show chips more obviously than neutrals, so prevention is key. After your final top coat dries (about 20 minutes), apply cuticle oil to each nail. This creates a barrier that prevents water absorption, which causes lifting. Reapply top coat every 2-3 days, and wear gloves when washing dishes or cleaning—water is polish’s biggest enemy.
5. Deep Burgundy Barn
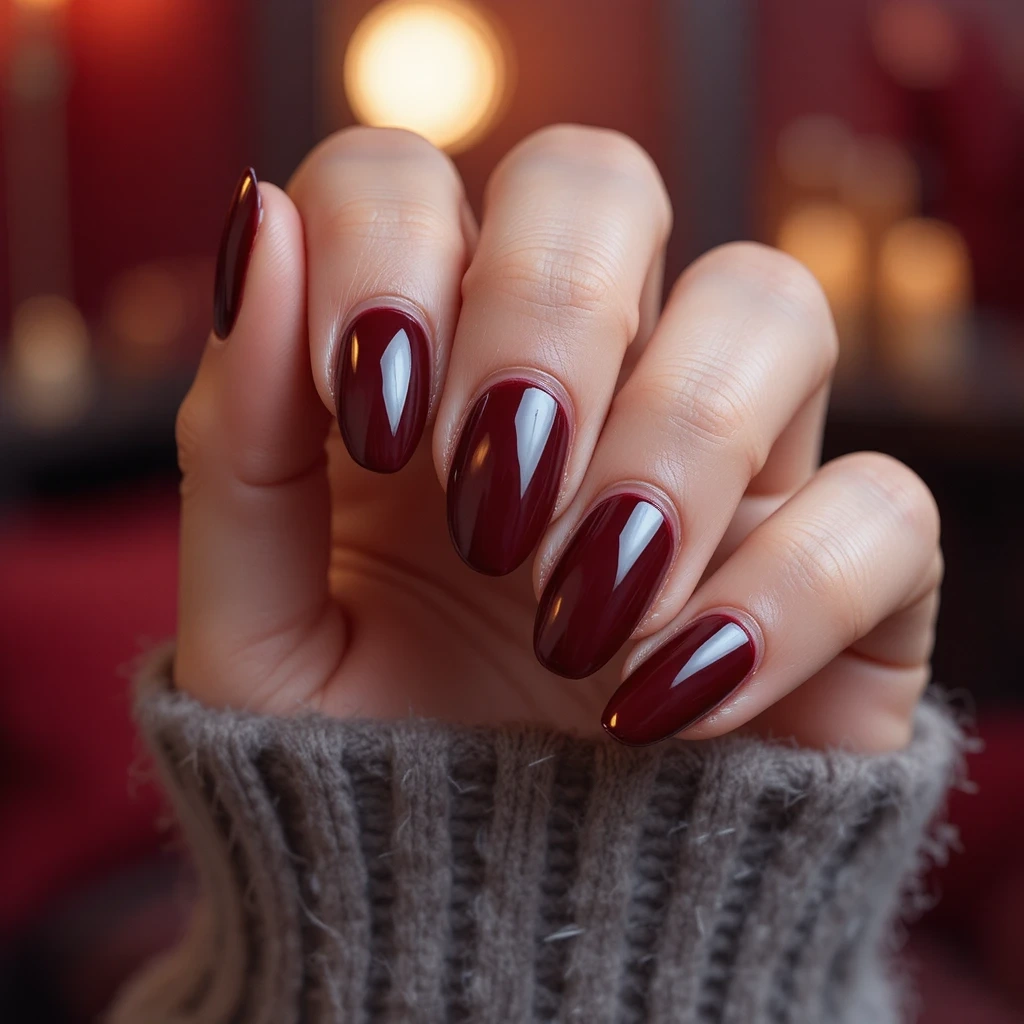
A rich, wine-colored burgundy with chocolate undertones that feels both sophisticated and country-appropriate. This deep shade has enough red to avoid looking gothic while maintaining a moody, dramatic presence that photographs beautifully. The glossy finish adds a luxe, jewel-like quality that elevates any outfit from casual to concert-ready.
Application Tips for Dark Colors: Dark polishes can stain your nails, so always use a good base coat—this is non-negotiable. Apply thin coats because dark colors look thick and gloopy easily. Let each coat dry for 4-5 minutes (longer than lighter colors) because the heavier pigment takes more time to set. Use a fan brush dipped in acetone for cleanup—dark colors show mistakes more readily, so precision matters.
Best Burgundy Shades: OPI’s “Lincoln Park After Dark” is the gold standard for deep burgundy. Essie’s “Bordeaux” is slightly more red-toned and gorgeous. For gel, try Kiara Sky’s “First Class.” For budget-conscious beauties, Revlon’s “Vixen” is shockingly good quality for the price. All of these have excellent pigmentation and smooth application.
Adding the Gold Foil Accent: This sounds fancy but it’s actually easy. After your burgundy is completely dry, apply a thin stripe of nail glue down the center of your accent nail (or two nails). Immediately press gold foil (available at Sally Beauty or Amazon) onto the glue, then peel away. It leaves a beautiful irregular gold line. Seal with top coat. For an easier option, use gold striping tape—just press it onto dry burgundy and seal with top coat.
Troubleshooting Dark Polish: If you get dark polish on your skin, don’t panic. Let it dry completely, then take a hot shower—the polish will often peel right off skin. For stubborn stains on cuticles, use a cotton swab dipped in oil-based makeup remover. Prevention is easier though: apply a thin layer of petroleum jelly around your nails before painting, then wipe it away after—the polish comes right off your skin.
Sparkle & Accent Nails
6. Gold Rush Glitter
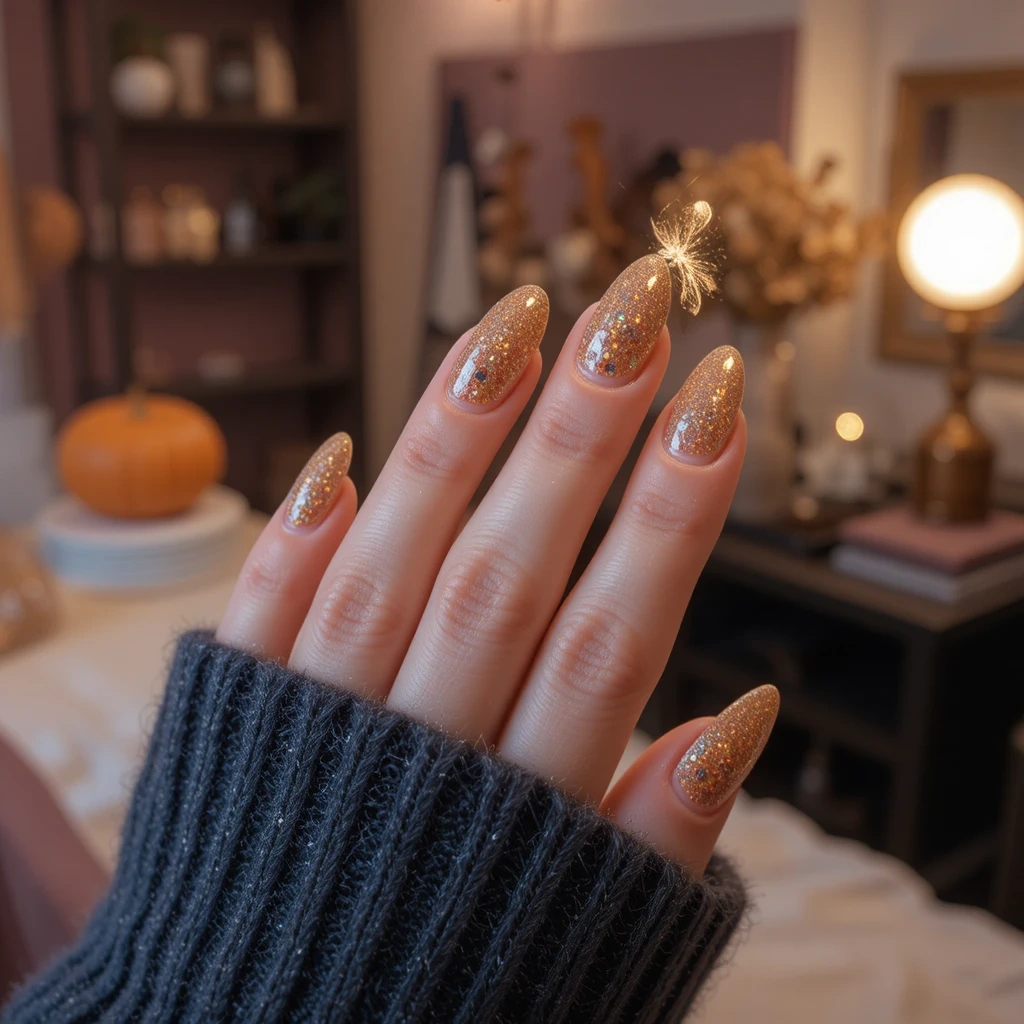
A warm champagne-gold glitter packed with various sizes of shimmer particles that catch every spotlight and camera flash. This isn’t your basic glitter—it has a sophisticated, almost metallic quality with both fine shimmer and larger hexagonal flakes. The effect is pure sparkle without being childish, creating that perfect concert-ready glamour.
How to Apply Glitter Without the Mess: Glitter application is where most people struggle, but this method works perfectly. Paint all nails with your nude base (try Design #1). Let dry completely—at least 15 minutes. On your accent nails (ring fingers), apply a thin coat of the same nude, then while it’s still wet, use a makeup sponge to dab on the glitter polish. This packing method gives dense, opaque coverage without needing 4-5 coats. Let dry 10 minutes, then apply two coats of top coat to smooth the texture.
Best Glitter Products: OPI’s “Goldeneye” is perfection for this look—dense, warm gold in a clear base. Essie’s “Summit of Style” is another beautiful option with mixed glitter sizes. China Glaze “I Herd That” gives that champagne-gold effect. For gel, Beetles Gold Glitter Gel is amazing and inexpensive on Amazon. Avoid craft glitter mixed with clear polish—it never adheres properly and creates a bumpy mess.
The Glitter Gradient Technique: For a softer look, create a glitter gradient. Apply your nude base to all nails. On accent nails, apply glitter heavily at the tip, then use a lighter dabbing motion toward the cuticle. This creates a fade effect. Use a dry makeup sponge to blend the glitter for a seamless transition. Three thin applications with blending between each works better than one thick coat.
Removing Glitter Easily: Glitter removal is notoriously difficult, but here’s the pro trick: soak cotton pads in acetone, place on nails, wrap each finger in aluminum foil, and wait 10 minutes. The glitter will wipe right off instead of requiring aggressive scrubbing that damages your nails. Trust me, this method is life-changing if you love glitter but hate removal.
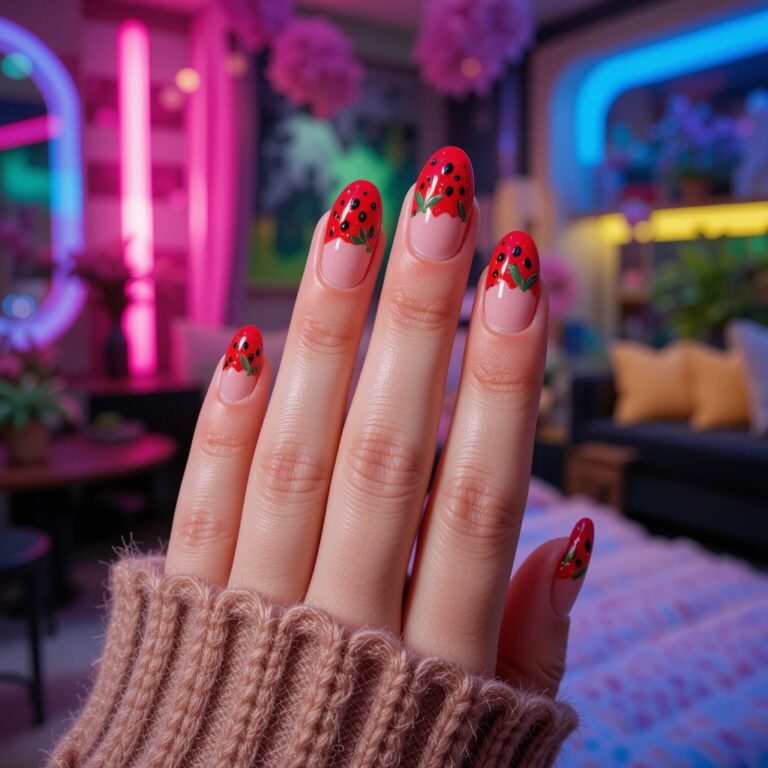
7. Turquoise Stone Accent
A genuine turquoise-inspired blue-green with matrix-like darker veining that mimics authentic Western turquoise jewelry. This accent nail design uses a marble or watercolor technique to recreate that stone-like appearance with depth and variation. The colors shift between seafoam green and sky blue with charcoal or brown veining, creating an authentic gemstone effect.
Step-by-Step Stone Effect Tutorial: This looks complicated but it’s actually beginner-friendly. Paint all nails with a nude or white base. On your ring fingers (your accent nails), while the base is still slightly tacky, drop small dots of turquoise blue polish randomly on the nail. Add a few dots of white and darker teal. Use a toothpick or dotting tool to swirl the colors together lightly—don’t over-mix or you’ll create mud. Let this dry completely (10+ minutes).
Creating the Realistic Veining: This is what makes it look like real turquoise. Using a thin nail art brush (or a toothpick for beginners), paint irregular thin lines in dark brown or black across your dried turquoise base. Make the lines organic and random—real turquoise has natural, irregular patterns. Connect some lines, leave others isolated, and vary the thickness. Less is more here; 4-6 veins per nail looks authentic.
Product Recommendations: For the base turquoise, try OPI’s “Teal the Cows Come Home” or Essie’s “Where’s My Chauffeur.” Mix with white (OPI “Alpine Snow”) and darker teal (Essie “Go Overboard”). For veining, use a black or brown nail art pen—Sally Hansen’s I Heart Nail Art pens are perfect for beginners. Or buy a cheap acrylic paint brush from a craft store and use regular polish with a tiny drop of thinner.
Sealing Your Stone Effect: After your design is completely dry (20+ minutes), apply a thick layer of glossy top coat. This is crucial—the glossy finish creates that authentic stone depth and makes the colors appear to be suspended under glass. Let the top coat self-level (don’t over-brush) and cure for at least 30 minutes before touching anything. Apply a second top coat layer the next day for maximum depth.
8. Pearl Chrome Western
A soft, iridescent pearl chrome with pink and blue shifting tones that creates a modern take on classic pearl snap shirts. This finish has a smooth, reflective quality that looks almost liquid on the nail, catching light from every angle. The opalescent effect feels both ethereal and contemporary, bridging traditional country aesthetics with current nail trends.
The Easy At-Home Chrome Alternative: Real chrome powder requires gel and a UV lamp, but here’s a stunning alternative anyone can do. Apply two coats of a pale pink or white polish (try Essie “Fiji” or OPI “Bubble Bath”). While the second coat is still slightly wet (about 30 seconds after application), use a makeup sponge to very lightly dab on an iridescent white or pearl polish—try Sally Hansen “Glass Slipper” or Essie “Pure Pearlfection.” This creates a soft chrome-like effect without special equipment.
True Chrome Powder Method (For Gel Users): If you do have a gel system, here’s the real deal. Apply gel base coat and cure. Apply two coats of white or light pink gel, curing between each. Apply no-wipe gel top coat and cure fully. Using a makeup sponge or silicone tool, rub chrome powder onto the nail in circular motions until you get full coverage. Dust off excess. Seal with gel top coat (use one specifically for chrome or it may dull) and cure. The result is mirror-like perfection.
Recommended Chrome Products: For the polish method, Sally Hansen Insta-Dri in “Pearly Whirl” is gorgeous. Essie’s “Set in Stones” gives amazing pearl shift. For actual chrome powder, Makartt Chrome Powder on Amazon is affordable and stunning—get “Mermaid” or “Pearl White” for this look. Born Pretty also makes excellent chrome powders in every shade imaginable for under $5.
Making Chrome Last: Chrome finishes are delicate, so protect them. Avoid using your nails as tools even more than usual—any scratching will show. Apply top coat every two days to maintain the finish. For gel chrome, be gentle for the first 24 hours while the top coat fully hardens. Cuticle oil is your friend—it keeps the chrome looking liquid and prevents dullness around the edges.
The Concert Venue Reality Check
Stadium Lighting Makes Everything Look Different
Indoor arena lighting is harsh and unflattering on some nail colors. Pale pinks and lilacs can wash out completely under those fluorescent overheads, making your hands look ghostly in photos. Warm tones (nudes, corals, golds) and deeper shades (burgundy, burnt orange) photograph much better because they have enough pigment to show up without looking neon.
Outdoor Amphitheaters Need Sun-Proof Colors
If you’re seeing someone at an outdoor venue, your nails will spend hours in direct sunlight. Light colors fade fast in UV exposure, and some polishes (especially reds and oranges) can actually change shade in intense sun. Gel polish handles this better than regular polish, but if you’re doing regular, go with shades that have enough depth that slight fading won’t ruin them.
Flash Photography Kills Certain Finishes
Matte nails photograph flat and dull in flash photos—they absorb light instead of reflecting it. If you’re planning to take lots of selfies and group photos (and let’s be honest, you are), stick with glossy or chrome finishes that catch light and actually show up in pictures. Glitter also photographs amazingly well because it reflects flash from multiple angles.
What Actually Survives Concert Conditions
Clapping, Dancing, and Holding Drinks
Your nails will take a beating. You’ll be clapping for encores, holding cold drinks that make your hands sweat, dancing with hands in the air, and probably grabbing onto things in crowded venues. Gel polish is worth the extra $20 because regular polish will chip by the time the opening act finishes. Not maybe—will.
The Bathroom Line Situation
Festival and concert bathrooms are a nail disaster waiting to happen. Porta-potties with sticky doors, bar bathrooms with ancient hand dryers, and that general chaos of thousands of people using the same facilities. Keep nails at a reasonable length (nothing past your fingertip) so you can actually function. Long stilettos might look great in photos but they’re a nightmare in real concert conditions.
Multi-Day Festival Reality
If you’re doing a multi-day festival, your manicure needs to last through camping, limited shower access, and constant hand sanitizer use. Get gel, keep the length short, and bring a small file in your bag for emergency smoothing. Even the best manicure will show wear by day 3—that’s just physics.
The Country Concert Aesthetic Breakdown
Classic Country vs. Modern Country Vibes
There are two distinct country concert aesthetics happening right now:
Classic/Traditional – Think Dolly, Willie, or anyone at the Grand Ole Opry. This calls for understated elegance: nude nails with maybe a single rhinestone, dusty rose, or classic red. Conservative length, simple shapes, nothing too flashy.
Modern/Festival – Think Stagecoach, Boots & Hearts, or any outdoor country festival. This is where you can go bold: turquoise accents, gold glitter, burnt orange, Western-themed nail art. This aesthetic embraces the costume-y fun of country fashion.
Match your nails to the vibe of the specific concert you’re attending, not just “country” in general.
Nail Length and the Two-Step Test
Here’s a real test: can you comfortably do the two-step or line dance with your nails at this length?
If your nails are so long you can’t snap your fingers, hold hands with a dance partner, or clap on beat without worrying about breakage, they’re too long for a country concert. This is a participation event, not a spectator sport. Your nails should enable your good time, not limit it.
Ideal concert nail length: Just past your fingertip. Enough to look polished and show off your color/design, short enough to actually live your life.
The Day-After Consideration
You’re probably not removing your concert nails the next morning. Can you wear these nails to work on Monday? To run errands on Sunday?
If the answer is “definitely not,” reconsider your choice. Unless you’re planning to take them off immediately (and who actually does that?), pick something that works for your real life, not just the 4 hours you’re at the concert.
The exception: Major once-a-year events like CMA Fest or a bucket-list artist. Then go wild—you can deal with the consequences later.
DIY vs Salon for Concert Nails
DIY These:
- Solid neutral colors (nude, dusty rose, vanilla latte)
- Single-color glitter accent nails
- Simple color combinations
Pay a Professional For:
- Chrome finishes (the technique is finicky)
- Turquoise stone effects (requires actual artistry)
- Gel application if you don’t have your own lamp
- Anything with 3D elements that need to actually stay on
Time vs Money Math: A gel manicure costs $40-60 and lasts the whole concert plus two weeks after. Two DIY attempts with regular polish that both chip = wasted time and polish. Sometimes professional is actually the better value.
Actually Useful Concert Nail Tips
Bring These in Your Bag:
- Mini nail file (for emergencies)
- Your exact nail color (for touch-ups)
- Hand sanitizer wipes (don’t just squirt sanitizer on glitter nails—it shows every streak)
Skip These:
- 3D charms that will fall off
- Extremely long lengths you can’t function with
- White polish (shows every single thing you touch)
Remember This: Your nails are an accessory to your concert experience, not the main event. If you spend the whole night worried about chipping or breaking a nail, you chose wrong. Go with something that lets you actually enjoy the show.
Just Pick Something and Go
Country concert nails aren’t that deep. Pick a color that makes you feel good, keep the length functional, and make sure it’s durable enough to survive the night. The best nail look is the one you don’t have to think about once you’re in the venue.
Whether you go full Western glam with turquoise and gold or keep it simple with a honey nude, the goal is the same: look good in photos, survive the dancing, and not stress about your manicure when you should be singing along to your favorite songs.