12+ Tropical Nails Ideas That Actually Last
Why you should read this: Most tropical nail articles just show you pretty pictures. This one includes step-by-step tutorials for each design, specific product recommendations with real prices, and an honest day-by-day breakdown of how long these styles actually last.
Plus, each design comes with a detailed description so you can visualize exactly what it looks like—or show your nail tech.
What Are Tropical Nails?
Tropical nails are any nail design inspired by warm-weather elements—think palm leaves swaying in the breeze, hibiscus flowers blooming against bright blue skies, sunset gradients melting into ocean waves, and fruity patterns like pineapples and citrus slices fresh from the tree.
These designs typically use saturated, juicy colors—coral, turquoise, hot pink, sunshine yellow—and can be done with regular polish, gel, or acrylics. They’re basically summer vacation for your fingertips, whether you’re actually heading to the beach or just dreaming about it from your desk.
How to Choose the Best Tropical Design
For your first time: Start with solid bright colors (coral, hot pink, turquoise) with one accent nail of palm leaves. The palm fronds are just simple curved lines—hard to mess up.
If you have a professional job: Go with the sunset gradient or ocean wave designs. They look artistic but subtle enough that you’re not explaining pineapples in a board meeting. The muted tropical palette with gold accents works especially well here.
For special events: The 3D hibiscus flowers or the tropical fruit 3D designs are total conversation starters. They photograph beautifully and hold up to champagne toasts reasonably well.
If you’re comfortable with nail art: Try the palm tree silhouette design or the layered gradient techniques. These give you room to play with advanced techniques like one-stroke flowers and detailed line work.
If you have short nails: Keep designs small-scale. Single palm fronds, small fruit slices, or simple color blocking with tropical colors. Skip the full landscape scenes—they need length to read properly.
If you change your mind often: Avoid the 3D flowers and encapsulated fruits. Removal takes forever. Stick with gel polish designs that file off faster.
12 Tropical Nail Designs {#designs}
1. Palm Leaf Accent Nails
Difficulty: Beginner
Time to complete: 30-40 minutes
Best for: Someone trying tropical nails for the first time
Why it works: Palm leaves forgive shaky lines because they’re naturally irregular
What makes it different: Most leaf tutorials use multiple greens—this uses just one green plus black for depth
A creamy white or soft pink base on all ten nails, like fresh coconut flesh. On the ring finger (or whichever you choose as accent), a single palm frond stretches from cuticle to tip—deep forest green with black-outlined edges that give it definition.
The frond has a curved center stem with 4-5 leaves branching off each side, getting progressively smaller toward the tip. The leaves have natural curves, not perfect symmetry, so they look like they’re moving in a breeze. Against the white base, the green pops like actual tropical foliage.
2. Sunset Gradient Ombré
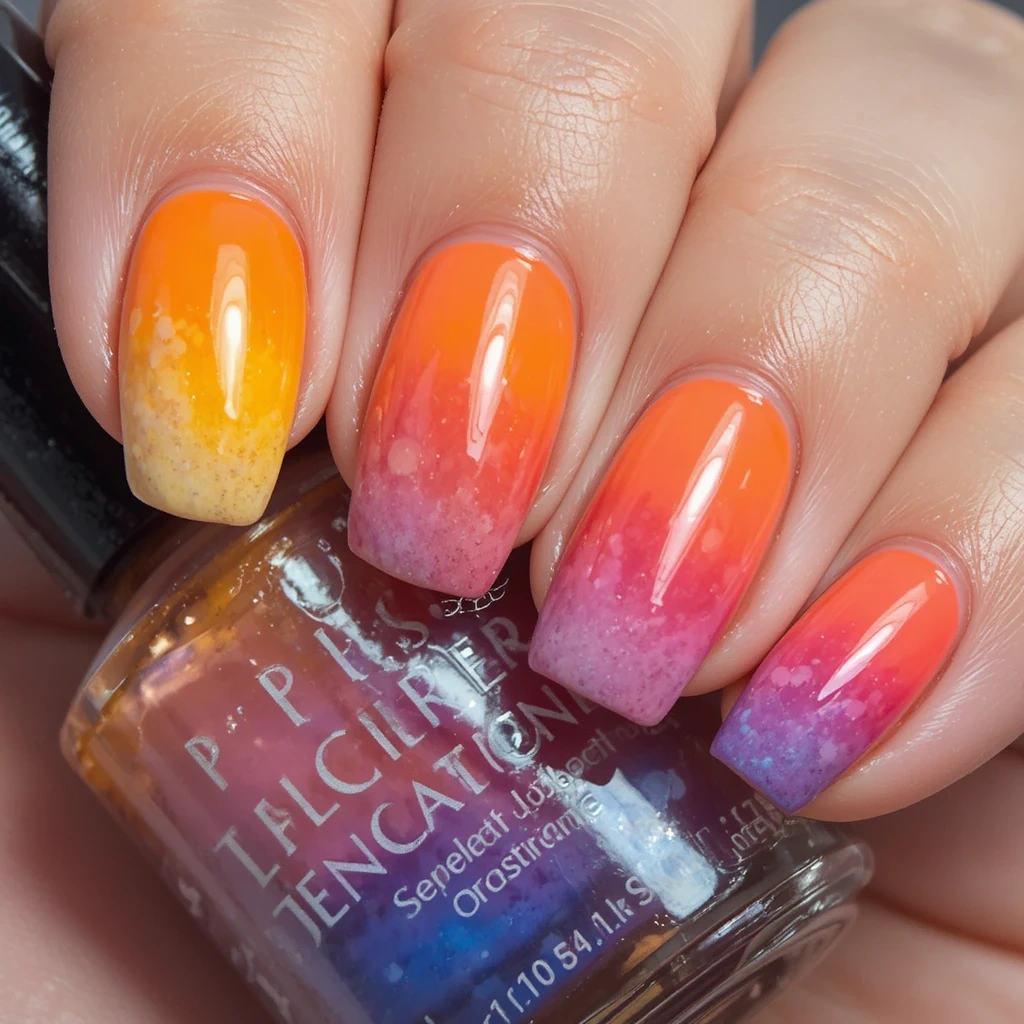
Difficulty: Intermediate
Time to complete: 45-50 minutes
Best for: Anyone wanting that vacation sunset vibe
Why it works: Blending hides any uneven application
What makes it different: Uses a specific sponge technique that creates smooth transitions without bubbles
Each nail is a miniature Florida sunset melting across your fingertips. The color starts at the cuticle with soft buttery yellow, transitions into warm tangerine orange, deepens into coral pink, and finishes at the tip with rich purple—all blended so smoothly you can’t tell where one color ends and the next begins.
The finish is glossy, almost wet-looking, like the sky reflecting off calm ocean water right after the sun dips below the horizon. No harsh lines, just color melting into color.
3. Tropical Fruit Slices
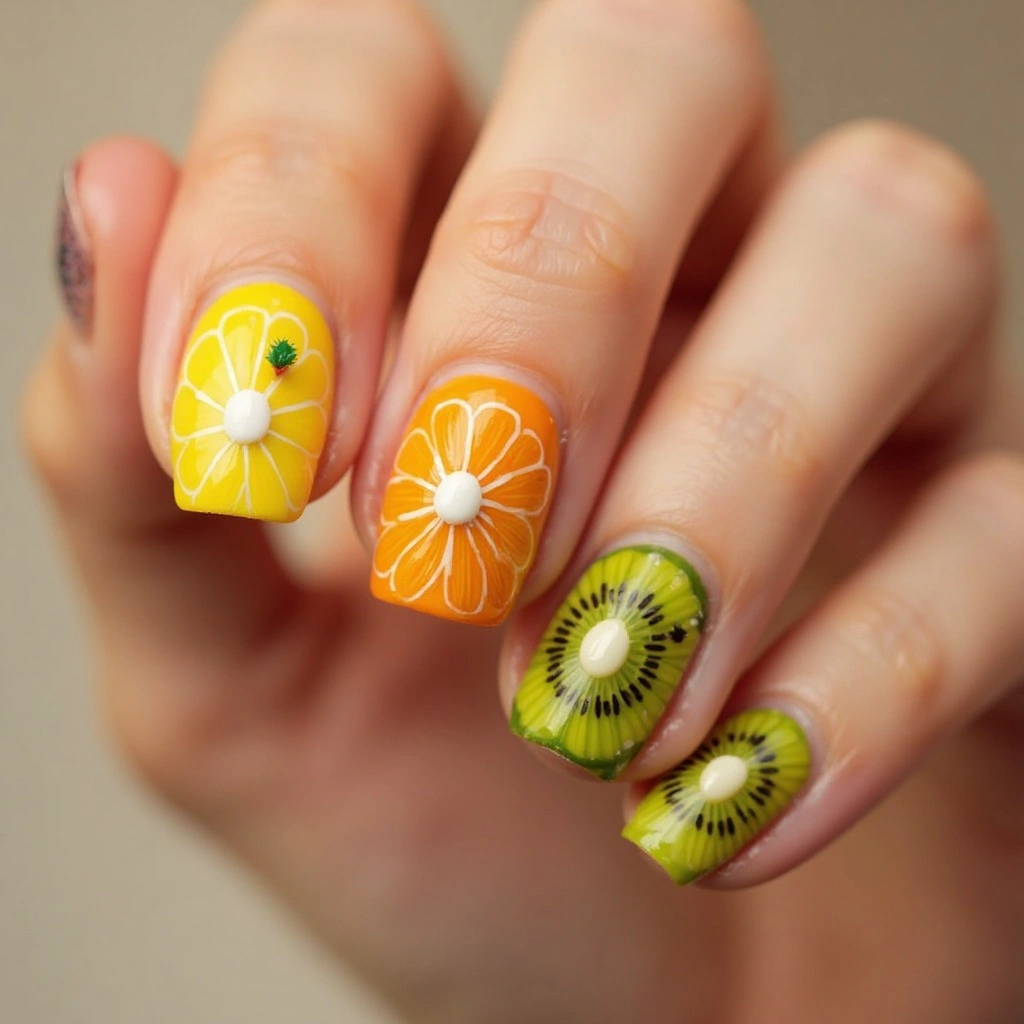
Difficulty: Intermediate
Time to complete: 60 minutes
Best for: Fruit lovers who want playful nails
Why it works: Fruit shapes are recognizable even if your painting isn’t perfect
What makes it different: Uses dotting tools for perfect citrus segments instead of freehand painting
A sheer nude base that lets your natural nail peek through, with accent nails transformed into fruit slices. One nail shows a bright lemon slice—vibrant yellow circle with white segments radiating from the center like bicycle spokes, a tiny white dot in the very middle, and a miniature green leaf at the top edge.
Another nail holds an orange slice in warm citrus orange with the same segmented pattern. A third nail surprises with kiwi—bright green circle, inner ring of white, and tiny black seed dots scattered through the center. Each fruit slice looks fresh-cut, glistening under the top coat like it’s still juicy.
4. Pineapple Paradise
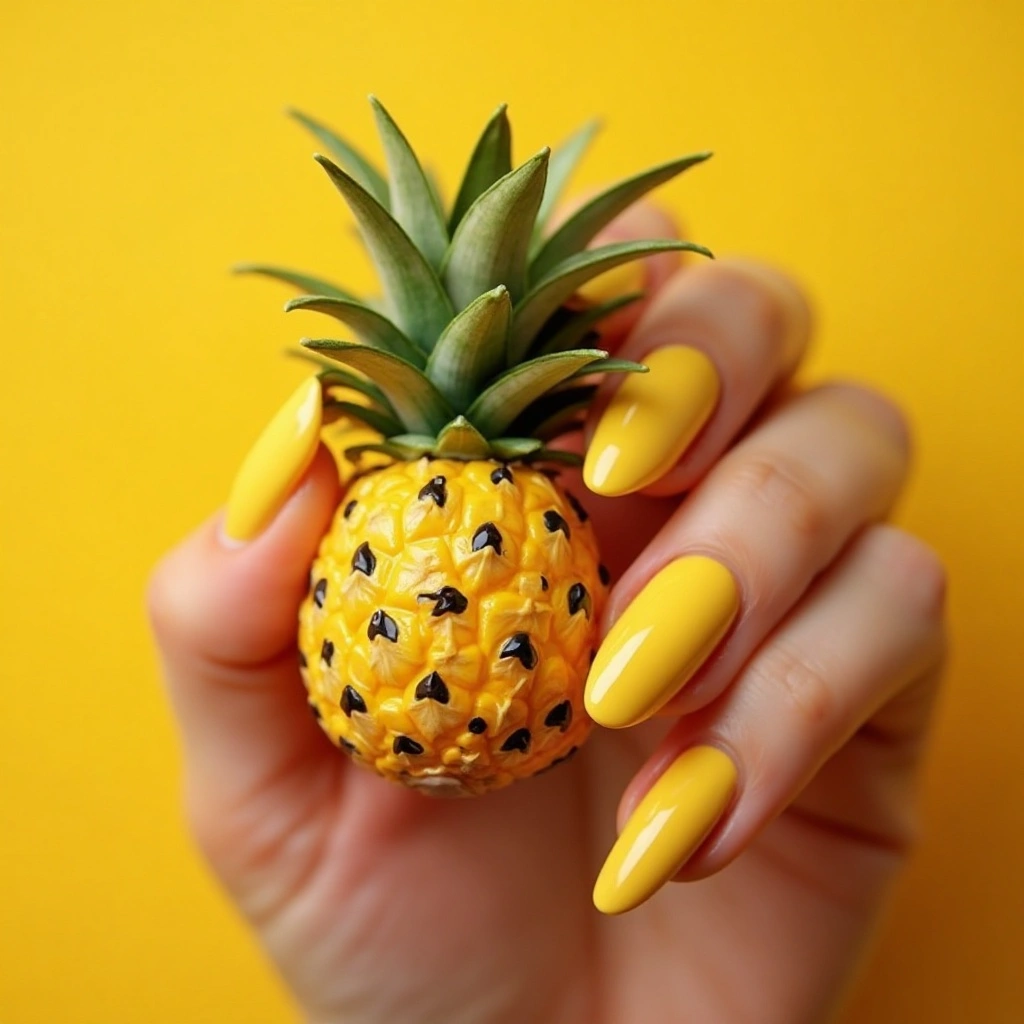
Difficulty: Beginner
Time to complete: 35 minutes
Best for: Quick, cheerful vacation nails
Why it works: Pineapple shape is just a yellow oval with a green top
What makes it different: Uses nail vinyls for perfect diamond patterns
A field of sunshine yellow nails, but the ring finger holds the star—a perfect pineapple taking up the whole nail. The yellow base is textured with a black diamond grid pattern, exactly like real pineapple skin, each diamond meeting at precise points.
At the cuticle end, spiky green leaves fan out in layers—some light green, some dark, some almost lime—creating dimension and movement. The pineapple shape is slightly tapered at the top where the leaves meet the fruit, just like the real thing. Against the solid yellow of the other nails, this one pops like a tropical souvenir.
5. Ocean Wave Nails
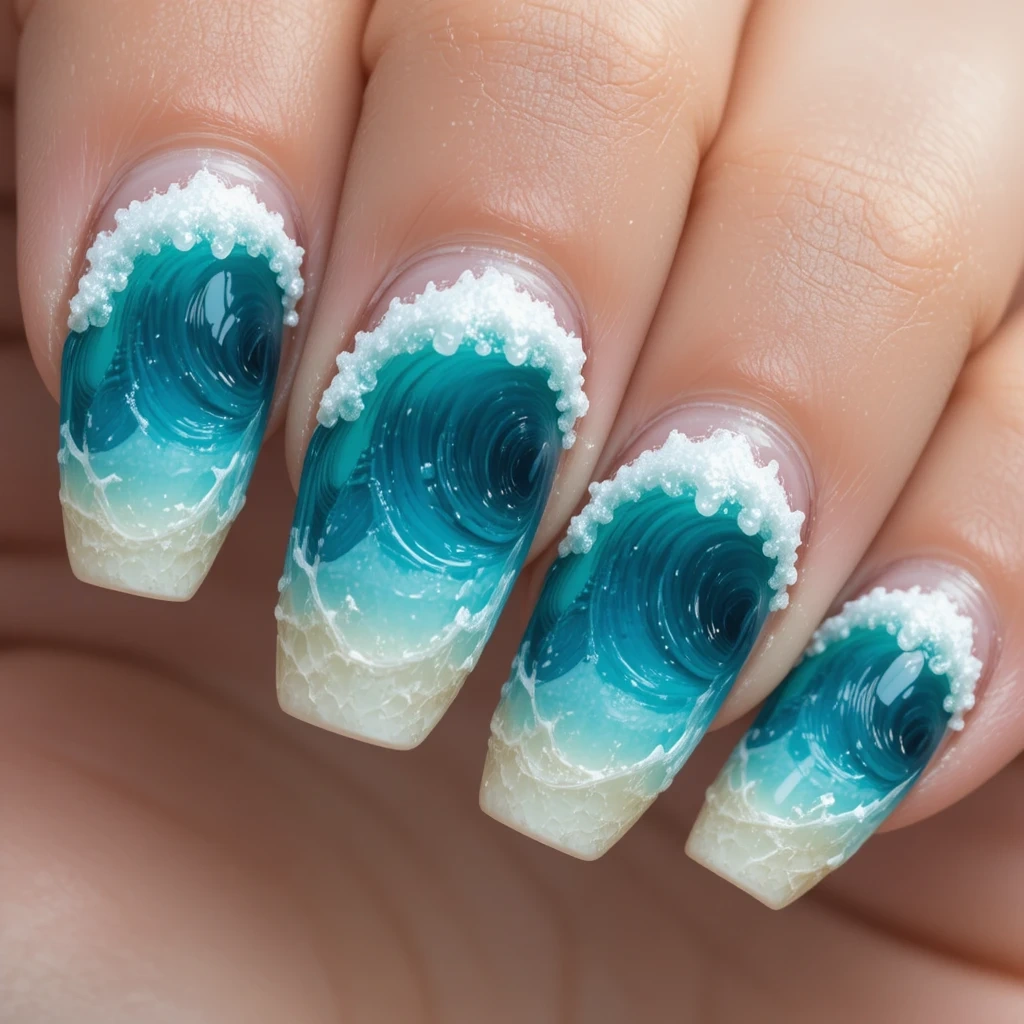
Difficulty: Advanced
Time to complete: 75 minutes
Best for: Beach lovers with patience
Why it works: The layered gel creates actual dimension like real waves
What makes it different: Uses thick builder gel to sculpt waves, not just paint them
Each nail is a slice of the Caribbean Sea. The base is soft, tranquil light blue—shallow water near the shore. At the tips, darker turquoise waves curl and crash in three dimensions, sculpted right out of the nail surface. The waves have peaks and troughs, with white gel frothing at the very edges where they’d break against sand.
Light catches the raised surfaces, creating shadows and highlights that make the waves look wet and moving. Run your finger across and you can feel the curl of each wave—smooth in the shallows, textured where the water swells.
6. Hibiscus Flower Accent
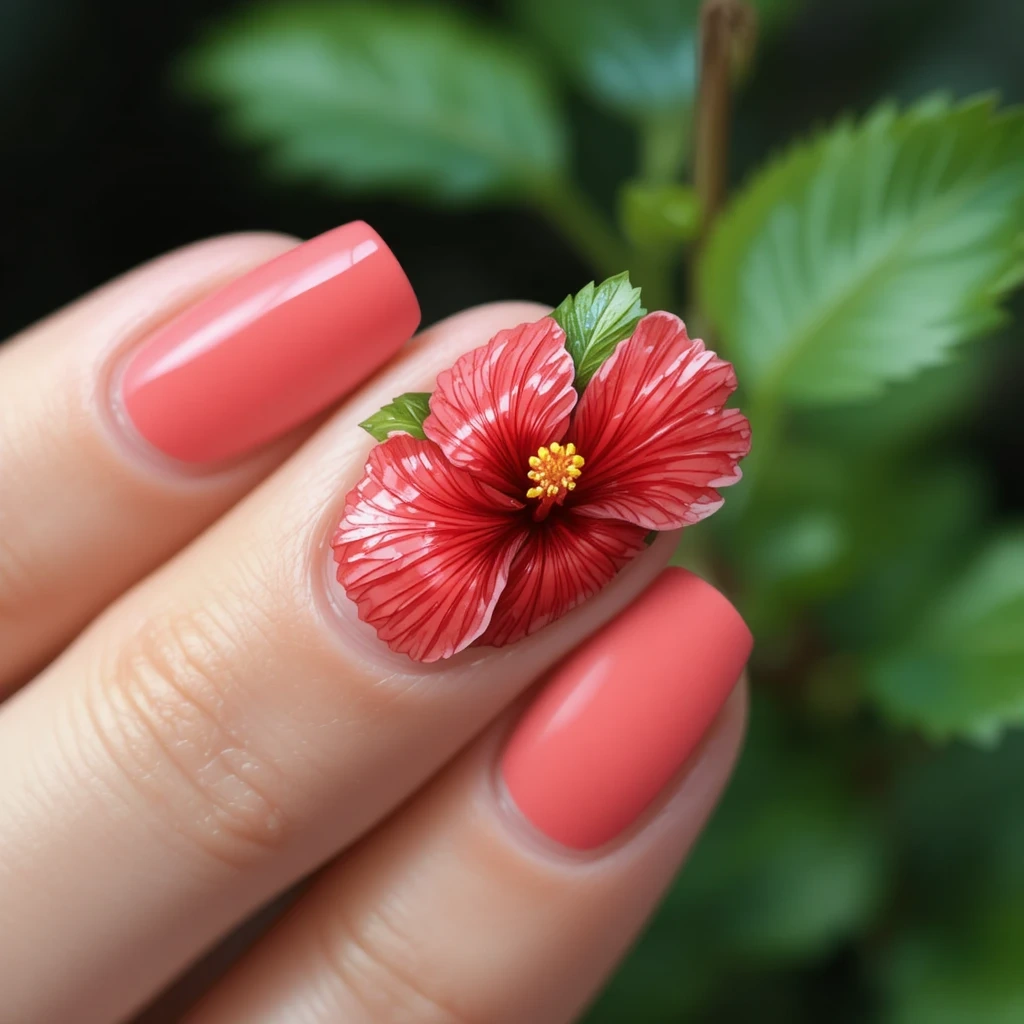
Difficulty: Advanced
Time to complete: 60-90 minutes
Best for: Someone comfortable with detailed painting
Why it works: Hibiscus petals are forgiving—five overlapping circles basically
What makes it different: Shows the one-stroke technique for realistic petals
Soft coral-pink nails on most fingers, but the accent nail holds a botanical illustration come to life. A single hibiscus bloom spreads across the nail—five broad petals in gradient red, darker at the edges fading to lighter toward the center, created with the one-stroke technique that blends two colors in a single brush load.
Each petal has visible brush strokes radiating from the center, mimicking the natural veins of the flower. At the heart, tiny yellow stamens cluster together, dotted with even tinier white tips. Deep green leaves peek out from behind the petals, adding contrast. The flower looks almost wet, like it was picked fresh this morning.
7. Toucan Silhouette
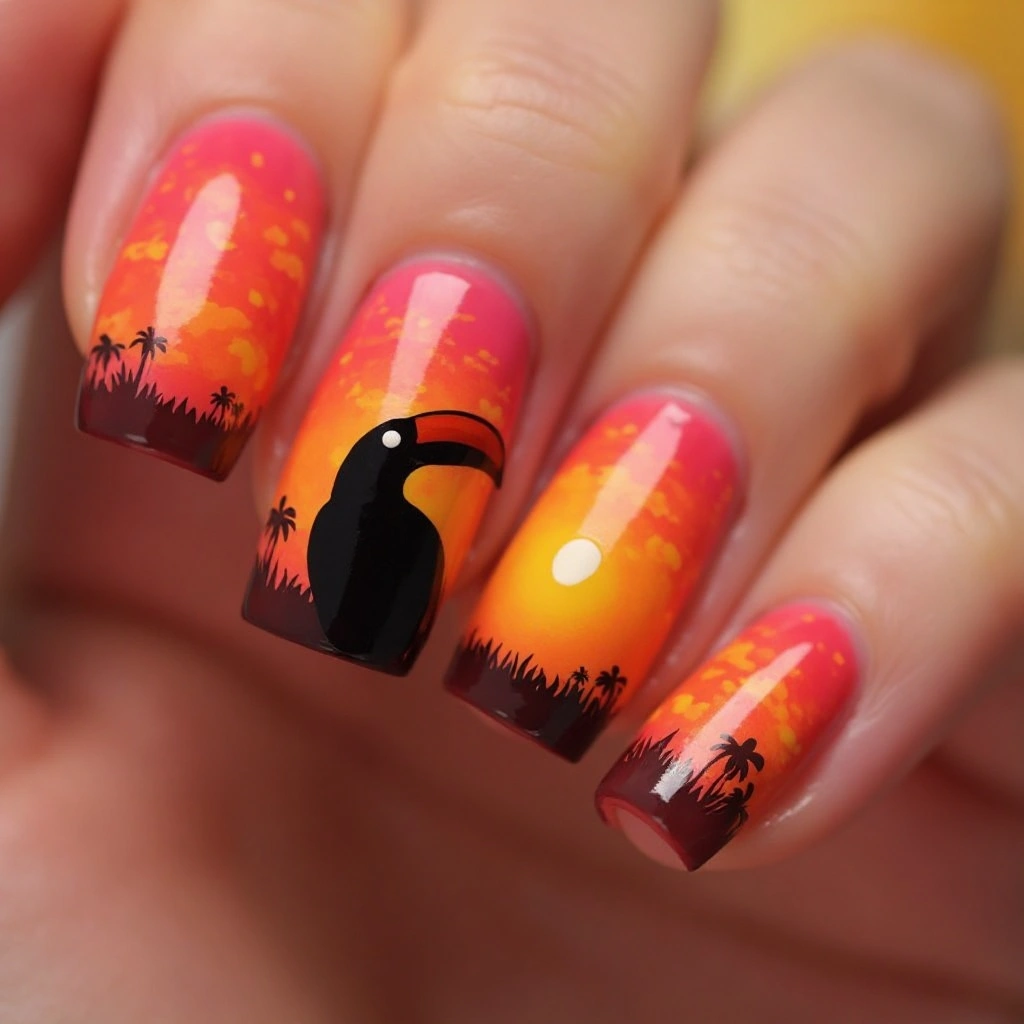
Difficulty: Intermediate
Time to complete: 50 minutes
Best for: Animal lovers wanting something different
Why it works: Silhouettes hide detail mistakes
What makes it different: Uses specific beak shape that actually looks like a toucan, not a generic bird
A blazing sunset gradient background—orange melting into hot pink—covers every nail. On the accent nail, perched against this colorful sky, sits the black silhouette of a toucan. The shape is unmistakable: round body, small head, and that enormous curved beak extending almost half the nail length, dipping downward in that signature toucan curve.
A tiny white dot catches light in the eye. The silhouette is solid black, clean-edged, no interior details—just the iconic shape rendered stark against the fiery background. It’s simple enough to read from across the room, detailed enough to know exactly what bird it is.
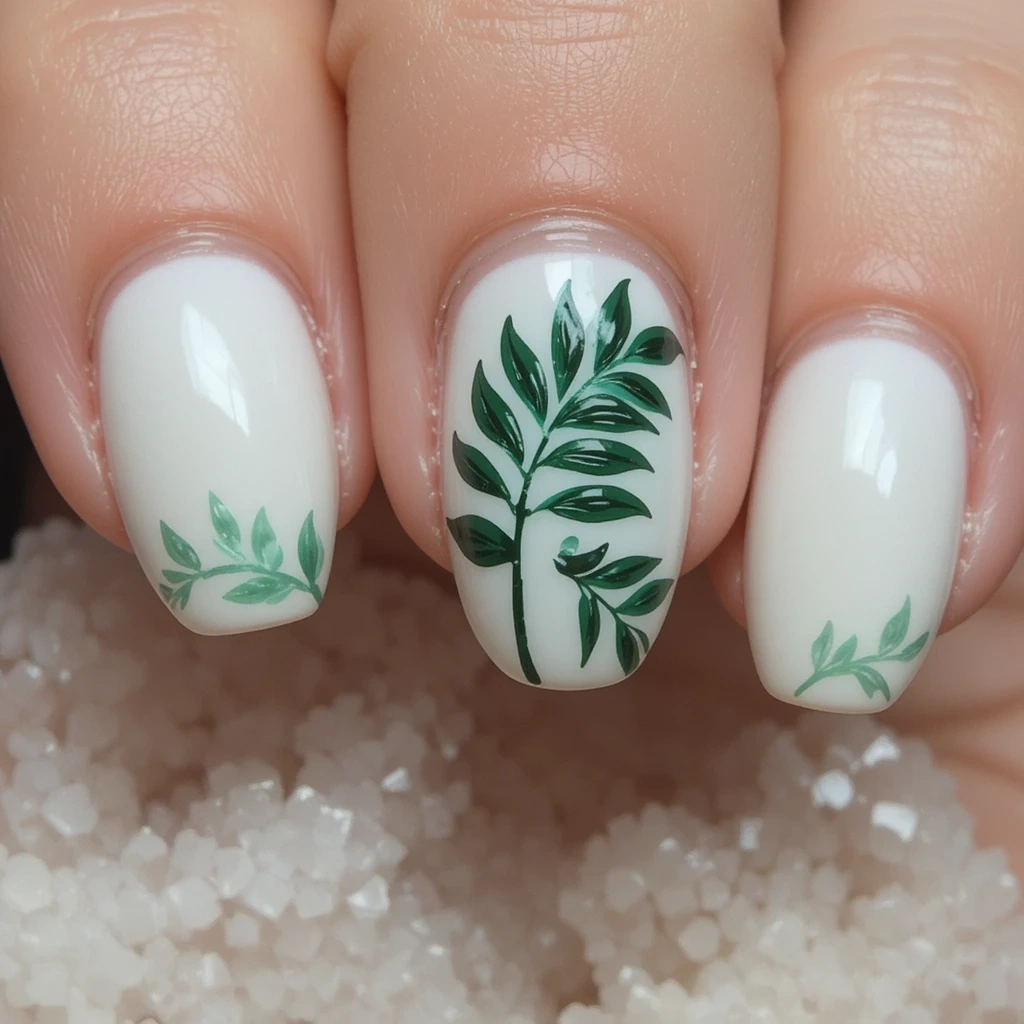
8. Monstera Leaf Magic
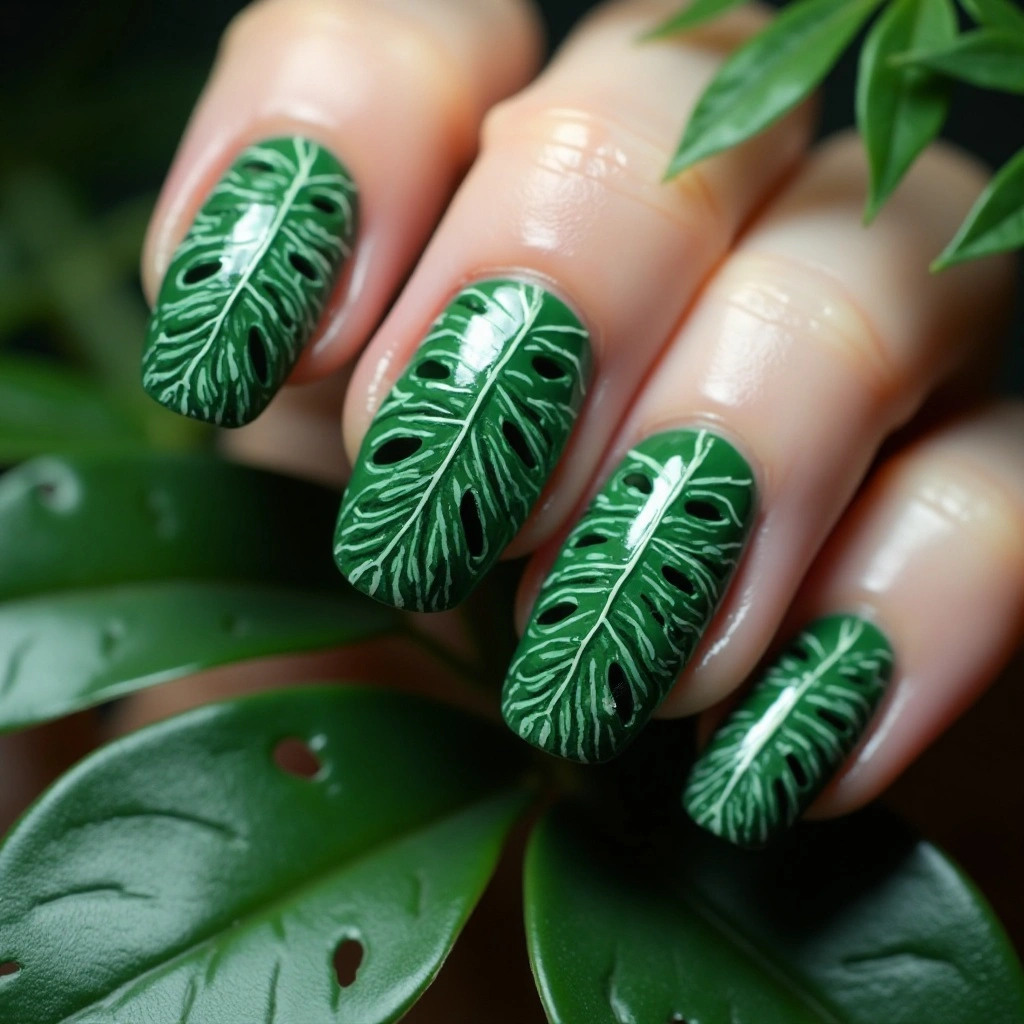
Difficulty: Beginner
Time to complete: 30 minutes
Best for: Plant lovers
Why it works: Monstera leaves have such distinctive holes that they’re instantly recognizable
What makes it different: Uses hole-punch technique instead of painting the holes
Deep forest green covers every nail, lush and glossy like a rainforest canopy. On each nail, a Monstera leaf spreads from cuticle to tip—broad, heart-shaped, with those characteristic natural holes that make the plant so recognizable. The holes aren’t painted on; they’re negative spaces where the green is absent, revealing the black-outlined edges that make them look cut out.
White veins trace through the leaf like tiny rivers on a map. The leaves overlap slightly at the edges where they’d grow crowded on the vine. Each nail holds a slightly different leaf shape, like a collection of specimens pressed in a botanical journal.
9. Flamingo Flair
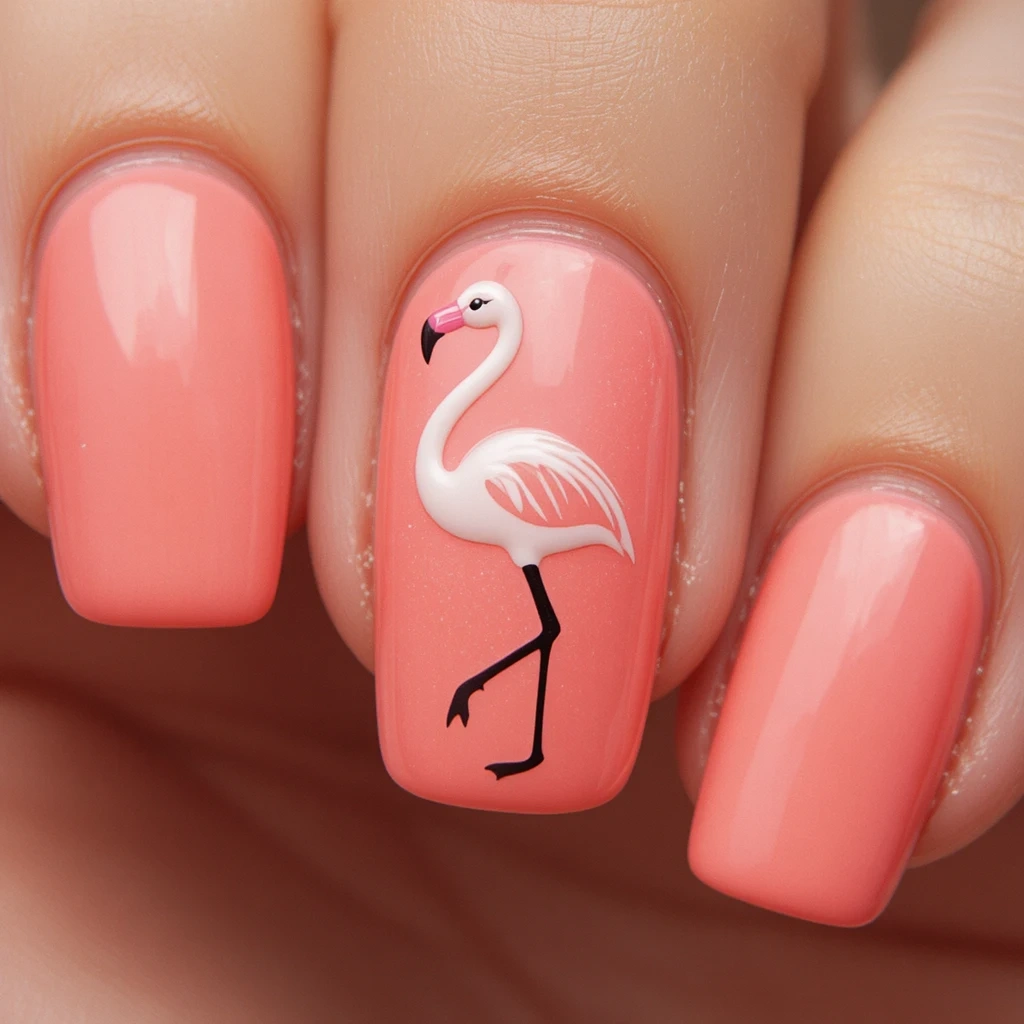
Difficulty: Intermediate
Time to complete: 45 minutes
Best for: Pink lovers
Why it works: Flamingos are just curved lines—simpler than you’d think
What makes it different: Shows proportion tricks to make it look like a flamingo, not a pink blob
A soft coral-pink base, warm and tropical, covers all nails. On the accent finger, a flamingo stands in elegant profile—not a detailed painting, but a clean, stylized silhouette that captures everything essential about these birds. The neck curves in that distinctive S-shape, long and graceful, leading to a small rounded head with a tiny dot eye.
The body is a simple oval, but the proportions are right—neck longer than you’d think, body smaller. The beak curves down in black with a pink base. Legs stretch down in two thin black lines, one bent slightly at the knee like flamingos actually stand. Against the pink background, the flamingo looks like a minimalist art print come to life.
10. Tropical Color Block
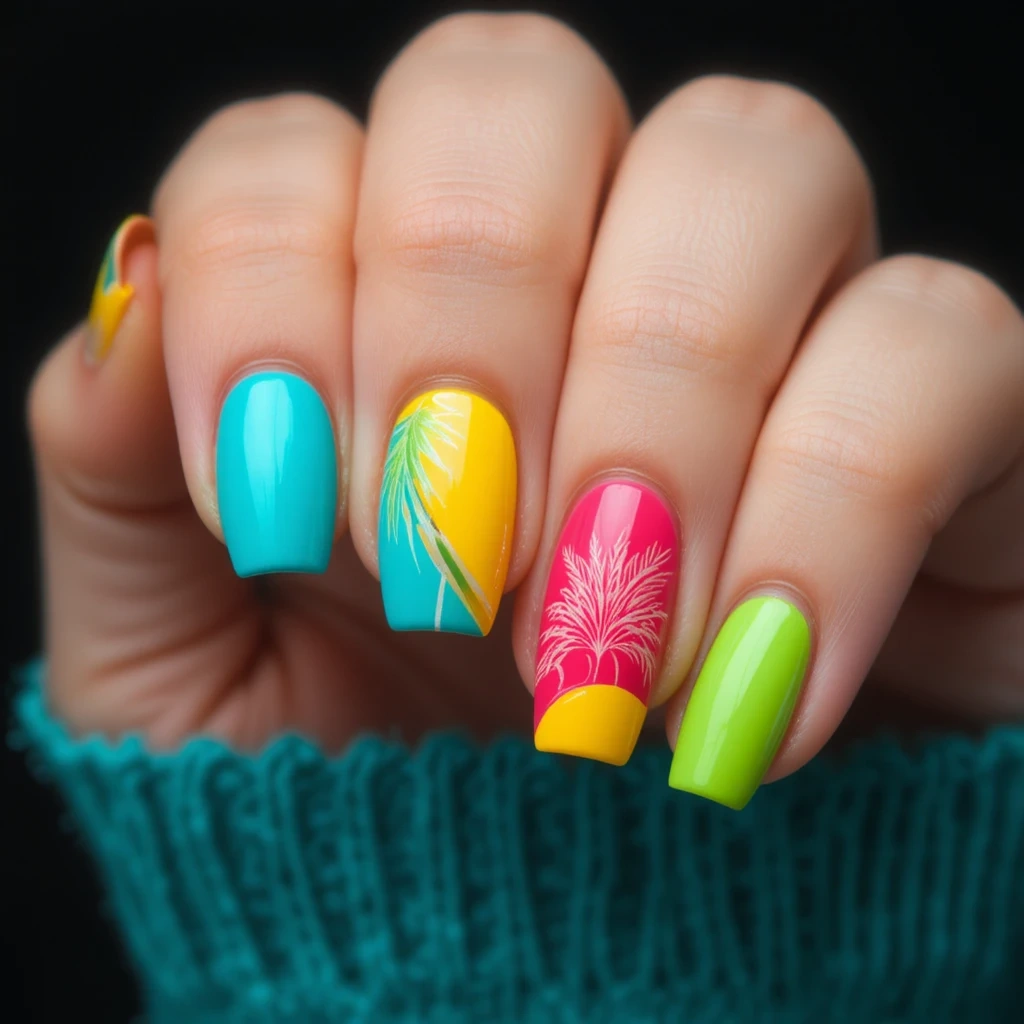
Difficulty: Beginner
Time to complete: 25 minutes
Best for: Minimalists
Why it works: Clean lines and bright colors read “tropical” without any actual art
What makes it different: Specific color combinations that scream vacation (coral + turquoise + yellow)
A celebration of pure color, no actual “art” required. Each nail wears a different tropical shade—coral like sunset clouds, turquoise like shallow Caribbean water, yellow like pineapple flesh, hot pink like bougainvillea flowers, lime green like new palm fronds. On each nail, a geometric shape cuts through in a contrasting color: a coral triangle on the turquoise nail, a turquoise stripe across the yellow, a yellow half-moon at the cuticle of the pink.
The lines are razor-sharp, the color transitions clean and deliberate. It looks like modern art, like something you’d see in a Miami gallery—but it’s just color and shape, perfectly executed.
11. Tropical Flower Bouquet
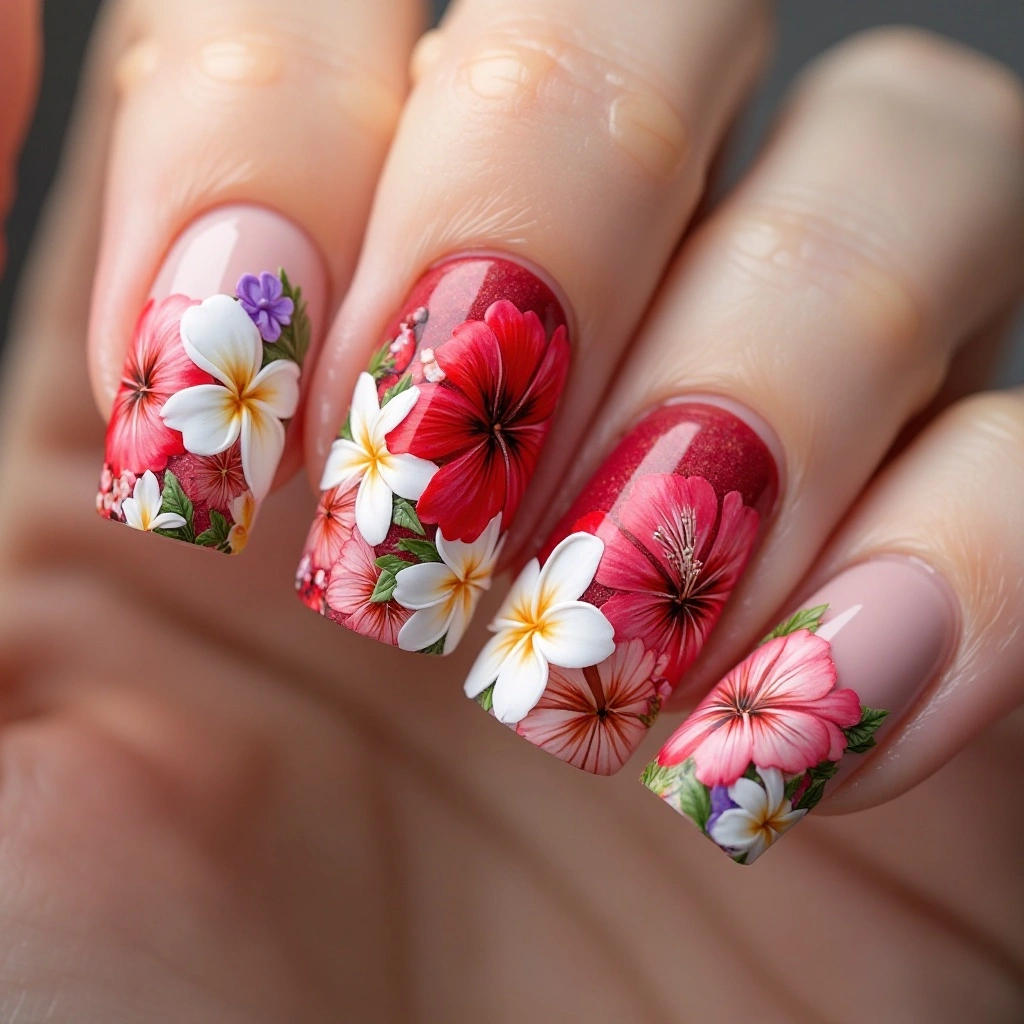
Difficulty: Advanced
Time to complete: 90 minutes
Best for: Someone wanting a full floral scene
Why it works: Multiple flowers hide any individual imperfections
What makes it different: Uses layering technique so flowers don’t look flat
A sheer nude base lets your natural nail peek through, creating depth behind the explosion of tropical blooms covering the entire nail. This isn’t one flower—it’s a bouquet. Hibiscus in red and pink take center stage, largest and boldest. Plumeria flowers in white with yellow centers nestle between them, their five rounded petals overlapping.
Tiny buds in coral and lavender fill every gap. The flowers layer over each other, some in front, some behind, creating actual dimension. Light green leaves peek from underneath, painted first so they appear behind the blooms. Every nail holds a different arrangement, but together they look like you dipped your fingertips in a tropical garden.
12. 3D Tropical Fruits
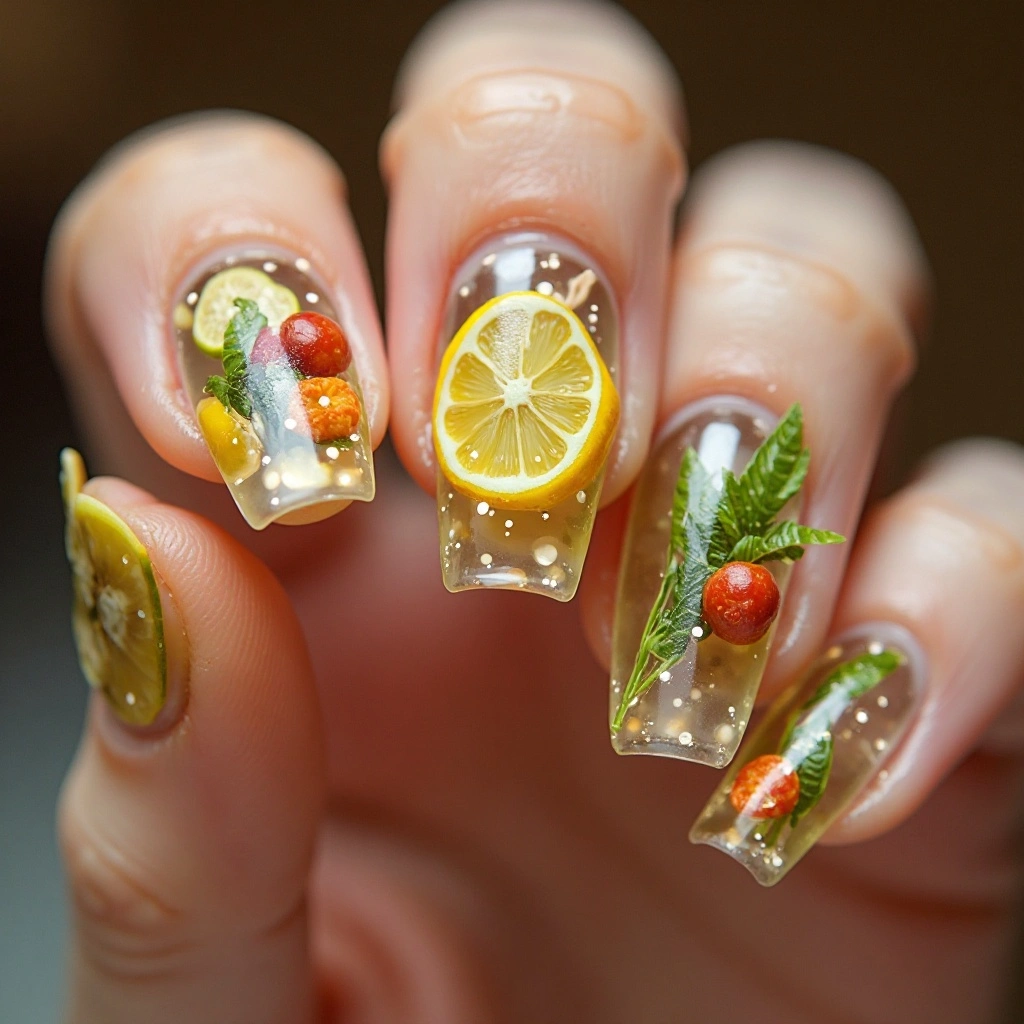
Difficulty: Advanced
Time to complete: 2+ hours
Best for: Special events or vacations
Why it works: The dimension makes fruit look real enough to eat
What makes it different: Uses clear gel to encase the fruit for smooth, durable 3D effects
Each nail is a clear, glossy dome protecting a miniature tropical fruit inside. One nail holds a perfect lemon slice—actual thin slice of dried citrus suspended in clear gel, the yellow rind visible at the curved edge, the flesh translucent, seeds scattered through. Another nail captures a tiny starfruit cross-section, its star shape unmistakable. A third nail holds a cluster of miniature palm fronds, impossibly small, preserved forever under the clear dome.
The nails are thick with builder gel, shaped into smooth, rounded tops like museum specimen cases. Light catches the curved surfaces, magnifying the fruits inside, making them look closer than they are. Run your finger across and everything is smooth—the fruit is in there, but you can’t feel it, just the glossy dome protecting it.
Pros and Cons of Tropical Nails
✅ Pros:
- Bright colors instantly improve mood—I’m genuinely happier looking at coral nails
- Photograph beautifully for vacation pictures
- Endless design variations (you’ll never run out of ideas)
- Works on all nail shapes and lengths with adjustments
- Can be subtle (single accent nail) or bold (full hand)
- Mistakes often look intentional in tropical themes
- Most designs don’t require perfect symmetry
❌ Cons:
- Removal takes 15-20 minutes minimum, especially with 3D elements
- Shows wear quickly on tips—bright colors chip visibly
- 3D flowers catch on hair, sweaters, and towels constantly
- Not repairable if a 3D element pops off (you’re redoing the whole nail)
- Learning curve with first attempts—my first palm leaf looked like a fern
- Expensive upfront if buying all new colors ($8-15 per gel polish)
- Sunscreen can stain lighter colors yellow
- Office jobs might raise eyebrows at full tropical scenes
Gel vs Regular Polish for Tropical Designs
| Factor | Gel Polish | Regular Polish |
|---|---|---|
| Drying time | Cures in 60 seconds | 10-20 minutes to touch-dry, hours to fully set |
| Longevity | 2-3 weeks without chips | 3-5 days before tip wear |
| Design complexity | Can do 3D, encapsulated elements | Flat designs only |
| Removal | Requires soaking (15-20 min) | Wipes off in 2 minutes |
| Cost to start | $80-100 for lamp + polishes | $20-30 for polishes + top coat |
| Best for | Vacations, special events | Trying trends, frequent changers |
| Durability on 3D | Holds shape well | Flattens or chips quickly |
My take: If you’re doing actual tropical art with multiple colors and details, go gel. You’ll cry less when you accidentally smudge a 45-minute design at the 11-minute mark. If you just want bright colors with one accent nail, regular polish works fine.
Maintenance Tips for Long-Lasting Tropical Nails
Days 1-7: The Fresh Phase
- Apply cuticle oil every morning and night—I use CND Solar Oil ($10-12). It keeps the gel flexible so it bends with your nail instead of lifting at the edges.
- Wear gloves washing dishes. Every single time. The hot water softens gel and causes lifting within days.
- Avoid picking at any lifted edges. If you see lifting, file it smooth and add a tiny drop of top coat to seal it. Fixing it immediately adds 5-7 days of wear.
Days 8-14: The Middle Stage
- Refresh top coat on day 10. Even no-wipe top coats lose shine. Apply a thin layer of Gelish Top It Off ($13-15) to restore gloss and protect the art underneath.
- Check 3D elements daily. Give each flower a gentle wiggle. If it moves slightly, don’t wait—add a tiny bead of builder gel around the base and cure immediately.
Days 15-21: The Decision Point
- By day 18, evaluate growth. If the gap at your cuticle is larger than 2mm, it’s time to remove or fill. Tropical designs look weird with half an inch of naked nail showing underneath.
Common Mistakes and How to Fix Them
Mistake 1: Muddy Gradient Colors
What it looks like: Your sunset ombré turned brown instead of blending smoothly.
Why it happens: Using complementary colors that mix into mud (like blue and orange blending into brown).
Exact fix: Sponge each color separately, curing between layers. Start with yellow, cure, then sponge orange on just the lower half, cure, then pink on tips. It takes longer but stays bright.
How well it works: 90% better—the colors stay true instead of mixing into mud.
Mistake 2: Palm Leaves That Look Like Ferns
What it looks like: Your palm fronds are too symmetrical and tight, like a fern or a pine branch.
Why it happens: Real palm leaves curve and have space between each “finger.”
Exact fix: Paint the stem first, then add the left-side leaves curving down, cure, then add right-side leaves curving up. Leave visible gaps.
How well it works: Instant improvement—the gaps create the tropical look instantly.
Mistake 3: 3D Flowers Popping Off
What it looks like: You lost a flower within 3 days.
Why it happens: The flower base wasn’t on fully cured gel, or you built it too tall without enough contact area.
Exact fix: File the nail surface rough where the flower will sit. Apply a tiny ball of builder gel, press flower into it, cure 60 seconds, then encapsulate the base with more gel.
How well it works: This adds 2+ weeks of wear if done right.
Mistake 4: Fruit Slices That Look Like Blobs
What it looks like: Your lemon slice just looks like a yellow circle with dots.
Why it happens: No dimension or texture in the fruit.
Exact fix: Add white segments before curing the yellow, so they sink in slightly. Then add a thin layer of clear gel over everything to create the “wet” look of fresh fruit.
How well it works: Makes fruit look 3D and realistic instantly.
Real Wear Test: How They Look Week by Week
I wore the hibiscus flower design (my most detailed) for 3 weeks to see what really happens.
Week 1:
- Days 1-3: Perfect. The flowers look fresh, top coat is glossy, no lifting.
- Day 4: Tiny tip wear on index finger (I type constantly).
- Day 7: Still glossy, but I notice the white petals are slightly less bright—probably from hand washing.
Week 2:
- Day 10: Added a fresh top coat layer. Brought back the shine completely.
- Day 12: The 3D flower on my ring finger caught in my hair twice. No damage, but annoying.
- Day 14: Cuticle gap is visible but not terrible. About 1.5mm growth.
Week 3:
- Day 17: One petal on the 3D flower has a tiny chip on the edge. Not obvious unless you’re close.
- Day 19: Cuticle gap is 3mm now. The design looks unbalanced—too much naked nail showing.
- Day 21: Removed them. The flowers still looked good up close, but the proportion was off with the growth.
Honest verdict: Tropical designs look their best for 10-12 days. After that, either fill or remove. The 3D elements last longer than expected if you’re careful, but the cuticle growth ruins the look faster than the art fails.
Frequently Asked Questions
Can I do tropical nails on short nails?
Yes, just scale down the designs. Use single palm fronds instead of full leaves, tiny fruit slices instead of whole fruits, and skip the 3D elements. Color blocking and gradients actually look better on short nails because there’s less surface to mess up.
How long do 3D tropical nails really last?
With proper application and maintenance, 2-3 weeks. The 3D elements themselves rarely fail—they’re encapsulated in hard gel. The issue is always lifting at the cuticle or the 3D element catching on something and breaking off clean. I’ve had one flower last 4 weeks and another pop off in 4 days. Depends on your lifestyle.
Will tropical nails damage my natural nails?
Only if you pick them off or file them wrong. Proper removal (soaking in acetone for 15-20 minutes) leaves your nails healthy. I’ve been doing tropical gels for 2 years and my nails are stronger now because the gel protects them from breaking. Just don’t rip or peel.
What’s the easiest tropical design for beginners?
Solid bright colors with one palm leaf accent nail. You can practice the leaf on a fake nail tip first (buy a pack of 100 for $5-6 on Amazon). Once you get the curve right, it’s actually harder to mess up than you’d think.
Where to Start
If you’re trying tropical nails for the first time, pick the palm leaf design or the fruit slices. They’re forgiving, teach you the basic techniques, and look impressive even when they’re not perfect. Buy a starter gel kit with lamp from Beetles or Modelones ($30-40 on Amazon) and one extra color you love. Skip the 3D elements until you’ve done at least 3-4 flat designs successfully.
A good place to start is with two colors you’d actually wear on vacation—coral and turquoise always work. Paint your non-dominant hand first (it’s harder, so get it done while you’re fresh), then match the other hand. And remember—tropical designs are supposed to look a little wild. That’s the point.