59 Prom Nails Ideas You Can’t Miss
Prom night deserves nails that are just as unforgettable as your dress, and the right manicure can elevate your entire look from beautiful to breathtaking. Whether you’re drawn to timeless elegance or bold statement designs, your prom nails should reflect your personal style while complementing your outfit and lasting through every dance and photo op.
From romantic soft glimmers to eye-catching embellishments, these five nail ideas will help you find the perfect finishing touch for one of the most memorable nights of your life.
Purple Prom Nails: 5 Elegant Ideas
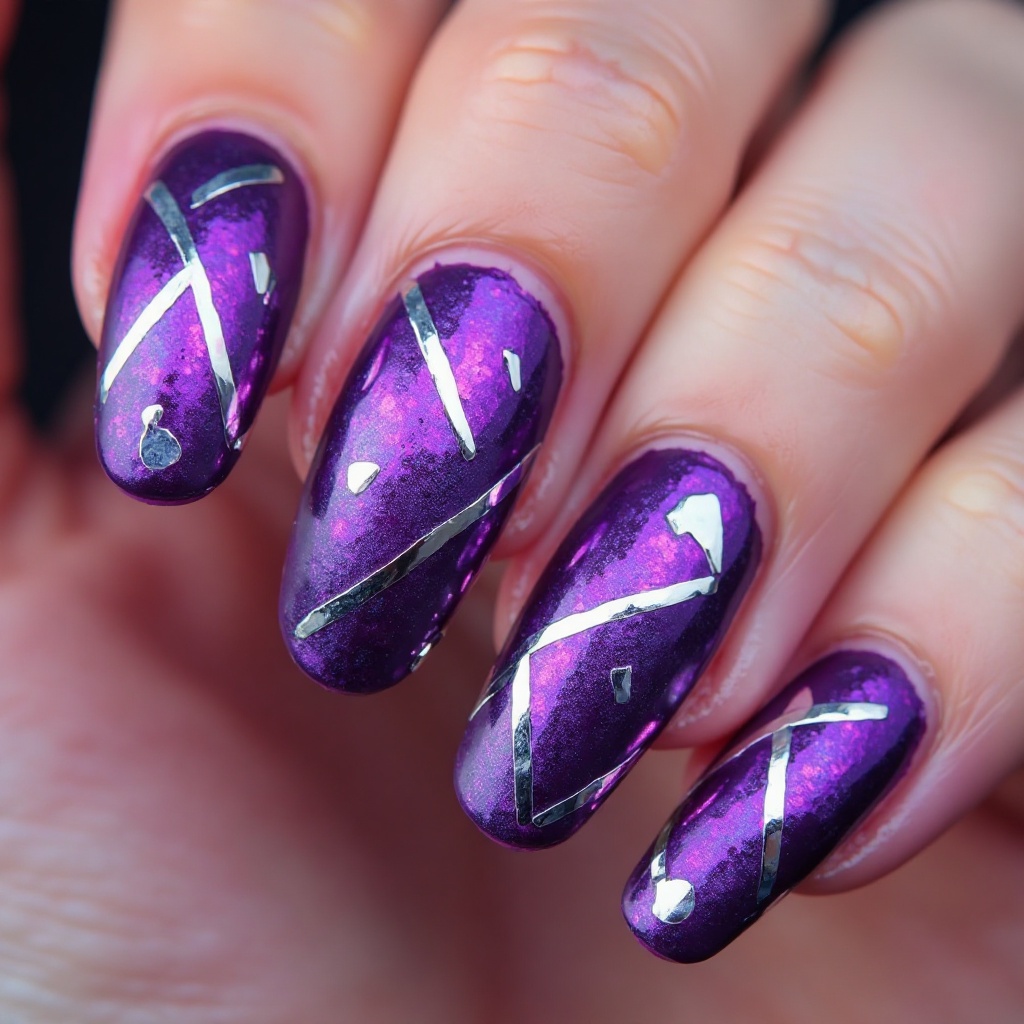
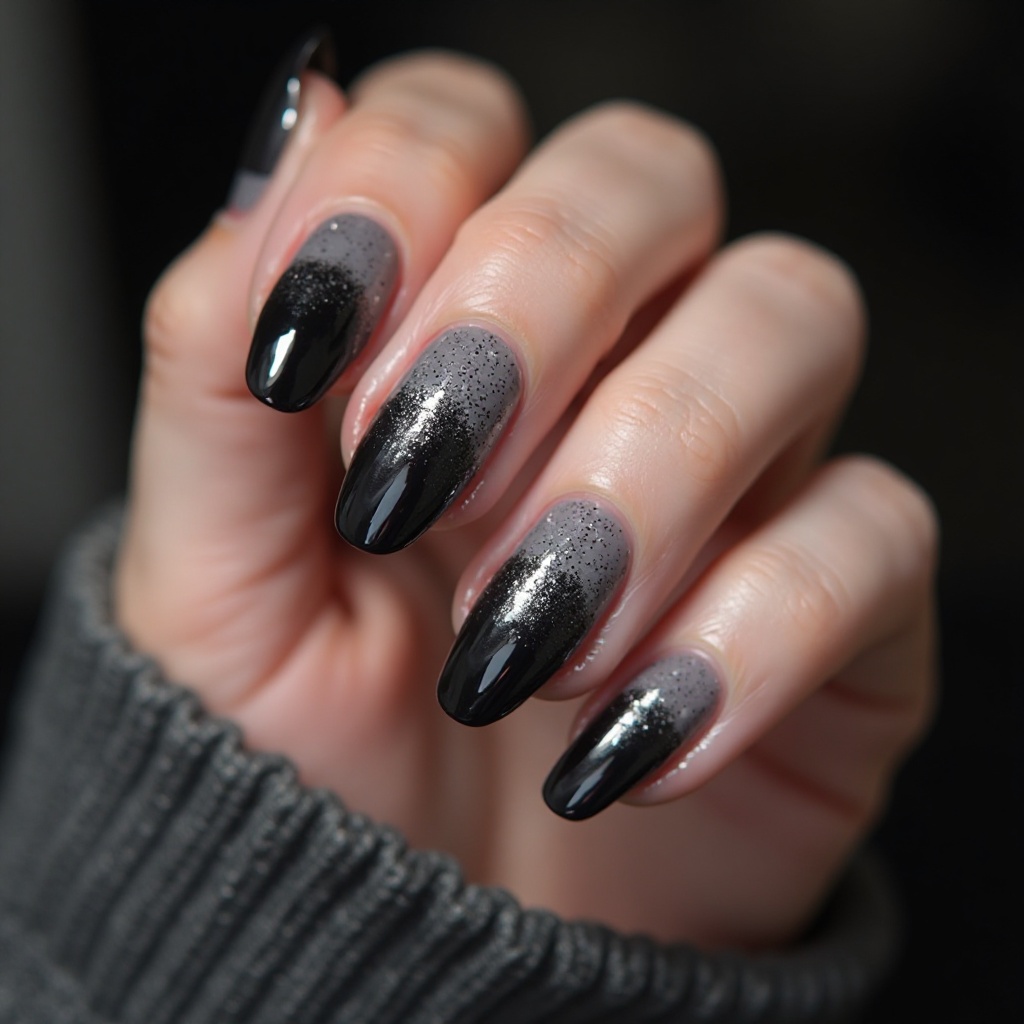
1. Deep Plum with Silver Glitter Gradient
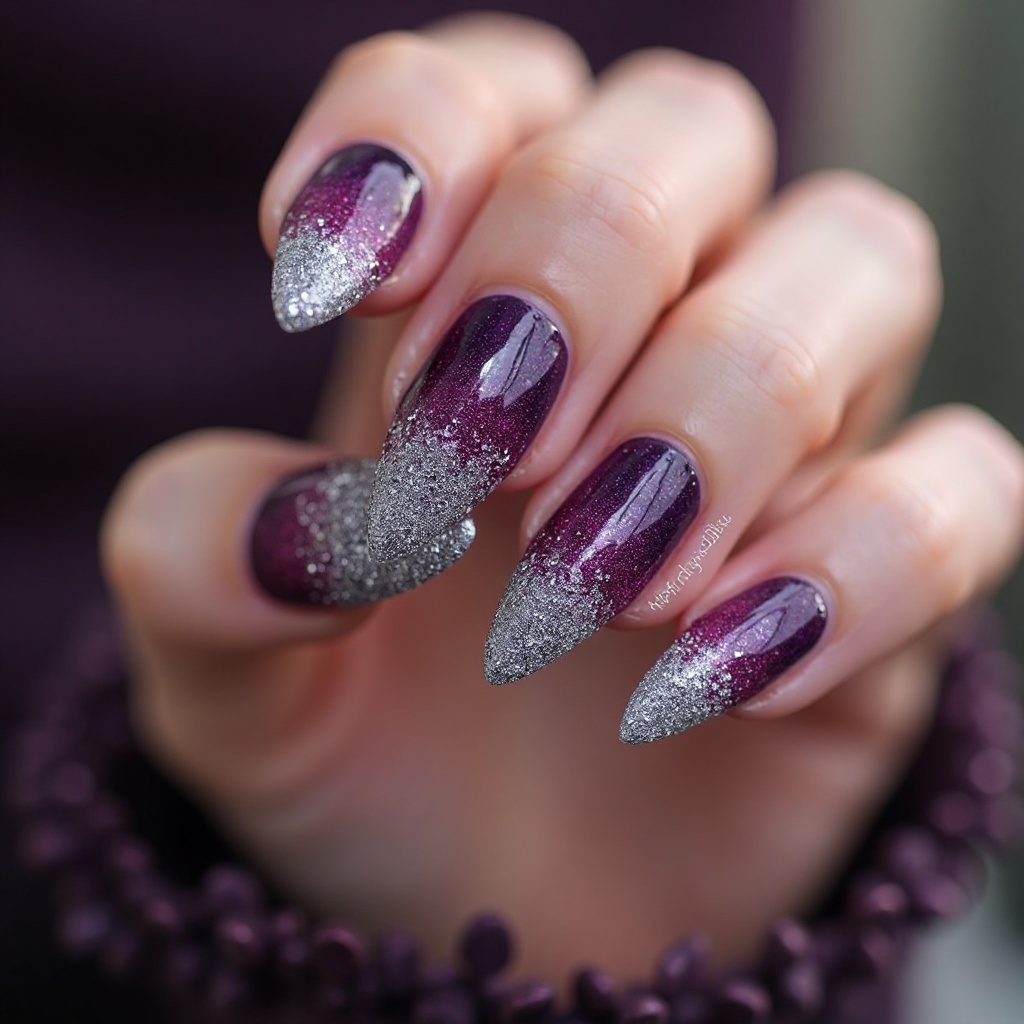
Rich, deep plum base that transitions into concentrated silver glitter at the tips, creating a regal and sophisticated look. The jewel-toned purple provides depth and elegance while the silver adds sparkle that catches every light. This combination works beautifully with purple, silver, black, or navy dresses and feels luxurious without being overly bold.
Why It Works for Prom: Deep plum is one of the most universally flattering purple shades, and the silver gradient adds just enough glamour for photos while maintaining sophistication.
Pro Tip: Use fine silver glitter rather than chunky for a more refined finish, and concentrate the heaviest glitter at the very tips for maximum impact.
How to Create Deep Plum with Silver Glitter Gradient at Home
What You’ll Need:
- Deep plum polish (OPI “Lincoln Park After Dark” or Essie “Bahama Mama”)
- Fine silver glitter polish (OPI “Desperately Seeking Sequins” or China Glaze “Fairy Dust”)
- Makeup sponge
- Paper plate
- Liquid latex or petroleum jelly
- Base coat and clear top coat
Step-by-Step Application:
- Prep and protect skin: Apply liquid latex or petroleum jelly around nails, then apply base coat.
- Apply plum base: Paint 2-3 coats of deep plum, drying 2 minutes between coats. Let final coat dry 5 minutes completely.
- Create gradient: Pour silver glitter onto paper plate. Dab sponge into glitter and bounce onto nail tips, using heavy pressure at tips and lightening as you move toward mid-nail. The gradient should fade by the center of the nail.
- Build layers: Repeat sponging 2-3 times, drying 3 minutes between layers. Focus more glitter at the tips each time.
- Seal: Apply 3 thick layers of clear top coat to smooth the glitter texture, waiting 3 minutes between each layer.
Time Required: 60-70 minutes Difficulty Level: Intermediate
2. Lavender Jelly with Holographic Flakes
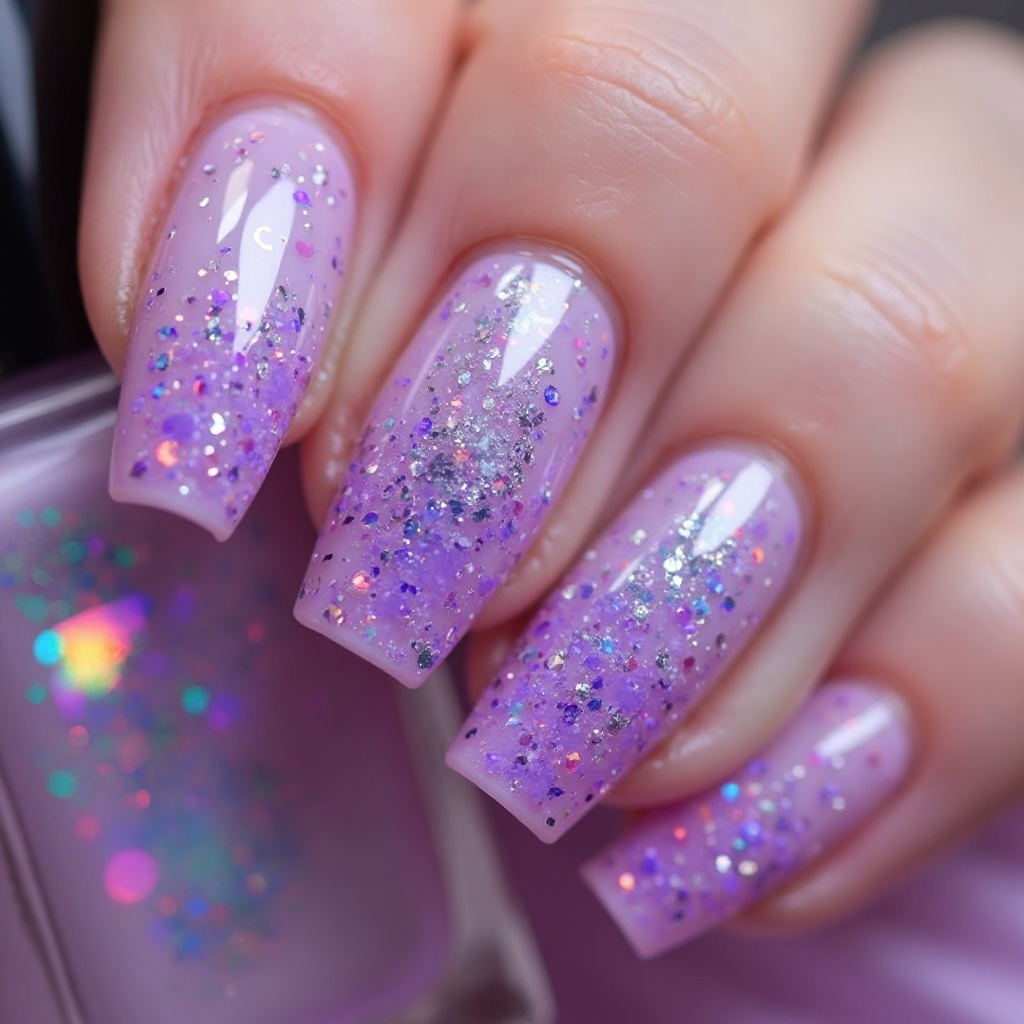
Translucent lavender jelly polish layered to create a glass-like effect, scattered with holographic flakes that shift colors. The soft purple has incredible depth and dimension, while the holographic flakes add ethereal sparkle. This design is perfect for those who want purple nails with a romantic, dreamy quality.
Why It Works for Prom: The jelly finish creates a unique luminous effect that photographs beautifully, and lavender is one of the trendiest colors for formal events right now.
Pro Tip: Apply 4-5 thin coats of jelly polish to achieve the perfect translucent depth—rushing with thick coats will look streaky.
How to Create Lavender Jelly with Holographic Flakes at Home
What You’ll Need:
- Lavender jelly polish (Essie “Lilacism” sheer formula or any jelly finish lavender)
- Holographic flakes (aurora or opal flakes)
- Clear polish for adhering flakes
- High-gloss top coat
- Base coat
- Small brush or toothpick
Step-by-Step Application:
- Prep and base: Standard prep plus base coat.
- Build jelly layers: Apply very thin first coat of lavender jelly—it will look extremely sheer. Dry 3 minutes. Apply 3-4 more thin coats, drying between each, until you achieve your desired translucent color intensity.
- Apply flakes: Paint thin layer of clear polish on each nail. While wet, use small brush to place holographic flakes, concentrating more toward tips for gradient effect. Press down gently.
- Seal with gloss: Let flakes dry 5 minutes. Apply 2-3 thick layers of high-gloss top coat to encapsulate flakes and create that glass effect.
Time Required: 70-80 minutes (jelly needs patience) Difficulty Level: Beginner-Intermediate
3. Purple Chrome with Geometric Negative Space
Vibrant purple chrome finish with strategic negative space cutouts in geometric patterns—triangles, diagonal lines, or abstract shapes that reveal natural nail. The chrome makes the purple incredibly saturated and eye-catching, while negative space adds modern edge. Metallic silver striping tape outlines the geometric shapes for crisp definition.
Why It Works for Prom: This design is perfect for making a bold statement while still being sophisticated, and the negative space prevents the chrome from feeling too heavy.
Pro Tip: Keep geometric patterns simple—one or two clean shapes per nail looks more intentional than complex patterns.
How to Create Purple Chrome with Geometric Negative Space at Home
What You’ll Need:
- Dark purple gel polish
- Purple chrome powder
- Gel setup (lamp, base, top coat)
- Silver striping tape (1mm width)
- Tweezers and scissors
- Rubbing alcohol
Step-by-Step Application:
- Prep and plan: Standard prep, apply gel base coat, cure 60 seconds. Plan your geometric patterns—decide which nails get designs.
- Apply tape for negative space: On design nails, place striping tape in desired geometric pattern on cured base coat. Press firmly. This creates the negative space areas.
- Apply purple gel: Paint 2 coats purple gel over all nails (including over tape), curing 60 seconds between coats.
- Apply gel top coat: Paint thin layer of no-wipe gel top coat, cure 60 seconds. Surface should be slightly tacky.
- Apply chrome powder: Rub purple chrome powder over all nails with eyeshadow applicator. Mirror effect appears instantly. Brush off excess.
- Remove tape: Use tweezers to carefully peel away striping tape, revealing natural nail in geometric shapes underneath.
- Add decorative tape (optional): Apply thin metallic striping tape along boundaries between chrome and natural nail for definition. Press firmly, trim excess.
- Seal: Apply gel top coat over everything including tape borders, cure 60 seconds. Apply second layer, cure again. Wipe with rubbing alcohol.
Time Required: 60-75 minutes Difficulty Level: Advanced—requires gel equipment
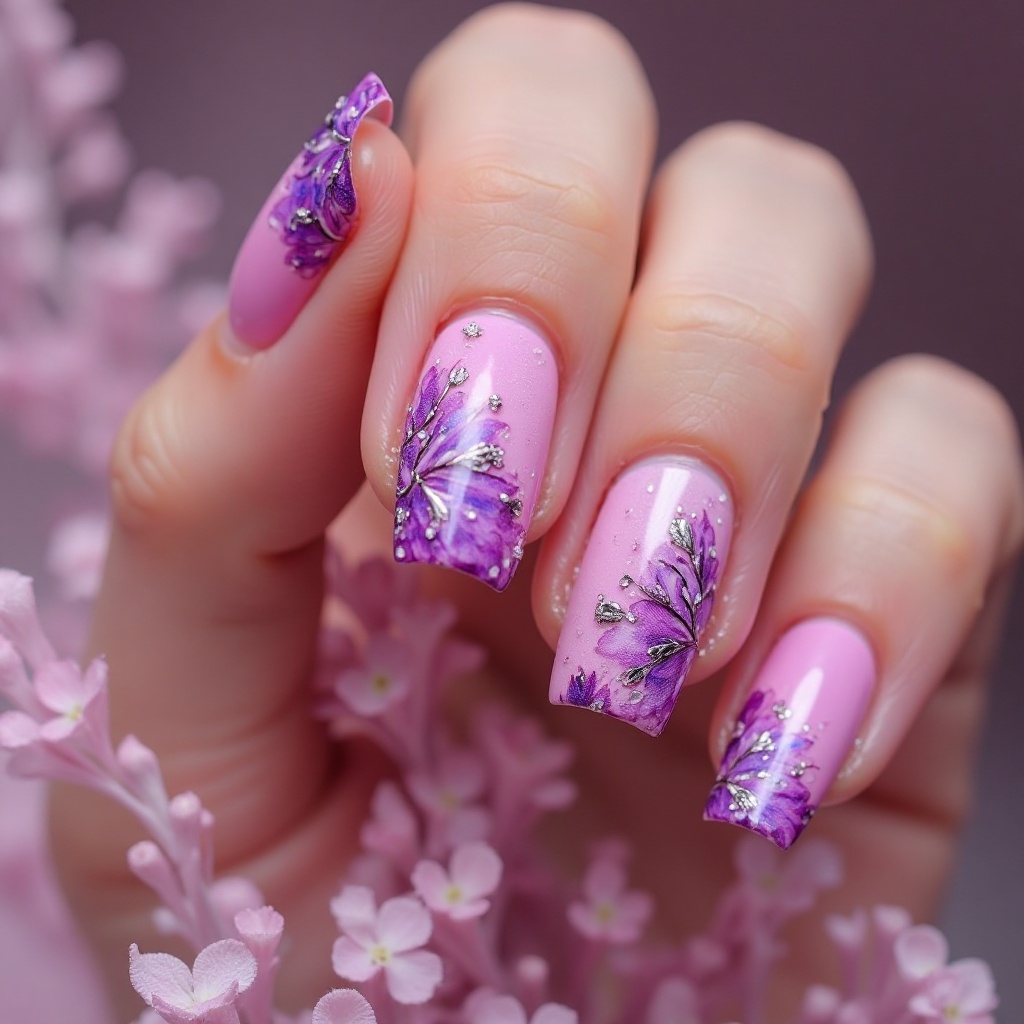
4. Soft Purple with White Floral Art
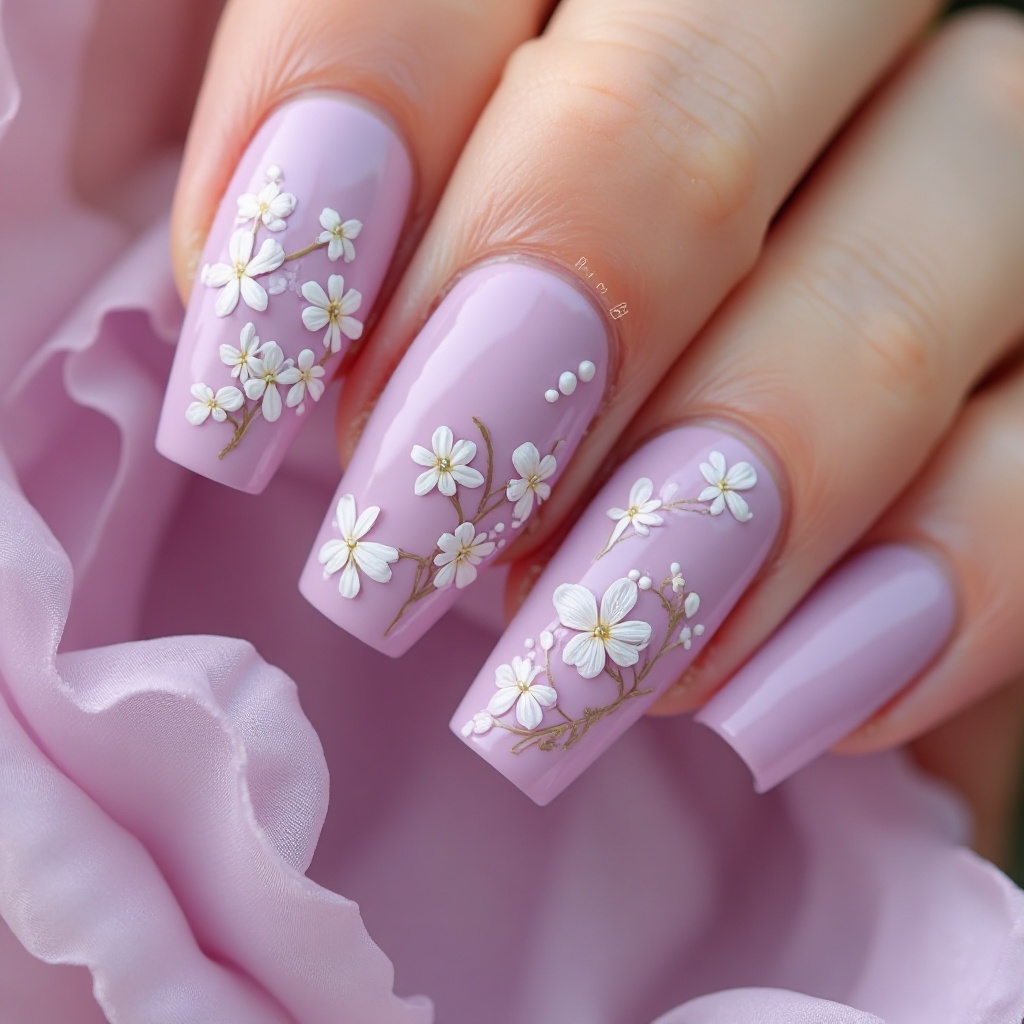
Creamy soft purple base adorned with delicate hand-painted white flowers or floral appliqués on accent nails. The feminine color combination creates a romantic, garden-inspired look that’s perfect for spring and summer proms. Small white details create beautiful contrast against the purple base.
Why It Works for Prom: The soft purple is approachable and romantic rather than bold, and the white florals add special occasion detail without overwhelming.
Pro Tip: Use pre-made 3D floral stickers if you’re not confident painting flowers—they look professional and are much easier for beginners.
How to Create Soft Purple with White Floral Art at Home
What You’ll Need:
- Soft purple polish (Essie “Play Date” or OPI “Do You Lilac It”)
- White polish or white striping polish
- Thin nail art brush OR 3D white floral stickers
- Dotting tool
- Base coat and clear top coat
Step-by-Step Application:
Method 1: Hand-Painted Flowers
- Prep and base: Standard prep plus base coat.
- Apply purple base: Paint 2 coats soft purple, drying 2 minutes between coats.
- Paint simple flowers: Using thin brush and white polish, paint 5-petal flowers on 1-2 accent nails. Create flowers by painting 5 small dots in a circle, then connecting them with curved strokes. Add a tiny yellow or white dot in center.
- Seal: Let dry 10 minutes, then apply 2 layers clear top coat.
Method 2: 3D Floral Stickers
- Prep and base: Standard prep plus base coat.
- Apply purple base: Paint 2 coats, dry completely.
- Apply stickers: Peel white 3D floral stickers and place on 1-2 accent nails using tweezers. Press firmly for 5 seconds.
- Seal around (not over): Apply top coat to all nails, painting carefully around 3D flowers but not over them (this preserves dimension). Paint 2-3 layers around flower bases for security.
Time Required: 40-60 minutes depending on method Difficulty Level: Beginner for stickers, Intermediate for hand-painting
5. Purple Ombré with Glitter Tips
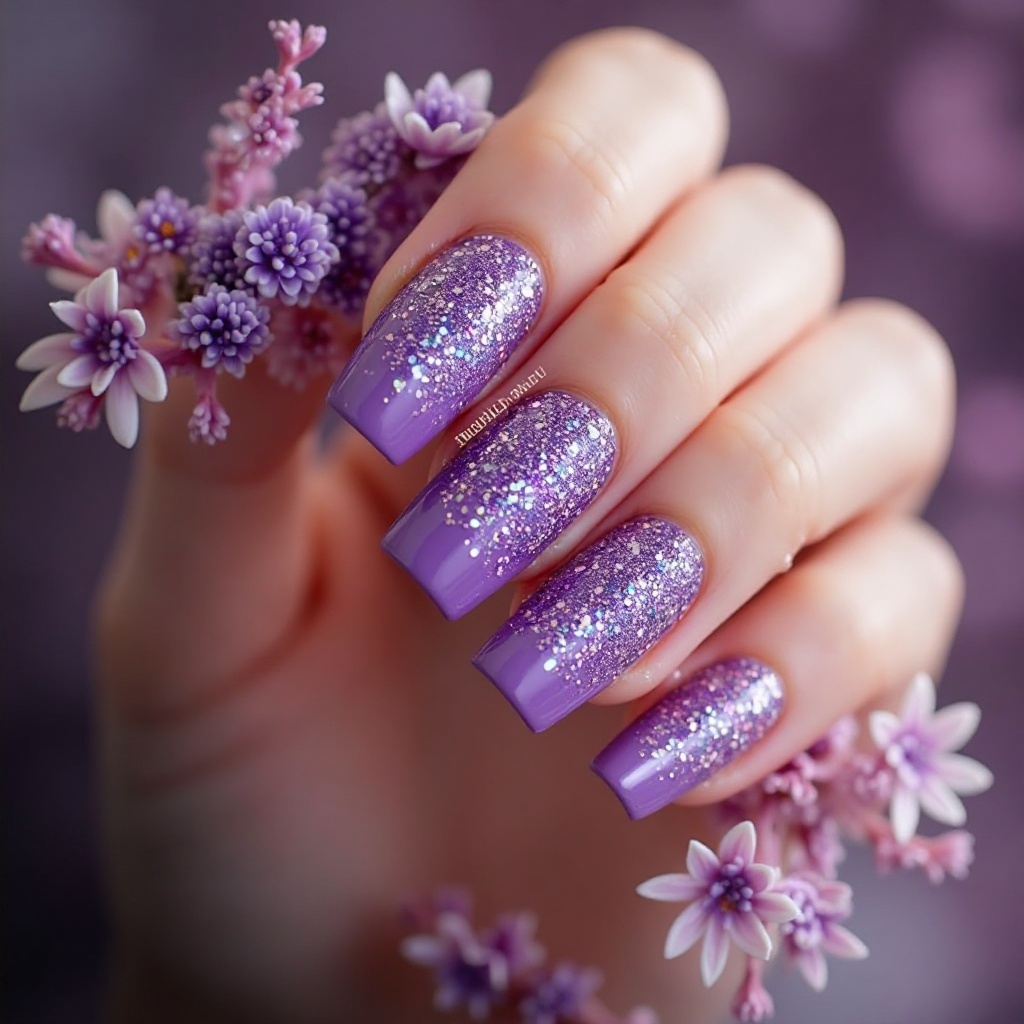
Gradient transition from deep violet at the cuticle to lighter lavender at the tips, topped with concentrated purple or holographic glitter at the very tips. The ombré creates beautiful dimension while the glitter tips add sparkle for special occasions. This design offers multiple shades of purple in one manicure.
Why It Works for Prom: The ombré technique showcases multiple purple tones, making it easier to match various purple dress shades, and the glitter adds prom-appropriate sparkle.
Pro Tip: Use three shades of purple (dark, medium, light) for the most seamless gradient transition.
How to Create Purple Ombré with Glitter Tips at Home
What You’ll Need:
- Dark purple polish (OPI “Purple Palazzo Pants”)
- Medium purple polish (Essie “Play Date”)
- Light lavender polish (OPI “Do You Lilac It”)
- Purple or holographic glitter polish
- Makeup sponges
- Paper plate
- Liquid latex or petroleum jelly
- Base coat and clear top coat
Step-by-Step Application:
- Prep and protect: Apply liquid latex around nails, then base coat.
- Apply lightest base: Paint 2 coats of light lavender as your base color. Dry 2 minutes between coats.
- Create gradient palette: On paper plate, paint three stripes side by side: dark purple, medium purple, light lavender, leaving small gaps between.
- Sponge gradient: Dab makeup sponge to pick up all three colors at once. Bounce onto nail with darkest color at cuticle, medium in middle, lightest at tip. Repeat 2-3 times, reloading sponge and drying 3 minutes between applications.
- Add glitter tips: Dab sponge into purple glitter polish and bounce onto the very tips of nails only (last 2-3mm). Apply 2 layers for concentrated sparkle.
- Smooth and seal: Let dry 10 minutes. Apply 3 layers of clear top coat to smooth texture, waiting 3 minutes between layers.
- Cleanup: Remove liquid latex barrier, clean edges with acetone if needed.
Time Required: 70-85 minutes Difficulty Level: Intermediate
6. Emerald Green with Gold Leaf Accents
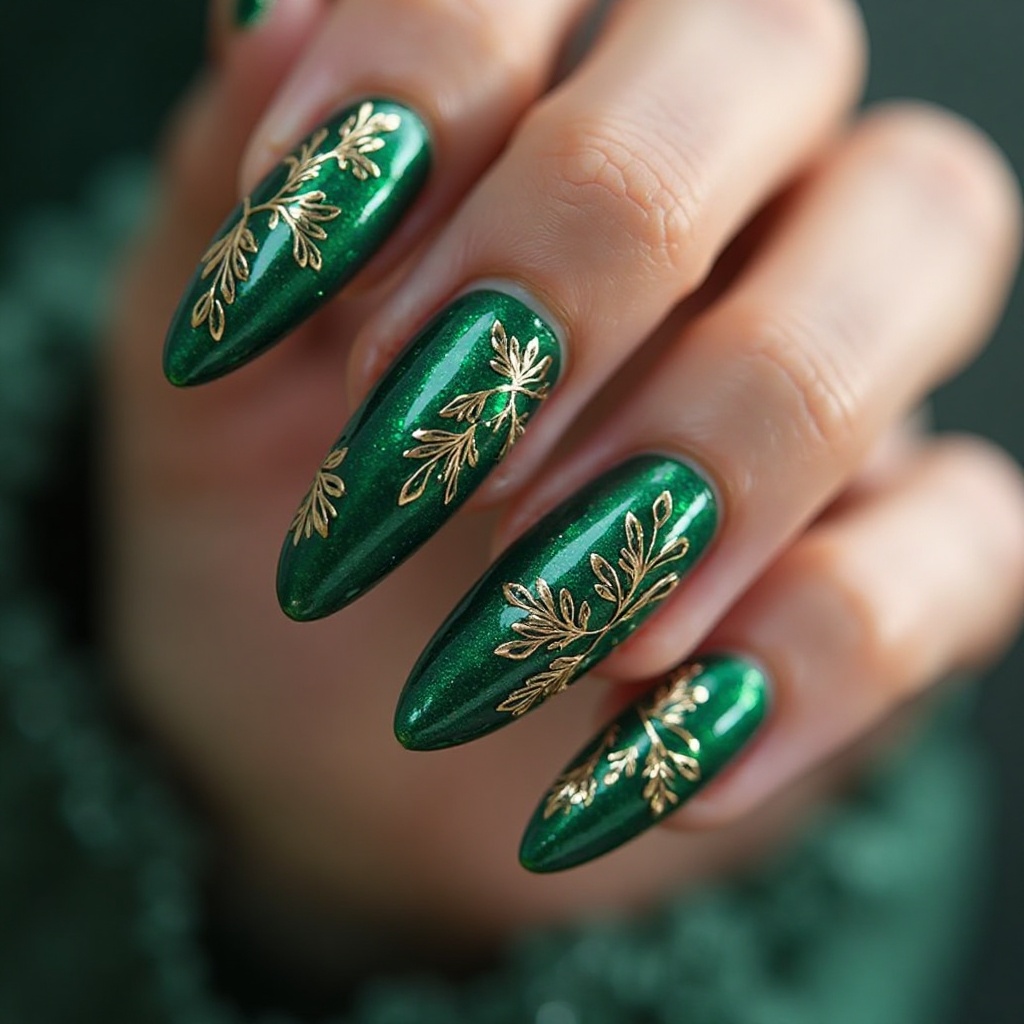
Deep, rich emerald green base with delicate gold leaf applied in organic patterns on accent nails. The jewel-toned green creates lux vibes while gold leaf adds warmth and elegance. This combination is perfect for those wanting sophisticated, unique prom nails that photograph beautifully.
Why It Works for Prom: Emerald green is one of the most elegant, expensive-looking colors, and gold leaf elevates it to red-carpet status.
Pro Tip: Apply gold leaf more heavily on one or two accent nails rather than distributing it evenly across all nails for a more intentional, designer look.
How to Create Emerald Green with Gold Leaf at Home
What You’ll Need:
- Deep emerald green polish (Essie “Going Incognito” or OPI “Envy the Adventure”)
- Genuine gold leaf sheets
- Tweezers and small brush
- Clear top coat (extra)
- Base coat
Step-by-Step Application:
- Prep and base: Standard prep plus base coat.
- Apply emerald base: Paint 2-3 coats of emerald green, drying 2 minutes between coats. Deep greens often need 3 coats for full opacity.
- Prepare gold leaf: Remove one sheet from booklet, place on clean paper. Use tweezers to tear small irregular pieces (1/4 nail size).
- Apply gold leaf: On 1-3 accent nails, paint thin layer of clear top coat where you want gold. While wet, use tweezers to place gold leaf pieces. Use small brush to press down gently. Overlap pieces for denser coverage or space out for delicate look.
- Brush excess: Use dry fan brush to sweep away gold leaf that didn’t stick.
- Seal thoroughly: Apply 3 thick layers of clear top coat over all nails, being extra generous on gold leaf nails. Wait 5 minutes between layers. Gold leaf needs serious sealing to prevent flaking.
Time Required: 50-65 minutes Difficulty Level: Beginner-Intermediate
7. Sage Green Matte with White Floral Details
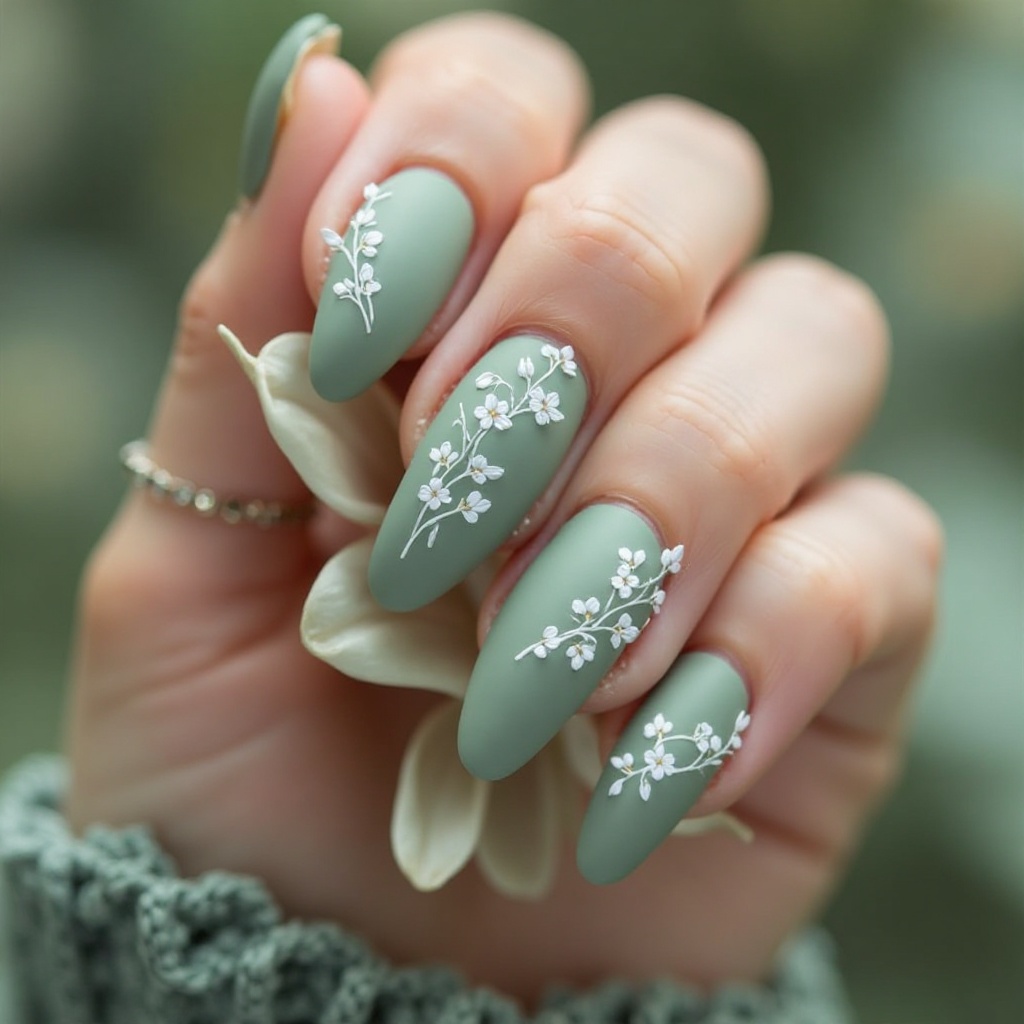
Soft, muted sage green in a matte finish adorned with delicate white hand-painted flowers or vines on accent nails. The earthy, sophisticated green paired with crisp white creates a fresh, botanical aesthetic. The matte finish adds modern edge while white details keep it feminine and special-occasion appropriate.
Why It Works for Prom: Sage green is incredibly trendy and works beautifully with both warm and cool-toned dresses, while the matte finish feels current and sophisticated.
Pro Tip: Apply matte top coat only after all white details are completely dry—matte top coat over wet white paint will cause smudging.
How to Create Sage Green Matte with White Florals at Home
What You’ll Need:
- Sage green polish (Essie “Olivia” or OPI “Suzi—The First Lady of Nails”)
- Matte top coat (Essie Matte About You or OPI Matte Top Coat)
- White polish or white striping polish
- Thin nail art brush
- Dotting tool
- Base coat
Step-by-Step Application:
- Prep and base: Standard prep plus base coat.
- Apply sage green base: Paint 2-3 coats of sage green, drying 2 minutes between coats.
- Paint white florals: On 1-2 accent nails, use thin brush with white polish to paint simple flowers, vines, or leaves. Options: small 5-petal flowers, delicate vines with tiny leaves, or scattered small dots for baby’s breath effect. Keep designs delicate and simple.
- Let dry completely: White details must be 100% dry before matte top coat—wait 10-15 minutes. Test by gently touching a non-visible area.
- Apply matte top coat: Carefully paint matte top coat over all nails in thin, even strokes. Avoid going over the same area twice—matte top coat shows brushstrokes if overworked. One smooth coat is better than multiple coats.
Time Required: 50-65 minutes Difficulty Level: Intermediate—requires painting skills
8. Mint Green Chrome
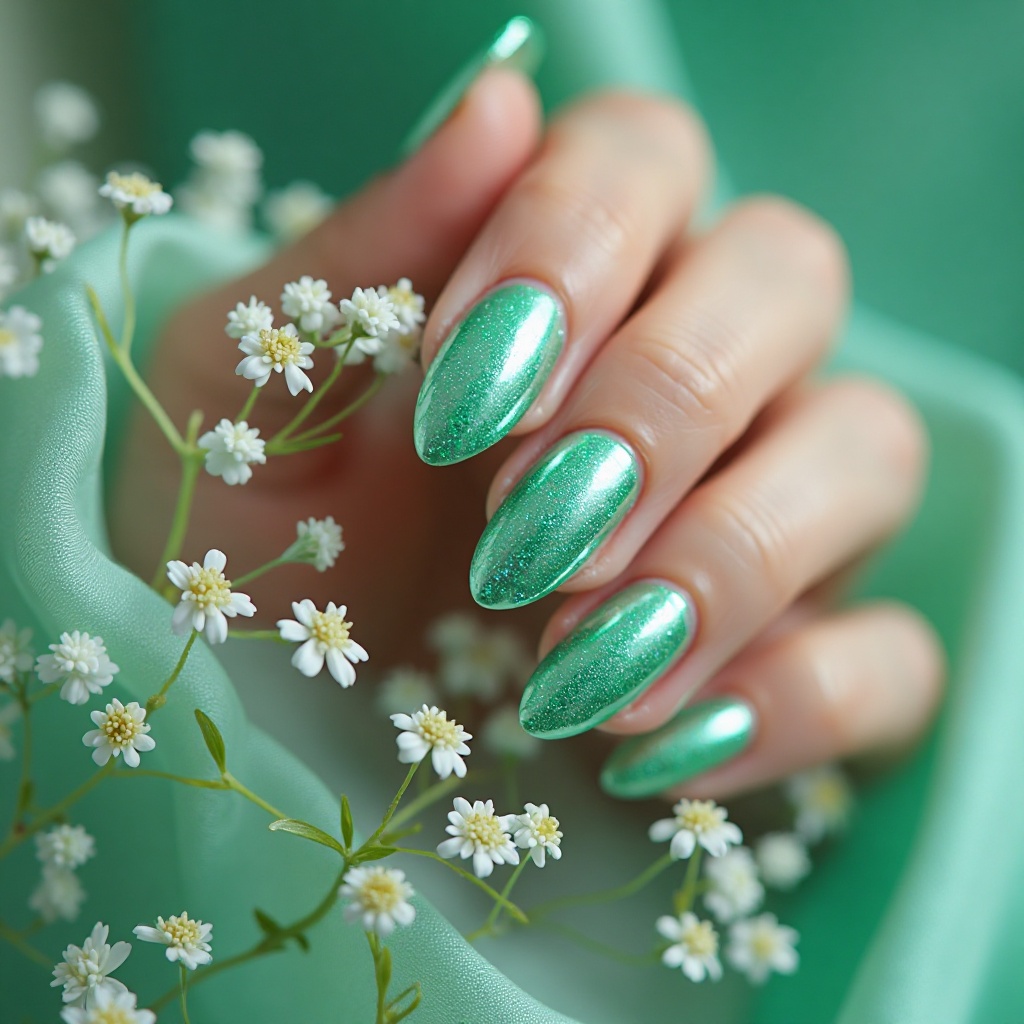
Bright mint green chrome finish that creates a mirror-like, futuristic effect. The chrome makes the mint incredibly vibrant and reflective, catching light dramatically. This fun, fresh color is perfect for spring and summer proms and pairs beautifully with mint, white, coral, or gold dresses.
Why It Works for Prom: Mint green is unexpected and memorable while still being soft and feminine, and chrome ensures it photographs beautifully.
Pro Tip: Pair mint chrome with coral or peach lipstick for a gorgeous color combination that feels cohesive.
How to Create Mint Green Chrome at Home
What You’ll Need:
- Dark teal or forest green gel polish (for base)
- Mint green chrome powder
- Gel setup (lamp, base, top coat)
- Eyeshadow applicator
- Rubbing alcohol
Step-by-Step Application:
- Prep and base: Standard prep, apply gel base coat, cure 60 seconds.
- Apply dark base: Paint 2 coats dark teal or forest green gel (chrome needs dark base), curing 60 seconds between coats.
- Apply gel top coat: Paint thin layer no-wipe gel top coat, cure 60 seconds until tacky.
- Apply mint chrome powder: Immediately rub mint green chrome powder onto tacky surface using eyeshadow applicator. Use circular motions and firm pressure. Mirror effect appears instantly.
- Seal chrome: Apply gel top coat gently to avoid disturbing powder, cure 60 seconds. Apply second layer for durability, cure again.
Time Required: 30-40 minutes Difficulty Level: Intermediate—requires gel equipment
9. Forest Green with Gold Glitter Gradient
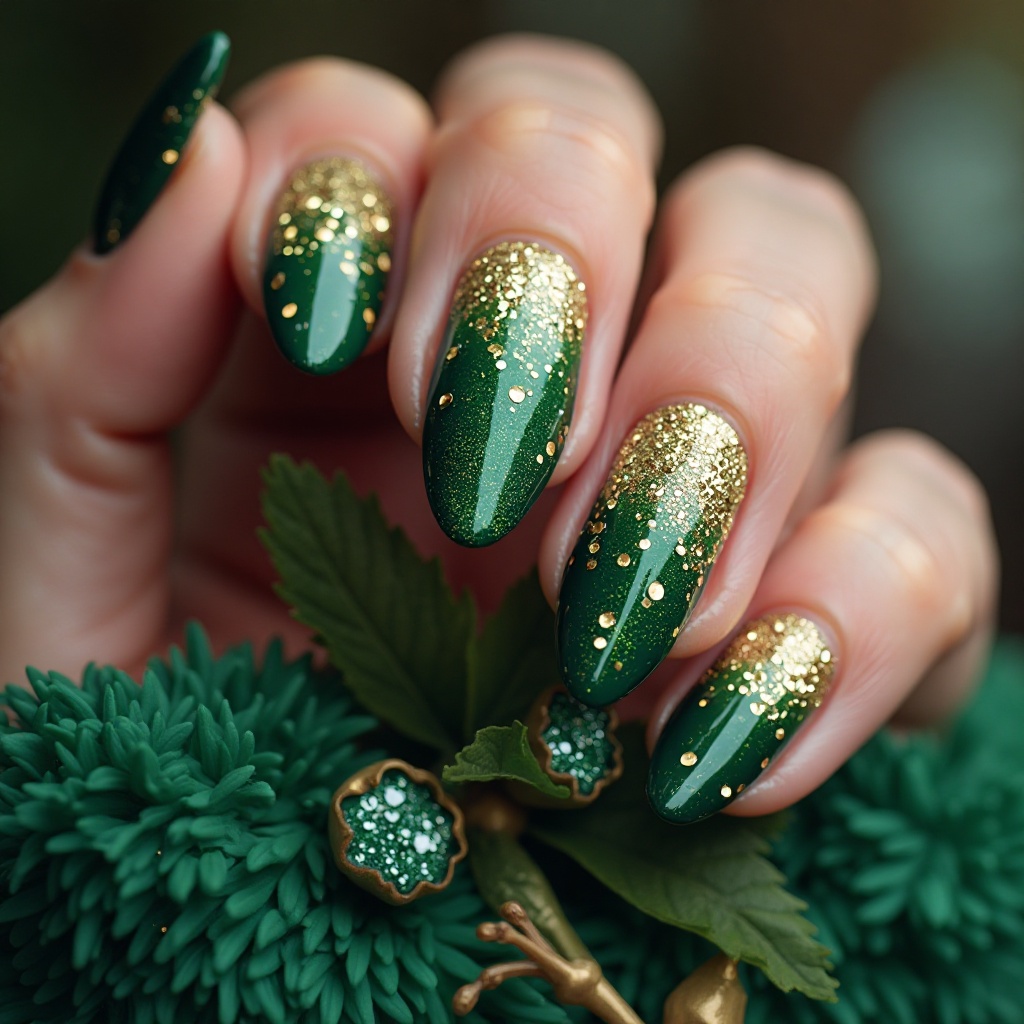
Deep forest green base transitioning into concentrated gold glitter at the tips, creating a luxurious, nature-inspired look. The rich green provides a stunning foundation while gold glitter adds warmth and sparkle. This combination feels elegant and perfect for fall or winter proms.
Why It Works for Prom: Forest green is sophisticated and unexpected, and the gold gradient creates beautiful warmth that photographs gorgeously.
Pro Tip: Use warm gold glitter (not yellow-gold) to complement the green’s undertones beautifully.
How to Create Forest Green with Gold Glitter Gradient at Home
What You’ll Need:
- Forest green polish (Essie “Going Incognito” or China Glaze “Emerald Sparkle”)
- Warm gold glitter polish (OPI “Goldeneye” or Essie “As Gold As It Gets”)
- Makeup sponge
- Paper plate
- Liquid latex
- Base coat and clear top coat
Step-by-Step Application:
- Prep and protect: Apply liquid latex around nails, then base coat.
- Apply green base: Paint 2-3 coats forest green, drying 2 minutes between coats. Let final coat dry 5 minutes.
- Create gradient: Pour gold glitter onto paper plate. Dab sponge into glitter and bounce onto nail tips, heavy at tips and fading toward center. Repeat 3 times, drying 3 minutes between layers.
- Seal: Apply 3 thick layers clear top coat to smooth glitter, waiting 3 minutes between layers.
Time Required: 60-70 minutes Difficulty Level: Intermediate
10. Mint to White Ombré with Silver Accents
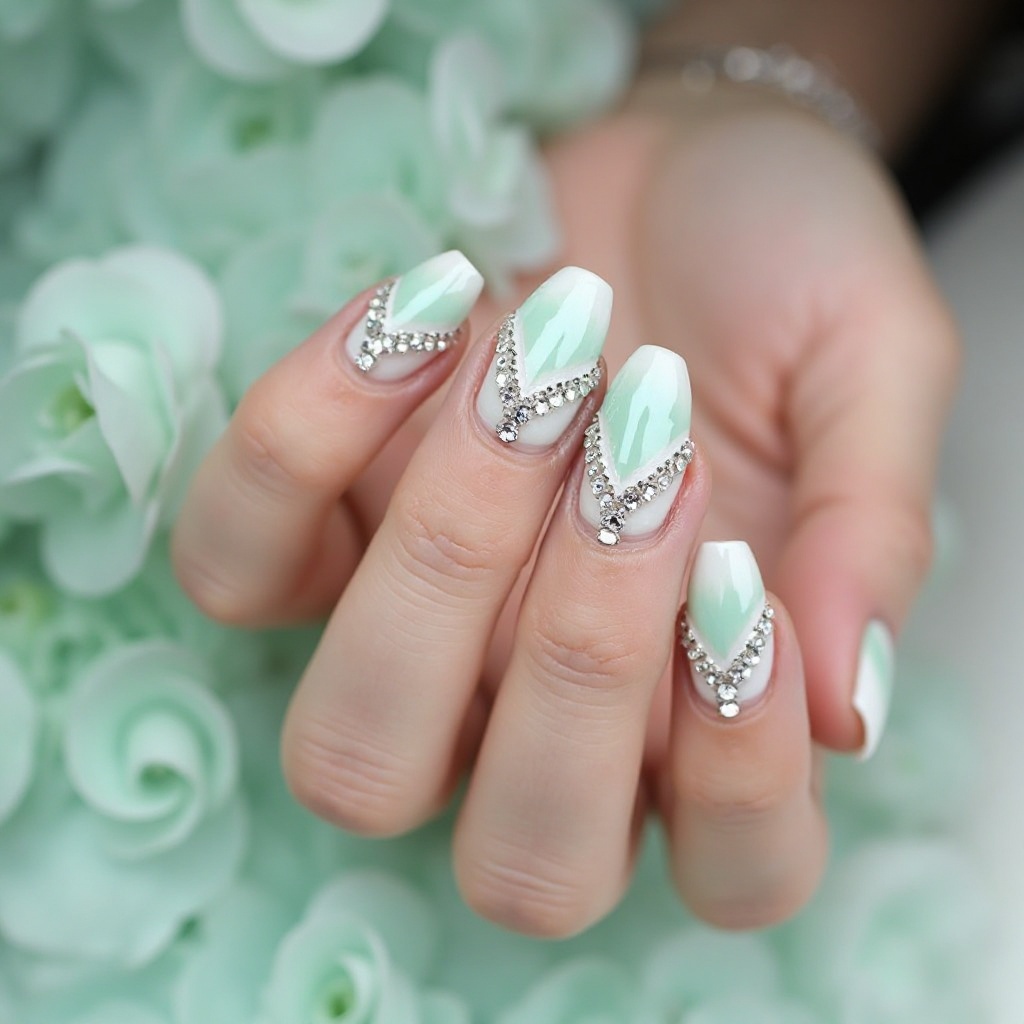
Gradient transition from fresh mint green at the tips to milky white at the cuticle, with tiny silver rhinestones or striping tape accents. The soft color combination feels fresh and romantic while silver details add sparkle. This design is perfect for spring proms and pastel dresses.
Why It Works for Prom: The mint-to-white gradient is soft and wearable while still being colorful and interesting, and silver accents add just enough glamour.
Pro Tip: Place one silver rhinestone at the point where mint transitions to white for an elegant focal point.
How to Create Mint to White Ombré with Silver Accents at Home
What You’ll Need:
- Milky white polish (OPI “Funny Bunny”)
- Mint green polish (Essie “Mint Candy Apple”)
- Makeup sponges
- Small silver rhinestones (SS6 size, 5-10 stones)
- Nail glue or clear polish
- Dotting tool
- Paper plate
- Liquid latex
- Base coat and clear top coat
Step-by-Step Application:
- Prep and protect: Apply liquid latex around nails, then base coat.
- Apply white base: Paint 2 coats milky white on all nails, dry 2 minutes between coats.
- Create gradient: On paper plate, paint white and mint stripes side by side. Dab sponge to pick up both colors. Bounce onto nails with white at cuticle, mint at tips. Repeat 3-4 times, drying 3 minutes between applications.
- Smooth: Let dry 10 minutes. Apply 2 layers clear top coat to smooth sponge texture, wait 3 minutes between layers.
- Apply rhinestones: On 1-2 accent nails, apply tiny dot of nail glue where mint transitions to white (mid-nail area). Use dotting tool to pick up and place one silver rhinestone. Press for 3 seconds. One stone per nail is elegant—avoid over-embellishing.
- Final seal: Apply 2 more thick layers of top coat, really building around rhinestone bases to encapsulate.
Time Required: 70-80 minutes Difficulty Level: Intermediate
Blue Prom Nails: 5 Stunning Ideas
11. Navy Blue with Silver Chrome Tips
Deep navy base paired with metallic silver chrome tips in a modern French manicure style. The dark navy provides sophistication while silver chrome tips add dramatic sparkle and edge. This design works beautifully with navy, black, silver, or burgundy dresses and feels both classic and contemporary.
Why It Works for Prom: Navy is timeless and elegant, while chrome tips make it feel special-occasion appropriate rather than everyday.
Pro Tip: Make the chrome tips slightly thicker than traditional French tips (3-4mm instead of 2mm) to really showcase the reflective finish.
How to Create Navy with Silver Chrome Tips at Home
What You’ll Need:
- Navy blue gel polish (Beetles or Kiara Sky navy)
- Silver chrome powder
- Gel setup (lamp, base, top coat)
- French tip guides or tape
- Eyeshadow applicator
- Rubbing alcohol
Step-by-Step Application:
- Prep and base: Standard prep, apply gel base coat, cure 60 seconds.
- Apply navy base: Paint entire nail with 2 coats navy gel, curing 60 seconds between coats.
- Apply tape guides: Once cured, place French tip guides or tape 3-4mm from tips. Press firmly.
- Apply gel top coat to tips: Paint thin layer no-wipe gel top coat only on tips beyond tape line. Cure 60 seconds until tacky.
- Apply silver chrome: Rub silver chrome powder onto tacky tips using eyeshadow applicator. Mirror effect appears. Dust off excess.
- Remove tape and seal: Carefully peel away tape. Apply gel top coat to entire nail, cure 60 seconds. Apply second layer, cure again.
Time Required: 45-60 minutes Difficulty Level: Intermediate—requires gel equipment
12. Baby Blue Matte with White Pearl Accents
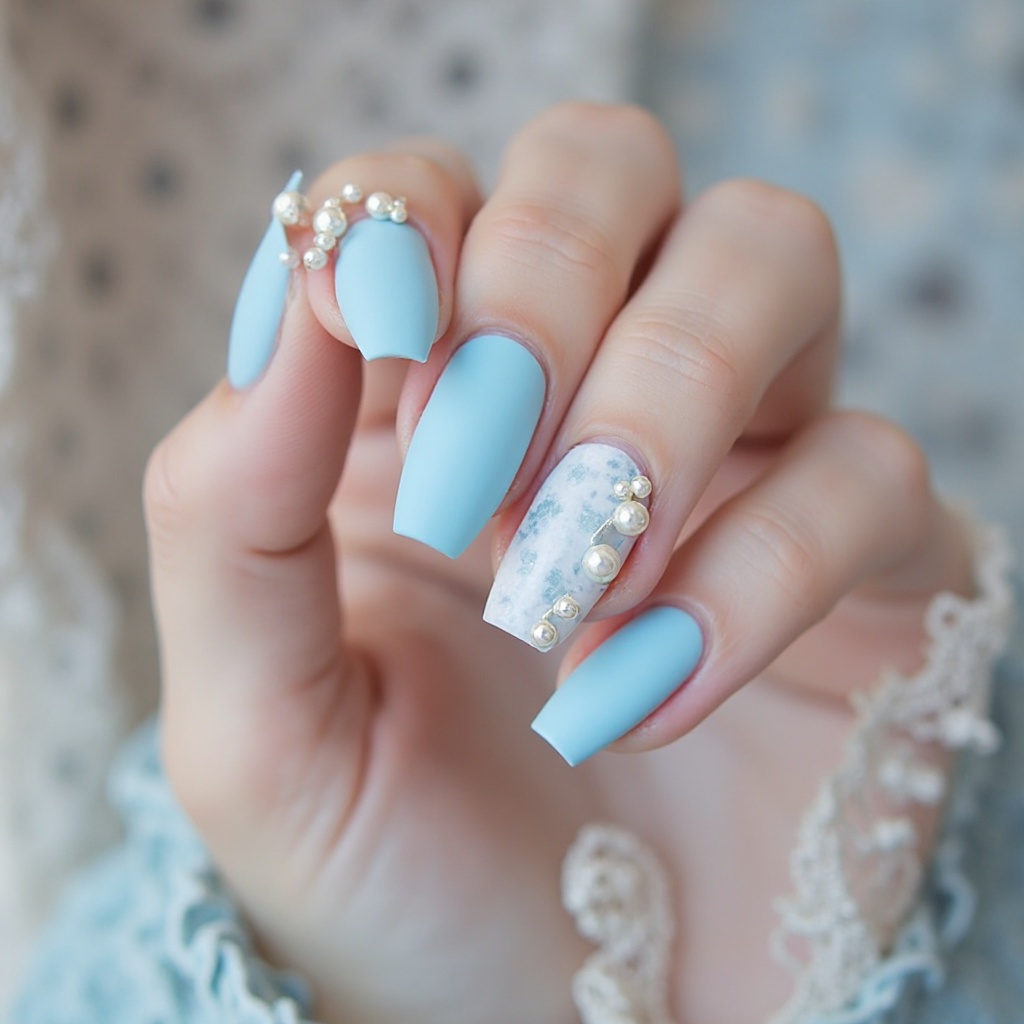
Soft baby blue in a matte finish adorned with small white pearl accents on accent nails. The powder-blue provides a sweet, romantic base while white pearls add delicate luxury. The matte finish makes it feel modern and sophisticated rather than juvenile.
Why It Works for Prom: Baby blue is universally flattering and photographs beautifully, while the matte finish and pearls elevate it from basic to special-occasion worthy.
Pro Tip: Apply matte top coat last, after pearls are secured—matte shows every imperfection so nails must be perfect first.
How to Create Baby Blue Matte with White Pearl Accents at Home
What You’ll Need:
- Baby blue polish (Essie “Borrowed & Blue” or OPI “It’s a Boy!”)
- Matte top coat
- Small white pearls (2-3mm, 10-15 pearls)
- Nail glue
- Dotting tool
- Base coat and regular clear top coat
Step-by-Step Application:
- Prep and base: Standard prep plus base coat.
- Apply baby blue: Paint 2-3 coats baby blue (light colors often need 3 coats), drying 2 minutes between coats.
- Apply pearls: On 1-2 accent nails, place 3-5 white pearls in curved line along cuticle or clustered in one corner. Apply tiny dot nail glue, pick up pearl with dotting tool, press into place. Hold 3 seconds. Let dry 5 minutes.
- Seal pearls: Apply regular clear top coat around pearl bases (not matte yet) to secure them. Apply 2 layers, building around pearls. Let dry 10 minutes.
- Apply matte top coat: Once pearls are completely secure and dry, carefully apply matte top coat over all nails including pearls (matte over pearls creates interesting contrast). Use smooth strokes without overworking.
Time Required: 50-65 minutes Difficulty Level: Beginner-Intermediate
13. Electric Blue Holographic
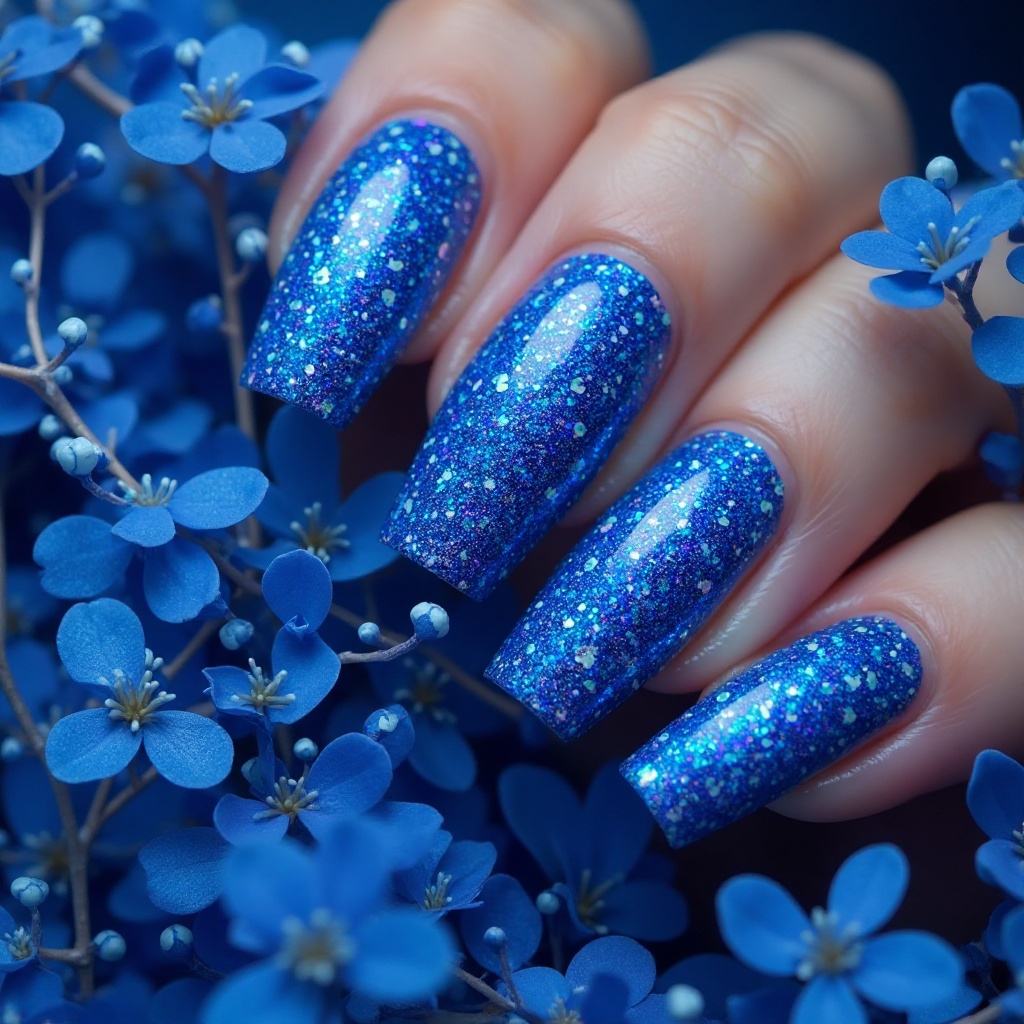
Vibrant electric blue holographic polish that shifts with rainbow sparkles in the light. The saturated blue is bold and eye-catching while the holographic finish adds dimension and sparkle. This high-impact design is perfect for those wanting to make a statement.
Why It Works for Prom: Electric blue is memorable and photographs incredibly well, and the holographic finish adds special-occasion sparkle without additional nail art.
Pro Tip: Apply holographic polish in 2-3 thin coats rather than thick coats—thin layers showcase the holographic effect better.
How to Create Electric Blue Holographic at Home
What You’ll Need:
- Electric blue holographic polish (ILNP “Birefringence” in blue, Holo Taco “Blue Freezie,” or Cirque Colors holographic blue)
- Base coat and glossy top coat
Step-by-Step Application:
- Prep and base: Standard prep plus base coat. Make sure base coat is completely smooth—any imperfections show through holographic.
- Apply holographic blue: Paint first coat thin and even. It will look streaky—normal for holographic. Dry 2 minutes. Apply second thin coat. Holographic polishes often have perfect coverage in 2 coats. If needed, apply thin third coat.
- Seal: Let dry 5 minutes completely. Apply glossy top coat to enhance holographic effect and add shine. Some prefer to skip top coat on holographic to maximize sparkle—your choice.
Time Required: 25-35 minutes Difficulty Level: Beginner—holographic polish is easy to apply
14. Sky Blue with White Cloud Art
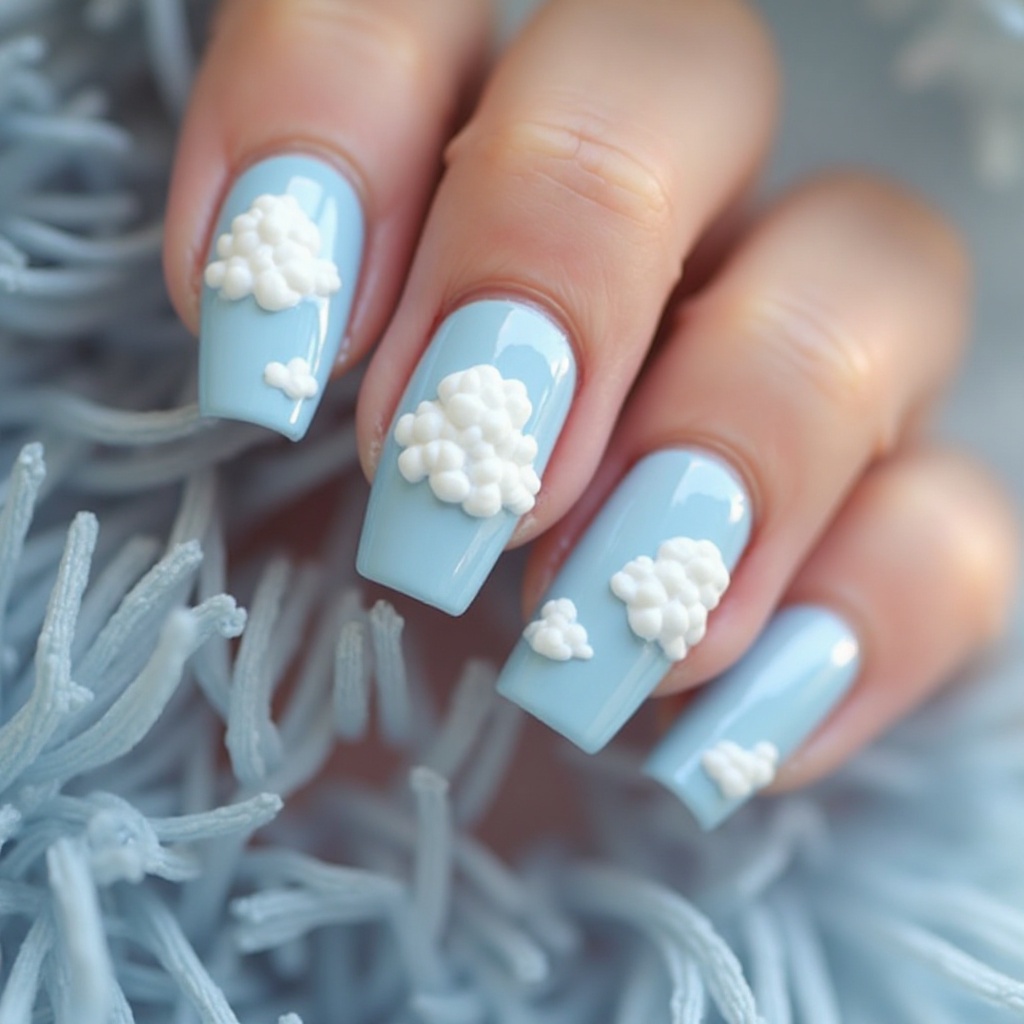
Soft sky blue base with hand-painted fluffy white clouds on accent nails, creating a dreamy, whimsical aesthetic. The light blue provides a serene foundation while white clouds add artistic, playful detail. This design is perfect for daytime or outdoor proms.
Why It Works for Prom: Sky blue is soft and romantic, and the cloud art adds personality without being too bold or overwhelming.
Pro Tip: Use a dabbing motion with a sponge to create fluffy, organic-looking clouds rather than painting perfect shapes.
How to Create Sky Blue with White Cloud Art at Home
What You’ll Need:
- Sky blue polish (Essie “Bikini So Teeny” or OPI “Can’t Find My Czechbook”)
- White polish
- Small piece of makeup sponge or thin brush
- Dotting tool
- Base coat and clear top coat
Step-by-Step Application:
- Prep and base: Standard prep plus base coat.
- Apply sky blue base: Paint 2-3 coats sky blue, drying 2 minutes between coats.
- Paint clouds (Method 1—Sponge): On 1-2 accent nails, dab small piece of makeup sponge into white polish. Lightly dab onto nail in irregular cloud shapes—2-3 clouds per nail. The sponge creates soft, fluffy edges naturally. Let dry 5 minutes.
- Paint clouds (Method 2—Brush): Use thin brush with white polish to paint irregular oval/blob shapes for clouds. While wet, use clean dotting tool to lightly dab and soften edges, creating fluffy appearance.
- Seal: Let clouds dry 10 minutes completely. Apply 2 layers clear top coat.
Time Required: 45-60 minutes Difficulty Level: Beginner-Intermediate
15. Teal Ombré with Turquoise Glitter
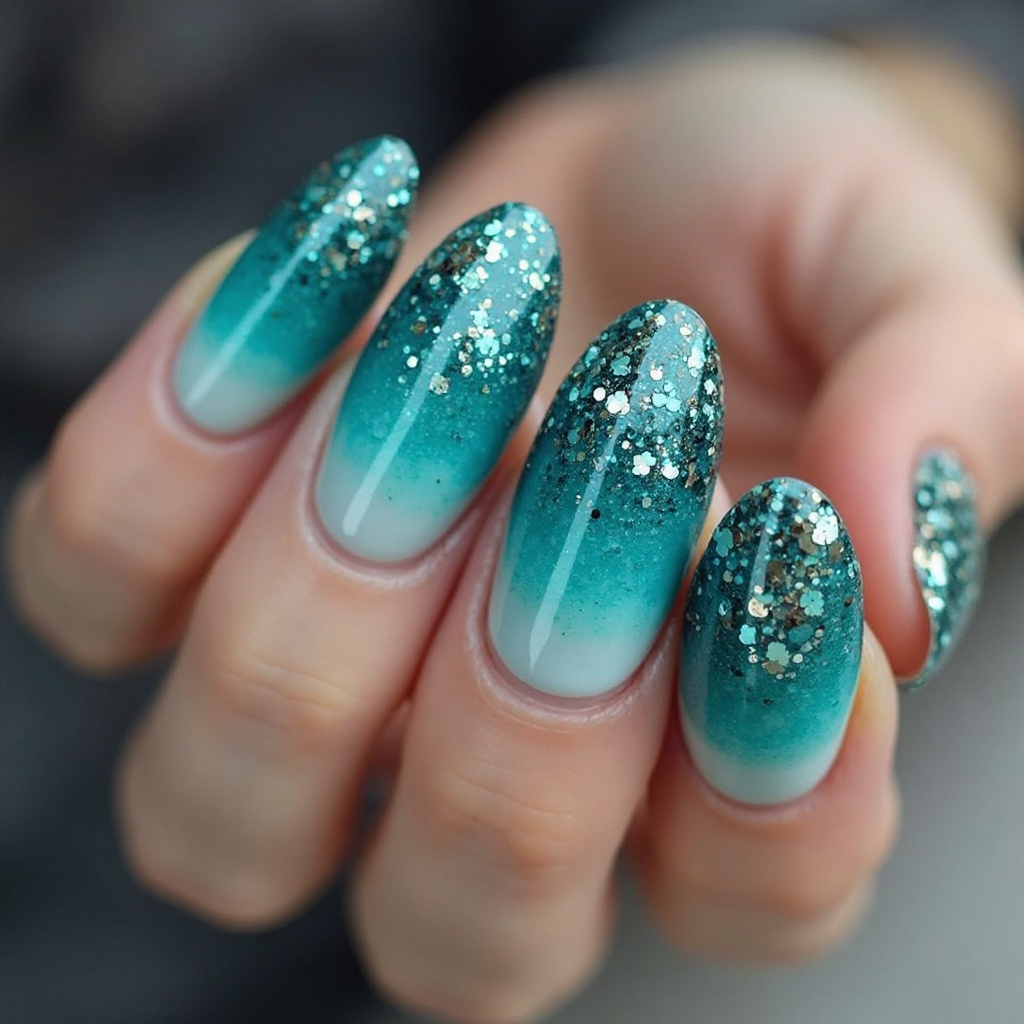
Gradient transition from deep teal at the cuticle to bright turquoise at the tips, topped with concentrated turquoise or holographic glitter at the very tips. The ombré showcases multiple blue-green tones while glitter adds sparkle. This design bridges blue and green beautifully.
Why It Works for Prom: Teal is sophisticated and unique, and the ombré technique creates beautiful dimension that photographs well from every angle.
Pro Tip: Use three shades (deep teal, medium teal, bright turquoise) for the smoothest gradient.
How to Create Teal Ombré with Turquoise Glitter at Home
What You’ll Need:
- Deep teal polish (Essie “Go Overboard”)
- Medium teal polish
- Bright turquoise polish (OPI “Can’t Find My Czechbook”)
- Turquoise or holographic glitter polish
- Makeup sponges
- Paper plate
- Liquid latex
- Base coat and clear top coat
Step-by-Step Application:
- Prep and protect: Apply liquid latex around nails, then base coat.
- Apply lightest base: Paint 2 coats bright turquoise as base, dry 2 minutes between coats.
- Create gradient: On paper plate, paint three stripes: deep teal, medium teal, turquoise. Dab sponge to pick up all three. Bounce onto nail with darkest at cuticle. Repeat 3 times, drying 3 minutes between.
- Add glitter tips: Dab sponge into turquoise glitter, bounce onto very tips only. Apply 2 layers for sparkle.
- Smooth and seal: Let dry 10 minutes. Apply 3 layers clear top coat, waiting 3 minutes between layers.
Time Required: 70-85 minutes Difficulty Level: Intermediate
Red Prom Nails: 5 Classic Ideas
16. Classic Red with Gold Striping Tape Accent
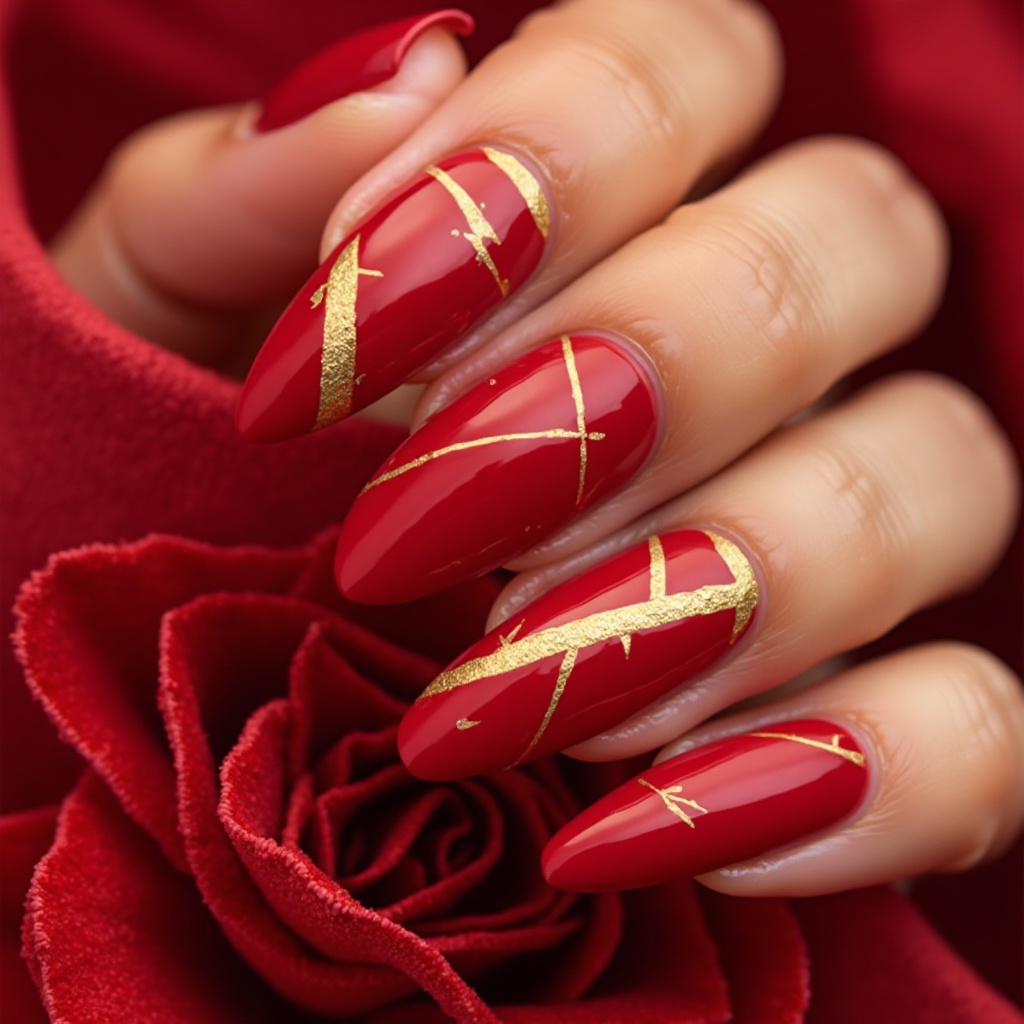
Timeless, glossy true red base with thin gold striping tape applied in geometric patterns or simple lines on accent nails. The vibrant red is bold and confident while gold tape adds elegant detail. This combination exudes Old Hollywood glamour and sophistication.
Why It Works for Prom: Red nails are eternally chic and photograph beautifully, and the gold tape makes them feel elevated and special-occasion appropriate.
Pro Tip: Apply striping tape to completely dry nails and seal immediately with top coat—waiting too long before sealing causes tape to lift.
How to Create Classic Red with Gold Striping Tape at Home
What You’ll Need:
- Classic red polish (OPI “Big Apple Red,” Essie “Really Red,” or Chanel “Pirate”)
- Gold striping tape (1mm width)
- Scissors or nail clippers
- Tweezers
- Base coat and clear top coat
Step-by-Step Application:
- Prep and base: Standard prep plus base coat.
- Apply red base: Paint 2-3 coats red, drying 2 minutes between coats. Let final coat dry completely—10 minutes. Tape won’t adhere to wet polish.
- Plan design: Decide tape placement. Options: single diagonal stripe, V-shape chevron, vertical stripes, or geometric crossing lines. Keep it simple—1-3 strips per nail maximum on accent nails only.
- Apply tape: Cut tape to desired length. Use tweezers to place on nail, pressing down firmly along entire length. For curves, tape naturally follows nail shape. For geometric patterns, apply multiple strips.
- Trim excess: Use scissors or clippers to carefully trim any tape extending beyond nail edge.
- Seal immediately: Apply clear top coat over entire nail including tape within 2-3 minutes of placing tape. The top coat secures tape and prevents lifting. Apply second thick layer for extra security.
Time Required: 35-50 minutes Difficulty Level: Beginner-Intermediate
17. Cherry Red with White Tips (Modern French)
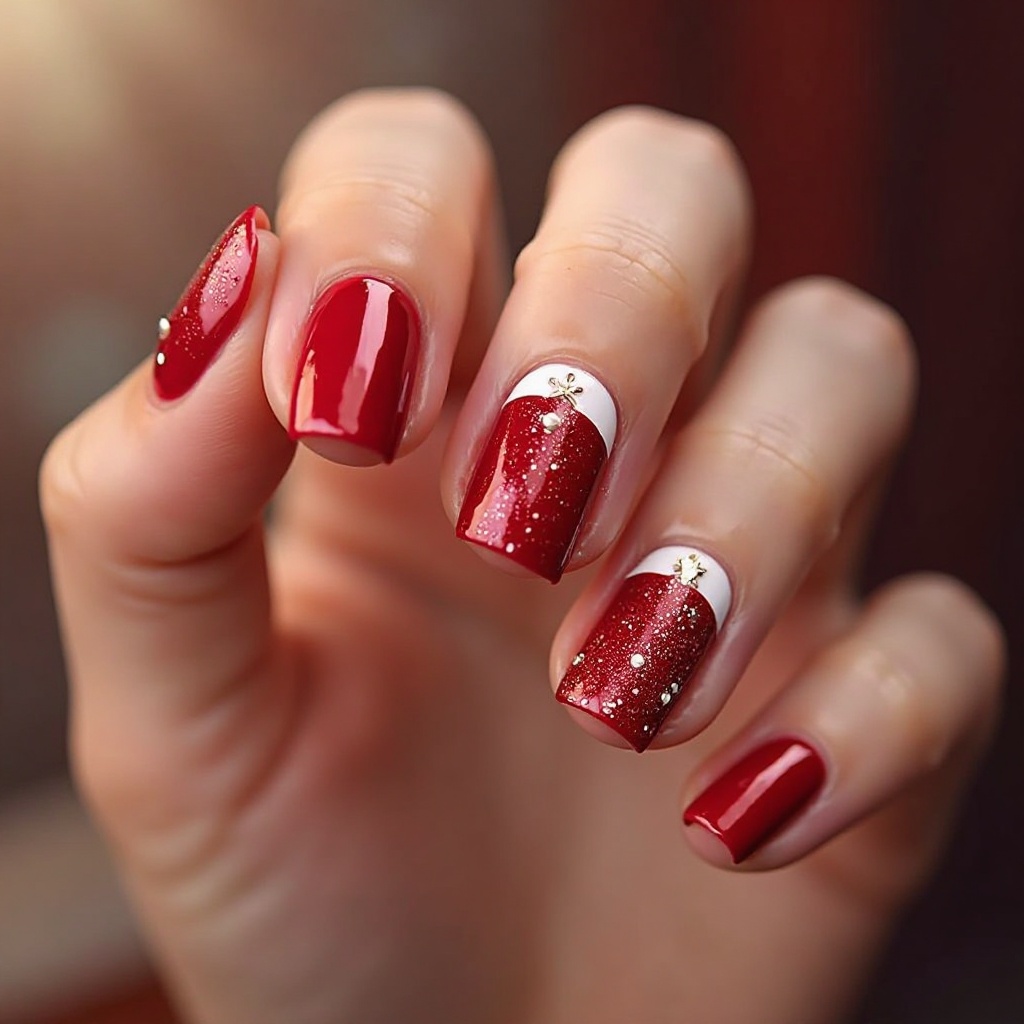
Vibrant cherry red base paired with crisp white tips in a modern French manicure style with slightly thicker tips than traditional. The red and white combination is classic and fresh while feeling bold and contemporary. This design bridges retro and modern aesthetics beautifully.
Why It Works for Prom: The red and white combo is striking and memorable, and the French tip structure keeps it polished and elegant rather than too bold.
Pro Tip: Make the white tips 3-4mm wide for a modern, statement look rather than the traditional 2mm.
How to Create Cherry Red with White Tips at Home
What You’ll Need:
- Cherry red polish (Essie “Really Red” or OPI “Big Apple Red”)
- White polish (Essie “Blanc”)
- French tip guides or striping tape
- Base coat and clear top coat
Step-by-Step Application:
- Prep and base: Standard prep plus base coat.
- Apply red base: Paint entire nail with 2-3 coats cherry red, drying 2 minutes between coats. Let final coat dry 10 minutes completely.
- Apply French guides: Place French tip guides or tape 3-4mm from tips. Press down firmly.
- Paint white tips: Apply white polish in thin, even coats on tips beyond tape. Apply 2-3 coats for full opacity, drying 2 minutes between. Remove tape immediately after last coat while polish is wet for clean lines.
- Seal: Let dry 5 minutes. Apply 2 layers clear top coat to all nails.
Time Required: 50-65 minutes Difficulty Level: Intermediate
18. Red Glitter Gradient
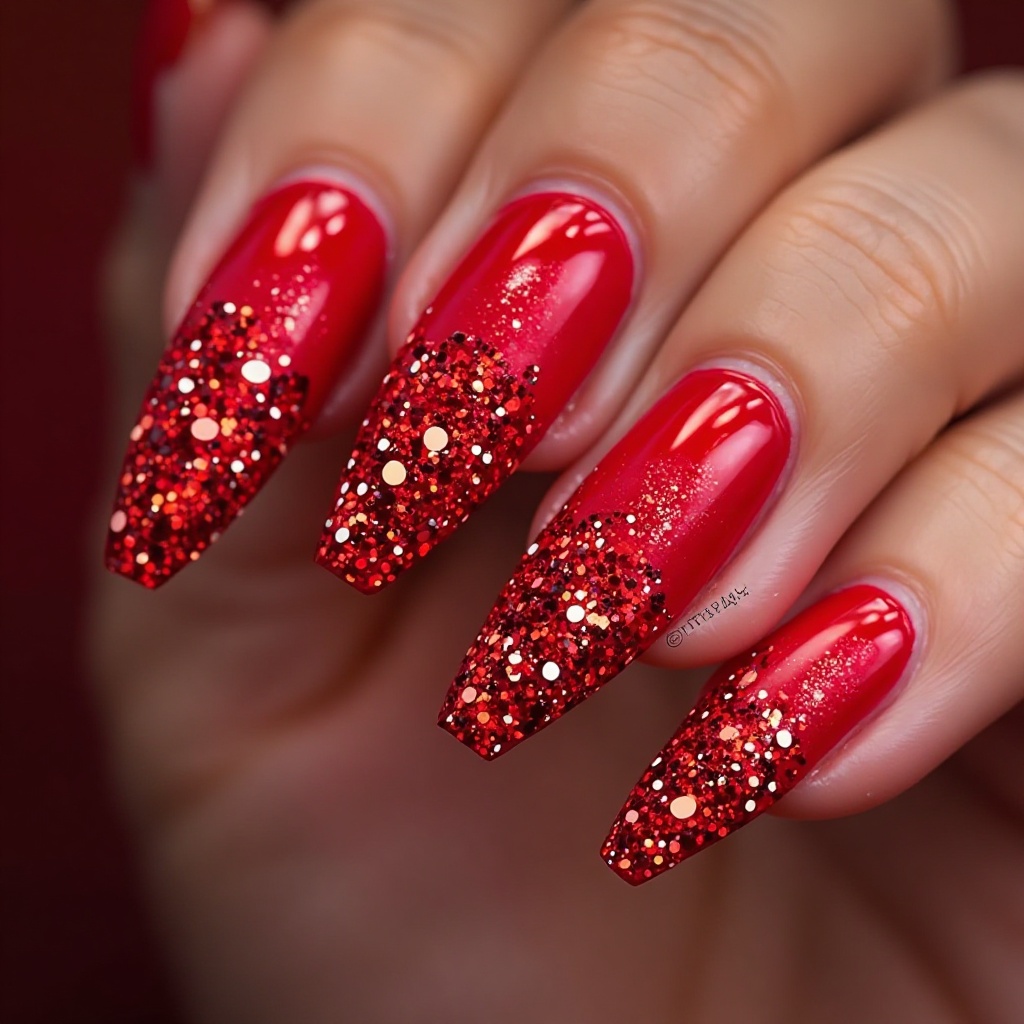
Solid red base transitioning into dense red or holographic glitter concentrated at the tips, creating dramatic sparkle while maintaining red color throughout. The glitter gradient adds special-occasion glamour without changing the base color. This design is perfect for those who want red nails with extra sparkle.
Why It Works for Prom: The glitter gradient adds excitement and dimension to classic red, making it feel more special-occasion appropriate.
Pro Tip: Use red glitter that matches your base shade for a monochromatic look, or holographic glitter for rainbow sparkle.
How to Create Red Glitter Gradient at Home
What You’ll Need:
- Red polish (OPI “Big Apple Red”)
- Red or holographic glitter polish
- Makeup sponge
- Paper plate
- Liquid latex
- Base coat and clear top coat
Step-by-Step Application:
- Prep and protect: Apply liquid latex around nails, then base coat.
- Apply red base: Paint 2-3 coats red, drying 2 minutes between coats. Let final coat dry 5 minutes.
- Create gradient: Pour glitter onto paper plate. Dab sponge into glitter and bounce onto nail tips, heavy at tips and fading toward center. Repeat 3-4 times, drying 3 minutes between layers.
- Seal: Apply 3 thick layers clear top coat to smooth glitter, waiting 3 minutes between layers.
Time Required: 60-75 minutes Difficulty Level: Intermediate
19. Red with Black Lace Stamping
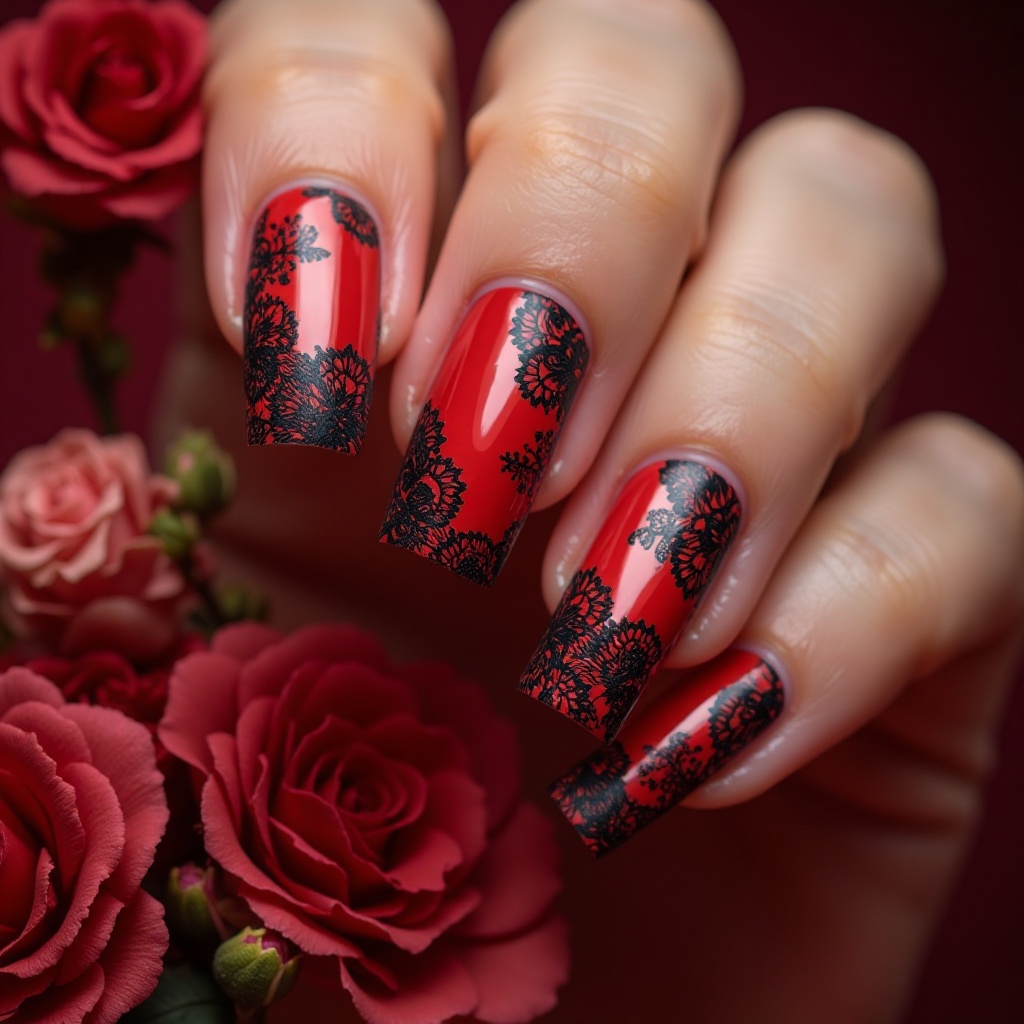
Classic red base with delicate black lace patterns stamped or hand-painted on accent nails, creating a romantic, vintage-inspired look. The red and black combination is dramatic and elegant while the lace pattern adds intricate, feminine detail. This design channels vintage glamour with modern execution.
Why It Works for Prom: The lace pattern adds special occasion detail, and the red-black combo is timelessly elegant and photographs beautifully.
Pro Tip: Use nail stamping plates with lace patterns for easier, more precise application than hand-painting.
How to Create Red with Black Lace at Home
What You’ll Need:
- Red polish (OPI “Big Apple Red”)
- Black stamping polish OR black striping polish with thin brush
- Nail stamping kit with lace pattern plate (optional but easier)
- OR thin nail art brush for hand-painting
- Base coat and clear top coat
Step-by-Step Application:
Method 1: Stamping (Easier)
- Prep and base: Standard prep plus base coat.
- Apply red base: Paint 2-3 coats red, let dry completely (10 minutes).
- Stamp lace: Apply black stamping polish to lace pattern on stamping plate, scrape excess, pick up with stamper, transfer to 1-2 accent nails. Let dry 5 minutes.
- Seal: Apply 2 layers clear top coat.
Method 2: Hand-Painting (Advanced)
- Prep and base: Standard prep plus base coat.
- Apply red base: Paint 2-3 coats red, let dry completely.
- Paint lace: Using thin brush with black polish, paint delicate lace patterns on accent nails—swirls, loops, flower shapes. Keep lines thin and delicate.
- Seal: Let dry 10 minutes. Apply 2 layers clear top coat.
Time Required: 45-70 minutes depending on method Difficulty Level: Beginner for stamping, Advanced for hand-painting
Black Prom Nails: 5 Edgy Ideas
20. Glossy Black with Gold Foil Accents
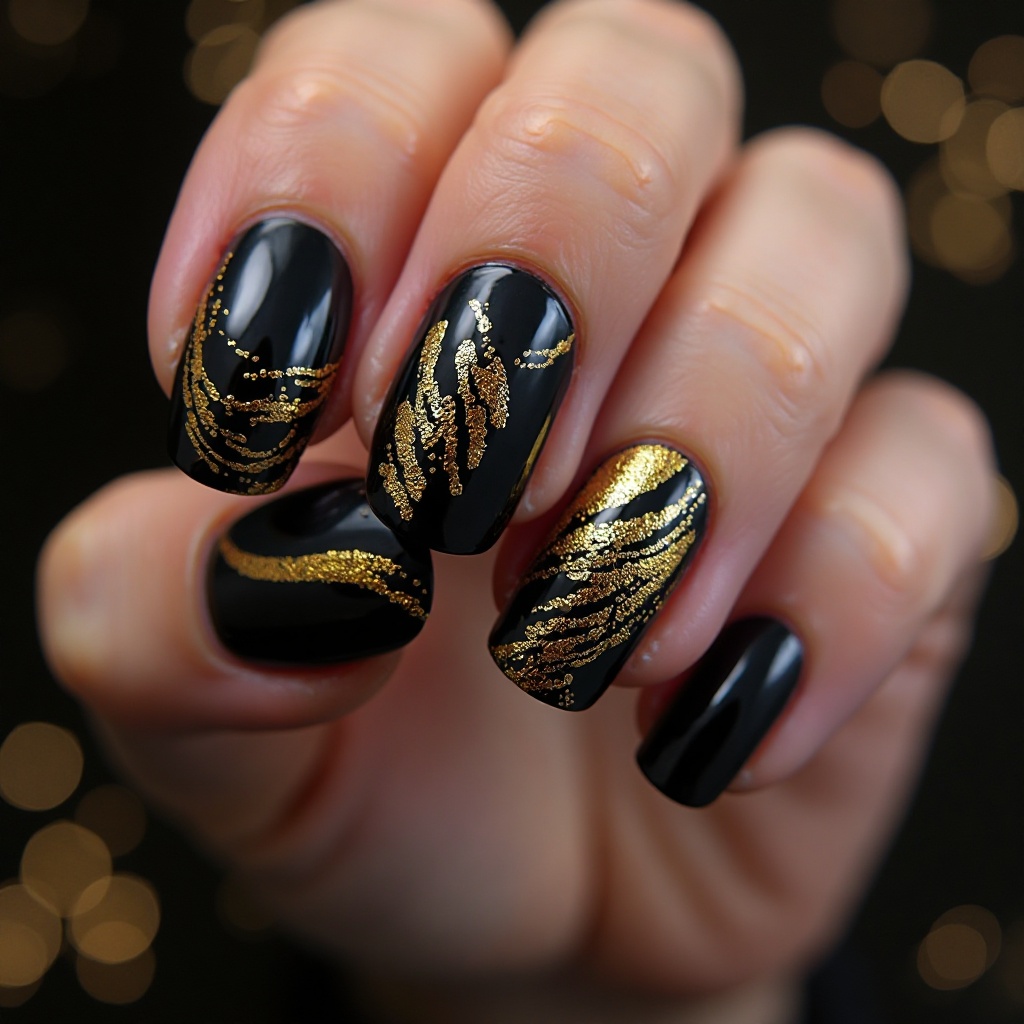
Shiny, jet-black base with hand-placed gold foil applied in abstract patterns on select nails. The black provides bold foundation while gold foil adds luxury and warmth. This combination is dramatic and high-fashion, perfect for making a statement.
Why It Works for Prom: Black is timeless and elegant, and gold foil elevates it from basic to special-occasion worthy with editorial flair.
Pro Tip: Apply gold foil in irregular, abstract shapes rather than trying for perfect coverage—the organic application looks more expensive and intentional.
How to Create Glossy Black with Gold Foil at Home
What You’ll Need:
- Jet black polish (Essie “Licorice” or OPI “Black Onyx”)
- Gold nail foil (not gold leaf—actual foil)
- Foil adhesive or clear base coat
- Tweezers or silicone tool
- Clear top coat
- Base coat
Step-by-Step Application:
- Prep and base: Standard prep plus base coat.
- Apply black base: Paint 2-3 coats black (usually needs 3 for true opacity), drying 2 minutes between coats.
- Apply foil adhesive: On 1-3 accent nails, paint thin layer foil adhesive in abstract shapes, diagonal stripes, or random placement. Let dry 3-5 minutes until tacky but not wet.
- Apply gold foil: Cut or tear small pieces of gold foil. Place shiny-side-up onto tacky adhesive and press firmly with finger or silicone tool for 3-5 seconds. Quickly peel away foil sheet—gold transfers to nail. Repeat until desired coverage.
- Seal: Apply 3 thick layers clear top coat over all nails, being generous on foil nails. Wait 5 minutes between layers.
Time Required: 45-60 minutes Difficulty Level: Beginner-Intermediate
21. Matte Black with Silver Chrome Accents
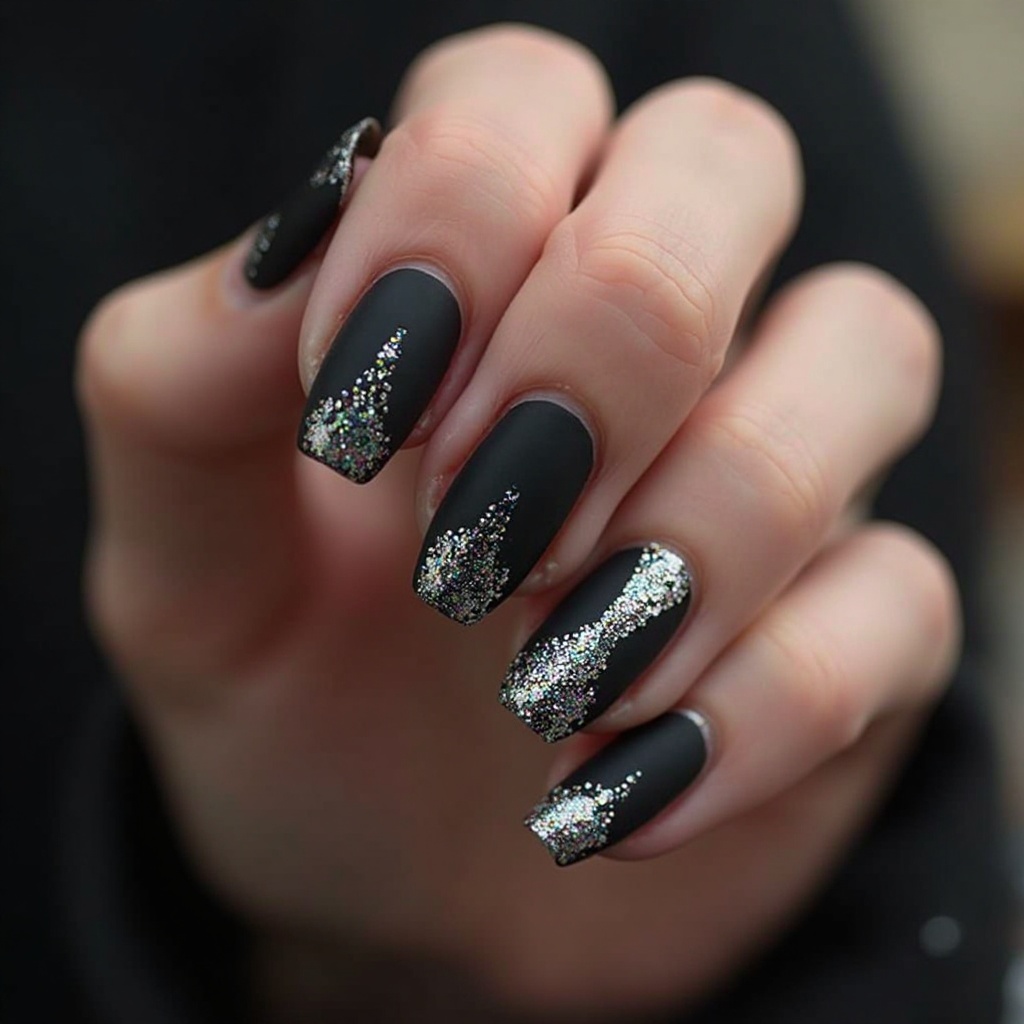
Flat matte black base with select nails or nail tips in reflective silver chrome, creating striking contrast between textures. The matte black is modern and edgy while silver chrome adds glamorous sparkle. This design plays with texture contrast beautifully.
Why It Works for Prom: The texture contrast is visually interesting and sophisticated, and black-silver is a classic color combo that photographs beautifully.
Pro Tip: Apply matte black to most nails and silver chrome to just 1-2 accent nails for best balance—too much chrome can overwhelm.
How to Create Matte Black with Silver Chrome Accents at Home
What You’ll Need:
- Black gel polish
- Silver chrome powder
- Matte gel top coat
- Regular gel top coat
- Gel setup (lamp, base)
- Eyeshadow applicator
- Rubbing alcohol
Step-by-Step Application:
- Prep and base: Standard prep, apply gel base coat, cure 60 seconds.
- Apply black gel: Paint 2 coats black gel on all nails, curing 60 seconds between coats.
- Create chrome accents: On 1-2 accent nails, apply thin layer no-wipe gel top coat and cure 60 seconds until tacky. Rub silver chrome powder onto tacky surface. Dust off excess.
- Seal chrome: Apply regular glossy gel top coat to chrome nails only, cure 60 seconds twice (2 layers).
- Apply matte to others: Apply matte gel top coat to remaining black nails (not chrome nails), cure 60 seconds. Wipe with rubbing alcohol.
Time Required: 45-60 minutes Difficulty Level: Intermediate—requires gel equipment
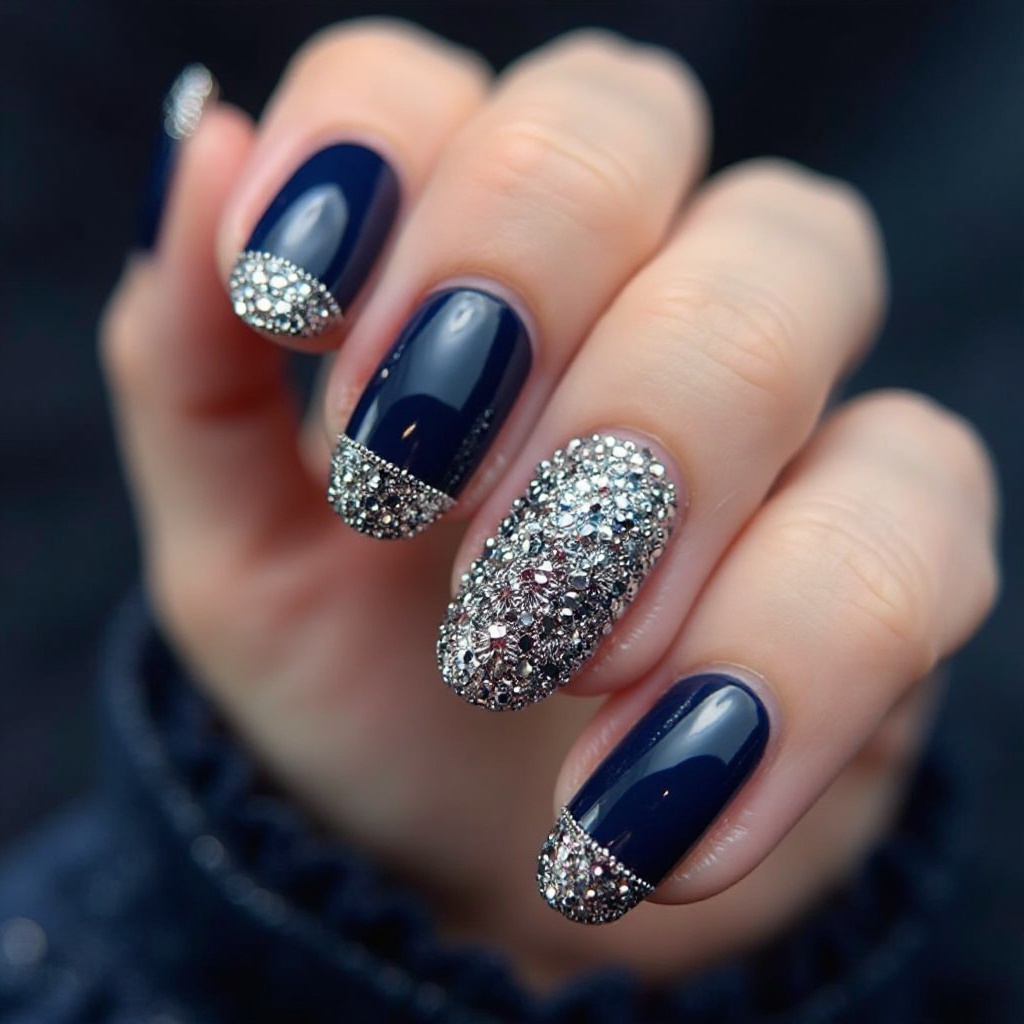
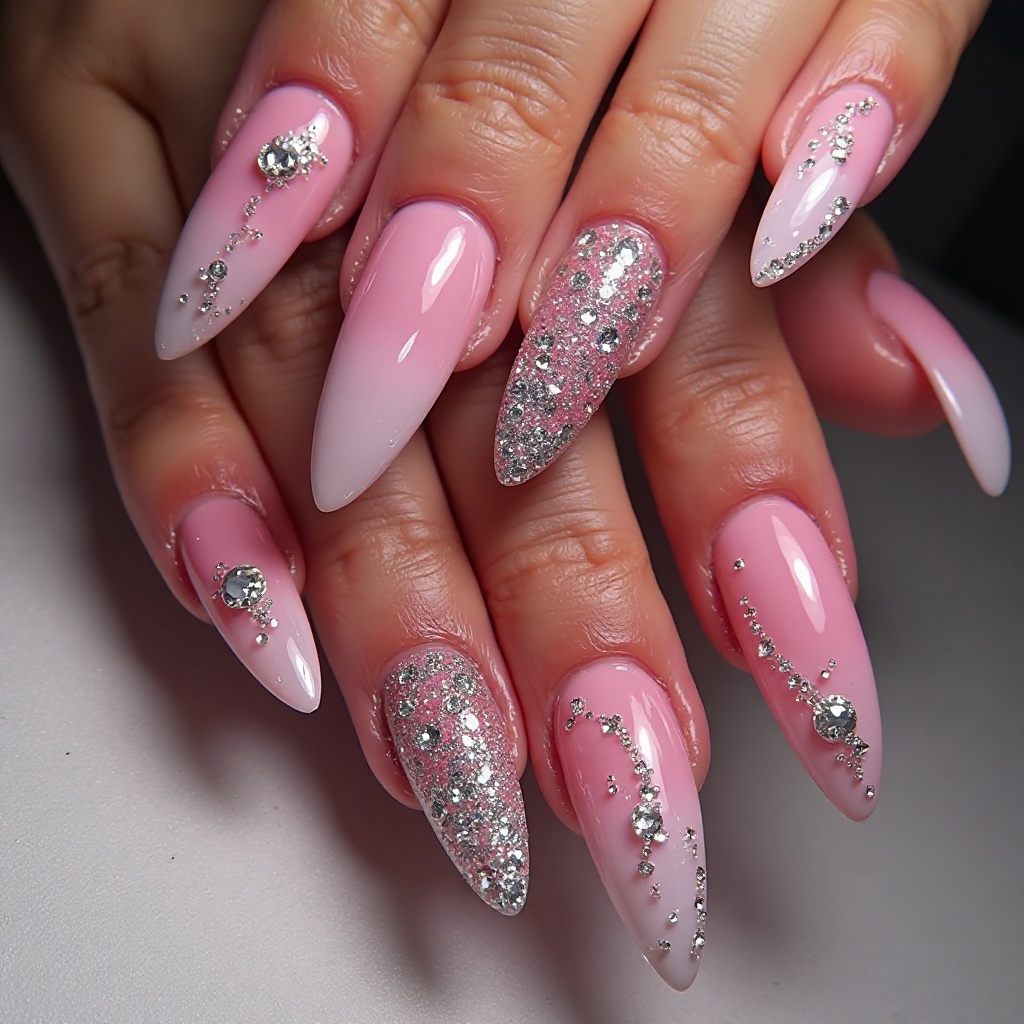
21. Black with Crystal Cluster Accent
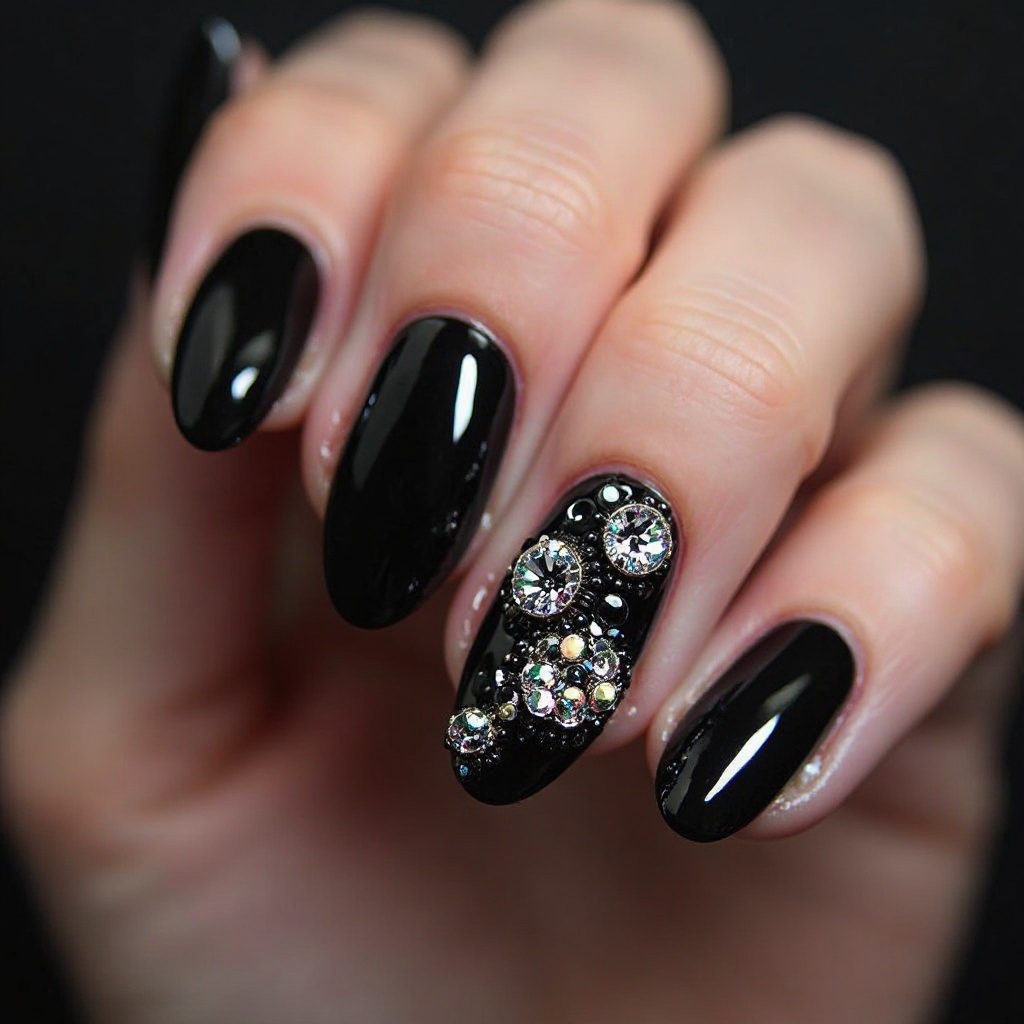
Solid black base with clustered Swarovski crystals in various sizes on one or two accent nails, creating a luxurious, jewelry-inspired look. The black provides dramatic foundation while crystals add serious sparkle and dimension. This design is perfect for evening proms.
Why It Works for Prom: Black and crystals is a classic red-carpet combination that feels expensive and glamorous without being over-the-top.
Pro Tip: Use crystals in 2-3 different sizes (SS6, SS8, SS10) for more interesting, dimensional clusters.
How to Create Black with Crystal Cluster at Home
What You’ll Need:
- Black polish (Essie “Licorice”)
- Swarovski crystals in 2-3 sizes (total 15-20 crystals)
- Nail glue or clear gel
- Dotting tool or waxed stick
- Base coat and thick clear top coat
Step-by-Step Application:
- Prep and base: Standard prep plus base coat.
- Apply black base: Paint 2-3 coats black, drying 2 minutes between coats. Let final coat dry 10 minutes.
- Plan cluster placement: Decide which 1-2 nails get crystals. Popular placement: clustered near cuticle on one side, or in one corner.
- Apply crystals: Start with largest crystal—apply tiny dot nail glue, pick up crystal with dotting tool, press into place. Work outward placing medium then small crystals around the large one, creating organic cluster shape. Use 5-10 crystals per nail in cluster formation.
- Encapsulate: Let dry 5 minutes. Apply 3-4 thick layers clear top coat, really building around crystal bases. Wait 5 minutes between layers.
Time Required: 60-75 minutes Difficulty Level: Intermediate
22. Black Ombré to Gray
Gradient transition from pure black at the tips to soft gray at the cuticle, creating a sophisticated, smoky effect. The ombré adds dimension while keeping the overall look dark and edgy. This design is perfect for those who want black nails with more visual interest.
Why It Works for Prom: The ombré creates depth and dimension that photographs beautifully, and the dark palette is universally flattering.
Pro Tip: Use three shades (black, charcoal gray, light gray) for the smoothest gradient transition.
How to Create Black to Gray Ombré at Home
What You’ll Need:
- Black polish (Essie “Licorice”)
- Charcoal gray polish
- Light gray polish (Essie “Chinchilly”)
- Makeup sponges
- Paper plate
- Liquid latex
- Base coat and clear top coat
Step-by-Step Application:
- Prep and protect: Apply liquid latex around nails, then base coat.
- Apply light gray base: Paint 2 coats light gray as base, dry 2 minutes between coats.
- Create gradient: On paper plate, paint three stripes: black, charcoal gray, light gray. Dab sponge to pick up all three. Bounce onto nail with black at tips, gray at cuticle. Repeat 3-4 times, drying 3 minutes between.
- Smooth and seal: Let dry 10 minutes. Apply 3 layers clear top coat, waiting 3 minutes between layers.
Time Required: 70-85 minutes Difficulty Level: Intermediate
23. Black with White Marble Veining
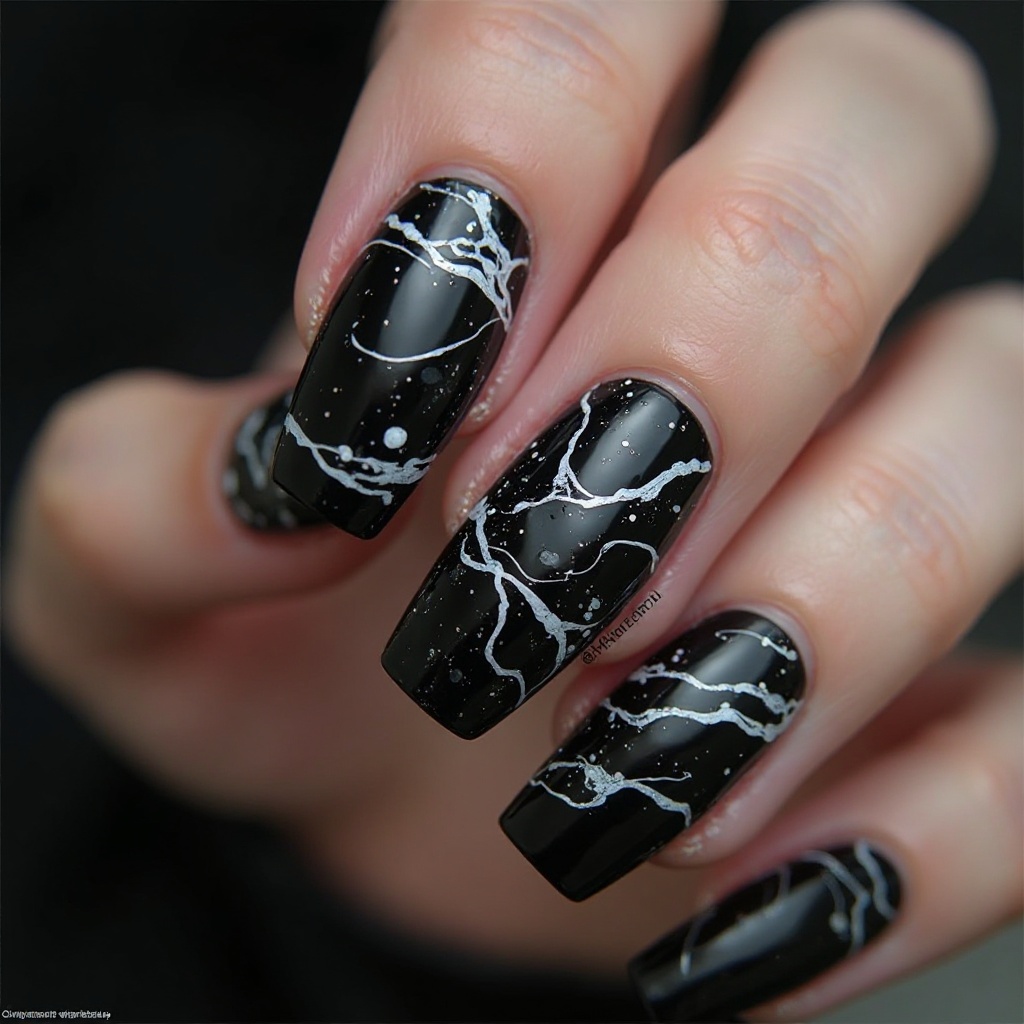
Glossy black base with delicate white marble veining hand-painted on select nails, creating a luxurious stone effect. The black-white contrast is striking while marble pattern adds artistic sophistication. This design channels high-fashion editorial aesthetics.
Why It Works for Prom: The marble effect is unique and artistic, and black-white is timeless and photographs beautifully with any dress color.
Pro Tip: Study real black marble images before painting—veins should be irregular, diagonal, and intersecting, never perfectly straight.
How to Create Black with White Marble at Home
What You’ll Need:
- Black polish (Essie “Licorice”)
- White polish or white striping polish
- Thin nail art brush (size 0)
- Gray polish (optional, for depth)
- Base coat and clear top coat
Step-by-Step Application:
- Prep and base: Standard prep plus base coat.
- Apply black base: Paint 2-3 coats black, drying 2 minutes between coats. Let final coat dry completely—10 minutes.
- Thin white polish: If using regular white polish, add tiny drop of top coat to thin it to ink-like consistency. Test on paper.
- Paint veining: Using thin brush, paint irregular white veins diagonally across 1-3 accent nails. Vary pressure for thick-thin lines. Make veins intersect and branch. Work diagonally for natural look. 3-5 veins per nail.
- Add gray depth (optional): Paint few thin gray lines alongside white veins for shadow effect.
- Soften: While slightly wet, lightly drag clean dry brush through some veins to soften edges.
- Seal: Let dry 10 minutes. Apply 2 layers clear top coat.
Time Required: 50-65 minutes Difficulty Level: Intermediate—requires artistic hand
Pink Prom Nails: 5 Romantic Ideas
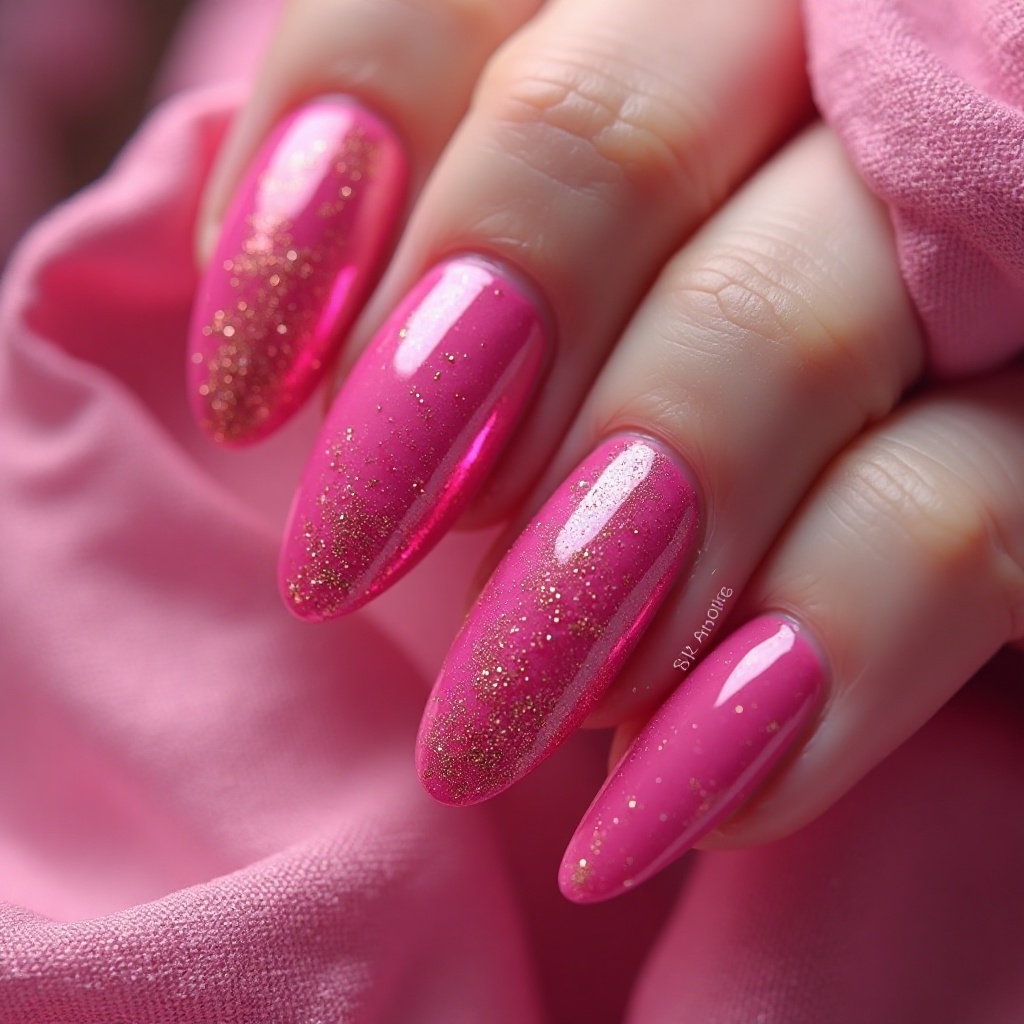
24. Hot Pink with Silver Glitter Gradient
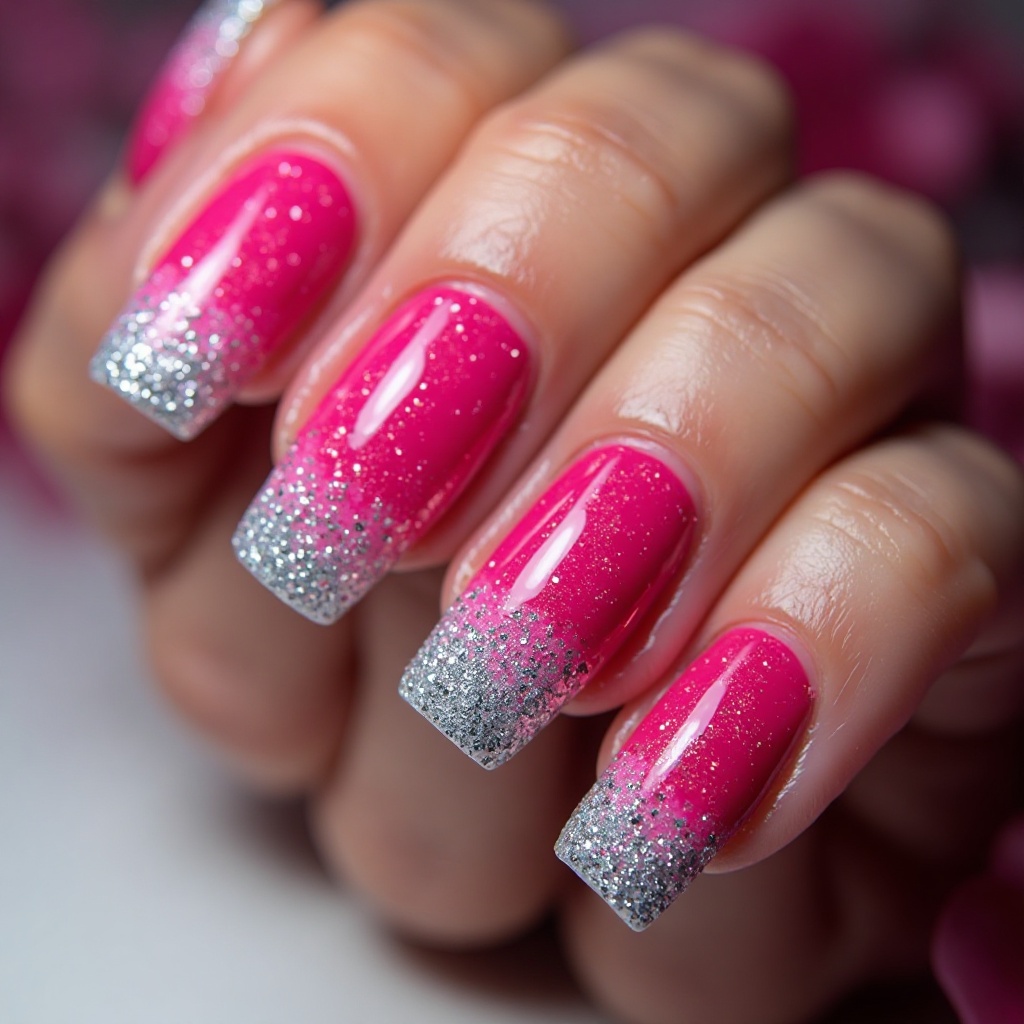
Vibrant hot pink base transitioning into dense silver glitter at the tips, creating a fun, energetic look with glamorous sparkle. The bold pink is confident and youthful while silver glitter adds formal-event sparkle. This design is perfect for those who love bold color with prom-appropriate glamour.
Why It Works for Prom: Hot pink is memorable and photographs beautifully, and the silver gradient ensures it feels special-occasion appropriate rather than casual.
Pro Tip: Use fine silver glitter for a sophisticated finish—chunky glitter can look juvenile with hot pink.
How to Create Hot Pink with Silver Glitter Gradient at Home
What You’ll Need:
- Hot pink polish (OPI “Hurry-Juku Get This Color!” or Essie “Watermelon”)
- Fine silver glitter polish (China Glaze “Fairy Dust”)
- Makeup sponge
- Paper plate
- Liquid latex
- Base coat and clear top coat
Step-by-Step Application:
- Prep and protect: Apply liquid latex around nails, then base coat.
- Apply hot pink base: Paint 2-3 coats hot pink, drying 2 minutes between coats. Let final coat dry 5 minutes.
- Create gradient: Pour silver glitter onto paper plate. Dab sponge into glitter and bounce onto nail tips, heavy at tips and fading toward center. Repeat 3 times, drying 3 minutes between layers.
- Seal: Apply 3 thick layers clear top coat to smooth glitter, waiting 3 minutes between layers.
Time Required: 60-70 minutes Difficulty Level: Intermediate
25. Dusty Rose with Gold Leaf Accents
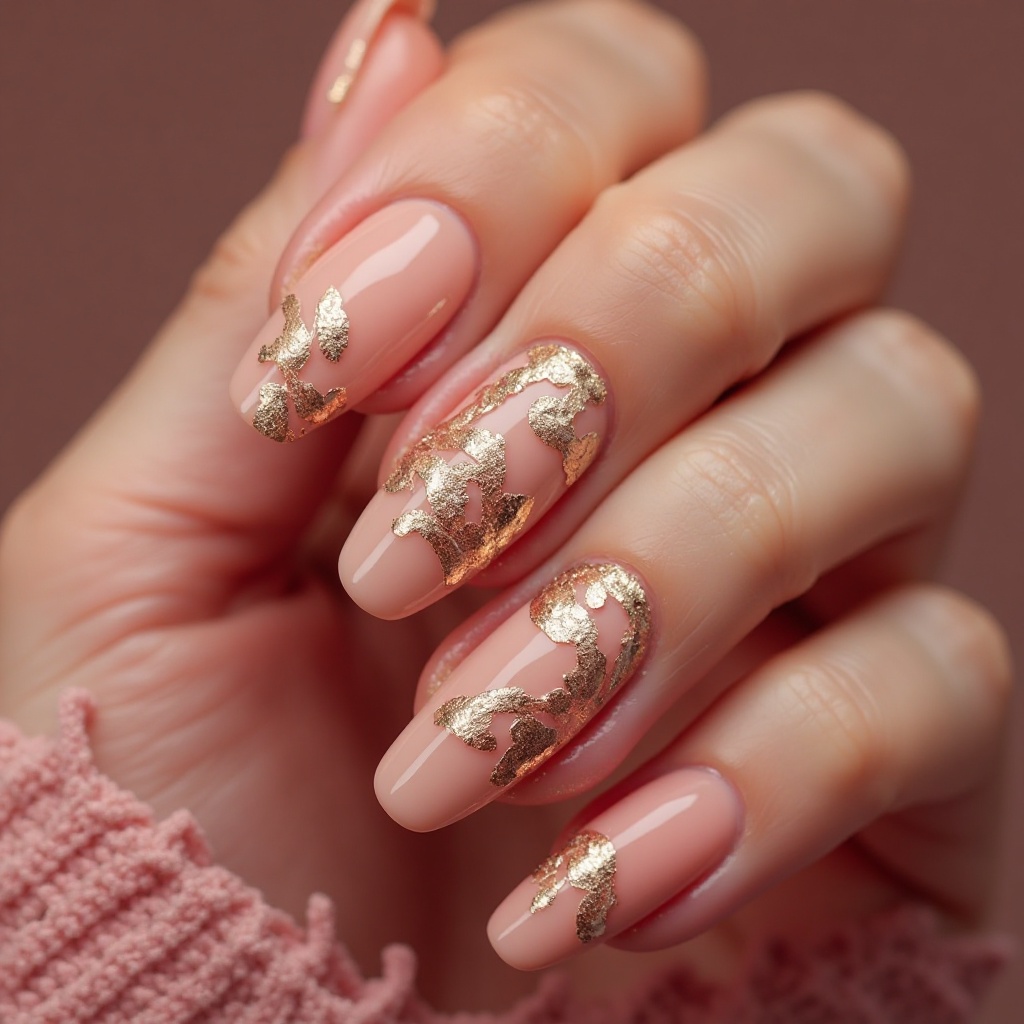
Soft, muted dusty rose base with delicate gold leaf applied in organic patterns on accent nails, creating an elegant, vintage-inspired look. The dusty rose is sophisticated and romantic while gold leaf adds luxury. This combination feels expensive and editorial.
Why It Works for Prom: Dusty rose is universally flattering and works with virtually any dress color, while gold leaf makes it feel special and unique.
Pro Tip: Keep gold leaf application minimal and delicate—too much can overwhelm the soft dusty rose base.
How to Create Dusty Rose with Gold Leaf at Home
What You’ll Need:
- Dusty rose polish (Essie “Lady Like” or OPI “Tickle My France-y”)
- Genuine gold leaf sheets
- Tweezers and small brush
- Clear top coat (extra)
- Base coat
Step-by-Step Application:
- Prep and base: Standard prep plus base coat.
- Apply dusty rose: Paint 2-3 coats dusty rose, drying 2 minutes between coats.
- Prepare gold leaf: Tear small irregular pieces of gold leaf using tweezers.
- Apply gold leaf: On 1-2 accent nails, paint thin layer clear top coat where you want gold. While wet, place gold leaf pieces with tweezers. Press with small brush. Keep application delicate—few small pieces per nail.
- Brush excess: Use dry fan brush to sweep away loose leaf.
- Seal thoroughly: Apply 3 thick layers clear top coat, waiting 5 minutes between layers.
Time Required: 50-65 minutes Difficulty Level: Beginner-Intermediate
26. Bubblegum Pink Chrome
Bright bubblegum pink chrome finish that creates a mirror-like, candy-coated effect. The chrome makes the pink incredibly vibrant and reflective, catching light dramatically. This fun, playful color is perfect for those who love bold pink with a modern edge.
Why It Works for Prom: The chrome finish elevates pink from sweet to sophisticated, and the reflective surface photographs exceptionally well.
Pro Tip: Pair bubblegum pink chrome with neutral or white dresses for best impact—it can clash with certain dress colors.
How to Create Bubblegum Pink Chrome at Home
What You’ll Need:
- Dark pink or fuchsia gel polish (for base)
- Pink chrome powder
- Gel setup (lamp, base, top coat)
- Eyeshadow applicator
- Rubbing alcohol
Step-by-Step Application:
- Prep and base: Standard prep, apply gel base coat, cure 60 seconds.
- Apply dark pink base: Paint 2 coats dark pink or fuchsia gel, curing 60 seconds between coats.
- Apply gel top coat: Paint thin layer no-wipe gel top coat, cure 60 seconds until tacky.
- Apply pink chrome powder: Rub pink chrome powder onto tacky surface using eyeshadow applicator. Mirror effect appears instantly.
- Seal chrome: Apply gel top coat gently, cure 60 seconds. Apply second layer, cure again.
Time Required: 30-40 minutes Difficulty Level: Intermediate—requires gel equipment
27. Pale Pink with White Floral 3D Appliqués
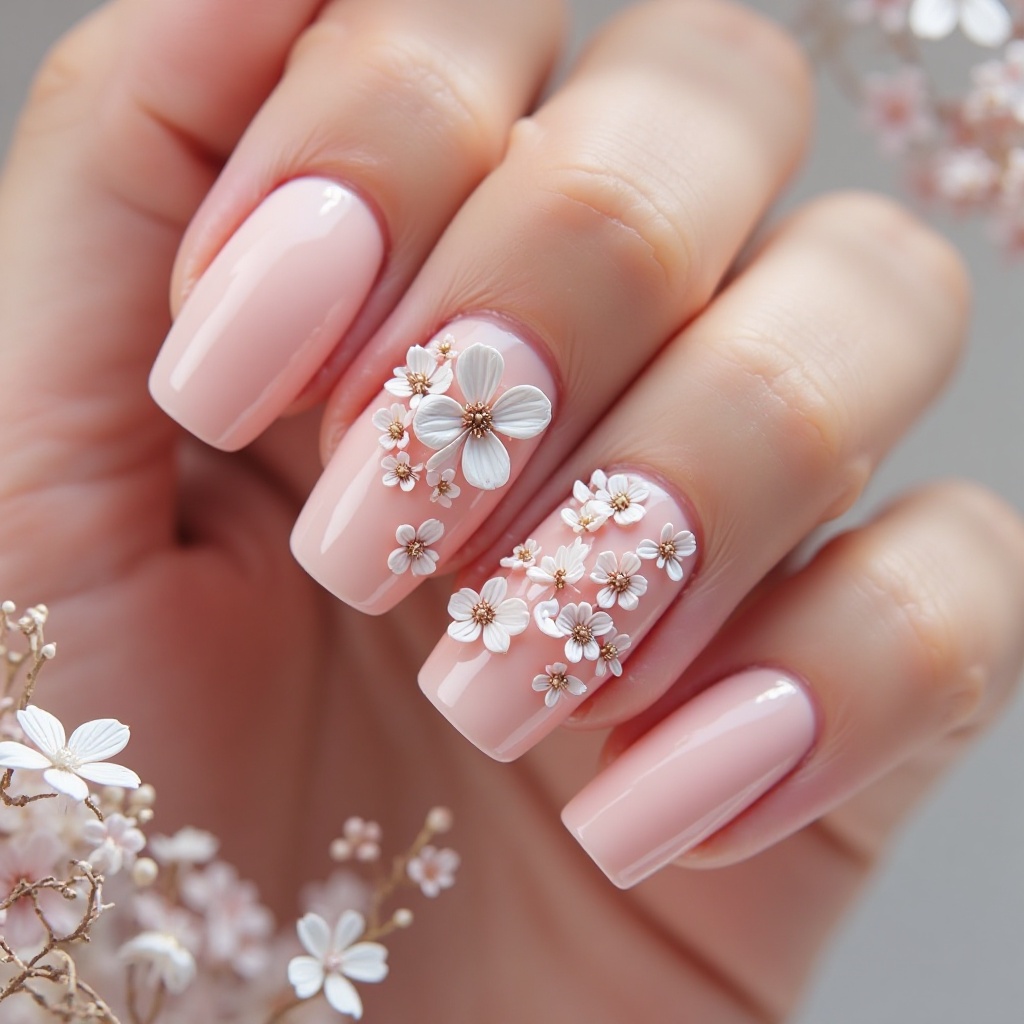
Soft pale pink base adorned with tiny 3D white floral stickers or appliqués on accent nails, creating a delicate, romantic garden-inspired look. The pale pink is sweet and feminine while 3D flowers add special occasion detail and texture.
Why It Works for Prom: The soft color palette is timeless and romantic, and 3D flowers add dimension that photographs beautifully.
Pro Tip: Choose small 3D flowers (5-7mm) rather than large ones—smaller looks more elegant and sophisticated.
How to Create Pale Pink with White Floral 3D Appliqués at Home
What You’ll Need:
- Pale pink polish (Essie “Fiji” or OPI “Bubble Bath”)
- Pre-made 3D white floral stickers
- Tweezers
- Nail glue (if stickers aren’t adhesive-backed)
- Clear top coat
- Base coat
Step-by-Step Application:
- Prep and base: Standard prep plus base coat.
- Apply pale pink: Paint 2-3 coats pale pink (light colors often need 3 coats), drying 2 minutes between coats. Let final coat dry completely—10 minutes.
- Apply flowers: Peel one white 3D flower from sheet. Use tweezers to position on accent nail (1-2 nails per hand). Press firmly for 5 seconds. If no adhesive backing, apply tiny dot nail glue first. Apply 2-4 small flowers per nail.
- Seal around (not over): Apply clear top coat to all nails, painting carefully around 3D flower bases but not over them (preserves dimension). Apply 2-3 layers around flower bases for security.
Time Required: 35-50 minutes Difficulty Level: Beginner
28. Pink to Purple Ombré
Gradient transition from soft baby pink at the cuticle to deeper purple or mauve at the tips, creating a romantic, multi-tonal effect. The ombré showcases pink-to-purple spectrum beautifully while adding dimension. This design is perfect for those who can’t choose between pink and purple.
Why It Works for Prom: The gradient creates visual interest and works with both pink and purple dress tones, offering versatility.
Pro Tip: Use three shades (baby pink, mauve, purple) for the smoothest, most seamless gradient transition.
How to Create Pink to Purple Ombré at Home
What You’ll Need:
- Baby pink polish (Essie “Fiji”)
- Mauve polish (Essie “Lady Like”)
- Purple polish (Essie “Play Date”)
- Makeup sponges
- Paper plate
- Liquid latex
- Base coat and clear top coat
Step-by-Step Application:
- Prep and protect: Apply liquid latex around nails, then base coat.
- Apply pink base: Paint 2 coats baby pink as base, dry 2 minutes between coats.
- Create gradient: On paper plate, paint three stripes: baby pink, mauve, purple. Dab sponge to pick up all three. Bounce onto nail with pink at cuticle, purple at tips. Repeat 3-4 times, drying 3 minutes between.
- Smooth and seal: Let dry 10 minutes. Apply 3 layers clear top coat, waiting 3 minutes between layers.
Time Required: 70-85 minutes Difficulty Level: Intermediate
Silver Prom Nails: 5 Glamorous Ideas
29. Silver Chrome Mirror Finish
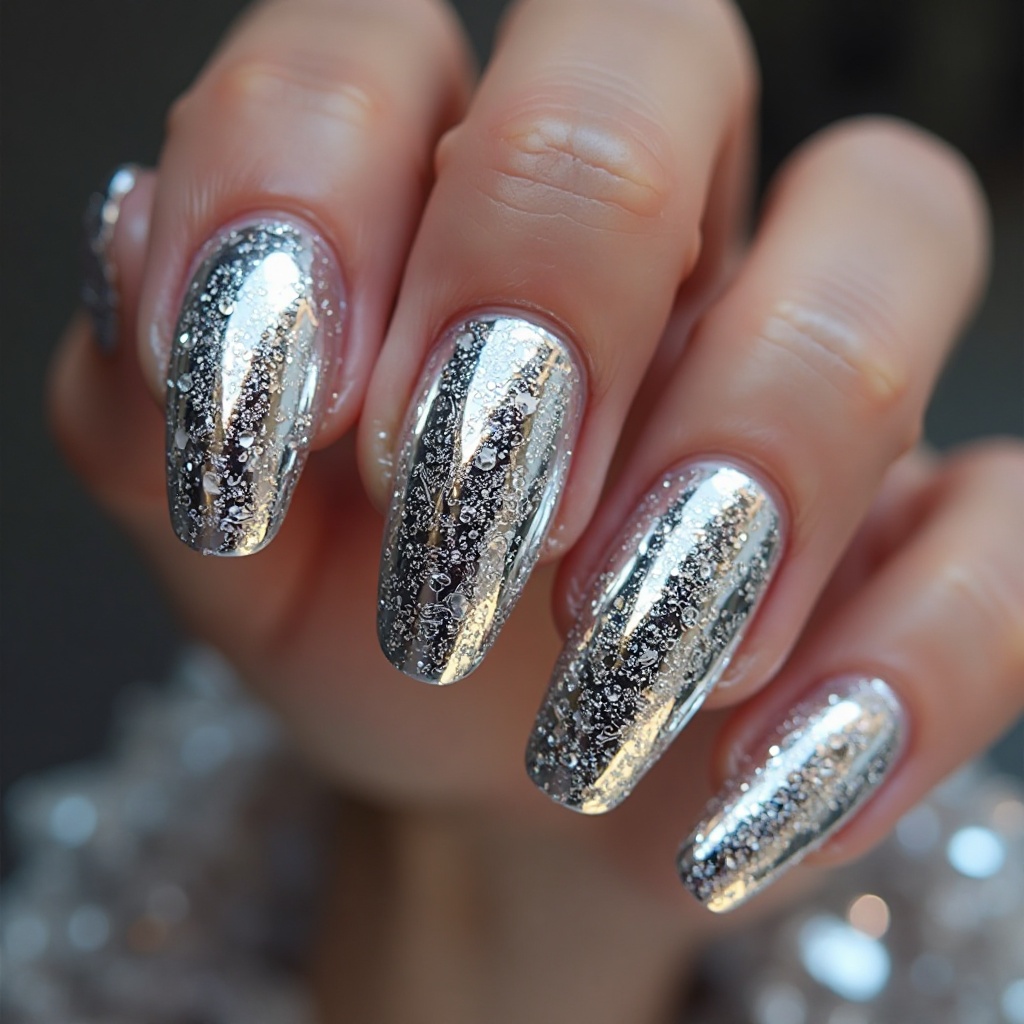
Full silver chrome finish that creates a perfect mirror effect, reflecting light dramatically. The high-shine chrome is bold and futuristic while being elegant enough for formal events. This design makes a serious statement and photographs exceptionally well.
Why It Works for Prom: Silver chrome is universally flattering, works with any dress color, and creates show-stopping photos with its reflective surface.
Pro Tip: Keep nails at medium length with almond or coffin shape to maximize the reflective surface area.
How to Create Silver Chrome Mirror Finish at Home
What You’ll Need:
- Black gel polish (for base)
- Silver chrome powder
- Gel setup (lamp, base, top coat)
- Eyeshadow applicator
- Rubbing alcohol
Step-by-Step Application:
- Prep and base: Standard prep, apply gel base coat, cure 60 seconds.
- Apply black base: Paint 2 coats black gel, curing 60 seconds between coats. Must be completely opaque.
- Apply gel top coat: Paint thin layer no-wipe gel top coat, cure 60 seconds until tacky.
- Apply silver chrome powder: Rub silver chrome powder onto tacky surface using eyeshadow applicator with circular motions and firm pressure. Perfect mirror effect appears instantly. Dust off excess.
- Seal chrome: Apply gel top coat gently to avoid disturbing powder, cure 60 seconds. Apply second layer for durability, cure again.
Time Required: 30-40 minutes Difficulty Level: Intermediate—requires gel equipment
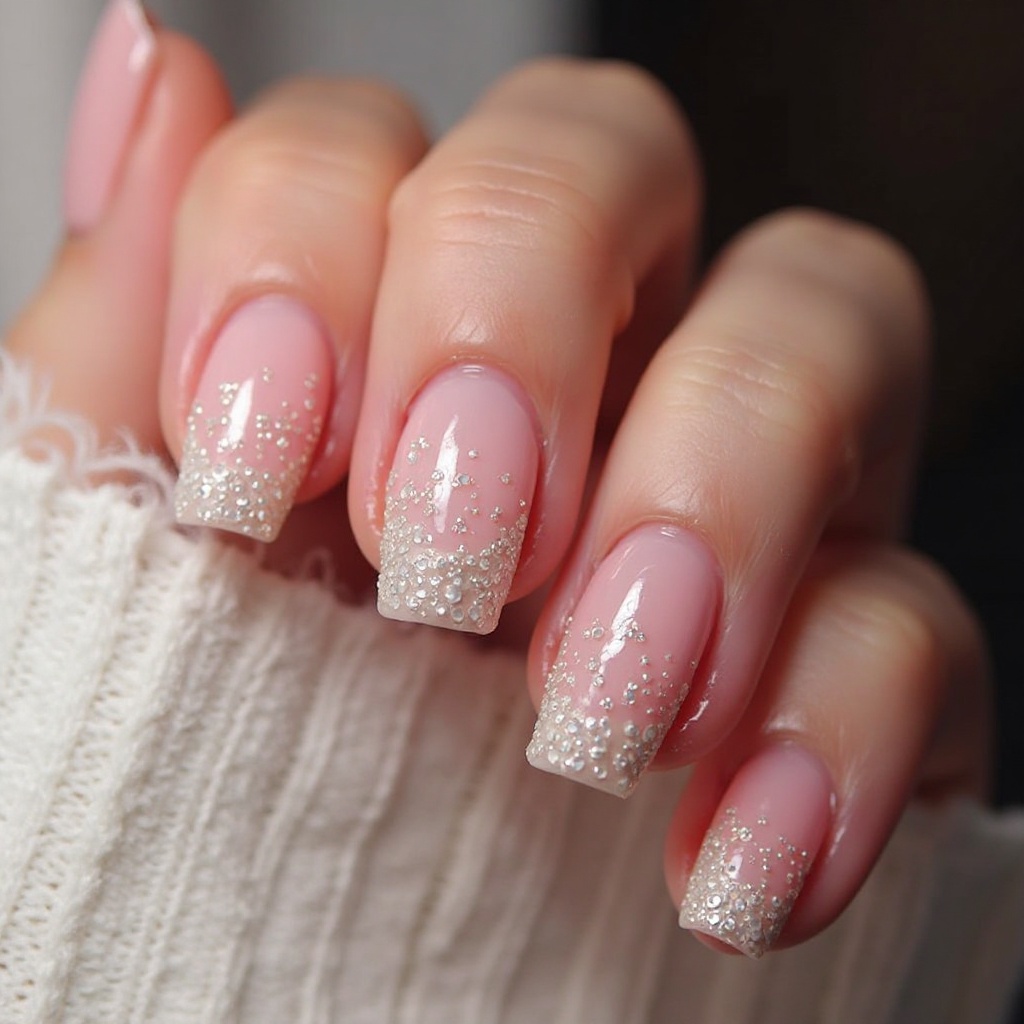
30. Silver Glitter Gradient on Nude Base
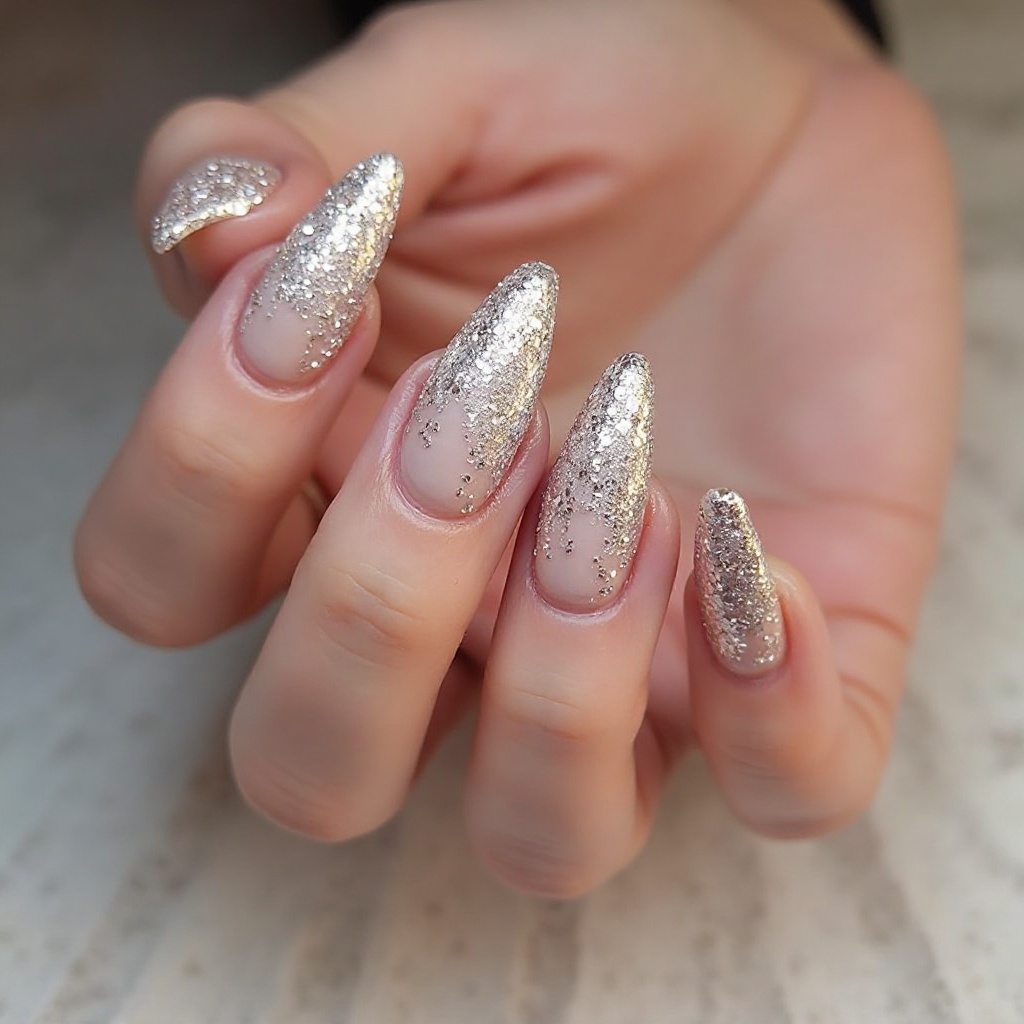
Soft nude base transitioning into concentrated silver glitter at the tips, creating an elegant, understated look with strategic sparkle. The nude provides neutral sophistication while silver glitter adds formal-event glamour. This design is perfect for those wanting subtle elegance.
Why It Works for Prom: The nude base keeps it wearable and sophisticated while silver glitter provides prom-appropriate sparkle without being overwhelming.
Pro Tip: Use fine silver micro-glitter for the most refined, elegant finish.
How to Create Silver Glitter Gradient on Nude at Home
What You’ll Need:
- Nude polish (OPI “Samoan Sand” or Essie “Au Natural”)
- Fine silver micro-glitter polish (China Glaze “Fairy Dust”)
- Makeup sponge
- Paper plate
- Liquid latex
- Base coat and clear top coat
Step-by-Step Application:
- Prep and protect: Apply liquid latex around nails, then base coat.
- Apply nude base: Paint 2 coats nude, drying 2 minutes between coats. Let final coat dry 5 minutes.
- Create gradient: Pour silver glitter onto paper plate. Dab sponge into glitter and bounce onto nail tips, heavy at tips and fading toward center. Repeat 3 times, drying 3 minutes between layers.
- Seal: Apply 3 thick layers clear top coat to smooth glitter, waiting 3 minutes between layers.
Time Required: 60-70 minutes Difficulty Level: Intermediate
31. Silver Foil with Black Accent Nails
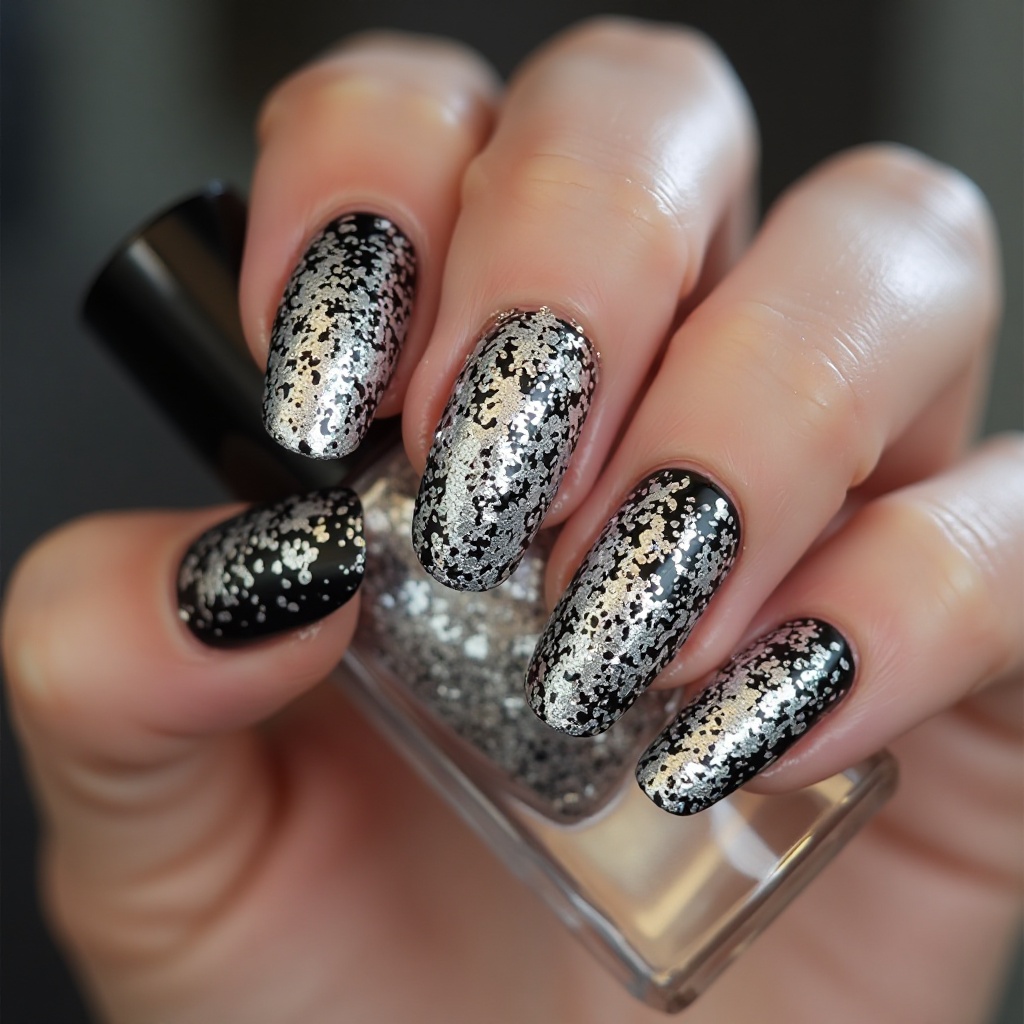
Alternating silver foil nails and glossy black nails, creating bold contrast and modern edge. The silver foil is textured and eye-catching while black provides grounding. This design plays with metallic and matte beautifully.
Why It Works for Prom: The silver-black combination is sophisticated and edgy, perfect for making a fashion-forward statement.
Pro Tip: Apply silver foil to 3 nails per hand (thumb, middle, pinky) and black to remaining 2 (pointer, ring) for best balance.
How to Create Silver Foil with Black Accents at Home
What You’ll Need:
- Black polish (Essie “Licorice”)
- Silver nail foil
- Foil adhesive
- Tweezers
- Clear top coat
- Base coat
Step-by-Step Application:
- Prep and base: Standard prep plus base coat.
- Apply black to select nails: Paint 2-3 coats black on 2 nails per hand (pointer and ring fingers typically), drying 2 minutes between coats.
- Apply foil adhesive to others: On remaining nails (thumb, middle, pinky), paint thin layer foil adhesive covering entire nail. Let dry 3-5 minutes until tacky.
- Apply silver foil: Cut silver foil pieces slightly larger than nails. Place shiny-side-up onto tacky adhesive and press firmly for 5 seconds. Peel away backing—silver transfers. Repeat for each nail.
- Seal: Apply 3 thick layers clear top coat over all nails, waiting 5 minutes between layers.
Time Required: 50-65 minutes Difficulty Level: Beginner-Intermediate
32. Silver Holographic with Clear Tips

Silver holographic base with clear or bare tips creating negative space, adding modern edge to sparkly nails. The holographic provides rainbow sparkle while clear tips keep it from feeling too heavy. This design is fashion-forward and unique.
Why It Works for Prom: The negative space adds sophistication to sparkly nails, preventing them from feeling too juvenile or overwhelming.
Pro Tip: Make clear tips 3-4mm for modern proportions—too thin looks accidental, proper width looks intentional.
How to Create Silver Holographic with Clear Tips at Home
What You’ll Need:
- Silver holographic polish (ILNP “Cygnus Loop” or Holo Taco silver)
- French tip guides or tape
- Clear polish or just top coat for tips
- Base coat and clear top coat
Step-by-Step Application:
- Prep and base: Standard prep plus base coat on entire nail.
- Apply tape guides: Place French tip guides or tape 3-4mm from tips. Press firmly.
- Apply silver holographic: Paint 2-3 thin coats silver holographic on area below tape (majority of nail), drying 2 minutes between coats. Leave tips bare.
- Remove tape: Carefully peel away tape while last coat is still slightly wet for clean lines.
- Seal: Apply clear top coat to entire nail including bare tips. Apply 2 layers for smoothness.
Time Required: 35-50 minutes Difficulty Level: Beginner-Intermediate
34. Silver Chrome French Tips
Classic nude or pink base paired with silver chrome tips in French manicure style, creating modern elegance. The neutral base is sophisticated while silver chrome tips add high-fashion sparkle. This design updates the classic French with metallic glamour.
Why It Works for Prom: The French structure is timeless and elegant, while chrome tips make it feel special and contemporary.
Pro Tip: Make chrome tips slightly thicker (3-4mm) than traditional French to really showcase the reflective finish.
How to Create Silver Chrome French Tips at Home
What You’ll Need:
- Nude or pink gel polish
- Silver chrome powder
- Gel setup (lamp, base, top coat)
- French tip guides or tape
- Eyeshadow applicator
- Rubbing alcohol
Step-by-Step Application:
- Prep and base: Standard prep, apply gel base coat, cure 60 seconds.
- Apply nude/pink base: Paint entire nail with 2 coats nude or pink gel, curing 60 seconds between coats.
- Apply tape guides: Once cured, place French tip guides 3-4mm from tips. Press firmly.
- Apply gel top coat to tips: Paint thin layer no-wipe gel top coat only on tips beyond tape. Cure 60 seconds until tacky.
- Apply silver chrome: Rub silver chrome powder onto tacky tips using eyeshadow applicator. Dust off excess.
- Remove tape and seal: Peel away tape. Apply gel top coat to entire nail, cure 60 seconds. Apply second layer, cure again.
Time Required: 45-60 minutes Difficulty Level: Intermediate—requires gel equipment
Gold Prom Nails: 5 Luxurious Ideas
35. Rose Gold Glitter Gradient
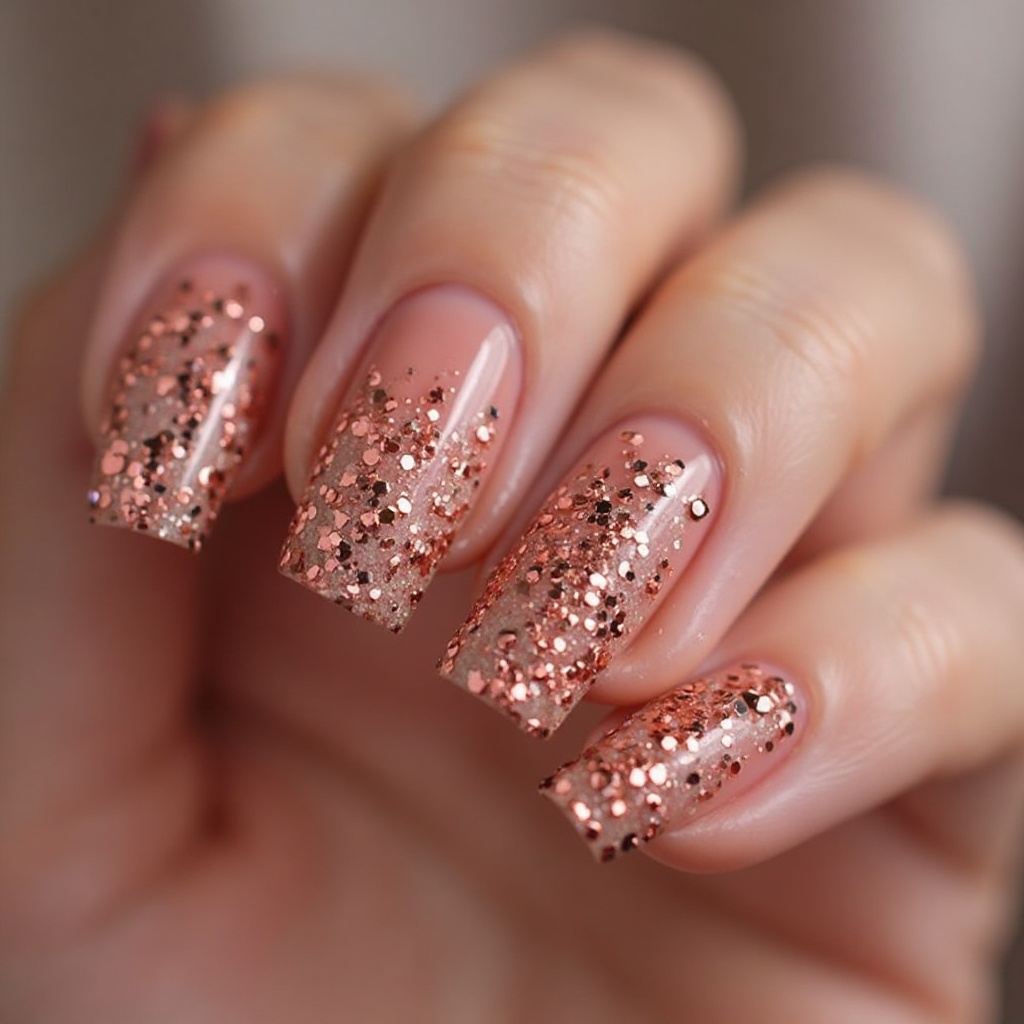
Soft nude base transitioning into concentrated rose gold glitter at the tips, creating warm, romantic sparkle. The nude provides elegant foundation while rose gold glitter adds luxurious shimmer. This combination is universally flattering and photographs beautifully.
Why It Works for Prom: Rose gold is one of the most flattering metallics for all skin tones, and the gradient keeps sparkle from being overwhelming.
Pro Tip: Use fine rose gold glitter for sophisticated shimmer—chunky glitter can look less refined.
How to Create Rose Gold Glitter Gradient at Home
What You’ll Need:
- Nude polish (OPI “Samoan Sand”)
- Rose gold glitter polish (OPI “Cozu-Melted in the Sun” or Essie “Penny Talk”)
- Makeup sponge
- Paper plate
- Liquid latex
- Base coat and clear top coat
Step-by-Step Application:
- Prep and protect: Apply liquid latex around nails, then base coat.
- Apply nude base: Paint 2 coats nude, drying 2 minutes between coats. Let final coat dry 5 minutes.
- Create gradient: Pour rose gold glitter onto paper plate. Dab sponge into glitter and bounce onto nail tips, heavy at tips and fading toward center. Repeat 3 times, drying 3 minutes between layers.
- Seal: Apply 3 thick layers clear top coat to smooth glitter, waiting 3 minutes between layers.
Time Required: 60-70 minutes Difficulty Level: Intermediate
36. Gold Chrome Mirror Finish
Full gold chrome finish creating a brilliant mirror effect, reflecting light dramatically in warm gold tones. The high-shine chrome is bold and luxurious while being elegant enough for formal events. This design makes a serious glamorous statement.
Why It Works for Prom: Gold chrome is show-stopping and photographs exceptionally well, creating that “wow factor” perfect for special occasions.
Pro Tip: Pair gold chrome nails with gold jewelry and accessories for a cohesive, intentional metallic look.
How to Create Gold Chrome Mirror Finish at Home
What You’ll Need:
- Black or dark brown gel polish (for base)
- Gold chrome powder
- Gel setup (lamp, base, top coat)
- Eyeshadow applicator
- Rubbing alcohol
Step-by-Step Application:
- Prep and base: Standard prep, apply gel base coat, cure 60 seconds.
- Apply dark base: Paint 2 coats black or dark brown gel, curing 60 seconds between coats. Must be completely opaque.
- Apply gel top coat: Paint thin layer no-wipe gel top coat, cure 60 seconds until tacky.
- Apply gold chrome powder: Rub gold chrome powder onto tacky surface using eyeshadow applicator with circular motions and firm pressure. Perfect mirror effect appears instantly. Dust off excess.
- Seal chrome: Apply gel top coat gently to avoid disturbing powder, cure 60 seconds. Apply second layer for durability, cure again.
Time Required: 30-40 minutes Difficulty Level: Intermediate—requires gel equipment
37. Champagne Gold with White Accents
Soft champagne gold base with crisp white accents—either white tips in French style or white geometric patterns. The champagne provides warm metallic elegance while white adds fresh contrast. This combination is sophisticated and timeless.
Why It Works for Prom: Champagne gold is subtle and elegant rather than bold, and white accents keep it fresh and modern.
Pro Tip: Use a champagne shimmer rather than flat gold for more depth and dimension.
How to Create Champagne Gold with White Accents at Home
What You’ll Need:
- Champagne gold polish (OPI “Cosmo-Not Tonight Honey” or Essie “Penny Talk”)
- White polish (Essie “Blanc”)
- French tip guides or striping tape
- Base coat and clear top coat
Step-by-Step Application:
- Prep and base: Standard prep plus base coat.
- Apply champagne gold: Paint entire nail with 2-3 coats champagne gold, drying 2 minutes between coats. Let final coat dry 10 minutes.
- Apply guides: Place French tip guides or tape for white tips 2-3mm from tips, or create geometric patterns with striping tape.
- Paint white accents: Apply white polish in thin coats on tips or geometric sections. Apply 2-3 coats for opacity, drying 2 minutes between. Remove tape immediately after last coat while wet.
- Seal: Let dry 5 minutes. Apply 2 layers clear top coat.
Time Required: 50-65 minutes Difficulty Level: Intermediate
38. Gold Foil on Nude Base
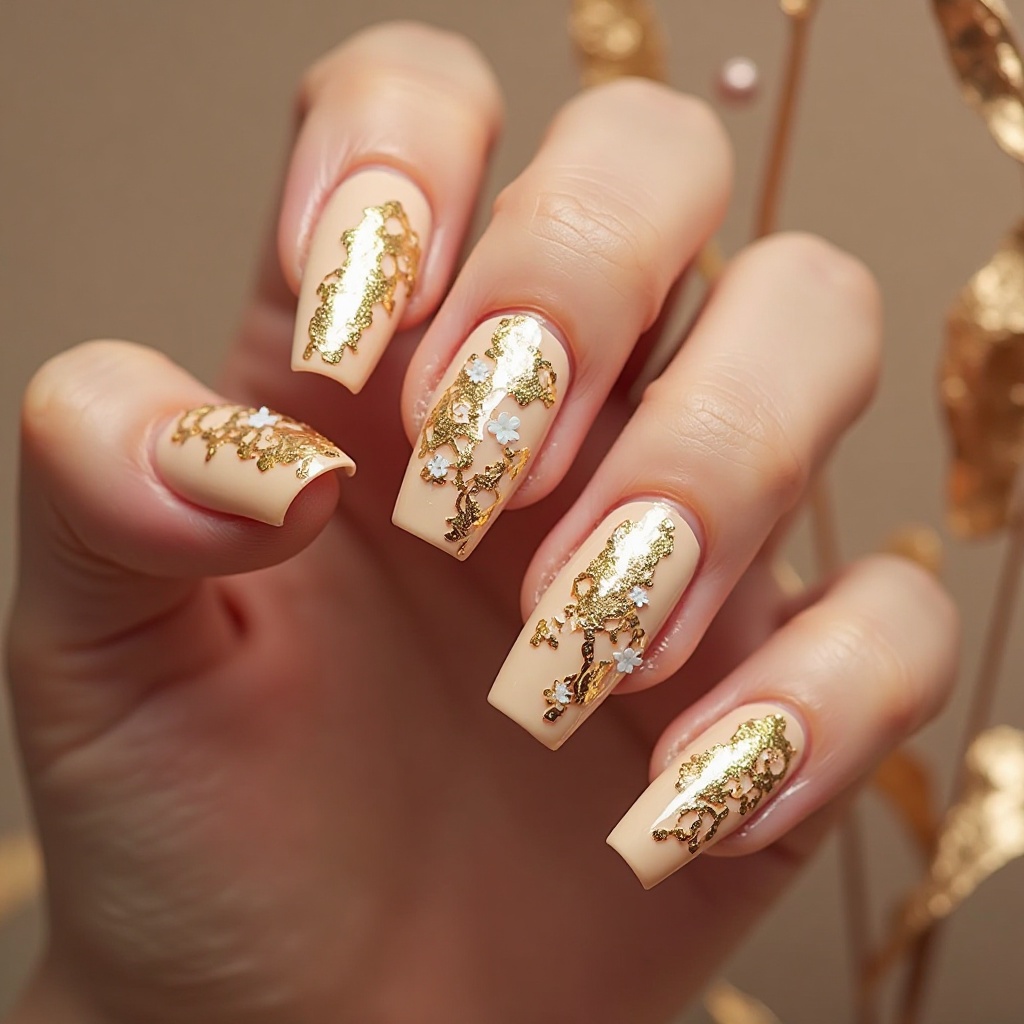
Nude or beige base with hand-placed gold foil applied in abstract patterns on select nails, creating modern luxury. The nude provides neutral sophistication while gold foil adds expensive-looking metallic detail. This design is editorial and high-fashion.
Why It Works for Prom: The nude-gold combination is timeless and universally flattering, and the foil technique creates unique, artistic results.
Pro Tip: Apply gold foil in irregular, organic shapes for the most expensive, editorial look.
How to Create Gold Foil on Nude Base at Home
What You’ll Need:
- Nude polish (OPI “Samoan Sand” or Essie “Au Natural”)
- Gold nail foil
- Foil adhesive
- Tweezers
- Clear top coat
- Base coat
Step-by-Step Application:
- Prep and base: Standard prep plus base coat.
- Apply nude base: Paint 2-3 coats nude, drying 2 minutes between coats. Let final coat dry 10 minutes.
- Apply foil adhesive: On 1-3 accent nails, paint thin layer foil adhesive in abstract shapes or random placement. Let dry 3-5 minutes until tacky.
- Apply gold foil: Cut or tear small pieces of gold foil. Place shiny-side-up onto tacky adhesive and press firmly for 5 seconds. Peel away backing—gold transfers.
- Seal: Apply 3 thick layers clear top coat, waiting 5 minutes between layers.
Time Required: 45-60 minutes Difficulty Level: Beginner-Intermediate
39. Gold Glitter Ombré on White Base
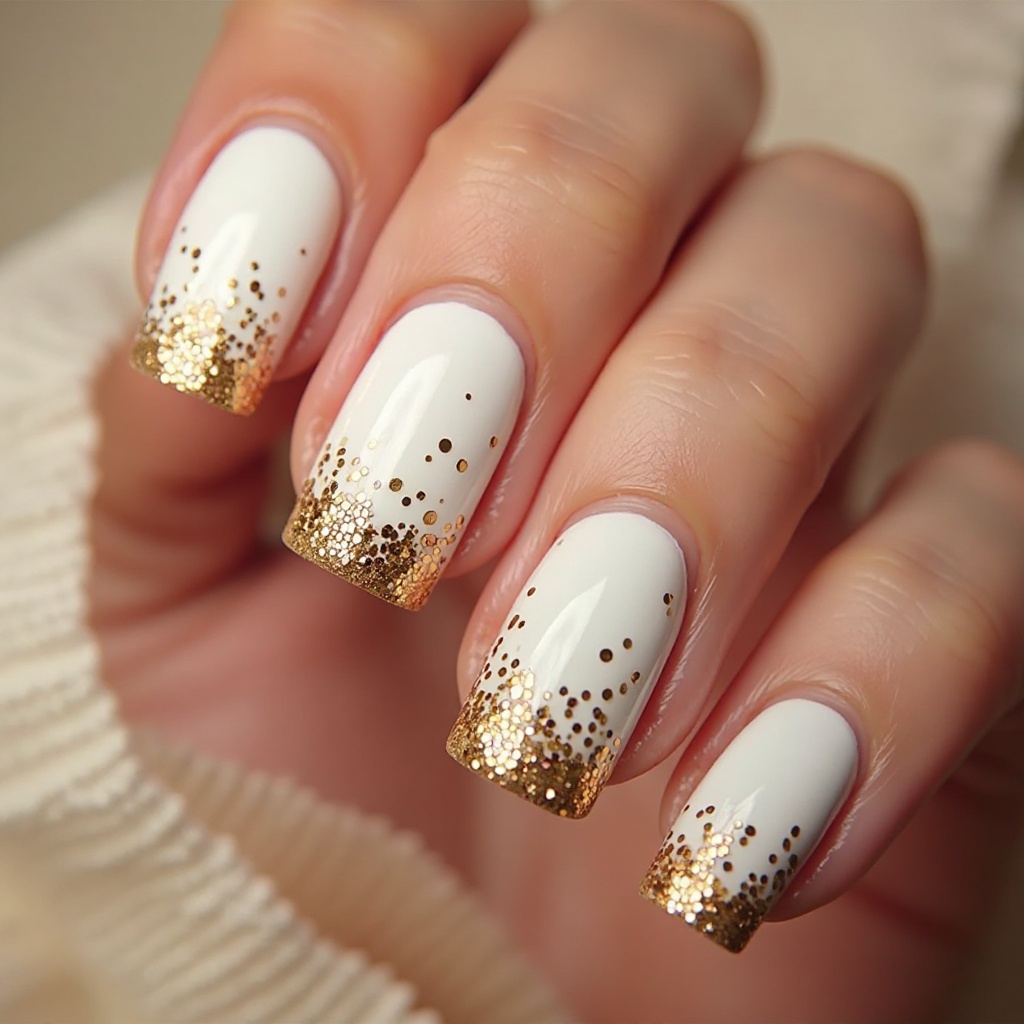
Crisp white base transitioning into concentrated gold glitter at the tips, creating fresh, glamorous contrast. The white provides clean foundation while gold glitter adds warm sparkle. This combination is bright, festive, and perfect for photos.
Why It Works for Prom: White and gold is a classic elegant combination that feels fresh and special-occasion appropriate.
Pro Tip: Use warm gold glitter (not yellow-toned) for the most elegant, expensive-looking finish.
How to Create Gold Glitter Ombré on White at Home
What You’ll Need:
- White polish (OPI “Alpine Snow” or Essie “Blanc”)
- Gold glitter polish (OPI “Goldeneye”)
- Makeup sponge
- Paper plate
- Liquid latex
- Base coat and clear top coat
Step-by-Step Application:
- Prep and protect: Apply liquid latex around nails, then base coat.
- Apply white base: Paint 2-3 coats white, drying 2 minutes between coats. Let final coat dry 5 minutes.
- Create gradient: Pour gold glitter onto paper plate. Dab sponge into glitter and bounce onto nail tips, heavy at tips and fading toward center. Repeat 3 times, drying 3 minutes between layers.
- Seal: Apply 3 thick layers clear top coat to smooth glitter, waiting 3 minutes between layers.
Time Required: 60-70 minutes Difficulty Level: Intermediate
Prom Nails Acrylic: 5 Professional Ideas
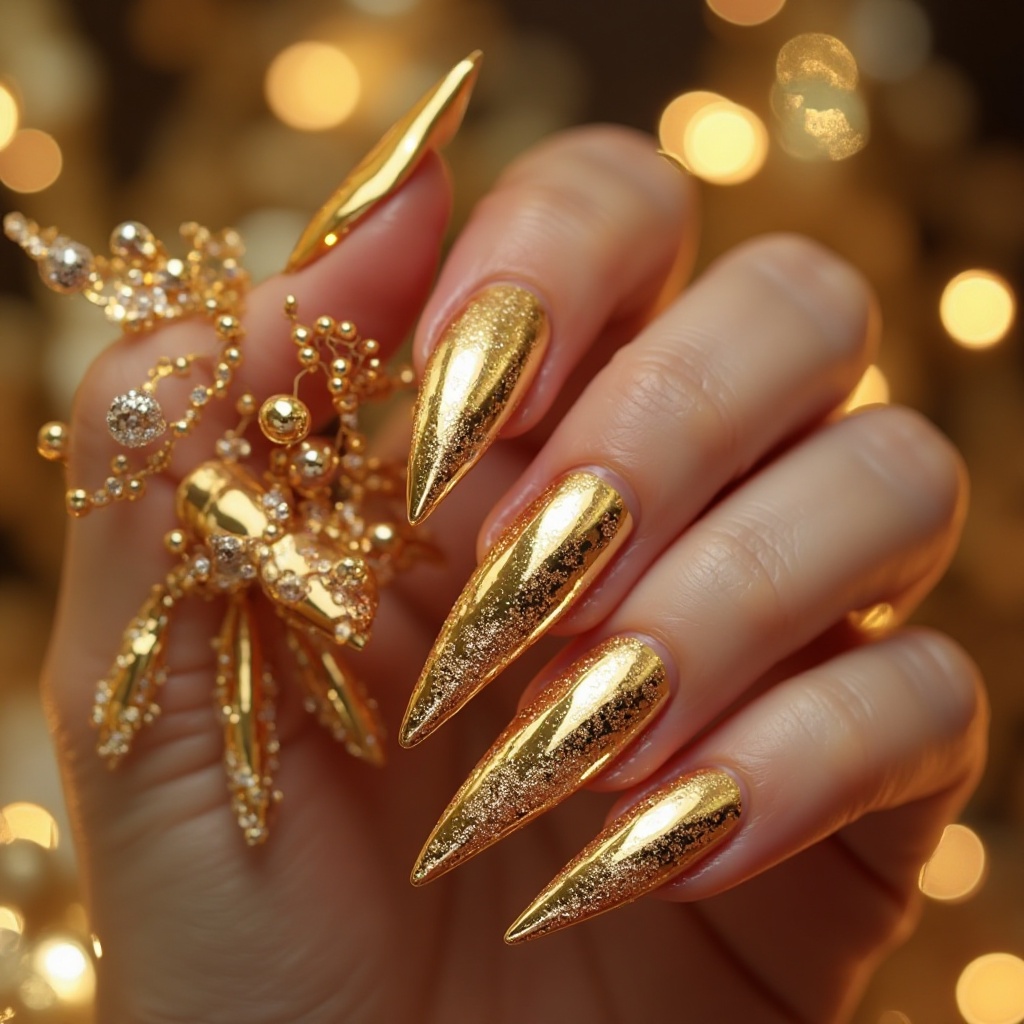
40. Acrylic Stiletto with Ombré and Crystals
Long stiletto-shaped acrylic nails with color ombré and strategic crystal placement, creating dramatic, show-stopping glamour. The length and shape make a bold statement while ombré adds dimension and crystals provide sparkle. This design is for those wanting maximum drama.
Why It Works for Prom: Acrylic allows for extreme length and sharp shapes impossible with natural nails, creating that high-fashion, red-carpet look.
Pro Tip: Practice basic tasks with press-on stiletto nails a week before your appointment to ensure you can function with this dramatic length and shape.
How to Get Acrylic Stiletto with Ombré and Crystals
What to Request at Salon:
- Stiletto shape (sharply pointed)
- Length: 1/2 to 3/4 inch extension
- Color ombré (choose two coordinating colors)
- 3-5 small crystals per accent nail (2 accent nails per hand maximum)
- High-gloss top coat
At-Home Alternative: Purchase pre-made press-on nails in stiletto shape with ombré and crystals (brands like Glamnetic, Static Nails, or Kiss). These are temporary (last 1-2 weeks) and perfect for special occasions. Apply with nail glue 1-2 days before prom.
Maintenance Tips:
- Acrylic stilettos require fills every 2-3 weeks
- Avoid using tips for tasks—use finger pads instead
- Be extra careful around delicate fabrics
- Remove professionally after 3-4 weeks maximum
Time Required: 2-3 hours at salon Cost: $60-100 depending on location and detail level
41. Acrylic Coffin with French Ombré
Coffin-shaped (squared-off) acrylic nails with French ombré—white tips fading into nude or pink base. The coffin shape is modern and elegant while French ombré updates the classic French with soft gradient. This design balances drama with wearability.
Why It Works for Prom: Coffin shape elongates fingers beautifully, and French ombré is timeless yet contemporary.
Pro Tip: Choose nude or soft pink base that matches your skin tone for the most elegant, cohesive look.
How to Get Acrylic Coffin with French Ombré
What to Request at Salon:
- Coffin (ballerina) shape
- Length: Medium to long (1/3 to 1/2 inch extension)
- French ombré: nude/pink base fading to white tips
- High-gloss finish
At-Home Alternative: Use coffin-shaped press-ons and create French ombré with sponge technique (see earlier ombré instructions). Apply press-ons with nail glue.
Maintenance Tips:
- Coffin shape is more durable than stiletto
- Fills needed every 2-3 weeks
- Avoid catching squared tips on fabric
Time Required: 1.5-2 hours at salon Cost: $50-80
42. Acrylic Almond with Full Chrome
Almond-shaped acrylic nails with full chrome finish in your choice of color (rose gold, silver, gold, or colored chrome). The almond shape is feminine and elegant while chrome creates high-impact shine. This design is sophisticated and modern.
Why It Works for Prom: Almond shape is universally flattering, and chrome finish photographs exceptionally well.
Pro Tip: Choose chrome color that complements your jewelry—rose gold chrome with gold jewelry, silver chrome with silver jewelry.
How to Get Acrylic Almond with Full Chrome
What to Request at Salon:
- Almond shape
- Length: Medium (1/4 to 1/3 inch extension)
- Full chrome finish in chosen color
- Chrome-safe top coat
At-Home Alternative: Chrome requires gel and powder application, making it difficult at home. Best to visit salon, or use chrome-effect press-ons as alternative.
Maintenance Tips:
- Chrome can dull over time—request chrome top coat for longevity
- Avoid harsh chemicals that dull chrome finish
- Fills needed every 2-3 weeks
Time Required: 2-2.5 hours at salon Cost: $65-90
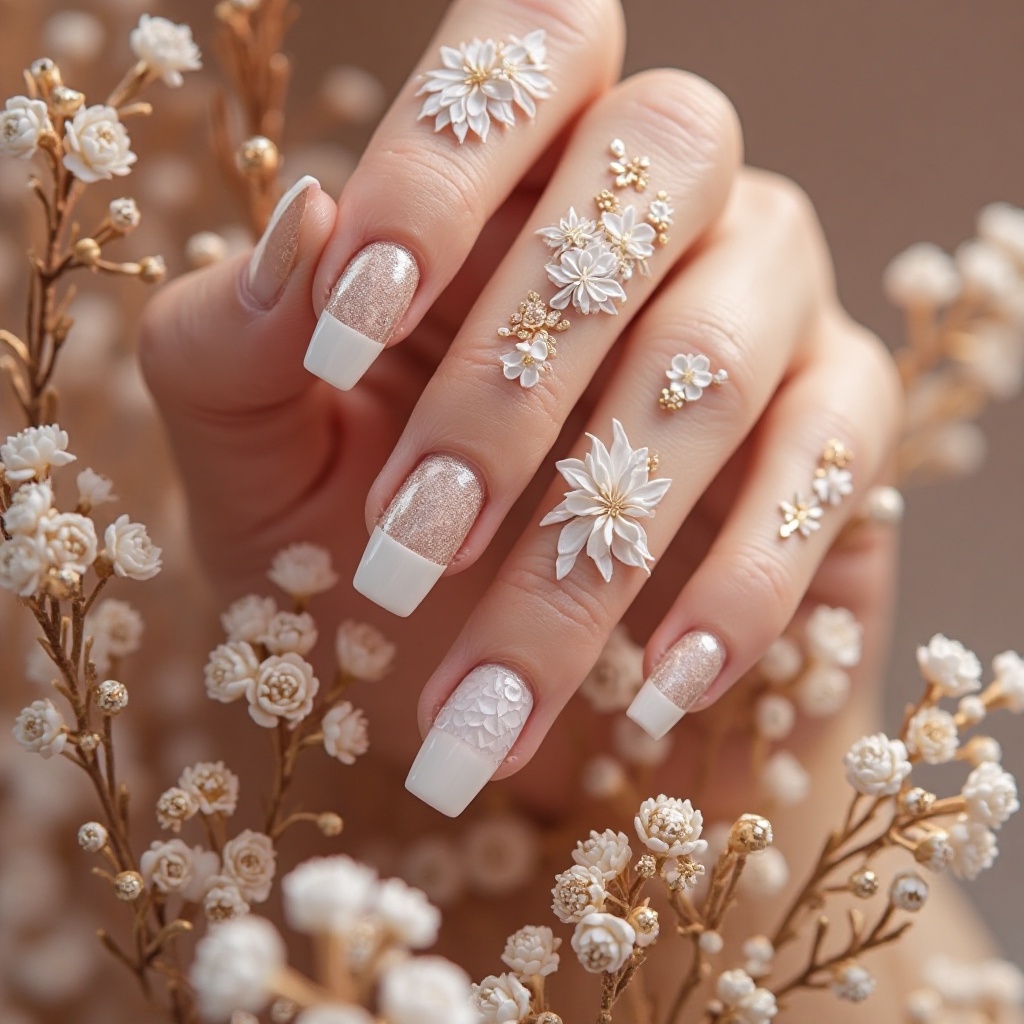
43. Acrylic Medium Length with 3D Floral Art
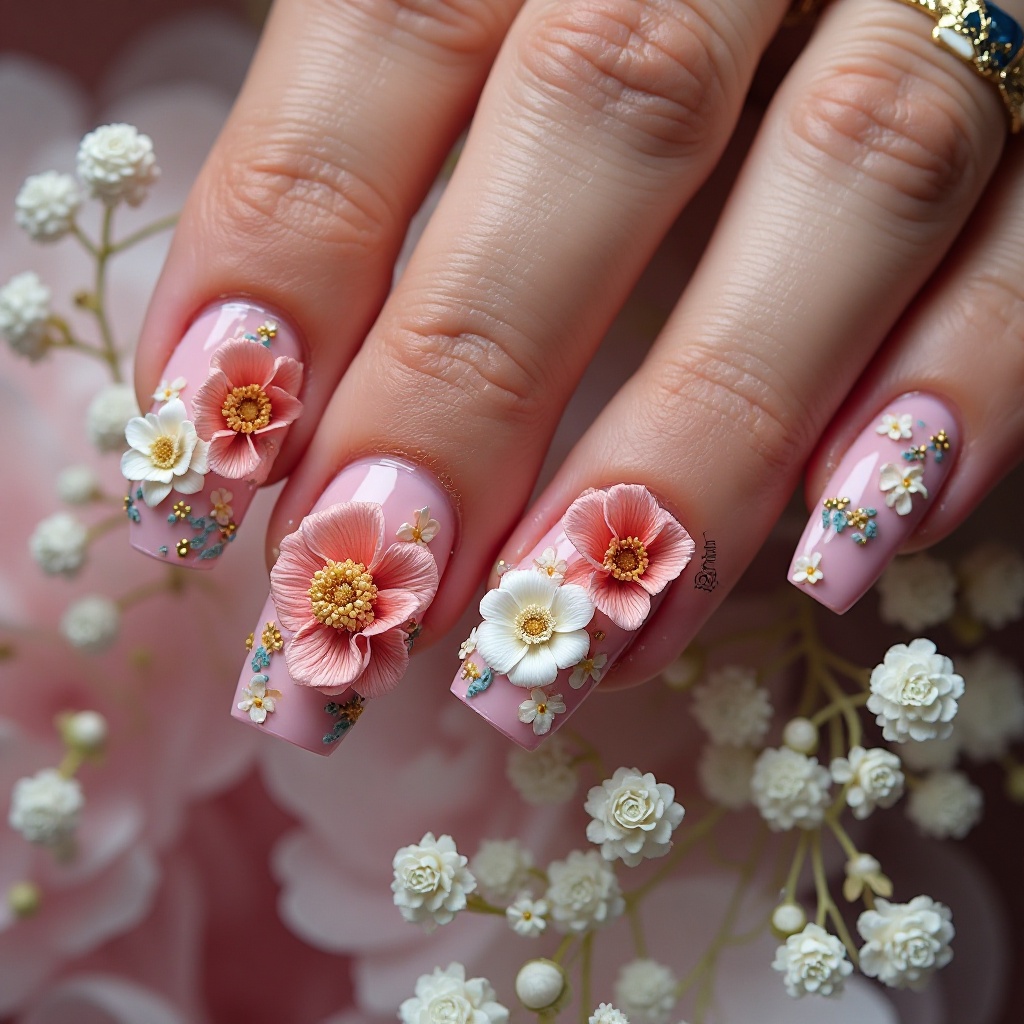
Medium-length acrylic nails with hand-sculpted 3D acrylic flowers on accent nails, creating dimensional, artistic elegance. The 3D flowers are molded from acrylic and look incredibly realistic. This design is for those wanting unique, wearable art.
Why It Works for Prom: The medium length is practical while 3D acrylic flowers add special-occasion detail that’s more durable than stick-on embellishments.
Pro Tip: Request smaller, delicate 3D flowers (5-8mm) rather than large ones for elegance—oversized flowers look costume-y.
How to Get Acrylic with 3D Floral Art
What to Request at Salon:
- Shape: Your preference (almond or coffin recommended)
- Length: Medium (1/4 inch extension)
- Base color: Soft pink, nude, or white
- Hand-sculpted 3D acrylic flowers on 1-2 accent nails per hand
- 2-4 small flowers per nail in white or coordinating colors
At-Home Alternative: This technique requires professional acrylic sculpting skills. Use 3D floral press-ons or stickers instead for at-home application.
Maintenance Tips:
- 3D acrylic flowers are more durable than stick-ons
- Be careful around clothing and hair
- Fills needed every 2-3 weeks
Time Required: 2.5-3 hours at salon (3D work is time-intensive) Cost: $70-110 depending on detail
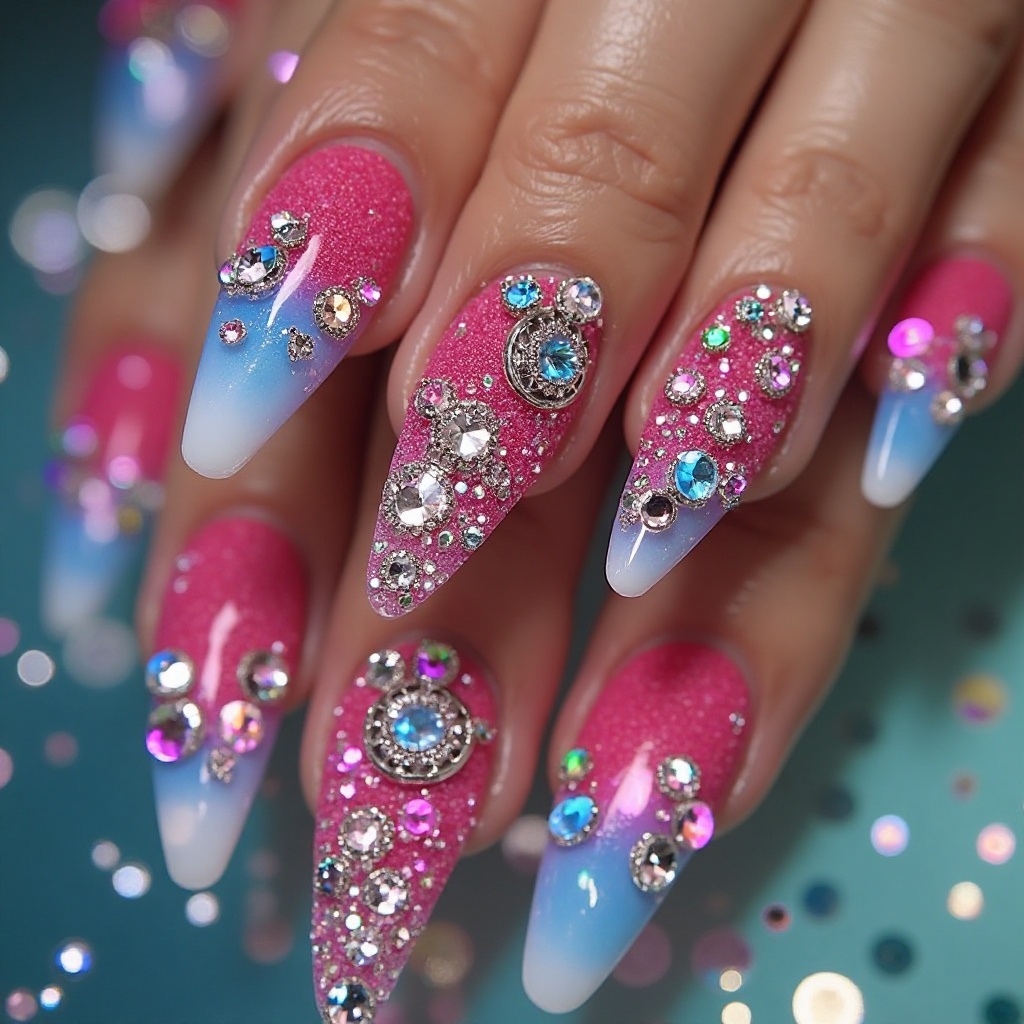
44. Acrylic Long with Glitter Ombré and Rhinestones
Long acrylic nails with glitter ombré (solid color fading to dense glitter at tips) plus rhinestone accents, creating maximum glamour. The length makes a statement while glitter and rhinestones add serious sparkle. This design is for those wanting full red-carpet glamour.
Why It Works for Prom: Long acrylics create that dramatic, special-occasion look, and the glitter ombré with rhinestones ensures maximum sparkle for photos.
Pro Tip: Limit rhinestones to accent nails only—covering all nails is overwhelming and can look gaudy.
How to Get Acrylic Long with Glitter Ombré and Rhinestones
What to Request at Salon:
- Shape: Coffin or almond
- Length: Long (1/2 to 3/4 inch extension)
- Glitter ombré: Solid color base fading to glitter tips
- 3-7 Swarovski rhinestones on 1-2 accent nails per hand
- High-gloss top coat
At-Home Alternative: Apply long press-on nails, create glitter gradient with sponge technique, add rhinestones with nail glue, seal with multiple top coat layers.
Maintenance Tips:
- Long nails require adjustment period—practice tasks before prom
- Fills every 2-3 weeks
- Rhinestones may need occasional replacement if they pop off
Time Required: 2-3 hours at salon Cost: $70-110
Romantic & Timeless Elegance
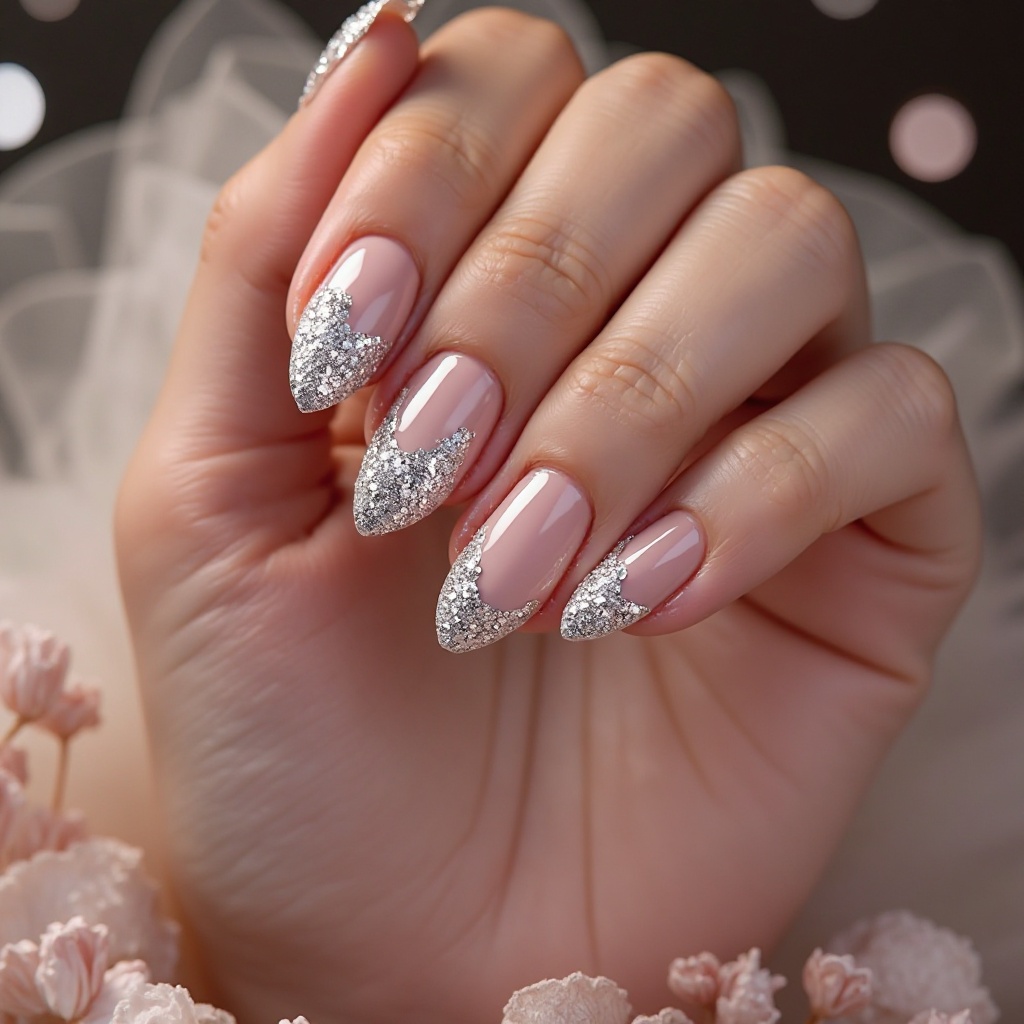
45. Pearl-Kissed French Tips
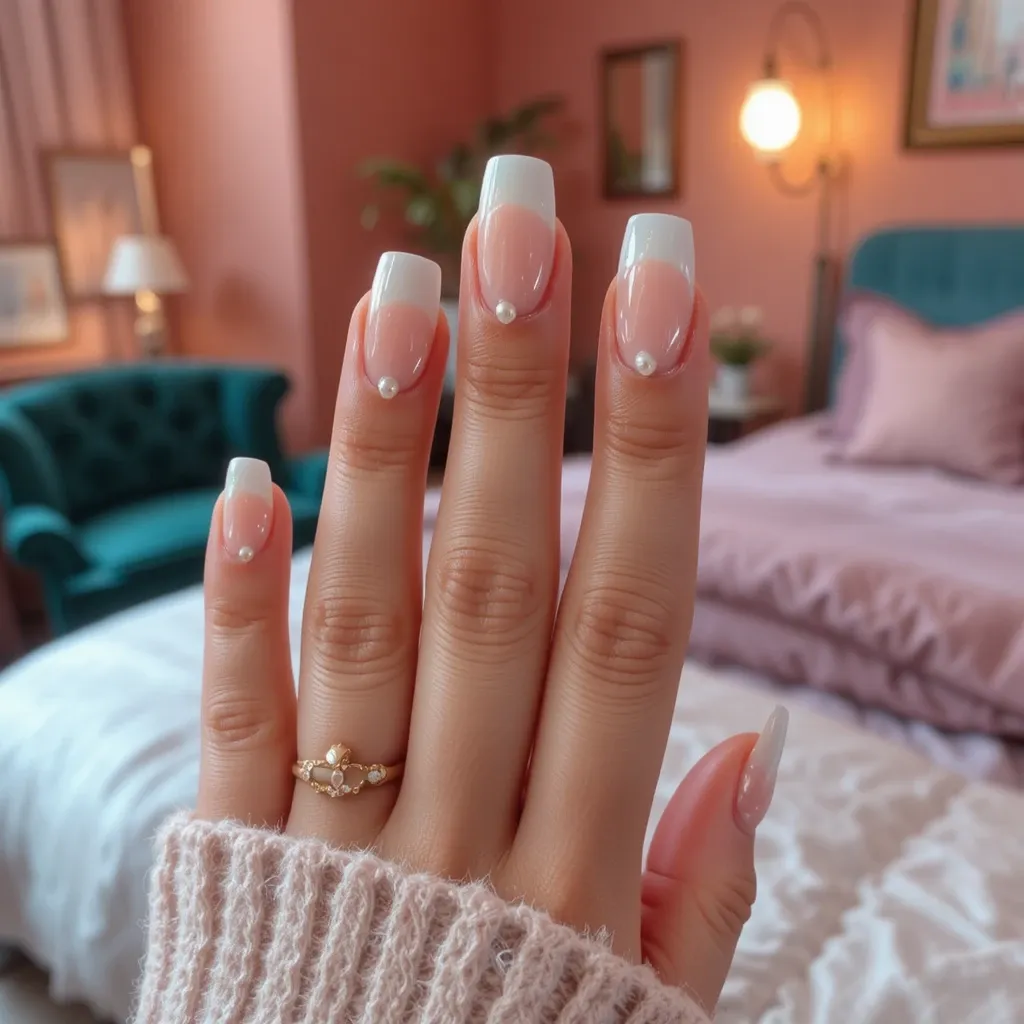
Delicate sheer pink or nude base with crisp white tips adorned with tiny pearl accents placed strategically along the smile line. The classic French silhouette gets an elevated, romantic upgrade with lustrous pearl embellishments that catch the light beautifully. This design works flawlessly with both traditional and modern french tip variations, creating dimension without overwhelming your overall look.
Why It Works for Prom: This elevated take on the French manicure offers timeless sophistication that photographs beautifully and complements any dress color or style, while the pearl accents add just enough glamour for the special occasion without competing with your jewelry.
Pro Tip: Request medium-sized pearls (2-3mm) and place them slightly off-center or in asymmetric clusters for a modern, intentional look rather than a straight line that can read too formal.
How to Create Pearl-Kissed French Tips at Home
What You’ll Need:
- Sheer pink or nude base polish (try OPI “Bubble Bath” or Essie “Ballet Slippers”)
- White polish for tips (Essie “Blanc” or OPI “Alpine Snow”)
- Small nail art pearls (2-3mm diameter, available at Sally Beauty or Amazon)
- Nail glue or clear gel top coat
- French tip guides or striping tape
- Clear top coat (Seche Vite recommended)
- Dotting tool or toothpick
Step-by-Step Application:
- Prep your nails: Push back cuticles, file nails to your desired shape (oval or almond works best), and lightly buff the surface. Wipe with rubbing alcohol to remove oils.
- Apply base color: Paint 2 thin coats of sheer pink or nude polish, letting each dry for 2 minutes. This creates the translucent base that makes French tips look natural.
- Create the French tips: Apply French tip guides or tape 2-3mm from the tip. Paint white polish in thin, even strokes. For steadier hands, rest your painting hand on a table and move only your fingers. Remove guides immediately while polish is wet, then let dry completely (5 minutes).
- Place the pearls: While your nails are still bare, plan your pearl placement—typically 2-3 pearls per nail along the smile line works best. Apply a tiny dot of nail glue or a thin layer of clear top coat where you want each pearl. Use a dotting tool or dampened toothpick to pick up each pearl and press gently into place. Work on one nail at a time.
- Seal everything: Wait 5 minutes for pearl adhesive to set, then carefully apply 2 layers of clear top coat, letting the first layer dry 3 minutes before applying the second. Use a thicker top coat around pearls to encapsulate them fully—this prevents them from catching on fabric or falling off.
Common Mistakes to Avoid:
- Using pearls that are too large (over 4mm)—they’ll snag on everything and feel bulky
- Applying top coat too quickly after placing pearls—they’ll shift position
- Painting French tips too thick—thin layers prevent bubbling and dry faster
Time Required: 45-60 minutes total (including drying time) Difficulty Level: Intermediate—the French tips require a steady hand, but tape guides make it manageable for beginners
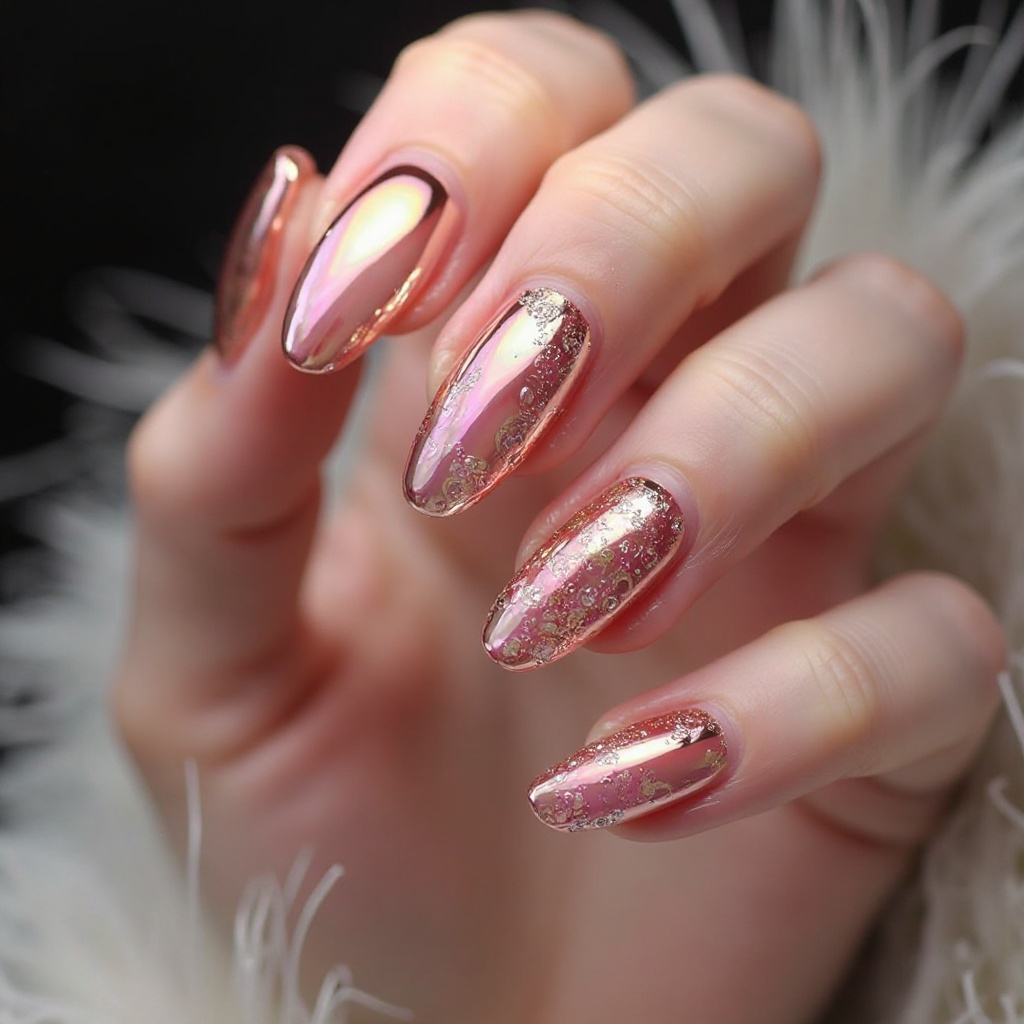
46. Rose Gold Chrome Dream
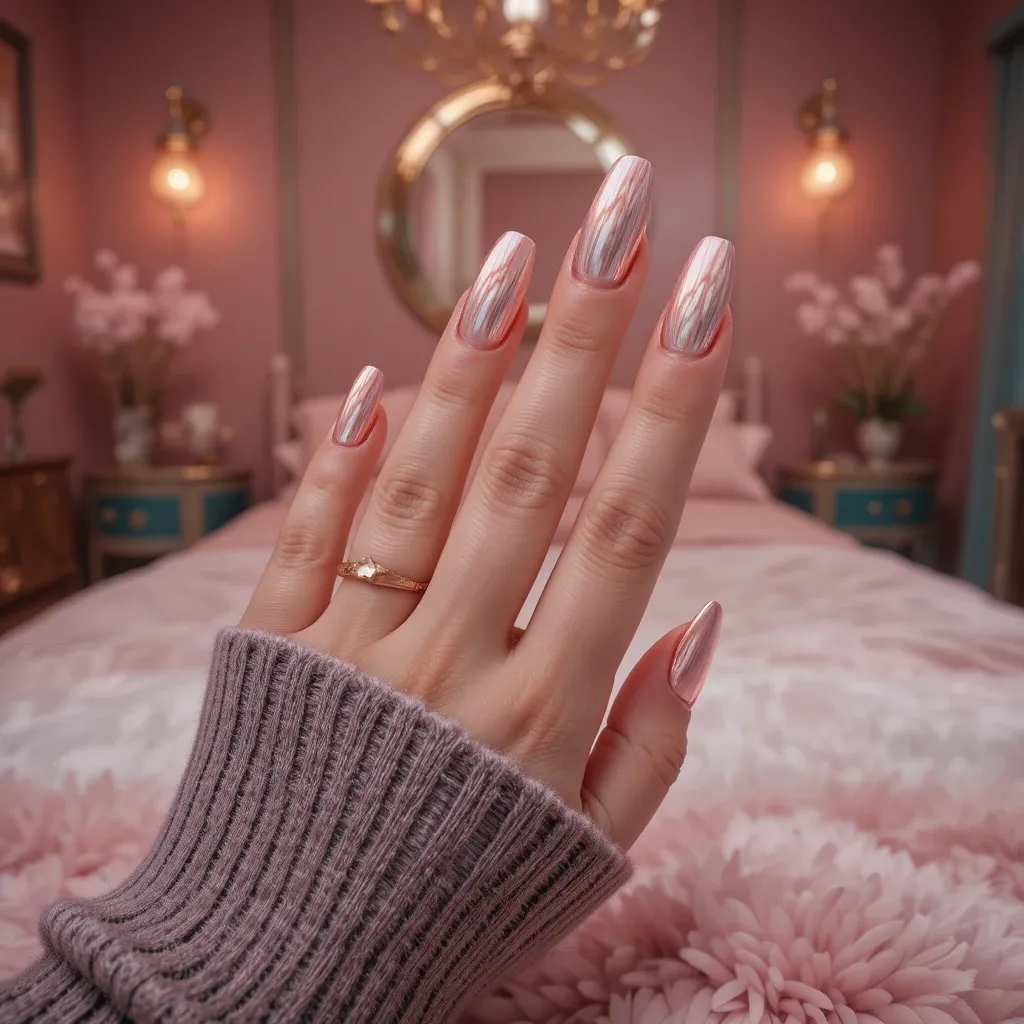
A reflective rose gold chrome finish that shifts between warm pink and metallic gold tones depending on the lighting and angle. The mirror-like surface creates an incredibly luxe, high-fashion effect that pairs gorgeously with warm-toned dresses and gold jewelry. This single-color application delivers maximum impact with minimal nail art, letting the innovative finish do all the talking.
Why It Works for Prom: Chrome nails photograph exceptionally well in both natural and flash photography, ensuring your manicure looks stunning in every prom photo while the rose gold tone is universally flattering and romantic.
Pro Tip: Opt for almond or coffin nail shapes to maximize the reflective surface area, and pair with a glossy top coat specifically designed for chrome to maintain that mirror finish throughout the night.
How to Create Rose Gold Chrome at Home
What You’ll Need:
- Black or dark gray gel base polish (Beetles or Modelones gel polish)
- Rose gold chrome powder (Born Pretty or Vishine brand)
- Gel top coat (no-wipe formula like Makartt)
- Chrome-specific top coat (optional but recommended)
- UV or LED nail lamp
- Eyeshadow applicator or silicone tool
- Lint-free wipes and rubbing alcohol
- Base coat
Step-by-Step Application:
- Prep and base coat: After standard nail prep, apply a thin layer of gel base coat and cure under LED lamp for 60 seconds (or UV lamp for 2 minutes). This is crucial—skip this and everything will peel off.
- Apply dark base color: Chrome powder needs a dark base to reflect properly. Apply 2 thin coats of black or dark gray gel polish, curing each layer for 60 seconds. Make sure coverage is completely opaque with no streaks or thin spots—any imperfections will show through the chrome.
- Apply gel top coat: Paint a thin, even layer of no-wipe gel top coat over your dark base. Cure for 60 seconds. The surface must be completely smooth and sticky for chrome to adhere—this sticky layer is essential.
- Apply chrome powder: Immediately after curing, while the top coat is still slightly tacky, use an eyeshadow applicator or silicone tool to rub rose gold chrome powder onto the nail. Use gentle circular motions and firm pressure. You’ll see the mirror effect develop immediately. Cover the entire nail surface, including edges and near the cuticle. Dust off excess powder with a fluffy brush.
- Seal the chrome: This is critical—apply a gel top coat specifically designed for chrome (regular top coats can dull the finish). Paint a thin layer very gently to avoid disturbing the powder. Cure for 60 seconds. Apply a second layer if you want extra durability, curing again.
Why Gel is Required: Chrome powder only works over gel polish—it won’t adhere to regular polish. The sticky layer created by curing gel top coat is what allows the powder to bond and create that mirror effect.
Budget-Friendly Alternative: If you don’t have a gel setup, look for chrome press-on nails from brands like Static Nails or Glamnetic—they’re reusable and look professionally done.
Common Mistakes to Avoid:
- Using regular polish instead of gel—chrome simply won’t work
- Not making the base dark enough—the chrome will look dull and streaky
- Using too much top coat when sealing—this can dull the mirror finish
- Touching the chrome powder before sealing—oils from your skin will create dull spots
Time Required: 30-40 minutes Difficulty Level: Intermediate—requires gel equipment but the technique itself is straightforward
Product Investment: $40-60 for complete gel setup (lamp, gel polish, chrome powder, top coats) that you can reuse for years
Soft & Dreamy Pastels
47. Lavender Cloud Ombré
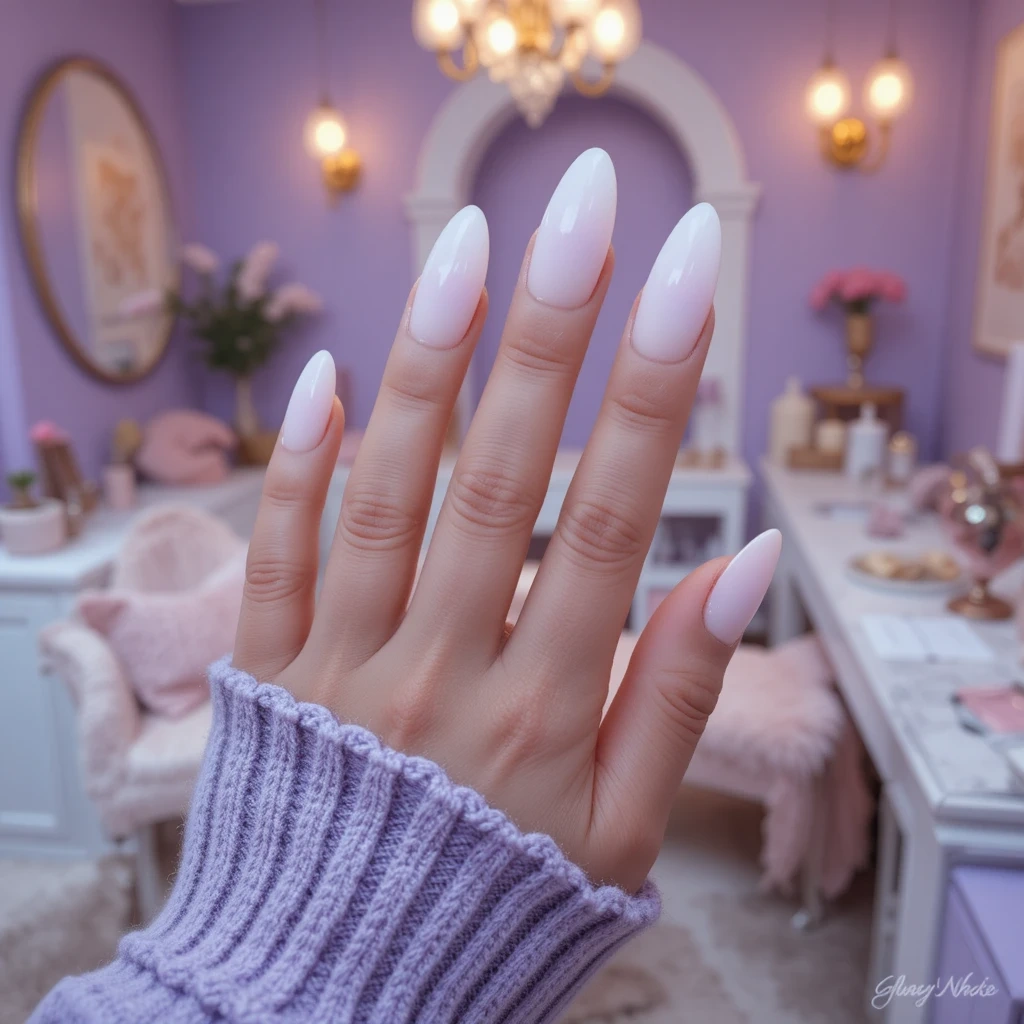
A gradient transition from milky white at the cuticle to soft lavender at the tips, creating an ethereal, cloud-like effect. The subtle color shift adds dimension and visual interest while maintaining an overall soft, feminine aesthetic that feels fresh and youthful. Finished with a glossy top coat, this design has a dreamy, almost watercolor quality that’s perfect for spring prom season.
Why It Works for Prom: Lavender is having a major moment in fashion and beauty, and the ombré technique ensures the color stays wearable and sophisticated rather than too bold, making it perfect for those who want color without commitment.
Pro Tip: Ask your nail tech to use a makeup sponge for the gradient application rather than brushing—it creates a softer, more seamless transition between the white and lavender shades.
How to Create Lavender Cloud Ombré at Home
What You’ll Need:
- Milky white polish (Essie “Marshmallow” or OPI “Funny Bunny”)
- Soft lavender polish (Essie “Lilacism” or OPI “Do You Lilac It”)
- Makeup sponges (cut into small pieces)
- Small paper plate or plastic palette
- Base coat and glossy top coat
- Liquid latex or petroleum jelly for cleanup
- Cotton swabs and acetone
Step-by-Step Application:
- Prep and protect: After standard nail prep and base coat application, apply liquid latex or petroleum jelly around your nails on the skin—the sponge technique is messy, and this makes cleanup much easier. Let the barrier dry if using liquid latex.
- Apply white base: Paint 2 coats of milky white polish on all nails, letting each coat dry 2 minutes. This creates the base for your gradient and ensures the colors show up vibrant and opaque.
- Create your gradient palette: On a small paper plate, place a stripe of white polish and a stripe of lavender polish side by side, leaving a small gap between them. You’ll be picking up both colors at once with your sponge.
- Apply with sponge method: Cut a makeup sponge into a small wedge (about the size of your nail). Lightly tap the sponge onto both polish stripes so it picks up white on one end and lavender on the other—the middle will naturally mix slightly. Quickly dab the sponge onto your nail using a gentle bouncing motion, positioning it so white is near the cuticle and lavender is at the tip. The key is dabbing, not swiping. Repeat 2-3 times, reloading the sponge between applications. The texture will look bumpy—that’s normal.
- Build gradually: Let the first sponged layer dry for 3 minutes, then repeat the sponging process 2-3 more times to build color intensity and create a smoother gradient. Each layer should be lighter than the last—too much polish creates a goopy, thick mess.
- Smooth the texture: Once you’re happy with your gradient (after 3-4 sponge layers), let everything dry completely for 10 minutes. The sponging creates a textured, slightly bumpy surface. Apply 2-3 layers of glossy top coat, waiting 2 minutes between each layer. The top coat will fill in the texture and create a smooth, glass-like finish.
- Clean up: Remove the liquid latex barrier, or use a cotton swab dipped in acetone to clean polish off your skin. Work carefully around the cuticle area to keep edges crisp.
The Sponge Trick Explained: Makeup sponges have tiny holes that create that soft, airbrushed gradient effect. Brushes leave visible streaks, but sponges naturally blend colors as you dab. The light bouncing motion (not rubbing or swiping) is what creates the seamless transition.
Common Mistakes to Avoid:
- Swiping the sponge instead of dabbing—this creates streaks instead of a gradient
- Using too much polish on the sponge—it should be damp, not dripping
- Not letting layers dry between applications—wet polish will just smear
- Skipping the skin barrier—cleanup takes forever without it
Budget-Friendly Tip: Use regular household sponges cut into small pieces instead of makeup sponges—they work exactly the same way and cost a fraction of the price.
Time Required: 60-75 minutes (gradient takes patience) Difficulty Level: Beginner-friendly—messy but forgiving since ombré is naturally imperfect
Bold & Show-Stopping Glam
48. Midnight Sparkle with Crystal Accents
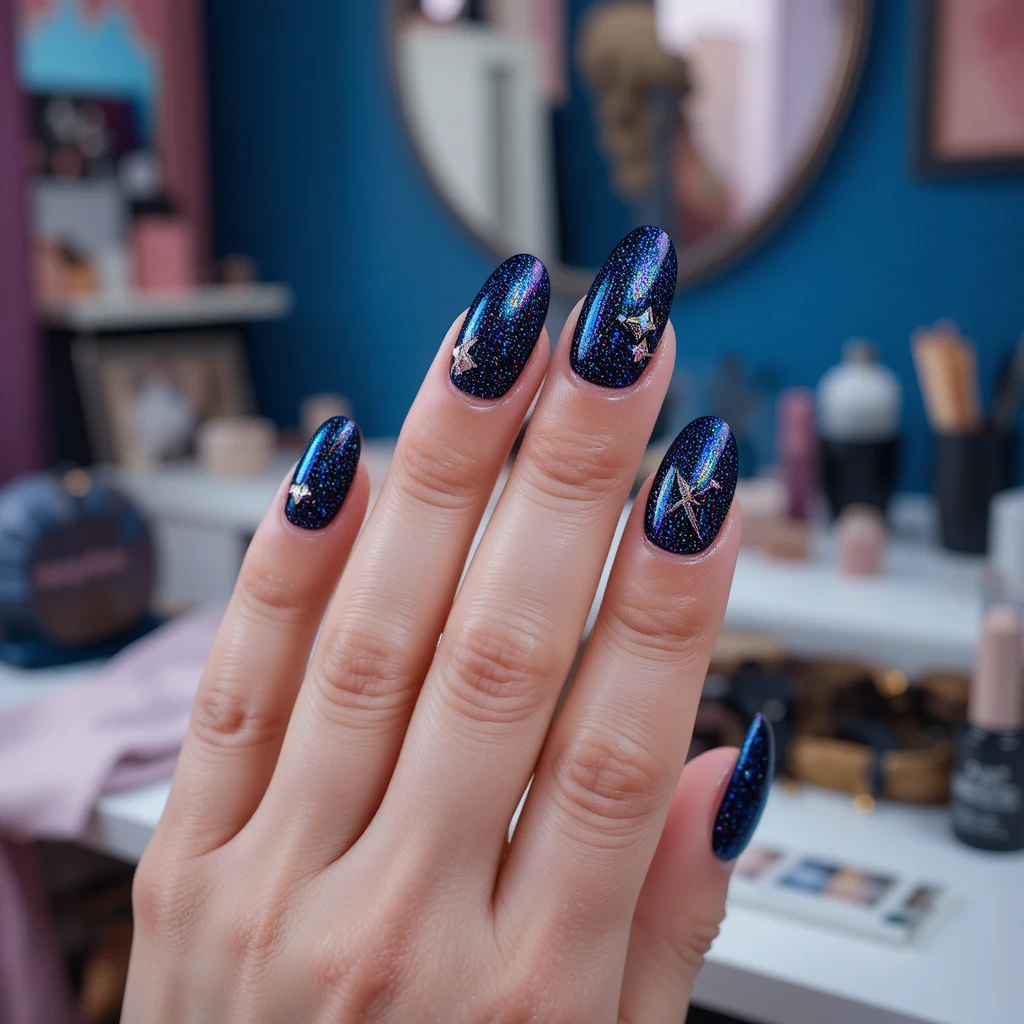
Deep navy or black base color completely covered in fine holographic glitter that creates a starry night effect, with strategic Swarovski crystal placement on accent nails. The dark base provides stunning contrast against the rainbow sparkle, while crystals add strategic points of brilliance that catch light with every hand movement. This design channels red-carpet glamour and works beautifully with both bold jewel-tone dresses and classic black gowns.
Why It Works for Prom: This high-drama design photographs incredibly well and holds up through hours of dancing since glitter and crystals are securely sealed under top coat, plus the dark base makes it surprisingly versatile with various dress colors.
Pro Tip: Limit crystal embellishments to one or two accent nails (typically ring fingers) to keep the look balanced, and request proper nail art gel or resin to ensure crystals stay secure all night long.
How to Create Midnight Sparkle with Crystals at Home
What You’ll Need:
- Deep navy or black base polish (OPI “Lincoln Park After Dark” or Essie “Licorice”)
- Holographic glitter polish (ILNP “Juliette” or Holo Taco “Scattered Holo”)
- Small Swarovski crystals or flat-back rhinestones (SS6 or SS8 size, 10-15 stones)
- Nail glue or clear gel polish for adhesion
- Dotting tool or waxed stick for crystal placement
- Base coat and thick clear top coat (Sally Hansen Mega Shine or Out The Door)
- Small container for organizing crystals
Step-by-Step Application:
- Prep and base: Complete standard nail prep and apply base coat. This is especially important for dark colors which can stain nails yellow without proper base protection.
- Apply dark base color: Paint 2-3 thin coats of navy or black polish, letting each dry 2 minutes. Dark polishes often require 3 coats for full opacity. Wait 5 minutes after the final coat before moving to glitter—if the base isn’t completely dry, the glitter application will cause smudging.
- Layer the glitter: Apply 1-2 coats of holographic glitter polish over the completely dry dark base. For heavier glitter coverage, dab (don’t stroke) the glitter polish onto the nail to deposit more sparkle. Let dry completely—5 minutes minimum. The holographic particles create that rainbow starry night effect when they catch light.
- Plan crystal placement: Before applying any adhesive, decide which nails get crystals (typically 1-2 accent nails per hand) and visualize your pattern. Popular placements: a curved line following the cuticle, a cluster near one side of the cuticle, or a gradient from one corner. Keep it simple—3-5 crystals per nail maximum.
- Apply crystals: Pour your crystals into a small shallow container so they’re easy to access. Apply a tiny dot of nail glue where you want each crystal (or if using gel, apply a thin layer of clear gel and cure 30 seconds first). Lick the tip of your waxed dotting tool or stick (saliva makes crystals stick to the tool), pick up one crystal, and press it firmly into the glue/gel. Hold for 3 seconds. Repeat for each crystal, working one at a time. If using gel, cure for 60 seconds after all crystals are placed.
- Encapsulate with top coat: This step is critical for crystal security. Apply a thick layer of clear top coat over all nails, being especially generous around the base of each crystal. You want to create a “dome” of top coat that encapsulates the crystals. The first layer won’t fully cover the crystals—that’s normal. Let it dry 5 minutes, then apply a second thick layer, really building up around the crystals. The goal is that you shouldn’t be able to feel the edges of the crystals when you run your finger over them.
- Final cure: Let everything dry completely for at least 30 minutes before doing anything with your hands. Touch-test by gently tapping nails together—if you hear clicking instead of soft tapping, they’re not dry yet.
The Crystal Placement Secret: Professional nail artists use odd numbers (3, 5, 7 crystals) because it’s more visually pleasing than even numbers. Place crystals in asymmetric, organic patterns rather than straight lines for a modern look.
Alternative Method for Beginners: Buy pre-made crystal stickers or press-on nails with crystals already embedded—brands like Dashing Diva and imPRESS make gorgeous options that last 1-2 weeks.
Common Mistakes to Avoid:
- Using crystals that are too large (over 3mm)—they catch on everything and pop off easily
- Not encapsulating crystals fully with top coat—they’ll fall off within hours
- Applying glitter polish in thick coats—it gets goopy and takes forever to dry
- Placing too many crystals—less is more for elegance
Crystal Quality Matters: Genuine Swarovski crystals reflect light beautifully and look expensive. Cheap plastic rhinestones look dull and obviously fake. Invest the $3-5 in quality crystals—you’re using so few that one container lasts years.
Time Required: 60-75 minutes Difficulty Level: Intermediate—crystal placement requires patience and steady hands
49. Milky White with Gold Leaf Accents
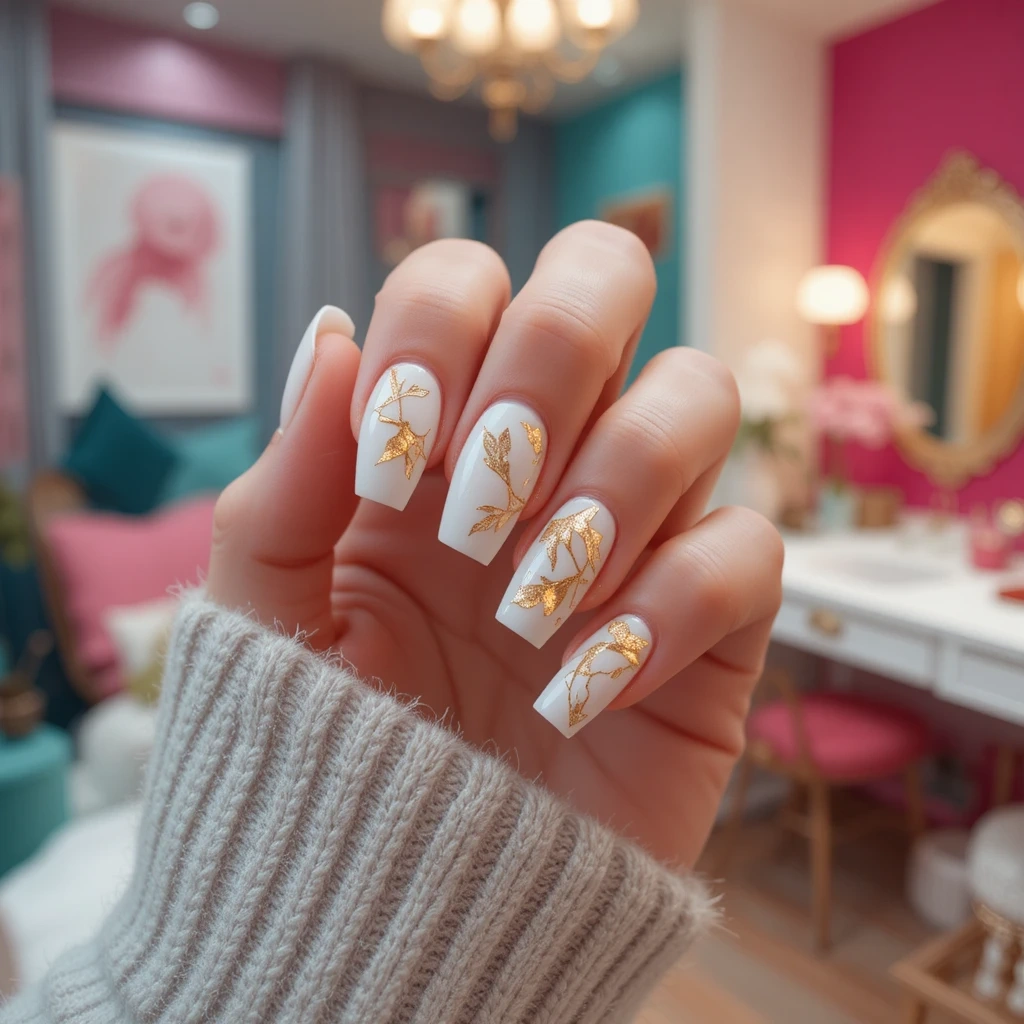
Creamy, opaque milky white base with delicate sheets of genuine gold leaf applied in organic, abstract patterns on select nails. The combination creates a luxurious, modern aesthetic that feels both minimalist and special occasion-worthy at the same time. The gold leaf catches light differently than traditional glitter, offering a more sophisticated, editorial shimmer that feels expensive and refined.
Why It Works for Prom: Milky white nails are currently one of the biggest nail trends and work with literally any dress color, while the gold leaf adds customizable glamour that can be as subtle or bold as you prefer.
Pro Tip: Gold leaf is delicate, so request a thick builder gel or multiple layers of top coat to encapsulate it fully—this prevents flaking and ensures your nails look pristine through your entire prom experience.
How to Create Milky White with Gold Leaf at Home
What You’ll Need:
- Opaque milky white polish (OPI “Funny Bunny,” Essie “Marshmallow,” or Cirque Colors “Hatch”)
- Genuine gold leaf sheets (available at craft stores or Amazon, $8-12 for a pack)
- Clear top coat (you’ll need extra—Sally Hansen Insta-Dri or Seche Vite)
- Tweezers with fine tips
- Small brush (like a clean lip brush or fan brush)
- Base coat
- Optional: gel top coat for extra durability
Step-by-Step Application:
- Prep and base: Standard nail prep plus base coat. Make sure nails are completely clean—any oils will prevent good adhesion.
- Apply milky white base: Paint 2-3 coats of milky white polish. These polishes tend to be slightly sheer, so 3 coats usually achieves full opacity without streaking. Let each coat dry 2 minutes. Wait 5 full minutes after your final coat before touching the nails—milky whites show every fingerprint.
- Decide your design: Gold leaf works best as an accent on 1-3 nails per hand. Popular placements: both ring fingers, one accent nail per hand, or alternating nails. Keep some nails plain white to let the gold leaf really stand out.
- Prepare your gold leaf: Gold leaf is extremely thin and delicate—it tears at the slightest touch. Remove one sheet from the booklet and place it on a clean paper. Use tweezers to tear small, irregular pieces (about 1/4 the size of your nail). Irregular shapes look intentionally artistic; perfect shapes look forced.
- Apply gold leaf: On your accent nails, apply a thin layer of clear top coat to the areas where you want gold leaf. While the top coat is still wet (work quickly), use tweezers to place gold leaf pieces onto the wet polish. The leaf will stick immediately. Use your small brush to gently press the leaf down and push it into corners or along edges. You can overlap multiple pieces for denser coverage or space them out for a delicate look. Don’t try to smooth it perfectly—wrinkles and texture are part of the aesthetic.
- Brush away excess: Once you’ve placed your gold leaf pieces, use a dry fan brush to gently sweep away any excess leaf that didn’t stick. Gold leaf is so light that pieces will float away easily. This reveals your final design and removes stray flakes.
- Seal with multiple top coat layers: This is crucial—gold leaf flakes off easily without proper sealing. Apply a thick first layer of clear top coat over all nails, being extra generous on gold leaf nails. Let dry 5 minutes. Apply a second thick layer, really encapsulating the leaf. For extra durability (highly recommended for prom), apply a third layer. Each layer should be thicker than normal—you’re creating a protective shell around delicate leaf.
- Final dry time: Let everything dry completely for 30-45 minutes. Gold leaf designs need extra curing time because of the multiple top coat layers.
Understanding Gold Leaf: Real gold leaf (called “composition leaf” or “imitation leaf” at craft stores) costs $8-12 and comes in tiny sheets between tissue paper. It’s infinitely better than gold foil nail stickers—the irregular, organic application creates an expensive, editorial look that stickers can’t replicate.
The Application Technique: Work on one nail at a time—top coat dries quickly and gold leaf won’t stick to dry polish. Have your gold leaf pieces pre-torn and ready before you start applying top coat. Speed matters here.
Creative Variations:
- Minimalist: Just a few small leaf flakes concentrated near the cuticle or one corner
- Bold: Cover 50-75% of the accent nail with overlapping leaf pieces
- French tip: Apply gold leaf only on the tips for a modern French manicure
- Combo: Mix gold and silver leaf on different nails for mixed-metal glamour
Common Mistakes to Avoid:
- Touching the gold leaf with your fingers—oils prevent adhesion and tear the delicate leaf
- Not sealing with enough top coat—leaf will flake off after a few hours
- Using gold nail foil instead of actual leaf—foil doesn’t have the same organic, luxe appearance
- Trying to apply gold leaf to completely dry polish—it won’t stick at all
Time Required: 50-65 minutes Difficulty Level: Beginner-Intermediate—requires patience but very forgiving since imperfection is part of the look
Classic with a Twist
50. Champagne Shimmer with Silver Foil Details
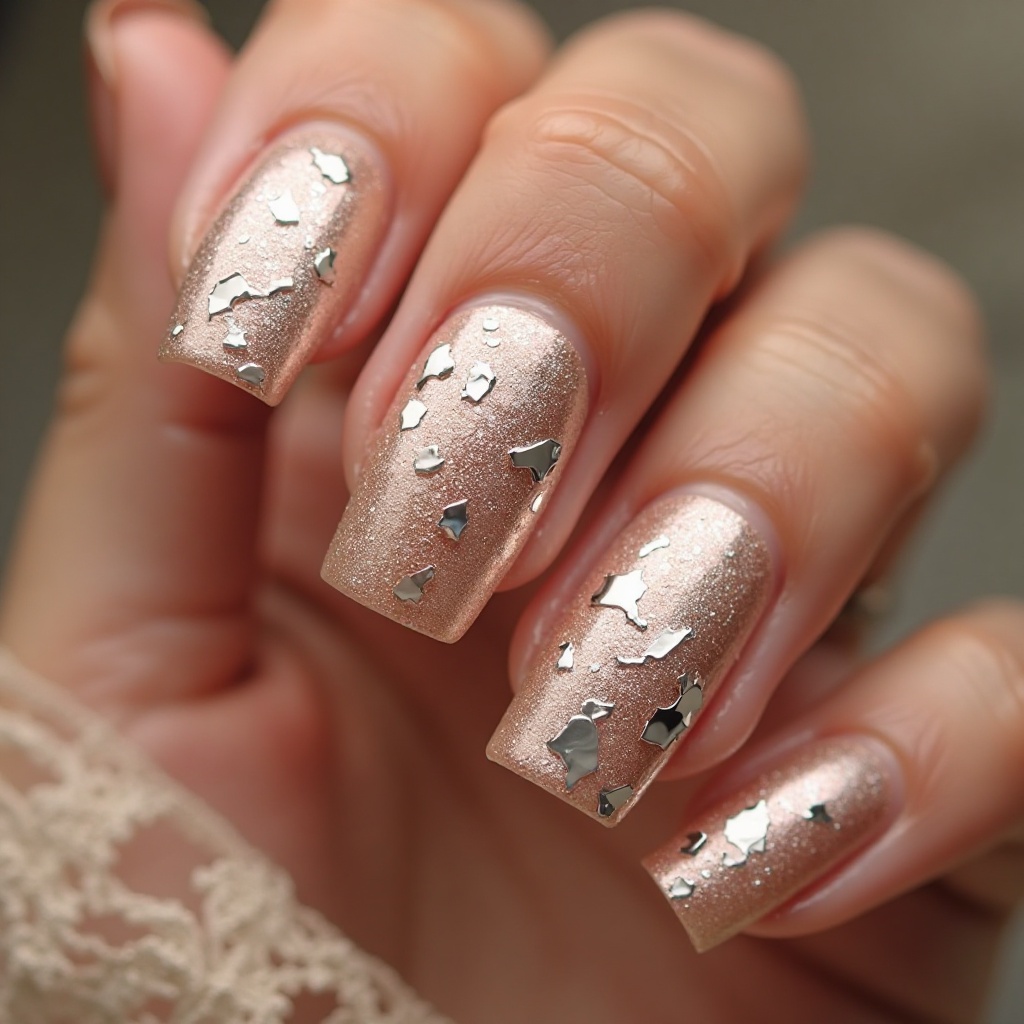
A warm champagne nude base with a subtle shimmer finish, accented with hand-placed silver foil fragments on one or two accent nails. The foil creates an abstract, artistic effect that looks like cracked metal or delicate veining, adding edge to an otherwise classic color. This design balances sophistication with just enough visual interest to feel special and current without being overly trendy.
Why It Works for Prom: The neutral champagne base is universally flattering and pairs with any dress color, while the silver foil adds unexpected texture that photographs beautifully and feels unique.
Pro Tip: Silver foil works especially well on almond-shaped nails where the foil can follow the natural curve of the nail, and always seal it with two layers of top coat for durability.
How to Create Champagne Shimmer with Silver Foil at Home
What You’ll Need:
- Champagne or warm nude shimmer polish (OPI “Cosmo-Not Tonight Honey” or Essie “Penny Talk”)
- Silver nail foil (not gold leaf—actual nail foil, available at Sally Beauty or Amazon)
- Foil adhesive or clear base coat
- Tweezers or silicone tool
- Clear top coat
- Base coat
Step-by-Step Application:
- Prep and base: After standard prep, apply base coat and let dry completely.
- Apply champagne base: Paint 2 coats of your champagne shimmer polish on all nails, drying 2 minutes between coats. The shimmer adds subtle dimension that complements the foil texture beautifully.
- Choose accent nails: Decide which 1-2 nails per hand will receive foil accents—ring fingers are classic, but middle and ring together create impact.
- Apply foil adhesive: On your accent nails only, paint a thin layer of foil adhesive (or clear base coat if you don’t have adhesive) in the areas where you want foil. You can apply it in abstract shapes, diagonal stripes, or just randomly for organic placement. Let the adhesive dry until it’s tacky but not wet—this takes 2-5 minutes depending on brand. Test by gently touching with your knuckle; it should feel slightly sticky but not transfer to your skin.
- Apply silver foil: Cut or tear small pieces of silver foil from the sheet (foil comes on a backing paper). Place the foil shiny-side-up onto your tacky adhesive and press firmly with your finger or a silicone tool. Rub for 3-5 seconds with firm pressure. Quickly peel away the foil sheet—the silver should transfer to your nail wherever there was adhesive. If it doesn’t transfer fully, reapply the foil and press harder. Repeat until you’ve covered all your desired areas.
- Create abstract patterns: For the most artistic look, don’t try to cover areas completely—let some foil transfer fully, some partially, creating irregular, metallic patterns. The imperfect transfer creates that cracked metal effect that looks intentional and modern.
- Seal immediately: Foil is fragile and will rub off without protection. Apply 2-3 thick layers of clear top coat, letting each dry 3 minutes. Really encapsulate the foil completely to prevent edges from lifting.
Foil vs. Gold Leaf—What’s the Difference? Nail foil comes on a plastic backing sheet and transfers when pressed onto sticky adhesive. Gold leaf floats freely and sticks to wet top coat. Foil creates sharper, more metallic patterns, while leaf creates softer, more organic looks. Both are beautiful—just different aesthetics.
The Adhesive Timing Trick: If adhesive is too wet, foil won’t transfer—it just sticks to the backing. If it’s too dry, nothing happens. The “tacky but not wet” stage (feels like weak tape) is your transfer window.
Common Mistakes to Avoid:
- Not letting adhesive dry enough before applying foil
- Not pressing firmly enough—light pressure won’t transfer the foil
- Peeling the foil away slowly—quick, firm peeling works best
- Skipping multiple top coat layers—foil scratches off easily
Time Required: 40-50 minutes Difficulty Level: Beginner-Intermediate—the technique requires practice but is very forgiving
51. Blush Pink Glass Nails
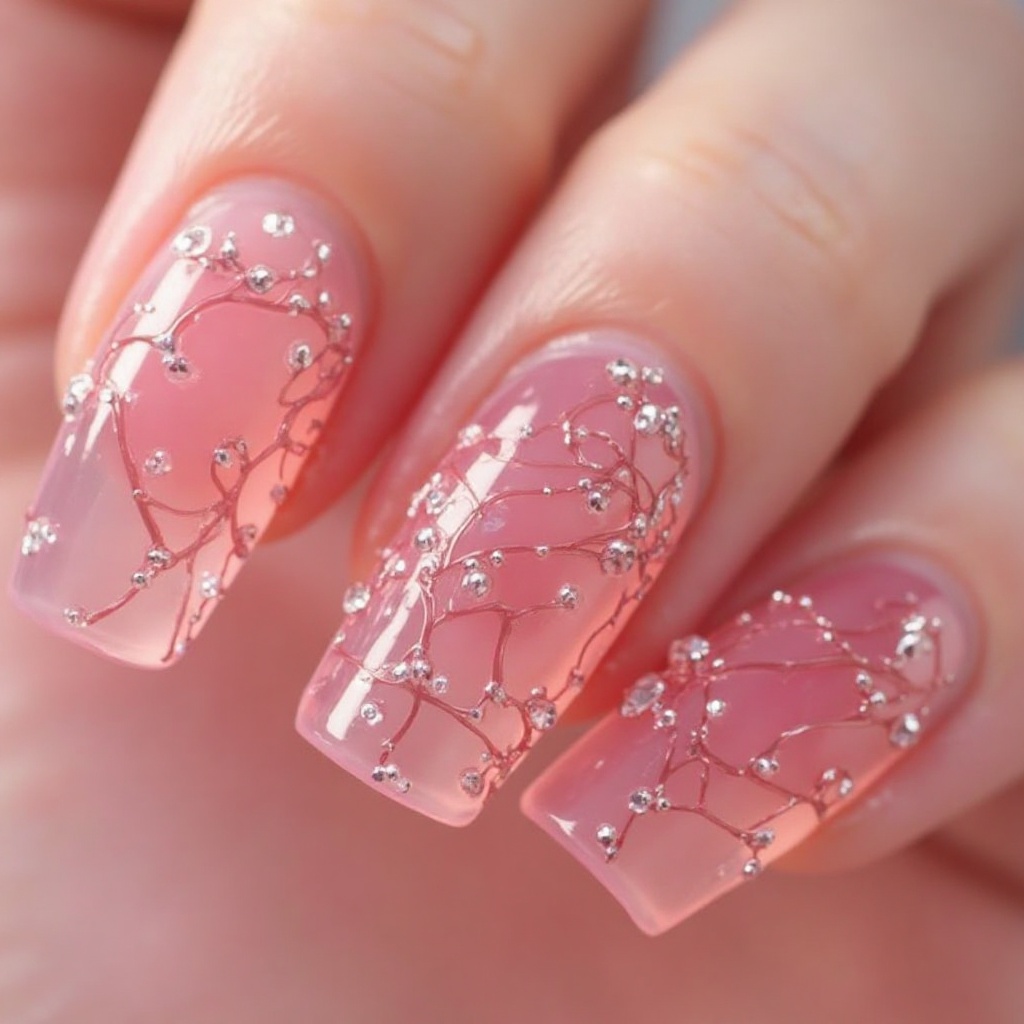
A translucent, jelly-like blush pink finish that creates a glass-like appearance with incredible depth and dimension when layered properly. The sheer, glossy effect allows light to pass through the polish, creating an almost gemstone quality that looks delicate and feminine. Multiple thin layers build up the color intensity while maintaining that signature translucent, glassy finish that’s currently dominating social media.
Why It Works for Prom: Glass nails have a unique luminous quality that looks ethereal in person and stunning in photos, plus the soft pink tone is romantic and works beautifully with both pastels and jewel tones.
Pro Tip: Request at least three thin coats of jelly polish to achieve the proper glass effect—thick coats will look streaky rather than translucent and smooth.
How to Create Blush Pink Glass Nails at Home
What You’ll Need:
- Jelly or sheer blush pink polish (Essie “Fiji,” OPI “Bubble Bath,” or Look for “jelly” finish polishes)
- High-gloss gel-effect top coat (Sally Hansen Miracle Gel Top Coat or Essie Gel Couture Top Coat)
- Base coat
- Optional: white or nude polish for base layer
Step-by-Step Application:
- Prep and base: Standard nail prep plus base coat. The smoother your base, the more glass-like your result.
- Optional: Apply nude base: For a more opaque glass effect, apply 1-2 coats of sheer nude or white polish first. This creates a milky base that the blush pink will layer over. For a more translucent look, skip this and apply jelly polish directly to clear base coat.
- Build jelly layers: Apply your first coat of jelly polish very thinly—almost like you’re wiping the brush across the nail rather than painting. It will look incredibly sheer and streaky. That’s normal. Let dry 3 minutes. Apply a second thin coat, again very sheer. Dry 3 minutes. Apply a third coat. Now you should start seeing color build-up and that translucent, depth-filled look. If you want more intensity, add a fourth thin coat.
- The thin coat rule: Jelly polishes MUST be applied in thin layers. Thick coats look streaky, take forever to dry, and never achieve that glass effect. Think of it like watercolor—you’re building up color gradually through transparency.
- Apply glossy top coat: Once your jelly layers are built to your desired opacity (typically 3-4 coats), wait 5 minutes for complete drying. Apply a thick layer of high-gloss top coat—this is what creates the actual “glass” effect. The top coat should be noticeably thicker than your jelly layers. Let dry 5 minutes, then apply a second thick layer of glossy top coat. This double glossy layer creates that deep, glassy shine that mimics real glass.
- Cure completely: Jelly nails require longer drying time because of the multiple layers. Let everything dry for 45-60 minutes before using your hands normally. Quick-dry drops can help speed this up.
What Makes It “Glass”? The glass effect comes from three things: (1) translucent jelly polish that allows light to pass through, creating depth; (2) multiple thin layers that build color gradually rather than opaquely; (3) thick, high-gloss top coat that creates a smooth, reflective surface. All three elements are essential.
Jelly Polish Basics: Jelly polishes are formulated to be sheer and translucent. They’re usually labeled “jelly,” “sheer,” or “glass.” If your polish is opaque in 2 coats, it’s not a true jelly. Jelly polishes take 3-5 coats to build noticeable color.
Color Variations:
- Clear glass: Just clear jelly polish with glossy top coat
- Rose glass: Sheer pink jelly
- Peach glass: Sheer peach or coral jelly
- Lavender glass: Sheer purple jelly
- Nude glass: Sheer beige or tan jelly
Common Mistakes to Avoid:
- Applying jelly polish in thick coats—it will be streaky and opaque, not glassy
- Not using enough glossy top coat—the glass effect needs that high-shine finish
- Getting impatient and not building enough jelly layers
- Using regular creme polish instead of actual jelly formula
Budget Tip: If you can’t find jelly polish, mix 1 part regular polish with 2 parts clear polish to create a DIY jelly effect.
Time Required: 60-75 minutes (multiple layers need dry time) Difficulty Level: Beginner-friendly—just requires patience
Dramatic & Unforgettable
52. Burgundy Wine with Gold Chrome French Tips
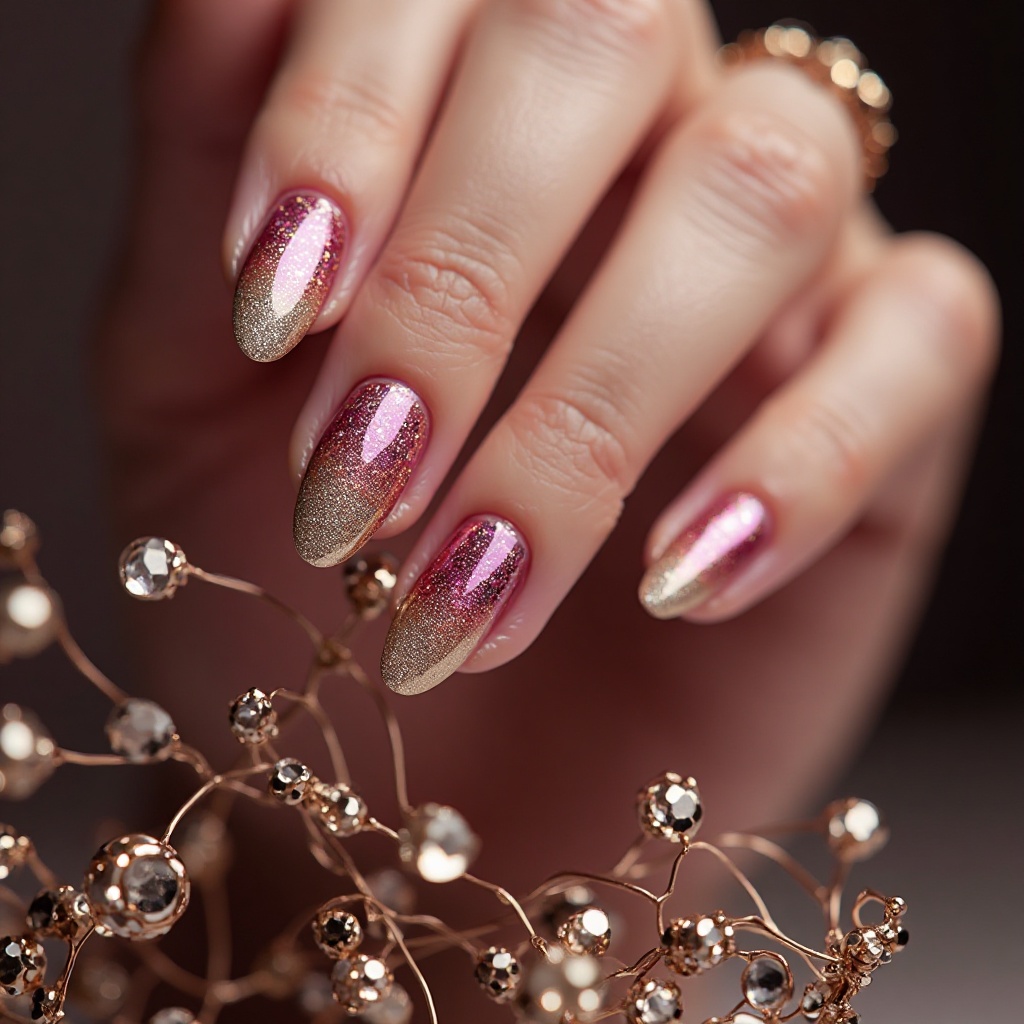
Rich, deep burgundy wine base paired with metallic gold chrome tips in a modern French manicure style with a thicker tip line. The color combination exudes luxury and sophistication, with the warm burgundy creating stunning contrast against the brilliant gold chrome. This design works particularly well for evening proms and pairs beautifully with burgundy, gold, navy, or emerald green dresses.
Why It Works for Prom: The deep burgundy feels mature and elegant while the gold tips add just enough sparkle and glamour for a special occasion without being too juvenile or overdone.
Pro Tip: Ask for a slightly wider French tip (3-4mm instead of the traditional 2mm) to really showcase the gold chrome and create a bold, modern statement.
How to Create Burgundy Wine with Gold Chrome Tips at Home
What You’ll Need:
- Deep burgundy polish (OPI “Malaga Wine” or Essie “Bordeaux”)
- Gold chrome powder (if using gel method) OR gold chrome polish (if using regular polish)
- Gel setup (lamp, gel base, gel top coat) if doing true chrome
- French tip guides or tape
- Clear top coat
- Base coat
Method 1: True Chrome Tips (Requires Gel)
- Prep and base: Standard prep plus gel base coat, cure 60 seconds.
- Apply burgundy base: Paint 2 coats of burgundy gel polish, curing 60 seconds between coats. Apply to the entire nail—the gold tips will go over this. Wait until your burgundy coverage is perfect and opaque.
- Create tape guides: Once burgundy is cured, place French tip guides or thin striping tape across each nail where you want the gold tips to start (3-4mm from the tips). Press tape down firmly so polish won’t seep underneath.
- Apply gel top coat to tips only: Paint a thin layer of no-wipe gel top coat only on the tips beyond the tape line. Cure 60 seconds. The surface should be slightly tacky.
- Apply gold chrome powder: Rub gold chrome powder onto the tacky gel tips using an eyeshadow applicator.Use circular motions and firm pressure. The mirror effect will appear instantly. Dust off excess.
- Remove tape and seal: Carefully peel away the tape guides. You should have a clean line between burgundy and gold. Apply gel top coat to the entire nail, being careful at the color boundary. Cure 60 seconds. Apply a second layer for durability and cure again.
Method 2: Chrome Polish Tips (No Gel Needed—Easier for Beginners)
- Prep and base: Standard prep plus regular base coat.
- Apply burgundy base: Paint 2-3 coats of burgundy polish on entire nails, letting each dry 3 minutes. Make sure coverage is completely opaque.
- Wait and prep for tips: Let burgundy dry completely—at least 10 minutes. Once dry, apply French tip guides or tape where you want the gold line to start.
- Paint gold tips: Use a gold chrome nail polish (brands like Sally Hansen, Essie, or China Glaze make chrome-effect regular polishes) and carefully paint the tips in thin coats. Apply 2 coats for full metallic coverage, drying 2 minutes between. Remove tape immediately after the second coat while polish is still wet.
- Seal everything: Once gold tips are dry (5 minutes), apply 2 layers of clear glossy top coat to all nails, letting each dry 3 minutes.
Getting Clean Lines: The tape guide method works, but for the cleanest lines, some nail artists paint the tips first freehand, then go back with burgundy polish on a thin brush to “clean up” and sharpen the line. This takes practice but creates the crispest edges.
Tip Width Guide:
- Traditional French: 2mm tip
- Modern French: 3-4mm tip (what we’re doing)
- Bold French: 5-6mm tip
Common Mistakes to Avoid:
- Painting over tape that’s not fully pressed down—polish seeps underneath creating blurry lines
- Making tips too thin—the gold won’t show up enough
- Not letting the burgundy base dry completely before taping
- Using cheap chrome polish instead of quality—it won’t have that true metallic reflect
Time Required: 50-70 minutes depending on method Difficulty Level: Intermediate—creating clean lines takes a steady hand
53. Icy Blue Holographic with Silver Glitter Gradient
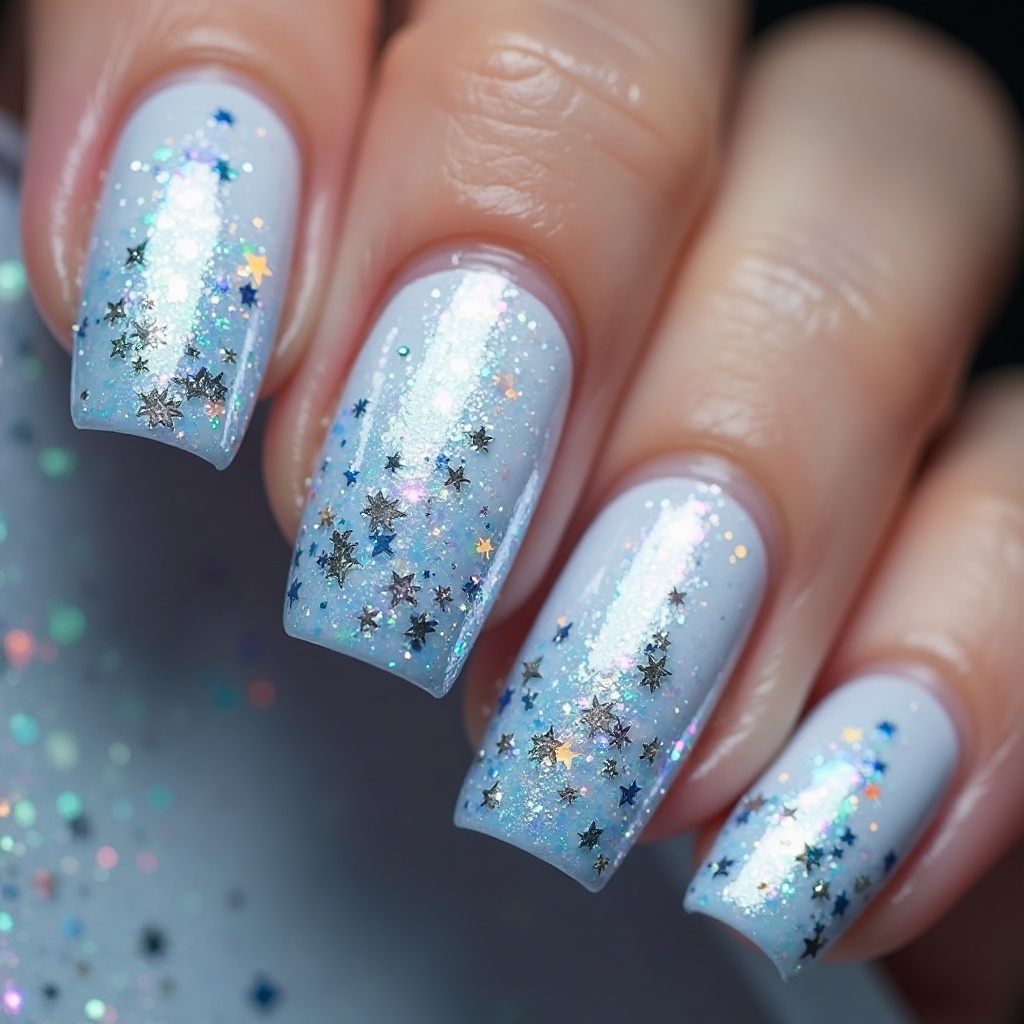
A pale icy blue holographic base that shifts with rainbow sparkles, featuring a concentrated silver glitter gradient that’s densest at the tips and fades toward the cuticle. The combination creates a frosty, winter princess effect with serious sparkle that catches every light source in the room. The holographic finish adds dimension while the glitter gradient prevents the design from feeling too heavy or overwhelming.
Why It Works for Prom: This design is pure magic under both natural and artificial lighting, and the cool blue tone is unexpected and memorable while still being elegant enough for a formal event.
Pro Tip: Choose fine micro-glitter rather than chunky glitter for the gradient—it creates a smoother, more sophisticated finish that won’t snag on your dress fabric throughout the night.
How to Create Icy Blue Holographic with Silver Glitter Gradient at Home
What You’ll Need:
- Pale icy blue holographic polish (ILNP “Birefringence,” Holo Taco “Frozen Benanas,” or Cirque Colors “Throneless”)
- Silver micro-glitter polish (OPI “Desperately Seeking Sequins” or Essie “Set in Stones”)
- Makeup sponge cut into small pieces
- Small paper plate or palette
- Liquid latex or petroleum jelly for cleanup
- Clear top coat (extra—you’ll need multiple layers)
- Base coat
Step-by-Step Application:
- Prep, protect, and base: Standard prep, apply petroleum jelly or liquid latex around nails for easy cleanup, then apply base coat.
- Apply holographic base: Paint 2 coats of icy blue holographic polish, drying 2 minutes between coats. Holographic polishes usually have good coverage, but the pale blue might need 2-3 coats for full opacity. Let dry completely—5 minutes minimum.
- Prep your sponge and glitter: Cut your makeup sponge into small wedges. Pour or paint a line of silver glitter polish onto your paper plate—you’ll be picking this up with your sponge.
- Create gradient with sponge: Dab your sponge into the glitter polish so one end is loaded with glitter. Starting at the tip of your nail, use light bouncing/dabbing motions to apply the glitter. Use heavier pressure and more dabs at the very tip, gradually lightening your pressure and using fewer dabs as you move toward the middle of the nail. Stop completely about 2/3 of the way up the nail—the gradient should fade to nothing rather than reaching the cuticle.
- Build the gradient: Let the first glitter layer dry 3 minutes, then repeat the sponging process. The second and third layers build density at the tips while keeping the fade soft and gradual. Apply 2-3 sponged layers total, focusing more glitter concentration at the tips each time.
- Smooth the texture: Glitter applied by sponge creates a bumpy, textured surface. Let everything dry completely (10 minutes), then apply 2-3 thick layers of clear top coat, waiting 3 minutes between each layer. The top coat fills in texture and creates a smooth, glassy finish. You want enough top coat that you can’t feel the glitter bumps when you run your finger over the nail.
- Cleanup: Remove skin barrier and clean up any mess with acetone on a small brush or cotton swab.
The Gradient Secret: Start with heavy glitter at the tips and gradually decrease as you move toward the cuticle. The fade should be gradual—not an abrupt line where glitter stops. Think of it like blending eyeshadow.
Holographic vs. Regular Polish: Holographic polishes contain special particles that create rainbow reflections in sunlight and bright light. Regular shimmery polishes just sparkle. Holographic is more dramatic and modern—worth the investment ($10-15) for special occasions.
Glitter Size Matters:
- Micro-glitter: Tiny, sand-like particles (what we want—smooth and elegant)
- Fine glitter: Slightly larger, noticeable sparkles (still good)
- Chunky glitter: Large pieces (too heavy for this design)
Common Mistakes to Avoid:
- Applying too much glitter at once—build gradually for control
- Making the gradient stop abruptly instead of fading
- Using chunky glitter instead of micro—it creates a bumpy, uneven finish
- Not applying enough top coat to smooth the texture
Time Required: 60-75 minutes Difficulty Level: Intermediate—the sponge gradient technique takes practice
Modern & Fashion-Forward
54. Nude Marble with Rose Gold Veining
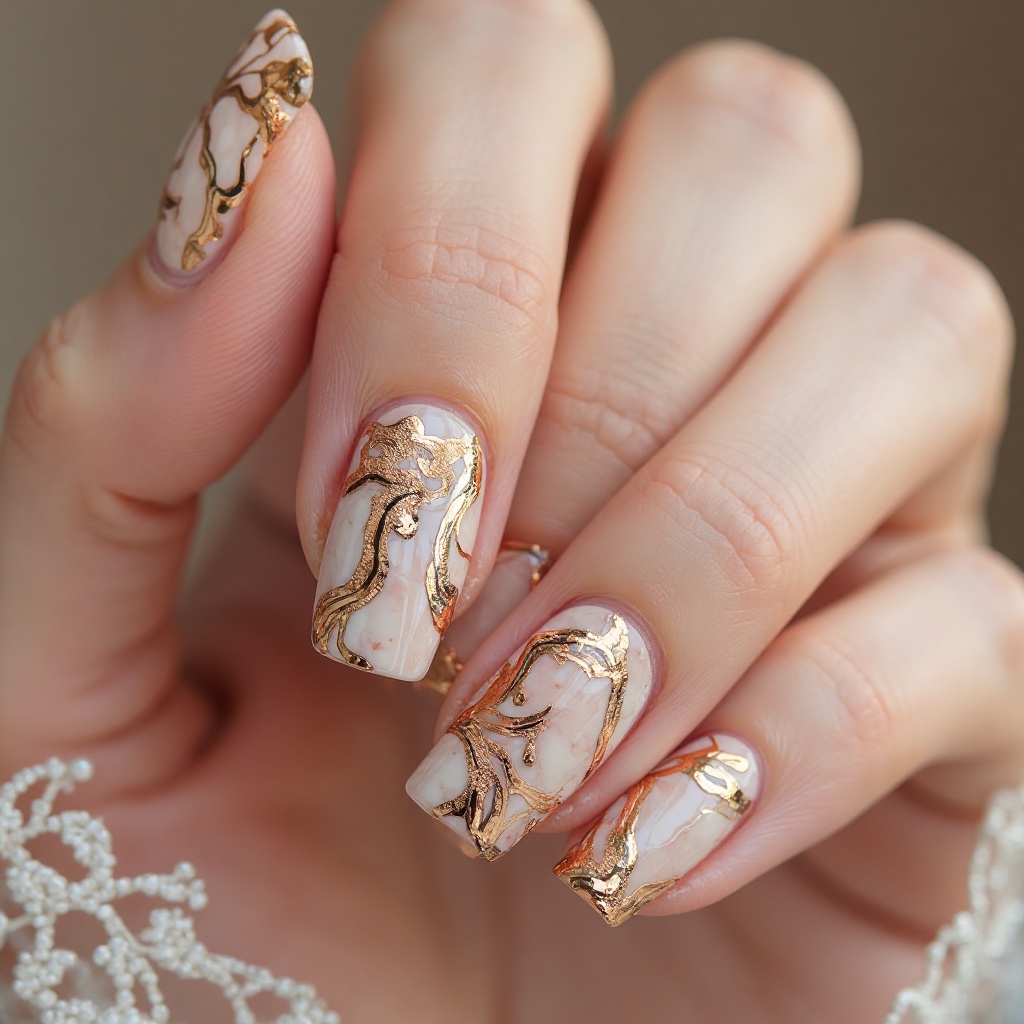
A neutral nude or soft beige base with hand-painted marble veining in rose gold, creating an organic stone effect that’s both natural and glamorous. Each nail features unique veining patterns that mimic real marble, making your manicure a true work of wearable art. The rose gold veining adds warmth and luxury while the nude base keeps the overall look sophisticated and refined.
Why It Works for Prom: Marble nails are incredibly trendy right now and offer something visually interesting without being too bold, plus the nude and rose gold palette works with virtually any dress color.
Pro Tip: Bring reference photos of marble patterns you love to ensure you and your nail tech are on the same page about the veining style—some prefer delicate, sparse lines while others want bolder, more dramatic patterns.
How to Create Nude Marble with Rose Gold Veining at Home
What You’ll Need:
- Nude or soft beige base polish (OPI “Samoan Sand” or Essie “Ballet Slippers”)
- Rose gold metallic polish or rose gold striping polish (Sally Hansen Insta-Dri in “Rose to the Occasion” or any rose gold metallic)
- Thin nail art brush or striping brush (size 0 or 00)
- Gray or taupe polish (optional, for depth)
- Clear top coat
- Base coat
- Small cup of water for thinning paint if needed
Step-by-Step Application:
- Prep and base: Standard prep plus base coat.
- Apply nude base: Paint 2 coats of nude or beige polish, drying 2 minutes between coats. Make sure coverage is smooth and even—any streaks will show through the marble veining.
- Study marble patterns: Before you start, look at real marble images (search “white marble with gold veins” online). Notice how veins are irregular, diagonal, and intersecting—never perfectly straight or parallel. Some are thin, some slightly thicker. They cluster in some areas and are sparse in others.
- Thin your rose gold polish: Dip your thin brush into rose gold polish, then wipe most of it off on the bottle edge. If the polish is too thick, add one tiny drop of nail polish thinner or clear top coat to make it flow better (test on paper first). You want the consistency of ink.
- Paint veining: Using your thin brush with thinned rose gold polish, paint irregular, jagged lines diagonally across each nail. Vary the pressure—start thin, press slightly for a thicker section, then thin again. Make veins intersect and branch off each other. Work diagonally (not vertical or horizontal) for the most natural marble look. Don’t overthink it—marble is organic and imperfect. Less is more—3-5 veins per nail is usually enough.
- Optional: Add depth with gray: For more realistic marble, add a few very thin gray or taupe lines alongside some of your rose gold veins. This creates shadows and makes the marble look dimensional. Use the same technique: thin irregular lines that follow near (but not on top of) the gold veins.
- Soften the veins: While the veining is still slightly wet (work quickly), take a clean, dry thin brush and very gently drag through some parts of the veins. This softens hard edges and creates a more natural, blended look rather than harsh lines. Don’t blend too much—you still want defined veins.
- Seal immediately: Once you’re happy with your marble effect, apply clear top coat to all nails. The top coat will slightly blur the veins even more, creating that smooth marble stone appearance. Apply 2 layers of top coat for a glassy finish, drying 3 minutes between layers.
The Marble Technique Explained: Real marble forms through natural processes that create irregular, organic patterns. Your hand-painted veins should reflect this—avoid straight lines, perfect spacing, or symmetrical patterns. Each nail should look slightly different, like individual marble pieces.
Practice First: Marble veining requires a steady hand and takes practice. Before painting on your nails, practice on paper or a false nail tip. Draw 10-15 practice veins to get comfortable with pressure, flow, and the irregular pattern before committing to your real nails.
Brush vs. Striping Polish: Thin nail art brushes give you more control and create more natural-looking veins. Striping polish bottles have built-in thin brushes and are easier for beginners, but the lines can look too uniform. Choose based on your skill level.
Common Mistakes to Avoid:
- Making veins too uniform or parallel—they should cross and branch randomly
- Using too-thick polish that creates heavy, bold lines instead of delicate veins
- Overworking the design—marble should look effortless, not overworked
- Painting veins perfectly vertically or horizontally—diagonal looks most natural
Creative Variations:
- Classic white marble: White base with gray/silver veining
- Black marble: Black base with white or gold veining
- Green marble: Sage green base with white or gold veining
Time Required: 45-60 minutes Difficulty Level: Intermediate—requires artistic hand and practice
55. Soft Pink with 3D Floral Appliqués
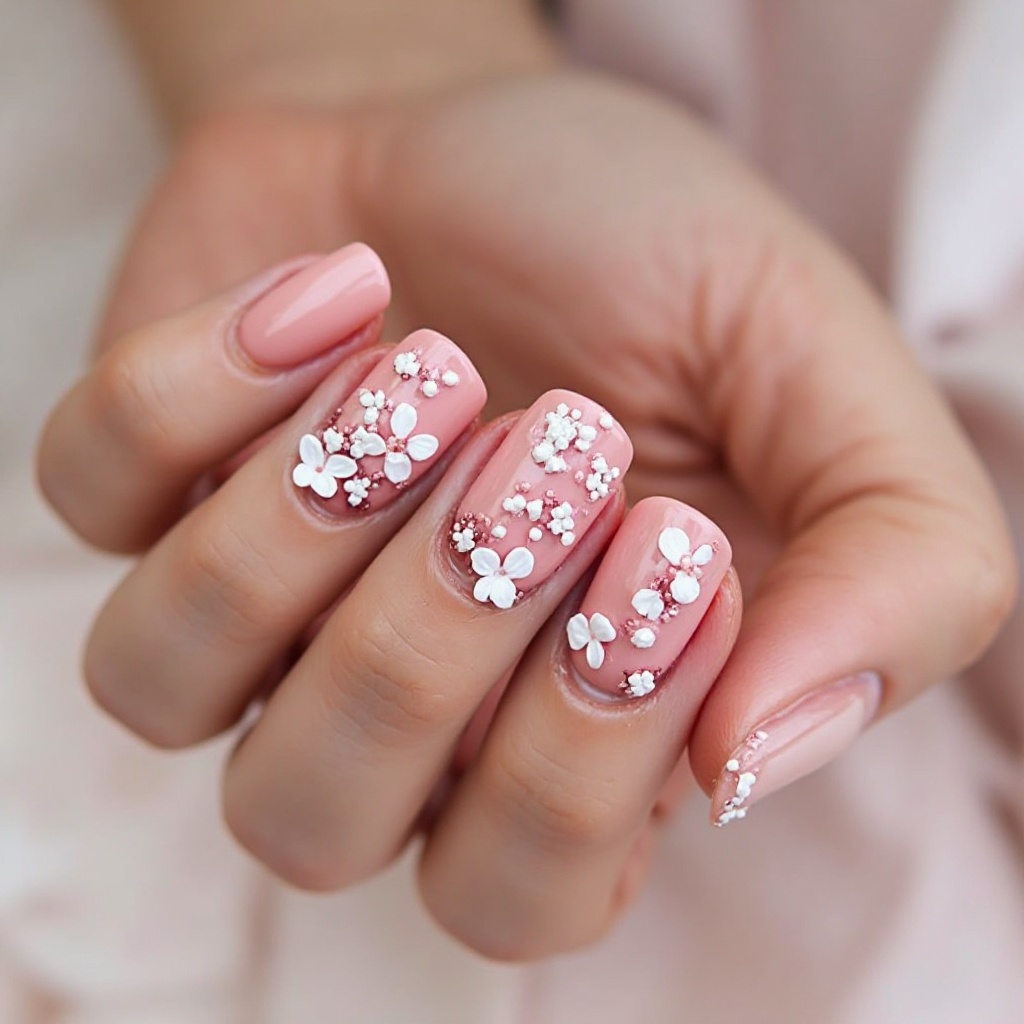
A creamy soft pink base adorned with tiny 3D floral appliqués in white and blush tones, creating a garden-inspired romantic look. The dimensional flowers are applied strategically on accent nails (typically ring and middle fingers) using gel or acrylic sculpting techniques that create realistic petal textures. This design channels bridal elegance while still feeling youthful and perfect for prom’s romantic atmosphere.
Why It Works for Prom: The 3D elements add incredible visual interest and texture that photographs beautifully from every angle, and the soft color palette is timeless and feminine.
Pro Tip: Keep 3D florals to 2-3 nails maximum and request smaller flower sizes to maintain elegance—oversized flowers can look costume-y rather than sophisticated.
How to Create Soft Pink with 3D Floral Appliqués at Home
What You’ll Need:
- Soft pink polish (Essie “Fiji” or OPI “Bubble Bath”)
- Pre-made 3D floral nail stickers/appliqués (available at Sally Beauty, Ulta, or Amazon)
- OR nail art acrylic powder and monomer if you want to sculpt flowers yourself (advanced)
- Nail glue or clear gel polish
- Dotting tool or tweezers
- Clear top coat
- Base coat
Method 1: Using Pre-Made 3D Flower Stickers (Beginner-Friendly)
- Prep and base: Standard prep plus base coat.
- Apply soft pink base: Paint 2 coats of soft pink polish, drying 2 minutes between coats. Make sure coverage is even and smooth.
- Plan flower placement: Decide which nails get flowers (typically 1-2 per hand—ring fingers are classic). Plan where each flower will sit—slightly off-center near the cuticle or in one corner looks more modern than centered.
- Apply flowers: Most 3D flower stickers come with adhesive backing. Peel one flower from the sheet, use tweezers to position it on your nail, and press firmly for 5 seconds. If your stickers don’t have adhesive, apply a tiny dot of nail glue where you want the flower, wait 3 seconds for it to get tacky, then press the flower into place.
- Add additional decorative elements (optional): Many 3D flower sets come with tiny leaves, pearls, or rhinestones. Apply these around the flowers using the same technique to create a fuller, more elaborate design.
- Seal carefully: Here’s the tricky part—3D elements can’t be fully covered with top coat or they lose their dimension. Apply top coat to all non-3D nails normally. On flower nails, carefully paint top coat around the base of the flowers to secure them, but avoid brushing directly over the flowers. Use a thin brush to paint top coat right up to the flower edges. Apply 2-3 layers around the flowers for security.
Method 2: Sculpting 3D Flowers with Acrylic (Advanced)
This technique requires acrylic nail powder, monomer, and artistic skill. It’s best left to experienced nail artists or nail techs, as it requires sculpting tiny petals and assembling them on the nail—beyond beginner scope but included for those interested in learning advanced techniques.
Understanding 3D Nail Art: 3D elements sit on top of the nail surface rather than being painted flat. They create actual dimension and texture you can feel. This is different from nail art that just looks 3D—these elements physically stick up from the nail.
Pre-Made vs. Hand-Sculpted: Pre-made 3D stickers are perfect for at-home use—they’re affordable ($5-10 for a pack), easy to apply, and look professional. Hand-sculpted 3D flowers require advanced acrylic skills and are typically only done by professional nail artists. For prom, pre-made stickers are your best option unless you’re already experienced with acrylics.
Common Mistakes to Avoid:
- Applying too many flowers—it looks overwhelming and unbalanced
- Using flowers that are too large (over 8mm)—they catch on everything
- Covering flowers completely with top coat—they lose their 3D effect
- Not securing the base of flowers well enough—they’ll pop off
Durability Reality Check: 3D nail art is beautiful but less durable than flat designs. Elements can catch on clothing, hair, or fabric and potentially pop off. They’re perfect for special occasions like prom where you’ll be extra careful, but not ideal for everyday wear. Make sure flowers are very securely attached.
Time Required: 30-45 minutes (using pre-made stickers) Difficulty Level: Beginner-Intermediate for stickers, Advanced for hand-sculpted
Edgy & Contemporary
56. Black with Silver Glitter Ombré
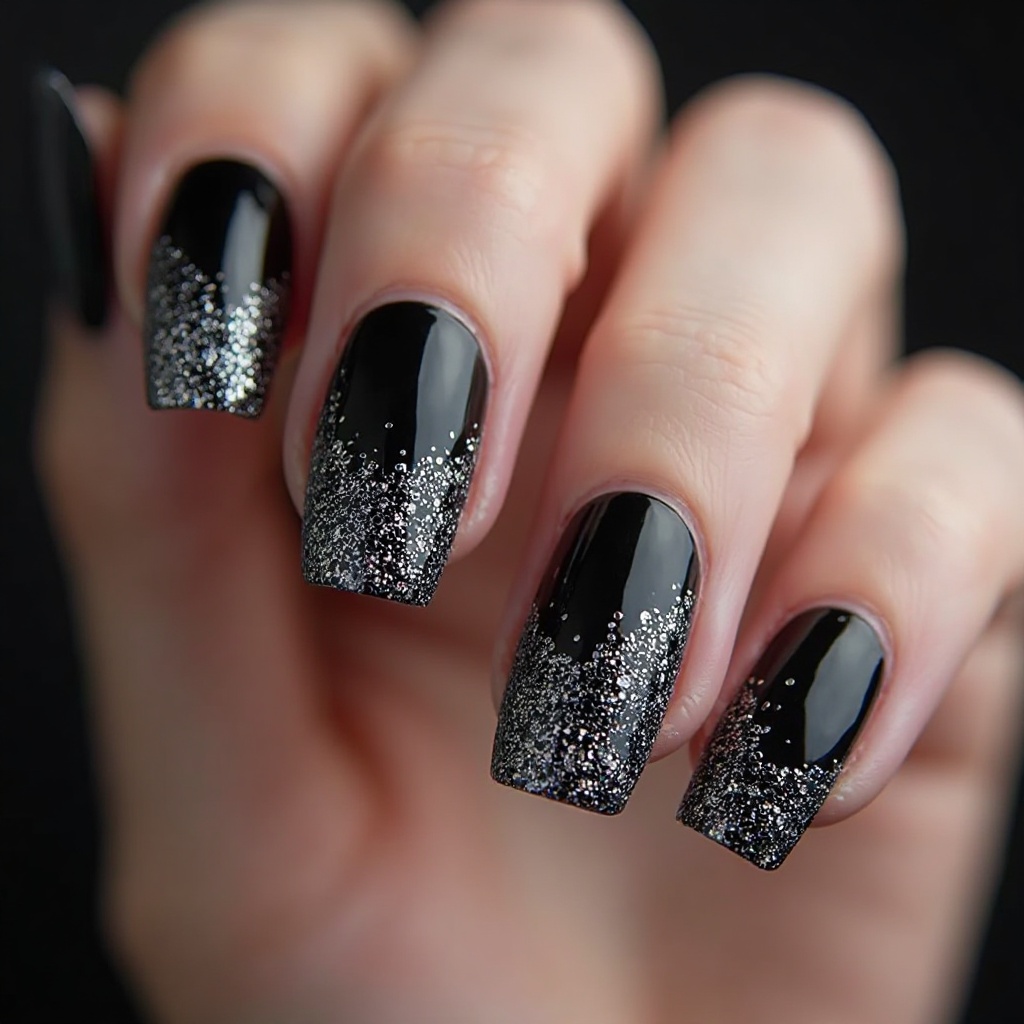
A classic black base that transitions into dense silver glitter at the tips, creating a dramatic ombré effect that’s both edgy and glamorous. The black provides a bold, confident foundation while the silver glitter softens the look and adds serious sparkle for the occasion. This design is perfect for those who want to make a statement and pairs exceptionally well with black, silver, or jewel-tone dresses.
Why It Works for Prom: Black nails with glitter strike the perfect balance between edgy and elegant, and the ombré technique keeps the look modern rather than gothic or too harsh.
Pro Tip: Request a chunky silver glitter mix rather than fine glitter for more dramatic light reflection, and make sure the ombré transition starts at the midpoint of the nail rather than too close to the cuticle.
How to Create Black with Silver Glitter Ombré at Home
What You’ll Need:
- Black polish (Essie “Licorice” or OPI “Black Onyx”)
- Chunky silver glitter polish (China Glaze “Fairy Dust,” Essie “Set in Stones,” or OPI “Silver Shatter”)
- Makeup sponge cut into pieces
- Small paper plate or palette
- Liquid latex or petroleum jelly
- Clear top coat (multiple layers needed)
- Base coat
Step-by-Step Application:
- Prep, protect, base: Standard prep, apply petroleum jelly/liquid latex around nails, then base coat. This is especially important for black polish which stains badly.
- Apply black base: Paint 2-3 coats of black polish (black often needs 3 coats for true opacity), drying 2-minutes between each. Let the final coat dry completely—5 minutes minimum. Any wetness will cause the sponged glitter to smear the black.
- Prep sponge and glitter: Cut makeup sponge into small wedges. Pour or paint a thick line of silver glitter polish onto your paper plate.
- Create the ombré: Dab your sponge into the glitter so it’s well-loaded. Starting at the very tips of your nails, use bouncing/dabbing motions to apply glitter. Start with heavy coverage at the tips, use medium pressure and dabs as you move toward the middle of the nail, then lighten your pressure and use fewer dabs as you approach the center/cuticle area. The gradient should start dense at tips and fade completely by mid-nail.
- Build glitter density: Let the first sponged layer dry 3 minutes, then repeat. Focus your heaviest applications at the very tips to create dramatic sparkle concentration. Apply 3-4 sponged layers total, with each layer concentrating more glitter toward the tips. The goal is very dense, chunky glitter at tips fading to pure black at the base.
- Smooth and seal: Let everything dry 10 minutes. The sponged glitter creates a very bumpy texture. Apply 3-4 thick layers of clear top coat, waiting 3 minutes between each layer. You need enough top coat to completely smooth out the glitter bumps and create an even surface. The nail should feel smooth when you run your finger over it, not bumpy.
- Cleanup: Remove skin barrier and clean any mess with acetone.
The Black Base Advantage: Black creates maximum contrast with silver glitter, making the sparkle pop dramatically. The dark base also makes the glitter appear brighter and more reflective than it would over a light base.
Chunky vs. Fine Glitter: For this design specifically, chunky glitter creates more impact. Fine micro-glitter over black can look dusty rather than glamorous. Choose a glitter polish with varying sizes of glitter particles for the most dimensional, eye-catching effect.
Gradient Placement Guide:
- Tips (1-3mm): Super dense, heavy glitter—barely any black showing
- Lower tips to mid-nail (4-7mm): Medium glitter density—you see both black and glitter
- Mid-nail to cuticle: Pure black with maybe a few stray glitter pieces
Common Mistakes to Avoid:
- Starting the glitter too close to the cuticle—it should fade to pure black by mid-nail
- Not applying enough glitter at the tips—the tips should be heavily glittered
- Using fine glitter instead of chunky—it won’t create enough drama
- Not applying enough top coat—glitter needs 3-4 layers to be fully smooth
Alternative Color Combos:
- Navy base with gold glitter
- Burgundy base with rose gold glitter
- Deep purple base with holographic glitter
Time Required: 70-85 minutes (multiple layers need dry time) Difficulty Level: Intermediate—requires patience to build glitter gradient
57. Electric Blue Chrome with Geometric Negative Space
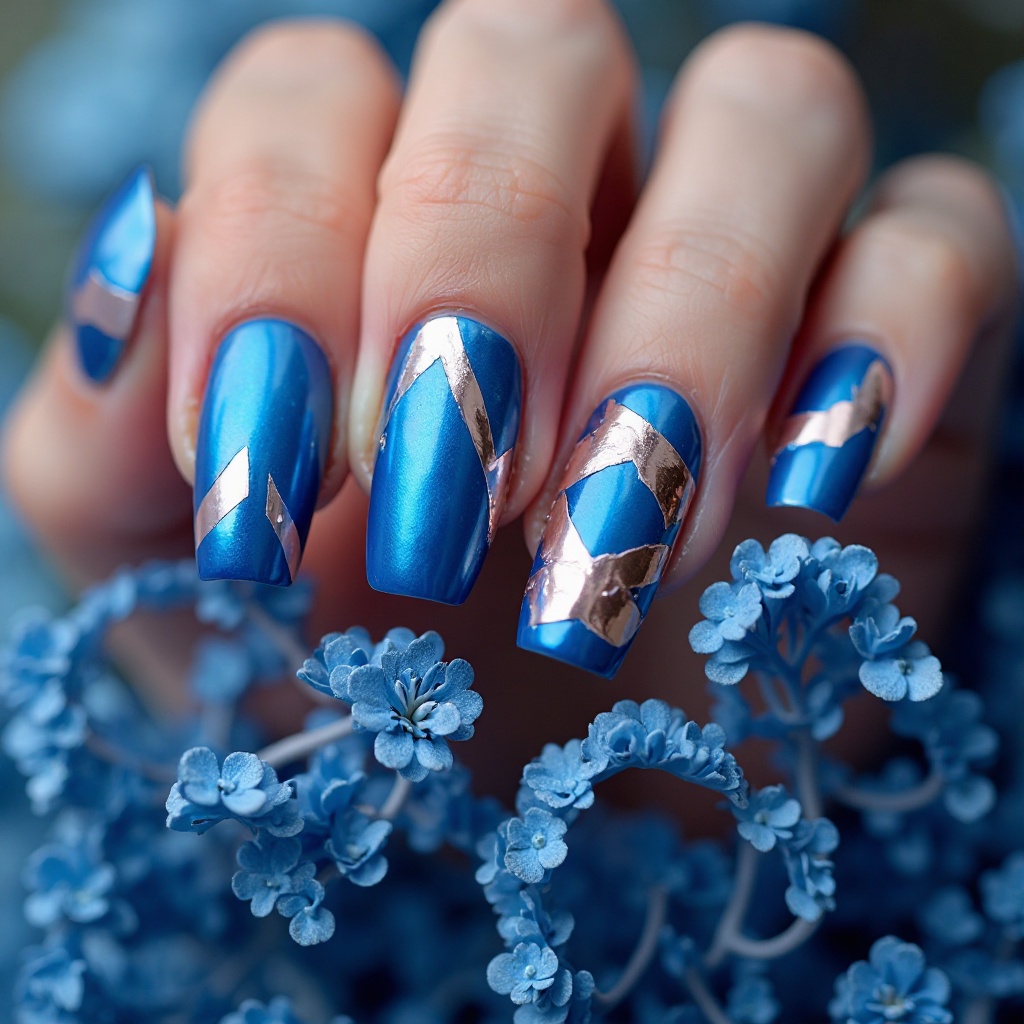
A vibrant electric blue chrome base with strategic negative space cutouts in geometric patterns—think triangular windows or diagonal stripes that reveal your natural nail. The chrome finish makes the blue incredibly saturated and eye-catching, while the negative space adds modern sophistication and prevents the bold color from overwhelming. Thin metallic striping tape often outlines the geometric shapes for crisp, clean edges.
Why It Works for Prom: This design is perfect for fashion-forward individuals who want to stand out and showcase their personal style, and the negative space keeps it from feeling too heavy despite the bold color.
Pro Tip: Bring inspiration photos with specific geometric patterns you love, and consider pairing this with a shorter to medium nail length where the patterns are easier to execute precisely.
How to Create Electric Blue Chrome with Geometric Negative Space at Home
What You’ll Need:
- Electric blue gel polish (dark or saturated blue—Beetles or Kiara Sky gel polish)
- Blue chrome powder OR electric blue chrome polish
- Metallic silver or gold striping tape (1mm width)
- Gel setup (lamp, gel base coat, gel top coat)
- Scissors or nail clippers for cutting tape
- Tweezers for tape placement
- Rubbing alcohol and lint-free wipes
- Base coat
Step-by-Step Application (Using Gel Chrome):
- Prep and plan: Standard nail prep. Before starting, sketch or plan your geometric patterns—decide which nails get designs and what shapes (triangles, diagonal lines, chevrons, etc.). Keeping designs to 1-3 nails per hand works best.
- Apply gel base coat: Paint gel base coat on all nails and cure 60 seconds.
- Create negative space with tape: On nails that will have geometric patterns, place striping tape in your desired pattern directly on the cured base coat. For example: diagonal stripes, triangle shapes, chevrons. Press tape down very firmly along all edges. The tape creates the “outline” of your negative space—areas under tape will stay as your natural nail.
- Apply blue gel polish: Paint 2 coats of electric blue gel polish on all nails (including over the tape on design nails), curing 60 seconds between coats. Don’t worry about painting over your tape—you want complete coverage.
- Apply gel top coat: Paint a thin layer of no-wipe gel top coat over all nails and cure 60 seconds. The surface should be slightly tacky.
- Apply blue chrome powder: While the top coat is tacky, rub blue chrome powder over all nails using an eyeshadow applicator. The mirror effect will appear. Brush off excess powder.
- Remove tape carefully: This is the magic moment—use tweezers to gently peel away the striping tape. It should lift easily, revealing your natural nail underneath in geometric shapes. If any tape is stubborn, use a toothpick to lift an edge first.
- Define with striping tape (optional): For crisp, professional-looking edges, you can apply thin metallic striping tape along the boundaries between chrome and natural nail. This creates a defined outline and covers any imperfect edges. Press tape down firmly and trim excess with scissors.
- Seal everything: Apply gel top coat carefully over all nails, including over the striping tape borders if you added them. Cure 60 seconds. Apply a second layer for durability and cure again. Wipe away the tacky residue with rubbing alcohol on a lint-free wipe.
Understanding Negative Space: Negative space in nail art means leaving parts of your natural nail bare (unpainted) as an intentional part of the design. The bare nail becomes part of the art itself, creating modern, minimalist looks with visual interest.
The Striping Tape Trick: Striping tape serves two purposes: (1) creating the initial negative space pattern during application, and (2) adding decorative metallic outlines after removal. You can use it for both or just one depending on your desired look.
Geometric Pattern Ideas:
- Diagonal stripe: One tape strip diagonally across the nail
- Triangle: Three strips creating a triangle of negative space
- Chevron: Two strips meeting in a V-shape
- Half-moon: Curved tape near the cuticle
- Abstract blocks: Multiple small tape pieces creating geometric sections
Common Mistakes to Avoid:
- Not pressing tape down firmly enough—chrome polish seeps underneath creating blurry edges
- Making patterns too intricate—simple, bold shapes look more modern
- Peeling tape away too quickly—go slow to prevent polish lifting
- Forgetting to seal tape borders with top coat—they’ll peel up immediately
Simplified Version Without Gel: Use regular electric blue polish (no chrome) with striping tape to create negative space patterns. The technique is the same, just skip the chrome powder step. This is much easier for beginners and still looks stunning.
Time Required: 60-75 minutes Difficulty Level: Advanced—requires gel experience and steady hands for tape placement
Sweet & Whimsical
58. Baby Pink with Iridescent Flakes
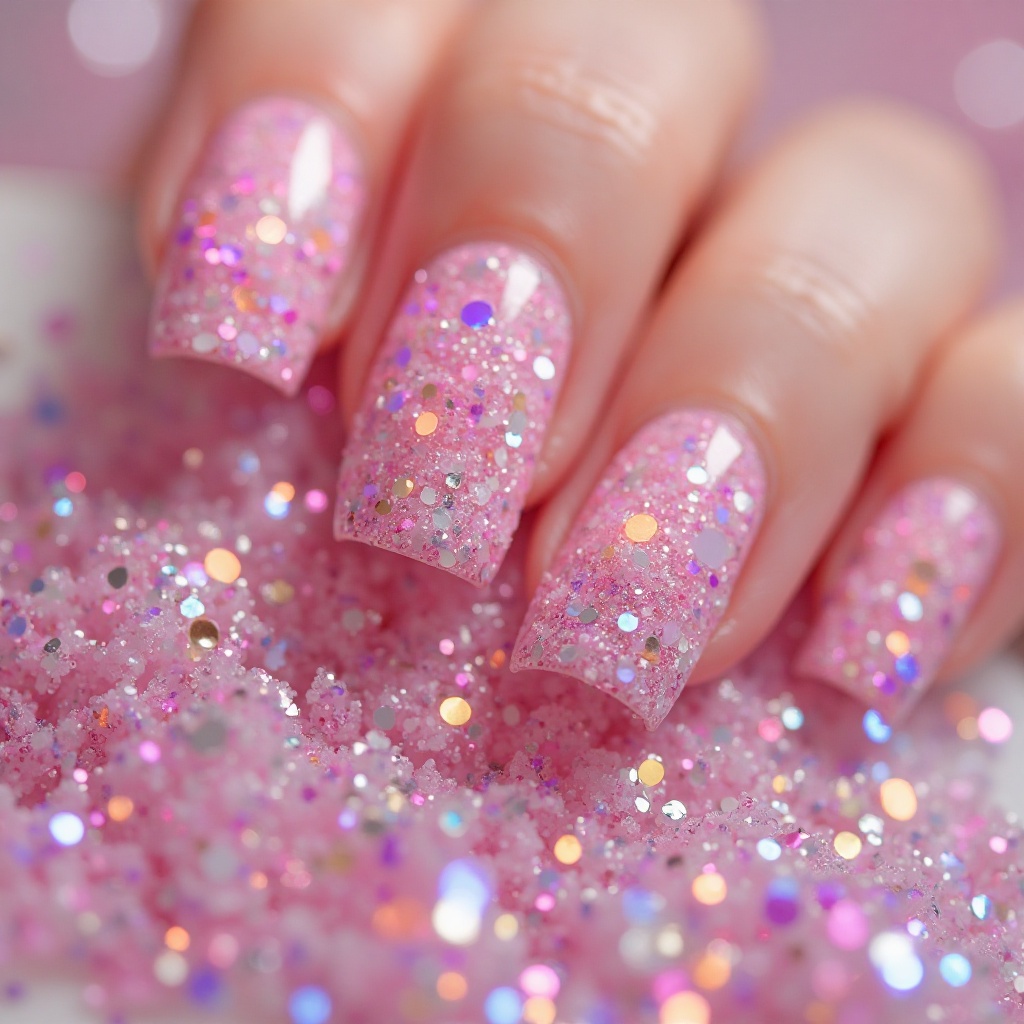
A soft baby pink base scattered with iridescent flakes that shift between pink, blue, and purple depending on the light and viewing angle. The flakes create a fairy-like sparkle effect that’s more subtle than glitter but more interesting than plain polish, perfect for sweet and romantic aesthetics. A glossy top coat encapsulates the flakes and creates incredible depth and dimension that makes the manicure look multi-dimensional.
Why It Works for Prom: The baby pink is universally flattering and sweet without being childish, while the iridescent flakes add that special occasion sparkle in a unique, modern way.
Pro Tip: Ask your nail tech to concentrate more flakes toward the tips and fewer near the cuticle to create a subtle gradient effect that elongates your fingers visually.
How to Create Baby Pink with Iridescent Flakes at Home
What You’ll Need:
- Baby pink polish (Essie “Fiji,” OPI “Mod About You,” or Essie “Romper Room”)
- Iridescent flakes/mylar flakes (available at Sally Beauty, Amazon, or craft stores)
- Clear polish or gel for applying flakes
- Small brush or toothpick for flake placement
- Glossy top coat (you’ll need extra)
- Base coat
- Small container or piece of paper for holding flakes
Step-by-Step Application:
- Prep and base: Standard nail prep plus base coat.
- Apply baby pink base: Paint 2-3 coats of baby pink polish, drying 2 minutes between coats. Some baby pinks are quite sheer, so you might need 3 coats for full opacity. Let the final coat dry completely—5 minutes.
- Prep your flakes: Pour a small amount of iridescent flakes onto a piece of paper or into a small container so they’re easy to access. Iridescent flakes are extremely thin and lightweight—they float easily, so work in a non-drafty area.
- Apply flakes with gradient effect: Paint a thin layer of clear polish on one nail, working in sections. While the clear polish is still wet, use a small brush or dampened toothpick to pick up flakes and place them on the nail. Concentrate heavier application near the tips, medium application in the middle of the nail, and minimal/sparse application near the cuticle. This creates a gradient concentration rather than uniform coverage.
- Press and secure: Once you’ve placed flakes on one nail, use a dry finger or silicone tool to gently press them down into the clear polish. This ensures they’re flat and well-adhered. Repeat the process for all nails, working one at a time (clear polish dries quickly).
- Alternative: Sprinkle method: For a more random, organic look, paint clear polish on the nail and immediately sprinkle flakes over it (work over a piece of paper to catch excess). Tap off loose flakes. This creates more random placement but less control over gradient placement.
- Seal with multiple top coat layers: Let the flakes dry for 5 minutes, then apply a thick layer of glossy top coat to all nails. The top coat encapsulates the flakes and creates that multi-dimensional, glass-like effect. Let dry 3 minutes, then apply a second thick layer. Two layers are essential—the first seals the flakes, the second creates smoothness and extra depth. You shouldn’t be able to feel the flakes when running your finger over the nail.
What Are Iridescent Flakes? Iridescent flakes (also called mylar flakes, aurora flakes, or opal flakes) are tiny, ultra-thin pieces of film that reflect light in multiple colors—pink, blue, purple, green. They’re thinner than glitter and create a softer, more ethereal sparkle effect. They shift colors dramatically as you move your hands.
Flakes vs. Glitter:
- Flakes: Flat, thin, color-shifting, softer sparkle
- Glitter: Chunky, single-color, bold sparkle
- Flakes create a more delicate, sophisticated look while glitter creates bold drama
Application Control:
- Brush/toothpick placement: More control, precise gradient
- Sprinkling: Random, organic placement, less control Choose based on your skill level and desired look.
Common Mistakes to Avoid:
- Using too many flakes—it looks messy instead of delicate
- Not pressing flakes down—they’ll stick up and catch on things
- Applying flakes over completely dry polish—they won’t stick
- Not using enough top coat—flakes need to be fully encapsulated or they’ll lift
Flake Color Variations:
- Aurora/opal: Shifts between multiple colors (pink, blue, purple)
- Unicorn: White with rainbow shift
- Mermaid: Teal/green shift
- Angel: Iridescent white with pastel shift
Time Required: 50-65 minutes Difficulty Level: Beginner-Intermediate—requires patience but very forgiving
59. Vanilla Latte Nude with White Swirl Art
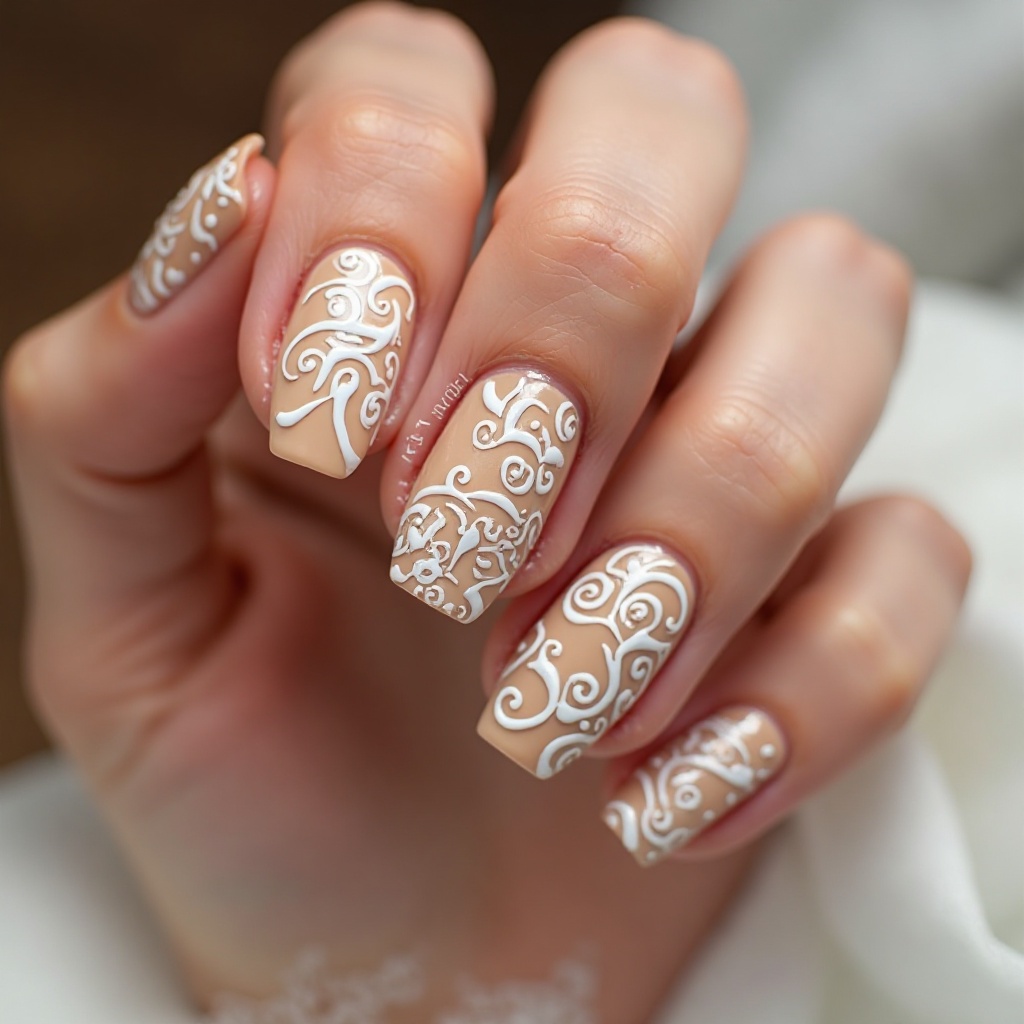
A warm vanilla latte nude base featuring delicate white swirl patterns hand-painted on accent nails, creating an abstract artistic effect. The swirls can be simple curved lines or more intricate patterns that mimic coffee art or marble, depending on your preference. This design is understated yet special, offering visual interest without overwhelming your overall look or competing with your dress and accessories.
Why It Works for Prom: Nude nails are incredibly versatile and photograph beautifully, while the white swirl art adds personality and makes the manicure feel custom and intentional rather than plain.
Pro Tip: Choose a coffin or long almond shape to give your nail artist more canvas for the swirl designs, and request thin, delicate lines rather than thick swirls for a more refined, elegant finish.
How to Create Vanilla Latte Nude with White Swirl Art at Home
What You’ll Need:
- Warm nude/beige polish (OPI “Samoan Sand,” Essie “Au Natural,” or OPI “Tiramisu for Two”)
- White polish or white striping polish
- Thin nail art brush (size 0 or 00) or striping brush
- Dotting tool or toothpick
- Clear top coat
- Base coat
- Small cup of nail polish thinner or clear top coat for thinning
Step-by-Step Application:
- Prep and base: Standard nail prep plus base coat.
- Apply nude base: Paint 2-3 coats of warm nude polish, drying 2 minutes between coats. Make sure coverage is smooth and even.
- Choose accent nails: Decide which nails will have swirl art—typically 1-2 per hand (ring fingers or ring + middle). Keeping some nails plain creates balance.
- Thin your white polish: Dip your thin brush into white polish, wipe most off, and test the consistency. For delicate swirls, you want the polish thin enough to flow smoothly but opaque enough to show up on the nude base. If it’s too thick, add one tiny drop of nail polish thinner to your brush and mix (test on paper first).
- Create swirl patterns: Using your thin brush loaded with thinned white polish, paint organic swirl shapes on your accent nails. Think of coffee cream swirls—they’re irregular, flowing, and organic. Options:
- Simple swirls: 2-3 curved S-shaped lines flowing across the nail
- Coffee art style: Circular swirls that mimic latte art
- Abstract waves: Wavy lines that cross and flow
- Minimalist: Just 1-2 very simple curved lines Work with a light touch—you want thin, delicate lines , not thick paint strokes.
- Add dimension (optional): While the white swirls are still slightly wet, you can add tiny dots alongside some swirls using a dotting tool or toothpick. This creates extra visual interest and a more complex design.
- Let dry completely: Swirl art needs to dry completely before top coat—10 minutes minimum. If you apply top coat over wet art, the white will smear and blur.
- Seal with top coat: Apply 2 layers of clear glossy top coat to all nails, letting the first dry 3 minutes before applying the second. The top coat creates a smooth, glass-like finish and makes the swirls look seamlessly integrated rather than painted on top.
The Swirl Technique: Think flowing, organic shapes—swirls should look effortless, like cream naturally swirling through coffee. Avoid rigid, geometric shapes or overly perfect curves. The beauty is in the organic, imperfect flow.
Practice Makes Perfect: Swirl art is an artistic technique that requires practice. Before painting your nails, practice swirls on paper or a nail practice hand. Draw 20-30 swirls to get comfortable with brush pressure, flow, and creating organic shapes. This makes the actual application much easier.
Brush Control Tips:
- Hold the brush near the bristles (not at the end of the handle) for maximum control
- Use your whole arm to move, not just your wrist
- Rest your painting hand on a stable surface
- Work slowly—rushing creates shaky lines
Common Mistakes to Avoid:
- Making swirls too thick or bold—delicate is more elegant
- Creating too many swirls—2-4 per nail is plenty
- Making swirls too geometric or symmetrical—they should look organic
- Applying top coat before art is dry—it will smear
Design Variations:
- Gold swirls instead of white for warmer tones
- Metallic silver swirls for cool sophistication
- Multiple thin swirls vs. few bold swirls
- Abstract organic blobs instead of lines
Time Required: 45-60 minutes Difficulty Level: Intermediate—requires artistic hand and steady brush control
The Prom Photo Problem Nobody Mentions
Your Nails Will Be in EVERY Photo
You’re thinking about how your dress looks, but your hands are going to be in more photos than your face. Corsage shots, group poses where everyone holds hands up, holding your clutch, adjusting your hair, couples photos where you’re on his arm—your nails are EVERYWHERE.
Photos Where Your Nails Are the Focus:
- Corsage/boutonniere close-ups (literally the main subject)
- Ring shots (if you wear statement rings)
- Holding your clutch or prom favor
- Adjusting your dress or hair
- Pointing at things
- Making heart hands or peace signs with friends
What Photographs Terribly:
- Matte finishes (look flat and dull)
- Colors too close to your skin tone (disappear completely)
- Overly intricate designs (blur into visual noise)
- Very pale nails without contrast (vanish in flash photos)
What Photographs Well:
- Glossy finishes (catch light)
- Chrome/metallic (reflect flash beautifully)
- Bold, saturated colors (show up clearly)
- Simple designs with high contrast (read clearly from distance)
The Test: Take a flash selfie with your hand near your face. If your nails don’t immediately catch your eye in the photo, they’re not going to show up in prom pics either.
The Dress Matching Dilemma
Should Your Nails Match Your Dress? (Usually No)
The matchy-matchy look is dated. Your nails exactly matching your dress color looks coordinated in a bad way—like you’re in a wedding party where everyone had to match.
Better Approach:
- Bold dress = Neutral nails (let dress be the star)
- Neutral dress = Bold nails (add personality)
- Patterned dress = Simple solid nails (avoid chaos)
- Simple dress = You can go bolder with nails
Color Pairing That Actually Works:
- Red dress → Nude or white nails (not red)
- Navy dress → Rose gold or champagne
- Emerald green → Gold or nude
- Pink dress → White or silver (not more pink)
- Black dress → Literally anything
The Exception: If your dress is a specific color that’s central to your prom vision (like you specifically chose lavender because it’s YOUR color), then yes, lavender nails work. But make them a different SHADE of lavender, not identical.
The Length That Broke Before Prom
How Long Is Too Long
Every prom season, someone shows up with nails so long they can’t zip their own dress. Don’t be that person.
Length Reality Check:
- Very Short = Can’t really appreciate designs, looks unfinished
- Short (just past fingertip) = Safe, practical, boring
- Medium (1/4 inch past) = Sweet spot for prom
- Long (1/2 inch past) = Bold but manageable
- Very Long (3/4 inch+) = You will regret this
Things You Can’t Do With Very Long Nails:
- Put in earrings
- Do your own dress zipper
- Manage bobby pins for hair
- Text normally
- Hold your clutch comfortably
- Eat finger foods
- Use the bathroom easily (sorry but true)
- Put in contacts
The Smart Strategy: Get medium length for prom. If you love them and can function, go longer next time. But prom night isn’t the time to discover you can’t zip your own dress.
The Chrome Reality Check
It Looks Perfect for Exactly 2 Hours
Chrome nails in photos look AMAZING. Chrome nails after 4 hours of prom look… less amazing.
The Chrome Timeline:
- First 2 hours: Flawless, mirror-finish perfection
- Hour 3-4: Still pretty but showing fingerprints
- Hour 5-6: Noticeably dulled, visible wear
- After-prom: You’re just done with these
What Kills Chrome Fast:
- Dancing (hand contact/friction)
- Holding your phone (oil transfer)
- Touching your dress (fabric friction)
- Hand-holding (oil and friction)
- Literally any normal prom activity
Is It Worth It? For the photos and first half of prom = Yes For all-night perfection = No Get them anyway, embrace the temporary nature, accept they’ll dull by after-prom.
Prom Timing: When to Actually Get Your Nails Done
The 48-Hour Window
Too Early (4+ days before):
- Risk of chips from pre-prom activities
- Nails won’t look fresh in photos
- More time for something to go wrong
Too Late (day of):
- No time to fix mistakes
- Stress about them being perfect
- Can’t do dress rehearsal to test function
Perfect Timing:
- 2 days before = Ideal for gel/extensions
- 1 day before = Fine for regular polish
- Never day-of = Too stressful
The Schedule: Get nails done 48 hours before prom. This gives you:
- Time to function-test them
- One full day for polish to fully cure
- Buffer time if something goes wrong
- Still fresh enough to look perfect
The Embellishment Disaster
That Crystal Will Fall Off (Probably)
3D embellishments look INCREDIBLE… until they don’t. And they always stop looking incredible at the worst possible moment.
What Fails First:
- Pearls (pop off from literally any pressure)
- Rhinestones (come loose from dancing)
- Chains (snag on everything and pull off)
- 3D flowers (catch on dress fabric)
- Anything glued on (heat + dancing + friction = gone)
Making Embellishments Last:
- Use proper nail art gel, not regular nail glue
- Encapsulate completely under thick builder gel
- Limit to 2-3 nails maximum
- Smaller embellishments stay better than large
- Accept they might not make it to after-prom
Emergency Kit Must-Have: Bring nail glue and extra embellishments in your clutch. You WILL need them.
What Your Nail Choice Says at Prom
The Unspoken Messages
Classic French Tips: “I’m elegant and timeless. My mother approved these.”
Chrome: “I’m trendy and confident. I will absolutely be posting these.”
Bold Dark Colors: “I’m edgy and this is my aesthetic. I didn’t let my mom pick my dress either.”
Nude/Neutral: “I’m sophisticated and my dress is doing all the talking.”
Glitter/Sparkle: “I’m here for the full prom experience. Yes, I rented a limo.”
Intricate Nail Art: “I planned this for months. Everything is coordinated. I have Pinterest boards.”
None of these are wrong—they’re just different vibes. Pick the one that matches YOUR vibe, not what you think prom nails “should” be.
The Group Photo Nail Panic
When Everyone’s Nails Are Better Than Yours
You’ll have that moment in group photos where you look down and think everyone else’s nails look better than yours. This is normal and also wrong.
The Truth:
- Nobody is actually judging your nails
- Everyone is too worried about their own appearance
- In photos, you notice your nails; others notice their own
- Your nails look better to others than they do to you
What Actually Matters:
- That you feel confident
- That they didn’t completely fail (all fall off/chip terribly)
- That they photograph decently
- That you’re not stressed about them all night
If you’re happy with your nails when you first get them, that’s what matters. Don’t let group photo comparison steal your joy.
The Budget Reality
How Much Prom Nails Actually Cost
Basic Gel Manicure: $40-60 Gel with Simple Design: $60-80 Extensions + Design: $80-120 Chrome/Special Finishes: Add $15-30 Embellishments: Add $5-20 Full Prom Set (extensions, design, embellishments): $100-150+
Hidden Costs:
- Touch-up appointment if something goes wrong
- Emergency supplies (glue, polish, file)
- Removal (if not included)
Budget Options:
- Press-on nails: $15-30 (seriously underrated)
- DIY gel kit: $50 upfront, $0 per use after
- Regular polish at home: $10-20
- Simple salon gel without art: $40-50
The Math: If you’re paying $150 for nails and can barely afford it, consider whether that money might be better spent on your dress, shoes, or actual prom tickets. Beautiful nails don’t require breaking the bank.
Press-Ons: The Secret Option
Why Nobody Admits They’re Actually Good
High-quality press-on nails have gotten REALLY good. Like, salon-quality good. But there’s still stigma around them.
Modern Press-On Reality:
- Last 7-10 days with proper application
- Come in every design imaginable
- Cost $15-30 vs. $100+ for salon
- Can apply them yourself perfectly
- Look identical to salon nails in photos
The Catch:
- Requires practice to apply well
- Need to size them correctly
- Not customizable
- Still feel “fake” to wear initially
When Press-Ons Make Sense:
- Budget is tight
- You want to test a style before committing
- Your schedule is too busy for salon appointments
- You like changing nail designs frequently
When to Skip Them:
- You’ve never applied them before (prom isn’t practice time)
- You want custom colors/design
- You prefer salon experience
The After-Prom Decision
Should You Keep Them or Remove Them?
Your prom nails looked perfect for prom. The day after? Different story.
Remove Immediately If:
- They’re damaged/chipped from prom night
- They’re uncomfortable or too long
- You have school/work where they’re inappropriate
- Extensions that need professional removal
Keep Them If:
- They still look good
- You have more events coming up
- They’re comfortable
- You want to enjoy them longer
The Reality: Most people keep prom nails for a few days to a week post-prom to show them off at school, then remove them. That’s totally normal.
The Regret-Proof Checklist
Before You Commit, Ask Yourself:
✓ Can I function in these for 8+ hours? ✓ Will they photograph well (not just look good in person)? ✓ Do they actually match my prom aesthetic? ✓ Am I choosing these because I like them or because they’re trendy? ✓ Can I afford them without financial stress? ✓ Do I have a plan if something goes wrong? ✓ Have I tested this length/style before?
If you answered yes to all of these, you’re good. If you hesitated on any, reconsider your choice.
Just Make a Decision and Commit
Prom nails are important but they’re not THAT important. You will look beautiful regardless of whether you choose French tips or chrome, nude or bold, simple or embellished.
The worst prom nail choice is the one where you’re stressed about them all night. Pick something you genuinely like, trust that it’ll work out, and then forget about them and enjoy your prom.
Nobody’s prom was ruined by imperfect nails. Lots of proms were ruined by stressing over details that didn’t actually matter.
Your nails will be fine. You’ll be fine. Go to prom.