59 Prom Nails Ideas You Can’t Miss
pSo, prom is coming up. You’ve got the dress, the shoes are sorted, and now it’s time to think about your nails. A good manicure is the finishing touch that pulls your whole look together, especially in all those photos you’ll be taking.
I’ve been playing around with nail art for years, and I’ve learned that what looks good in a Pinterest photo doesn’t always work in real life—especially after a night of dancing. This guide isn’t just a list of pretty pictures. It’s a collection of designs I’ve tried myself, complete with step-by-step tutorials, the real products I used, and honest talk about the challenges. Whether you want something subtle or a full-on statement, I’ve got you covered.
How to Choose the Best Prom Nail Design
Picking the right design can feel overwhelming with so many options. Here’s a simple guide to help you decide based on your personal style and situation:
- For your first time doing your own nails: Stick with Soft Purple with White Floral Art using the sticker method. It’s almost impossible to mess up, or a simple glitter gradient which is very forgiving.
- If you have a professional job or conservative style: You can’t go wrong with a classic Deep Plum with Silver Glitter Gradient or Emerald Green with Gold Leaf. They’re elegant and sophisticated without being too “loud.”
- If you want something for a special event: Go all out! This is the night for Purple Chrome with Geometric Negative Space or a full set of holographic flakes. They photograph amazingly and feel really special.
- If you’re comfortable with nail art and want a challenge: Try the Purple Chrome design or a seamless Purple Ombré. These techniques take a little practice but have a huge payoff.
- If you have short nails: Lavender Jelly with Holographic Flakes is perfect. The sheer finish makes nails look longer, and the flakes add interest without overwhelming your nail bed.
- If you change your mind often or know you’ll want them off right after prom: Avoid heavy gel designs with chrome powder or lots of 3D elements. Removing these at home can be a real chore and might damage your nails.
Purple Prom Nails: 5 Elegant Ideas
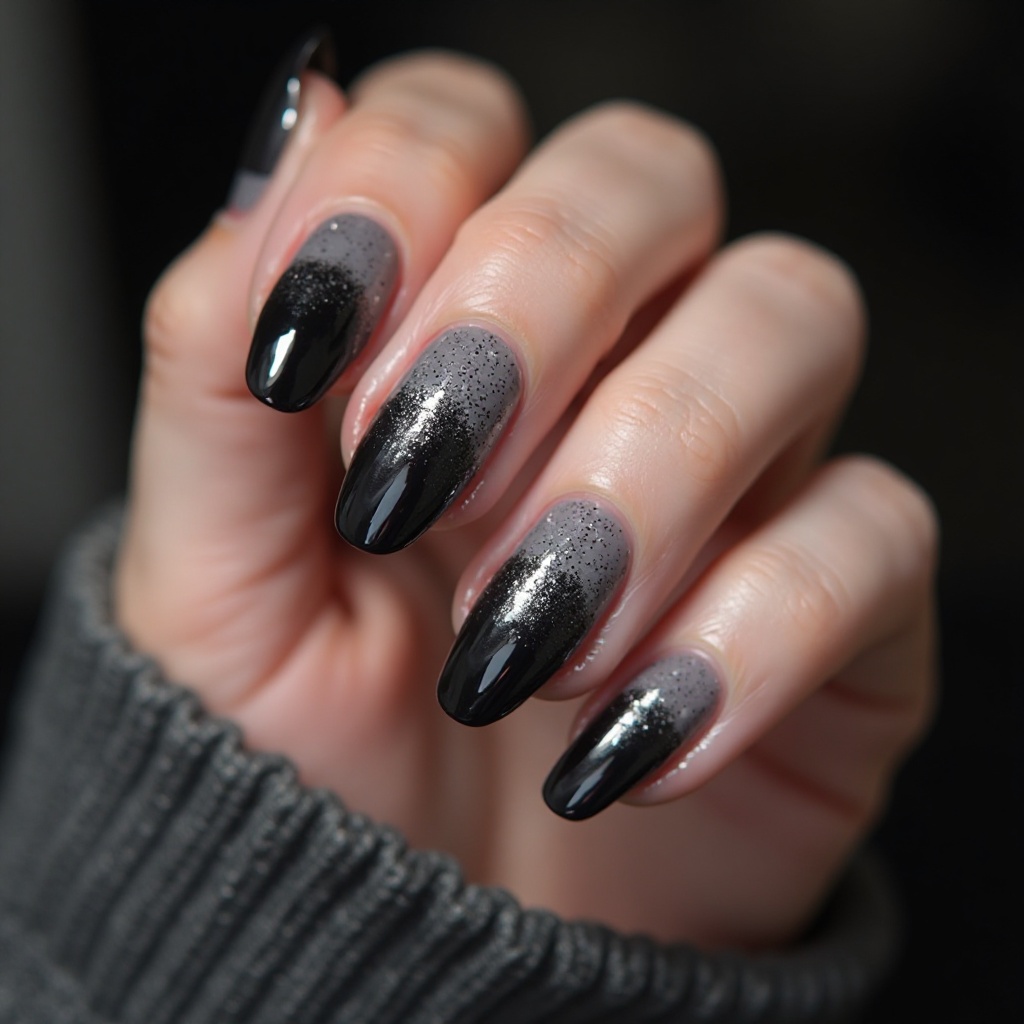
1. Deep Plum with Silver Glitter Gradient
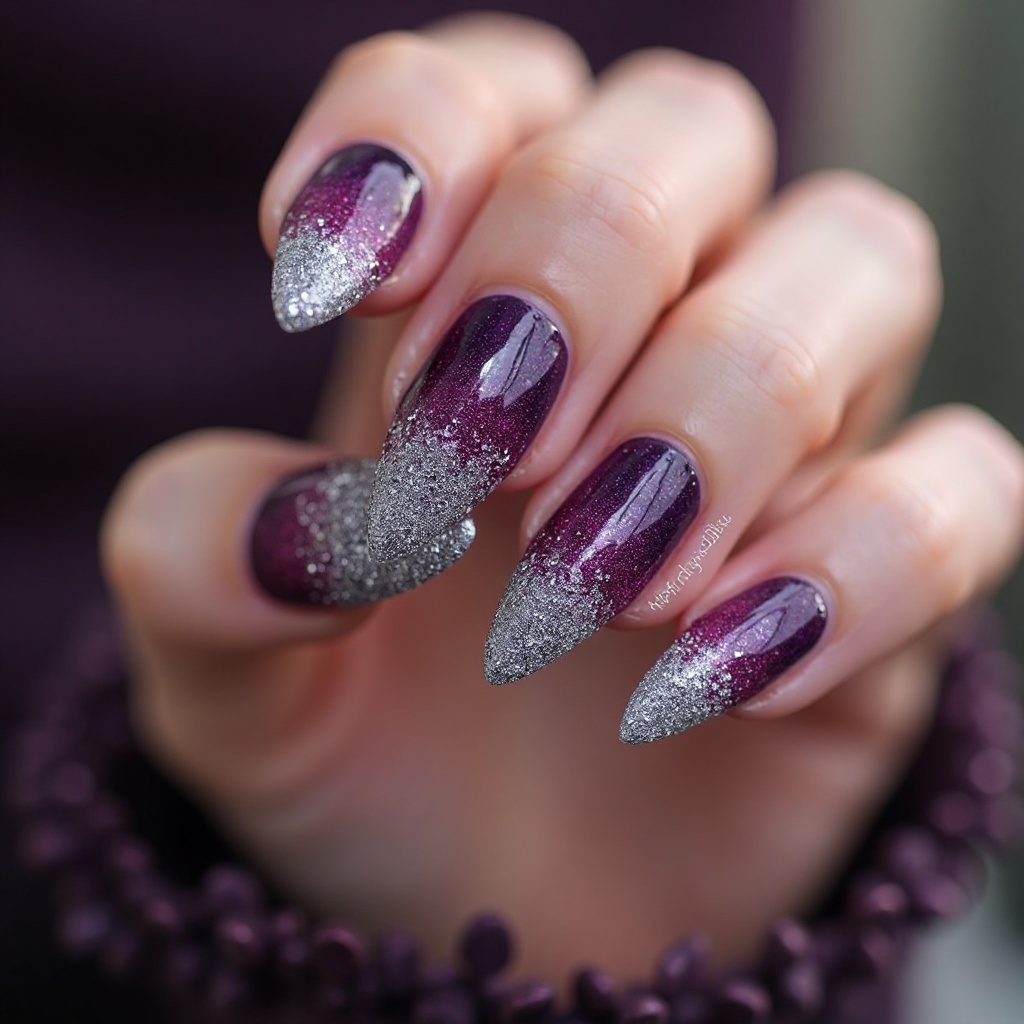
Rich, deep plum base that transitions into concentrated silver glitter at the tips, creating a regal and sophisticated look. The jewel-toned purple provides depth and elegance while the silver adds sparkle that catches every light. This combination works beautifully with purple, silver, black, or navy dresses and feels luxurious without being overly bold.
- Difficulty: Intermediate
- Time to complete: 60-70 minutes
- Best for: Someone who wants a sophisticated, elegant look that matches almost any dress color.
- Why it works: Deep plum is universally flattering, and the glitter at the tips adds a ton of glamour for photos without being overwhelming.
- What makes it different: It’s a classic “special occasion” look that’s easier to execute than a full-on glitter bomb.
Step-by-Step:
- Prep and protect: Apply liquid latex or a thick layer of lotion around your nails to catch stray glitter, then apply a base coat.
- Apply plum base: Paint 2-3 thin coats of a deep plum polish. I really like Essie “Bahama Mama” ($9) —it’s a one-coater for me, which saves time. Let each coat dry for about 2 minutes.
- Create the gradient: Pour some fine silver glitter polish onto a paper plate. My favorite is China Glaze “Fairy Dust” ($8, at Sally Beauty) because the glitter is super fine, so it doesn’t feel bumpy. Dab a makeup sponge into the glitter, then bounce it onto your nail tips. Use heavy pressure at the very tip and lighter as you move toward the middle. The goal is for the glitter to fade out by the center of your nail.
- Build layers: Repeat the sponging 2-3 times, letting it dry for a few minutes between each layer. This builds up the sparkle.
- Seal it: This is the most important step. Apply 2-3 thick layers of a quick-dry top coat like Seche Vite ($9-11, Ulta) . It will smooth out the glitter texture and make everything look glossy and professional.
2. Lavender Jelly with Holographic Flakes
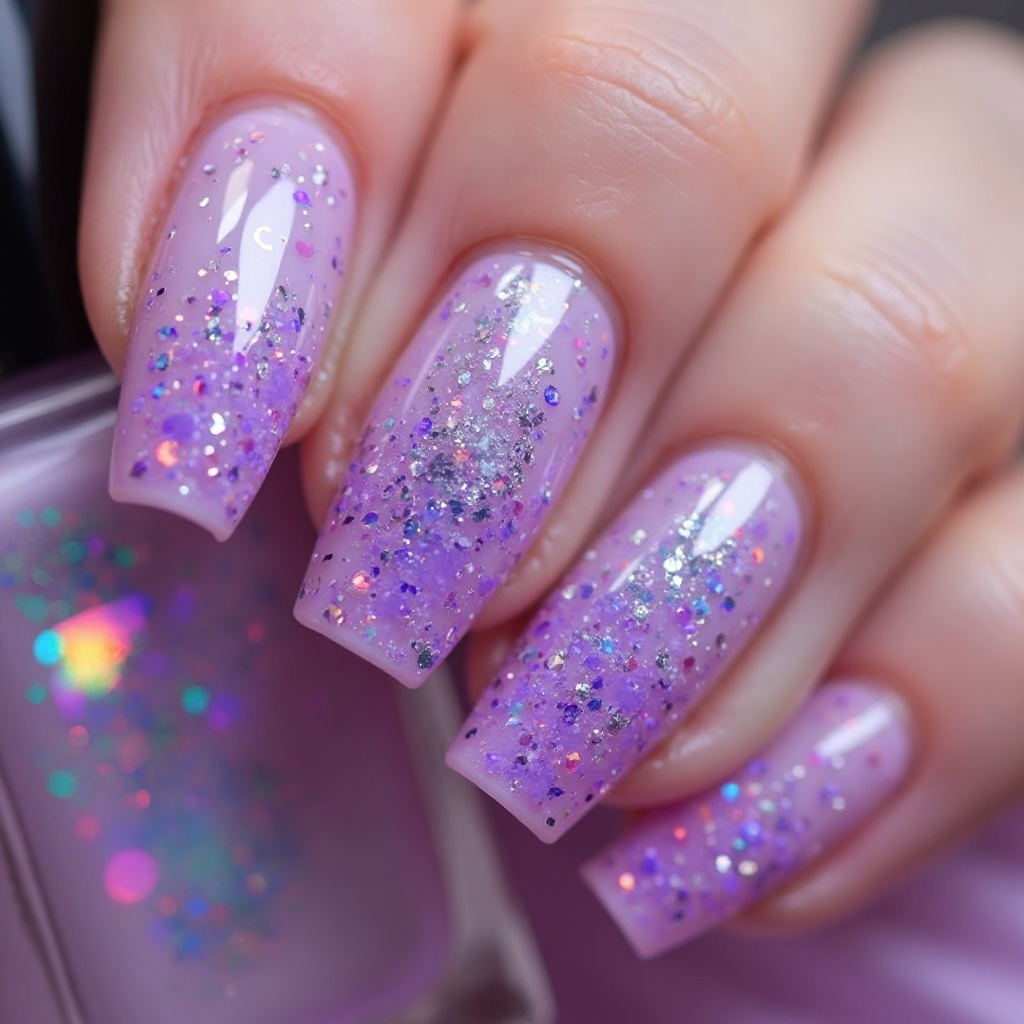
Translucent lavender jelly polish layered to create a glass-like effect, scattered with holographic flakes that shift colors. The soft purple has incredible depth and dimension, while the holographic flakes add ethereal sparkle. This design is perfect for those who want purple nails with a romantic, dreamy quality.
- Difficulty: Beginner-Intermediate
- Time to complete: 70-80 minutes (the jelly layers take patience!)
- Best for: Anyone wanting a romantic, ethereal look that’s trendy but not too bold.
- Why it works: The jelly finish creates a unique, luminous effect that photographs beautifully.
- What makes it different: It’s not just glitter; it’s dimension and light reflection.
Step-by-Step:
- Prep and base: Standard prep and base coat.
- Build jelly layers: This is where patience pays off. Apply a very thin first coat of lavender jelly polish. It will look streaky and terrible—that’s normal! I used Cirque Colors “Lucky Jelly” ($14.50, their website) for this. Wait 3 minutes. Apply another thin coat. Repeat until you have 4-5 coats and you love the color depth. It should look like stained glass.
- Apply flakes: On your last jelly coat, while it’s still slightly tacky, use a small brush or toothpick to place holographic flakes. I got a big pot of aurora flakes on Etsy for like $6. Concentrate them near the tips for an ombré effect.
- Seal with gloss: Once the flakes are placed, wait 5 minutes, then seal everything with a thick, high-gloss top coat. This encapsulates the flakes so they don’t snag on anything.
3. Purple Chrome with Geometric Negative Space
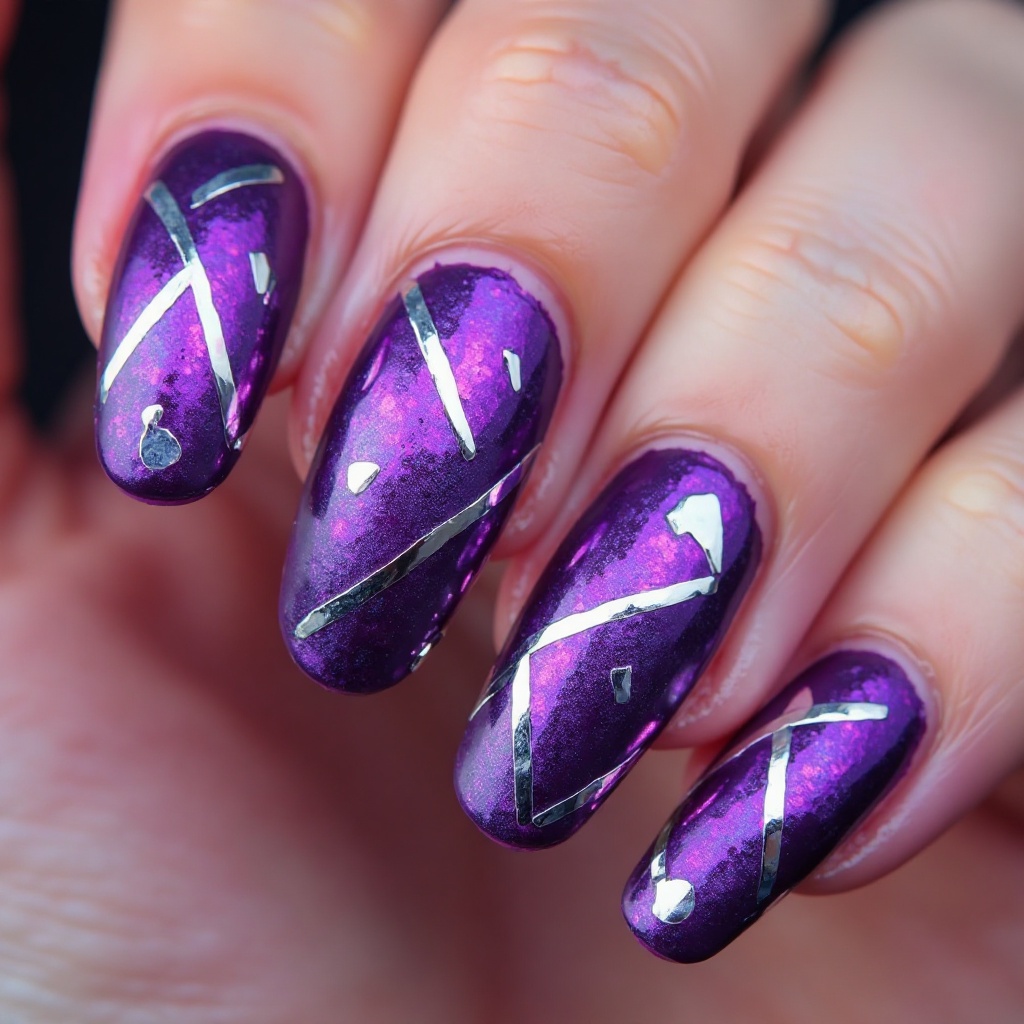
Vibrant purple chrome finish with strategic negative space cutouts in geometric patterns—triangles, diagonal lines, or abstract shapes that reveal natural nail. The chrome makes the purple incredibly saturated and eye-catching, while negative space adds modern edge. Metallic silver striping tape outlines the geometric shapes for crisp definition.
- Difficulty: Advanced
- Time to complete: 60-75 minutes
- Best for: Making a bold, fashion-forward statement.
- Why it works: The chrome is incredibly eye-catching, and the negative space adds a modern, graphic element.
- What makes it different: It’s a true mirror-finish manicure that looks like it was done in a high-end salon.
Step-by-Step:
- Prep and plan: Do your cuticle prep and apply a gel base coat. Cure for 60 seconds under your lamp. Before you start, decide which nails will have the geometric cutouts.
- Apply tape for negative space: On the nails you’ve chosen, place small pieces of 1mm striping tape in simple shapes—a diagonal line, a triangle at the cuticle, etc. Press them down firmly.
- Apply purple gel: Paint 2 coats of a dark purple gel polish (I use Modelones gel polish in #2067, $12 on Amazon) over all nails, taping right over the tape. Cure for 60 seconds between coats.
- Prep for chrome: Apply a thin layer of no-wipe gel top coat. Cure for 60 seconds. The surface should be slightly sticky.
- Apply chrome powder: Use an eyeshadow applicator to rub the purple chrome powder firmly into the tacky layer. I used Born Pretty purple chrome powder ($5) . It will turn into a mirror finish instantly. Brush off the excess.
- Reveal the negative space: Using tweezers, carefully peel away the striping tape. The natural nail underneath will be revealed, creating your geometric shapes.
- Seal: Apply a final layer of gel top coat over everything, making sure to cap the edges. Cure for 60 seconds, then wipe with rubbing alcohol.
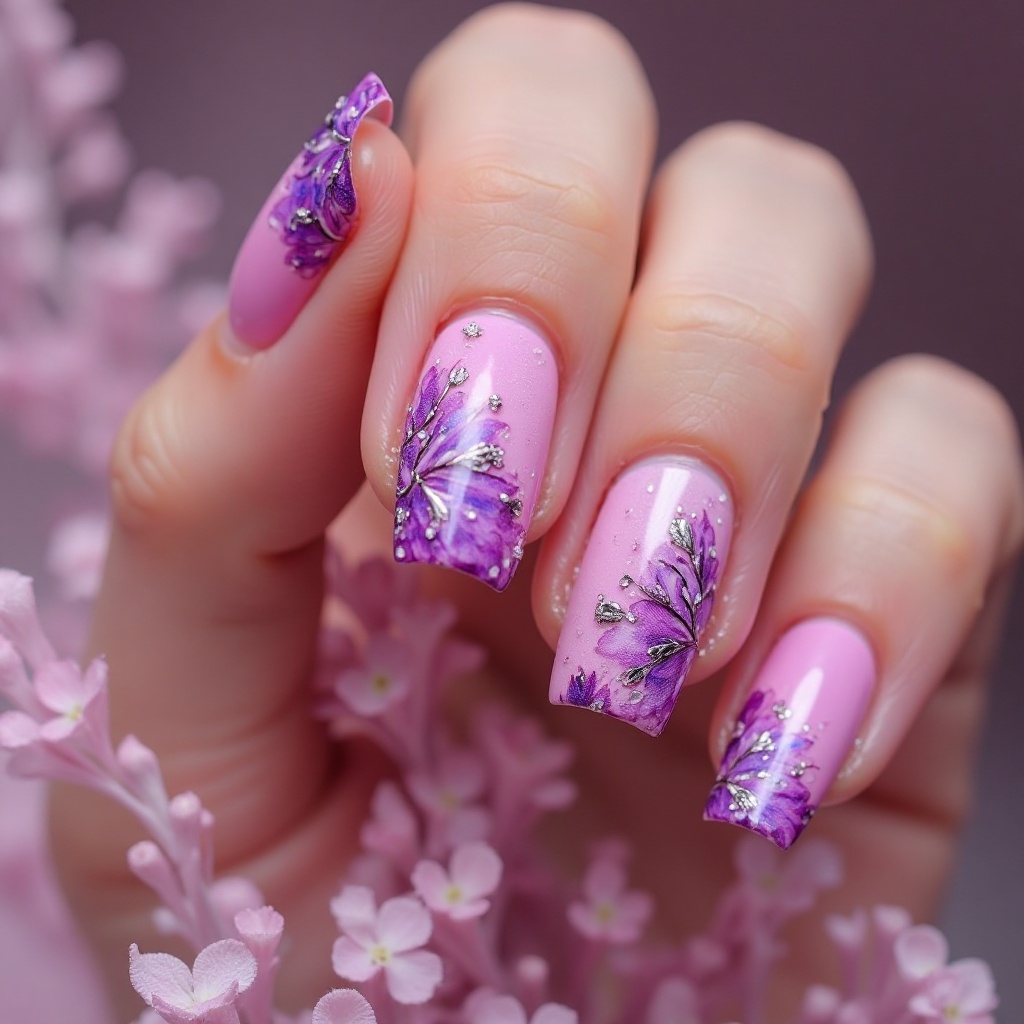
4. Soft Purple with White Floral Art
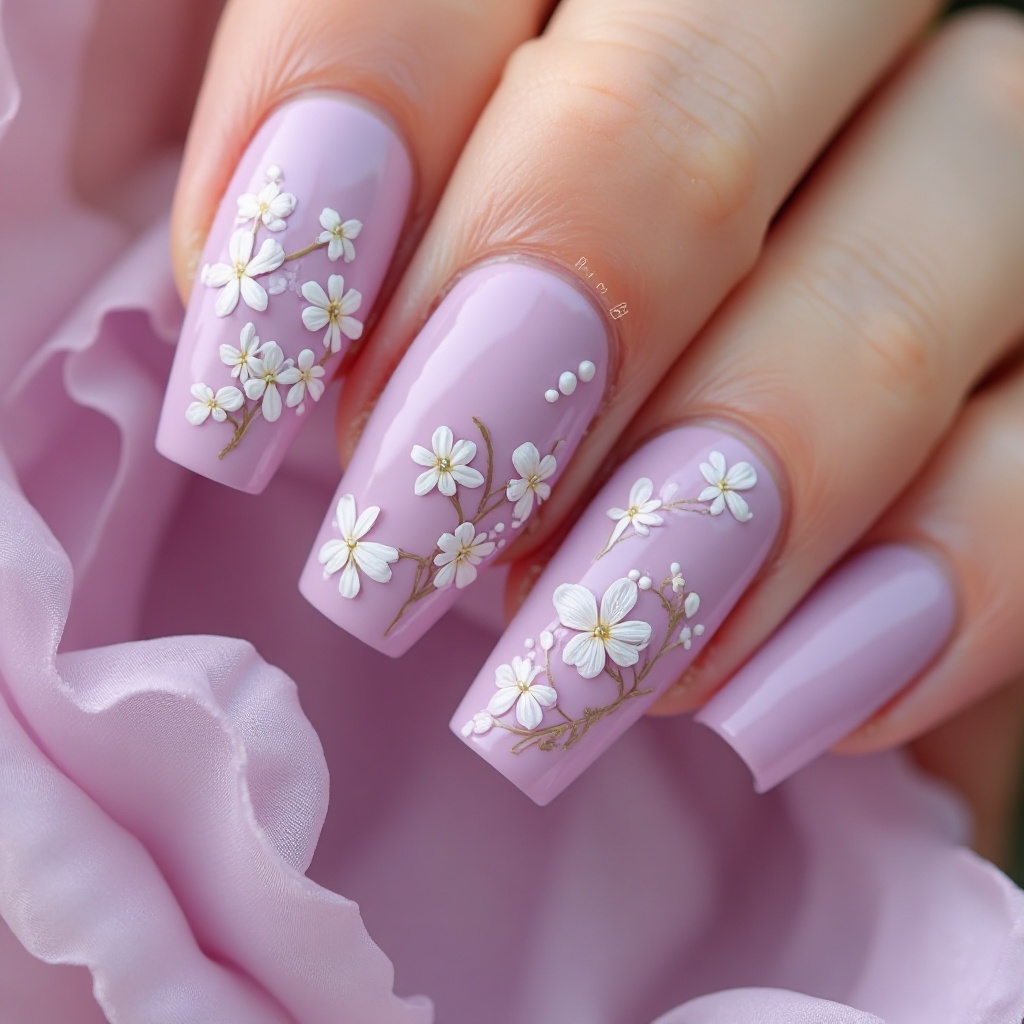
Creamy soft purple base adorned with delicate hand-painted white flowers or floral appliqués on accent nails. The feminine color combination creates a romantic, garden-inspired look that’s perfect for spring and summer prom nails . Small white details create beautiful contrast against the purple base.
- Difficulty: Beginner (with stickers) / Intermediate (hand-painted)
- Time to complete: 40-60 minutes
- Best for: A romantic, garden-party vibe, especially for spring proms.
- Why it works: The contrast of white against a soft purple is classic and pretty, and it looks more intricate than it is.
- What makes it different: It adds a personal, hand-crafted touch to your prom look.
Step-by-Step (Sticker Method):
- Prep and base: Standard prep and 2 coats of a soft purple polish. I love Essie “Play Date” ($9) for this.
- Apply stickers: Once the purple is completely dry, use tweezers to pick up white 3D floral nail stickers. Place them on 1 or 2 accent nails. Press them down firmly for about 5 seconds.
- Seal around them: Apply a generous layer of top coat to all nails, but paint carefully around the 3D stickers. If you paint over them, they’ll lose their dimension. Apply 2-3 layers around the base of the flowers to make sure they’re secure.
5. Purple Ombré with Glitter Tips
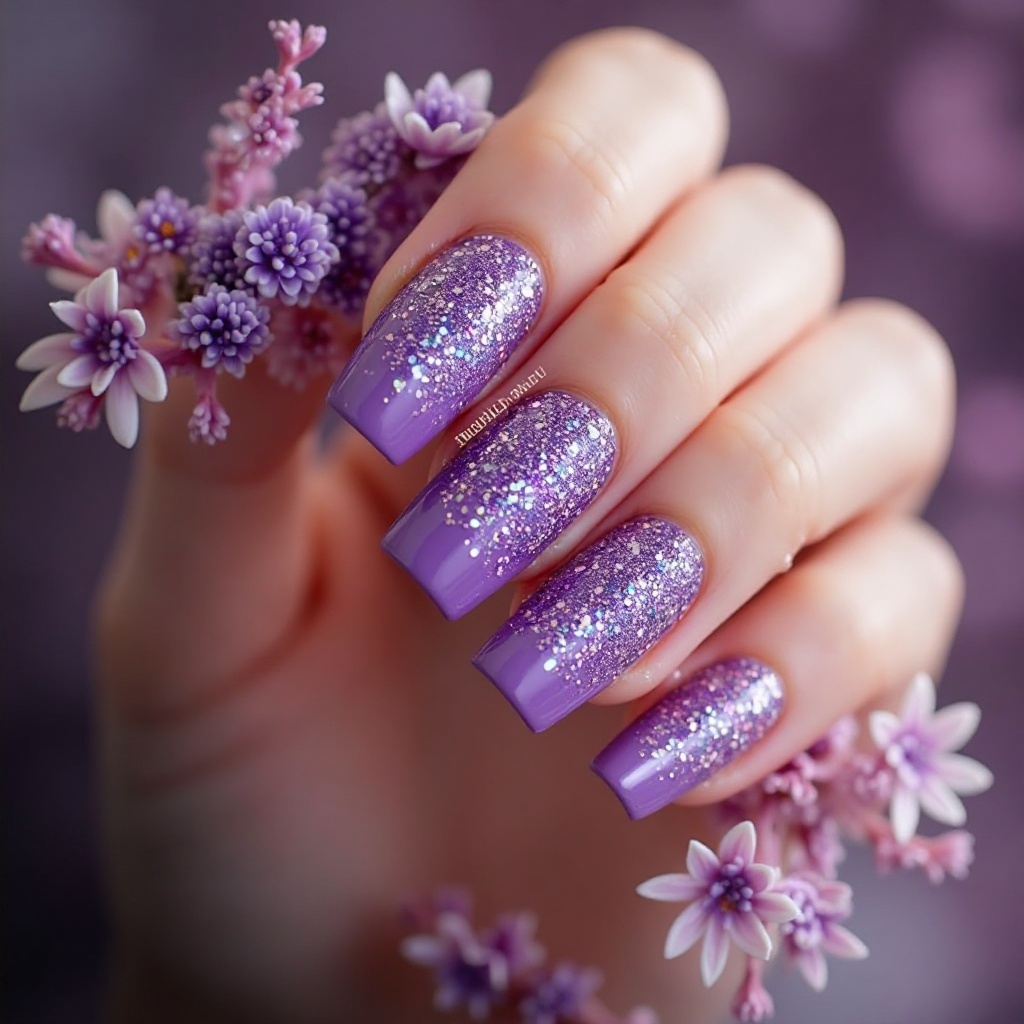
Gradient transition from deep violet at the cuticle to lighter lavender at the tips, topped with concentrated purple or holographic glitter at the very tips. The ombré creates beautiful dimension while the glitter tips add sparkle for special occasions. This design offers multiple shades of purple in one manicure.
- Difficulty: Intermediate
- Time to complete: 70-85 minutes
- Best for: Matching a dress with multiple shades of purple, or if you just can’t pick one color.
- Why it works: The gradient showcases multiple tones and adds dimension that a single color can’t.
- What makes it different: It’s custom and blended just for you.
Step-by-Step:
- Prep and protect: Apply liquid latex around your nails. Then, apply 2 coats of your lightest lavender as a base.
- Create your gradient palette: On a paper plate, paint three thick stripes next to each other: dark purple, medium purple, light lavender.
- Sponge the gradient: Dab a makeup sponge into all three colors, then bounce it onto your nail. The dark should be at the cuticle, the light at the tip. It will look messy. Repeat 2-3 times, letting it dry for a few minutes in between, until the color is vibrant.
- Add glitter tips: Dab a separate sponge into a holographic glitter polish and tap it onto just the very tips. I used ILNP “My Private Rainbow” ($10, their site) for a fine, linear holographic effect.
- Smooth and seal: Once you’re happy, let it dry for a full 10 minutes. Then, seal everything with 2-3 thick layers of quick-dry top coat to smooth out the sponged texture.
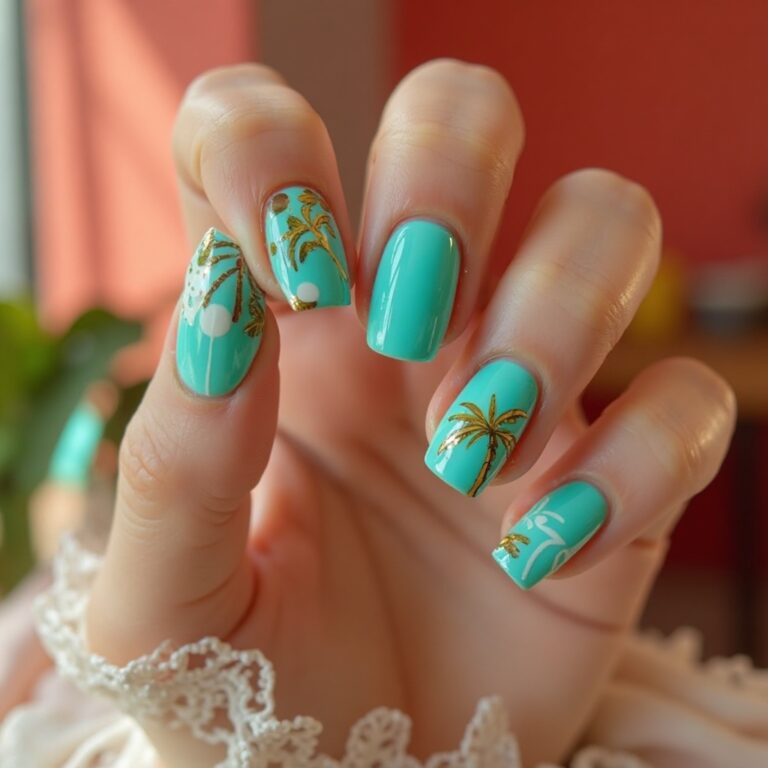
6. Emerald Green with Gold Leaf Accents
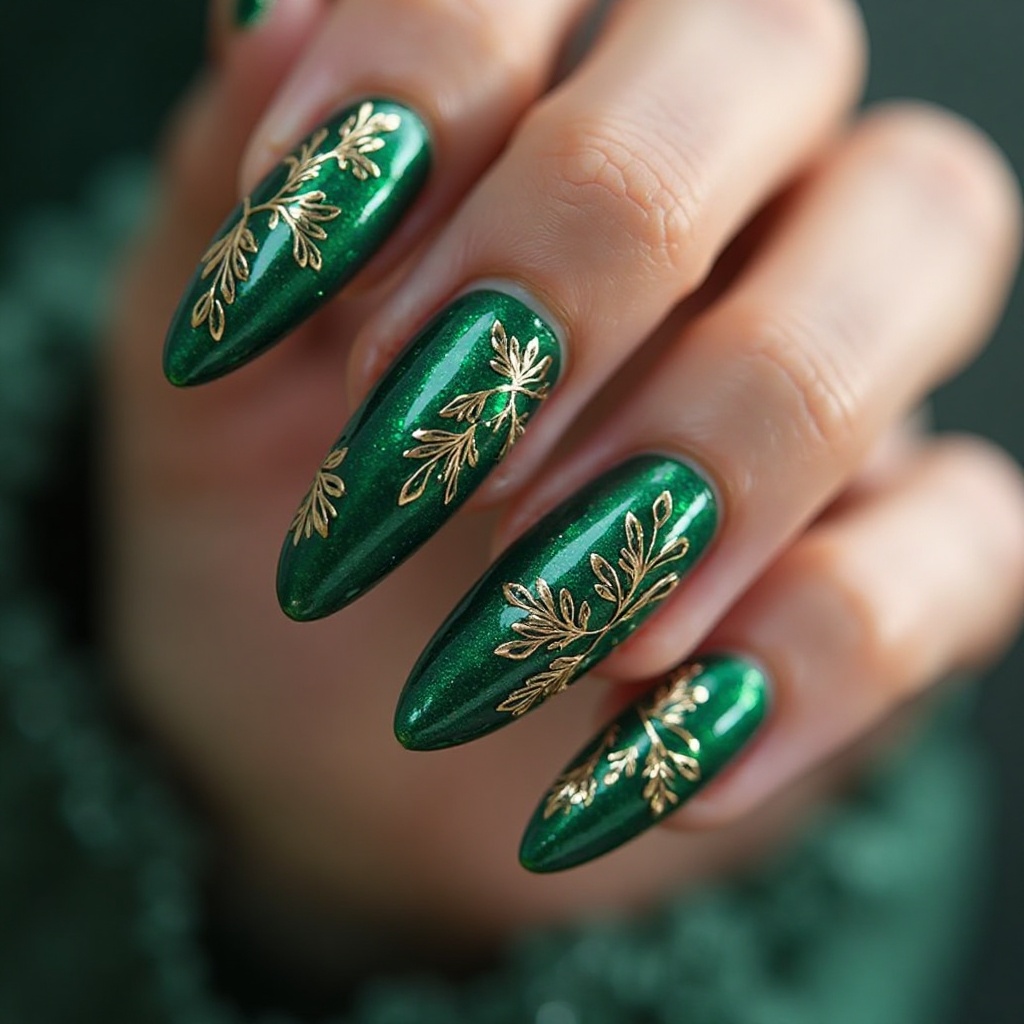
Deep, rich emerald green base with delicate gold leaf applied in organic patterns on accent nails. The jewel-toned green creates lux vibes while gold leaf adds warmth and elegance. This combination is perfect for those wanting sophisticated, unique prom nails that photograph beautifully.
- Difficulty: Intermediate
- Time to complete: 50-65 minutes
- Best for: A luxe, sophisticated look that stands out from the sea of pink and glitter.
- Why it works: Emerald green is a rich, expensive-looking color, and the real gold leaf adds a touch of warmth and elegance.
- What makes it different: It has a textured, one-of-a-kind quality that printed glitter just can’t replicate.
Step-by-Step:
- Prep and base: Standard prep and base coat.
- Apply emerald base: Paint 2-3 thin coats of a deep emerald green. I swear by Essie “Going Incognito” ($9) for this—it’s a perfect, deep jewel tone.
- Prepare the gold leaf: Open your gold leaf booklet and, using tweezers, tear off small, irregular pieces, about the size of a small pea or smaller.
- Apply the gold leaf: On your accent nails, paint a small area with a thin layer of clear top coat. While it’s wet, use your tweezers to place a piece of gold leaf onto it. Gently pat it down with a small, dry brush.
- Brush away excess: Use a clean, fluffy brush (like an old eyeshadow brush) to gently sweep away any loose flakes that didn’t stick.
- Seal thoroughly: This is non-negotiable. Apply 2-3 generous layers of top coat over the gold leaf nails. Let each layer dry fully. If you don’t seal it well, the gold leaf will catch on everything and flake off by the end of the night.
7. Sage Green Matte with White Floral Details
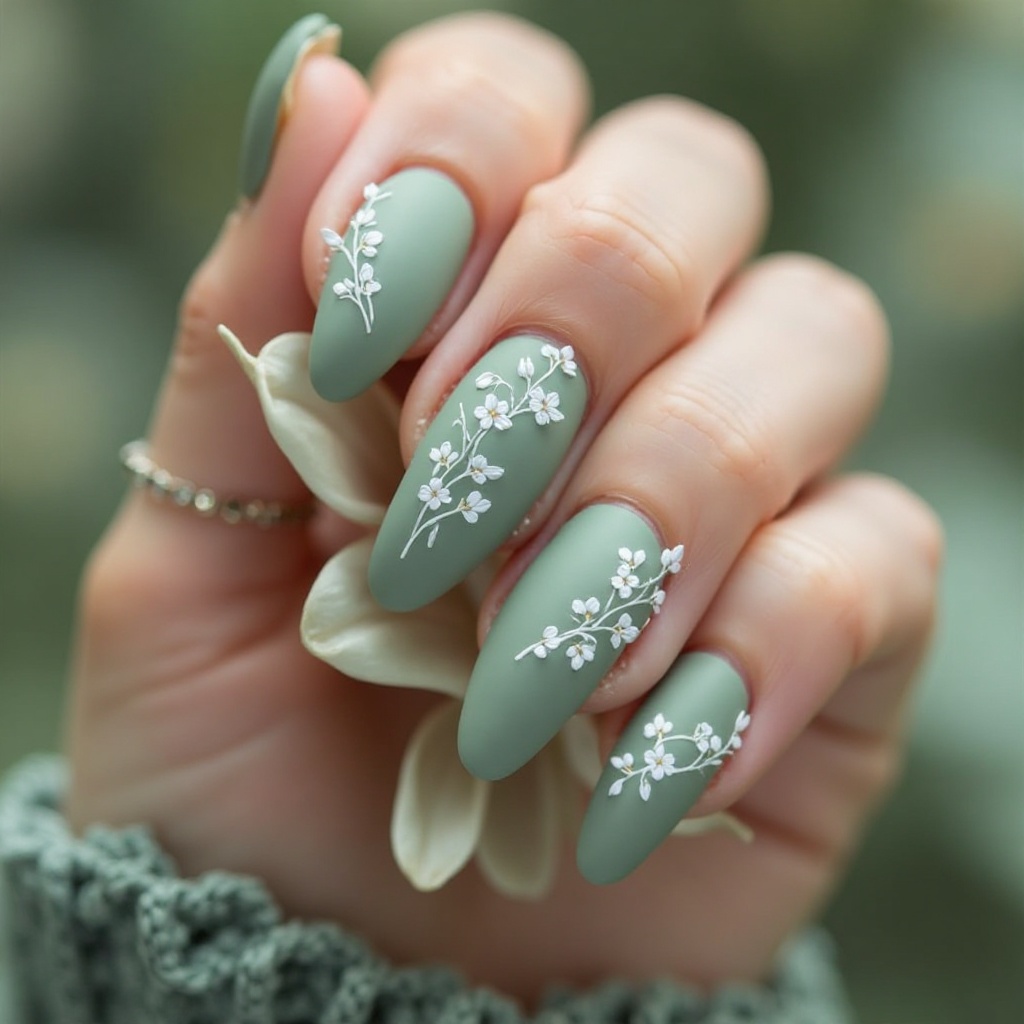
Soft, muted sage green in a matte finish adorned with delicate white hand-painted flowers or vines on accent nails. The earthy, sophisticated green paired with crisp white creates a fresh, botanical aesthetic. The matte finish adds modern edge while white details keep it feminine and special-occasion appropriate.
- Difficulty: Intermediate—requires painting skills
- Time to complete: 50-65 minutes
- Best for: A trendy, nature-inspired look that feels current and sophisticated.
- Why it works: Sage green is incredibly popular right now and works beautifully with both warm and cool-toned dresses.
- What makes it different: The matte finish against the glossy white florals creates beautiful texture contrast.
Step-by-Step:
- Prep and base: Standard prep plus base coat.
- Apply sage green base: Paint 2-3 coats of sage green. I used Essie “Olivia” ($9) for this—it’s a perfect muted green. Dry 2 minutes between coats.
- Paint white florals: On 1-2 accent nails, use a thin brush with white polish to paint simple flowers, vines, or leaves. Keep designs delicate—tiny 5-petal flowers or small leaves work best.
- Let dry completely: This step is crucial. White details must be 100% dry before matte top coat—wait 10-15 minutes. Test by gently touching a non-visible area.
- Apply matte top coat: Carefully paint Essie “Matte About You” ($9) over all nails in thin, even strokes. Avoid going over the same area twice—matte top coat shows brushstrokes if overworked. One smooth coat is better than multiple coats.
8. Mint Green Chrome
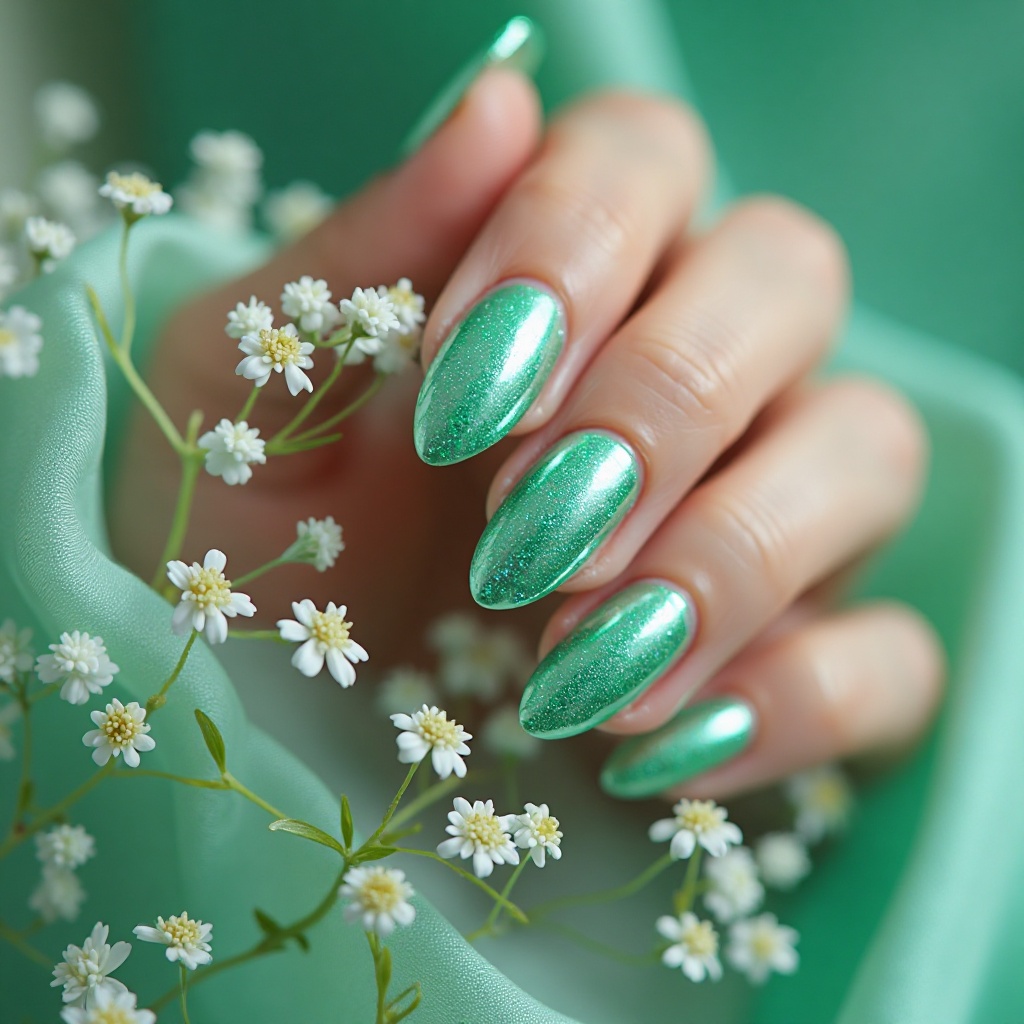
Bright mint green chrome finish that creates a mirror-like, futuristic effect. The chrome makes the mint incredibly vibrant and reflective, catching light dramatically. This fun, fresh color is perfect for spring and summer proms and pairs beautifully with mint, white, coral, or gold dresses.
- Difficulty: Intermediate—requires gel equipment
- Time to complete: 30-40 minutes
- Best for: A bold, memorable look that photographs like a dream.
- Why it works: Mint green is unexpected but still soft and feminine, and chrome makes it feel special.
- What makes it different: It has that high-fashion, editorial mirror finish you can’t get with regular polish.
Step-by-Step:
- Prep and base: Standard prep, apply gel base coat, cure 60 seconds.
- Apply dark base: Paint 2 coats of a dark teal or forest green gel polish. Chrome powders need a dark base to show their true color—I used Beetles Gel in #847 ($10 for set) . Cure 60 seconds between coats.
- Apply gel top coat: Paint a thin layer of no-wipe gel top coat, cure 60 seconds until tacky.
- Apply mint chrome powder: Immediately rub mint green chrome powder onto the tacky surface using an eyeshadow applicator. Use circular motions and firm pressure. The mirror effect appears instantly.
- Seal chrome: Apply gel top coat gently to avoid disturbing the powder, cure 60 seconds. Apply a second layer for durability, cure again. Wipe with rubbing alcohol.
9. Forest Green with Gold Glitter Gradient
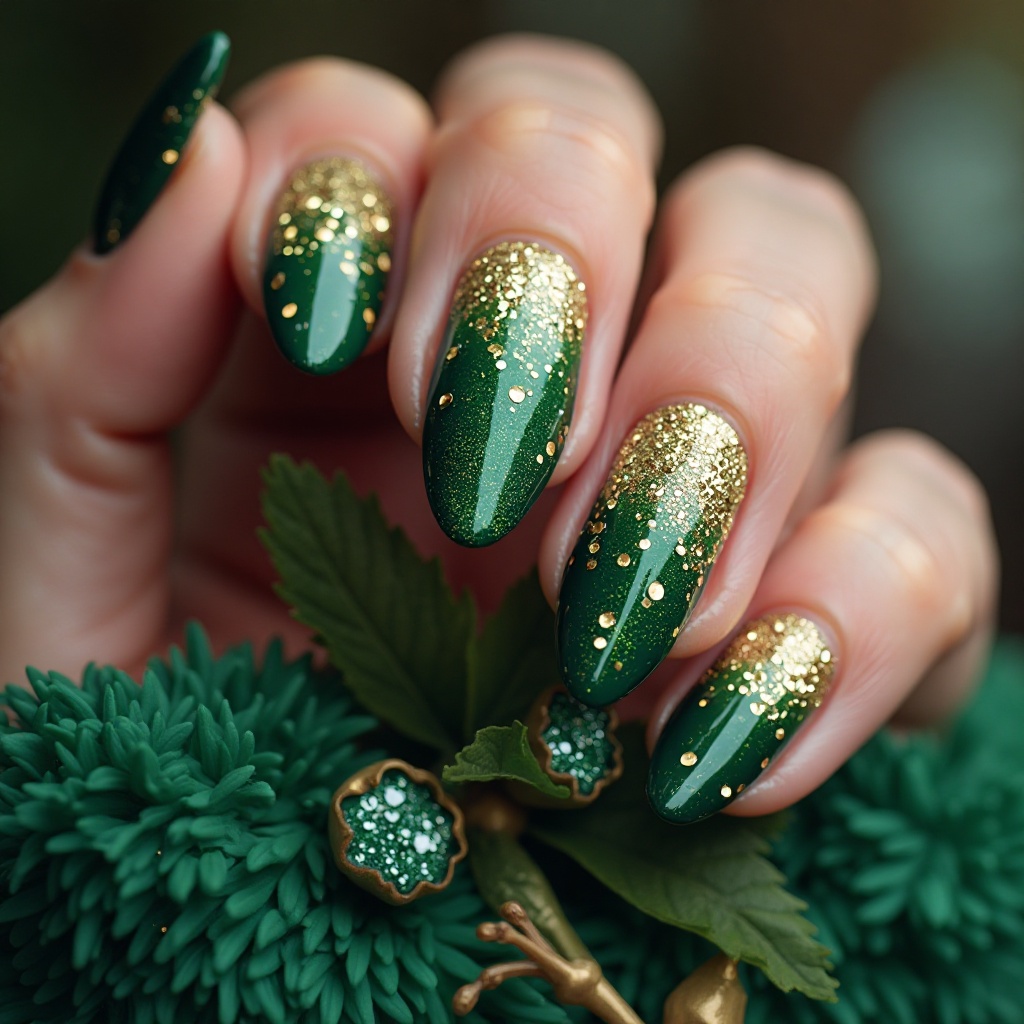
Deep forest green base transitioning into concentrated gold glitter at the tips, creating a luxurious, nature-inspired look. The rich green provides a stunning foundation while gold glitter adds warmth and sparkle. This combination feels elegant and perfect for fall or winter proms.
- Difficulty: Intermediate
- Time to complete: 60-70 minutes
- Best for: A sophisticated, elegant look perfect for fall or winter proms.
- Why it works: Forest green is elegant and unexpected, and the gold gradient creates beautiful warmth.
- What makes it different: The warm gold against deep green feels like jewelry for your nails.
Step-by-Step:
- Prep and protect: Apply liquid latex around nails, then base coat.
- Apply green base: Paint 2-3 coats forest green. Essie “Going Incognito” ($9) is my favorite for this—it’s a true deep green. Dry 2 minutes between coats.
- Create gradient: Pour warm gold glitter polish onto a paper plate. Dab a sponge into the glitter and bounce onto nail tips, heavy at tips and fading toward center. Use a true gold glitter like OPI “GoldenEye” ($12) for the best warmth. Repeat 3 times, drying 3 minutes between layers.
- Seal: Apply 3 thick layers of clear top coat to smooth the glitter, waiting 3 minutes between layers.
10. Mint to White Ombré with Silver Accents
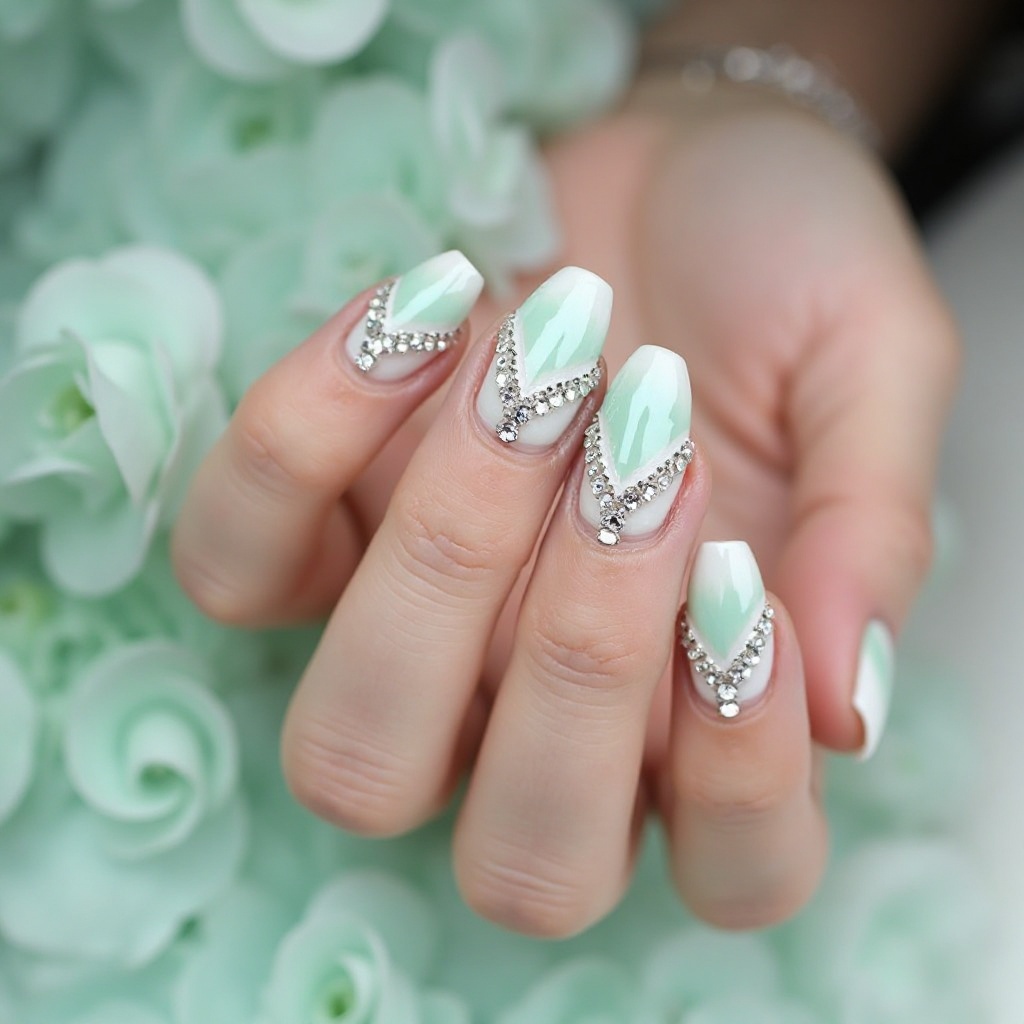
Gradient transition from fresh mint green at the tips to milky white at the cuticle, with tiny silver rhinestones or striping tape accents. The soft color combination feels fresh and romantic while silver details add sparkle. This design is perfect for spring proms and pastel dresses.
- Difficulty: Intermediate
- Time to complete: 70-80 minutes
- Best for: Spring proms and pastel dresses—it’s soft, romantic, and photograph-friendly.
- Why it works: The mint-to-white gradient is wearable while still being colorful and interesting.
- What makes it different: The single rhinestone at the gradient transition point creates an elegant focal point.
Step-by-Step:
- Prep and protect: Apply liquid latex around nails, then base coat.
- Apply white base: Paint 2 coats of milky white on all nails. OPI “Funny Bunny” ($12) is perfect for this—it’s sheer but buildable. Dry 2 minutes between coats.
- Create gradient: On a paper plate, paint white and mint stripes side by side. I used Essie “Mint Candy Apple” ($9) for the mint. Dab a sponge to pick up both colors. Bounce onto nails with white at cuticle, mint at tips. Repeat 3-4 times, drying 3 minutes between applications.
- Smooth: Let dry 10 minutes. Apply 2 layers of clear top coat to smooth the sponge texture, wait 3 minutes between layers.
- Apply rhinestones: On 1-2 accent nails, apply a tiny dot of nail glue where the mint transitions to white (mid-nail area). Use a dotting tool to pick up and place one small silver rhinestone (SS6 size). Press for 3 seconds. One stone per nail is elegant—avoid over-embellishing.
- Final seal: Apply 2 more thick layers of top coat, building around the rhinestone bases to encapsulate them completely.
11. Navy Blue with Silver Chrome Tips
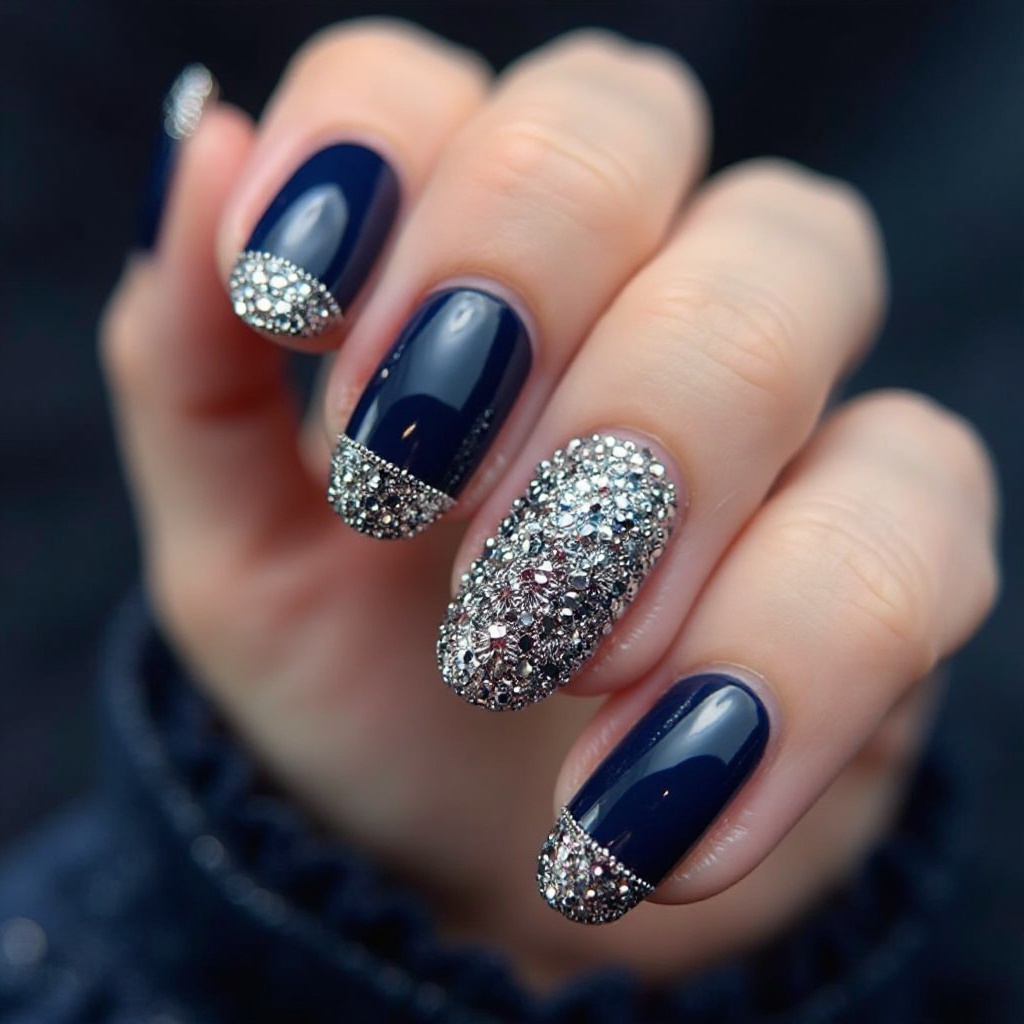
Deep navy base paired with metallic silver chrome tips in a modern French manicure style. The dark navy provides sophistication while silver chrome tips add dramatic sparkle and edge. This design works beautifully with navy, black, silver, or burgundy dresses and feels both classic and contemporary.
- Difficulty: Intermediate—requires gel equipment
- Time to complete: 45-60 minutes
- Best for: A classic-meets-modern look that works with navy, black, silver, or burgundy dresses.
- Why it works: Navy is timeless and elegant, while chrome tips make it feel special-occasion appropriate.
- What makes it different: The chrome tips are reflective and mirror-like, not just metallic polish.
Step-by-Step:
- Prep and base: Standard prep, apply gel base coat, cure 60 seconds.
- Apply navy base: Paint the entire nail with 2 coats of navy gel polish. Cure 60 seconds between coats.
- Apply tape guides: Once cured, place French tip guides or striping tape 3-4mm from the tips. Press firmly.
- Apply gel top coat to tips: Paint a thin layer of no-wipe gel top coat only on the tips beyond the tape line. Cure 60 seconds until tacky.
- Apply silver chrome: Rub silver chrome powder onto the tacky tips using an eyeshadow applicator. The mirror effect appears instantly. Dust off excess.
- Remove tape and seal: Carefully peel away the tape. Apply gel top coat to the entire nail, cure 60 seconds. Apply a second layer, cure again. Wipe with rubbing alcohol.
12. Baby Blue Matte with White Pearl Accents
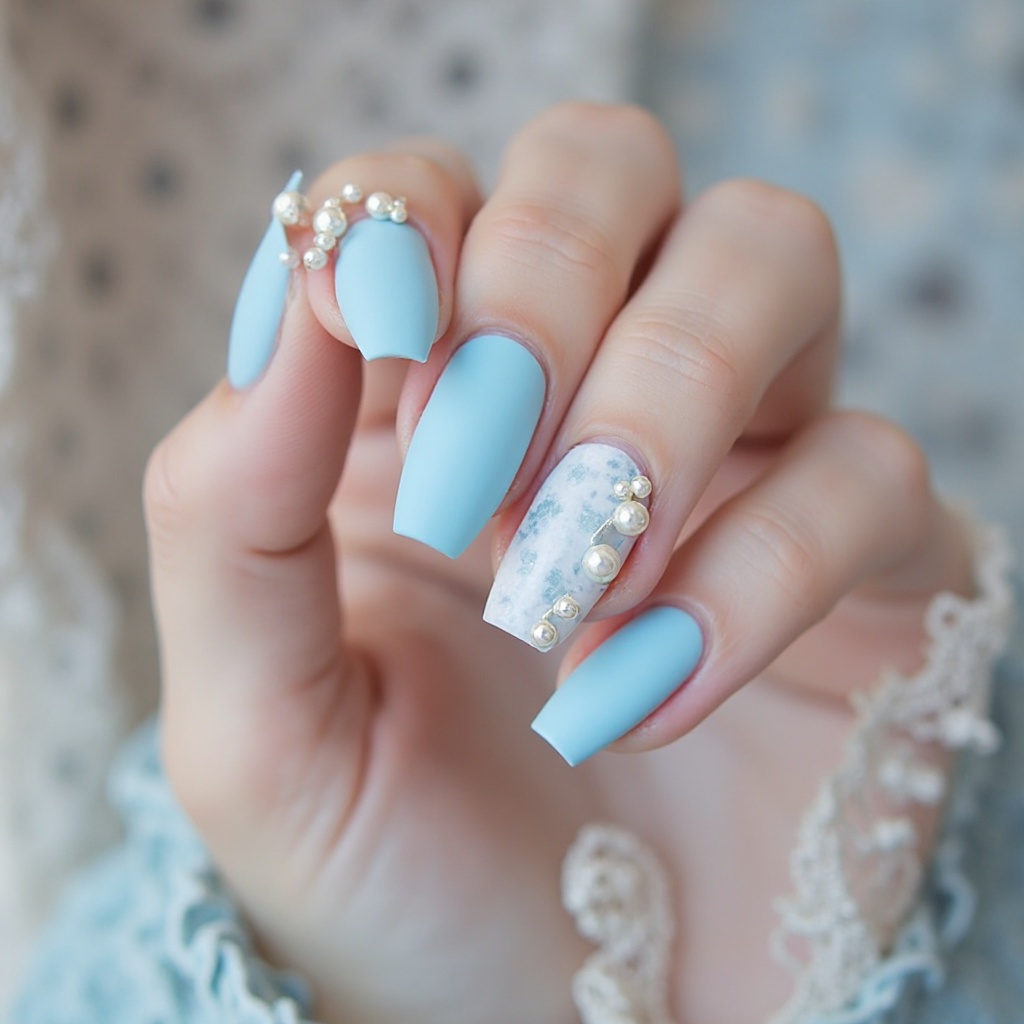
Soft baby blue in a matte finish adorned with small white pearl accents on accent nails. The powder-blue provides a sweet, romantic base while white pearls add delicate luxury. The matte finish makes it feel modern and sophisticated rather than juvenile.
- Difficulty: Beginner-Intermediate
- Time to complete: 50-65 minutes
- Best for: A sweet, romantic look that’s universally flattering.
- Why it works: Baby blue photographs beautifully, and the matte finish with pearls feels modern.
- What makes it different: The pearls add texture and dimension without being sparkly or glittery.
Step-by-Step:
- Prep and base: Standard prep plus base coat.
- Apply baby blue: Paint 2-3 coats of baby blue—light colors often need 3 coats. I used Essie “Borrowed & Blue” ($9) . Dry 2 minutes between coats.
- Apply pearls: On 1-2 accent nails, place 3-5 small white pearls (2-3mm size) in a curved line along the cuticle or clustered in one corner. Apply a tiny dot of nail glue, pick up the pearl with a dotting tool, and press into place. Hold for 3 seconds. Let dry 5 minutes.
- Seal pearls: Apply regular clear top coat around the pearl bases (not matte yet) to secure them. Apply 2 layers, building up around the pearls. Let dry 10 minutes.
- Apply matte top coat: Once pearls are completely secure, carefully apply matte top coat over all nails including the pearls. The matte over pearls creates an interesting contrast. Use smooth strokes without overworking.
13. Electric Blue Holographic
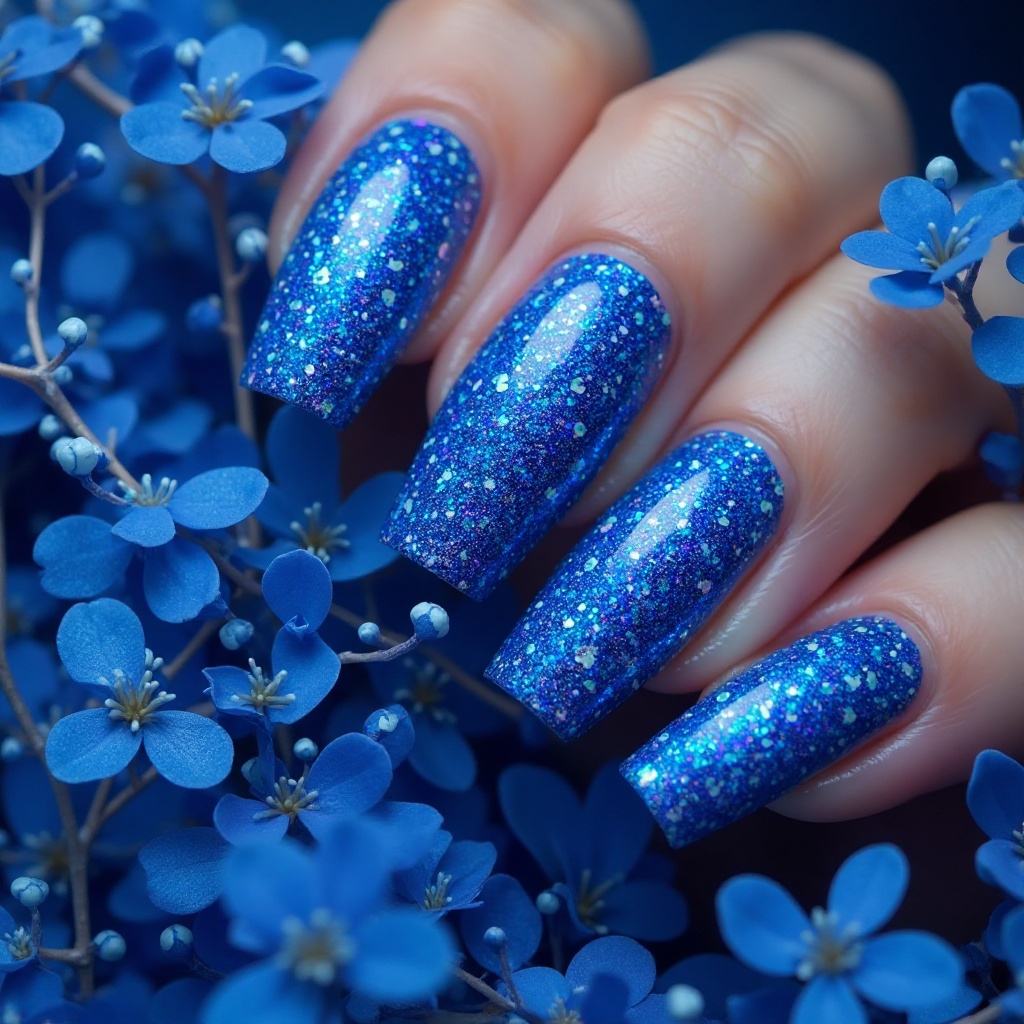
Vibrant electric blue holographic polish that shifts with rainbow sparkles in the light. The saturated blue is bold and eye-catching while the holographic finish adds dimension and sparkle. This high-impact design is perfect for those wanting to make a statement.
- Difficulty: Beginner
- Time to complete: 25-35 minutes
- Best for: A high-impact, statement-making look with minimal effort.
- Why it works: Electric blue is memorable and photographs incredibly well.
- What makes it different: The holographic effect is built into the polish—no extra steps needed.
Step-by-Step:
- Prep and base: Standard prep plus base coat. Make sure your base coat is completely smooth—any imperfections will show through holographic polish.
- Apply holographic blue: Paint the first coat thin and even. It will look streaky—that’s normal for holographic polish. Dry 2 minutes. Apply a second thin coat. Holographic polishes often have perfect coverage in 2 coats. I love ILNP “Birefringence” in blue ($10, their website) for this.
- Seal: Let dry 5 minutes completely. Apply a glossy top coat to enhance the holographic effect and add shine. Some people prefer to skip top coat on holographic to maximize sparkle—your choice.
14. Sky Blue with White Cloud Art
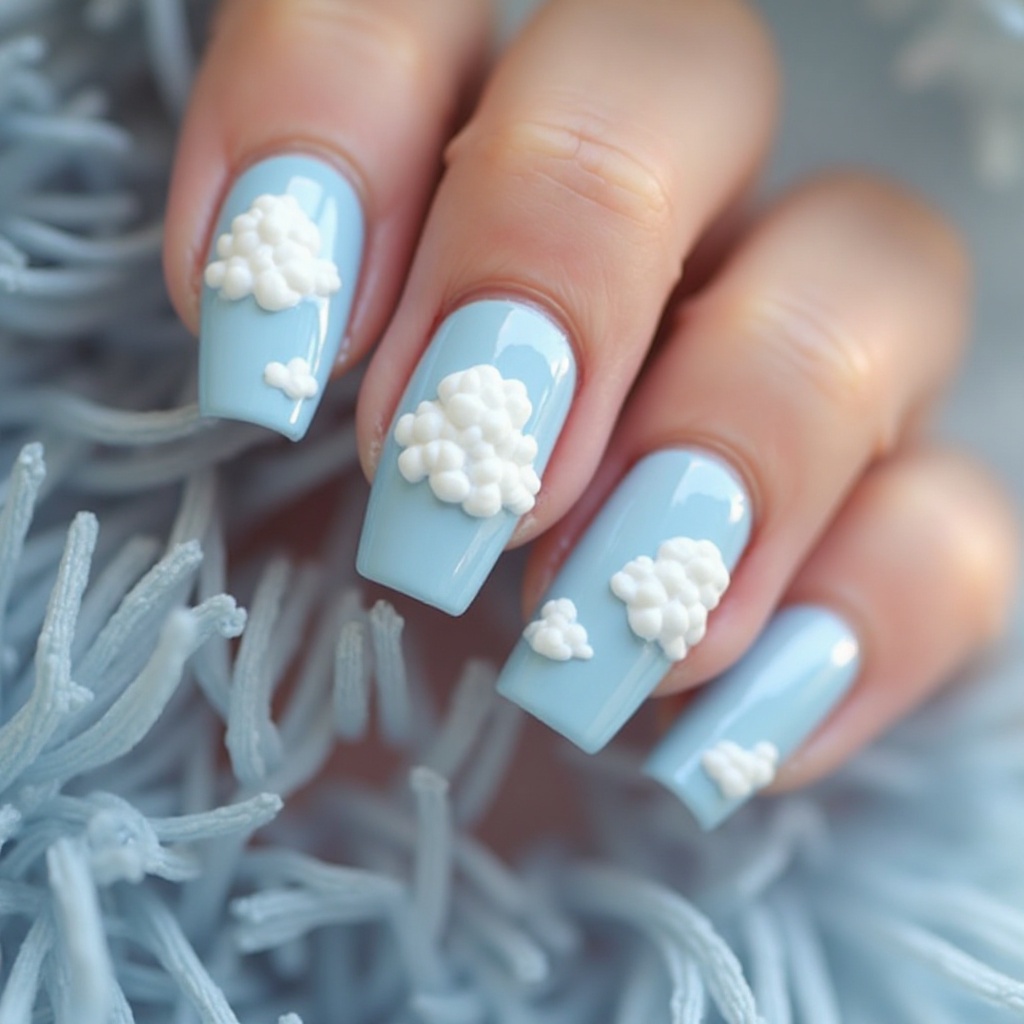
Soft sky blue base with hand-painted fluffy white clouds on accent nails, creating a dreamy, whimsical aesthetic. The light blue provides a serene foundation while white clouds add artistic, playful detail. This design is perfect for daytime or outdoor proms.
- Difficulty: Beginner-Intermediate
- Time to complete: 45-60 minutes
- Best for: Daytime or outdoor proms—it has a fresh, airy feel.
- Why it works: Sky blue is soft and romantic, and the cloud art adds personality without being too bold.
- What makes it different: The sponge method creates fluffy, organic-looking clouds that look more realistic than hand-painted shapes.
Step-by-Step:
- Prep and base: Standard prep plus base coat.
- Apply sky blue base: Paint 2-3 coats of sky blue. Essie “Bikini So Teeny” ($9) is my favorite for this—it’s a perfect soft blue. Dry 2 minutes between coats.
- Paint clouds (sponge method): On 1-2 accent nails, dab a small piece of makeup sponge into white polish. Lightly dab onto the nail in irregular cloud shapes—2-3 clouds per nail. The sponge creates soft, fluffy edges naturally. Let dry 5 minutes.
- Paint clouds (brush method alternative): If you prefer hand-painting, use a thin brush to paint irregular oval/blob shapes. While wet, use a clean dotting tool to lightly dab and soften the edges, creating a fluffy appearance.
- Seal: Let clouds dry 10 minutes completely. Apply 2 layers of clear top coat.
15. Teal Ombré with Turquoise Glitter
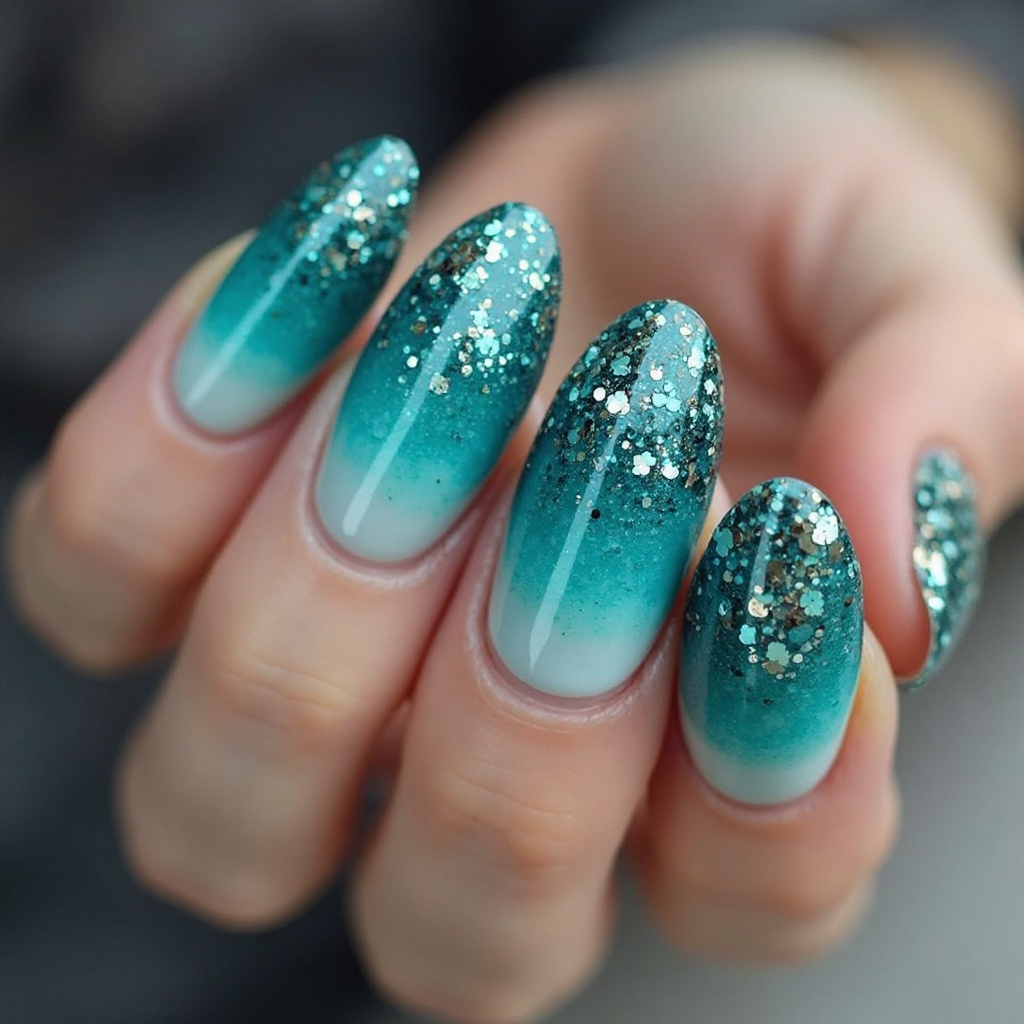
Gradient transition from deep teal at the cuticle to bright turquoise at the tips, topped with concentrated turquoise or holographic glitter at the very tips. The ombré showcases multiple blue-green tones while glitter adds sparkle. This design bridges blue and green beautifully.
- Difficulty: Intermediate
- Time to complete: 70-85 minutes
- Best for: Bridging blue and green beautifully—perfect if you can’t decide between the two.
- Why it works: Teal is sophisticated and unique, and the ombré technique creates dimension.
- What makes it different: It uses three shades for the smoothest, most professional-looking gradient.
Step-by-Step:
- Prep and protect: Apply liquid latex around nails, then base coat.
- Apply lightest base: Paint 2 coats of bright turquoise as your base. OPI “Can’t Find My Czechbook” ($12) works great. Dry 2 minutes between coats.
- Create gradient: On a paper plate, paint three stripes: deep teal, medium teal, and bright turquoise. I use Essie “Go Overboard” ($9) for the deep teal. Dab a sponge to pick up all three colors. Bounce onto the nail with the darkest at the cuticle. Repeat 3 times, drying 3 minutes between layers.
- Add glitter tips: Dab a sponge into turquoise glitter polish and bounce onto the very tips only. Apply 2 layers for concentrated sparkle.
- Smooth and seal: Let dry 10 minutes. Apply 3 layers of clear top coat, waiting 3 minutes between layers.
Red Prom Nails: 5 Classic Ideas
16. Classic Red with Gold Striping Tape Accent
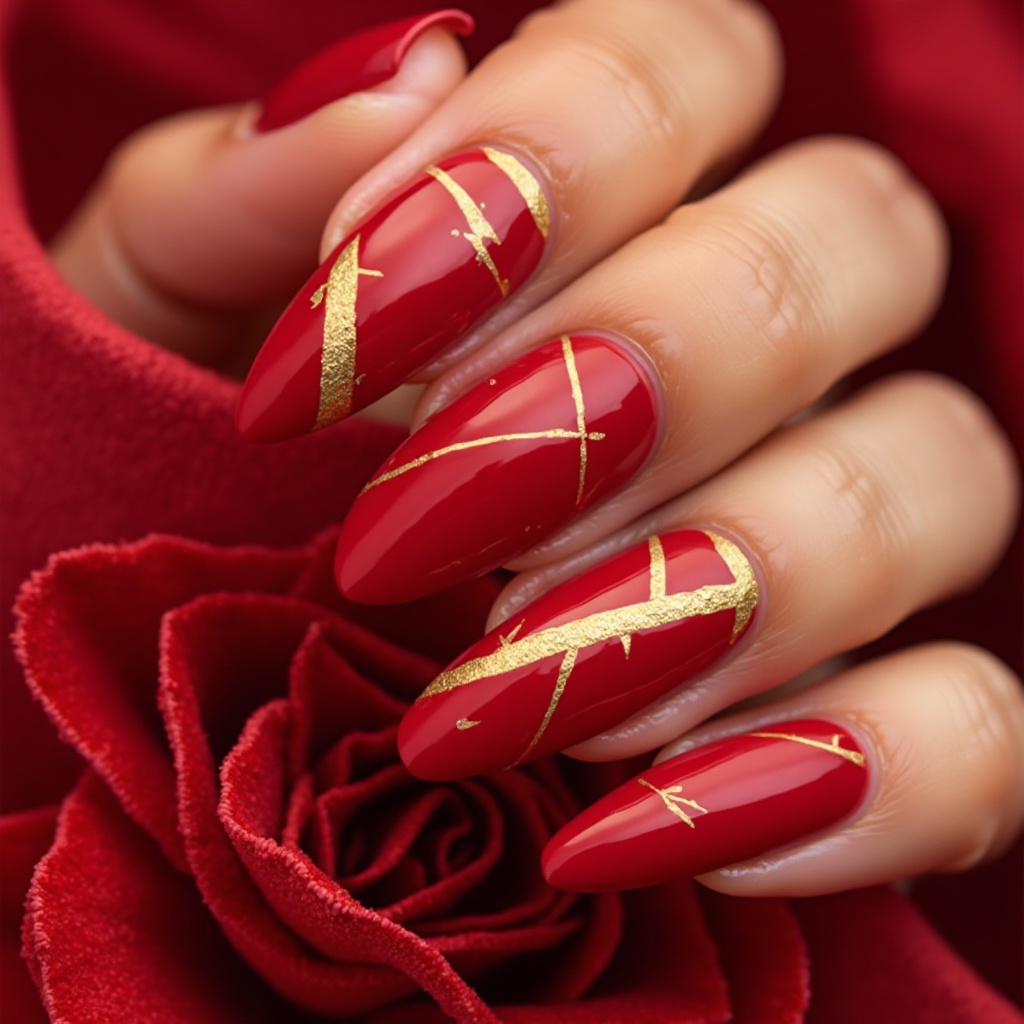
Timeless, glossy true red base with thin gold striping tape applied in geometric patterns or simple lines on accent nails. The vibrant red is bold and confident while gold tape adds elegant detail. This combination exudes Old Hollywood glamour and sophistication.
- Difficulty: Beginner-Intermediate
- Time to complete: 35-50 minutes
- Best for: Old Hollywood glamour that’s eternally chic.
- Why it works: Red nails are timeless and photograph beautifully, and the gold tape elevates them.
- What makes it different: The gold tape adds geometric precision that looks expensive and intentional.
Step-by-Step:
- Prep and base: Standard prep plus base coat.
- Apply red base: Paint 2-3 coats of classic red. My go-to is OPI “Big Apple Red” ($12) —it’s the perfect true red. Dry 2 minutes between coats. Let the final coat dry completely for 10 minutes—tape won’t adhere to wet polish.
- Plan design: Decide on tape placement. Options: a single diagonal stripe, a V-shape chevron, vertical stripes, or geometric crossing lines. Keep it simple—1-3 strips per nail maximum on accent nails only.
- Apply tape: Cut 1mm gold striping tape to your desired length. Use tweezers to place it on the nail, pressing down firmly along the entire length.
- Trim excess: Use scissors or nail clippers to carefully trim any tape extending beyond the nail edge.
- Seal immediately: Apply clear top coat over the entire nail including the tape within 2-3 minutes of placing it. This secures the tape and prevents lifting. Apply a second thick layer for extra security.
17. Cherry Red with White Tips (Modern French)
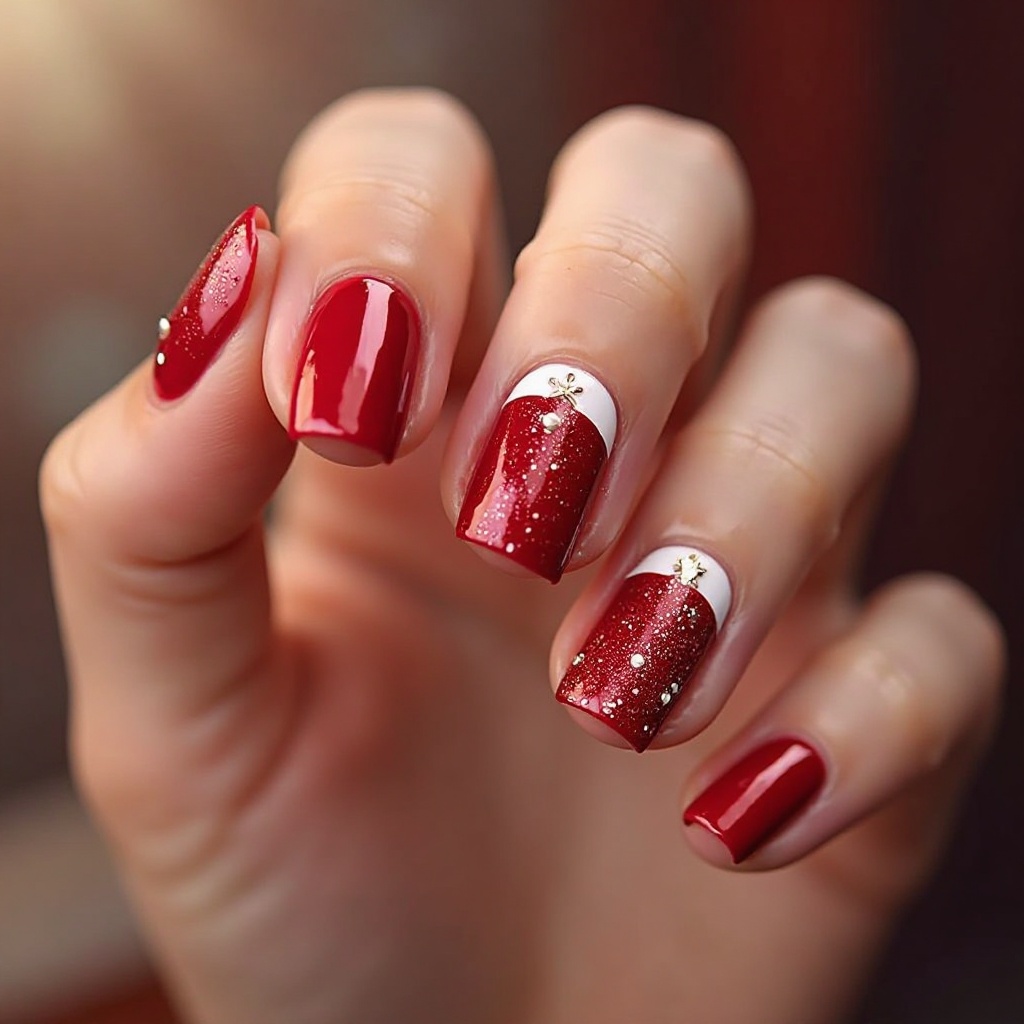
Vibrant cherry red base paired with crisp white tips in a modern French manicure style with slightly thicker tips than traditional. The red and white combination is classic and fresh while feeling bold and contemporary. This design bridges retro and modern aesthetics beautifully.
- Difficulty: Intermediate
- Time to complete: 50-65 minutes
- Best for: A retro-inspired look with modern proportions.
- Why it works: The red-white combo is striking and memorable.
- What makes it different: The thicker tips (3-4mm instead of 2mm) make it feel current, not old-fashioned.
Step-by-Step:
- Prep and base: Standard prep plus base coat.
- Apply red base: Paint the entire nail with 2-3 coats of cherry red. I used Essie “Really Red” ($9) for this. Dry 2 minutes between coats. Let the final coat dry 10 minutes completely.
- Apply French guides: Place French tip guides or striping tape 3-4mm from the tips. Press down firmly.
- Paint white tips: Apply white polish in thin, even coats on the tips beyond the tape. Use Essie “Blanc” ($9) for a crisp, opaque white. Apply 2-3 coats for full opacity, drying 2 minutes between. Remove the tape immediately after the last coat while the polish is still wet for clean lines.
- Seal: Let dry 5 minutes. Apply 2 layers of clear top coat to all nails.
18. Red Glitter Gradient
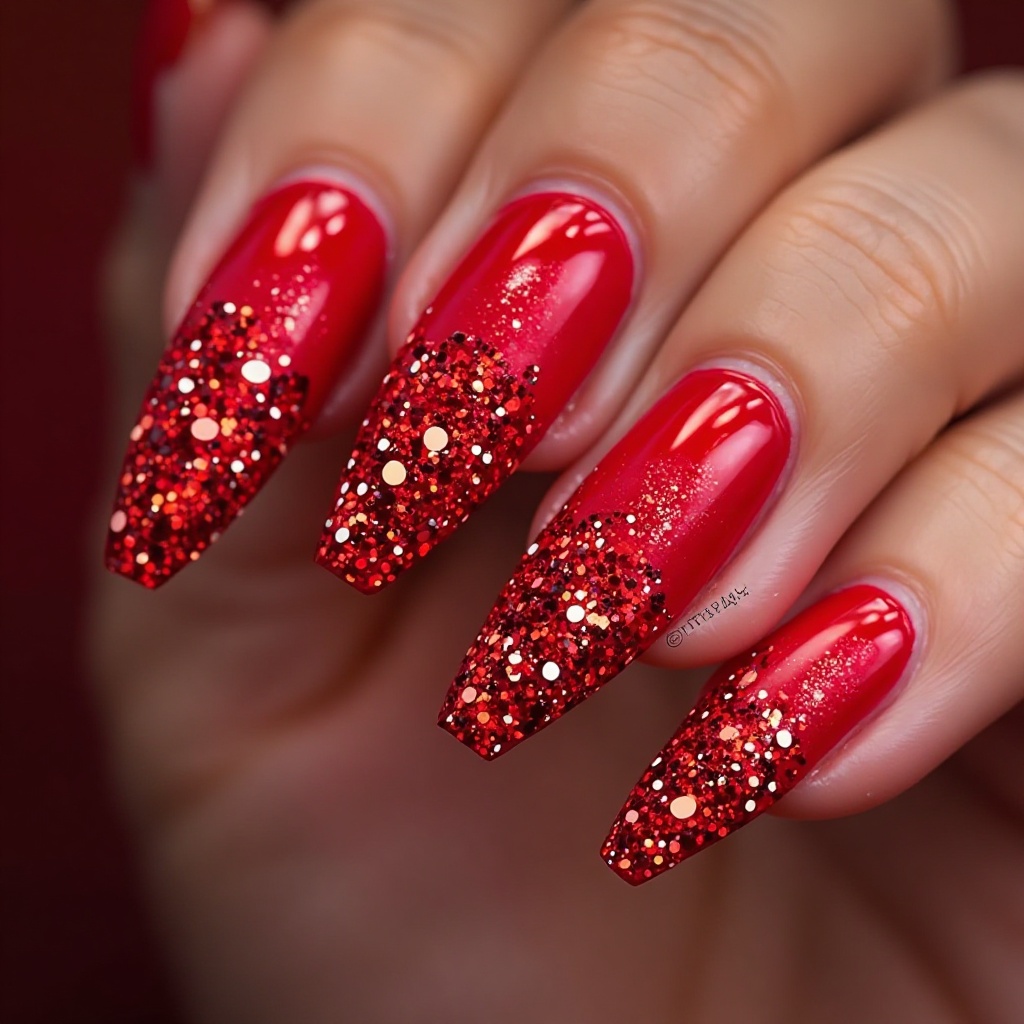
Solid red base transitioning into dense red or holographic glitter concentrated at the tips, creating dramatic sparkle while maintaining red color throughout. The glitter gradient adds special-occasion glamour without changing the base color. This design is perfect for those who want red nails with extra sparkle.
- Difficulty: Intermediate
- Time to complete: 60-75 minutes
- Best for: Those who want classic red nails but with extra sparkle for photos.
- Why it works: The gradient adds dimension and excitement to a classic color without being too complicated.
- What makes it different: You get the boldness of a red nail with the built-in sparkle of a glitter tip.
Step-by-Step:
- Prep and protect: Apply liquid latex around nails, then base coat.
- Apply red base: Paint 2-3 coats of classic red. Let the final coat dry 5 minutes.
- Create gradient: Pour red or holographic glitter polish onto a paper plate. Dab a sponge into the glitter and bounce onto nail tips, heavy at the tip and fading toward center. Repeat 3-4 times, drying 3 minutes between layers.
- Seal: Apply 3 thick layers of clear top coat to smooth the glitter texture, waiting 3 minutes between layers.
19. Red with Black Lace Stamping
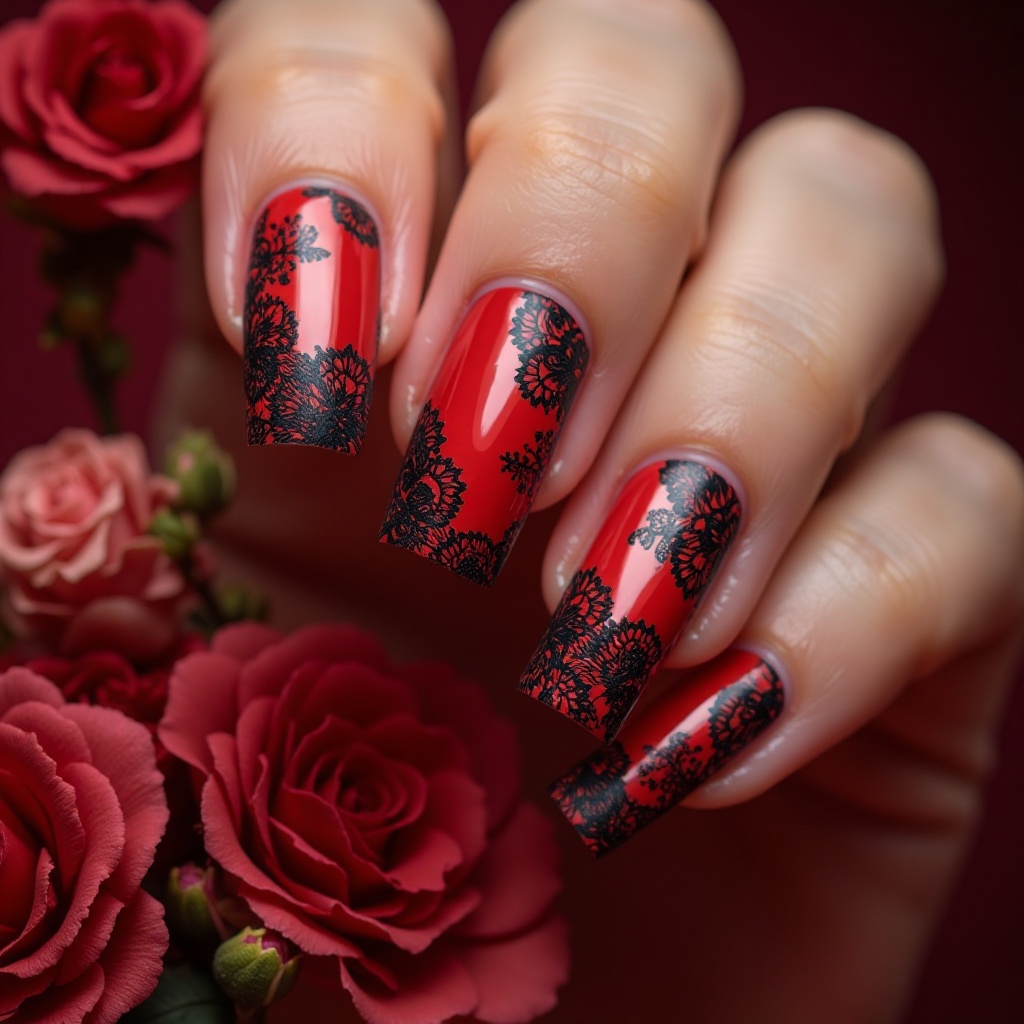
Classic red base with delicate black lace patterns stamped or hand-painted on accent nails, creating a romantic, vintage-inspired look. The red and black combination is dramatic and elegant while the lace pattern adds intricate, feminine detail. This design channels vintage glamour with modern execution.
- Difficulty: Beginner (with stamping)
- Time to complete: 45-70 minutes
- Best for: Achieving an intricate, vintage look without needing a steady hand for painting.
- Why it works: The lace pattern adds special occasion detail, and the red-black combo is timeless.
- What makes it different: It channels Old Hollywood glamour with a modern, easy-to-execute technique.
Step-by-Step (Stamping Method):
- Prep and base: Standard prep plus base coat.
- Apply red base: Paint 2-3 coats of red. Let the final coat dry completely for 10 minutes—this is crucial for stamping.
- Stamp the lace: Apply black stamping polish to a lace pattern on your stamping plate. Scrape off the excess, pick up the design with your stamper, and roll it onto 1-2 accent nails. Let it dry for 5 minutes.
- Seal: Apply 2 layers of clear top coat. I like using a water-based top coat first to avoid smearing the stamp, then a regular quick-dry top coat like Seche Vite ($9-11) .
Black Prom Nails: 5 Edgy Ideas
20. Glossy Black with Gold Foil Accents
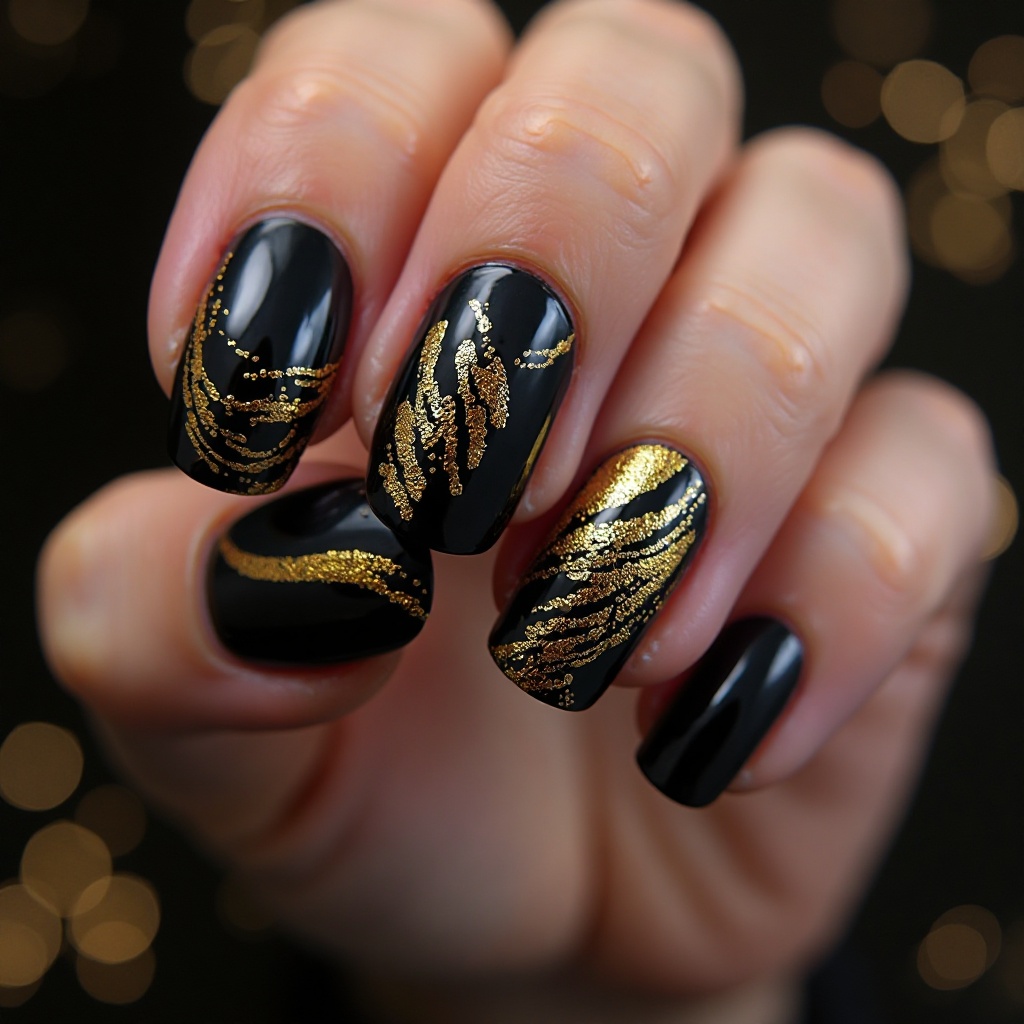
Shiny, jet-black base with hand-placed gold foil applied in abstract patterns on select nails. The black provides bold foundation while gold foil adds luxury and warmth. This combination is dramatic and high-fashion, perfect for making a statement.
- Difficulty: Intermediate
- Time to complete: 50-65 minutes
- Best for: Making a dramatic, high-fashion statement that looks editorial.
- Why it works: Black is timeless, and real gold foil elevates it from basic to special-occasion worthy.
- What makes it different: The organic, abstract application of the foil looks more expensive and intentional than a stamped pattern.
Step-by-Step:
- Prep and base: Standard prep plus base coat.
- Apply black base: Paint 2-3 coats of jet-black polish. I swear by Essie “Licorice” ($9, at drugstores) —it’s one of the most opaque blacks I’ve found. Dry 2 minutes between coats. Let the final coat dry 5 minutes.
- Apply foil adhesive: On 1-3 accent nails, paint a thin layer of nail foil adhesive in abstract shapes, diagonal stripes, or random patches. I use Kiss Nail Foil Adhesive ($5, at Walmart) . Let it dry for 3-5 minutes until it’s tacky but not wet.
- Apply gold foil: Tear small pieces of genuine gold nail foil. Place it shiny-side-up onto the tacky adhesive and press firmly with your finger or a silicone tool for 3-5 seconds. Quickly peel away the foil sheet—the gold transfers to the nail. Repeat until you achieve your desired coverage.
- Seal: This is non-negotiable. Apply 3 thick layers of clear top coat over all nails, being generous on the foil nails. Wait 5 minutes between layers to prevent the foil from lifting.
21. Matte Black with Silver Chrome Accents
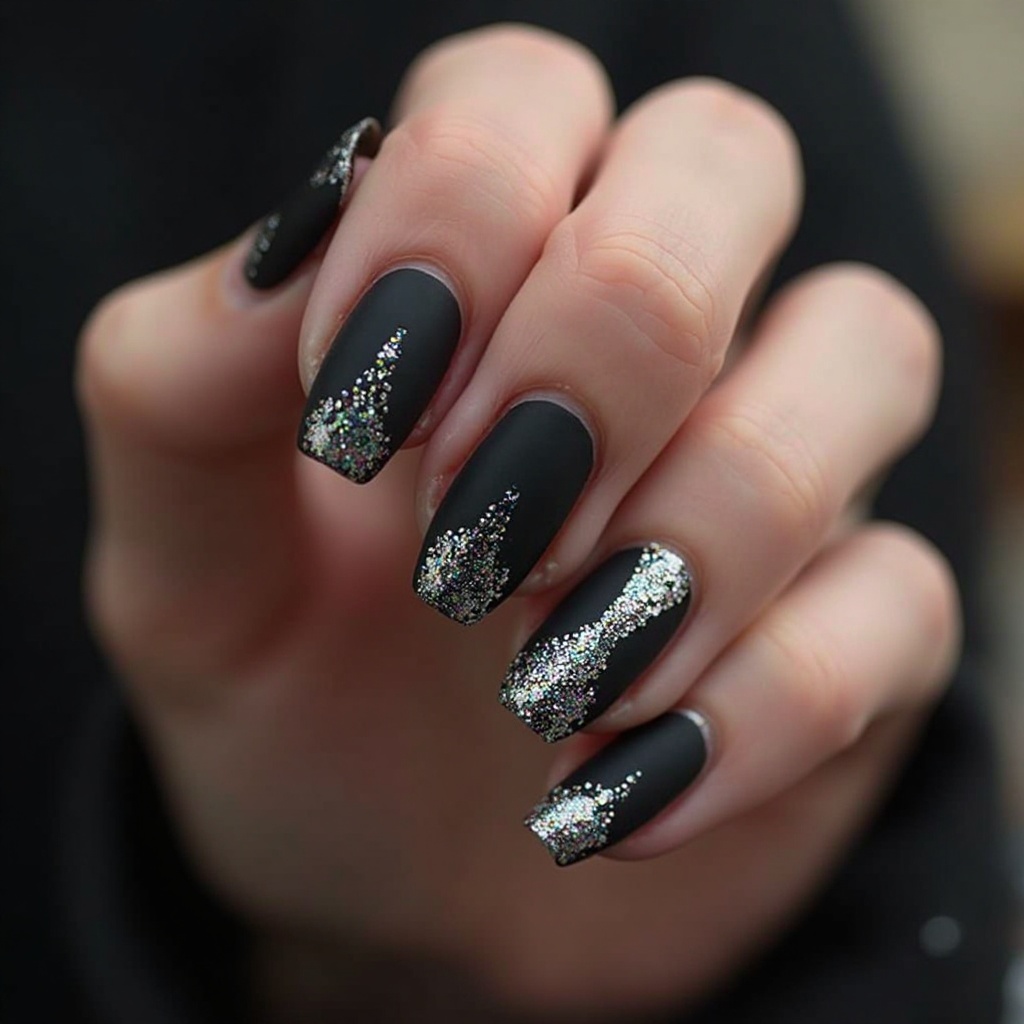
Flat matte black base with select nails or nail tips in reflective silver chrome, creating striking contrast between textures. The matte black is modern and edgy while silver chrome adds glamorous sparkle. This design plays with texture contrast beautifully.
- Difficulty: Intermediate—requires gel equipment
- Time to complete: 45-60 minutes
- Best for: A fashion-forward look that balances edgy and glamorous elements.
- Why it works: The texture contrast is visually interesting and sophisticated, and black-silver is a classic color combo that photographs beautifully.
- What makes it different: The matte and mirror finishes side by side create high-impact contrast that catches the eye.
Step-by-Step:
- Prep and base: Standard prep, apply gel base coat, cure 60 seconds.
- Apply black gel: Paint 2 coats of black gel on all nails. I use Modelones Black Gel ($12 for set, Amazon) . Cure 60 seconds between coats.
- Create chrome accents: On 1-2 accent nails, apply a thin layer of no-wipe gel top coat and cure 60 seconds until tacky. Rub silver chrome powder onto the tacky surface using an eyeshadow applicator. Dust off excess.
- Seal chrome: Apply regular glossy gel top coat to the chrome nails only, cure 60 seconds. Apply a second layer for durability, cure again.
- Apply matte to others: Apply matte gel top coat to the remaining black nails (not chrome nails), cure 60 seconds. Wipe all nails with rubbing alcohol.
- Pro Tip: Apply matte black to most nails and silver chrome to just 1-2 accent nails for the best balance—too much chrome can overwhelm the design.
21. Black with Crystal Cluster Accent
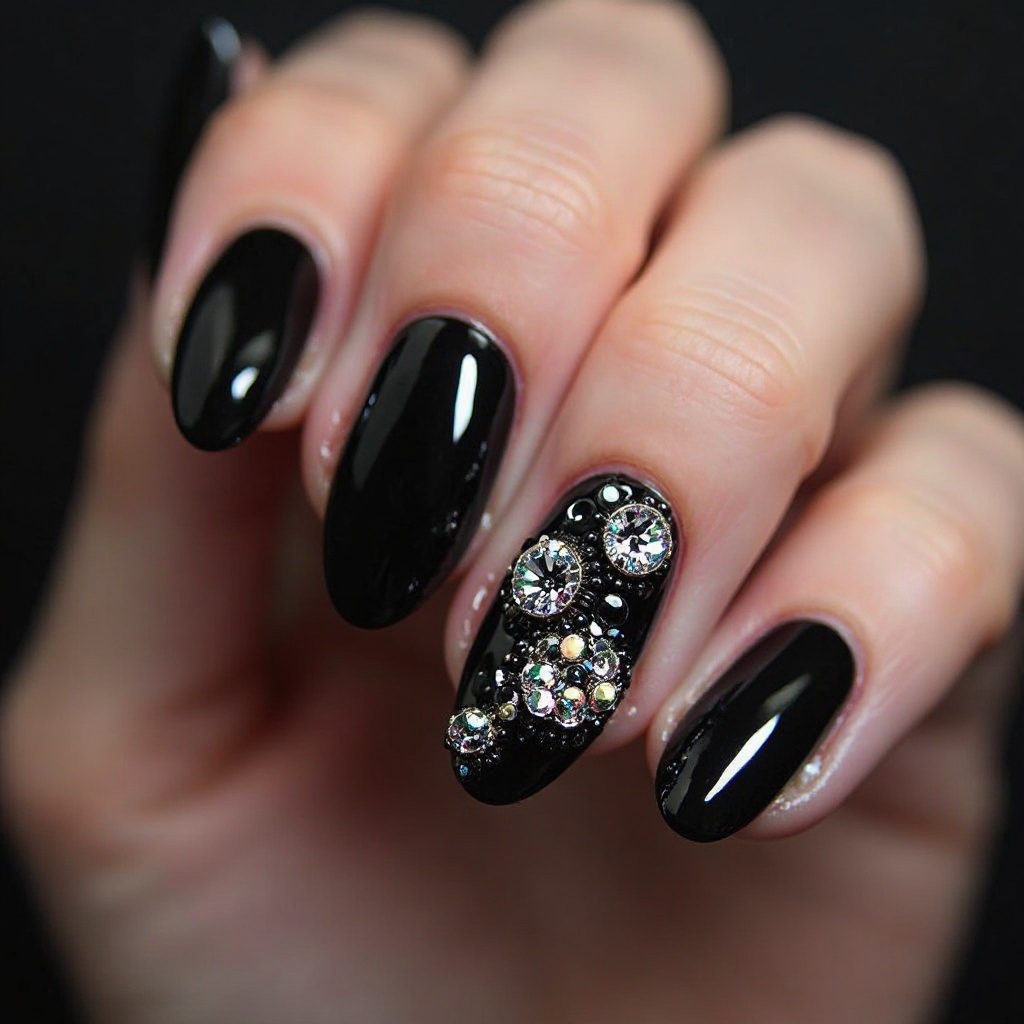
Solid black base with clustered Swarovski crystals in various sizes on one or two accent nails, creating a luxurious, jewelry-inspired look. The black provides dramatic foundation while crystals add serious sparkle and dimension. This design is perfect for evening proms.
- Difficulty: Intermediate
- Time to complete: 60-75 minutes
- Best for: Evening proms and formal events where you want maximum glamour.
- Why it works: Black and crystals is a classic red-carpet combination that feels expensive without being over-the-top.
- What makes it different: Using crystals in multiple sizes creates dimension and makes the cluster look more organic and intentional.
Step-by-Step:
- Prep and base: Standard prep plus base coat.
- Apply black base: Paint 2-3 coats of black. Essie “Licorice” ($9, at drugstores) is perfect for this. Dry 2 minutes between coats. Let the final coat dry 10 minutes completely.
- Plan cluster placement: Decide which 1-2 nails get crystals. Popular placements: clustered near the cuticle on one side, or in one corner of the nail.
- Apply crystals: Start with the largest crystal (SS10). Apply a tiny dot of nail glue, pick up the crystal with a dotting tool or waxed stick, and press into place. Work outward, placing medium (SS8) then small (SS6) crystals around the large one, creating an organic cluster shape. Use 5-10 crystals per nail total.
- Encapsulate: Let dry 5 minutes. Apply 3-4 thick layers of clear top coat, really building up around the crystal bases. Wait 5 minutes between layers. This prevents them from snagging on hair and fabric.
- Pro Tip: I buy Swarovski crystal mixes on Etsy for around $8—they come in assorted sizes perfect for clusters.
22. Black Ombré to Gray
Gradient transition from pure black at the tips to soft gray at the cuticle, creating a sophisticated, smoky effect. The ombré adds dimension while keeping the overall look dark and edgy. This design is perfect for those who want black nails with more visual interest.
- Difficulty: Intermediate
- Time to complete: 70-85 minutes
- Best for: Those who want black nails but with more visual interest and depth.
- Why it works: The ombré creates dimension that photographs beautifully, and the dark palette is universally flattering.
- What makes it different: Using three shades (black, charcoal, light gray) creates a smoother, more professional gradient than just two colors.
Step-by-Step:
- Prep and protect: Apply liquid latex around nails, then base coat.
- Apply light gray base: Paint 2 coats of light gray as your base. Essie “Chinchilly” ($9) is a perfect cool gray. Dry 2 minutes between coats.
- Create gradient palette: On a paper plate, paint three stripes next to each other: black, charcoal gray, and light gray.
- Apply gradient: Dab a makeup sponge to pick up all three colors at once. Bounce onto the nail with black concentrated at the tips, gray at the cuticle. Repeat 3-4 times, drying 3 minutes between layers, until the gradient is smooth and vibrant.
- Smooth and seal: Let dry 10 minutes. Apply 3 layers of clear top coat, waiting 3 minutes between layers. This smooths out the sponge texture.
23. Black with White Marble Veining
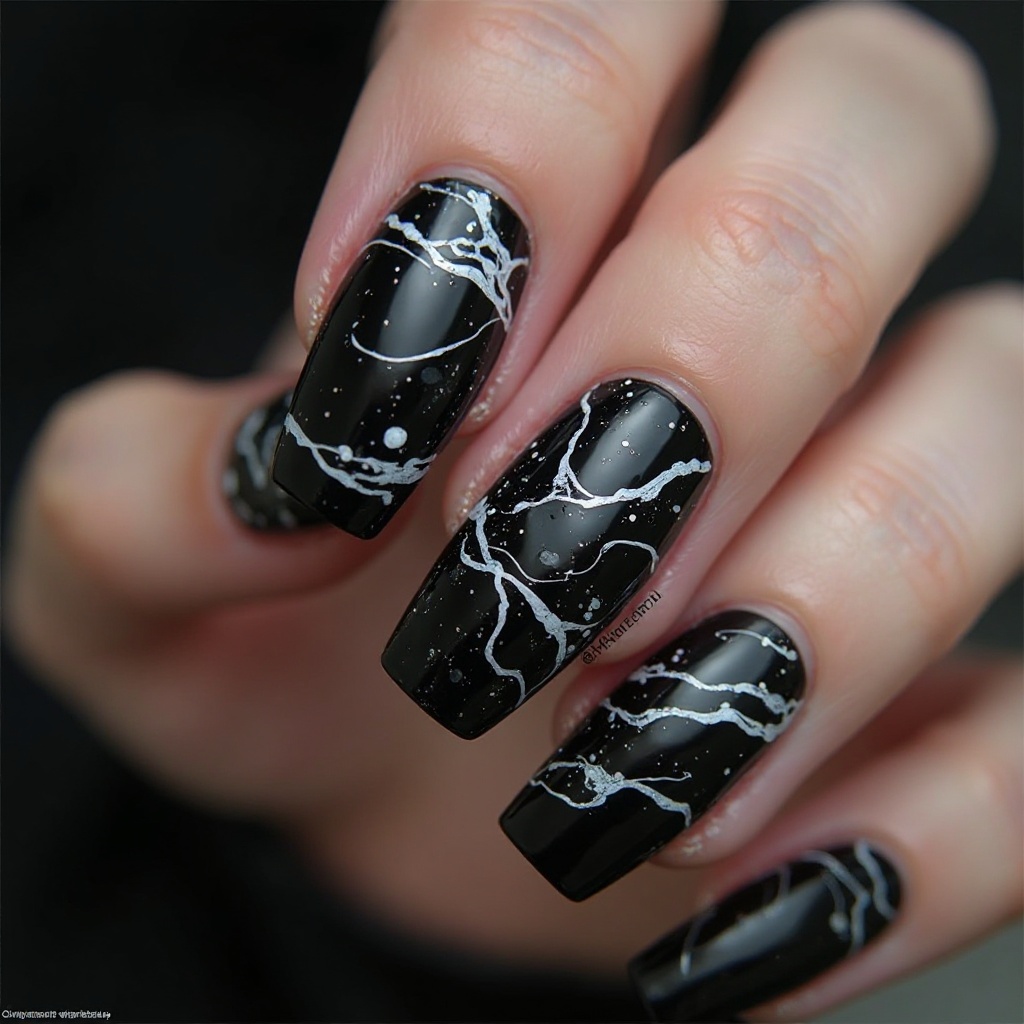
Glossy black base with delicate white marble veining hand-painted on select nails, creating a luxurious stone effect. The black-white contrast is striking while marble pattern adds artistic sophistication. This design channels high-fashion editorial aesthetics.
- Difficulty: Intermediate—requires a steady hand
- Time to complete: 50-65 minutes
- Best for: An artistic, editorial look that stands out from typical prom nail designs.
- Why it works: The marble effect is unique and artistic, and black-white is timeless with any dress color.
- What makes it different: Realistic marble veining looks high-end and custom, not like a stamp or sticker.
Step-by-Step:
- Prep and base: Standard prep plus base coat.
- Apply black base: Paint 2-3 coats of black on all nails. Let the final coat dry completely—10 minutes minimum.
- Thin the white polish: On a paper plate, mix a drop of white polish with a tiny drop of clear top coat. This creates an ink-like consistency that flows better for veining. OPI “Alpine Snow” ($12) thins well for this.
- Paint the veining: Using a thin nail art brush (size 0 or 00), paint irregular white veins diagonally across 1-3 accent nails. Vary your pressure to create thick and thin lines. Make veins intersect and branch naturally. Study real black marble images for reference—veins are never perfectly straight.
- Add depth (optional): Paint a few thin gray lines alongside some white veins for shadow and dimension.
- Soften: While slightly wet, lightly drag a clean, dry brush through some veins to soften edges for a more realistic look.
- Seal: Let dry 10 minutes. Apply 2 layers of clear top coat.
Pink Prom Nails: 5 Romantic Ideas
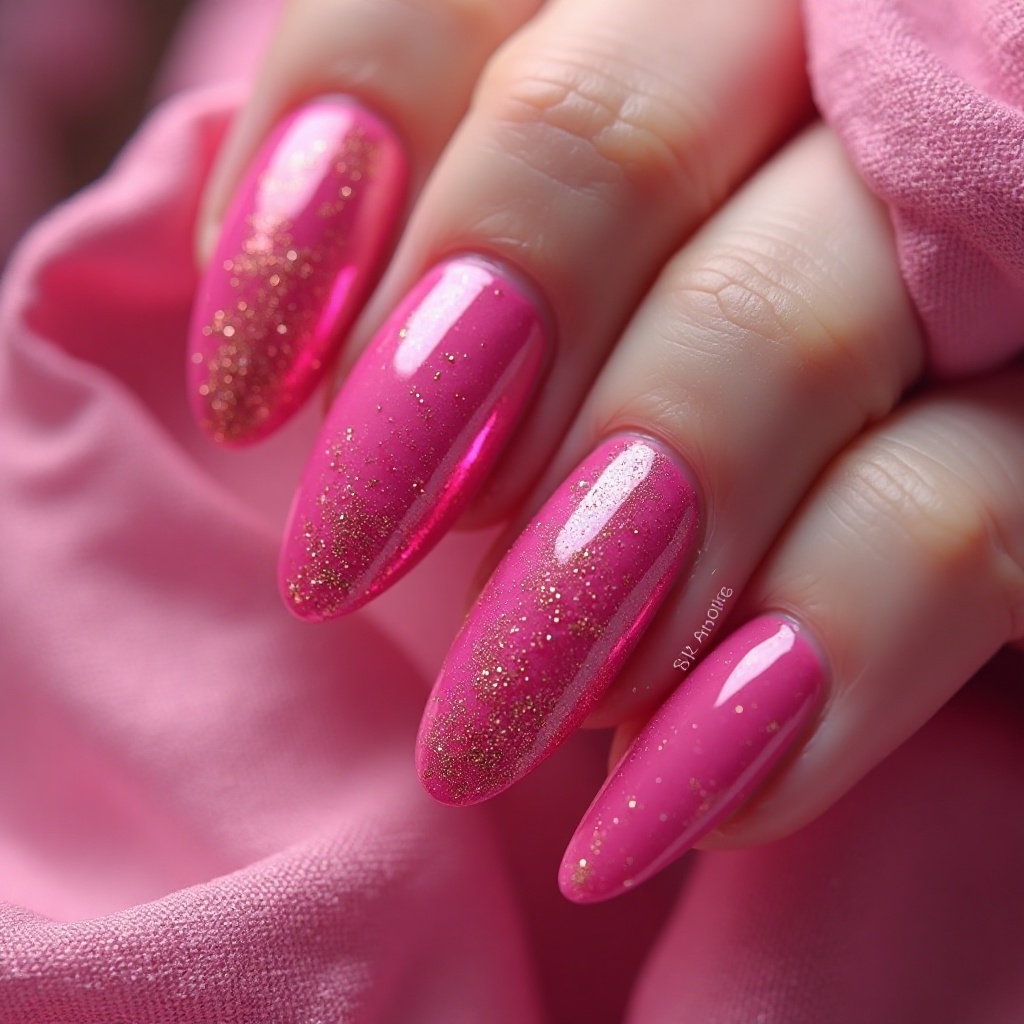
24. Hot Pink with Silver Glitter Gradient
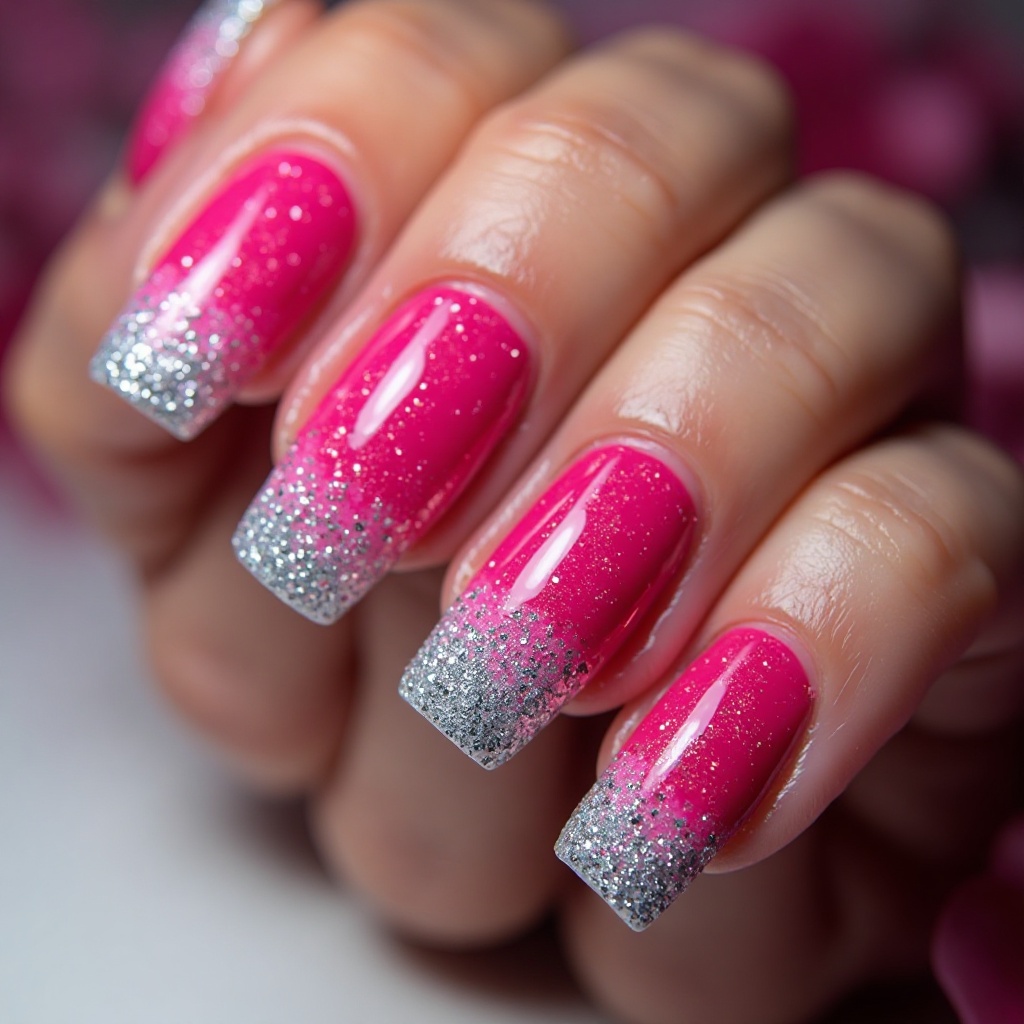
Vibrant hot pink base transitioning into dense silver glitter at the tips, creating a fun, energetic look with glamorous sparkle. The bold pink is confident and youthful while silver glitter adds formal-event sparkle. This design is perfect for those who love bold color with prom-appropriate glamour.
- Difficulty: Intermediate
- Time to complete: 60-70 minutes
- Best for: Those who love bold color and want their nails to be a statement piece.
- Why it works: Hot pink is memorable and photographs beautifully, and the silver gradient ensures it feels special-occasion appropriate.
- What makes it different: The contrast between bright pink and cool silver creates visual pop that stands out in photos.
Step-by-Step:
- Prep and protect: Apply liquid latex around nails, then base coat.
- Apply hot pink base: Paint 2-3 coats of hot pink. I used OPI “Hurry-Juku Get This Color!” ($12) —it’s a true, vibrant hot pink. Dry 2 minutes between coats. Let the final coat dry 5 minutes.
- Create gradient: Pour fine silver glitter polish onto a paper plate. China Glaze “Fairy Dust” ($8, at Sally Beauty) is my favorite because it’s fine and looks sophisticated. Dab a sponge into the glitter and bounce onto nail tips, heavy at tips and fading toward center. Repeat 3 times, drying 3 minutes between layers.
- Seal: Apply 3 thick layers of clear top coat to smooth the glitter, waiting 3 minutes between layers.
25. Dusty Rose with Gold Leaf Accents
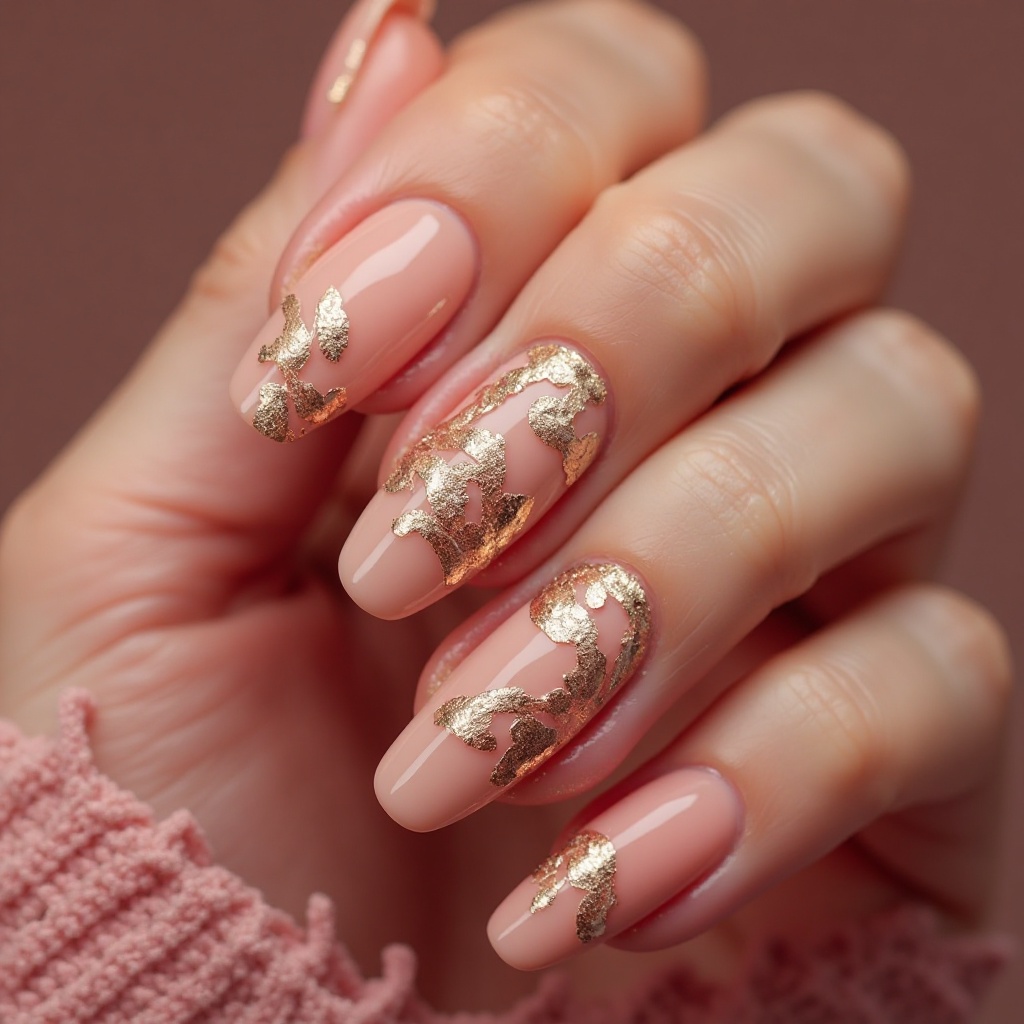
Soft, muted dusty rose base with delicate gold leaf applied in organic patterns on accent nails, creating an elegant, vintage-inspired look. The dusty rose is sophisticated and romantic while gold leaf adds luxury. This combination feels expensive and editorial.
- Difficulty: Beginner-Intermediate
- Time to complete: 50-65 minutes
- Best for: A soft, romantic look that feels expensive and editorial.
- Why it works: Dusty rose is universally flattering and works with virtually any dress color.
- What makes it different: The gold leaf application is minimal and delicate, keeping the overall look refined.
Step-by-Step:
- Prep and base: Standard prep plus base coat.
- Apply dusty rose: Paint 2-3 coats of dusty rose. Essie “Lady Like” ($9, at drugstores) is my go-to—it’s the perfect muted pink. Dry 2 minutes between coats.
- Prepare gold leaf: Tear small, irregular pieces of genuine gold leaf using tweezers. Keep pieces small and delicate.
- Apply gold leaf: On 1-2 accent nails, paint a thin layer of clear top coat where you want gold. While wet, place gold leaf pieces with tweezers. Press gently with a small brush. Keep application minimal—a few small pieces per nail is plenty.
- Brush excess: Use a dry fan brush to sweep away any loose leaf that didn’t stick.
- Seal thoroughly: Apply 3 thick layers of clear top coat, waiting 5 minutes between layers. Gold leaf needs serious sealing to prevent flaking.
26. Bubblegum Pink Chrome
Bright bubblegum pink chrome finish that creates a mirror-like, candy-coated effect. The chrome makes the pink incredibly vibrant and reflective, catching light dramatically. This fun, playful color is perfect for those who love bold pink with a modern edge.
- Difficulty: Intermediate—requires gel equipment
- Time to complete: 30-40 minutes
- Best for: A fun, playful look that still feels sophisticated due to the chrome finish.
- Why it works: The chrome finish elevates pink from sweet to editorial.
- What makes it different: The reflective surface photographs exceptionally well and looks like candy-coated metal.
Step-by-Step:
- Prep and base: Standard prep, apply gel base coat, cure 60 seconds.
- Apply dark pink base: Paint 2 coats of dark pink or fuchsia gel polish. Chrome needs a dark base—I used Beetles Gel in #846 ($10 for set, Amazon) . Cure 60 seconds between coats.
- Apply gel top coat: Paint a thin layer of no-wipe gel top coat, cure 60 seconds until tacky.
- Apply pink chrome powder: Rub pink chrome powder onto the tacky surface using an eyeshadow applicator. Use firm, circular motions. The mirror effect appears instantly.
- Seal chrome: Apply gel top coat gently to avoid disturbing the powder, cure 60 seconds. Apply a second layer for durability, cure again. Wipe with rubbing alcohol.
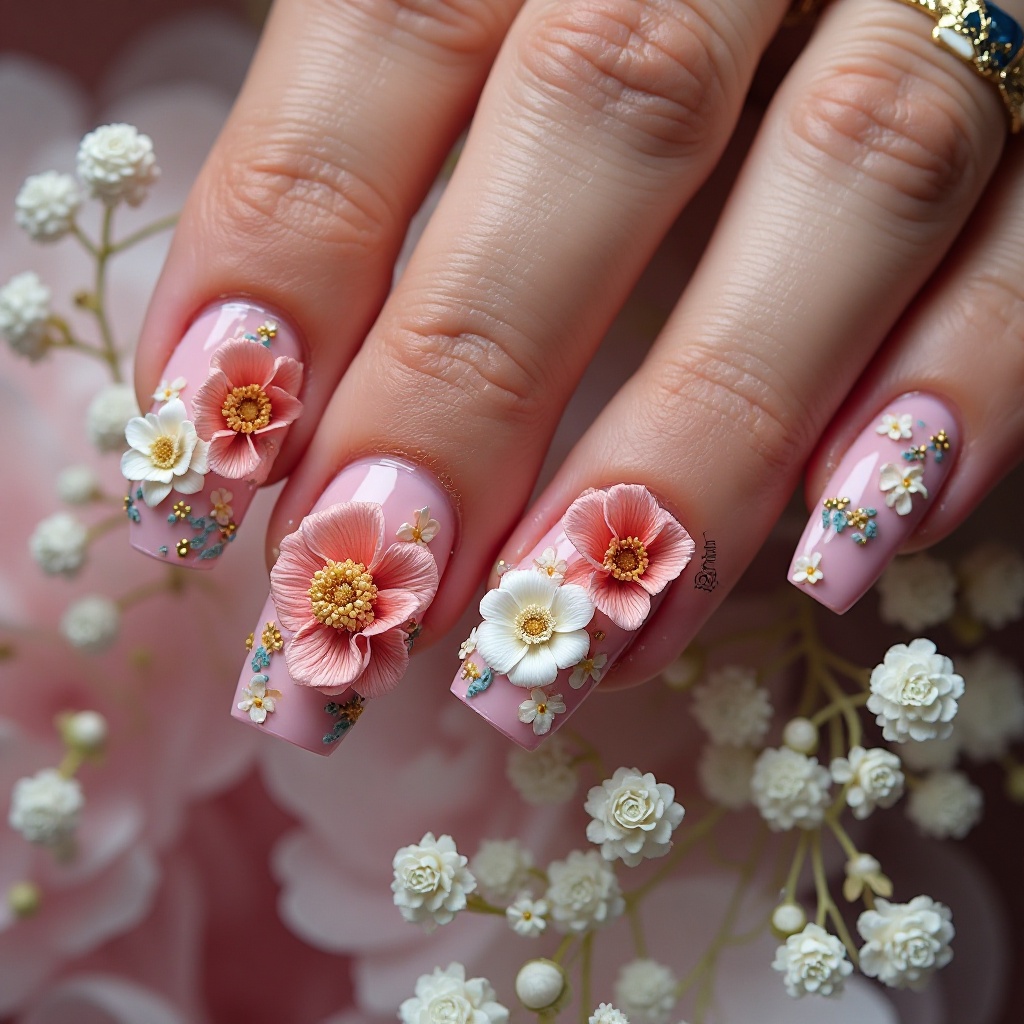
27. Pale Pink with White Floral 3D Appliqués
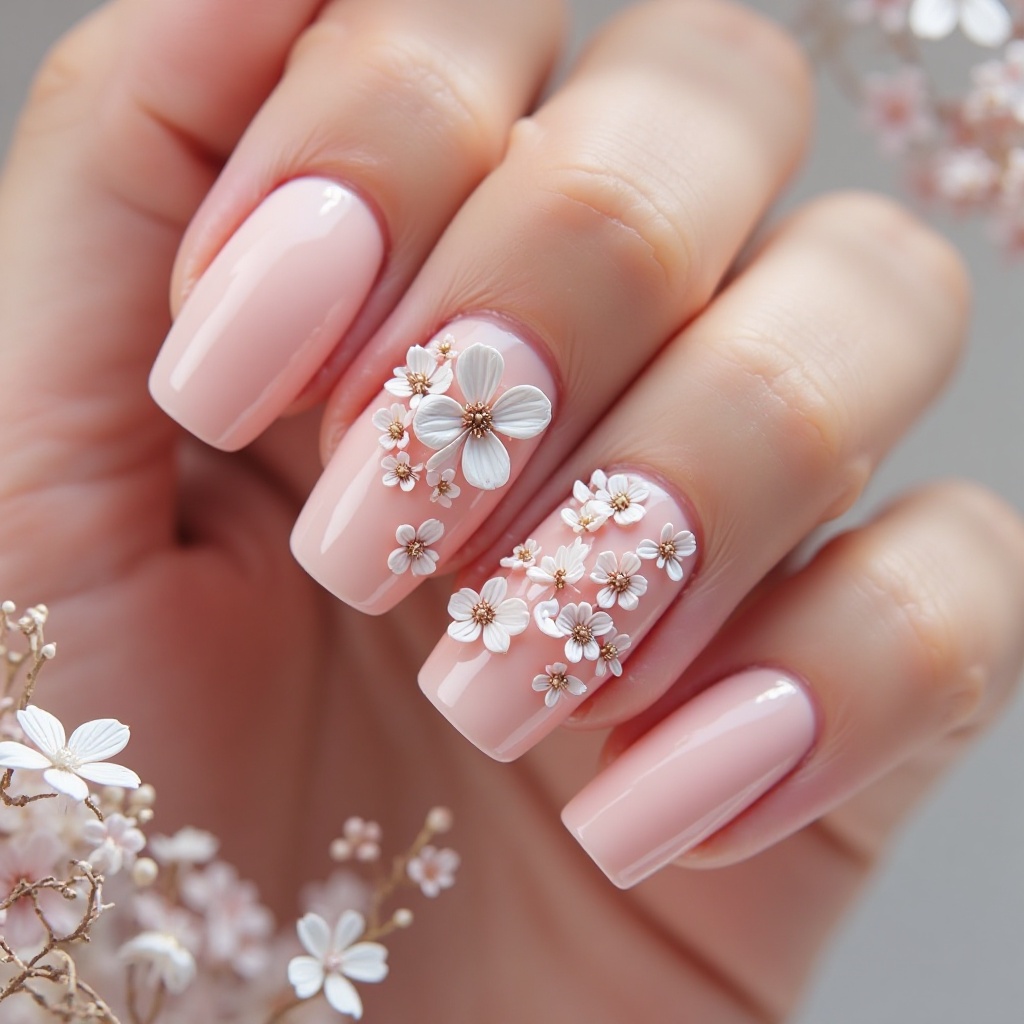
Soft pale pink base adorned with tiny 3D white floral stickers or appliqués on accent nails, creating a delicate, romantic garden-inspired look. The pale pink is sweet and feminine while 3D flowers add special occasion detail and texture.
- Difficulty: Beginner
- Time to complete: 35-50 minutes
- Best for: A sweet, romantic look that requires minimal artistic skill.
- Why it works: The soft color palette is timeless and romantic, and 3D flowers add special occasion detail.
- What makes it different: The 3D flowers add actual texture and dimension that flat art can’t achieve.
Step-by-Step:
- Prep and base: Standard prep plus base coat.
- Apply pale pink base: Paint 2-3 coats of pale pink. Light colors often need 3 coats. Essie “Fiji” ($9) is my favorite—it’s a soft, milky pink. Dry 2 minutes between coats. Let the final coat dry completely for 10 minutes.
- Apply flowers: Use tweezers to pick up one 3D white flower from the sheet. Position it on an accent nail (1-2 nails per hand). Press firmly for 5 seconds. If the flowers aren’t adhesive-backed, apply a tiny dot of nail glue first. Use 2-4 small flowers per nail.
- Seal around (not over): Apply clear top coat to all nails, painting carefully around the 3D flower bases but not over them. This preserves the dimension. Apply 2-3 layers around the flower bases for security.
- Pro Tip: I buy assorted 3D white floral appliqués on Amazon for around $6—they come in sheets with various sizes.
28. Pink to Purple Ombré
Gradient transition from soft baby pink at the cuticle to deeper purple or mauve at the tips, creating a romantic, multi-tonal effect. The ombré showcases pink-to-purple spectrum beautifully while adding dimension. This design is perfect for those who can’t choose between pink and purple.
- Difficulty: Intermediate
- Time to complete: 70-85 minutes
- Best for: Those who can’t choose between pink and purple—this design gives you both.
- Why it works: The gradient creates visual interest and works with both pink and purple dress tones.
- What makes it different: Using three shades (baby pink, mauve, purple) creates a seamless, professional-looking transition.
Step-by-Step:
- Prep and protect: Apply liquid latex around nails, then base coat.
- Apply pink base: Paint 2 coats of baby pink as your base. Essie “Fiji” ($9) works great. Dry 2 minutes between coats.
- Create gradient palette: On a paper plate, paint three stripes next to each other: baby pink, mauve, and purple. For mauve, I use Essie “Lady Like” ($9) ; for purple, Essie “Play Date” ($9) .
- Apply gradient: Dab a makeup sponge to pick up all three colors at once. Bounce onto the nail with pink at the cuticle, purple at the tips. Repeat 3-4 times, drying 3 minutes between layers.
- Smooth and seal: Let dry 10 minutes. Apply 3 layers of clear top coat, waiting 3 minutes between layers.
Silver Prom Nails: 5 Glamorous Ideas
29. Silver Chrome Mirror Finish
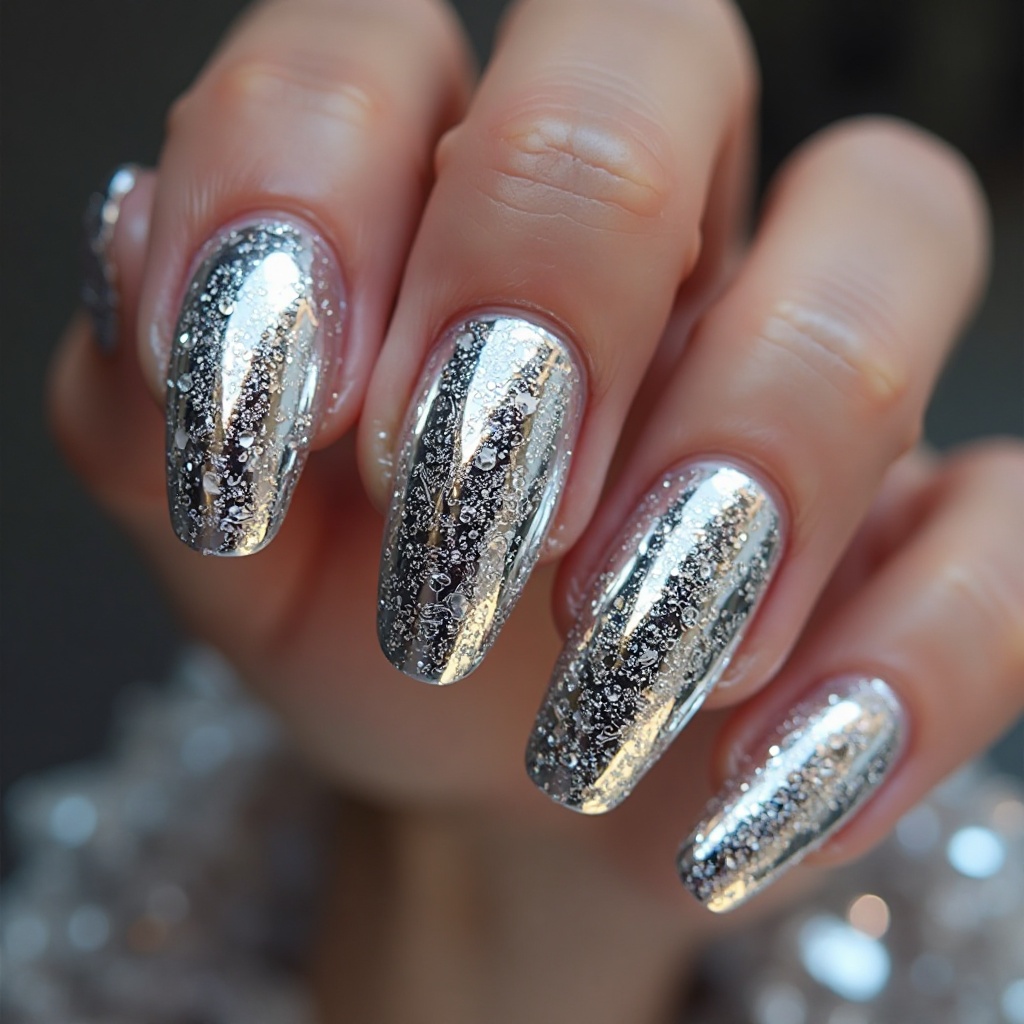
Full silver chrome finish that creates a perfect mirror effect, reflecting light dramatically. The high-shine chrome is bold and futuristic while being elegant enough for formal events. This design makes a serious statement and photographs exceptionally well.
- Difficulty: Intermediate—requires gel equipment
- Time to complete: 30-40 minutes
- Best for: Making a serious statement—this design guarantees show-stopping photos.
- Why it works: Silver chrome is universally flattering and works with any dress color.
- What makes it different: The reflective surface is unlike anything achievable with regular polish.
Step-by-Step:
- Prep and base: Standard prep, apply gel base coat, cure 60 seconds.
- Apply black base: Paint 2 coats of black gel polish. Must be completely opaque—chrome needs a dark base to reflect properly. Cure 60 seconds between coats.
- Apply gel top coat: Paint a thin layer of no-wipe gel top coat, cure 60 seconds until tacky.
- Apply silver chrome powder: Rub silver chrome powder onto the tacky surface using an eyeshadow applicator. Use firm, circular motions. The perfect mirror effect appears instantly. Dust off excess.
- Seal chrome: Apply gel top coat gently to avoid disturbing the powder, cure 60 seconds. Apply a second layer for durability, cure again. Wipe with rubbing alcohol.
- Pro Tip: Keep nails at medium length with almond or coffin shape to maximize the reflective surface area.
30. Silver Glitter Gradient on Nude Base
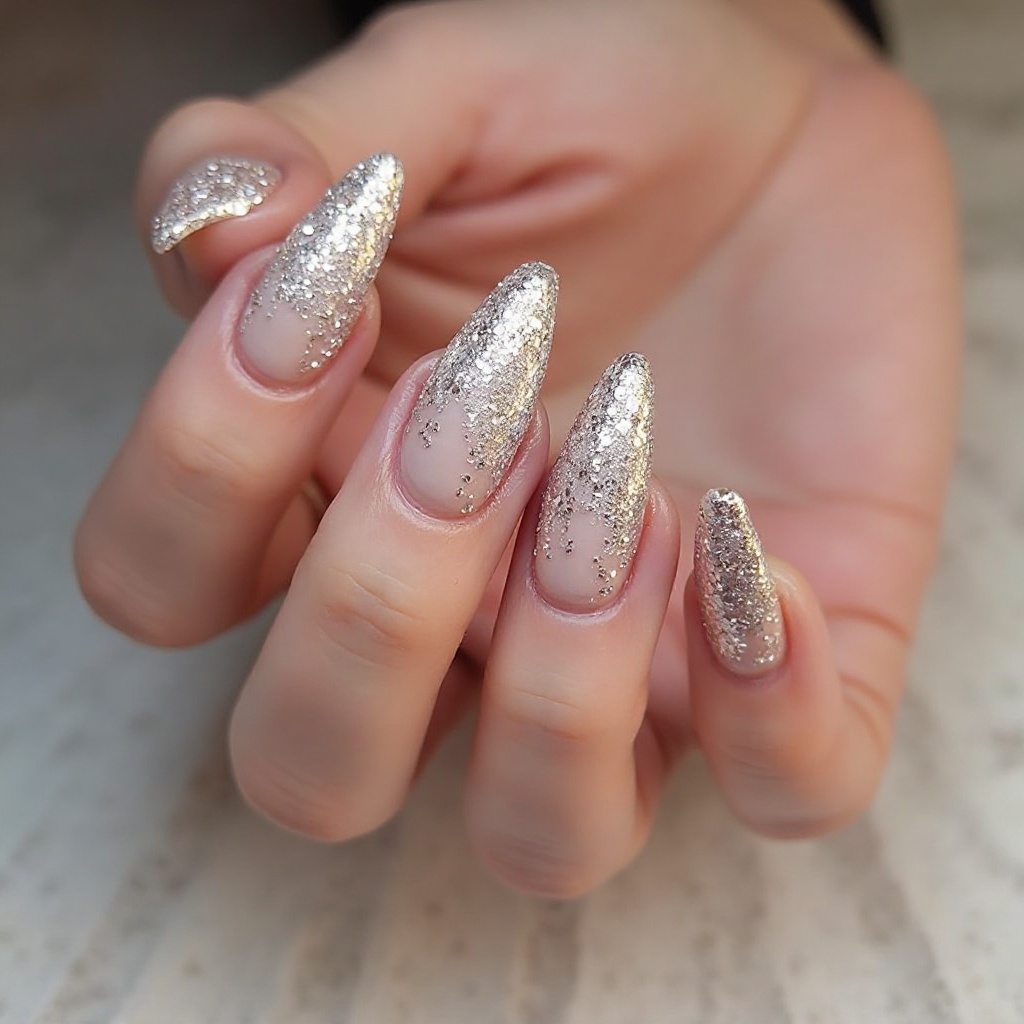
Soft nude base transitioning into concentrated silver glitter at the tips, creating an elegant, understated look with strategic sparkle. The nude provides neutral sophistication while silver glitter adds formal-event glamour. This design is perfect for those wanting subtle elegance.
- Difficulty: Intermediate
- Time to complete: 60-70 minutes
- Best for: Those wanting subtle elegance with just enough sparkle for prom.
- Why it works: The nude base keeps it wearable while silver glitter provides prom-appropriate glamour.
- What makes it different: Using fine silver micro-glitter creates a more refined, sophisticated finish than chunky glitter.
Step-by-Step:
- Prep and protect: Apply liquid latex around nails, then base coat.
- Apply nude base: Paint 2 coats of nude polish. OPI “Samoan Sand” ($12) is a classic beige nude. Dry 2 minutes between coats. Let the final coat dry 5 minutes.
- Create gradient: Pour fine silver micro-glitter polish onto a paper plate. China Glaze “Fairy Dust” ($8) is perfect for this. Dab a sponge into the glitter and bounce onto nail tips, heavy at tips and fading toward center. Repeat 3 times, drying 3 minutes between layers.
- Seal: Apply 3 thick layers of clear top coat to smooth the glitter, waiting 3 minutes between layers.
31. Silver Foil with Black Accent Nails
Alternating silver foil nails and glossy black nails, creating bold contrast and modern edge. The silver foil is textured and eye-catching while black provides grounding. This design plays with metallic and matte beautifully.
- Difficulty: Beginner-Intermediate
- Time to complete: 50-65 minutes
- Best for: A graphic, modern look that plays with texture and contrast.
- Why it works: The silver-black combination is sophisticated and edgy, perfect for making a fashion-forward statement.
- What makes it different: The foil texture is unique and catches light differently than glitter or chrome.
Step-by-Step:
- Prep and base: Standard prep plus base coat.
- Apply black to select nails: Paint 2-3 coats of black on 2 nails per hand. I usually do pointer and ring fingers in black. Dry 2 minutes between coats.
- Apply foil adhesive to others: On the remaining nails (thumb, middle, pinky), paint a thin layer of foil adhesive covering the entire nail. Let dry 3-5 minutes until tacky but not wet.
- Apply silver foil: Cut silver foil pieces slightly larger than each nail. Place shiny-side-up onto the tacky adhesive and press firmly for 5 seconds. Quickly peel away the backing—the silver transfers to the nail. Repeat for each nail.
- Seal: Apply 3 thick layers of clear top coat over all nails, waiting 5 minutes between layers. This prevents the foil from lifting.
- Pro Tip: This alternating pattern (3 silver, 2 black per hand) creates the best visual balance.
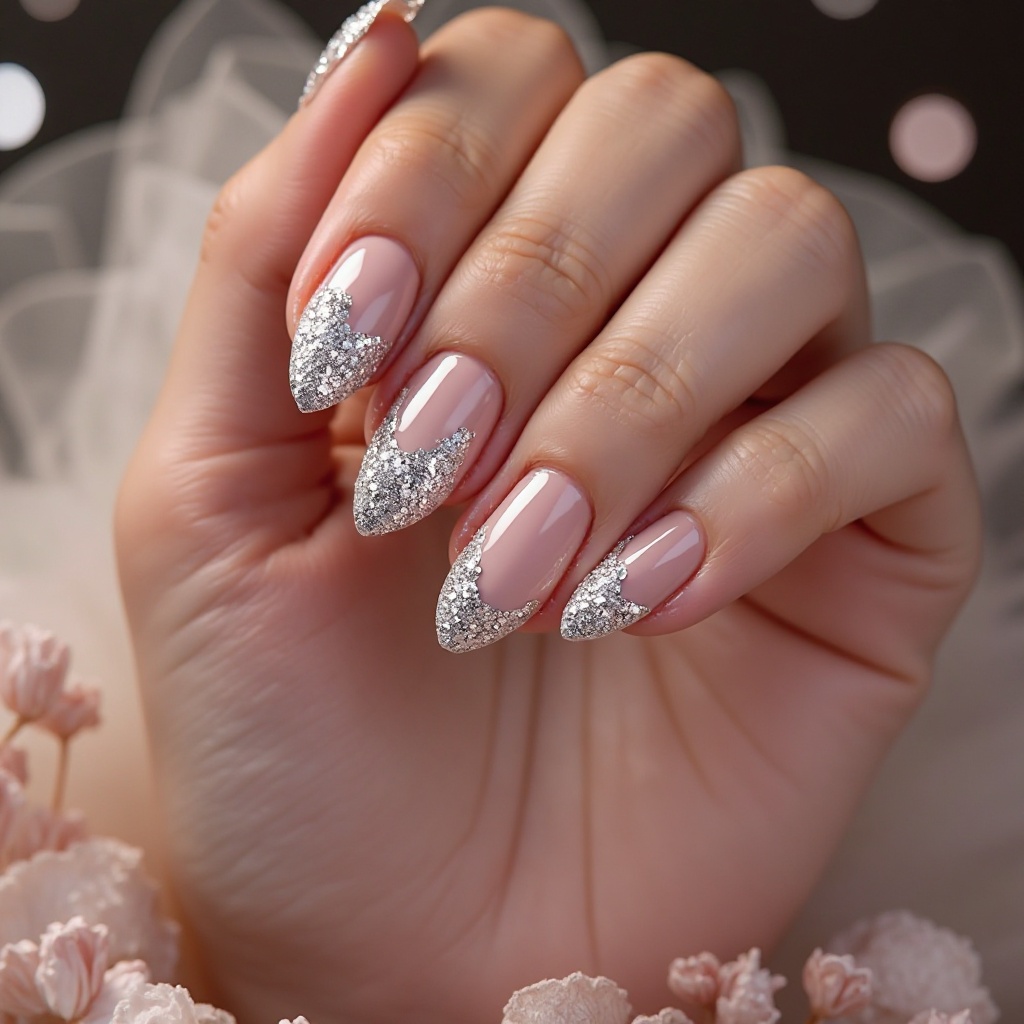
32. Silver Holographic with Clear Tips

Silver holographic base with clear or bare tips creating negative space, adding modern edge to sparkly nails. The holographic provides rainbow sparkle while clear tips keep it from feeling too heavy. This design is fashion-forward and unique.
- Difficulty: Beginner-Intermediate
- Time to complete: 35-50 minutes
- Best for: A fashion-forward take on sparkly nails that feels modern and intentional.
- Why it works: The negative space adds sophistication to sparkly nails, preventing them from feeling too juvenile.
- What makes it different: The clear tips create a “French tip” effect that’s unexpected and editorial.
Step-by-Step:
- Prep and base: Standard prep plus base coat on the entire nail.
- Apply tape guides: Place French tip guides or striping tape 3-4mm from the tips. Press firmly. This width looks intentional—too thin looks accidental.
- Apply silver holographic: Paint 2-3 thin coats of silver holographic polish on the area below the tape (the majority of the nail). I used ILNP “Cygnus Loop” ($10, their website) for rainbow sparkle. Dry 2 minutes between coats. Leave the tips bare.
- Remove tape: Carefully peel away the tape while the last coat is still slightly wet for the cleanest lines.
- Seal: Apply clear top coat to the entire nail, including the bare tips. Apply 2 layers for smoothness.
34. Silver Chrome French Tips
Classic nude or pink base paired with silver chrome tips in French manicure style, creating modern elegance. The neutral base is sophisticated while silver chrome tips add high-fashion sparkle. This design updates the classic French with metallic glamour.
- Difficulty: Intermediate—requires gel equipment
- Time to complete: 45-60 minutes
- Best for: Updating the classic French manicure with metallic glamour.
- Why it works: The French structure is timeless and elegant, while chrome tips make it feel special and contemporary.
- What makes it different: The mirror-finish tips are reflective and high-shine, not just metallic polish.
Step-by-Step:
- Prep and base: Standard prep, apply gel base coat, cure 60 seconds.
- Apply nude/pink base: Paint the entire nail with 2 coats of nude or pink gel polish. Cure 60 seconds between coats.
- Apply tape guides: Once cured, place French tip guides 3-4mm from the tips. Press firmly. The slightly thicker tip shows off the chrome better.
- Apply gel top coat to tips: Paint a thin layer of no-wipe gel top coat only on the tips beyond the tape. Cure 60 seconds until tacky.
- Apply silver chrome: Rub silver chrome powder onto the tacky tips using an eyeshadow applicator. Dust off excess.
- Remove tape and seal: Carefully peel away the tape. Apply gel top coat to the entire nail, cure 60 seconds. Apply a second layer for durability, cure again. Wipe with rubbing alcohol.
Gold Prom Nails: 5 Luxurious Ideas
35. Rose Gold Glitter Gradient
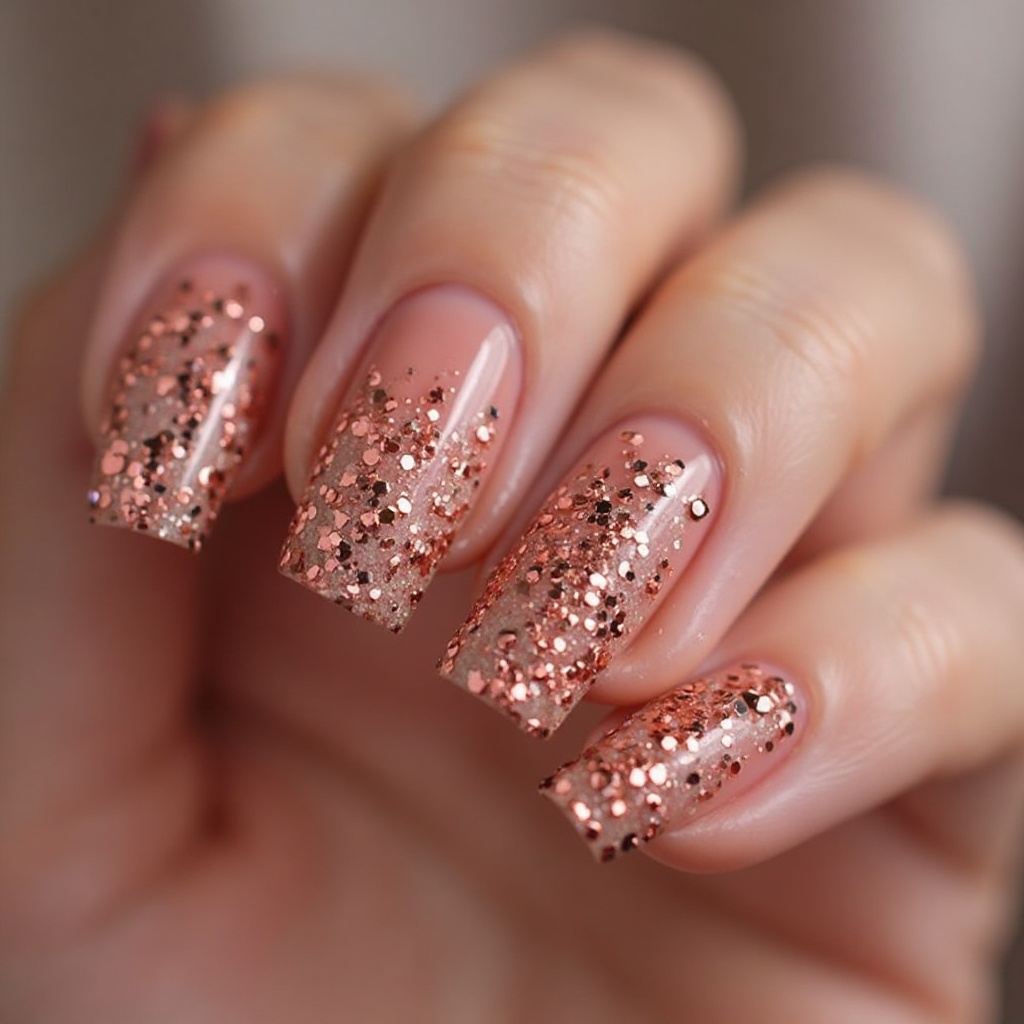
Soft nude base transitioning into concentrated rose gold glitter at the tips, creating warm, romantic sparkle. The nude provides elegant foundation while rose gold glitter adds luxurious shimmer. This combination is universally flattering and photographs beautifully.
- Difficulty: Intermediate
- Time to complete: 60-70 minutes
- Best for: A universally flattering metallic look that works on all skin tones.
- Why it works: Rose gold is one of the most flattering metallics for all skin tones.
- What makes it different: The fine glitter creates sophisticated shimmer rather than chunky sparkle.
Step-by-Step:
- Prep and protect: Apply liquid latex around nails, then base coat.
- Apply nude base: Paint 2 coats of nude polish. OPI “Samoan Sand” ($12) works perfectly. Dry 2 minutes between coats. Let the final coat dry 5 minutes.
- Create gradient: Pour rose gold glitter polish onto a paper plate. OPI “Cozu-Melted in the Sun” ($12) is a beautiful rose gold. Dab a sponge into the glitter and bounce onto nail tips, heavy at tips and fading toward center. Repeat 3 times, drying 3 minutes between layers.
- Seal: Apply 3 thick layers of clear top coat to smooth the glitter, waiting 3 minutes between layers.
36. Gold Chrome Mirror Finish
Full gold chrome finish creating a brilliant mirror effect, reflecting light dramatically in warm gold tones. The high-shine chrome is bold and luxurious while being elegant enough for formal events. This design makes a serious glamorous statement.
- Difficulty: Intermediate—requires gel equipment
- Time to complete: 30-40 minutes
- Best for: Maximum glamour—this design is show-stopping and photograph-friendly.
- Why it works: Gold chrome is warm and luxurious, and the reflective surface catches every light source.
- What makes it different: The mirror finish looks like liquid metal, not just metallic polish.
Step-by-Step:
- Prep and base: Standard prep, apply gel base coat, cure 60 seconds.
- Apply dark base: Paint 2 coats of black or dark brown gel polish. Brown base gives warmer gold, black gives cooler gold. Cure 60 seconds between coats. Must be completely opaque.
- Apply gel top coat: Paint a thin layer of no-wipe gel top coat, cure 60 seconds until tacky.
- Apply gold chrome powder: Rub gold chrome powder onto the tacky surface using an eyeshadow applicator. Use firm, circular motions. The perfect mirror effect appears instantly. Dust off excess.
- Seal chrome: Apply gel top coat gently to avoid disturbing the powder, cure 60 seconds. Apply a second layer for durability, cure again. Wipe with rubbing alcohol.
- Pro Tip: Pair gold chrome nails with gold jewelry and accessories for a cohesive, intentional metallic look.
37. Champagne Gold with White Accents
Soft champagne gold base with crisp white accents—either white tips in French style or white geometric patterns. The champagne provides warm metallic elegance while white adds fresh contrast. This combination is sophisticated and timeless.
- Difficulty: Intermediate
- Time to complete: 50-65 minutes
- Best for: A subtle, elegant metallic look that’s not as bold as full chrome.
- Why it works: Champagne gold is subtle and elegant rather than bold, and white accents keep it fresh.
- What makes it different: Using a champagne shimmer rather than flat gold creates more depth and dimension.
Step-by-Step:
- Prep and base: Standard prep plus base coat.
- Apply champagne gold: Paint 2-3 coats of champagne gold shimmer polish. OPI “Cosmo-Not Tonight Honey” ($12) is a beautiful champagne. Dry 2 minutes between coats. Let the final coat dry 10 minutes.
- Apply guides: Place French tip guides or striping tape for white tips 2-3mm from the tips, or create geometric patterns with striping tape.
- Paint white accents: Apply white polish in thin coats on the tips or geometric sections. Use Essie “Blanc” ($9) for opaque white coverage. Apply 2-3 coats for opacity, drying 2 minutes between. Remove the tape immediately after the last coat while the polish is still wet for clean lines.
- Seal: Let dry 5 minutes. Apply 2 layers of clear top coat.
38. Gold Foil on Nude Base
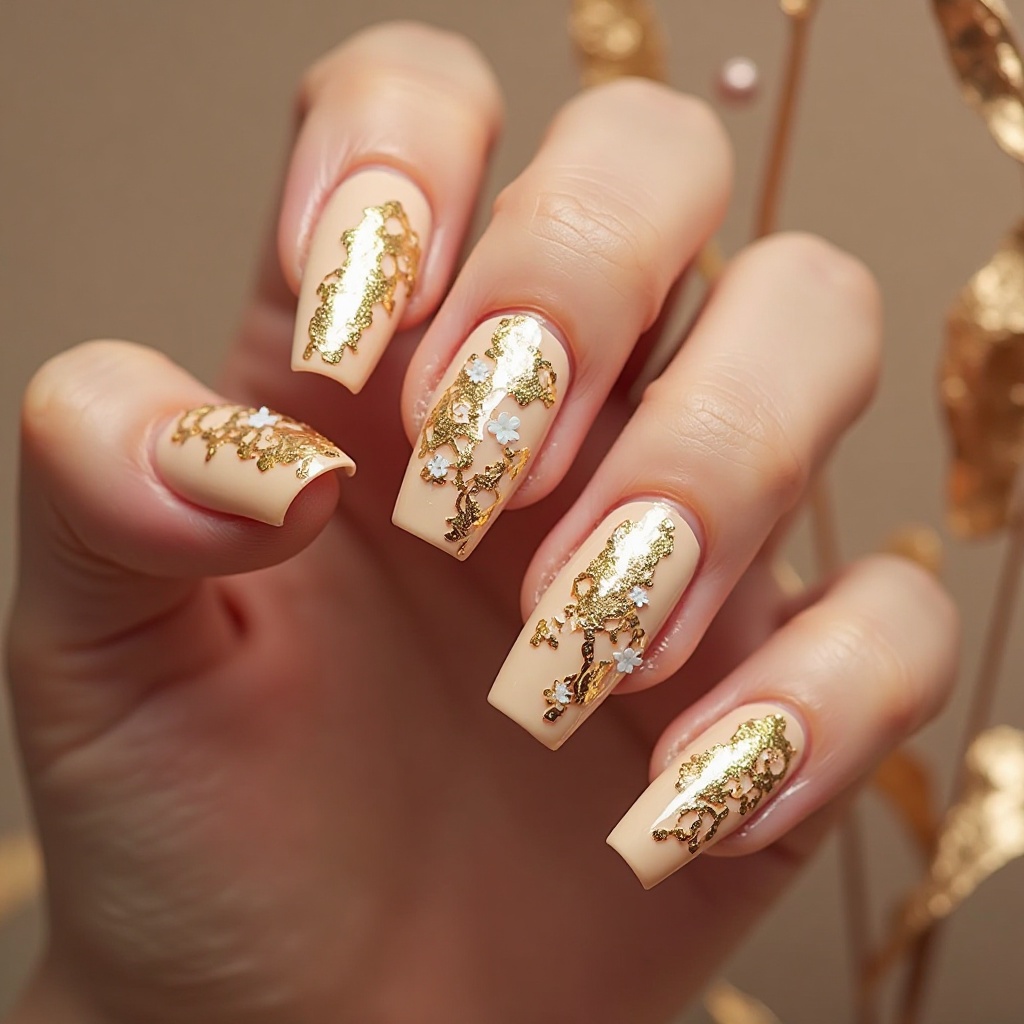
Nude or beige base with hand-placed gold foil applied in abstract patterns on select nails, creating modern luxury. The nude provides neutral sophistication while gold foil adds expensive-looking metallic detail. This design is editorial and high-fashion.
- Difficulty: Beginner-Intermediate
- Time to complete: 45-60 minutes
- Best for: An editorial, high-fashion look that’s still wearable.
- Why it works: The nude-gold combination is timeless and universally flattering.
- What makes it different: The foil technique creates unique, artistic results—no two nails are exactly alike.
Step-by-Step:
- Prep and base: Standard prep plus base coat.
- Apply nude base: Paint 2-3 coats of nude polish. Essie “Au Natural” ($9) is a good neutral option. Dry 2 minutes between coats. Let the final coat dry 10 minutes.
- Apply foil adhesive: On 1-3 accent nails, paint a thin layer of foil adhesive in abstract shapes or random placement. Let dry 3-5 minutes until tacky.
- Apply gold foil: Cut or tear small pieces of gold nail foil. Place shiny-side-up onto the tacky adhesive and press firmly for 5 seconds. Quickly peel away the backing—the gold transfers to the nail.
- Seal: Apply 3 thick layers of clear top coat, waiting 5 minutes between layers.
- Pro Tip: Apply gold foil in irregular, organic shapes for the most expensive, editorial look. Avoid perfect circles or squares.
39. Gold Glitter Ombré on White Base
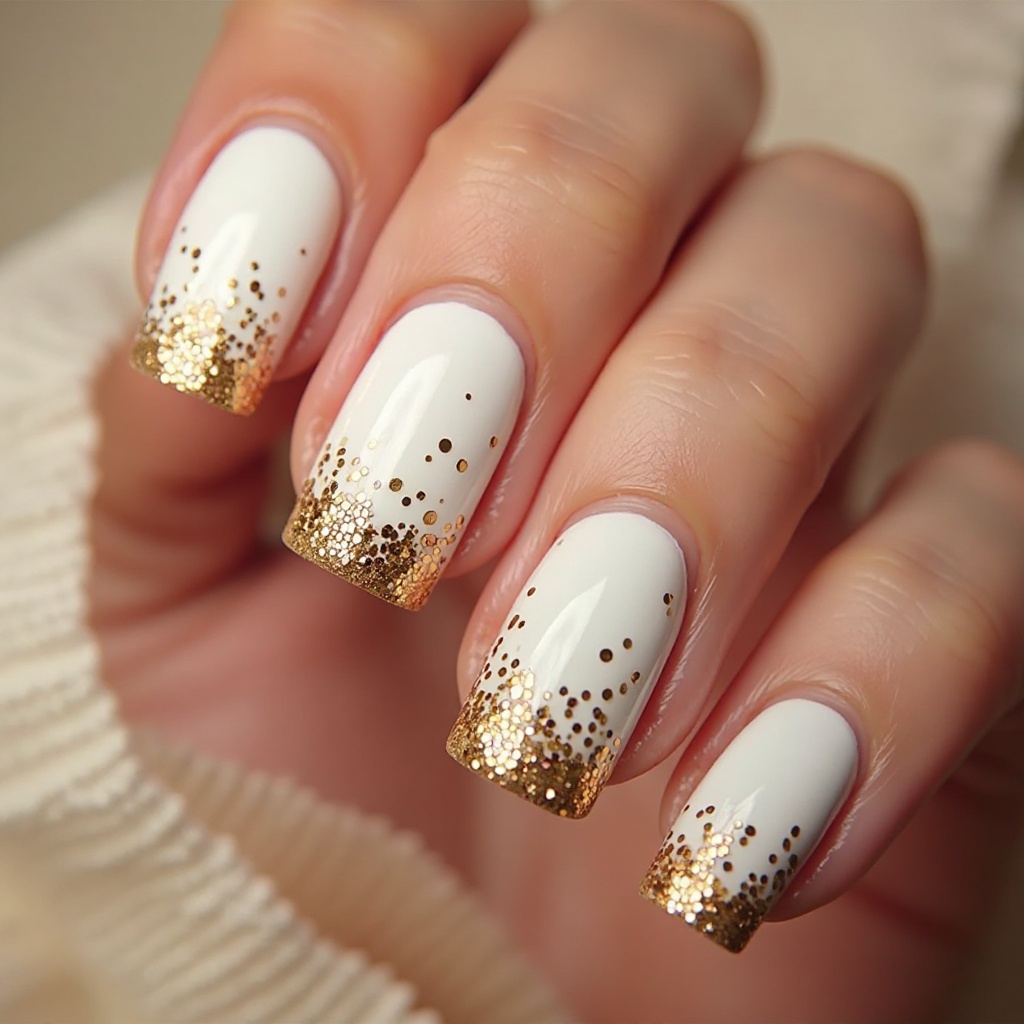
Crisp white base transitioning into concentrated gold glitter at the tips, creating fresh, glamorous contrast. The white provides clean foundation while gold glitter adds warm sparkle. This combination is bright, festive, and perfect for photos.
- Difficulty: Intermediate
- Time to complete: 60-70 minutes
- Best for: A bright, festive look that photographs beautifully against any dress color.
- Why it works: White and gold is a classic elegant combination that feels fresh and special-occasion appropriate.
- What makes it different: The white base makes the gold pop more than a nude or pink base would.
Step-by-Step:
- Prep and protect: Apply liquid latex around nails, then base coat.
- Apply white base: Paint 2-3 coats of white polish. OPI “Alpine Snow” ($12) is my go-to for opaque white coverage. Dry 2 minutes between coats. Let the final coat dry 5 minutes.
- Create gradient: Pour warm gold glitter polish onto a paper plate. OPI “GoldenEye” ($12) has the right warm undertone. Dab a sponge into the glitter and bounce onto nail tips, heavy at tips and fading toward center. Repeat 3 times, drying 3 minutes between layers.
- Seal: Apply 3 thick layers of clear top coat to smooth the glitter, waiting 3 minutes between layers.
Prom Nails Acrylic: 5 Professional Ideas
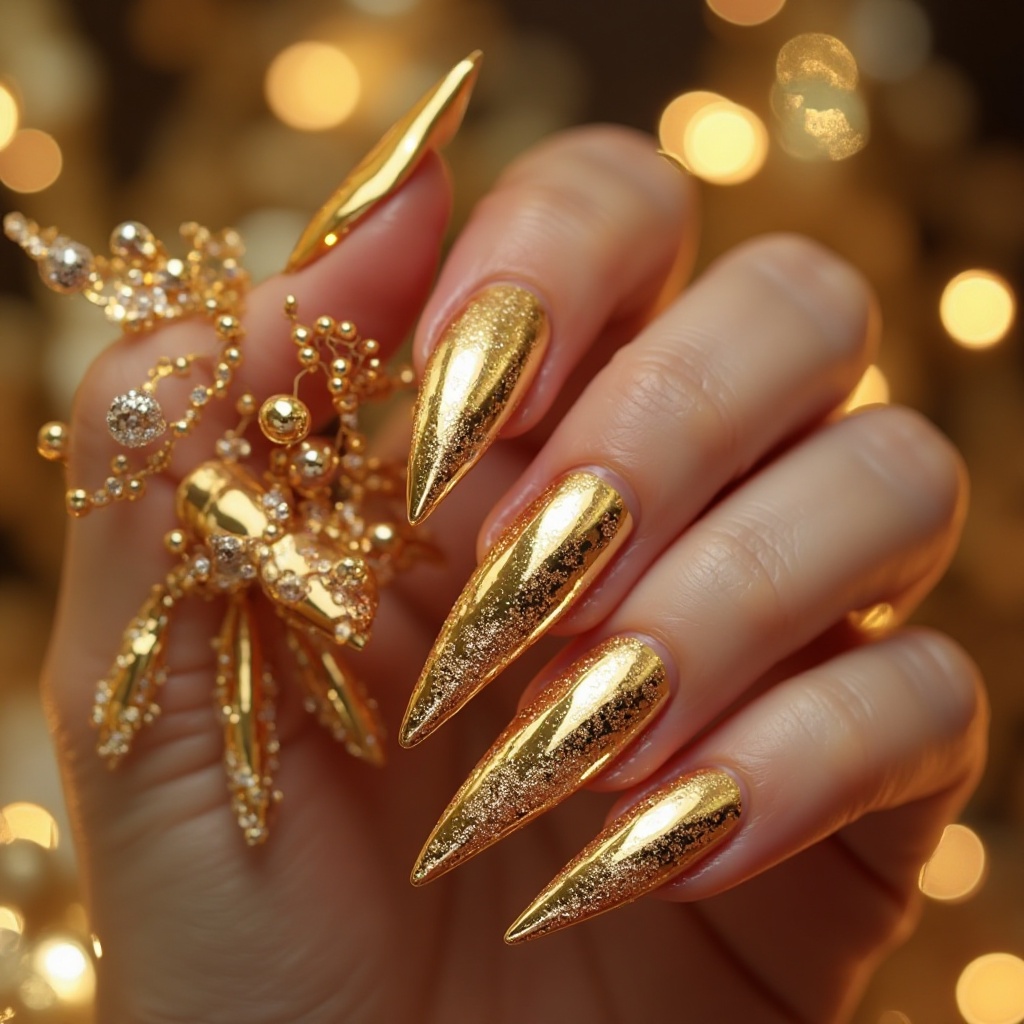
40. Acrylic Stiletto with Ombré and Crystals
Long stiletto-shaped acrylic nails with color ombré and strategic crystal placement, creating dramatic, show-stopping glamour. The length and shape make a bold statement while ombré adds dimension and crystals provide sparkle. This design is for those wanting maximum drama.
- Difficulty: Professional salon service recommended
- Time to complete: 90-120 minutes at salon
- Best for: Those wanting maximum drama and willing to commit to longer nails for prom.
- Why it works: Acrylic allows for extreme length and sharp shapes impossible with natural nails, creating that high-fashion, red-carpet look.
- What makes it different: The stiletto shape is bold and editorial, and the combination of ombré and crystals creates maximum visual impact.
What to Request at Salon:
- Shape: Stiletto (sharply pointed)
- Length: 1/2 to 3/4 inch extension past your natural nail
- Color ombré: Choose two coordinating colors (pink to purple, black to silver, etc.)
- Crystals: 3-5 small crystals per accent nail, maximum 2 accent nails per hand
- Finish: High-gloss top coat
41. Acrylic Coffin with French Ombré
Coffin-shaped (squared-off) acrylic nails with French ombré—white tips fading into nude or pink base. The coffin shape is modern and elegant while French ombré updates the classic French with soft gradient. This design balances drama with wearability.
- Difficulty: Professional salon service recommended
- Time to complete: 1.5-2 hours at salon
- Best for: A modern, elegant look that elongates fingers beautifully.
- Why it works: Coffin shape is trendy but classic, and French ombré is timeless yet contemporary.
- What makes it different: The ombré technique softens the traditional French tip line, creating a more gradual, ethereal effect.
Step-by-Step (At-Home Alternative with Press-Ons):
- Purchase press-ons: Buy coffin-shaped press-on nails in a length you like. Glamnetic ($25-35, their website) or Static Nails ($18-22, Ulta) have excellent options.
- Create French ombré: Before applying press-ons, use the sponge gradient technique from earlier tutorials. Apply nude base, then sponge white polish at tips fading into nude. Let dry completely.
- Apply top coat: Seal with 2 layers of glossy top coat. Let dry 30 minutes.
- Apply press-ons: Use included nail glue to apply 1-2 days before prom. Press firmly for 10-15 seconds per nail.
- Pro Tip: Choose a nude or soft pink base that matches your skin tone for the most elegant, cohesive look.
What to Request at Salon:
- Shape: Coffin (ballerina)—squared-off tip that tapers
- Length: Medium to long (1/3 to 1/2 inch extension)
- Color: French ombré with nude/pink base fading to white tips
- Finish: High-gloss top coat
- Cost at salon: $50-80
42. Acrylic Almond with Full Chrome
Almond-shaped acrylic nails with full chrome finish in your choice of color (rose gold, silver, gold, or colored chrome). The almond shape is feminine and elegant while chrome creates high-impact shine. This design is sophisticated and modern.
- Difficulty: Professional salon service required
- Time to complete: 2-2.5 hours at salon
- Best for: Maximum glamour with a universally flattering shape.
- Why it works: Almond shape suits almost everyone, and chrome finish photographs exceptionally well.
- What makes it different: The mirror-like chrome finish is impossible to achieve with regular polish at home.
Step-by-Step (At-Home Alternative):
- Purchase chrome press-ons: Look for high-quality chrome-effect press-on nails. Kiss Impress ($8-10, drugstores) and Static Nails ($18-22, Ulta) make beautiful chrome options.
- Size properly: Select the correct size for each nail—press-ons should fit edge to edge without overlapping skin.
- Apply 1-2 days before prom: Use included glue tabs or nail glue. Press firmly for 10-15 seconds per nail.
- Seal edges: Apply clear top coat along edges where press-on meets natural nail for extra security.
- Pro Tip: Choose chrome color that complements your jewelry—rose gold with gold jewelry, silver chrome with silver jewelry.
What to Request at Salon:
- Shape: Almond (tapered oval, slightly pointed but rounded)
- Length: Medium (1/4 to 1/3 inch extension)
- Chrome color: Rose gold, silver, gold, or custom colored chrome
- Finish: Chrome-safe glossy top coat
- Cost at salon: $65-90
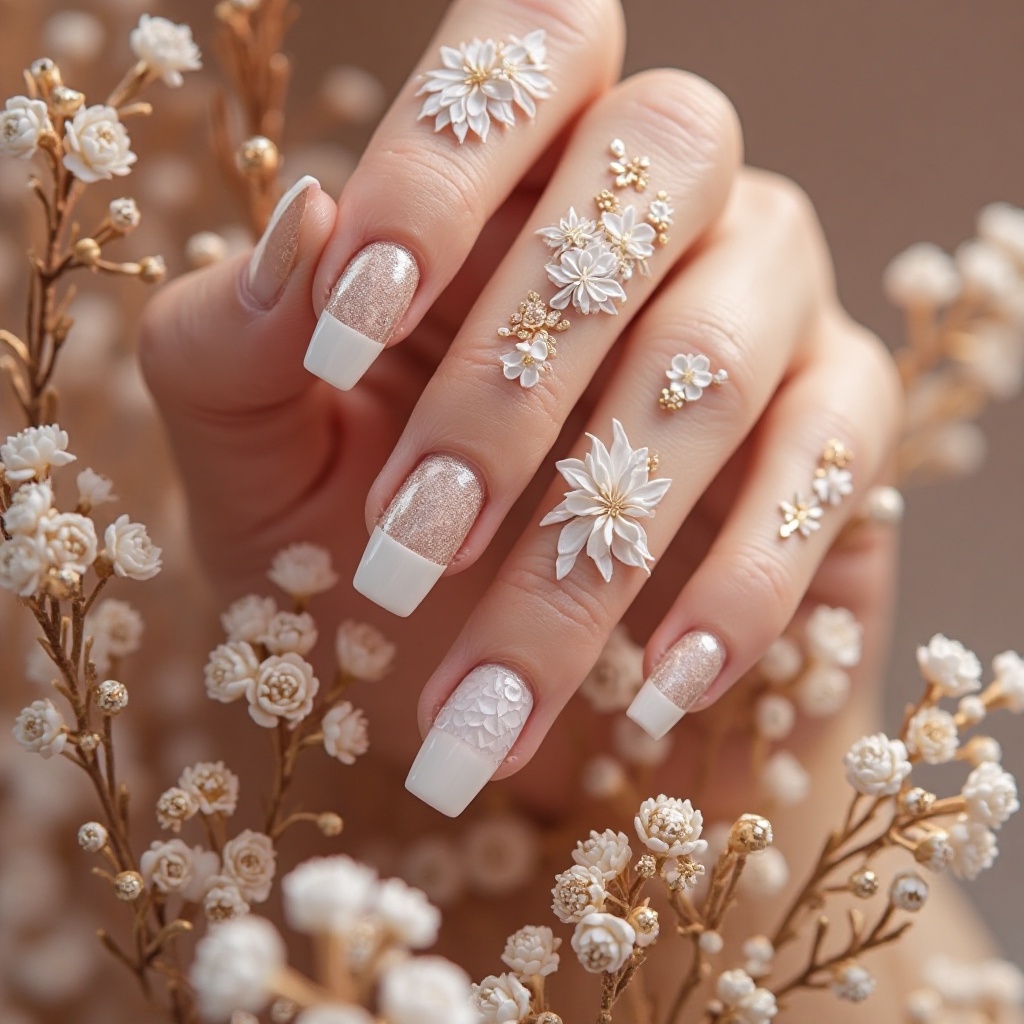
43. Acrylic Medium Length with 3D Floral Art
Medium-length acrylic nails with hand-sculpted 3D acrylic flowers on accent nails, creating dimensional, artistic elegance. The 3D flowers are molded from acrylic and look incredibly realistic. This design is for those wanting unique, wearable art.
- Difficulty: Professional salon service only
- Time to complete: 2.5-3 hours at salon
- Best for: A romantic, garden-inspired look that’s truly one-of-a-kind.
- Why it works: The medium length is practical while 3D acrylic flowers add special-occasion detail.
- What makes it different: Hand-sculpted acrylic flowers are custom-made for your nails—no two are exactly alike.
Step-by-Step (At-Home Alternative with Stickers):
- Apply base color: Paint 2-3 coats of soft pink or nude polish. Let dry completely.
- Purchase 3D floral stickers: Buy pre-made 3D white floral appliqués from Sally Beauty, Amazon ($6-10), or craft stores.
- Plan placement: Decide which 1-2 nails per hand get flowers. Ring fingers are classic.
- Apply flowers: Use tweezers to place flowers on dry nails. Press firmly for 5 seconds. If no adhesive backing, apply tiny dot of nail glue first.
- Seal carefully: Apply clear top coat around flower bases but not over them. Apply 2-3 layers for security.
- Pro Tip: Choose small flowers (5-8mm) for elegance—oversized looks costume-y rather than sophisticated.
What to Request at Salon:
- Shape: Almond or coffin (both work well for flower placement)
- Length: Medium (1/4 inch extension)
- Base color: Soft pink, nude, or white
- 3D flowers: Hand-sculpted acrylic flowers on 1-2 accent nails per hand
- Flower style: 2-4 small flowers per nail in white or blush with leaf details
- Cost at salon: $70-110 depending on detail
44. Acrylic Long with Glitter Ombré and Rhinestones
Long acrylic nails with glitter ombré (solid color fading to dense glitter at tips) plus rhinestone accents, creating maximum glamour. The length makes a statement while glitter and rhinestones add serious sparkle. This design is for those wanting full red-carpet glamour.
- Difficulty: Professional salon service recommended
- Time to complete: 2-3 hours at salon
- Best for: Maximum drama and photo-ready sparkle.
- Why it works: The length creates that special-occasion silhouette, and glitter with rhinestones ensures you’ll catch light from every angle.
- What makes it different: This is a “no holds barred” design—it’s meant to be noticed and photographed.
Step-by-Step (At-Home Alternative with Press-Ons):
- Purchase long press-ons: Buy coffin or almond press-ons in your desired length. Long options available at Glamnetic ($25-35) or Amazon ($15-20) .
- Create glitter ombré: Use sponge technique to apply glitter gradient from tips fading up. Let dry completely.
- Add rhinestones: Apply tiny dots of nail glue on accent nails. Use waxed stick to place 3-5 Swarovski crystals per nail in cluster formation. Press gently.
- Seal: Apply clear top coat around rhinestone bases. Let dry thoroughly.
- Apply press-ons: Use nail glue to apply 1-2 days before prom. Press firmly.
- Pro Tip: Limit rhinestones to 1-2 accent nails per hand—too many looks overwhelming rather than elegant.
What to Request at Salon:
- Shape: Coffin or almond (coffin gives more surface area for glitter)
- Length: Long (1/2 to 3/4 inch extension)
- Glitter ombré: Choose base color fading to dense glitter at tips
- Rhinestones: 3-7 Swarovski crystals on 1-2 accent nails per hand
- Finish: High-gloss top coat with extra layers to secure rhinestones
- Cost at salon: $70-110
Romantic & Timeless Elegance
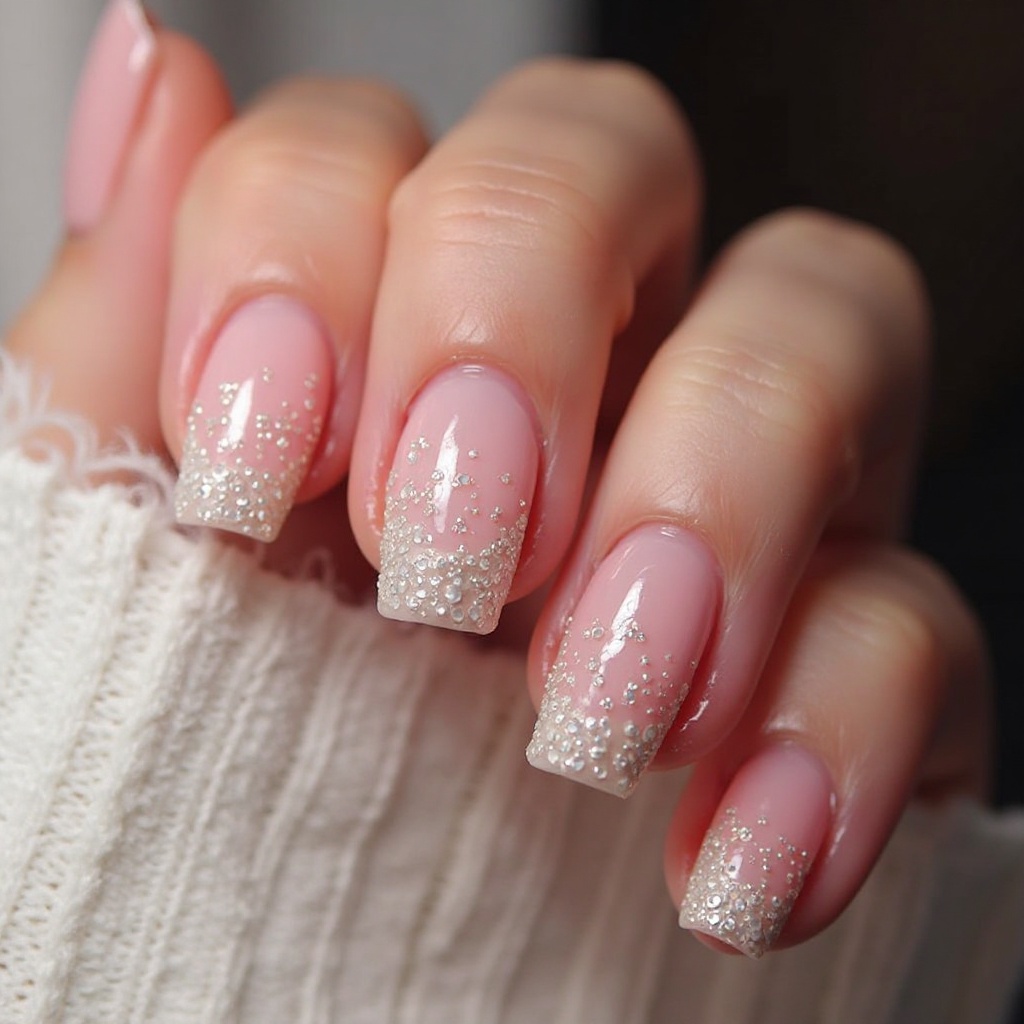
45. Pearl-Kissed French Tips
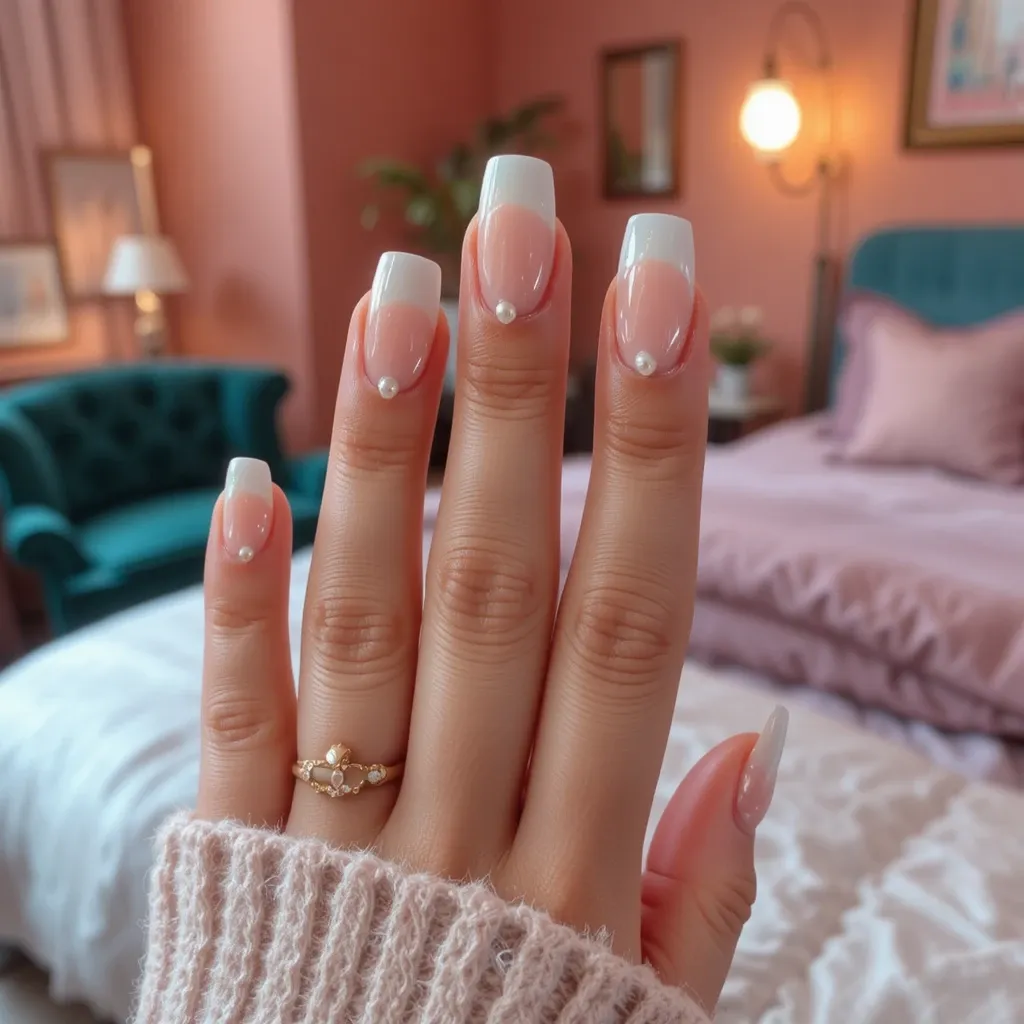
Delicate sheer pink or nude base with crisp white tips adorned with tiny pearl accents placed strategically along the smile line. The classic French silhouette gets an elevated, romantic upgrade with lustrous pearl embellishments that catch the light beautifully. This design works flawlessly with both traditional and modern french tip variations, creating dimension without overwhelming your overall look.
- Difficulty: Intermediate
- Time to complete: 45-60 minutes
- Best for: A timeless, elegant look that’s romantic without being too trendy.
- Why it works: The pearls add just enough glamour for prom without competing with your jewelry.
- What makes it different: The 3D pearl accents create subtle texture and dimension that flat art can’t achieve.
Step-by-Step:
- Prep and base: Standard prep plus base coat.
- Apply sheer base: Paint 2 thin coats of sheer pink or nude polish. OPI “Bubble Bath” ($12) is perfect—it’s a classic sheer pink. Dry 2 minutes between coats.
- Create French tips: Apply French tip guides 2-3mm from tips. Paint white polish in thin, even strokes. I used Essie “Blanc” ($9) . Remove guides immediately while polish is wet. Let dry 5 minutes.
- Place pearls: On accent nails, plan 2-3 pearls per nail along the smile line. Apply tiny dots of nail glue where you want each pearl. Use a dotting tool or waxed stick to pick up 2-3mm pearls and press gently into place. Hold 3 seconds.
- Seal carefully: Let pearls set 5 minutes. Apply clear top coat to all nails, painting carefully around pearl bases but not over them. Apply 2-3 layers around pearls for security.
- Pro Tip: Place pearls slightly off-center or in asymmetric clusters for a modern, intentional look rather than a straight line that can read too formal.
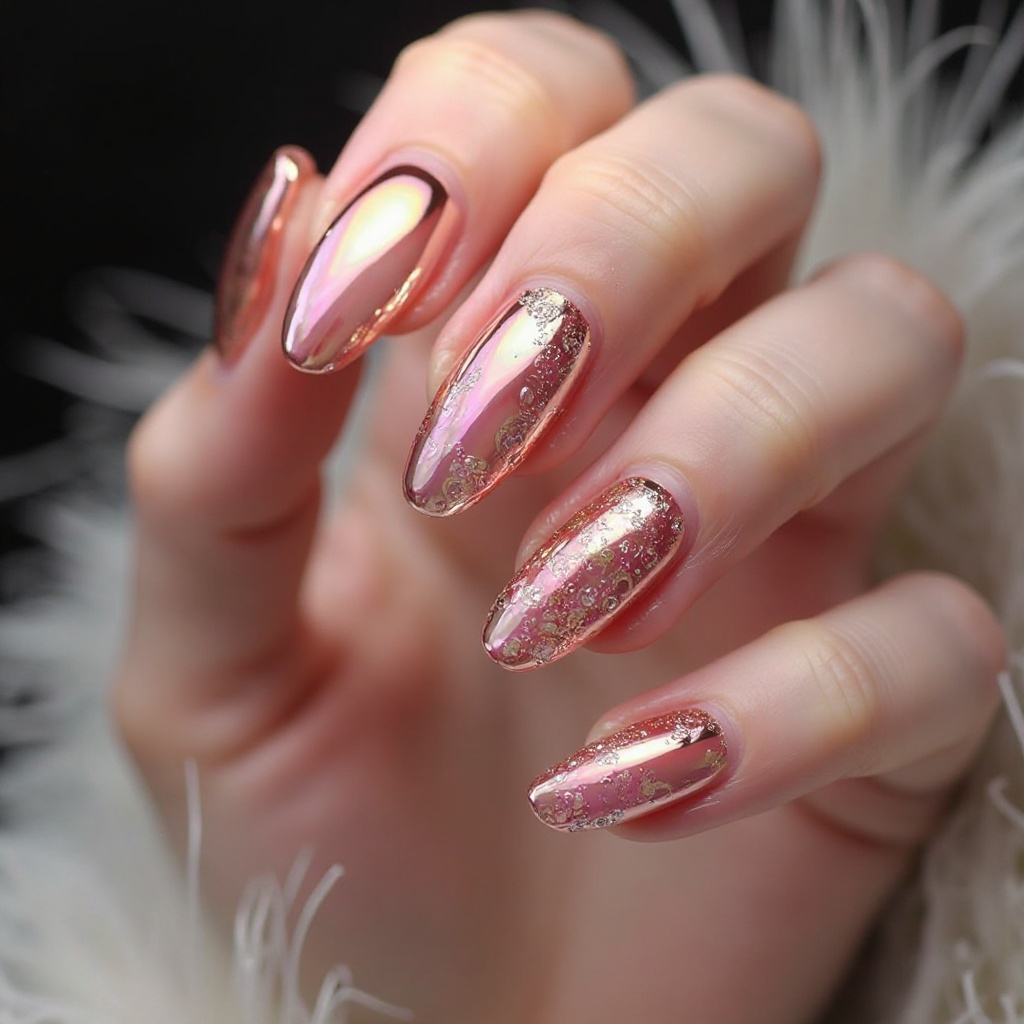
46. Rose Gold Chrome Dream
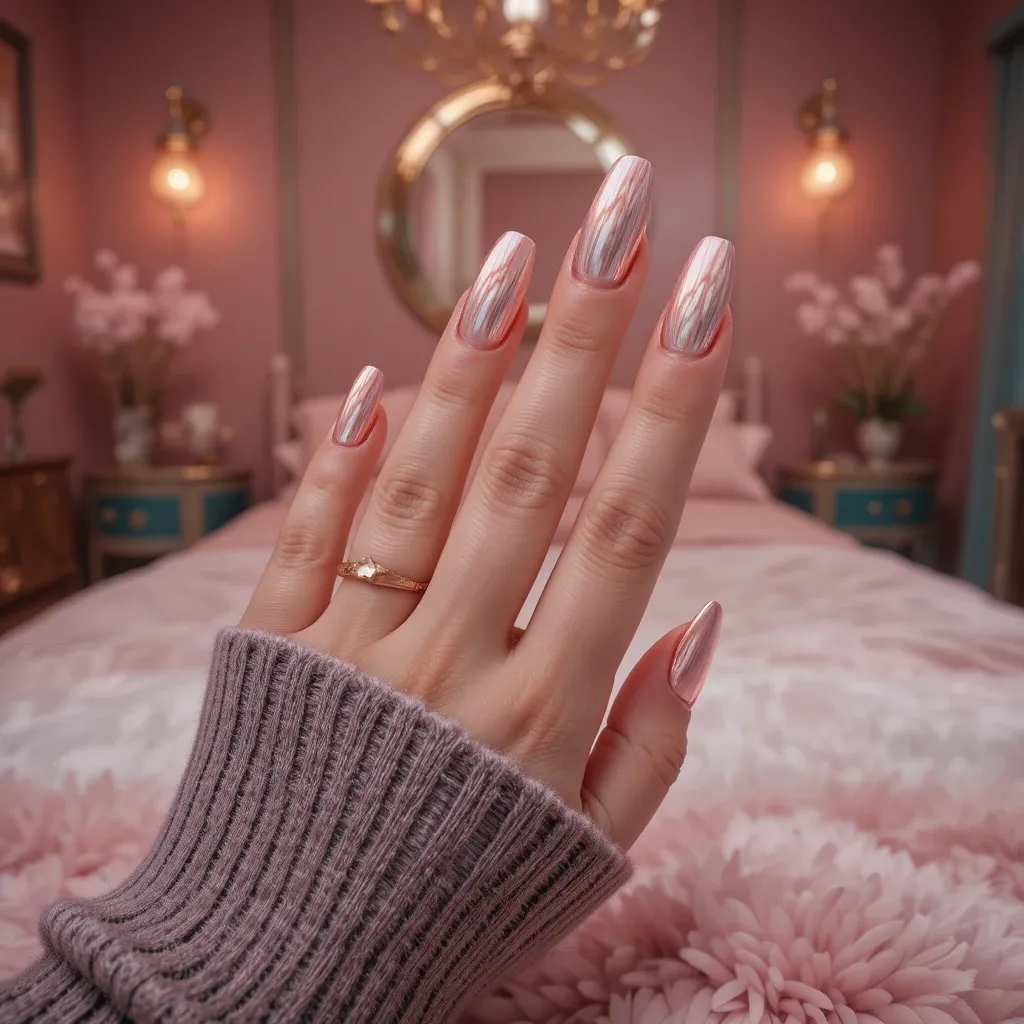
A reflective rose gold chrome finish that shifts between warm pink and metallic gold tones depending on the lighting and angle. The mirror-like surface creates an incredibly luxe, high-fashion effect that pairs gorgeously with warm-toned dresses and gold jewelry. This single-color application delivers maximum impact with minimal nail art, letting the innovative finish do all the talking.
- Difficulty: Intermediate—requires gel equipment
- Time to complete: 30-40 minutes
- Best for: Maximum glamour with minimal effort—the finish does all the work.
- Why it works: Rose gold is universally flattering and photographs exceptionally well in both natural and flash photography.
- What makes it different: The mirror finish looks like liquid metal, not just metallic polish.
Step-by-Step:
- Prep and base: Standard prep, apply gel base coat, cure 60 seconds.
- Apply dark base: Paint 2 coats of black or dark brown gel polish. Brown base gives warmer rose gold, black gives cooler tones. Cure 60 seconds between coats. Must be completely opaque.
- Apply gel top coat: Paint a thin layer of no-wipe gel top coat, cure 60 seconds until tacky.
- Apply rose gold chrome: Rub rose gold chrome powder onto the tacky surface using an eyeshadow applicator. Use firm, circular motions. The mirror effect appears instantly. Dust off excess.
- Seal chrome: Apply gel top coat gently to avoid disturbing the powder, cure 60 seconds. Apply a second layer for durability, cure again. Wipe with rubbing alcohol.
- Pro Tip: Opt for almond or coffin nail shapes to maximize the reflective surface area.
Soft & Dreamy Pastels
47. Lavender Cloud Ombré
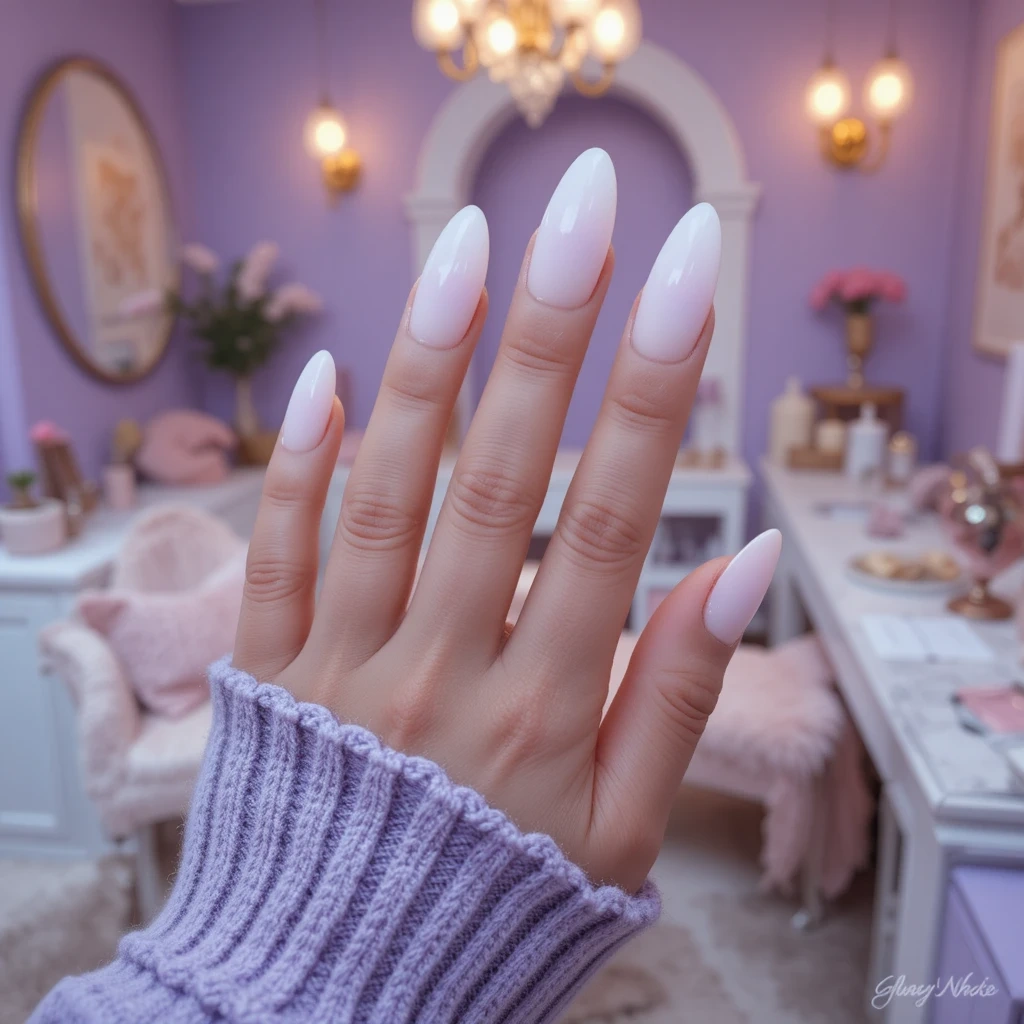
A gradient transition from milky white at the cuticle to soft lavender at the tips, creating an ethereal, cloud-like effect. The subtle color shift adds dimension and visual interest while maintaining an overall soft, feminine aesthetic that feels fresh and youthful. Finished with a glossy top coat, this design has a dreamy, almost watercolor quality that’s perfect for spring prom season.
- Difficulty: Beginner-friendly
- Time to complete: 60-75 minutes
- Best for: A soft, romantic look that’s trendy but not overwhelming.
- Why it works: Lavender is having a major moment, and the ombré technique keeps it wearable.
- What makes it different: The sponge technique creates a soft, airbrushed effect that brushes can’t achieve.
Step-by-Step:
- Prep and protect: Apply liquid latex around nails, then base coat.
- Apply white base: Paint 2 coats of milky white polish. Essie “Marshmallow” ($9) is perfect. Dry 2 minutes between coats.
- Create gradient palette: On a paper plate, paint stripes of white and lavender side by side. I used Essie “Lilacism” ($9) for the lavender.
- Apply with sponge: Dab a makeup sponge to pick up both colors. Bounce onto nail with white at cuticle, lavender at tips. Use light dabbing, not swiping. Repeat 2-3 times, drying 3 minutes between layers.
- Smooth texture: Let dry 10 minutes. Apply 2-3 layers of clear top coat to smooth the sponge texture, waiting 3 minutes between layers.
- Pro Tip: The light bouncing motion (not rubbing or swiping) is what creates the seamless transition.
Bold & Show-Stopping Glam
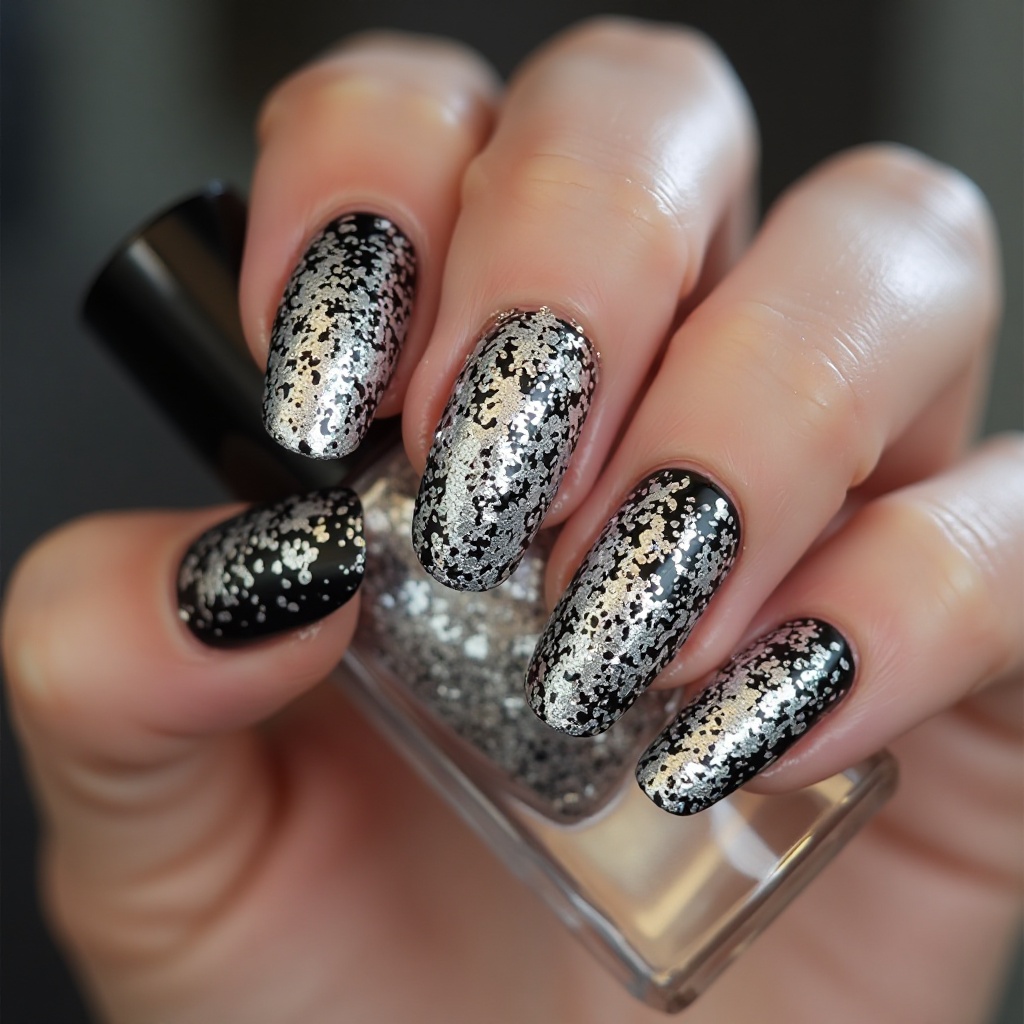
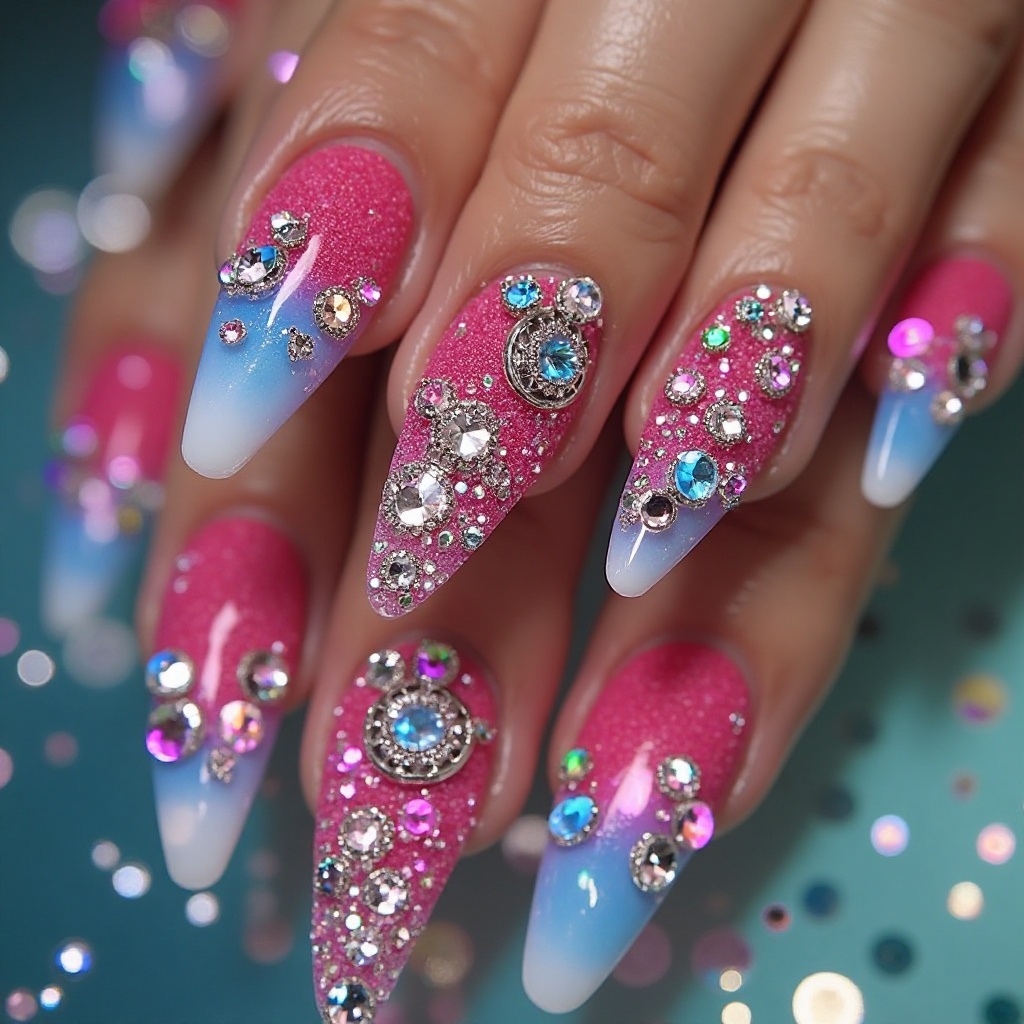
48. Midnight Sparkle with Crystal Accents
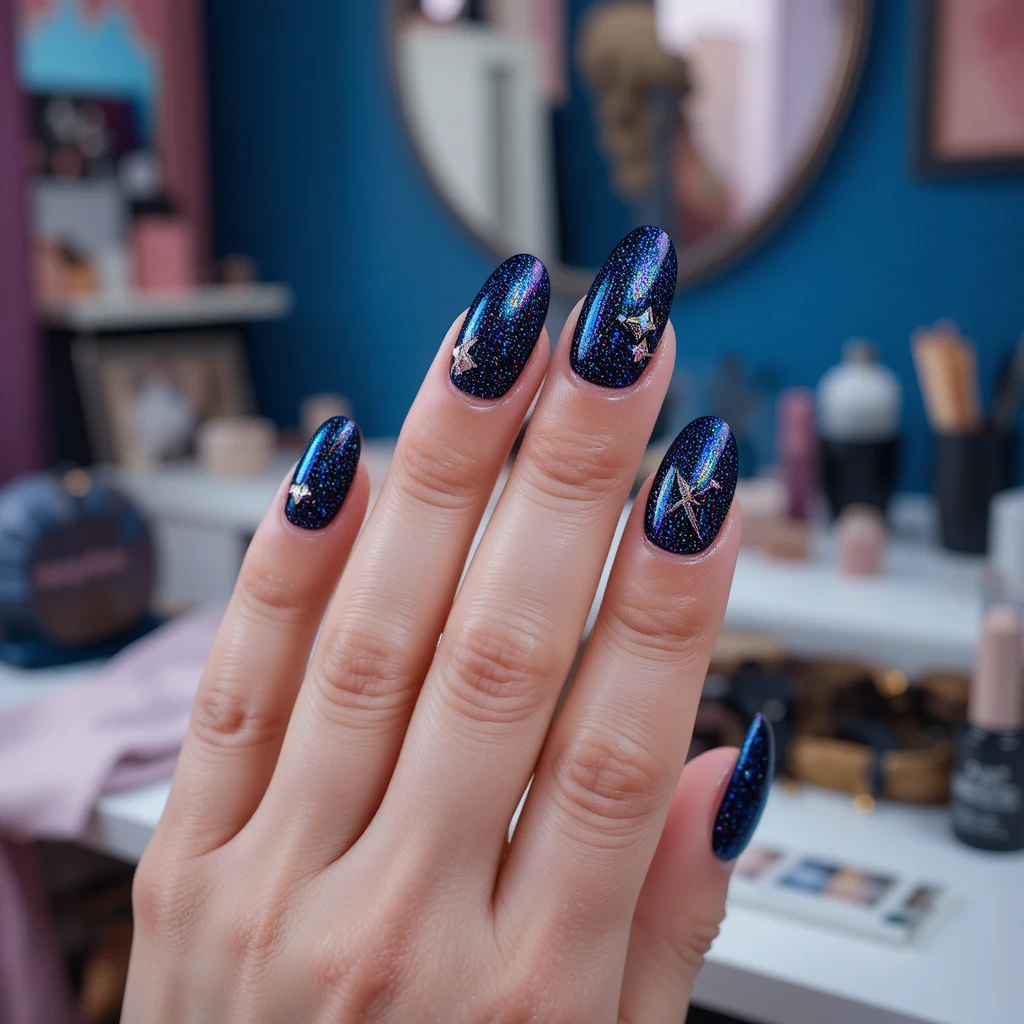
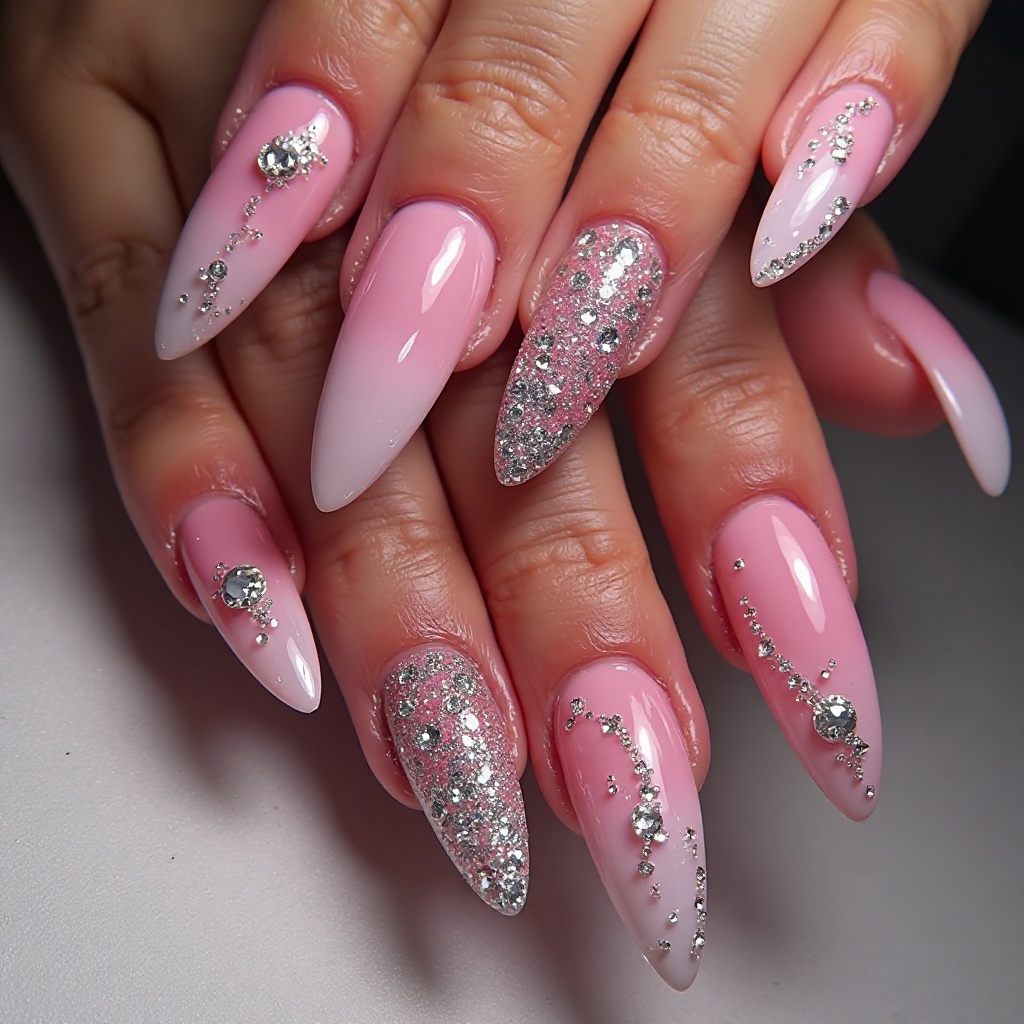
Deep navy or black base color completely covered in fine holographic glitter that creates a starry night effect, with strategic Swarovski crystal placement on accent nails. The dark base provides stunning contrast against the rainbow sparkle, while crystals add strategic points of brilliance that catch light with every hand movement. This design channels red-carpet glamour and works beautifully with both bold jewel-tone dresses and classic black gowns.
- Difficulty: Intermediate
- Time to complete: 60-75 minutes
- Best for: High-drama glamour that photographs incredibly well.
- Why it works: The dark base makes glitter and crystals pop dramatically.
- What makes it different: The combination of holographic glitter and genuine crystals creates dimensional sparkle.
Step-by-Step:
- Prep and base: Standard prep plus base coat.
- Apply dark base: Paint 2-3 coats of navy or black polish. Essie “Licorice” ($9) or OPI “Lincoln Park After Dark” ($12) work great. Dry 2 minutes between coats. Let final coat dry 5 minutes.
- Layer glitter: Apply 1-2 coats of holographic glitter polish. Use dabbing motion for heavier coverage. I used ILNP “Juliette” ($10, their website) . Let dry completely.
- Plan crystal placement: Decide which 1-2 accent nails get crystals. Popular placements: curved line near cuticle, cluster in one corner. Use 3-5 crystals per nail maximum.
- Apply crystals: Apply tiny dots of nail glue where you want crystals. Use a waxed stick or dotting tool to pick up Swarovski crystals (SS6 or SS8 size) and press into place. Hold 3 seconds.
- Encapsulate: Apply 2-3 thick layers of clear top coat, building around crystal bases. Wait 5 minutes between layers. Crystals should feel smooth, not sharp.
- Pro Tip: Use genuine Swarovski crystals ($3-5 for a mixed pack)—they reflect light beautifully while cheap plastic looks dull.
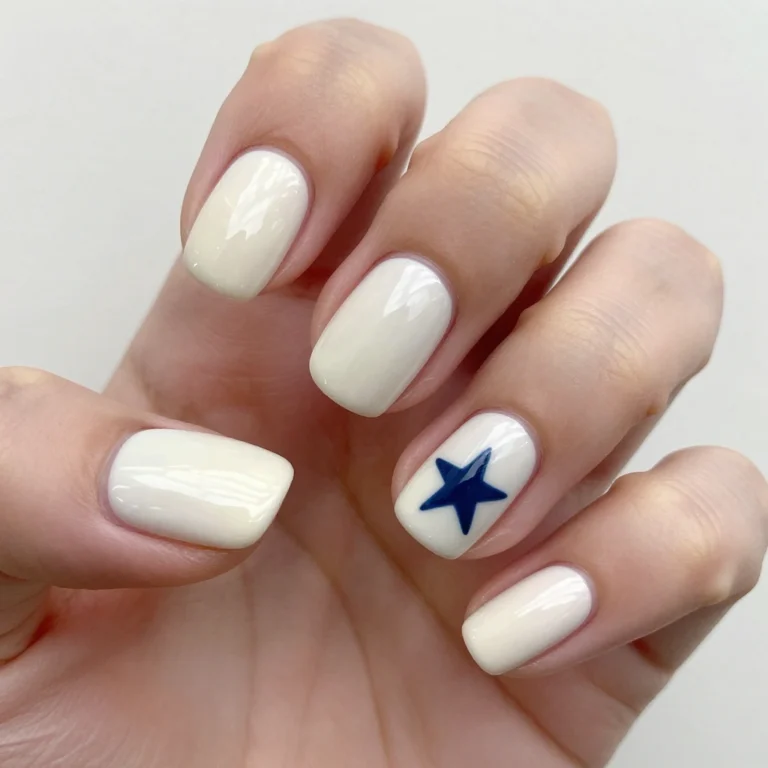
49. Milky White with Gold Leaf Accents
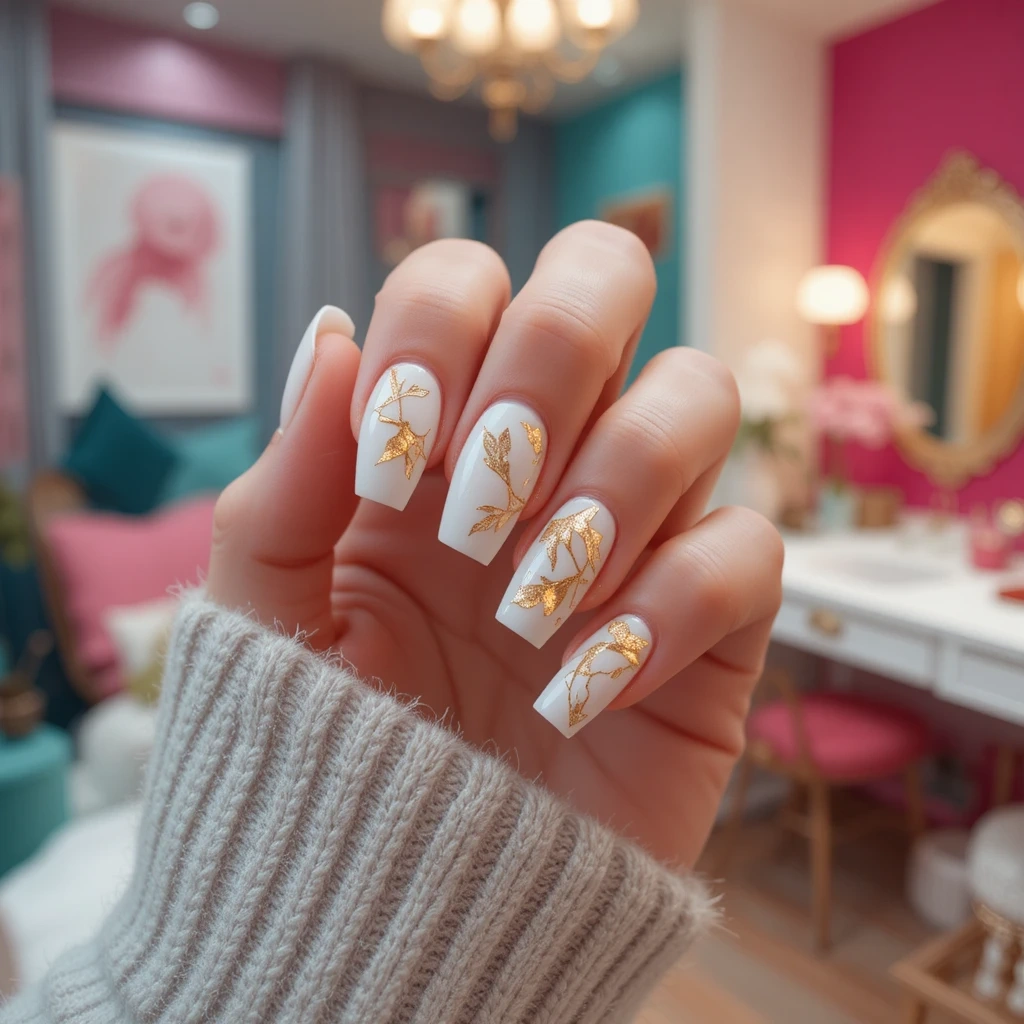
Creamy, opaque milky white base with delicate sheets of genuine gold leaf applied in organic, abstract patterns on select nails. The combination creates a luxurious, modern aesthetic that feels both minimalist and special occasion-worthy at the same time. The gold leaf catches light differently than traditional glitter, offering a more sophisticated, editorial shimmer that feels expensive and refined.
- Difficulty: Beginner-Intermediate
- Time to complete: 50-65 minutes
- Best for: A modern, editorial look that’s minimal but special.
- Why it works: Milky white is trendy and works with any dress color.
- What makes it different: Genuine gold leaf creates organic, irregular patterns that look artistic and intentional.
Step-by-Step:
- Prep and base: Standard prep plus base coat.
- Apply milky white base: Paint 2-3 coats of opaque milky white. OPI “Funny Bunny” ($12) or Essie “Marshmallow” ($9) work well. Dry 2 minutes between coats. Let final coat dry 5 minutes.
- Prepare gold leaf: Tear small, irregular pieces of genuine gold leaf using tweezers. Keep pieces varied in size.
- Apply gold leaf: On 1-3 accent nails, paint thin layer of clear top coat where you want gold. While wet, place gold leaf pieces with tweezers. Press gently with a small brush. Overlap pieces for denser coverage or space out for delicate look.
- Brush excess: Use a dry fan brush to sweep away loose leaf that didn’t stick.
- Seal thoroughly: Apply 3 thick layers of clear top coat, waiting 5 minutes between layers. Gold leaf needs serious sealing to prevent flaking.
- Pro Tip: Work on one nail at a time—top coat dries quickly and gold leaf won’t stick to dry polish.
Classic with a Twist
50. Champagne Shimmer with Silver Foil Details
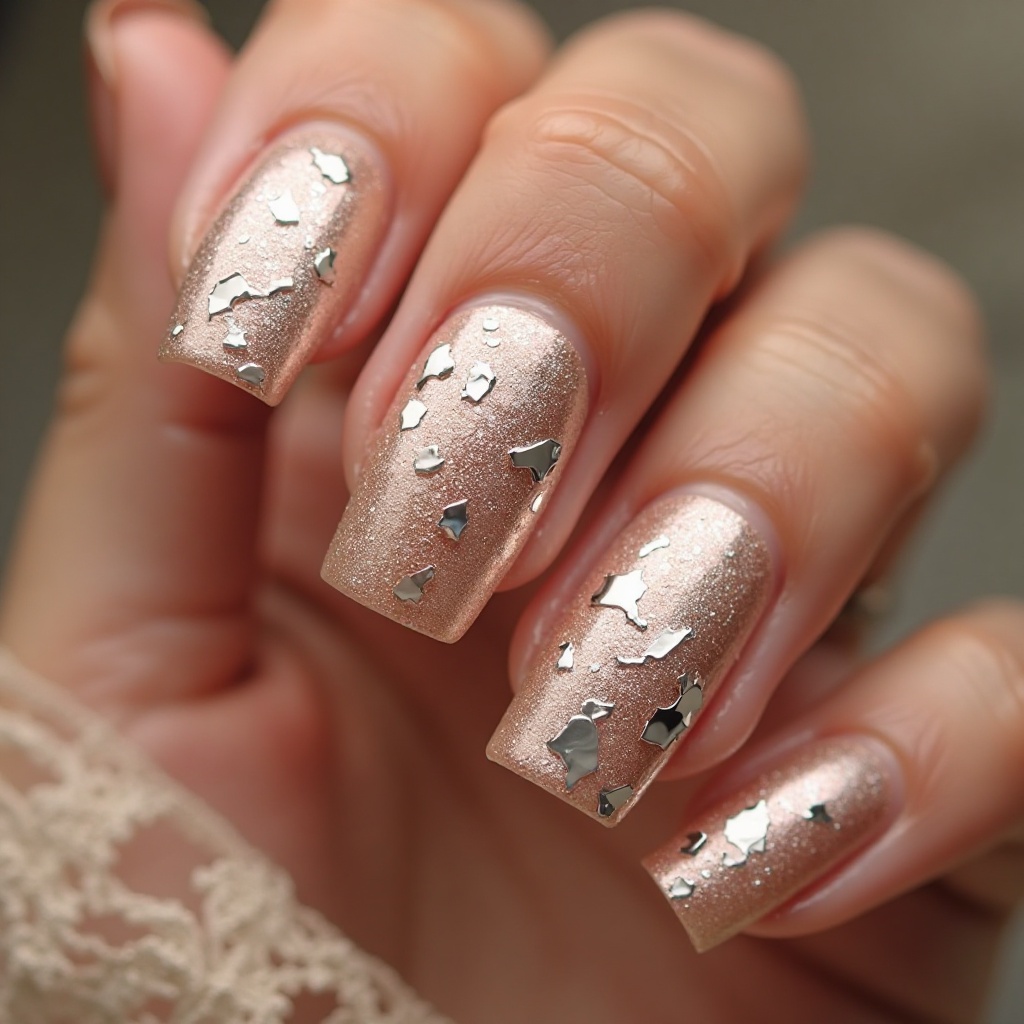
A warm champagne nude base with a subtle shimmer finish, accented with hand-placed silver foil fragments on one or two accent nails. The foil creates an abstract, artistic effect that looks like cracked metal or delicate veining, adding edge to an otherwise classic color. This design balances sophistication with just enough visual interest to feel special and current without being overly trendy.
- Difficulty: Beginner-Intermediate
- Time to complete: 40-50 minutes
- Best for: A subtle metallic look that’s not as bold as full chrome.
- Why it works: The champagne base is universally flattering, and silver foil adds unexpected texture.
- What makes it different: The foil creates abstract patterns that look like modern art.
Step-by-Step:
- Prep and base: Standard prep plus base coat.
- Apply champagne base: Paint 2 coats of warm champagne shimmer polish. OPI “Cosmo-Not Tonight Honey” ($12) is beautiful. Dry 2 minutes between coats.
- Choose accent nails: Decide which 1-2 nails per hand get foil—ring fingers are classic.
- Apply foil adhesive: On accent nails, paint thin layer of foil adhesive in abstract shapes. Let dry 3-5 minutes until tacky.
- Apply silver foil: Cut or tear small silver foil pieces. Place shiny-side-up onto tacky adhesive and press firmly for 5 seconds. Peel away backing—silver transfers. Repeat for desired coverage.
- Seal: Apply 2-3 thick layers of clear top coat, waiting 3 minutes between layers.
- Pro Tip: Don’t try for perfect coverage—partial transfer creates that cracked metal effect that looks intentional and modern.
51. Blush Pink Glass Nails
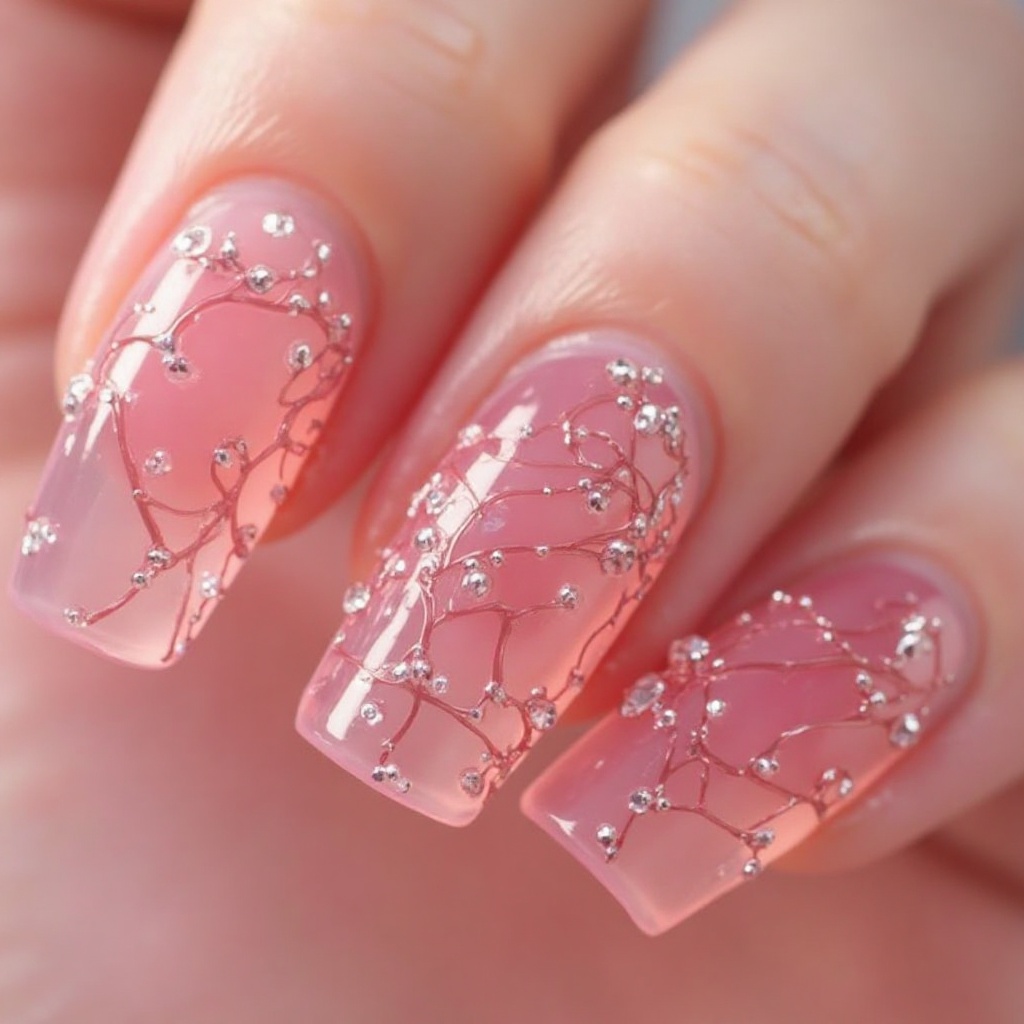
A translucent, jelly-like blush pink finish that creates a glass-like appearance with incredible depth and dimension when layered properly. The sheer, glossy effect allows light to pass through the polish, creating an almost gemstone quality that looks delicate and feminine. Multiple thin layers build up the color intensity while maintaining that signature translucent, glassy finish that’s currently dominating social media.
- Difficulty: Beginner-friendly
- Time to complete: 60-75 minutes
- Best for: A delicate, ethereal look that’s romantic and photograph-friendly.
- Why it works: The jelly finish creates unique luminous quality that solid polishes can’t achieve.
- What makes it different: Light passes through the polish, creating depth like stained glass.
Step-by-Step:
- Prep and base: Standard prep plus base coat.
- Build jelly layers: Apply first coat of blush pink jelly polish very thinly—it will look extremely sheer. Dry 3 minutes. Apply second thin coat, dry 3 minutes. Apply third coat—color should start building. Add fourth coat if needed for desired depth.
- The thin coat rule: Jelly polishes MUST be applied in thin layers. Thick coats look streaky and never achieve the glass effect.
- Apply glossy top coat: Once color depth is achieved, wait 5 minutes. Apply thick layer of high-gloss top coat—this creates the actual glass effect. Let dry 5 minutes. Apply second thick glossy layer.
- Cure completely: Let everything dry for 45-60 minutes. Quick-dry drops can help speed this up.
- Pro Tip: Look for polishes labeled “jelly,” “sheer,” or “glass.” If polish is opaque in 2 coats, it’s not a true jelly.
Dramatic & Unforgettable
52. Burgundy Wine with Gold Chrome French Tips
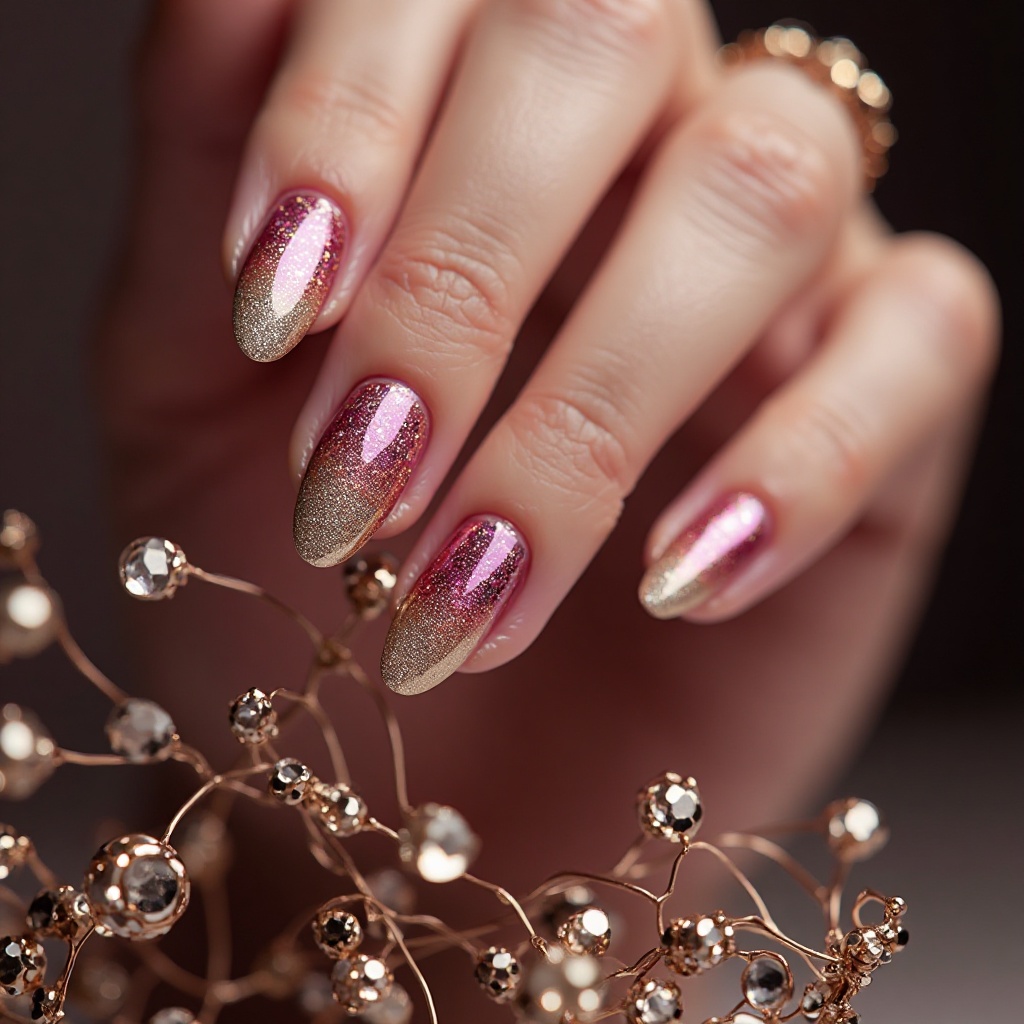
Rich, deep burgundy wine base paired with metallic gold chrome tips in a modern French manicure style with a thicker tip line. The color combination exudes luxury and sophistication, with the warm burgundy creating stunning contrast against the brilliant gold chrome. This design works particularly well for evening proms and pairs beautifully with burgundy, gold, navy, or emerald green dresses.
- Difficulty: Intermediate
- Time to complete: 50-70 minutes
- Best for: Evening proms and formal events where you want sophisticated drama.
- Why it works: Deep burgundy feels mature and elegant while gold tips add glamour.
- What makes it different: The thicker tip line (3-4mm) creates a bold, modern statement.
Step-by-Step:
- Prep and base: Standard prep plus base coat.
- Apply burgundy base: Paint 2-3 coats of deep burgundy. Essie “Bordeaux” ($9) or OPI “Malaga Wine” ($12) work perfectly. Dry 2 minutes between coats. Let final coat dry 10 minutes.
- Apply tape guides: Place French tip guides 3-4mm from tips. Press firmly.
- Paint gold tips: Use gold chrome polish (or gold metallic polish) to paint tips in thin coats. Apply 2 coats for full opacity, drying 2 minutes between. Remove tape immediately after second coat while wet.
- Seal: Let dry 5 minutes. Apply 2 layers of clear top coat.
- Pro Tip: For true chrome tips, use gel method with gold chrome powder—it creates a mirror finish that metallic polish can’t match.
53. Icy Blue Holographic with Silver Glitter Gradient
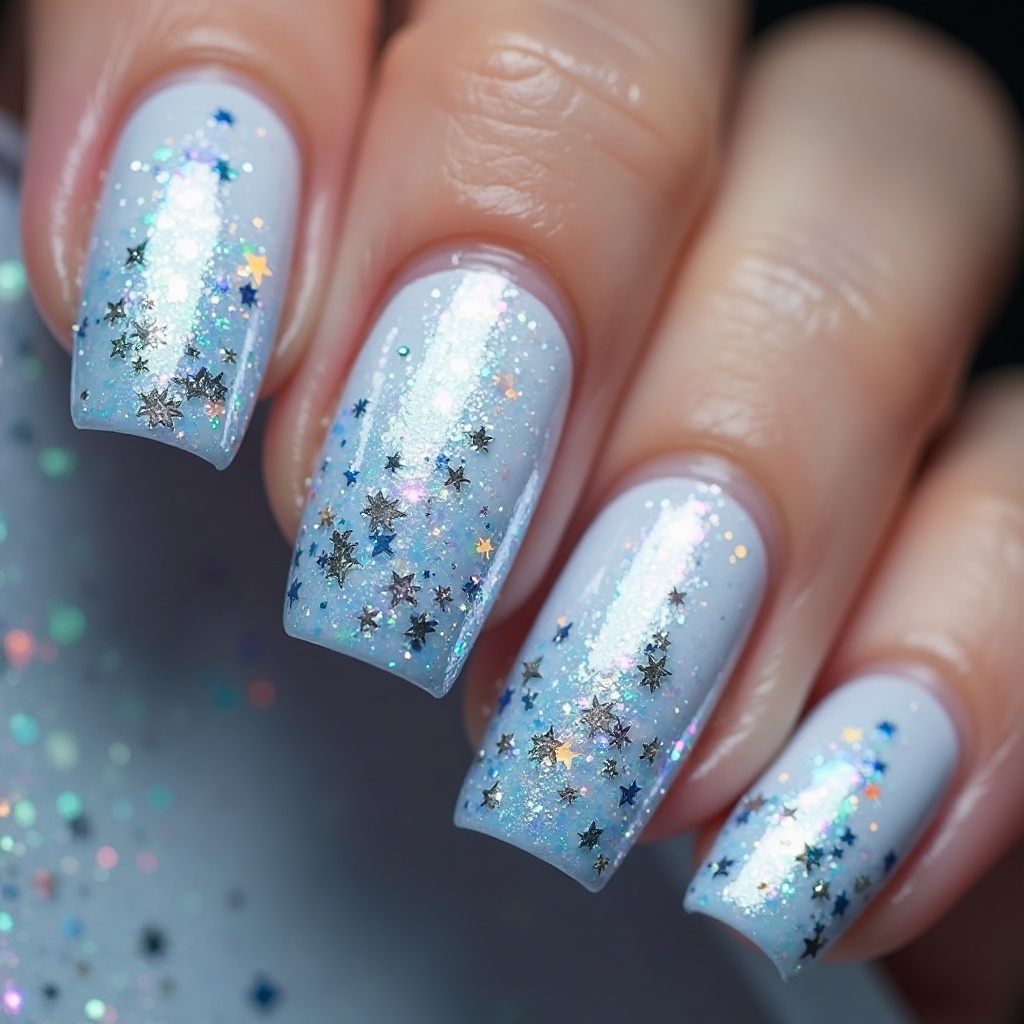
A pale icy blue holographic base that shifts with rainbow sparkles, featuring a concentrated silver glitter gradient that’s densest at the tips and fades toward the cuticle. The combination creates a frosty, winter princess effect with serious sparkle that catches every light source in the room. The holographic finish adds dimension while the glitter gradient prevents the design from feeling too heavy or overwhelming.
- Difficulty: Intermediate
- Time to complete: 60-75 minutes
- Best for: A dreamy, ethereal look that photographs like magic.
- Why it works: The cool blue tone is unexpected and memorable while still elegant.
- What makes it different: The holographic base shifts colors, creating dimension that single-color glitter can’t achieve.
Step-by-Step:
- Prep and protect: Apply liquid latex around nails, then base coat.
- Apply holographic base: Paint 2 coats of icy blue holographic polish. ILNP “Birefringence” ($10, their website) is perfect. Dry 2 minutes between coats. Let final coat dry 5 minutes.
- Prep glitter: Pour silver micro-glitter polish onto paper plate. China Glaze “Fairy Dust” ($8) works beautifully.
- Create gradient: Dab sponge into glitter, bounce onto nail tips with heavy pressure at tips, lightening toward center. Repeat 3 times, drying 3 minutes between layers.
- Smooth texture: Let dry 10 minutes. Apply 3 thick layers of clear top coat, waiting 3 minutes between layers. Surface should feel smooth, not bumpy.
- Pro Tip: Choose fine micro-glitter rather than chunky for a smoother, more sophisticated finish.
Modern & Fashion-Forward
54. Nude Marble with Rose Gold Veining
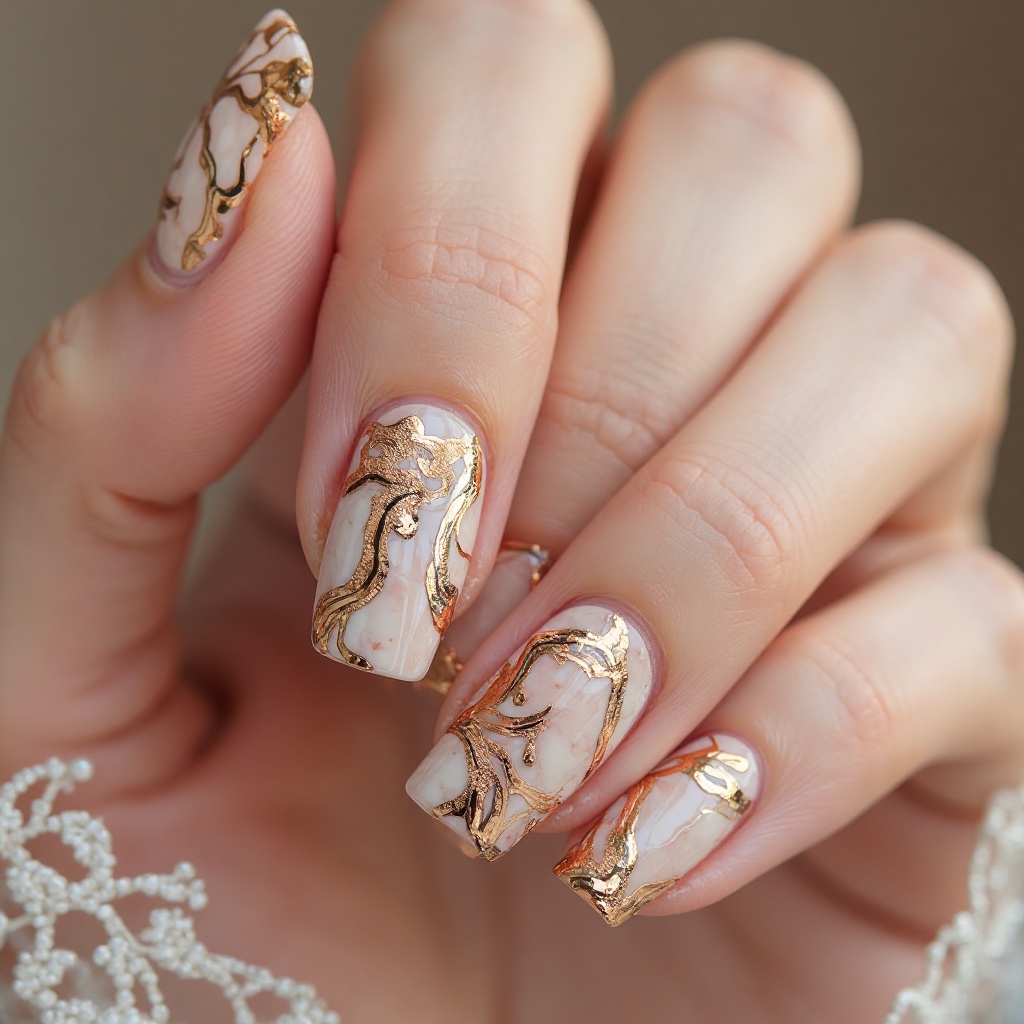
A neutral nude or soft beige base with hand-painted marble veining in rose gold, creating an organic stone effect that’s both natural and glamorous. Each nail features unique veining patterns that mimic real marble, making your manicure a true work of wearable art. The rose gold veining adds warmth and luxury while the nude base keeps the overall look sophisticated and refined.
- Difficulty: Intermediate—requires artistic hand
- Time to complete: 45-60 minutes
- Best for: An artistic, sophisticated look that’s unique to you.
- Why it works: Nude and rose gold work with virtually any dress color.
- What makes it different: Each nail has unique veining patterns—no two are alike.
Step-by-Step:
- Prep and base: Standard prep plus base coat.
- Apply nude base: Paint 2-3 coats of warm nude polish. OPI “Samoan Sand” ($12) is classic. Dry 2 minutes between coats.
- Thin rose gold polish: Dip thin brush into rose gold polish, wipe most off. If too thick, add tiny drop of thinner or clear top coat. Consistency should be ink-like.
- Paint veining: Using thin brush, paint irregular, diagonal veins on 1-3 accent nails. Vary pressure for thick-thin lines. Make veins intersect and branch. 3-5 veins per nail is plenty.
- Soften (optional): While slightly wet, lightly drag clean dry brush through some veins to soften edges.
- Seal: Let dry 10 minutes. Apply 2 layers of clear top coat.
- Pro Tip: Study real marble images before painting—veins are irregular, diagonal, and intersecting, never perfectly straight or parallel.
55. Soft Pink with 3D Floral Appliqués
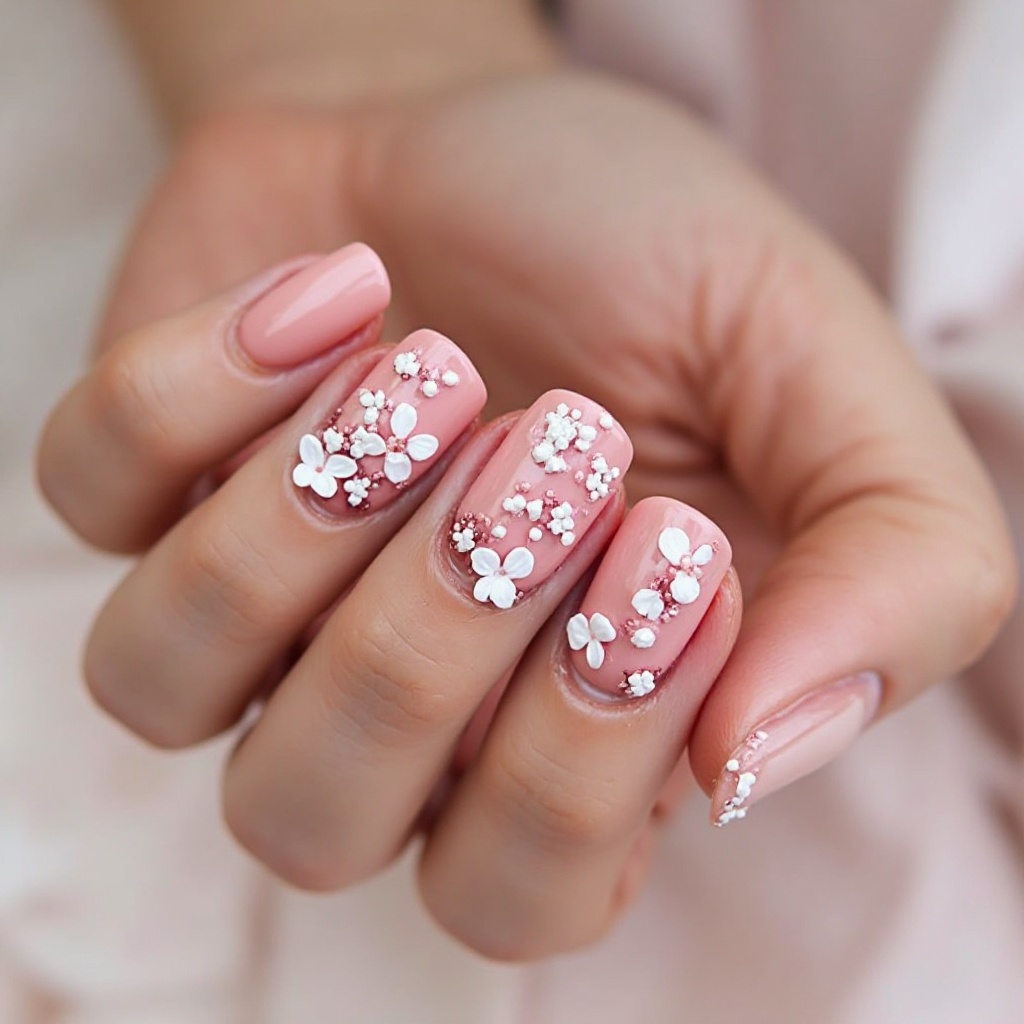
A creamy soft pink base adorned with tiny 3D floral appliqués in white and blush tones, creating a garden-inspired romantic look. The dimensional flowers are applied strategically on accent nails (typically ring and middle fingers) using gel or acrylic sculpting techniques that create realistic petal textures. This design channels bridal elegance while still feeling youthful and perfect for prom’s romantic atmosphere.
- Difficulty: Beginner
- Time to complete: 30-45 minutes
- Best for: A romantic, garden-party look with minimal artistic skill required.
- Why it works: The soft color palette is timeless and feminine.
- What makes it different: Pre-made 3D appliqués add texture and dimension that flat art can’t match.
Step-by-Step:
- Prep and base: Standard prep plus base coat.
- Apply soft pink base: Paint 2-3 coats of soft pink. Essie “Fiji” ($9) is perfect. Dry 2 minutes between coats. Let final coat dry completely—10 minutes.
- Apply flowers: Use tweezers to pick up 3D white floral stickers from sheet. Position on 1-2 accent nails per hand. Press firmly for 5 seconds. If no adhesive backing, apply tiny dot of nail glue first.
- Arrange placement: Use 2-4 small flowers per nail, placing them in organic clusters rather than straight lines.
- Seal carefully: Apply clear top coat to all nails, painting carefully around flower bases but not over them. Apply 2-3 layers around flowers for security.
- Pro Tip: Keep 3D flowers to 2-3 nails maximum and choose small flowers (5-7mm) for elegance—oversized looks costume-y.
Edgy & Contemporary
56. Black with Silver Glitter Ombré
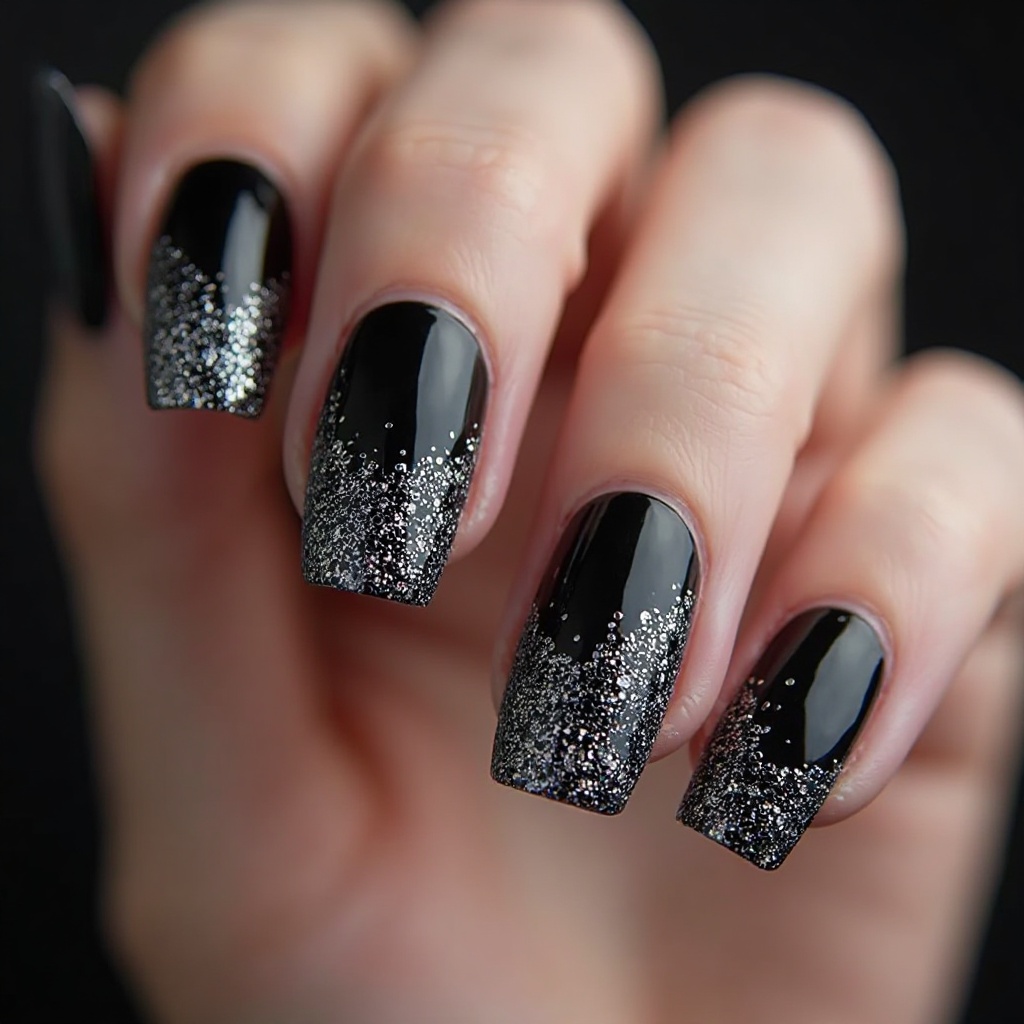
A classic black base that transitions into dense silver glitter at the tips, creating a dramatic ombré effect that’s both edgy and glamorous. The black provides a bold, confident foundation while the silver glitter softens the look and adds serious sparkle for the occasion. This design is perfect for those who want to make a statement and pairs exceptionally well with black, silver, or jewel-tone dresses.
- Difficulty: Intermediate
- Time to complete: 70-85 minutes
- Best for: An edgy look that balances drama with glamour.
- Why it works: Black creates maximum contrast, making silver glitter pop dramatically.
- What makes it different: Chunky glitter over black creates more impact than fine glitter.
Step-by-Step:
- Prep and protect: Apply liquid latex around nails, then base coat.
- Apply black base: Paint 2-3 coats of black polish. Essie “Licorice” ($9) is perfect. Dry 2 minutes between coats. Let final coat dry 5 minutes.
- Prep glitter: Pour chunky silver glitter polish onto paper plate.
- Create gradient: Dab sponge into glitter, bounce onto nail tips with heavy pressure at tips. Use medium pressure toward mid-nail, light pressure near cuticle. Repeat 3-4 times, drying 3 minutes between layers.
- Build density: Each layer should focus more glitter at tips, creating dense sparkle concentration at the very tips.
- Smooth texture: Let dry 10 minutes. Apply 3-4 thick layers of clear top coat, waiting 3 minutes between layers. Nail should feel completely smooth.
- Pro Tip: Start the glitter at the midpoint of the nail, not too close to cuticle—it should fade to pure black by mid-nail.
57. Electric Blue Chrome with Geometric Negative Space
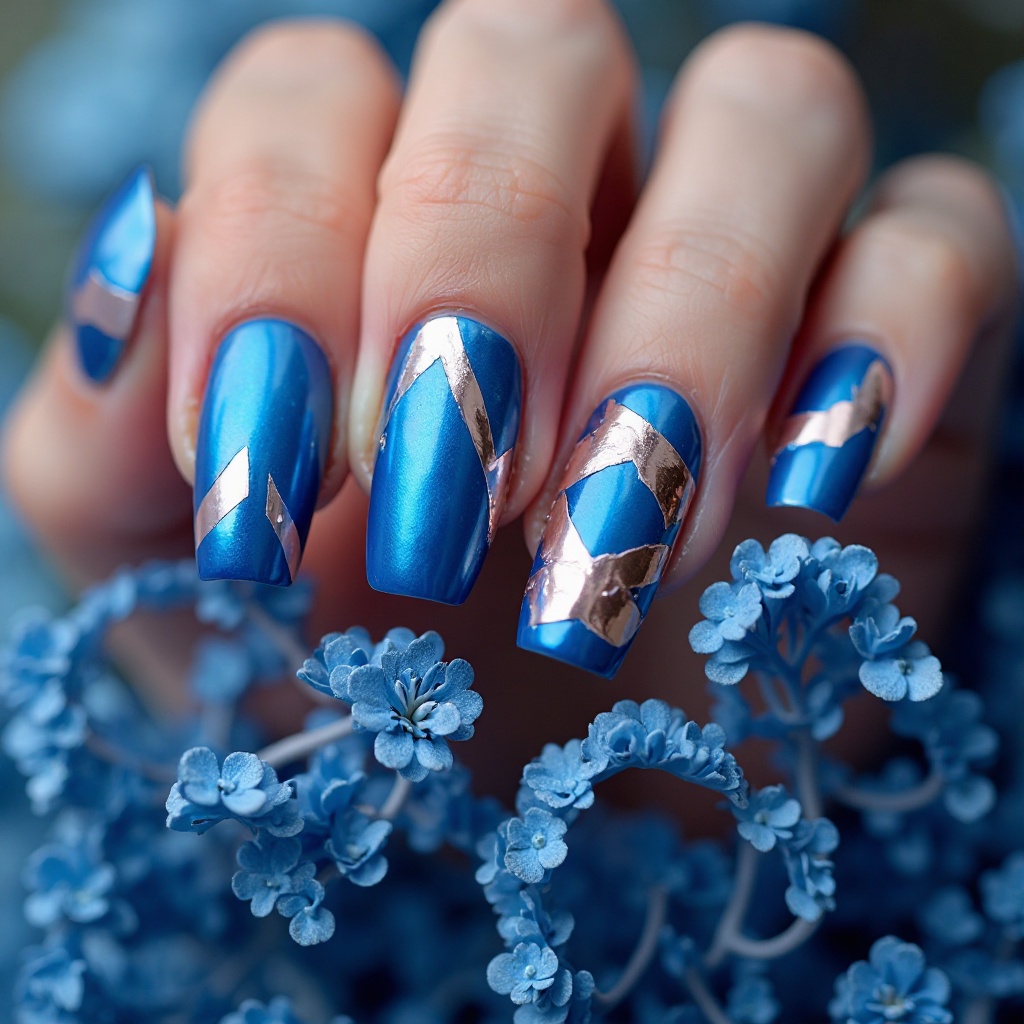
A vibrant electric blue chrome base with strategic negative space cutouts in geometric patterns—think triangular windows or diagonal stripes that reveal your natural nail. The chrome finish makes the blue incredibly saturated and eye-catching, while the negative space adds modern sophistication and prevents the bold color from overwhelming. Thin metallic striping tape often outlines the geometric shapes for crisp, clean edges.
- Difficulty: Advanced—requires gel equipment
- Time to complete: 60-75 minutes
- Best for: A fashion-forward, editorial look that shows off your personal style.
- Why it works: The negative space keeps bold chrome from feeling too heavy.
- What makes it different: The geometric patterns create intentional, artistic cutouts.
Step-by-Step:
- Prep and plan: Standard prep, apply gel base coat, cure 60 seconds. Sketch geometric patterns before starting.
- Apply tape for negative space: On design nails, place striping tape in geometric patterns (diagonals, triangles, chevrons) on cured base coat. Press firmly.
- Apply blue gel: Paint 2 coats of electric blue gel polish over all nails (including tape), curing 60 seconds between coats.
- Apply gel top coat: Paint thin layer of no-wipe gel top coat, cure 60 seconds until tacky.
- Apply chrome powder: Rub blue chrome powder over all nails with eyeshadow applicator. Mirror effect appears instantly. Dust off excess.
- Remove tape: Use tweezers to carefully peel away striping tape, revealing natural nail in geometric shapes.
- Add decorative tape (optional): Apply thin metallic striping tape along boundaries between chrome and natural nail for definition.
- Seal: Apply gel top coat over everything including tape borders, cure 60 seconds. Apply second layer, cure again. Wipe with rubbing alcohol.
- Pro Tip: Keep designs simple—one or two clean shapes per nail looks more intentional than complex patterns.
Sweet & Whimsical
58. Baby Pink with Iridescent Flakes
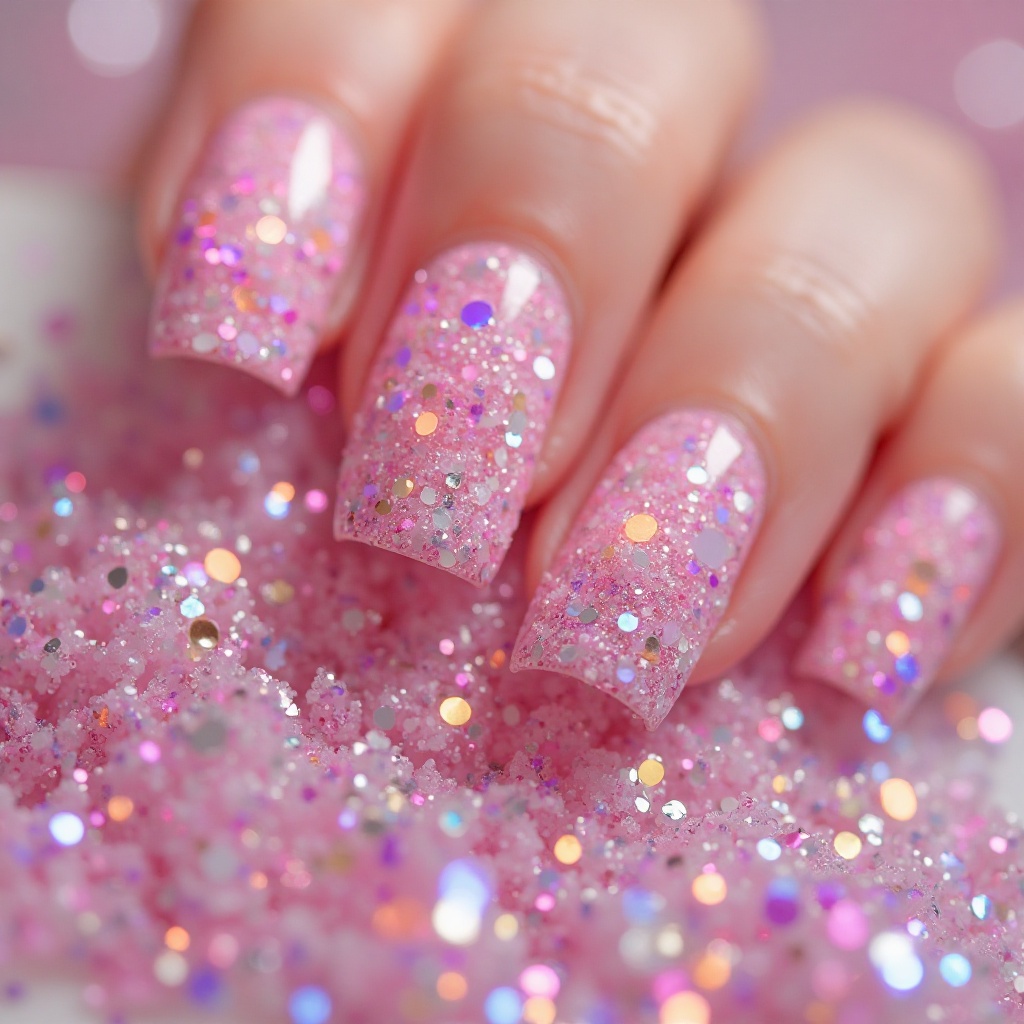
A soft baby pink base scattered with iridescent flakes that shift between pink, blue, and purple depending on the light and viewing angle. The flakes create a fairy-like sparkle effect that’s more subtle than glitter but more interesting than plain polish, perfect for sweet and romantic aesthetics. A glossy top coat encapsulates the flakes and creates incredible depth and dimension that makes the manicure look multi-dimensional.
- Difficulty: Beginner-Intermediate
- Time to complete: 50-65 minutes
- Best for: A delicate, ethereal sparkle that’s softer than glitter.
- Why it works: Baby pink is universally flattering and sweet without being childish.
- What makes it different: Iridescent flakes shift colors in different light, creating multi-dimensional sparkle.
Step-by-Step:
- Prep and base: Standard prep plus base coat.
- Apply baby pink base: Paint 2-3 coats of baby pink. Essie “Fiji” ($9) or OPI “Mod About You” ($12) work well. Dry 2 minutes between coats. Let final coat dry 5 minutes.
- Prepare flakes: Pour iridescent flakes onto paper. They’re lightweight—work in non-drafty area.
- Apply flakes with gradient: Paint thin layer of clear polish on one nail. While wet, use small brush or toothpick to place flakes, concentrating heavier near tips for gradient effect.
- Press and secure: Gently press flakes down with dry finger or silicone tool to ensure adhesion.
- Seal thoroughly: Let dry 5 minutes. Apply 2-3 thick layers of clear top coat, waiting 3 minutes between layers. Surface should feel completely smooth.
- Pro Tip: Concentrate more flakes toward tips and fewer near cuticle for a subtle gradient that elongates fingers.
59. Vanilla Latte Nude with White Swirl Art
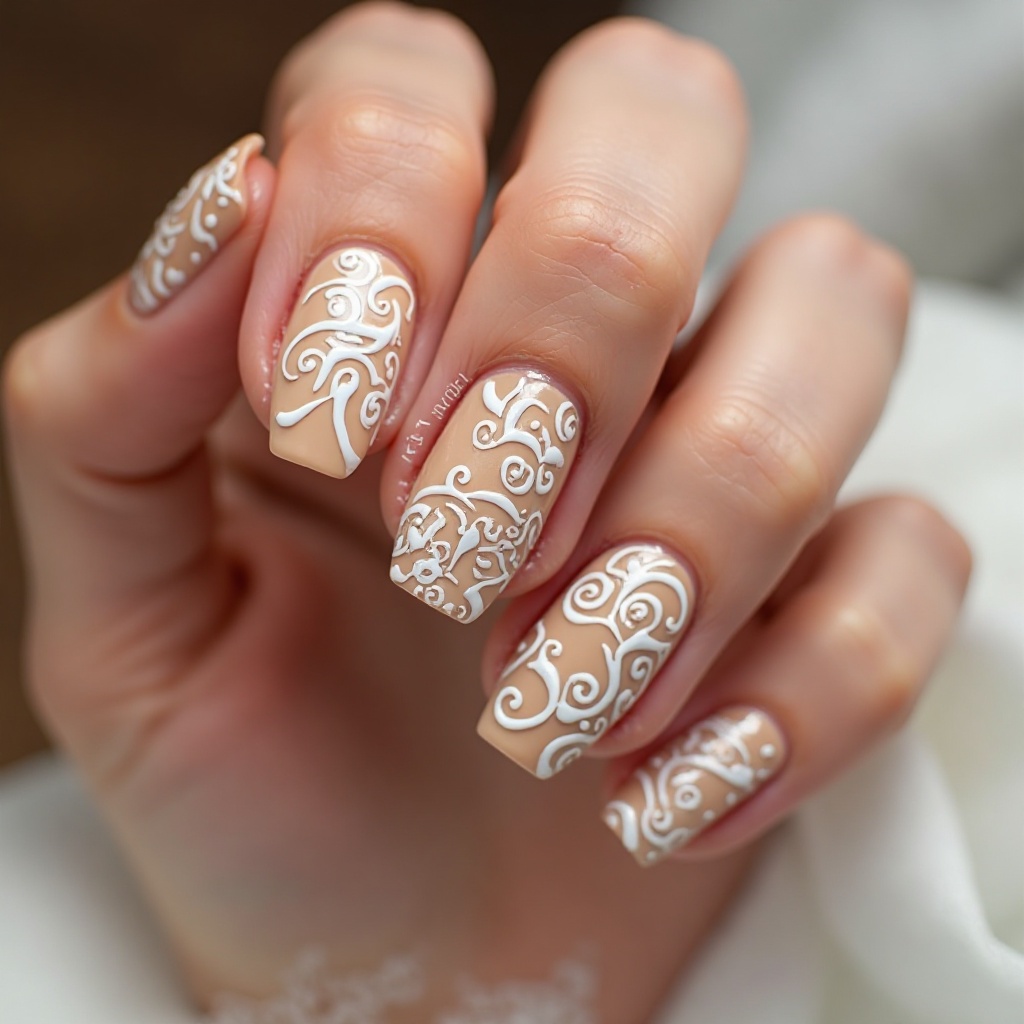
A warm vanilla latte nude base featuring delicate white swirl patterns hand-painted on accent nails, creating an abstract artistic effect. The swirls can be simple curved lines or more intricate patterns that mimic coffee art or marble, depending on your preference. This design is understated yet special, offering visual interest without overwhelming your overall look or competing with your dress and accessories.
- Difficulty: Intermediate—requires artistic hand
- Time to complete: 45-60 minutes
- Best for: An understated look with subtle artistic details.
- Why it works: Nude nails are versatile, and white swirls add personality without competing with your dress.
- What makes it different: The swirls are organic and flowing, like cream swirling in coffee.
Step-by-Step:
- Prep and base: Standard prep plus base coat.
- Apply nude base: Paint 2-3 coats of warm vanilla nude. OPI “Tiramisu for Two” ($12) or Essie “Au Natural” ($9) are perfect. Dry 2 minutes between coats. Let final coat dry 5 minutes.
- Thin white polish: Dip thin brush into white polish, wipe most off. Add tiny drop of thinner or clear top coat if needed. Consistency should flow smoothly.
- Choose accent nails: Decide which 1-2 nails per hand get swirls—ring fingers or ring + middle work well.
- Paint swirl patterns: Using thin brush, paint organic, flowing swirl shapes on accent nails. Think cream swirling in coffee—irregular, curved, flowing lines. 2-4 swirls per nail is plenty.
- Add dots (optional): While swirls are slightly wet, add tiny dots alongside some swirls using dotting tool.
- Seal: Let dry 10 minutes completely. Apply 2 layers of clear top coat.
- Pro Tip: Practice swirls on paper first—20-30 practice swirls help you get comfortable with brush pressure and flow before painting your nails.
Pros and Cons of Floral Nails
Floral nail art is one of the most popular prom choices, but it comes with its own set of considerations. Here’s the honest breakdown based on my experience wearing and creating floral designs.
✅ Pros:
- Photographs beautifully – Floral details show up well in close-up photos, especially hand shots with your corsage.
- Timeless appeal – Flowers never go out of style, unlike some trendy designs that feel dated quickly.
- Customizable – You can match flower colors to your dress exactly, creating a cohesive look.
- Forgiving for beginners – 3D stickers and decals make floral art accessible even if you can’t paint.
- Works with any nail length – Small flowers on short nails, larger arrangements on longer nails—both look great.
- Versatile style – From minimalist single blooms to full garden scenes, there’s a floral look for everyone.
❌ Cons:
- 3D flowers can snag – On hair, clothing, and especially delicate fabrics like chiffon or lace. I’ve lost a flower to a sweater before.
- Hand-painted florals require practice – Your first few attempts might look more like blob monsters than roses. Plan practice time.
- Stickers may lift – If not sealed properly around edges, 3D appliqués can start peeling within days.
- Detailed work takes time – A full floral set can take 2+ hours, which is tough if you’re impatient like me.
- Not ideal for very active nights – If you’re planning intense dancing, 3D elements are at higher risk of catching or popping off.
- Removal requires extra care – 3D elements need to be gently filed off or soaked separately, adding time to removal.
My honest take: Floral nails are gorgeous for prom, but if you’re doing 3D flowers, be prepared to be slightly more careful with your hands all night. For hand-painted florals, practice at least one full practice nail before the real thing.
What Happens After 2 Weeks?
I wore a set of floral nails (hand-painted, with one 3D accent nail) for two weeks to see what really happens. Here’s the honest timeline:
- Week 1: Perfect. The flowers look fresh, colors are bright, and I’m getting compliments. No chips, no lifting. The 3D flower is secure and hasn’t caught on anything yet.
- Week 2 (Days 8-10): The nails have grown out about 2mm, so there’s a noticeable gap of natural nail at the cuticle. The hand-painted flowers still look good, but the white polish has dulled slightly. The 3D flower is still secure but I notice I’m subconsciously avoiding using that finger for tasks.
- Week 2 (Days 11-14): Growth is now 3-4mm—the design is visibly “old.” One small petal on the 3D flower has chipped off (caught on a towel). The hand-painted flowers have minor wear at the tips from typing. The nails are longer than I like, and two have small chips at the corners. I’m ready for removal.
The reality: Floral nails, especially hand-painted ones, look their best for about 7-10 days. After that, growth and tip wear start to show. If you’re doing your nails for prom, aim to do them 1-2 days before the event, not a week ahead.
Maintenance Tips for Prom Nails
You did your nails a day or two before. Now you need to keep them perfect for the big night. Here are my tried-and-true tips:
- Day Before (After Application): Apply another coat of quick-dry top coat. This adds an extra layer of protection against chips and scratches before you even start getting ready. I use Seche Vite ($9-11) for this—it’s thick and self-levels beautifully.
- During Showering (Day Of): Avoid super hot water, which can soften and lift polish edges. Pat your nails dry; don’t rub. Hot water is the enemy of fresh manicures.
- During Hair and Makeup: Don’t put your nails in the path of hairspray or setting spray until they’re completely dry. If you’re using bobby pins, use a pair of pliers to open them—it saves your nail edges from prying and prevents chips.
- Touch-Up Kit: Pack a tiny bottle of clear top coat (like the mini Essie Good to Go, $6) in your clutch. If you get a small chip, you can dab a little on to seal the edge and prevent it from getting worse. Also bring a small nail glue for any 3D elements that might loosen.
- During the Event: Be careful when opening clutch purses, soda cans, or doors. Use your knuckles or the pads of your fingers, not your nail tips. This single habit prevents 90% of chips.
- After Prom (The Next Day): Apply cuticle oil generously. Your nails and cuticles have been through a lot. I like CND SolarOil ($10-12, Ulta) —it soaks in fast and doesn’t feel greasy.
Common Floral Nail Mistakes (And How to Fix Them)
I’ve made all of these mistakes so you don’t have to. Here’s what to watch for and how to fix it.
1. Mistake: 3D Flowers That Snag and Catch
- What it looks like: Your beautiful flower keeps catching on your hair, sweater, or date’s jacket.
- Why it happens: The flower wasn’t fully encapsulated with top coat, leaving exposed edges that grab fabric.
- Exact fix: Apply a thick layer of clear top coat around the base of the flower, building it up like a tiny dome. For future applications, make sure you use enough top coat to create a smooth transition from nail to flower.
- How well it works: This fixes snagging about 80% of the time. Very large 3D elements may always catch slightly regardless of sealing.
2. Mistake: Hand-Painted Flowers That Look Like Blobs
- What it looks like: Your flowers don’t look like flowers—they’re just shapeless white blobs.
- Why it happens: You’re using too much polish on your brush, or you’re not using the right brush size.
- Exact fix: Switch to a detail brush (size 00 or 000) and practice the “dot and pull” technique: create five small dots in a circle, then drag each dot toward the center with a clean brush to create petals. This creates recognizable flowers even for beginners.
- How well it works: This technique improves flower shapes dramatically on the first try.
3. Mistake: Floral Stickers Lifting at Edges
- What it looks like: The edges of your 3D sticker are peeling up, and dirt is collecting underneath.
- Why it happens: You didn’t seal the edges properly with top coat, or you applied the sticker to polish that wasn’t completely dry.
- Exact fix: Apply a tiny amount of nail glue under the lifted edge using a toothpick. Press firmly for 10 seconds. Then apply clear top coat around the edge, not over the flower.
- How well it works: This is a temporary fix that usually lasts 2-3 more days. For long-term wear, better initial sealing is key.
4. Mistake: Flowers Falling Off Completely
- What it looks like: You look down and your accent nail is now flowerless.
- Why it happens: The flower wasn’t securely adhered, or it caught on something and popped off.
- Exact fix: If you still have the flower, clean the back and the nail spot with rubbing alcohol, reapply nail glue, and press firmly for 15 seconds. If the flower is lost, you can either replace it with another or paint a simple flower design to cover the spot.
- How well it works: Reattachment works well if you catch it quickly. The replacement flower may not match perfectly, but it’s better than a bare spot.
Frequently Asked Questions
How far in advance should I do my floral nails for prom?
I’d say 1-2 days before prom is the sweet spot. If you do them the day of, you risk smudging them while rushing. Any earlier, and you’ll have noticeable growth at the cuticles and potential wear on the floral details.
Can I do floral nails if I’m not artistic?
Absolutely. Use 3D floral stickers or decals—they look professional and require zero painting skill. Brands like Dashing Diva ($8-10, Ulta) and Kiss ($6-8, drugstores) make beautiful floral press-ons and stickers that are foolproof.
How do I make 3D flowers stay on all night?
Two words: nail glue and encapsulation. Apply a tiny dot of nail glue to the back of each flower (even if it’s self-adhesive), press firmly for 10 seconds, then apply clear top coat around the base, building it up slightly. This creates a secure anchor that survives dancing.
What if a 3D flower falls off during prom?
Don’t panic. If you have your touch-up kit (you packed one, right?), you can reattach it with a tiny drop of glue. If you lost the flower, remove any remaining glue with a toothpick and either leave that nail plain or cover the spot with a small rhinestone if you have one in your kit.
Can I shower with 3D floral nails?
Yes, but be gentle. Avoid super hot water, which can soften glue. Pat nails dry instead of rubbing. Try not to let the flowers catch on washcloths or towels—I’ve lost flowers this way.
How do I remove 3D flowers without damaging my nails?
Don’t pick or pull—this removes layers of your natural nail. Instead, soak a cotton ball in acetone, place it on the nail, wrap with foil, and wait 10-15 minutes. The glue will dissolve and the flowers will slide off gently. Then wash hands and apply cuticle oil generously.
Conclusion
Prom nails are more than just polish—they’re the finishing touch that makes you feel completely put-together for one of the most memorable nights of your life. Whether you choose the romantic elegance of floral designs, the high-impact drama of chrome, or the timeless sophistication of a classic French, the best design is one that feels like you and can survive a night of dancing, photos, and memories.
A good place to start is with the Pearl-Kissed French Tips if you want timeless elegance, or Baby Pink with Iridescent Flakes for something soft and dreamy. If you’re feeling bold and have some practice time, Electric Blue Chrome with Geometric Negative Space is a guaranteed conversation starter.
Whatever you choose, remember to do a practice run if you’re doing them yourself, give yourself plenty of time, and don’t stress the small imperfections. No one else will notice them, and the memories of your prom night are about so much more than perfect nails.
Have an amazing prom—you’re going to look beautiful!