16 Hot Pink Chrome Nails Inspo You’ll Love
Hot pink chrome nails are having their moment right now, and honestly, it’s about time. This bold, futuristic finish combines the playful energy of hot pink with the eye-catching reflective quality of chrome, creating a look that’s equal parts confidence and glamour.
Whether you’re hitting brunch with friends or stepping into a spring wedding, these nails make a statement without saying a word—and they stay flawless for weeks with proper application.
Vibrant & Bold Hot Pink Chrome
1. Classic Hot Pink Chrome
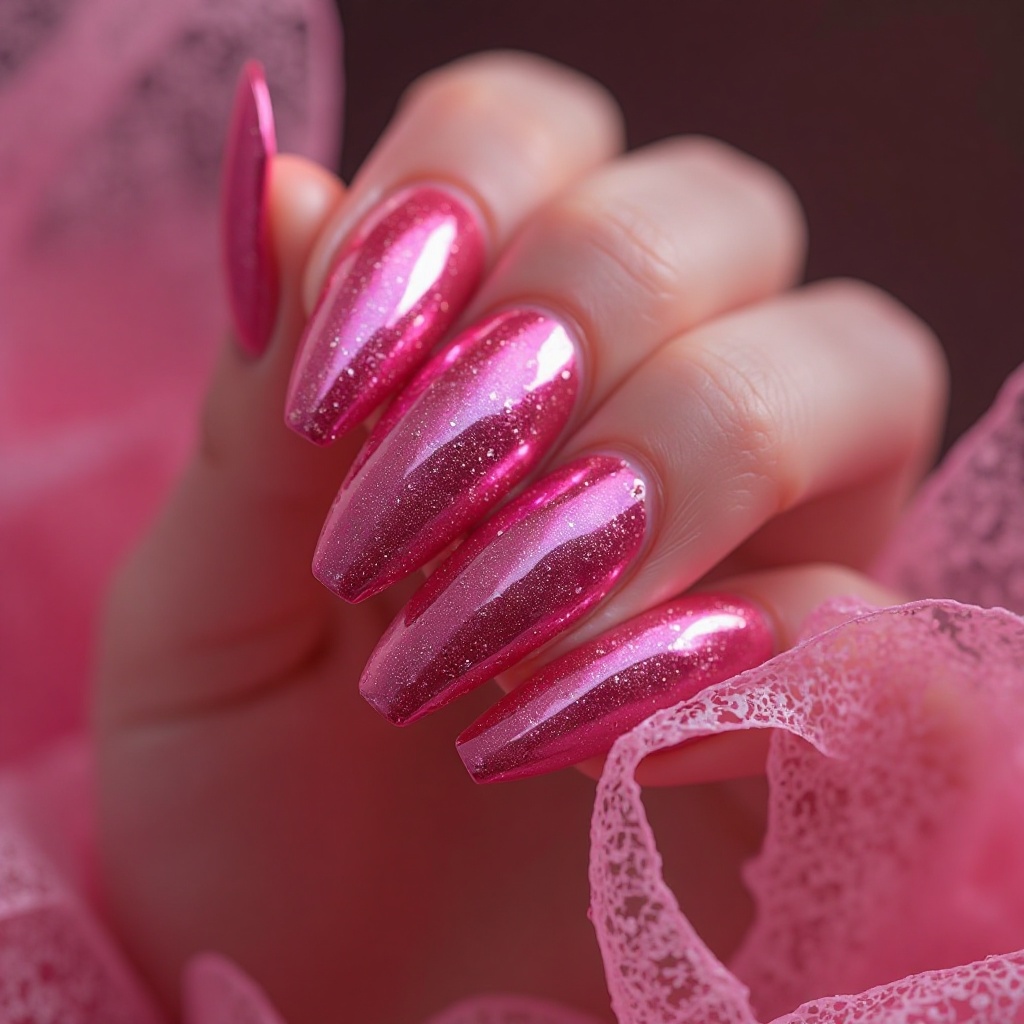
A full-coverage hot pink chrome nails that catches light from every angle, creating that liquid metal effect that stops people mid-scroll. The finish shifts between bright fuchsia and deeper rose tones depending on how the light hits, giving you a multidimensional manicure that feels alive. This is the ultimate confidence nail—bold, unapologetic, and impossible to ignore.
Why It Works: This shade works year-round but especially shines in spring and summer when you want your nails to match your energy. The chrome finish elevates a classic hot pink into something editorial and modern, making it perfect for both casual days and elevated events.
Pro Tip: Apply chrome powder over a smooth gel base in short, gentle buffing motions to avoid streaking. Almond or coffin shapes show off the reflective finish best, giving you maximum surface area for that mirror-like shine.
How to Create This Look: Follow the basic chrome application steps above using your brightest hot pink gel polish. For the most vibrant result, apply 2-3 thin coats of hot pink gel before adding chrome powder. This is the easiest chrome design for beginners—perfect for practicing your technique before moving to more complex looks.
Recommended Products:
- Beetles Gel Polish in “Hot Pink” or “Fuchsia Flame”
- Kalolary Hot Pink Chrome Powder
- Vishine No-Wipe Top Coat
2. Hot Pink Chrome with Matte Accent
Full hot pink chrome nails on most nails with one or two accent nails in matte hot pink creates a stunning texture contrast that adds depth to your manicure. The matte nails ground the look and prevent it from feeling too flashy, while the chrome nails bring all the drama and dimension. This combination plays with light in the most sophisticated way—shiny catches attention, matte holds it.
Why It Works: The matte accent makes this look more versatile and wearable for professional settings while keeping that fun factor. It’s a genius way to tone down chrome without losing any of the impact, making it appropriate for literally any occasion on your calendar.
Pro Tip: Use the matte finish on your ring finger or create a checkerboard pattern alternating chrome and matte. Seal matte nails with a proper matte top coat—regular top coat will ruin the effect and make them look patchy.
How to Create This Look: Apply hot pink gel polish to all nails. On your chosen accent nails (typically ring fingers), apply matte top coat and cure. On remaining nails, apply chrome powder following the standard technique, then seal with chrome-safe glossy top coat. Make sure you’re using different top coats for matte vs chrome nails—this is crucial for achieving the proper texture contrast.
Texture Mixing Tips for Beginners:
- Start with just one matte accent nail per hand until you’re comfortable
- Use the same hot pink shade for both finishes to keep the look cohesive
- Apply matte top coat in slightly thicker layers than glossy for best results
Recommended Products:
- Modelones Matte Top Coat
- Any hot pink gel polish from your collection
- Same chrome powder as Look #1
Elegant Accent & Design Details
3. Hot Pink Chrome French Tips
A nude or clear base with hot pink chrome tips gives you that classic French manicure energy with a futuristic twist that feels fresh and current. The chrome tips create a bright, reflective border that elongates your fingers while keeping the overall look surprisingly subtle and wearable. This design bridges the gap between conservative and creative, making it perfect for anyone dipping their toes into bolder nail art.
Why It Works: French tips are eternally chic, and the hot pink chrome update makes them feel 2025-ready instead of dated. The negative space at the base keeps it from overwhelming your hands, so you get impact without the full commitment of ten chrome nails.
Pro Tip: Keep your tips thin and precise for a modern look—thick tips can look dated. Oval or square shapes work beautifully here, and make sure your cuticle area is perfectly clean to really showcase that contrast between base and tip.
How to Create This Look at Home:
Step 1: Apply gel base coat to all nails and cure.
Step 2: Apply a sheer nude or clear gel polish to the entire nail and cure. This creates your base color.
Step 3: Using striping tape or reinforcement stickers, mask off the smile line where you want your hot pink tips to start. Press down firmly to prevent bleeding.
Step 4: Apply hot pink gel polish only to the tip area, staying within your taped guides. Apply 2 coats for full coverage, curing between each.
Step 5: Carefully remove the tape while the gel is still wet (before final cure). Cure for 60 seconds.
Step 6: Apply chrome powder only to the hot pink tips using a small applicator. Dust off excess.
Step 7: Seal everything with chrome-safe top coat, making sure to cap the free edge. Cure.
Beginner-Friendly Alternative: If freehand or tape feels intimidating, use French tip nail stickers as guides. These have pre-cut smile lines that create perfect curves every time. You can find them at any beauty supply store for under $5.
Recommended Products:
- Beetles “Milky White” or “Sheer Nude” gel polish
- Striping tape or French tip guide stickers
- Small precision chrome applicator or eyeshadow brush
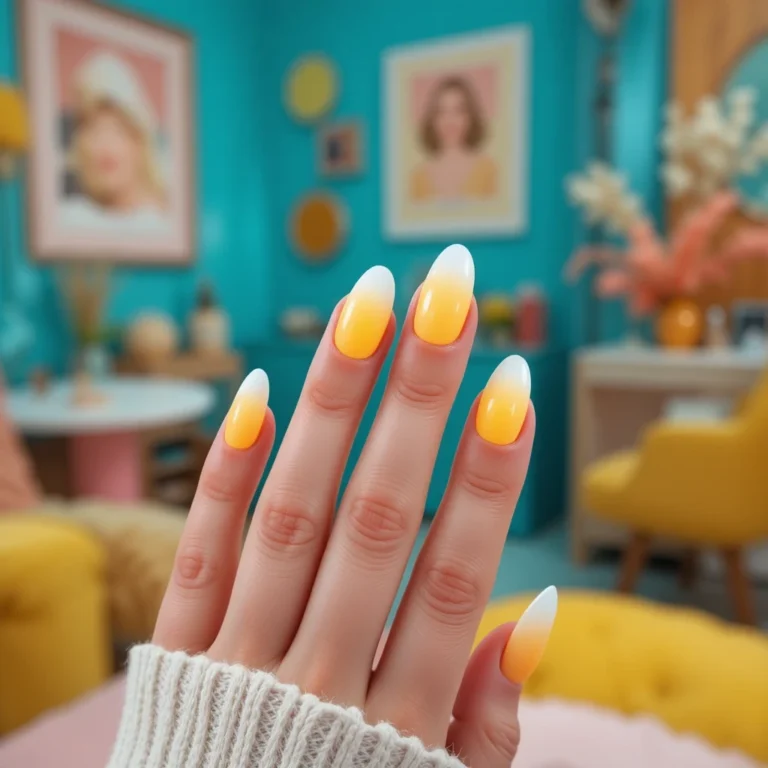
4. Hot Pink Chrome Ombré
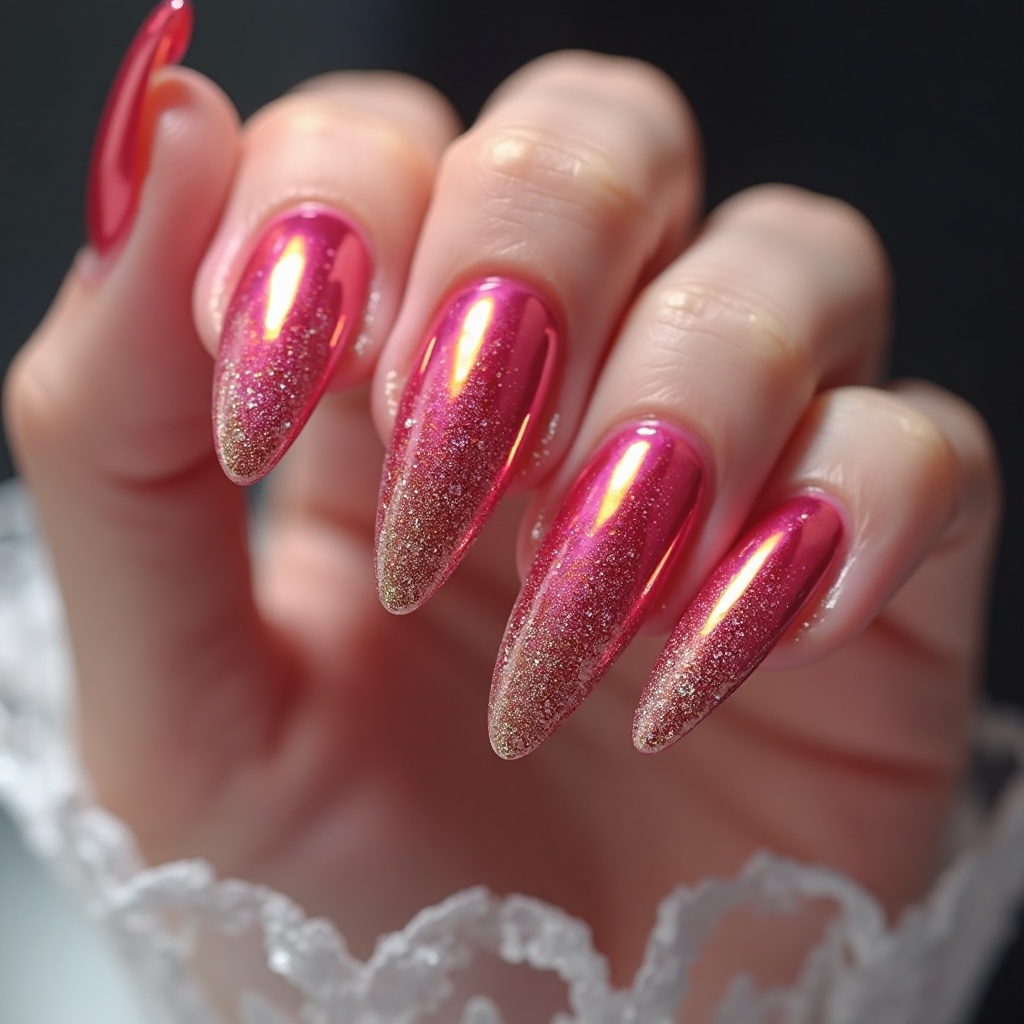
A gradient that transitions from clear or pale pink at the cuticle into intense hot pink chrome at the tips creates a stunning sunset effect on your nails. The ombré technique softens the chrome intensity while still delivering that head-turning metallic finish where it counts most. This design photographs beautifully and looks expensive and custom, even though it’s surprisingly achievable with the right technique.
Why It Works: Ombré gives you the drama of hot pink chrome while being more forgiving on different skin tones and more versatile with various outfits. The gradient creates natural dimension that makes your fingers look longer and more elegant, which is always a win.
Pro Tip: Use a makeup sponge to blend your pink shades before applying chrome powder for the smoothest gradient. Longer nail shapes like almond or coffin really showcase the ombré transition, giving you more canvas to work with.
How to Create Chrome Ombré (Sponging Technique):
What You’ll Need:
- 3 shades of pink gel polish: clear/nude, light pink, hot pink
- Small makeup sponge (cut into nail-width pieces)
- Acetone or cleanser for cleanup
- Liquid latex or tape for finger protection
Step 1: Apply gel base coat and cure. Apply one coat of your lightest pink (or clear) and cure.
Step 2: Apply liquid latex or tape around your nails to protect skin from excess polish.
Step 3: On a small palette or piece of foil, place small dots of your 3 pink shades in a row, slightly overlapping where they meet.
Step 4: Dab your sponge into the gradient you created, then gently press and roll it onto your nail, starting from the cuticle and working toward the tip. The colors will blend on the nail.
Step 5: Repeat 2-3 times, allowing the gradient to build and become opaque. Cure after each layer.
Step 6: Remove finger protection and clean up excess polish with a small brush dipped in acetone.
Step 7: Once you’re happy with your gradient, apply chrome powder focusing on the tips and fading upward. The chrome will enhance the ombré effect.
Step 8: Seal with top coat and cure.
Easier Method for Beginners: Use a nail art brush to apply your three shades in horizontal bands, then use a clean brush to gently blend where they meet before curing. This gives a similar effect with less mess.
Recommended Products:
- Beetles Gel Polish Set (comes with multiple pink shades)
- Small cosmetic wedge sponges
- Liquid latex barrier (Peel Off Cuticle Guard)
Statement-Making Chrome Combinations
5. Hot Pink Chrome with Silver Accents
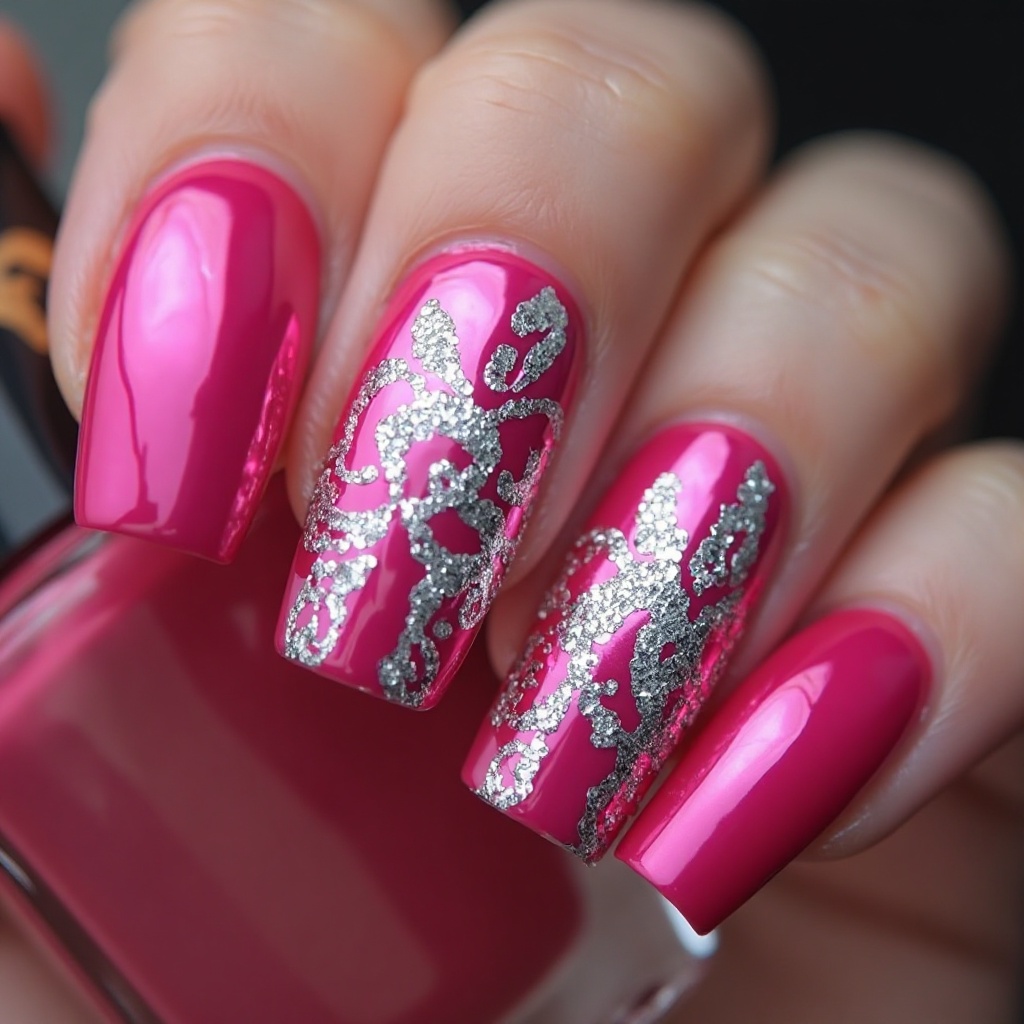
Hot pink chrome nails with strategic silver chrome stripes, swirls, or geometric designs create a dynamic color-blocked look that’s pure art. The silver adds a cool-toned contrast that makes the hot pink pop even more while introducing visual interest and breaking up the intensity. This combination feels high-fashion and editorial, like something you’d see backstage at fashion week.
Why It Works: The silver chrome cools down the warmth of hot pink, making it more universally flattering and adding a sophisticated edge. This design works beautifully for special events where you want your nails to be a conversation starter without competing with your outfit.
Pro Tip: Use striping tape to create clean lines between colors before applying chrome powder to each section. Short to medium nail lengths work best here to avoid overwhelming the design—too much length can make intricate details hard to read.
How to Create Two-Tone Chrome Designs:
For Geometric Stripes:
Step 1: Apply base coat and cure. Apply hot pink gel polish to entire nail, 2 coats, curing between each.
Step 2: Apply chrome powder to entire nail using standard technique. Dust off excess but DON’T seal yet.
Step 3: Apply thin striping tape in your desired pattern (diagonal, vertical, or geometric). Press down firmly.
Step 4: Using a small brush, carefully apply a thin layer of gel base coat ONLY to the areas you want silver. Cure.
Step 5: Apply silver chrome powder only to these freshly gelled sections. The powder won’t stick to the already-chromed areas.
Step 6: Carefully remove striping tape. Seal entire nail with top coat and cure.
For Swirls or Abstract Designs:
Step 1: Apply hot pink chrome to entire nail following standard technique.
Step 2: Using a thin nail art brush, paint swirls or abstract shapes with gel base coat directly over the hot pink chrome.
Step 3: Immediately apply silver chrome powder to these wet sections before curing.
Step 4: Dust off excess and seal with top coat.
Design Ideas for Silver Accents:
- Single diagonal stripe across each nail
- Thin vertical stripes on accent nails
- Abstract swirls on ring finger only
- Geometric triangles at the tips
- Half-and-half color block
Recommended Products:
- Silver chrome powder (Born Pretty or Makartt)
- Striping tape in various widths (1mm, 2mm, 3mm)
- Fine detail nail art brush (size 0 or 00)
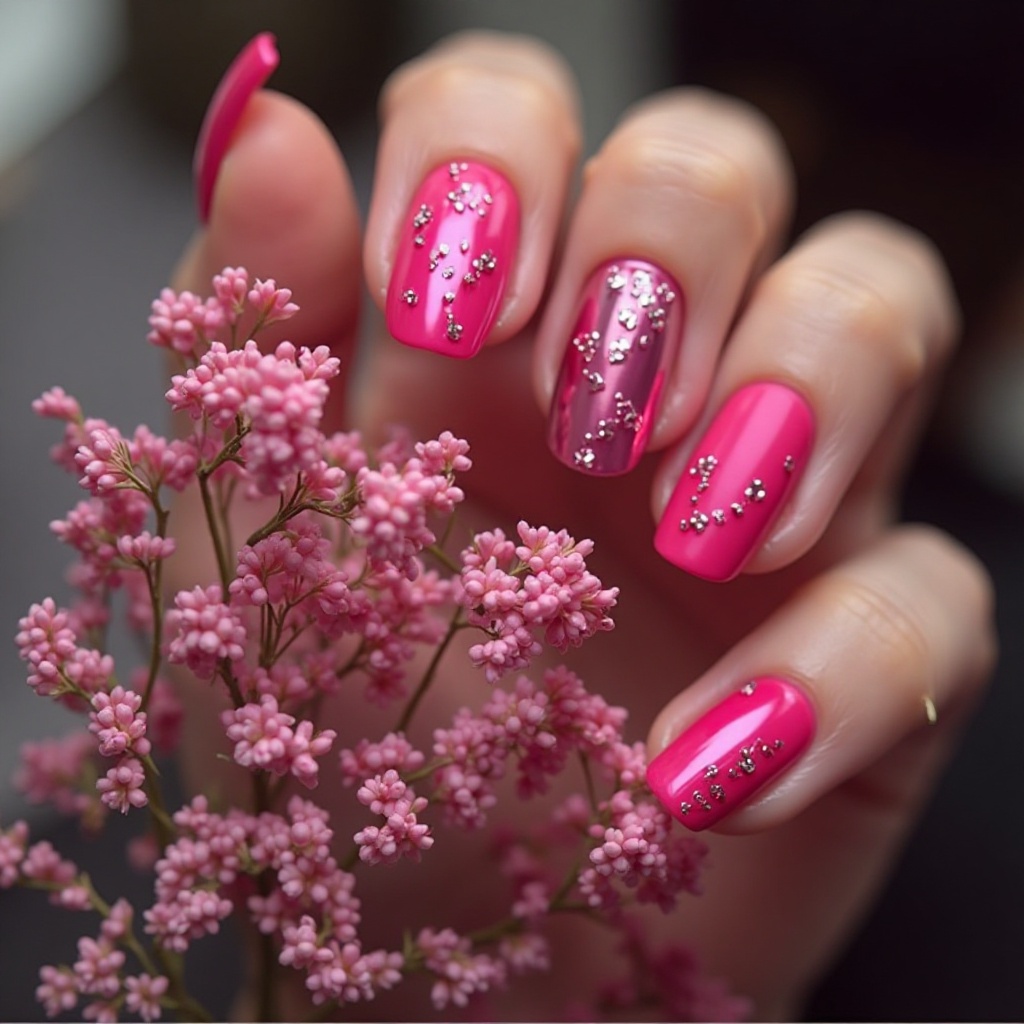
6. Hot Pink Chrome with 3D Details
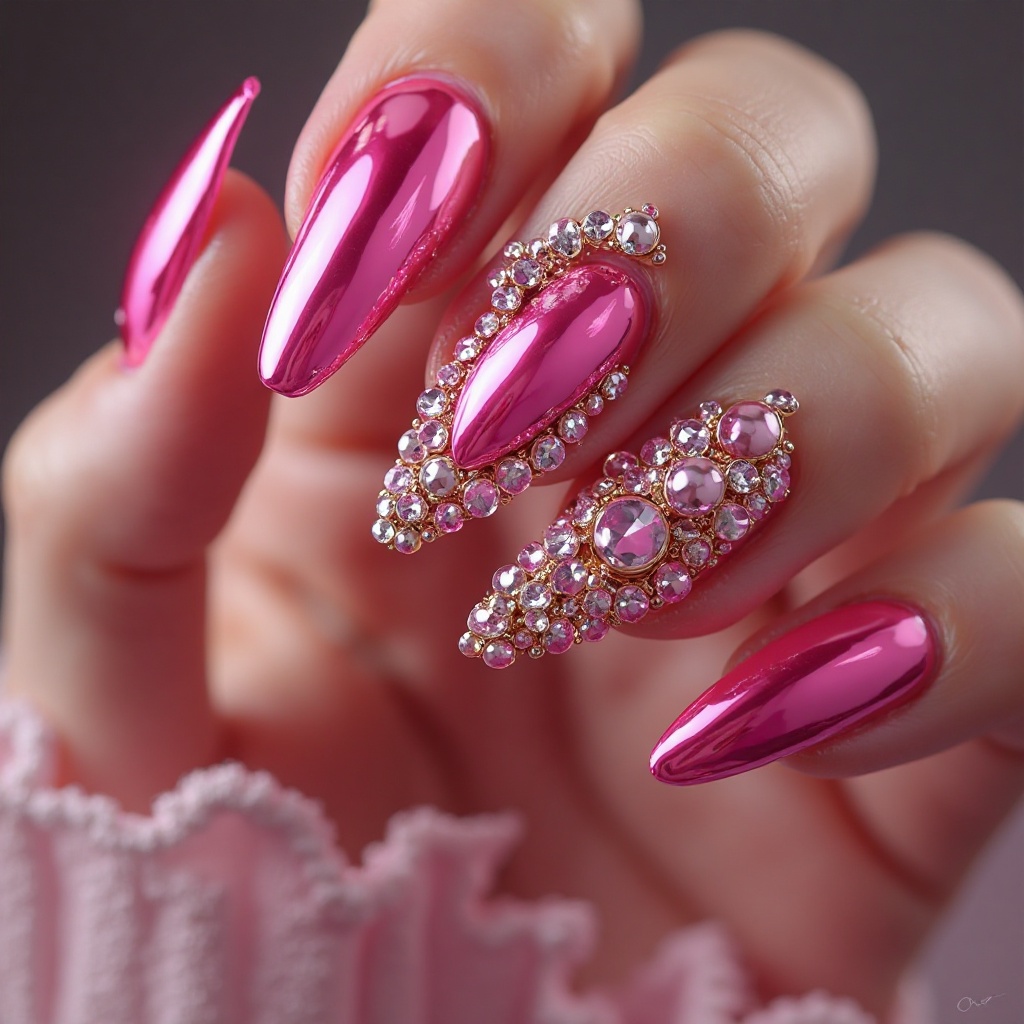
Hot pink chrome as your base with added rhinestones, pearls, or 3D chrome accents on one or two nails creates a luxurious, maximalist manicure. The 3D elements catch light differently than the chrome base, adding texture and dimension that makes your nails feel more like jewelry than polish. This is the “extra” nail look that’s perfect for celebrations, parties, or just when you’re feeling yourself.
Why It Works: The 3D details elevate chrome from trendy to truly special occasion-worthy while giving you a focal point that draws the eye. This design photographs incredibly well for social media and makes a statement without requiring complicated nail art skills—just strategic embellishment placement.
Pro Tip: Keep embellishments on just one or two accent nails to avoid looking cluttered and to maintain wearability. Use nail glue for rhinestones rather than relying on gel alone, and seal everything with a thick builder gel or top coat for longevity.
How to Apply 3D Embellishments on Chrome:
What You’ll Need:
- Rhinestones, pearls, studs, or charms
- Nail glue or strong gel adhesive
- Dotting tool or tweezers
- Builder gel or thick top coat
- Small brush for precision
Step 1: Complete your hot pink chrome manicure on all nails following the standard technique and seal with top coat. Cure fully.
Step 2: On your accent nail(s), plan your embellishment placement. Less is more—try a small cluster near the cuticle or a line along one side.
Step 3: Apply a tiny dot of nail glue or gel adhesive where you want each embellishment.
Step 4: Use a dotting tool or tweezers to pick up your rhinestone/pearl and place it precisely on the glue dot. Press gently to secure.
Step 5: Once all embellishments are placed, apply a thick layer of builder gel or top coat around (not over) the embellishments to seal them in place. For flat embellishments, you can coat over them.
Step 6: Cure for 90 seconds to ensure everything is locked in place.
Embellishment Placement Ideas:
- Small cluster of 3-5 rhinestones at cuticle of ring finger
- Single line of tiny pearls along one edge of nail
- One statement crystal in center of accent nail
- Scattered small studs across 1-2 nails
- Geometric arrangement of mixed-size rhinestones
Making 3D Details Last: The key to longevity with embellishments is encapsulation. Use builder gel (thicker than regular top coat) to create a dome around your rhinestones. This prevents them from catching on clothes or hair and popping off.
Recommended Products:
- Beetles 3D Nail Art Rhinestones Kit
- Makartt Nail Glue
- Beetles Builder Gel
- Precision tweezers or dotting tool set
Playful & Creative Hot Pink Chrome
7. Hot Pink Chrome with White Swirls
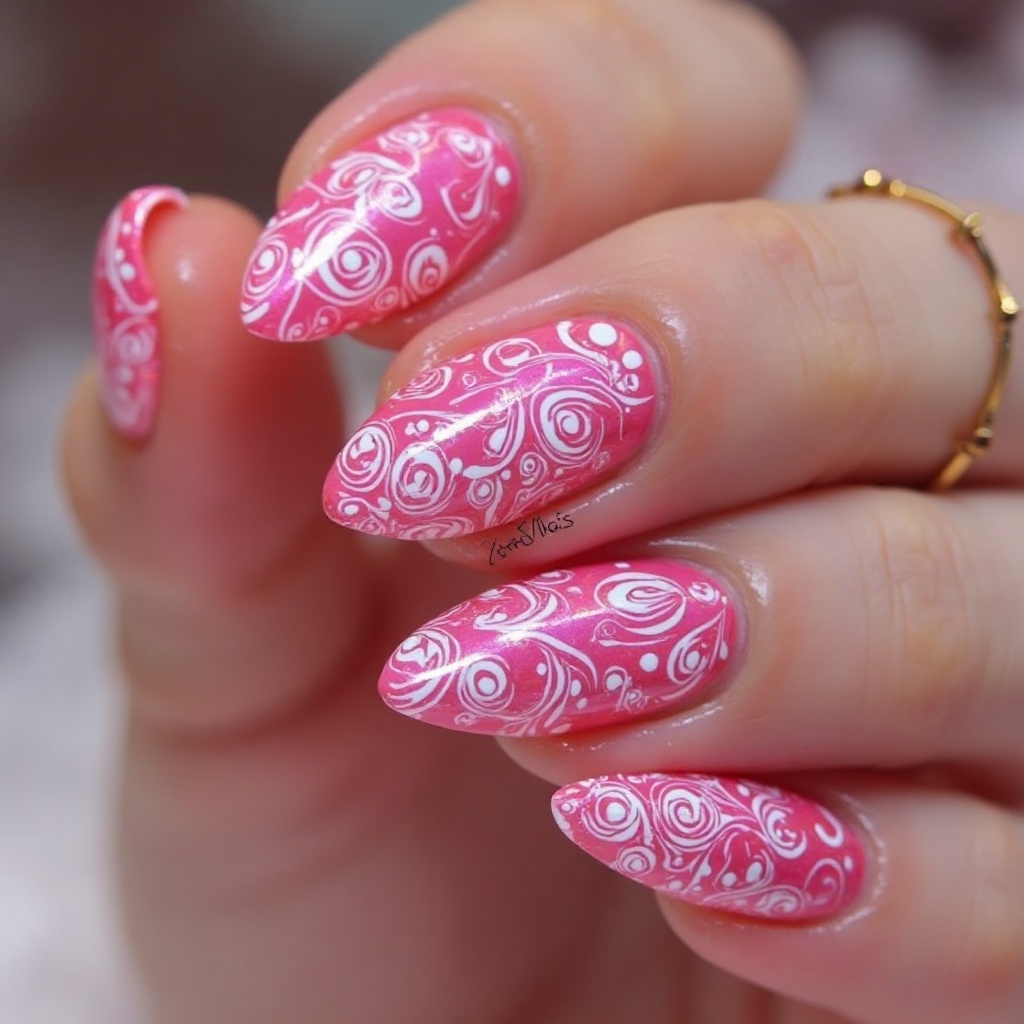
Hot pink chrome base with delicate white swirl designs creates a dreamy, artistic manicure that feels playful yet sophisticated. The white swirls add movement and flow to the reflective pink, creating a marble-like effect that’s mesmerizing to look at. This design works beautifully for those who want chrome with a softer, more whimsical edge.
Why It Works: The white details break up the intensity of hot pink chrome while adding an artistic element that feels hand-crafted and unique. This look transitions seamlessly from day to night and works for any season, making it incredibly versatile for your nail rotation.
Pro Tip: Use a thin nail art brush or striping brush to create organic, flowing swirls rather than rigid patterns. Apply the white design over your cured chrome and top coat for the crispest lines that won’t blur into the pink.
Pro Tip: Use a thin nail art brush or striping brush to create organic, flowing swirls rather than rigid patterns. Apply the white design over your cured chrome and top coat for the crispest lines that won’t blur into the pink.
How to Create Swirl Nail Art on Chrome:
Step 1: Complete your hot pink chrome manicure and seal with top coat. Cure fully and let cool.
Step 2: Using a thin nail art brush (size 0), dip into white gel polish and remove excess on a paper towel.
Step 3: Starting from one edge of your nail, create flowing S-curves and swirls across the surface. Work quickly but don’t overthink it—organic, imperfect swirls look more artistic.
Step 4: Add smaller swirls to fill gaps or create more visual interest. Cure for 60 seconds.
Step 5: Apply a thin layer of regular glossy top coat over the entire nail to seal the white design. Cure.
Swirl Pattern Ideas:
- Marble effect: Multiple intersecting swirls across the entire nail
- Minimalist: 2-3 simple curves on each nail
- Accent only: Swirls on ring finger, solid chrome on others
- Abstract: Random curved lines creating an artistic pattern
Beginner Practice Tip: Practice your swirl technique on paper first, or on a practice nail wheel. White gel polish is very forgiving—if you don’t like how it looks, wipe it off with cleanser before curing and try again.
Recommended Products:
- Beetles Pure White Gel Polish
- Nail art liner brush set
- Clear practice nail tips for practicing designs
8. Hot Pink Chrome Half-Moon Design

A reverse French manicure with hot pink chrome covering most of the nail and a bare or nude half-moon at the cuticle creates a modern, editorial look. The exposed half-moon adds breathing room to the bold chrome while highlighting your natural nail shape and cuticle line. This design feels high-fashion without being overly complicated to achieve.
Why It Works: Half-moon designs elongate the nail bed and create a sophisticated negative space element that makes hot pink chrome feel more refined. The contrast between the bare base and chrome finish adds dimension and makes your manicure look intentionally designed rather than just painted.
Pro Tip: Use reinforcement stickers or striping tape as guides to create perfect half-moon curves. Round or oval nail shapes complement this design best, as they follow the natural curve of your cuticle line.
How to Create Half-Moon Nails:
What You’ll Need:
- Round reinforcement stickers (office supplies work great!)
- Nude or sheer pink gel polish (optional)
- Your standard chrome supplies
Step 1: Apply base coat and cure. Apply sheer nude polish to entire nail if desired (or leave natural). Cure.
Step 2: Place a round reinforcement sticker at the base of each nail, creating a curved line that follows your cuticle shape. Press down firmly.
Step 3: Apply hot pink gel polish from the edge of the sticker toward the tip, covering the rest of the nail. Apply 2 coats, curing between each.
Step 4: While gel is still wet (before final cure), carefully remove the sticker to reveal the half-moon. Cure.
Step 5: Apply chrome powder only to the hot pink section, avoiding the half-moon area. Dust off excess.
Step 6: Seal entire nail with top coat, curing fully.
Sizing Your Half-Moons:
- Small half-moons (1-2mm): Modern and subtle
- Medium half-moons (3-4mm): Classic and balanced
- Large half-moons (5mm+): Bold and dramatic
Adjust sticker placement based on your nail length and personal preference.
Recommended Products:
- Round reinforcement labels (stationery section)
- Beetles “Nearly Nude” or “Sheer Blush” gel polish
- Same chrome supplies as previous looks
9. Hot Pink Chrome Animal Print Accent
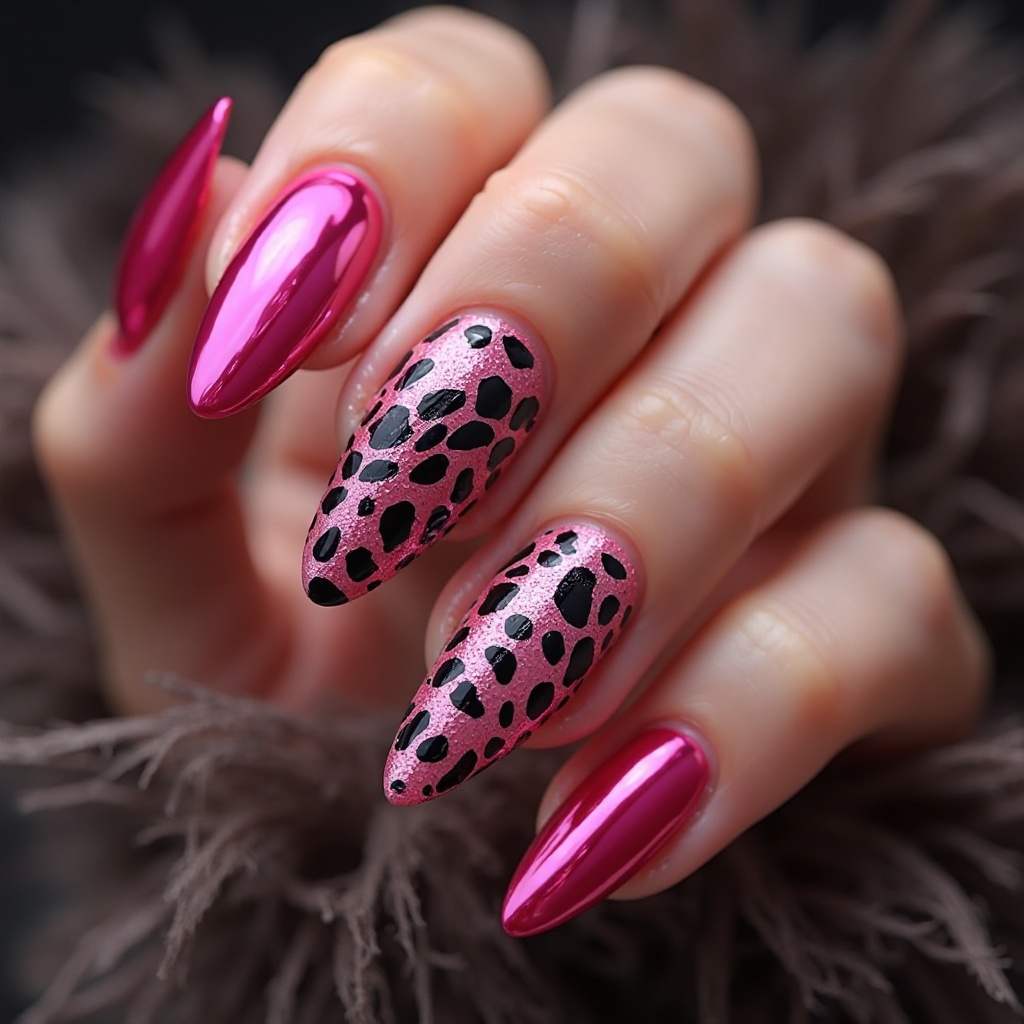
Hot pink chrome on most nails with one or two accent nails featuring hot pink and black animal print (leopard, zebra, or snake) creates an edgy, fashion-forward manicure. The animal print adds texture and pattern to break up the solid chrome while keeping the color story cohesive and intentional. This look screams confidence and shows you’re not afraid to mix bold elements together.
Why It Works: Animal print is a timeless trend that pairs surprisingly well with chrome finishes, creating a look that’s both trendy and classic. The pattern adds visual interest without requiring multiple colors, keeping your manicure cohesive while still being eye-catching and unique.
Pro Tip: Keep animal print on just your ring finger or alternate it with solid chrome for balance. Use a fine detail brush or stamping plate for clean, professional-looking animal print patterns that don’t look messy or amateur.
How to Create Leopard Print on Chrome (Easiest Animal Print):
Step 1: On your accent nail, apply hot pink gel polish (no chrome yet). Cure.
Step 2: Using a small dotting tool or toothpick, create irregular C-shaped spots in darker pink or brown gel polish. These are your leopard spots—make them random sizes and spacing. Cure.
Step 3: Using a thin brush and black gel polish, outline about 2/3 of each spot with a broken line (don’t fully close the circles). This creates the authentic leopard look. Cure.
Step 4: Apply chrome powder over the entire design. The chrome will coat everything, creating a metallic animal print effect.
Step 5: Seal with top coat and cure.
Alternative: Stamping for Perfect Prints
If hand-painting patterns feels intimidating, use nail stamping plates with animal print designs. This gives you professional-looking patterns every time.
Stamping Process:
- Apply hot pink chrome to all non-accent nails
- On accent nail, apply hot pink gel and cure
- Use black stamping polish and animal print stamping plate to transfer design
- Cure (if using gel stamping polish) or let dry
- Seal with top coat
Recommended Products:
- Maniology stamping plates (animal print collection)
- Black gel polish or stamping ink
- Dotting tool set
- Fine detail brush
10. Hot Pink Chrome with Gold Foil
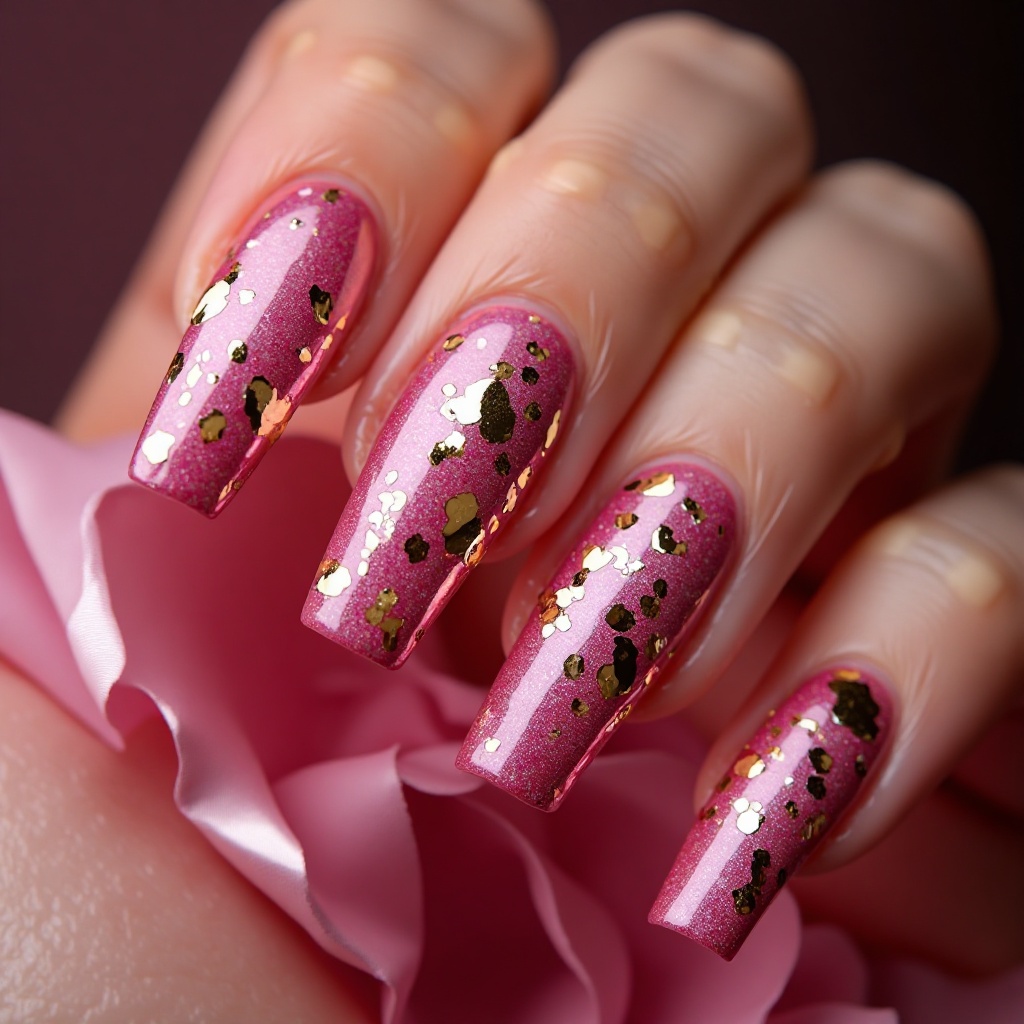
Hot pink chrome base with irregular pieces of gold foil creates a luxurious, abstract art effect on your nails. The gold foil catches light differently than the chrome, adding another layer of dimension and a warm metallic contrast to the cool pink. This combination feels expensive and custom, like something you’d see in a high-end editorial spread.
Why It Works: Gold and hot pink is a classic color combination that feels celebratory and luxe, perfect for special occasions or when you want to feel extra fancy. The irregular foil placement keeps each nail unique while the chrome base ties everything together into a cohesive look.
Pro Tip: Apply small, torn pieces of gold foil over your chrome base before sealing with top coat for the most organic, artistic effect. Less is more here—scattered foil pieces look more intentional than trying to cover too much surface area.
How to Apply Gold Foil to Chrome Nails:
What You’ll Need:
- Gold nail foil sheets or flakes
- Foil transfer gel or regular gel base coat
- Tweezers or orange wood stick
Method 1: Foil Transfer (Easiest)
Step 1: Complete hot pink chrome on all nails and seal with top coat. Cure and let cool completely.
Step 2: On accent nail(s), apply foil transfer gel in random patches or specific spots where you want gold. Cure until tacky (usually 30-45 seconds, less than full cure).
Step 3: Press gold foil sheet (shiny side up) onto the tacky gel and rub firmly. Peel away quickly—the gold should transfer to the sticky spots.
Step 4: Repeat in different areas to create your desired pattern. Apply top coat over everything and cure.
Method 2: Foil Flakes (More Control)
Step 1: Complete hot pink chrome and seal. Cure.
Step 2: Apply a thin layer of gel base coat to accent nail. Don’t cure yet.
Step 3: Using tweezers, place small torn pieces of gold foil onto the wet gel where desired.
Step 4: Cure to lock the foil in place.
Step 5: Apply top coat over everything, pressing gently around foil pieces. Cure.
Foil Placement Ideas:
- Scattered random pieces across accent nail
- Concentrated cluster near cuticle
- Diagonal line of foil across nail
- Just at the tips for a gilded effect
- Frame around the edges
Recommended Products:
- Born Pretty Gold Nail Foil Sheets
- Beetles Foil Transfer Gel
- Precision tweezers
Sophisticated Gradient & Color-Block Styles
11. Hot Pink to Nude Chrome Fade
A gradient that transitions from hot pink chrome at the tips through lighter pink tones to nude chrome at the base creates a sophisticated, wearable take on bold chrome. The fade technique keeps all the drama of hot pink while grounding it with neutral tones that make the look more versatile. This design works for absolutely anyone who wants to try hot pink chrome but feels hesitant about full-coverage intensity.
Why It Works: The nude base makes this look appropriate for professional settings while the hot pink tips still deliver personality and edge. The all-chrome finish keeps it cohesive and modern rather than looking like you couldn’t decide on one color.
Pro Tip: Use at least three shades of pink chrome powder to create a seamless gradient with no harsh lines. Blend where each color meets using a soft eyeshadow brush for the smoothest possible transition between shades.
How to Create a Multi-Chrome Gradient:
What You’ll Need:
- 3 chrome powders: nude/champagne, light pink, hot pink
- Small eyeshadow applicators (3 different ones)
- Base coat and hot pink gel polish
Step 1: Apply base coat and cure. Apply 2 coats of hot pink gel polish to create a vibrant base. Cure fully.
Step 2: Apply nude chrome powder to the base third of your nail (closest to cuticle) using gentle buffing motions.
Step 3: Apply light pink chrome powder to the middle third, slightly overlapping where it meets the nude section.
Step 4: Apply hot pink chrome powder to the tip third, overlapping with the light pink.
Step 5: Using a clean, soft brush, gently buff where the colors meet to blend them together seamlessly.
Step 6: Seal entire nail with chrome-safe top coat and cure.
Gradient Perfection Tips:
- Work quickly so you can blend before powder settles
- Use more powder in overlap areas for smoother transitions
- Buff in small circular motions for best blending
- Practice on one nail first to perfect your technique
Recommended Products:
- Vishine Chrome Powder Set (contains multiple shades)
- Small eyeshadow applicator set
- Soft blending brush
12. Hot Pink Chrome with Black Geometric Lines
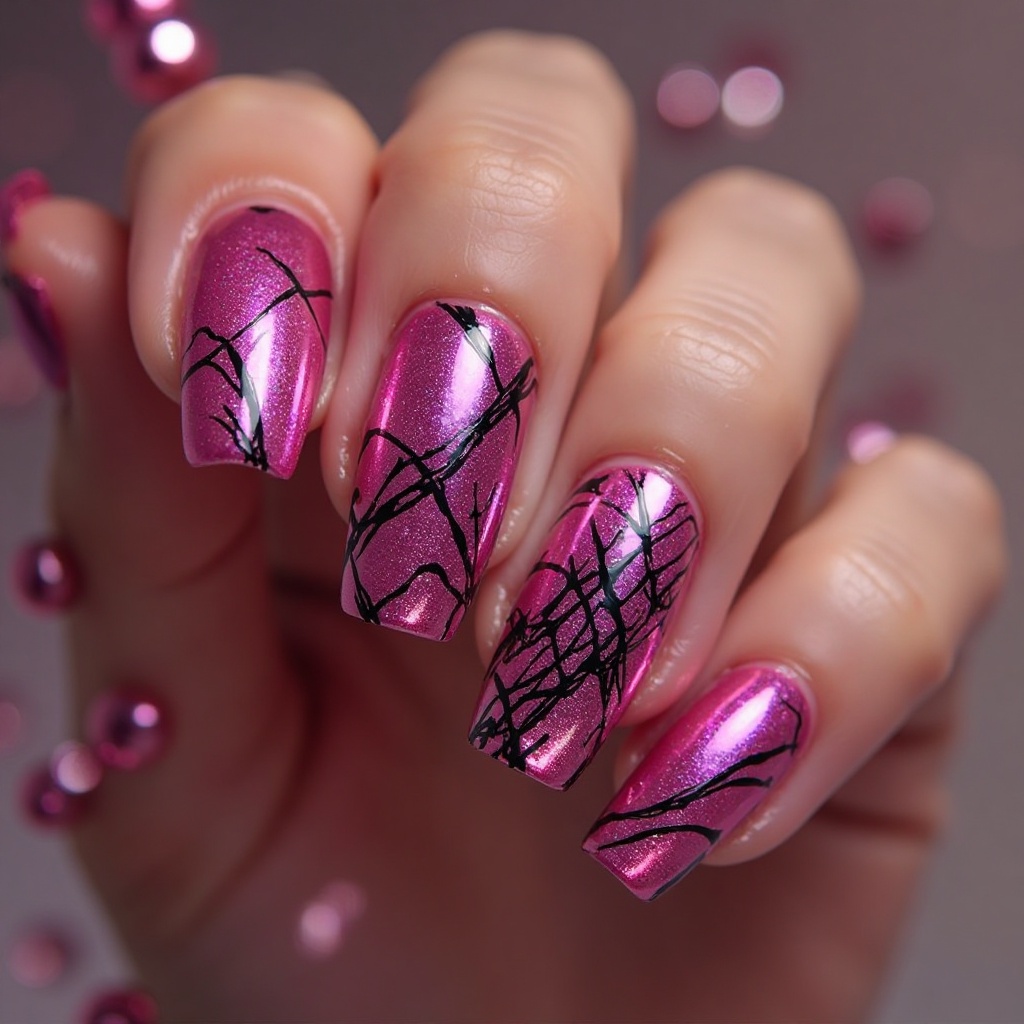
Hot pink chrome base with thin black geometric lines, triangles, or abstract shapes creates a modern, architectural manicure that feels artistic and intentional. The black lines add structure and definition to the reflective chrome, breaking up the surface in interesting ways that create movement and visual interest. This look is perfect for creatives who want their nails to reflect their artistic sensibilities.
Why It Works: Geometric designs are incredibly on-trend and pair beautifully with chrome finishes, creating contrast between the hard lines and the fluid, reflective surface. This look photographs amazingly well and gives you a conversation-starter manicure that people will actually compliment.
Pro Tip: Use ultra-thin striping tape or a fine liner brush to create crisp black lines over your cured chrome and top coat. Keep the geometric designs simple and intentional—too many lines can look busy and cluttered rather than artistic.
How to Create Geometric Line Art:
For Striping Tape Method (Easier):
Step 1: Complete hot pink chrome on all nails and seal with top coat. Cure fully and let cool.
Step 2: Cut thin striping tape into various lengths and apply to nails in your desired geometric pattern (triangles, diagonal lines, grids, etc.).
Step 3: Press tape down firmly so paint won’t bleed underneath.
Step 4: Apply black gel polish over and around the tape, filling in the areas you want black.
Step 5: Carefully remove tape while gel is still wet. Cure.
Step 6: Apply regular top coat to seal the design. Cure.
For Freehand Method (More Artistic):
Step 1: Complete hot pink chrome and seal. Cure.
Step 2: Using a fine liner brush (size 0 or 00) and black gel polish, paint thin lines in geometric patterns directly on the chrome. Work slowly for precision.
Step 3: Cure after completing each nail’s design.
Step 4: Seal with top coat and cure.
Geometric Design Ideas:
- Single diagonal line across each nail
- Triangle outline in one corner
- Grid pattern on accent nail
- Abstract intersecting lines
- Minimalist single vertical stripe
- Chevron pattern
Pro Practice Tip: Sketch your designs on paper first to plan the composition. For freehand work, rest your painting hand on your work surface to steady it.
Recommended Products:
- Black gel polish (Beetles or Modelones)
- Striping tape in 1mm width
- Nail art liner brush set
- Gel nail art pen (alternative to brush)
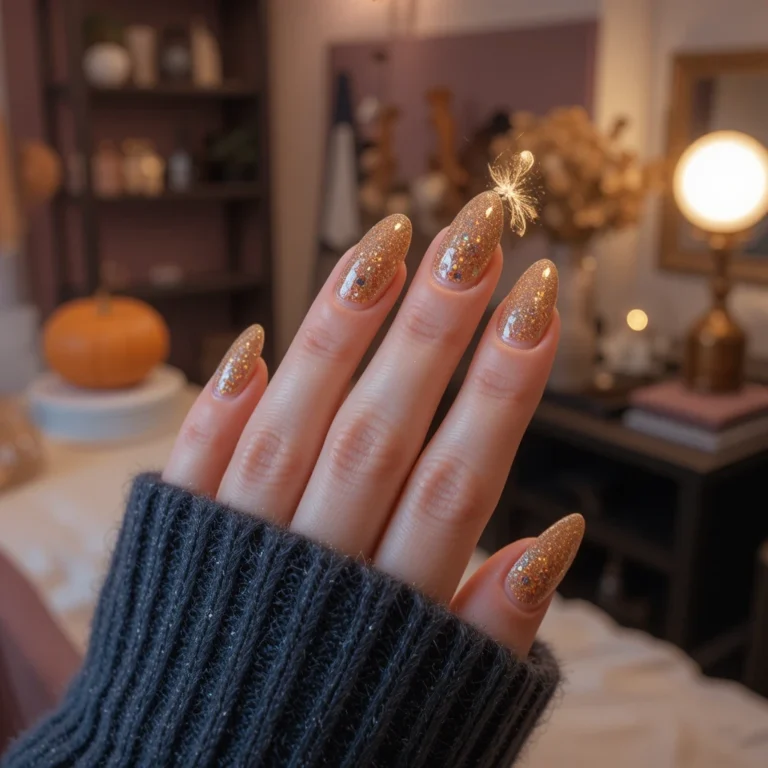
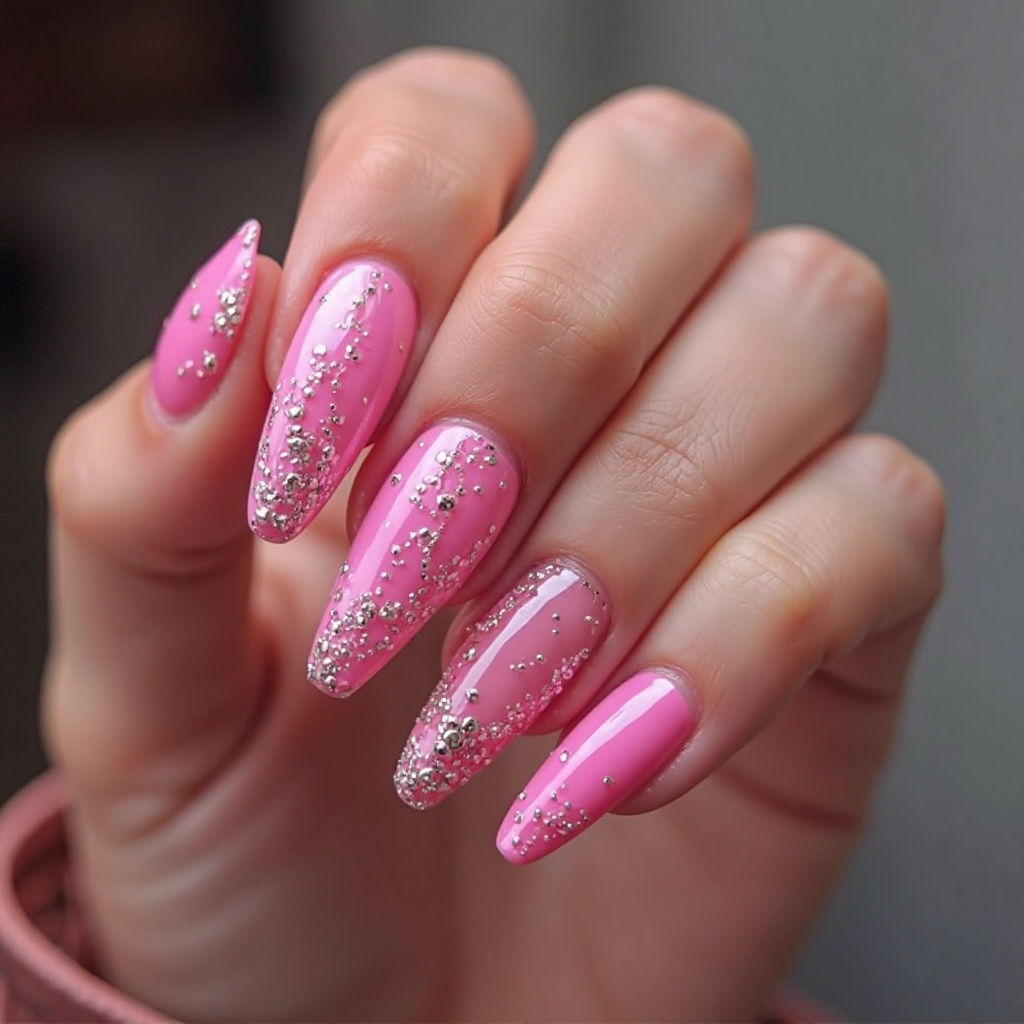
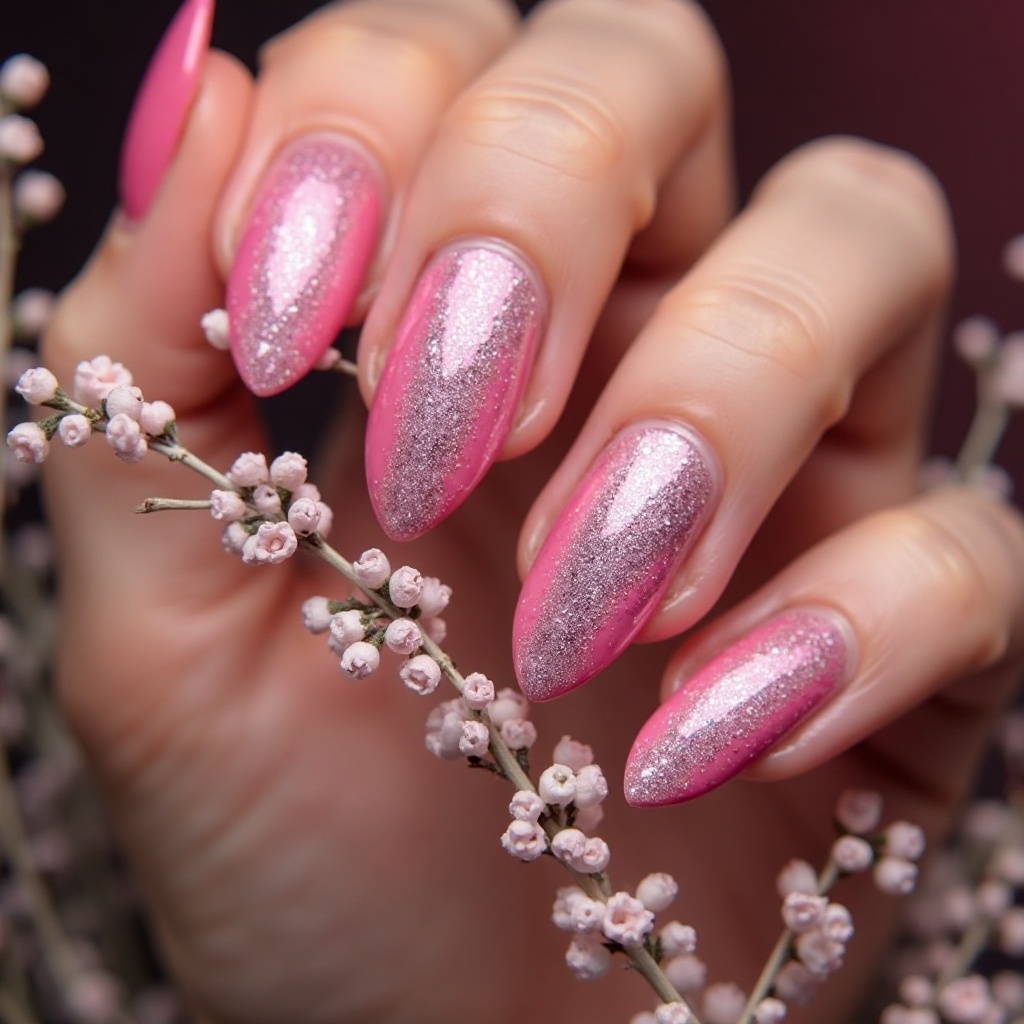
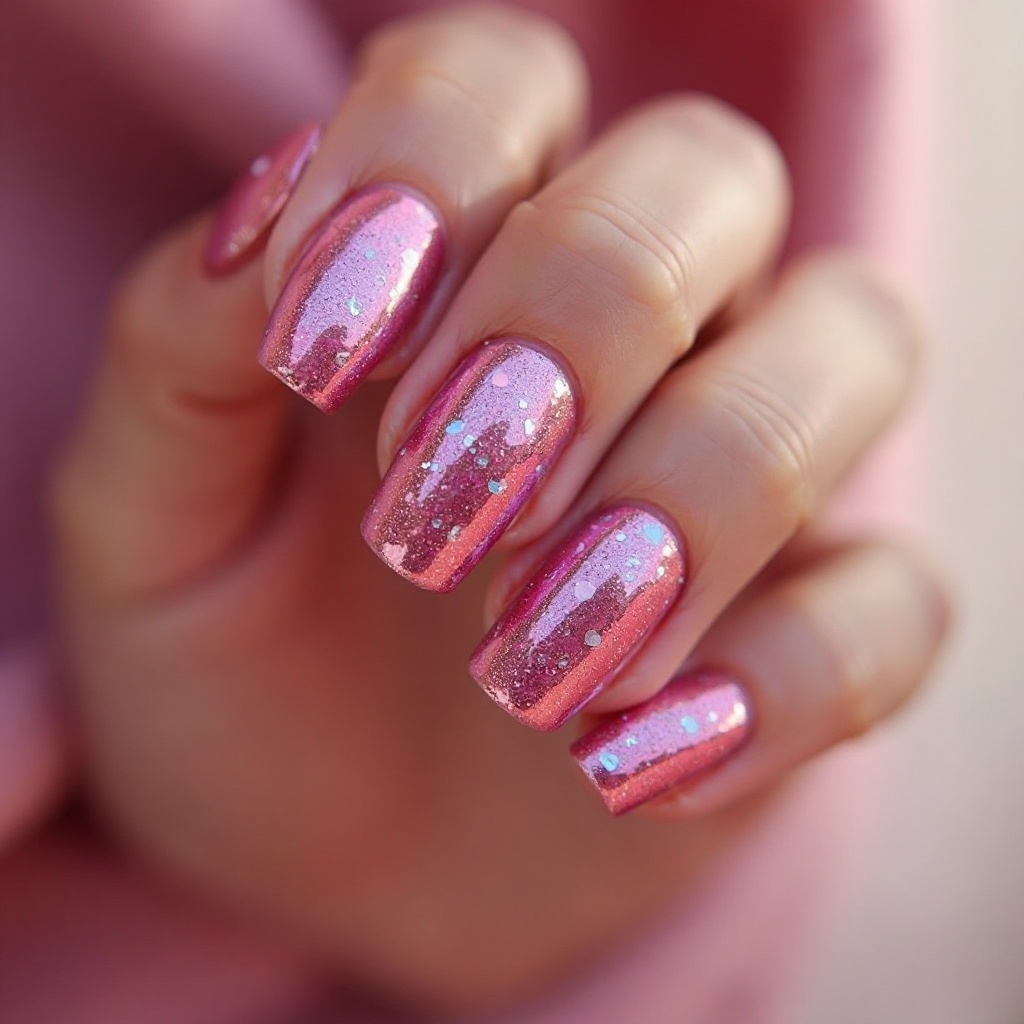
13. Hot Pink Chrome with Holographic Glitter Accent
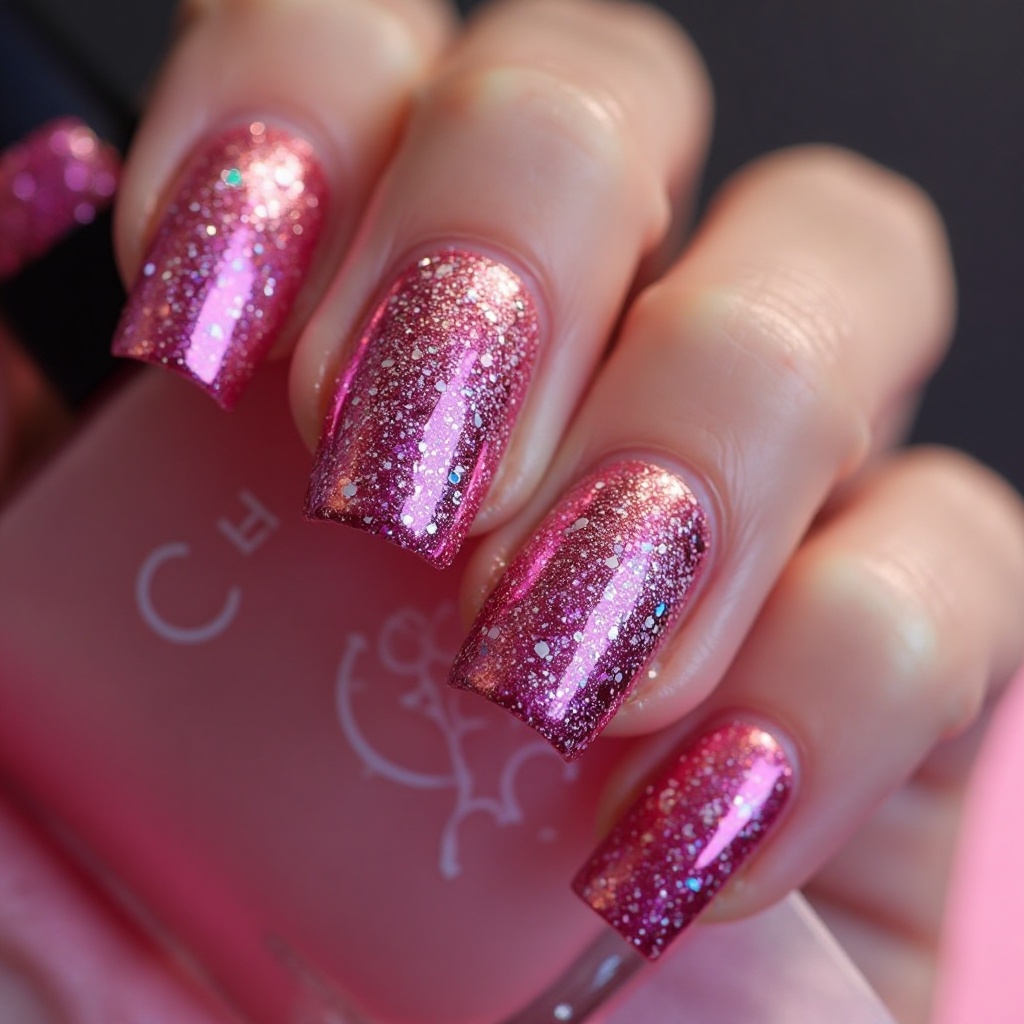
Hot pink chrome on most nails with one or two accent nails featuring hot pink holographic glitter creates a dazzling, multidimensional manicure. The holographic glitter adds rainbow reflections that complement the chrome’s mirror-like quality while introducing even more light-catching properties. This combination is maximum sparkle without feeling like you’re trying too hard.
Why It Works: Holographic glitter and chrome are both futuristic finishes that work beautifully together, creating a cohesive look that’s all about catching and reflecting light. The glitter accent prevents the manicure from being too uniform while adding texture and dimension that photographs beautifully.
Pro Tip: Apply holographic glitter in a clear or light pink gel base over your chrome nails, keeping it to just your ring finger or accent nail. Use chunky holographic pieces rather than fine glitter for more impact and dimension that really shows up.
How to Add Holographic Glitter:
Step 1: Complete hot pink chrome on all nails. Cure and seal with top coat.
Step 2: On your accent nail(s), apply a layer of clear gel or gel base coat. Don’t cure yet.
Step 3: While wet, sprinkle holographic glitter pieces over the nail or use a brush to place them strategically.
Step 4: Cure to lock glitter in place.
Step 5: Apply a thick layer of top coat or builder gel to encapsulate the glitter and create a smooth surface. Cure.
Step 6: If surface isn’t completely smooth, apply a second layer of top coat. Cure.
Glitter Application Patterns:
- Full coverage on accent nail
- Gradient concentration (heavy at tip, fading to base)
- Scattered random placement
- Clustered in one area
- Just at tips for sparkly French effect
Removing Bumpy Glitter Texture: The key to smooth glitter nails is encapsulation. Use builder gel (thicker than regular top coat) and apply a generous layer. Don’t be afraid to use more product—you can’t smooth out glitter with a thin coat.
Recommended Products:
- Modelones Holographic Glitter (chunky mix)
- Beetles Builder Gel
- Clear gel or base coat
- Small brush for glitter placement
14. Hot Pink Chrome Skittles Manicure
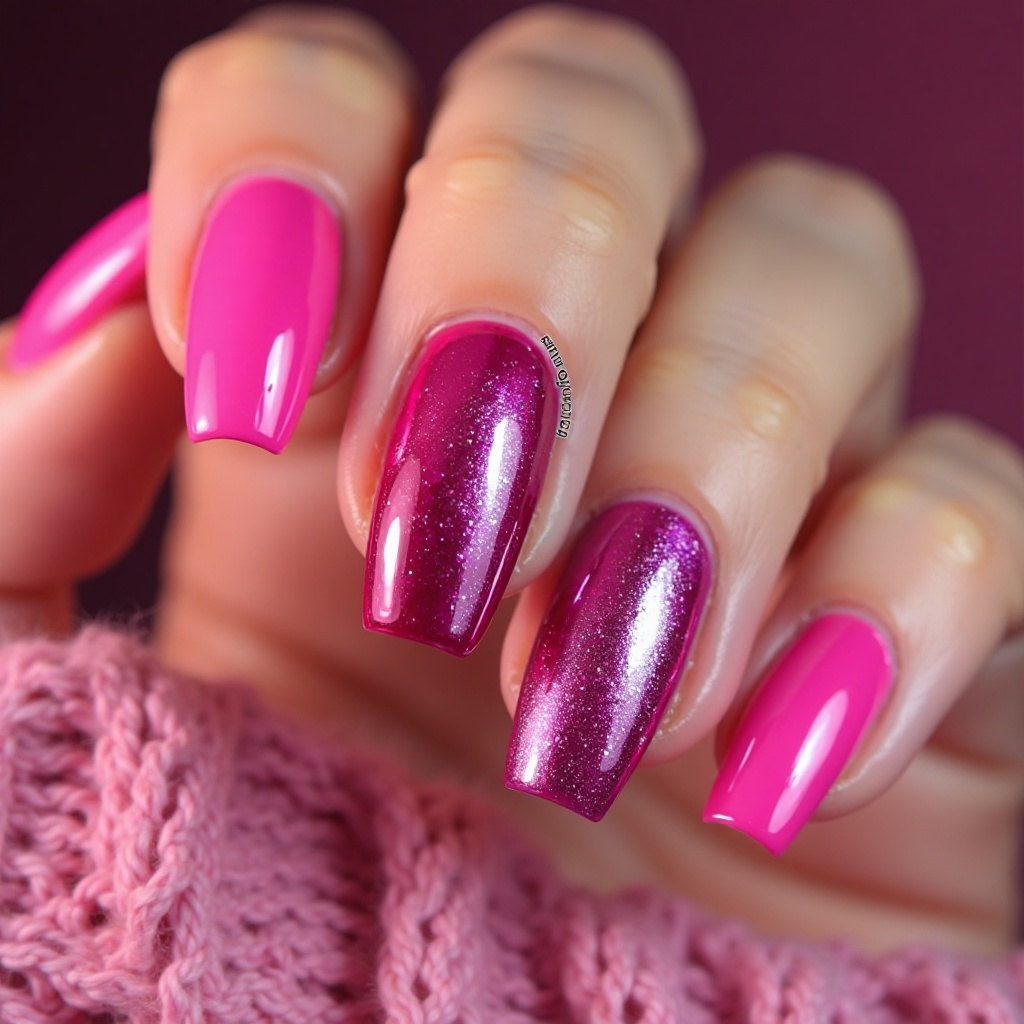
Each nail in a different shade of pink chrome—from pale baby pink through hot pink to deeper magenta—creates a playful “skittles” manicure that’s cohesive yet varied. The all-chrome finish keeps it from looking too chaotic while the gradient of pink shades adds visual interest and shows off your nail artistry. This look is fun, creative, and perfect for those who can’t commit to just one shade.
Why It Works: Skittles manicures let you wear multiple trends at once while keeping the look cohesive through the chrome finish and pink color family. Each nail becomes its own little work of art while still contributing to an overall aesthetic that feels intentional and designed.
Pro Tip: Arrange your pink shades from lightest to darkest across your hand, starting with your pinky and ending with your thumb. This creates a subtle gradient effect that looks more intentional than random color placement and is more visually pleasing.
How to Create a Skittles Chrome Manicure:
What You’ll Need:
- 5 different pink gel polishes (pale to deep)
- Hot pink chrome powder (or multiple pink chrome powders)
Step 1: Apply base coat to all nails and cure.
Step 2: Apply a different shade of pink gel to each finger, arranged from light to dark. Apply 2 coats to each, curing between coats.
Step 3: Apply chrome powder to all nails using the standard technique. If using one chrome powder, it will take on slightly different appearances over different base colors.
Step 4: Seal all nails with chrome-safe top coat and cure.
Shade Selection Guide:
- Pinky finger: Pale pink or almost white
- Ring finger: Light rose or blush pink
- Middle finger: Medium pink
- Index finger: Hot pink (your brightest)
- Thumb: Deep magenta or fuchsia
Advanced Skittles: Use different chrome powder colors on each nail instead of just different base colors. Try: champagne, rose gold, pink, hot pink, and magenta chrome.
Recommended Products:
- Beetles Pink Gel Polish Collection (contains multiple shades)
- Makartt Chrome Powder Set
- Same application tools as basic chrome
Romantic & Delicate Chrome Designs
15. Hot Pink Chrome with Pearl Accents
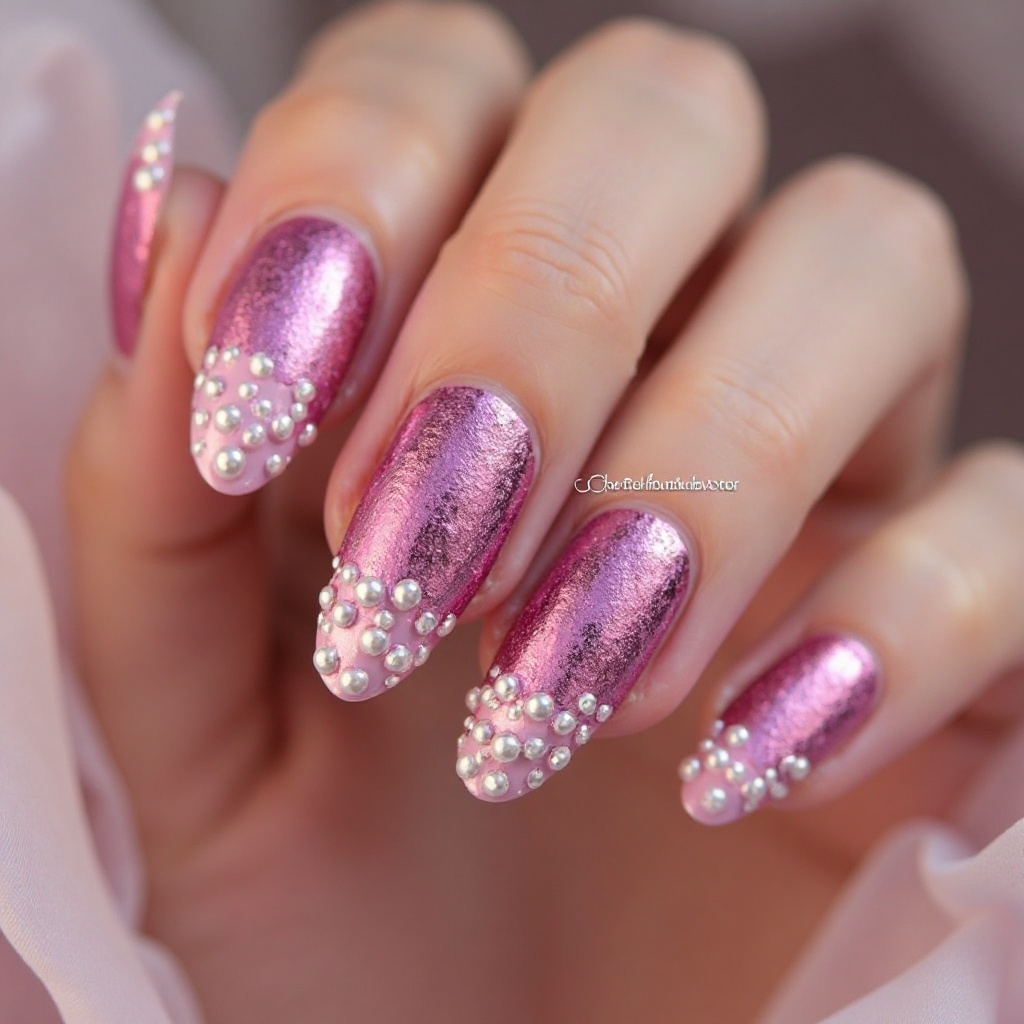
Hot pink chrome base with tiny pearl embellishments strategically placed at the cuticle line or in delicate patterns creates a romantic, feminine manicure. The pearls add a soft, luxurious element that tempers the boldness of hot pink chrome while introducing texture and elegance. This combination feels bridal-appropriate while still being unique enough to stand out from traditional wedding nails.
Why It Works: Pearls and chrome might seem like opposites, but together they create a beautiful balance of soft and bold, traditional and modern. This look works for romantic occasions, weddings, or anytime you want your nails to feel special and thoughtfully designed.
Pro Tip: Use small, flat-backed pearls and apply them with nail glue before sealing everything with a thick layer of builder gel or top coat. Place pearls in a curved line following your cuticle or create delicate clusters at the base of your ring finger nail.
How to Apply Pearl Embellishments:
What You’ll Need:
- Flat-backed pearl cabochons (2mm-4mm sizes)
- Nail glue or strong gel adhesive
- Dotting tool or tweezers
- Builder gel
Step 1: Complete hot pink chrome on all nails and seal. Cure fully.
Step 2: Plan your pearl placement. For beginners, try a simple curved line of 3-5 pearls following the cuticle line on your ring finger only.
Step 3: Apply a tiny dot of nail glue where you want each pearl.
Step 4: Pick up pearl with a damp dotting tool (moisture helps it stick to the tool) and place precisely on glue dot. Press gently.
Step 5: Repeat for all pearls in your design.
Step 6: Once all pearls are placed, apply builder gel around and slightly over the pearls to encapsulate them. Cure for 90 seconds.
Step 7: Apply a final thin layer of top coat if needed to smooth the surface. Cure.
Pearl Pattern Ideas:
- Curved line following cuticle (3-5 pearls)
- Single pearl in corner of accent nail
- Scattered random pearls (3-4 per nail)
- Pearl cluster (5-7 pearls grouped)
- Pearl French tips (pearls along smile line)
Making Pearls Last: The secret is encapsulation with builder gel. This creates a protective dome that prevents pearls from catching on things and popping off.
Recommended Products:
- Mixed size flat-back pearl set
- Beetles Builder Gel (clear)
- Professional nail glue
- Wax-tipped dotting tool
16. Hot Pink Chrome with Negative Space Hearts
Hot pink chrome with small heart cutouts that reveal your natural nail creates an adorable, romantic design that’s perfect for anyone who loves playful nail art. The negative space hearts add a sweet element while keeping the overall look wearable and not overly cutesy. This design balances bold chrome with delicate details beautifully.
Why It Works: Hearts are universally flattering and add a romantic touch without being over-the-top, making this look perfect for date nights or Valentine’s season. The negative space keeps it from feeling juvenile while the chrome keeps it current and on-trend.
Pro Tip: Use heart-shaped vinyl stickers or a tiny nail art punch to create perfect heart shapes before applying chrome powder. Place hearts strategically rather than covering your entire nail—one or two hearts per nail is plenty for maximum impact.
How to Create Negative Space Hearts:
What You’ll Need:
- Heart-shaped vinyl stickers or reinforcement stickers cut into hearts
- Pink or nude gel polish (optional)
- Standard chrome supplies
Step 1: Apply base coat and cure. Apply sheer pink or nude polish if desired (or leave natural). Cure.
Step 2: Place heart stickers strategically on each nail where you want the negative space to appear.
Step 3: Apply hot pink gel polish over the entire nail, covering the stickers. Apply 2 coats, curing between each.
Step 4: While the second coat is still wet (before curing), carefully remove the heart stickers with tweezers. Cure.
Step 5: Apply chrome powder to the hot pink areas, avoiding the heart cutouts.
Step 6: Seal entire nail with top coat, being gentle over the hearts. Cure.
Alternative Method: Reverse Hearts
Instead of negative space hearts, create hot pink chrome hearts on a nude base:
- Apply nude gel to all nails
- Use heart stickers to mask off heart shapes
- Apply chrome powder everywhere except hearts
- Remove stickers
- Paint hearts with hot pink gel and add chrome
- Seal everything
Heart Placement Ideas:
- Single centered heart on accent nail
- Two small hearts in opposite corners
- Scattered tiny hearts (3-4 per nail)
- One large heart taking up most of accent nail
- Hearts along the cuticle line
Recommended Products:
- Heart vinyl stickers (various sizes)
- Small scissors for cutting custom hearts
- Tweezers for precise removal
Hot Pink Chrome Nail Trends to Know
Chrome Finishes Are More Wearable Than Ever
Chrome technology has improved dramatically, making these once-specialty finishes accessible for everyday wear.
Modern chrome powders create that mirror-like shine without the peeling and chipping that plagued earlier versions. The application process has become simpler, with most chrome powders now working over standard gel bases rather than requiring special prep products. This means you can achieve the look at home without professional equipment.
You can now achieve salon-quality chrome at home with affordable chrome powder kits available at every beauty retailer, typically ranging from $8-15. The finish lasts just as long as regular gel polish when properly sealed, typically 2-3 weeks without significant wear. Brands like Beetles, Makartt, and Born Pretty have created beginner-friendly chrome systems with detailed instructions.
Many nail artists now offer chrome as a standard service rather than an upcharge, making it accessible to more people. The at-home market has exploded with tutorial videos and starter kits specifically designed for beginners.
Mixing Textures Creates Dimension
The most current chrome looks strategically combine chrome with other finishes rather than using chrome on every nail.
Mixing chrome with matte creates stunning contrast that adds sophistication and prevents your manicure from feeling one-dimensional. This technique is perfect for making bold colors more office-appropriate while keeping personality intact. Combining glossy and chrome finishes adds depth while keeping the look cohesive through color choice.
Texture mixing allows you to customize the intensity of your manicure based on your comfort level and the occasion. Someone nervous about full chrome can try just one or two chrome accent nails while keeping others glossy. This approach makes bold colors like hot pink more wearable for professional settings while maintaining that wow factor.
Layering different finishes also helps you get more mileage from your existing gel polish collection. You don’t need to buy all new products—just add chrome powder and matte top coat to your current stash to create dozens of new looks.
Negative Space Designs Add Breathing Room
Strategic bare areas in chrome manicures create modern, editorial looks that feel more refined than full-coverage chrome.
Negative space prevents chrome from overwhelming your hands and makes bold colors feel more intentional and designed. These designs are also more forgiving for beginners since you’re working with less surface area requiring perfect chrome application. French tips, half-moons, and geometric cutouts are the most popular negative space applications with chrome finishes.
This trend works especially well with hot pink because the negative space tones down what could be an overwhelming color. Your natural nail peeking through adds a soft, organic element that balances the futuristic chrome finish. It’s also a smart choice for people whose nail beds show through their nail plate, as the negative space incorporates this rather than fighting it.
Negative space designs typically last longer than full-coverage looks because there’s less chrome surface area to show wear at the tips. They’re also easier to maintain and touch up at home if minor damage occurs.
Shorter Nails Are Embracing Chrome
Chrome finishes are no longer reserved for long, dramatic nails—short nails are getting the full chrome treatment.
Hot pink chrome on short nails reads as confident and modern rather than trying too hard or looking costume-y. The boldness of the color combined with practical length creates a perfect balance of edgy and wearable. The reflective quality of chrome actually makes shorter nails appear longer by catching and reflecting light from multiple angles.
This shift has made chrome accessible to people with active lifestyles who need practical nail lengths but still want impact. Healthcare workers, teachers, parents, and anyone who uses their hands actively can now enjoy chrome without worrying about length being impractical. Short chrome nails are easier to maintain and less likely to experience tip wear than long chrome nails.
Many nail artists report that their clients are specifically requesting “short but statement” manicures, with chrome being the perfect solution. The trend shows that bold style choices don’t require impractical nail lengths.
Personalization Over Pinterest Copies
Cookie-cutter chrome manicures are out—customized chrome combinations that reflect individual style are trending.
People are mixing hot pink chrome with unexpected accent colors, unique nail art, and personal embellishments that tell their story. Instead of recreating viral looks exactly, the trend is to use them as inspiration and adapt elements to fit personal style. The focus is on creating something authentic to you rather than exactly recreating viral nail looks.
This approach ensures your nails feel like an extension of your personal style rather than a trendy moment you’re copying. Nail artists are encouraging clients to bring inspiration photos but customize elements to suit their preferences, lifestyle, and aesthetic. This might mean adjusting colors to match a favorite outfit, changing nail shapes to be more practical, or simplifying designs to fit time constraints.
The personalization trend has also led to more collaboration between nail artists and clients during appointments. Instead of just showing a photo and asking for a copy, clients are discussing their lifestyle needs, style preferences, and comfort levels to create truly custom designs.
Colored Chrome for Every Season
Traditional silver and gold chrome have been joined by an entire rainbow of colored chrome options.
Hot pink chrome works year-round, bringing enough boldness to stand out during fall and winter while feeling perfect for spring and summer. Unlike seasonal nail colors that only work for a few months, hot pink chrome’s versatility means you can wear it anytime and it feels appropriate. Colored chrome allows you to match nail trends to seasonal fashion colors and mood shifts throughout the year.
The versatility of hot pink—warm enough to feel inviting, cool enough to feel modern—makes it a perpetually appropriate choice. In spring, it feels fresh and floral. In summer, it’s vibrant and fun. In fall, it provides a pop against darker clothing. In winter, it adds much-needed color to gray days.
Seasonal chrome rotations keep your nails feeling current and connected to your wardrobe and the world around you. Many nail enthusiasts now have a chrome powder collection in multiple colors to swap seasonally, similar to how they rotate clothing colors.
How to Choose the Right Hot Pink Chrome Shade
Match Hot Pink Tones to Your Skin’s Undertones
Understanding your skin’s undertones helps you choose the most flattering hot pink chrome shade for your complexion.
Cool undertones (blue or pink veins visible at your wrist) look stunning in true hot pink or fuchsia chrome with blue-leaning tones. These shades enhance the natural coolness in your skin rather than clashing with it. Warm undertones (green veins at your wrist) are flattered by hot pink chrome that leans coral or has peachy notes mixed in. These warmer pinks harmonize with the golden or olive tones in your skin.
Neutral undertones can wear any hot pink chrome but look especially great in balanced, true hot pink without strong warm or cool notes. If you’re neutral, you have the most flexibility in shade selection.
Quick undertone test: Hold silver and gold jewelry next to your skin in natural light. If silver looks better and makes your skin glow, you likely have cool undertones. If gold looks better and brightens your complexion, you likely have warm undertones. If both look equally good, you’re probably neutral.
Another test method: Look at the inside of your wrist in natural light. Blue or purple veins indicate cool undertones. Green veins indicate warm undertones. A mix of both suggests neutral undertones.
The right undertone match makes hot pink chrome look like it belongs on your hands rather than clashing with your natural coloring. This single consideration can be the difference between a manicure that enhances your look and one that feels off or makes your hands look sallow.
Choose Based on Nail Length and Shape
Your nail length and shape dramatically affect how hot pink chrome presents and how wearable it feels.
Short nails (extending 1-2mm past fingertip): Hot pink chrome reads as chic and intentional on short nails, making it perfect for bold color without overwhelming your hands. Stick with brighter, cooler hot pinks that reflect more light to make short nails appear longer. Short round or oval shapes work best as they create the illusion of length.
Medium nails (extending 3-5mm past fingertip): The sweet spot for hot pink chrome, medium length allows you to try any shade and finish combination without practical concerns. This length showcases chrome beautifully without being high-maintenance or impractical for daily activities. You can experiment freely with any nail shape at this length.
Long nails (extending 6mm+ past fingertip): Long nails can handle deeper, more saturated hot pink chrome shades without looking costume-y because the color has more surface area to display. Very long nails make a statement regardless of color, so the intensity doesn’t overwhelm.
Nail shape considerations:
Almond and coffin shapes elongate hands and refine hot pink chrome, making it feel elegant rather than overwhelming. These shapes have the most surface area for showcasing chrome’s reflective properties.
Square shapes make hot pink chrome feel bold and editorial, perfect for making a statement. The angular tips create a modern, geometric aesthetic.
Oval shapes soften the intensity of hot pink chrome while still showcasing the reflective finish beautifully. This is the most universally flattering shape for chrome.
Stiletto or extreme shapes amplify the drama of hot pink chrome—only choose these if you want maximum impact and attention.
Factor in Your Lifestyle and Activities
Your daily activities and work environment should influence your hot pink chrome choices.
High-activity lifestyles (gym-goers, parents, active hobbies): Choose brighter hot pink chrome shades that hide tip wear and scratches better than deeper shades. Lighter colors show imperfections less obviously. Keep nails shorter to medium length to prevent breakage during physical activities. Consider adding one or two matte accent nails—matte finishes hide imperfections better than pure chrome if you get minor scratches.
Office professionals (corporate, finance, law, formal environments): Hot pink chrome French tips or ombré styles offer a compromise between bold and appropriate for conservative workplaces. The negative space or gradient makes the look more subtle while still being interesting. Pairing hot pink chrome with nude or matte accents tones down the intensity while keeping the style factor. Keep lengths practical (short to medium) and shapes conservative (round, oval, short square).
Creative fields (design, marketing, arts, entertainment): Go bold with full-coverage hot pink chrome, 3D embellishments, or mixed-texture designs that showcase your artistic personality. Creative environments typically embrace statement nails, so this is your chance to experiment fully. Longer lengths and dramatic shapes are usually acceptable and even celebrated.
Healthcare, food service, or hands-on work: Short nails with simple hot pink chrome designs work best for hygiene and safety requirements. Avoid 3D embellishments that could harbor bacteria or catch on gloves. Chrome is actually ideal for these fields because gel lasts longer than regular polish and withstands frequent handwashing.
Chrome finishes generally hide minor imperfections better than regular polish because the reflective quality diffuses light. However, scratches show more on darker, more saturated colors. If you’re rough on your hands, lighter or brighter hot pinks with high reflectivity are more forgiving than deep magenta chromes.
Coordinate with Your Wardrobe Colors
Your typical clothing colors should influence your hot pink chrome shade selection for maximum versatility.
Perfect pairings that always work:
Hot pink chrome looks stunning with black, white, gray, navy, and denim—basically all your neutral staples. These combinations are foolproof and work for 90% of people’s wardrobes.
Pair it with other jewel tones like emerald green, royal blue, or deep purple for a rich, saturated color story. These combinations feel luxurious and intentional.
Hot pink chrome also works beautifully with metallics like gold and silver jewelry, creating a cohesive metallic moment throughout your look.
Approach with caution:
Hot pink chrome can clash with orange, red, or yellow-toned clothing unless you’re intentionally going for a bold color-blocked look. If you wear a lot of warm tones, consider a coral-leaning hot pink chrome instead of cool fuchsia.
Be thoughtful about pairing it with other pastels—some combinations (hot pink + mint) work beautifully while others (hot pink + peach) can feel too saccharine or competing.
Wardrobe audit exercise:
Open your closet and notice your color patterns. Pull out your 10 most-worn outfits. What colors dominate? If you wear mostly black, white, and neutrals, hot pink chrome becomes your pop of color and personality—perfect choice. If you love color and pattern, consider whether hot pink chrome will complement or compete with your typical outfits.
The goal is to choose a hot pink chrome shade that works with at least 70% of your wardrobe so your manicure enhances rather than limits your styling options. When in doubt, cooler, blue-based hot pinks are more universally flattering and easier to pair with various clothing colors.
Select for Specific Occasions
Different settings call for different approaches to hot pink chrome intensity and design complexity.
Conservative professional settings (corporate offices, client-facing roles): Hot pink chrome French tips, ombré fades to nude, or negative space designs provide personality without overwhelming traditional workplaces. These designs show you have style while respecting dress code expectations. Keep nails shorter to medium length and avoid 3D embellishments or heavy nail art in conservative environments. Stick to 1-2 accent nails with chrome rather than full coverage if you’re unsure.
Casual everyday wear (errands, coffee dates, general life): Full-coverage hot pink chrome with simple matte or glossy accents works beautifully for daily life, running errands, and casual social events. This is the sweet spot where you can express yourself without overthinking appropriateness or practicality. You’ll get compliments from strangers and feel put-together even in jeans and a t-shirt.
Special events and parties (weddings, celebrations, nights out): Go bold with 3D details, holographic glitter, geometric designs, or mixed metallics for celebrations and nights out. Special occasions are the perfect time to try more elaborate hot pink chrome designs that might feel too extra for everyday. Your nails can match the energy of the event—the bolder the celebration, the bolder your nails.
Seasonal outdoor activities (beach, pool, hiking, gardening): Consider how activities like swimming, gardening, or hiking might affect your manicure longevity and plan accordingly. Brighter hot pink chrome shades hold up better to outdoor exposure and sun damage than deeper, more saturated tones. Keep lengths practical for the activity and avoid delicate embellishments that could get damaged.
Dating and romantic occasions: Chrome with pearl or rhinestone accents, negative space hearts, or sophisticated ombré designs feel romantic without being too cutesy. These designs show effort and attention to detail, which is always attractive.
Match your design complexity to the formality of the event—simpler designs work for most occasions while elaborate art is best reserved for celebrations. When in doubt, you can never go wrong with classic full-coverage hot pink chrome or simple French tips. These are universally appropriate and always look polished.
Nail Maintenance & Longevity Tips for Chrome Nails
Protect Against Daily Wear and Tear
Chrome nails require extra care to maintain their mirror-like finish through everyday activities and potential damage.
The reflective chrome layer is durable but can scratch or dull if exposed to rough surfaces or abrasive materials. Think of chrome as a mirror on your nails—anything that would scratch a mirror will affect your chrome finish. Unlike regular polish where minor scratches blend in, chrome shows every imperfection due to its mirror-like surface.
Be mindful when handling rough fabrics like burlap or textured canvas, using your phone’s textured case, touching rough stone or brick walls, or doing anything that creates friction against your nails. The first 48-72 hours after application are most crucial—this is when your top coat is still settling and most vulnerable to damage.
Mistake to avoid: Using your nails as tools to open packages, peel stickers, scrape labels, or pop open cans will create visible scratches and dents on chrome faster than any other finish. Always use the pads of your fingers or actual tools instead.
Daily protection habits:
Wear protective gloves when cleaning, doing dishes, or handling harsh chemicals that can break down your top coat. Even brief exposure to cleaning products can dull chrome’s shine if your nails aren’t properly protected. Keep a pair of rubber gloves under every sink where you might do wet work.
Be gentle when typing—aggressive keyboard use can cause micro-scratches on the tips of your nails where they strike the keys. Consider adjusting your typing style to use more fingertip and less nail tip.
Take off rings before applying hand lotion to avoid scratching your nails on the metal while rubbing in product. Apply lotion to the backs of your hands first, then gently work around your nails.
Combat Damage with Consistent Hydration
Dry cuticles and nail beds make even perfect chrome manicures look neglected and can lead to lifting and peeling.
Apply cuticle oil at least twice daily—once in the morning after your shower and once before bed—for optimal nail health and chrome longevity. This isn’t optional; it’s the single most important maintenance step for chrome nails. Massage the oil into your cuticles, sidewalls, and under your free edge to keep the entire nail area supple and healthy.
Well-hydrated cuticles prevent lifting at the base of your nails, which is where most chrome manicures start to fail. Dry cuticles pull away from the nail plate, creating gaps where moisture and debris can get under your gel. Dry, lifted cuticles create entry points for water and debris that compromise your chrome’s adhesion to the nail.
Pro move: Keep a small roller-ball cuticle oil pen in your purse, car, and desk drawer for easy reapplication throughout the day. Apply after every hand washing for maximum hydration.
Best cuticle oils for chrome nails:
Look for cuticle oils containing jojoba (absorbs quickly and mimics skin’s natural oils), vitamin E (promotes healing and strength), almond oil (deeply moisturizing), or argan oil (rich in nutrients). These absorb quickly and provide maximum hydration.
Avoid petroleum-based products like Vaseline that sit on top of skin rather than absorbing and actually nourishing your nail beds. These create a barrier but don’t provide real hydration.
The better hydrated your nail beds and cuticles, the longer your chrome manicure maintains its pristine appearance and adhesion. This single habit can add up to a week of additional wear time to your chrome nails. Many nail professionals say that cuticle oil is the difference between a 2-week and a 3-week manicure.
Time Your Salon Appointments Strategically
Proper scheduling prevents that awkward grown-out phase and keeps your nails consistently gorgeous.
Gel/acrylic chrome timing recommendations:
Book removal or fill appointments every 2-3 weeks for optimal appearance and nail health. By week two, most people have a visible growth line. By week three, most chrome shows visible tip wear and significant growth line, making this the ideal time for a refresh.
If your nails grow quickly, aim for the 2-week mark. If they grow slowly, you can often push to 3 weeks, especially if you’re good about maintenance at home.
Never go past 4 weeks with gel or acrylic chrome, as this can damage your natural nails underneath from excessive pressure and lifting.
Regular chrome polish timing (non-gel systems):
Plan for removal and reapplication every 7-10 days if you’re using non-gel chrome systems like regular polish with chrome powder. Regular polish chrome doesn’t have the same longevity as gel but offers easier removal and more flexibility to change designs frequently.
This shorter timeline is actually perfect for people who like to change their nail color often or who want to try many different chrome designs.
Strategic scheduling tips:
Schedule your next appointment before leaving the salon—don’t wait until your nails look terrible. Booking in advance prevents that desperate “I need an appointment NOW” scramble when your chrome starts showing wear. Most nail techs book up quickly, especially during peak seasons (prom, wedding season, holidays), so advance scheduling ensures you get your preferred time slots and nail tech.
Common mistake to avoid: Waiting until your chrome looks terrible before booking a fill or removal leads to weeks of unhappy nail days and potential damage to your natural nails from excessive lifting.
Occasion-based timing:
Consider your schedule when booking chrome appointments—avoid getting chrome right before extended water exposure like beach vacations or cruise trips. Water exposure (even in gloves) is chrome’s enemy.
Plan chrome manicures 2-3 days before big events and important dates where you want your nails looking their absolute best. This allows time for any minor adjustments if needed while ensuring maximum freshness for your event.
If you have back-to-back events, schedule a single chrome manicure that covers both rather than trying to squeeze in two separate appointments.
Invest in Quality Base and Top Coats
The products you use under and over your chrome powder make or break your manicure’s longevity and appearance. This is not the place to cheap out.
Why quality matters:
Cheap base coats don’t adhere properly or cure completely, creating an unstable surface for chrome powder application. If your base isn’t fully cured, the chrome powder won’t buff in smoothly and your color will be patchy.
Low-quality top coats can dull your chrome finish immediately upon application or cause it to peel within days rather than weeks. Some top coats simply aren’t formulated to work with chrome powder and will react badly no matter how carefully you apply them.
Quality products cost a bit more upfront ($10-15 vs $3-5) but last significantly longer and give you better results, making them more economical in the long run.
What to look for in base coats:
Choose a tacky, high-quality gel base coat that creates a smooth surface and cures completely under UV/LED light. The tackiness is crucial—chrome powder needs something to grip onto.
The base coat should be self-leveling to eliminate any texture or brushstrokes that would show through chrome. Chrome magnifies every imperfection in your base, so smoothness is paramount.
Look for base coats specifically labeled for use with chrome or metallics, as these are formulated with proper adhesion properties.
What to look for in top coats:
No-wipe gel top coats designed specifically for chrome are essential—regular top coats can dull the reflective finish instantly. The wiping process can damage chrome, so no-wipe formulas are mandatory.
Look for top coats labeled “chrome-safe,” “chrome-compatible,” or “works with chrome powder” that maintain the mirror-like shine while providing protection. These are formulated to seal chrome without interfering with its reflective properties.
The top coat should cure clear without any yellow tint, as yellowing will affect your chrome’s color and shine.
Specific product recommendations that work:
- Beetles Gel Base Coat (under $10, works perfectly with all chrome powders)
- Modelones No-Wipe Top Coat for Chrome (specifically formulated for chrome)
- Makartt Chrome-Safe Top Coat (seals without dulling)
- Vishine No-Wipe Gel Top Coat (works beautifully with chrome)
Application tips for longevity:
Apply top coat in thin, even layers and allow it to self-level rather than overworking it with your brush. The more you brush over chrome, the more likely you are to disturb the powder underneath.
Cure for the full recommended time—don’t shortcut this step thinking 30 seconds is close enough to 60 seconds. Under-cured top coat will remain slightly soft and be prone to damage.
Reapply a fresh layer of top coat every 4-5 days at home to extend your chrome’s pristine appearance between salon visits. This maintenance step adds significant longevity by refreshing the protective layer before it breaks down from daily wear.
Avoid These Polish-Destroying Elements
Certain substances and activities are particularly harmful to chrome finishes and should be minimized or avoided entirely. Being aware of these threats helps you protect your investment.
Chlorine (swimming pools, hot tubs, water parks):
Chlorine breaks down gel top coat rapidly, causing yellowing, dulling, and eventually complete breakdown of the protective layer. Once your top coat is compromised, your chrome is exposed and will deteriorate quickly.
Protection strategy: Wear waterproof gloves when swimming if possible, or apply an extra-thick layer of top coat before pool exposure. Rinse hands with fresh water immediately after pool exposure and apply cuticle oil to rehydrate. Limit pool time to under 30 minutes if possible.
Salt water (ocean swimming, beach activities):
Salt is abrasive and dehydrating, creating a double threat that can dull chrome’s reflective quality and cause lifting at the cuticle line. Salt crystals act like tiny sandpaper particles against your chrome.
Protection strategy: Apply a fresh layer of top coat the day before beach trips. Rinse hands thoroughly with fresh water after ocean exposure. Apply cuticle oil generously after any salt water contact to combat the dehydrating effects.
Hand sanitizer (alcohol-based formulas):
The alcohol content breaks down gel top coat with repeated exposure, creating a cloudy appearance and eventually causing peeling. During cold/flu season or post-pandemic life when hand sanitizer use is frequent, chrome nails face constant attack.
Protection strategy: Use hand sanitizer when necessary for health, but wash hands with soap and water when possible instead. After using sanitizer, wait 30 seconds for it to fully evaporate before touching anything, allowing it to dissipate rather than sitting on your nails. Apply cuticle oil after every 3-4 sanitizer uses to counteract the drying effects.
Acetone and harsh solvents (nail polish remover, cleaning products):
These break down gel products instantly and will destroy your chrome manicure on contact. Even non-acetone removers can damage chrome if they contain strong solvents.
Protection strategy: Wear gloves when using any cleaning products or solvents. If you need to remove regular polish from toenails while wearing chrome on fingers, use a cotton pad held with tweezers rather than your fingers to avoid contact. Never use acetone-based products anywhere near your chrome nails except during intentional removal.
Hot water and steam (long showers, saunas, hot yoga, dishwashing):
Extended exposure to heat and moisture causes gel to expand and contract, leading to premature lifting and peeling. The combination of heat + moisture is particularly damaging.
Protection strategy: Keep showers lukewarm rather than scalding hot, or at least keep hands out of the direct hot water stream. Wear gloves for dishwashing always. Avoid saunas and hot yoga during the first 48 hours after getting chrome (the most vulnerable period). If you do hot yoga regularly, consider whether chrome is the right choice for you, or plan manicures for weeks when you’re taking a break from hot classes.
Rough surfaces and abrasives (loofahs, pumice stones, scrubbing brushes, sandpaper):
These create micro-scratches on chrome that dull the mirror-like finish, even if you can’t see individual scratches. The cumulative effect over days turns your shiny chrome into a matte or cloudy appearance.
Protection strategy: Be gentle around your nails during exfoliation rituals. Use your palms rather than your fingertips when using body scrubs or loofahs. Wear gloves for any DIY projects involving sandpaper, steel wool, or abrasive pads. Be mindful when handling textured surfaces like brick walls, rough wood, or concrete.
The prevention rule to remember:
Think of your chrome nails as jewelry—specifically, as expensive rings you’d protect carefully. If you wouldn’t wear your best rings during an activity because you’d worry about damaging them, protect your chrome nails too. This mindset shift helps you instinctively protect your manicure throughout the day.
Know When to Remove and Start Fresh
Recognizing the signs that it’s time to remove your chrome prevents damage to your natural nails underneath and ensures your nails always look their best.
Signs it’s time for removal:
Visible lifting at cuticles or sidewalls: Any gap between the gel and your nail plate, even tiny ones, means moisture can get underneath. Once lifting starts, it only gets worse and can lead to fungal or bacterial infections.
Significant tip wear or dulling: When the chrome at your tips looks cloudy, scratched, or has worn away to reveal the color underneath, the protective barrier is compromised. Your manicure will deteriorate rapidly from this point.
Growth line of more than 3-4mm: This is primarily aesthetic, but excessive growth looks unkempt and draws attention to your nails in a negative way. It’s time for a fresh manicure.
Any green, yellow, or brown discoloration: This indicates moisture under the gel and potential bacterial or fungal growth. Remove immediately and let nails breathe for several days. See a doctor if discoloration doesn’t resolve quickly.
General lack of shine despite cuticle oil and care: When your chrome no longer responds to maintenance efforts and remains dull despite your best efforts, the top coat has broken down too much to continue protecting the chrome.
Physical discomfort: If your nails feel tight, sore, or uncomfortable, it’s past time for removal. Never tolerate pain from your manicure.
Proper removal technique to protect natural nails:
Step 1: File off the shiny top coat layer with a 180-grit file. This allows acetone to penetrate the gel layers.
Step 2: Soak cotton pads in pure acetone (not non-acetone remover).
Step 3: Place acetone-soaked pad on each nail and wrap fingertip in aluminum foil to prevent evaporation. Wait 10-15 minutes.
Step 4: Check one nail by gently pushing with an orange wood stick. If gel has softened and lifts easily, proceed. If not, rewrap and wait another 5 minutes.
Step 5: Gently push off softened gel with an orange wood stick—never force, peel, or pick at chrome nails as this removes layers of your natural nail plate and causes significant damage.
Step 6: If some gel remains, reapply acetone-soaked pad for another 5 minutes rather than forcing removal.
Step 7: Once all gel is removed, wash hands thoroughly, apply cuticle oil generously, and consider applying a nail strengthener.
Break schedule between manicures:
Give your nails a 2-3 day break between gel chrome manicures every 3-4 application cycles (about every 2-3 months) to let them recover. During breaks, apply strengthening base coats like OPI Nail Envy or Nailtiques and cuticle oil religiously 3-4 times daily to restore moisture and flexibility to your natural nails.
This break period allows your nails to return to their natural state and prevents the cumulative damage that comes from never giving them a rest from gel products.
Recovery schedule after extended gel/acrylic wear:
If you’ve been wearing continuous gel or acrylic chrome for 6+ months without breaks, take a full week to two weeks off to let nails breathe and recover. You may notice your nails are thin, peeling, or brittle—this is normal after extended wear.
Use a nail strengthener and hydrating treatments daily during this recovery period to rebuild your natural nail’s resilience and health. Look for products containing calcium, keratin, or biotin. Apply cuticle oil 4-5 times daily during recovery.
Consider taking a biotin supplement (2.5mg daily) during recovery periods to support nail health from the inside out.
Why proper removal matters long-term:
Proper removal is just as important as proper application for maintaining healthy natural nails long-term. Peeling or forcefully removing gel chrome removes layers of your natural nail plate along with the gel, leading to thin, weak, damaged nails.
The few extra minutes spent removing chrome correctly prevents weeks or even months of weak, peeling, damaged nails that refuse to hold any polish. Your future self will thank you for the patience.
Many people blame gel or chrome for “ruining” their nails, when actually improper removal is the culprit. Gel and chrome, when properly applied and removed, don’t damage nails.
Common Hot Pink Chrome Nail Mistakes (And How to Fix Them)
Mistake #1: Applying Chrome Powder Incorrectly
The problem:
Rushing the chrome application or using the wrong technique creates streaky, patchy finishes with visible brushstrokes instead of that smooth mirror effect. You end up with some areas that are intensely reflective and others that are dull or barely have chrome coverage. This is the most common mistake beginners make.
The fix:
- Wait until your gel base coat is fully cured AND has cooled for 30 seconds before applying chrome powder. Hot nails don’t accept chrome powder well.
- Use a silicone eyeshadow applicator or soft rubber tool rather than a brush for better chrome adhesion. Brushes are too soft and don’t create enough friction.
- Apply chrome powder using gentle, circular buffing motions rather than harsh back-and-forth strokes that can create directional streaking.
- Work in thin layers, building up coverage gradually rather than dumping powder and hoping for the best. Multiple thin applications give better coverage than one thick application.
- Apply more pressure than you think you need—you’re not just dusting powder on, you’re buffing it into the tacky gel layer.
Pro tip: After buffing chrome powder onto your nail, use a clean side of your applicator to gently polish the surface in one direction for extra shine before sealing. This final polish step makes the difference between good chrome and mirror-like chrome.
Practice exercise: Before doing your full hand, practice chrome application on just your pinky finger. If you’re not happy with the result, wipe it off with alcohol and try again until you get the technique right.
Mistake #2: Skipping or Rushing the Base Coat
The problem:
Inadequate base coat prep creates texture issues that show through chrome and reduces adhesion, leading to premature peeling and lifting. Chrome magnifies every imperfection in your base, so a rough or inadequately cured base coat means your entire manicure is compromised from the start.
The fix:
- Apply a thin layer of quality gel base coat and cure it completely under your UV/LED lamp for the FULL recommended time. Don’t guess—check your lamp’s instructions.
- Buff your natural nails gently before base coat application to create slight texture for better adhesion. Use a 180-grit buffer, not aggressive filing.
- Check that your base coat is completely smooth with no bubbles, brushstrokes, or thick patches before applying color. Hold your nail up to light and look carefully.
- Allow base coat to cool for 30 seconds after curing before proceeding with your manicure. This cooling period prevents tackiness issues.
- If you see any imperfections in your base coat, apply a second thin layer to create a smoother surface. Two thin layers are better than one thick imperfect layer.
Pro tip: Apply a second thin layer of base coat if your first layer isn’t perfectly smooth—chrome magnifies every imperfection. The extra minute spent perfecting your base saves hours of frustration with poor chrome application.
Signs your base coat needs improvement: If chrome powder isn’t adhering evenly, if you see texture through the chrome, or if chrome looks spotty, your base coat is the issue 90% of the time.
Mistake #3: Not Prepping Nails Properly
The problem:
Skipping nail prep steps causes chrome to lift within days rather than lasting the full 2-3 weeks you’re expecting from gel. Proper prep is boring and time-consuming, which is why people skip it, but it’s absolutely essential for longevity.
The fix:
- Push back cuticles thoroughly and remove all dead skin around the nail plate before starting. Use a cuticle pusher and cuticle remover if needed. Any dead skin left on the nail will prevent adhesion.
- Buff the nail surface lightly with a 180-grit buffer to remove shine and create slight texture. You’re not trying to thin the nail, just remove the natural oils and create tooth for gel to grab onto.
- Cleanse nails with rubbing alcohol or professional nail cleanser to remove ALL oils, debris, and dust. Swipe each nail 2-3 times until your cotton pad comes away clean.
- Avoid applying lotion, cuticle oil, or hand cream before your manicure—these create barriers that prevent adhesion. Do your manicure with completely clean, dry, product-free hands.
- Don’t touch your prepped nails with your fingers after cleansing. The oils from your skin will transfer back onto your nails.
Pro tip: Wait at least 30 minutes after showering to do your nails—your nail plate absorbs water and expands during showers, then contracts as it dries, which can cause immediate lifting if you apply gel while nails are still swollen with water.
Complete prep checklist: □ Push back cuticles □ Remove dead skin □ Shape nails with file □ Buff nail surface □ Clean under free edge □ Cleanse with alcohol □ Let nails dry completely □ Avoid touching nails
Mistake #4: Forgetting to Seal the Free Edge
The problem:
Not capping the free edge (tip of your nail) with base coat and top coat allows water to seep under your chrome from the tip, causing peeling and lifting. This is often called “tip shrinkage” and is one of the main reasons gel manicures fail prematurely.
The fix:
- After applying each layer (base coat, color, top coat), run your brush along the free edge to seal it completely.
- Make sure you’re actually coating the edge of your nail tip—hold your finger horizontally and look at the tip straight-on to verify coverage.
- Be thorough but not excessive—you don’t want product dripping down the underside of your nail or touching your skin, just a thin seal along the very edge.
- Check that your top coat has sealed the tip completely before curing. If you see any gaps, apply a bit more top coat specifically to that area.
- This step is especially important for chrome because any water exposure that reaches the gel layers will quickly compromise the chrome’s adhesion.
Pro tip: Reapply top coat just to your free edges every 3-4 days at home using a thin brush. This maintenance step extends wear time significantly and prevents tip wear from becoming visible. Keep a small bottle of your top coat and a thin brush specifically for this touch-up purpose.
Why this matters so much: Your nail tips are constantly being used—typing, opening things, scratching itches. They take the most abuse and are most vulnerable to water exposure. Sealing them properly is mandatory for chrome longevity.
Mistake #5: Using Old or Separated Chrome Powder
The problem:
Chrome powder that’s been exposed to air, moisture, or is past its prime creates dull, streaky finishes instead of that mirror-like shine you’re expecting. The powder clumps, doesn’t buff in smoothly, and gives inconsistent coverage that looks spotty rather than reflective.
The fix:
- Store chrome powder in an airtight container away from humidity and direct sunlight. The bathroom is the worst place to store it due to shower steam.
- Replace chrome powder every 6-12 months depending on frequency of use and storage conditions. If you use it weekly, replace every 6 months. If monthly, replace yearly.
- If chrome powder has hardened into clumps, changed texture, or doesn’t create a smooth finish anymore, it’s time to replace it—don’t try to salvage it. Fresh powder is inexpensive enough that trying to make old powder work isn’t worth the frustration.
- Always close your chrome powder container immediately after use to prevent air exposure. Every second it’s open, it’s degrading.
- Don’t contaminate your powder by using dirty applicators. Use a clean section of your applicator for each nail, or have multiple applicators.
Pro tip: Buy chrome powder in smaller quantities that you’ll use within a few months rather than bulk purchasing and having it deteriorate before you can use it all. A 1-2 gram jar is plenty for most people and will stay fresh through its use.
Signs your chrome powder has gone bad: Dull finish no matter how much you buff, clumpy texture, difficulty adhering to gel, inconsistent coverage, or a change in color from when you first opened it. When in doubt, test it on a single nail before doing your whole hand.
Conclusion
Hot pink chrome nails are the perfect way to express your bold, confident style while keeping your manicure fresh and on-trend. Whether you’re drawn to full-coverage drama, romantic pearl accents, or playful geometric designs, there’s a hot pink chrome look in this guide that’ll make you feel absolutely unstoppable every time you glance at your hands.
With the step-by-step tutorials, product recommendations, and troubleshooting tips you’ve learned here, you now have everything you need to create salon-quality chrome nails in your own home. Start with the basic chrome technique, master that foundation, then gradually work your way up to more complex designs as your confidence grows.
Save your favorite ideas from this list, screenshot the tutorials for easy reference during your next manicure session, and don’t be afraid to mix elements from different designs to create something uniquely yours. The beauty of DIY nails is the freedom to experiment and customize without the pressure or expense of a salon appointment.
Share this article with your nail-obsessed friends who need fresh inspiration and practical guidance—because these 16 hot pink chrome looks and detailed how-to instructions are too valuable to gatekeep. Now go create some stunning chrome nails and enjoy all the compliments that come your way!