7 Amethyst Nails Design That Look So Luxurious
Amethyst nails are having a major moment right now, and honestly, it’s about time this gemstone-inspired shade got the recognition it deserves. This rich purple hue sits perfectly between playful and sophisticated, making it incredibly versatile for any occasion—from casual coffee dates to elegant evening events.
Whether you’re drawn to deep plum tones or prefer lighter lavender vibes, amethyst shades offer that perfect pop of color while still feeling polished and put-together.
Best of all, these looks are totally achievable at home with the right techniques and products, so you can recreate that salon-quality finish without the salon price tag.
Minimalist & Elegant Amethyst
1. Soft Lavender Nude
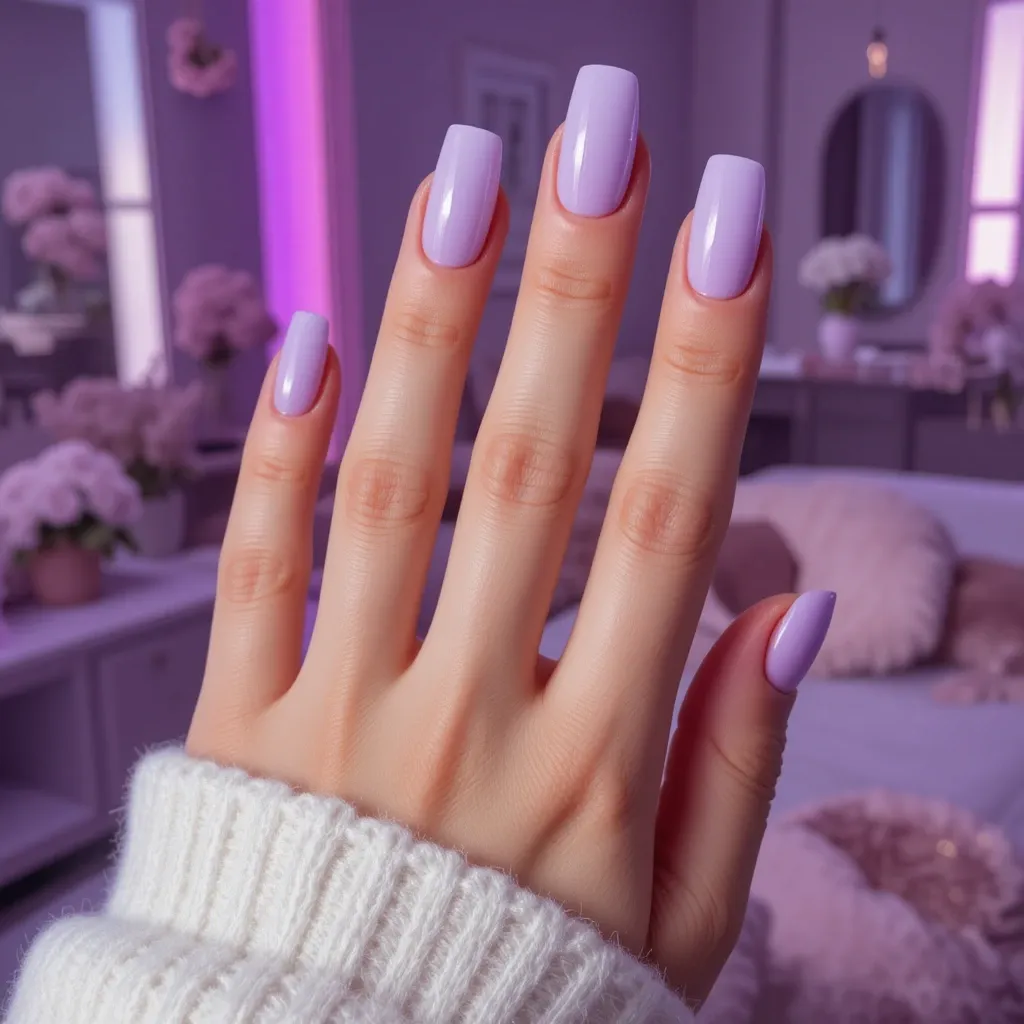
A barely-there lavender base with subtle purple undertones creates an ethereal, sophisticated look that’s perfect for those who want just a hint of color. The milky finish keeps things modern and fresh, while the delicate purple tint adds unexpected dimension. This shade works beautifully on any nail length and pairs effortlessly with both silver and gold jewelry.
How to Create This Look at Home: Start by prepping your nails with a gentle file and buffing block to create a smooth canvas—this step is crucial for sheer colors that show every imperfection. Apply a ridge-filling base coat like OPI Natural Nail Base Coat to even out the nail surface.
For the color, mix a tiny drop of lavender polish (try Essie “Lilacism”) with white or nude polish on a palette or tin foil to create your custom shade, or use a pre-made shade like Olive & June “LP” for that perfect milky lavender tone. Apply three thin coats rather than two thick ones—thin layers prevent bubbling and create that coveted translucent effect.
Wait two minutes between each coat to allow proper drying, and finish with a glossy top coat like Seche Vite for a glass-like finish that lasts up to a week.
Pro Tip: Almond or oval nail shapes make this shade look incredibly chic and elongating. If you’re shaping at home, file in one direction only (never sawing back and forth) to prevent splitting, and aim for a gentle point at the tip that mirrors your cuticle shape.
2. Glossy Deep Amethyst
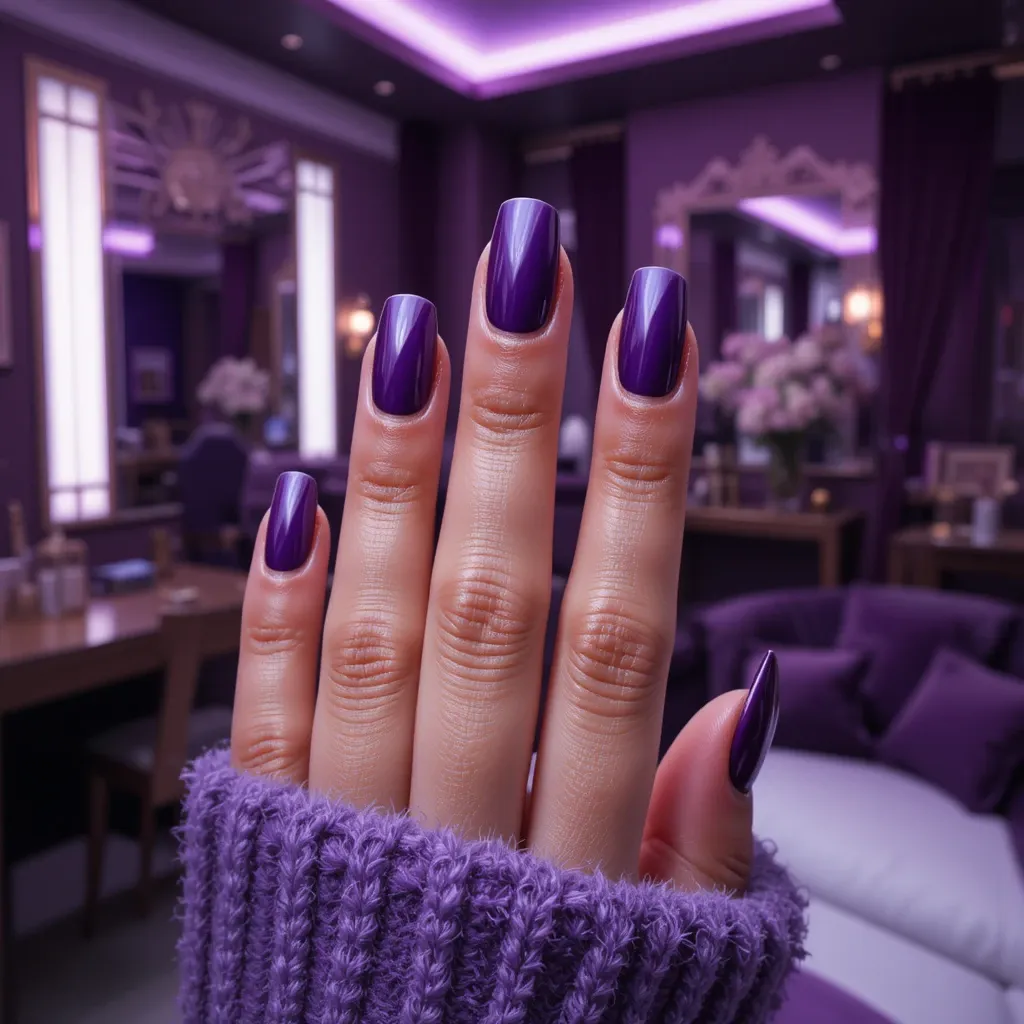
A rich, jewel-toned purple with blue undertones that captures the depth and brilliance of actual amethyst crystals when finished with a high-shine top coat. The color shifts subtly in different lighting, revealing hidden dimensions that make your nails look like wearable art. This shade makes a bold statement while still maintaining an air of sophistication and elegance.
How to Create This Look at Home: Protection is everything with deep purples, so start with a white or opaque base coat (Sally Hansen Advanced Hard as Nails works great) to prevent staining your natural nails. For the perfect deep amethyst shade, look for colors like OPI “Do You Have This Color in Stock-holm?” or Cirque Colors “Amethyst.” Apply your first coat slightly thinner than you think you need—deep colors can look streaky on the first pass, but don’t overwork them.
Let it dry completely (3-4 minutes), then apply a second coat for full opacity and depth. The secret to that professional glossy finish is in your top coat technique: apply one thick, even coat of a high-quality top coat like Essie Gel Couture Top Coat, making sure to “cap” the free edge by sweeping the brush across the tip of each nail. This sealing technique prevents chipping and can extend your manicure to 7-10 days.
Beginner-Friendly Alternative: If you’re nervous about staining or application, try a gel-effect polish system like Sally Hansen Miracle Gel, which doesn’t require UV light but gives you that extended wear and brilliant shine. The built-in top coat makes application foolproof for beginners.
Pro Tip: Apply cuticle oil or petroleum jelly around your nails before polishing—any mistakes wipe away easily with a cotton swab, making cleanup effortless. This shade looks particularly stunning on shorter, square-shaped nails for a modern, edgy vibe.
Cool-Toned Amethyst Variations
3. Icy Lilac Chrome
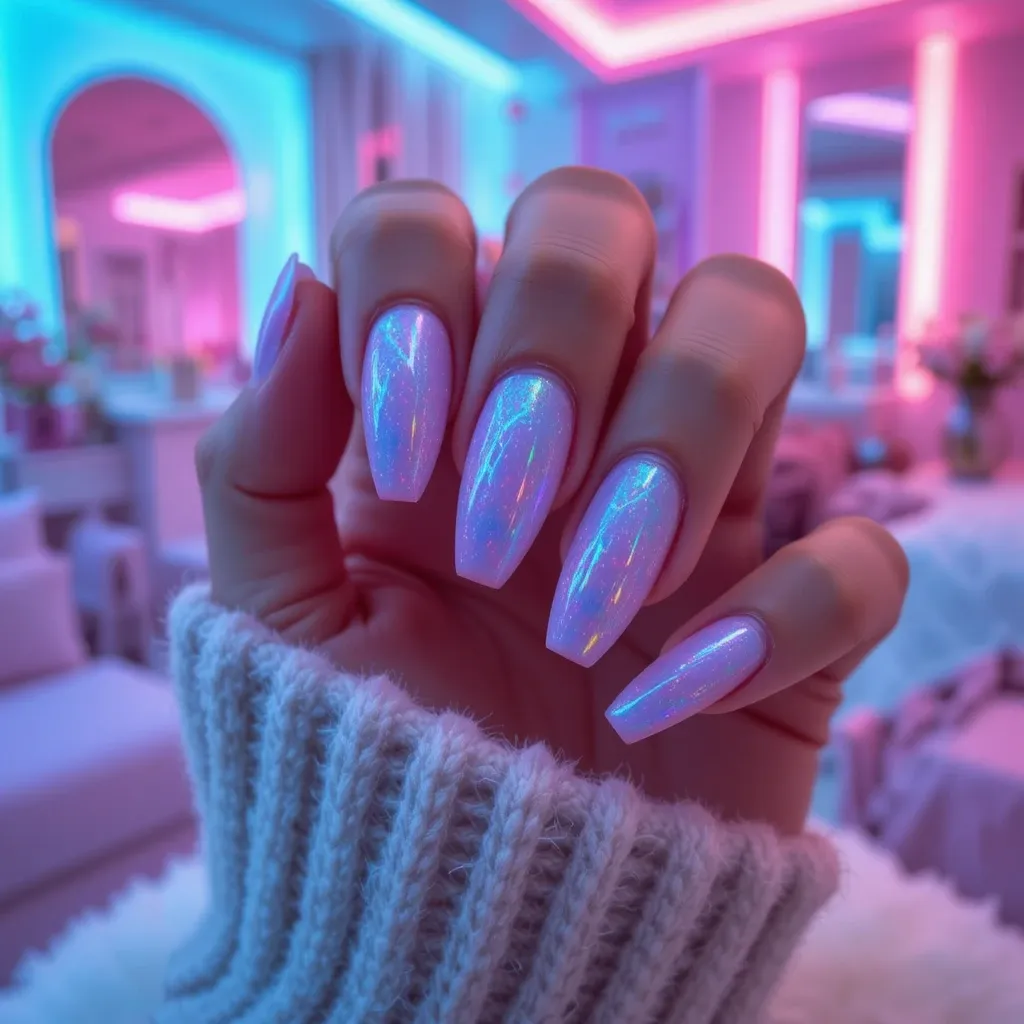
A cool-toned lilac base topped with reflective chrome powder creates an iridescent, almost holographic effect that catches the light beautifully. The metallic finish gives this soft purple shade an futuristic edge while maintaining its feminine appeal. The result is nails that literally shimmer and shift colors as you move your hands.
How to Create This Look at Home: Chrome nails seem intimidating, but they’re actually one of the easiest advanced techniques to master at home. You’ll need: a lilac gel polish (Modelones “Lilac Gray” works perfectly), chrome powder (Amazon has great affordable options like Born Pretty Chrome Powder in “Mermaid Purple”), a UV/LED lamp, gel base and top coat, and a silicone applicator or eyeshadow sponge. Here’s the process: Apply gel base coat and cure for 30 seconds.
Apply two thin coats of your lilac gel, curing 60 seconds between each coat. Apply gel top coat but DO NOT cure yet—while the top coat is still wet and tacky, use your applicator to rub the chrome powder onto the nail using circular motions until it’s fully covered and reflective.
Dust off excess powder with a soft brush. Seal with a no-wipe gel top coat (regular top coat can dull the chrome effect) and cure for 60 seconds. The entire process takes about 20 minutes and lasts 2-3 weeks.
Money-Saving Tip: A small jar of chrome powder costs $3-8 and lasts for dozens of manicures—way more cost-effective than $50+ salon chrome nails. The UV lamp is a one-time investment around $20-30 that opens up endless gel and nail art possibilities.
Pro Tip: Work in good lighting so you can see if you’ve achieved full chrome coverage. Any missed spots will show through, so take your time buffing the powder in circular motions until the entire nail surface is reflective.
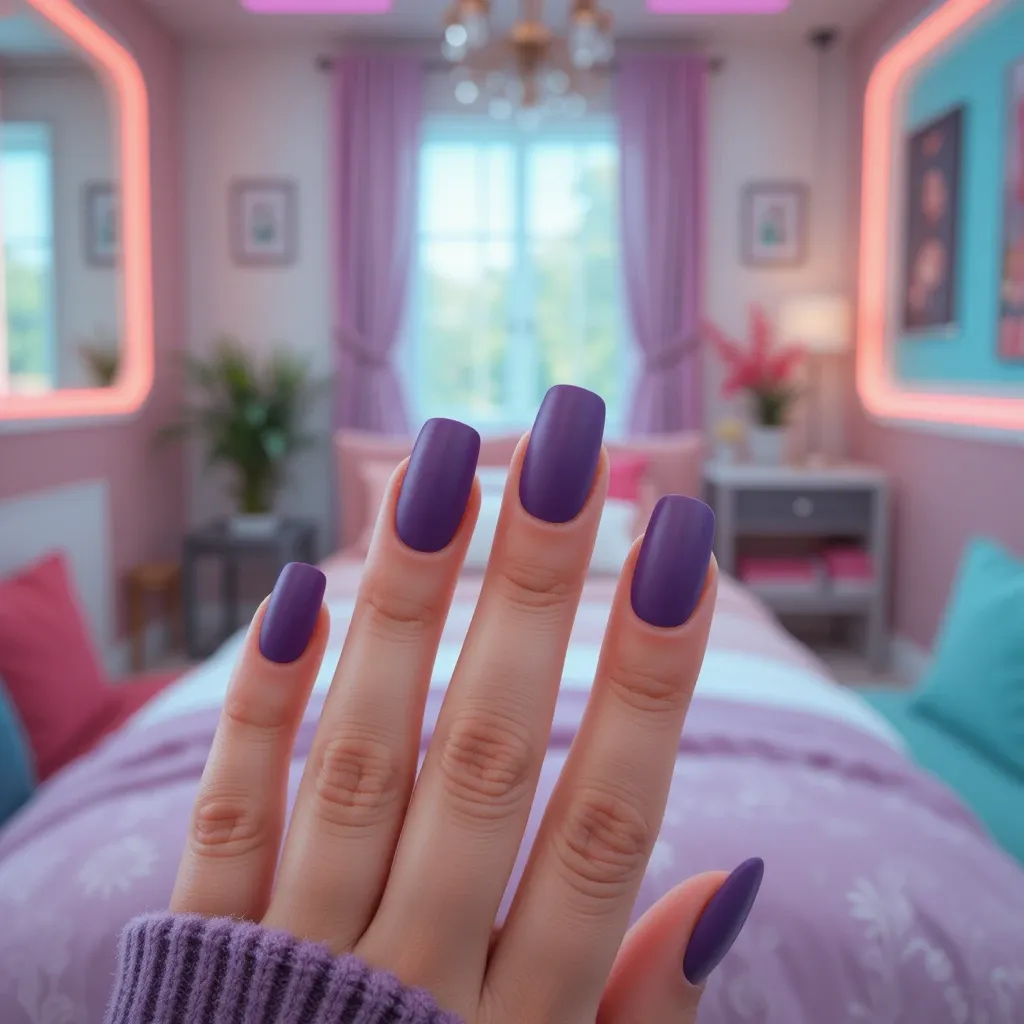
4. Matte Plum Perfection

A velvety matte finish transforms a medium-toned plum purple into something utterly sophisticated and touchably soft-looking. The lack of shine creates visual interest through texture rather than sparkle, giving your nails an almost suede-like appearance. This shade reads as both mysterious and approachable, making it perfect for transitioning from day to night.
How to Create This Look at Home: Matte nails are surprisingly simple to achieve with the right products. Start with your standard base coat, then apply two coats of a plum shade like Essie “Bahama Mama” or Zoya “Iris”—let these dry completely for 10 minutes (matte top coat emphasizes any imperfections, so proper drying prevents smudging).
Then apply a matte top coat like Essie Matte About You or OPI Matte Top Coat in one smooth, even layer. The key is to avoid going over the same area twice, as this can create glossy streaks in your matte finish. Let dry for 15 minutes before touching anything, as matte polish takes slightly longer to fully set than glossy formulas.
Troubleshooting Common Issues: If you get shiny spots on your matte nails, you likely applied hand lotion or oil too soon after polishing. Wait at least 2 hours before applying any moisturizers. If your matte finish looks uneven, you may have applied the top coat before your color was fully dry—next time, wait the full 10 minutes between your color and matte top coat.
Pro Tip: Avoid hand lotions and oils right after application, as they create shiny spots on matte finishes. Instead, focus moisturizing efforts on your cuticles only using a targeted cuticle oil pen or brush applicator.
Amethyst Accent & Mixed Designs
5. Amethyst French Tips
A modern twist on the classic French manicure featuring deep amethyst tips instead of traditional white, creating a fresh and unexpected look. The nude or sheer pink base keeps things grounded while the purple tips add that perfect pop of personality. This design works beautifully with both curved and straight tip lines, depending on your preferred aesthetic.
How to Create This Look at Home: French tips require a steady hand, but these tools make it beginner-friendly: French manicure guides or striping tape (available at any drugstore for $2-5), a nude base polish like OPI “Bubble Bath,” and your amethyst tip color like Essie “Kimono-Over.” Here’s the foolproof method: Apply base coat and let dry.
Apply two coats of your nude base color to all nails and allow to dry completely (5 minutes). Apply your French tip guides about 2-3mm from your nail tips, pressing firmly so polish doesn’t seep underneath. Paint the tips with your amethyst color in smooth, even strokes—it’s okay if it’s not perfect since the guide creates your clean line.
Immediately remove the guides while polish is still wet (waiting until it dries can pull off polish). If you got any polish on the nude section, dip a small brush in polish remover and carefully clean up the line. Finish with top coat over the entire nail, making sure to seal the edge where both colors meet.
No-Guide Alternative: For a more organic, hand-painted look that’s actually easier for beginners, skip the guides entirely and freehand a slightly imperfect line using a thin detail brush. This “artistic French” look is very on-trend and mistakes just add to the handmade charm.
Product Recommendations for Beginners: Sally Hansen French Manicure Pen ($7) lets you draw on the tips for foolproof application, or try Olive & June’s The Poppy system which includes guides and perfectly sized bottles for easy handling.
Pro Tip: Oval nails show off this design particularly well and are easier to paint than square tips for beginners. When shaping, create a gentle curve that follows your cuticle line for the most flattering proportions.
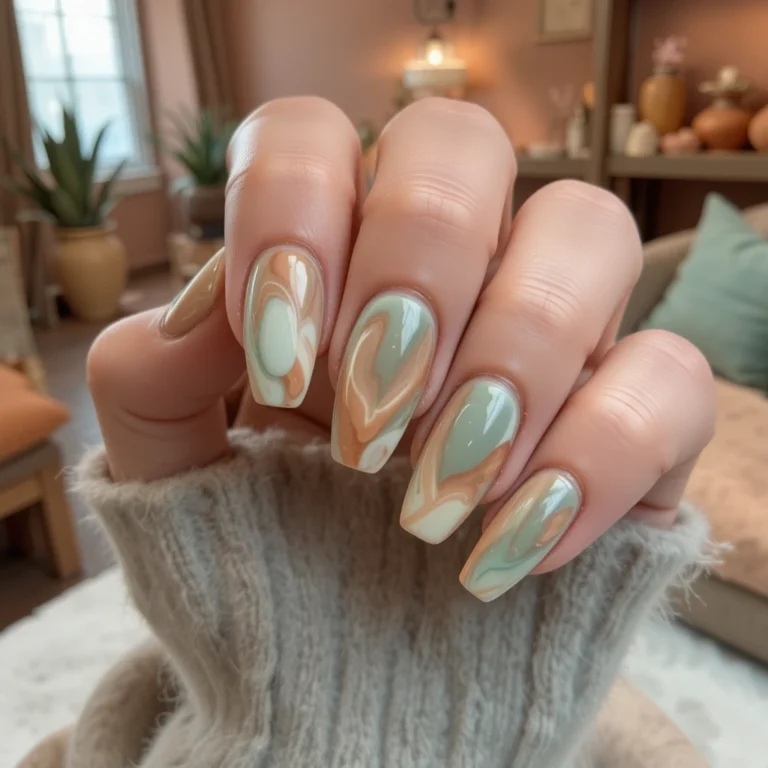
6. Amethyst Ombré Fade
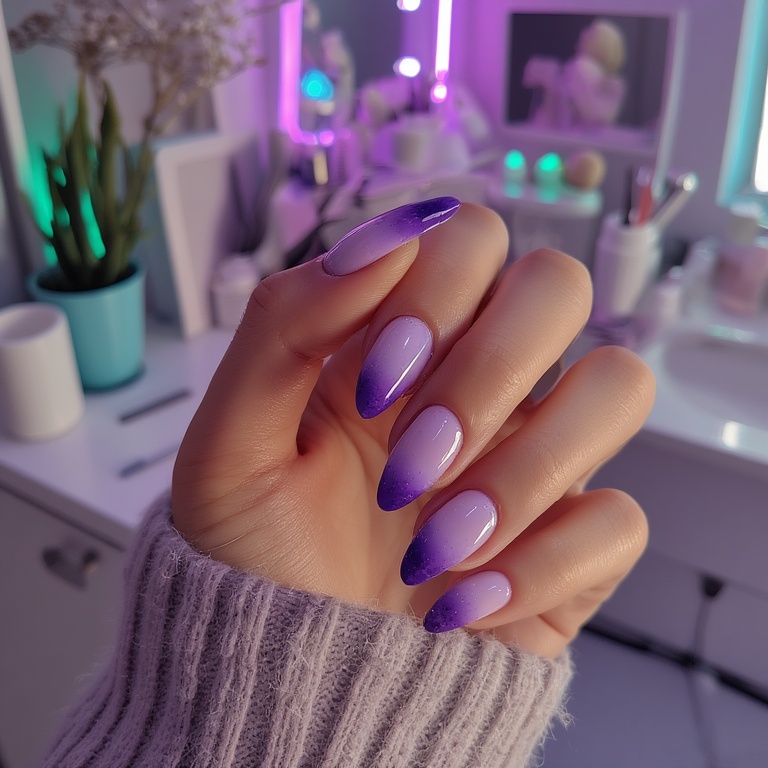
A gradient transition from soft lilac at the cuticle to deep purple at the tips creates a dimensional, multifaceted look that mimics actual amethyst geodes. The seamless color fade requires skillful blending but results in nails that look like miniature works of art. Each nail becomes a unique purple spectrum that catches attention without relying on rhinestones or complicated nail art.
How to Create This Look at Home: Ombré seems complex but this sponge technique makes it achievable in 30 minutes. Gather these supplies: a light lilac polish (Essie “Virgin Snow”), a deep purple (OPI “Lincoln Park After Dark”), a small makeup sponge cut into nail-sized pieces, a small palette or piece of tin foil, and liquid latex or tape for easy cleanup.
The process: Apply base coat and one coat of your lightest color as a base, let dry. On your palette, paint a stripe of light purple, then dark purple right next to it, slightly overlapping in the middle. Gently tap your sponge onto the colors to pick them up. Dab the sponge onto your nail in a bouncing motion (not wiping) starting from the cuticle and working toward the tip—the overlapping polish on the sponge creates the gradient.
Repeat 2-3 times, letting it dry slightly between layers to build opacity. The first application will look sheer and blotchy—this is normal! Each layer adds depth and smooths the transition. Finish with 2 coats of glossy top coat to smooth the texture created by the sponge and add brilliant shine.
Time-Saving Hack: Paint liquid latex (available on Amazon for $6) or Elmer’s school glue around your nails before starting—when you’re done, it peels right off with all the excess polish, eliminating cleanup time entirely.
Common Mistakes to Avoid: Don’t wipe the sponge across your nail—this creates streaks instead of a gradient. Always use a gentle dabbing/bouncing motion. Also, use a fresh section of sponge for each nail to prevent muddy colors from mixing too much.
Pro Tip: This technique works best with gel polish if you have a UV lamp—you can cure between layers for more control and the finish is smoother. For regular polish, patience is key: wait 2-3 minutes between sponging layers.
Bold & Statement Amethyst
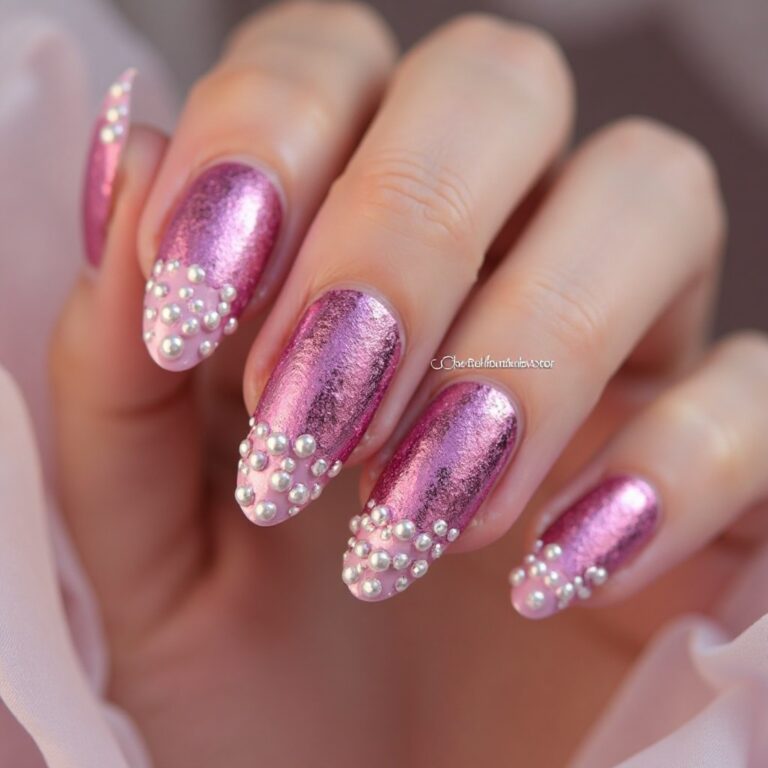
7. Amethyst with Gold Foil Accents
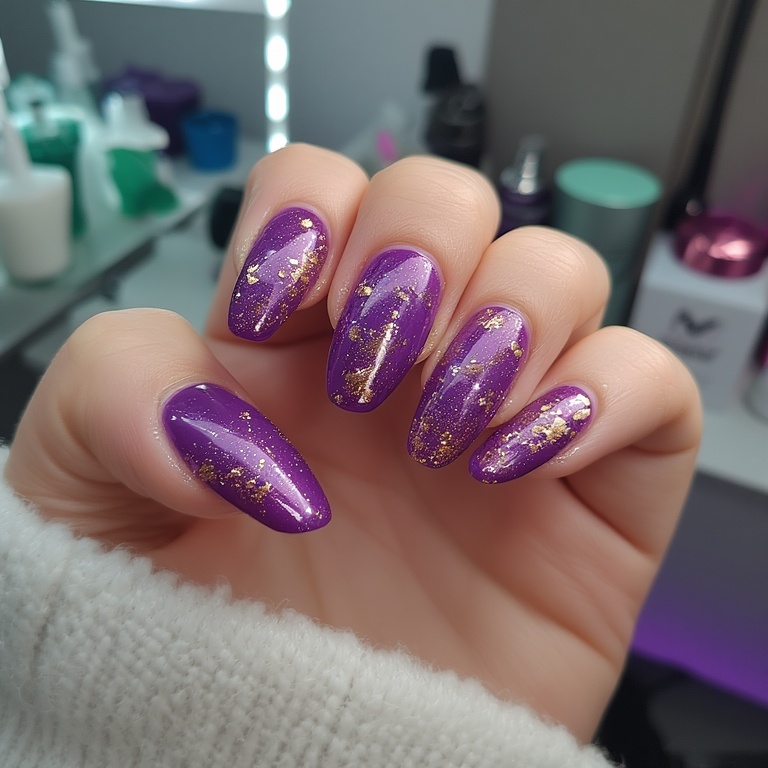
Deep amethyst base color adorned with delicate gold foil flakes or accent stripes creates a luxurious, almost regal appearance. The warm gold contrasts beautifully with cool purple tones, creating visual drama while maintaining sophistication. This combination feels special and celebratory without requiring complex nail art skills or excessive embellishments.
How to Create This Look at Home: Foil nails look expensive but are actually one of the easiest nail art techniques for beginners. You’ll need: deep amethyst polish (Zoya “Mira” is perfect), gold foil sheets or flakes (these are dirt cheap on Amazon—$5 gets you enough for 50+ manicures), foil glue or clear gel polish if using gel, and tweezers for placement.
For the simple version: Apply base coat and two coats of your amethyst color, allowing to dry completely. Apply a thin layer of foil glue (like Nailene Nail Art Glue) to one or two accent nails or to just the tips/base of all nails—let it dry until it’s tacky but not wet, about 30 seconds.
Press pieces of gold foil onto the tacky glue using tweezers, gently smoothing with your finger. The foil will stick to the glue and release from its backing. Continue placing small pieces until you’ve achieved your desired pattern—random flakes look modern, while straight strips look more elegant. Seal everything with two coats of top coat to smooth the foil and prevent it from peeling off.
Gel Method for Longer Wear: If you’re using gel, apply your amethyst gel color and cure. Apply a thin layer of no-wipe top coat to the areas where you want foil (don’t cure). Immediately press gold foil onto the wet top coat. Cure for 60 seconds. The foil will be permanently encased—no separate glue needed. Finish with another layer of top coat over everything and cure.
Design Ideas for Beginners: Start simple: try gold foil on just your ring finger as an accent nail, or create a thin gold stripe along the base of all nails for an elegant French-style look in reverse. As you gain confidence, experiment with random flake placement or geometric patterns.
Pro Tip: Less is more with foil—a few strategic pieces create elegance, while too much can look messy. Apply foil to one or two accent nails only for the most balanced, professional-looking result.
Essential Tools & Products for At-Home Amethyst Nails
Your Starter Kit (Under $50 Total): Building your at-home nail kit doesn’t require breaking the bank. Start with these essentials: a good base coat (OPI Natural Nail Base Coat, $10), a quality top coat (Seche Vite, $5), 2-3 amethyst shades in different tones (Essie or Sally Hansen, $4-9 each), a nail file and buffer (any drugstore brand, $3-5), cuticle oil (CND Solar Oil, $8), and cotton pads plus acetone-free remover (Cutex, $4).
This basic kit covers 90% of the looks in this guide and will last for dozens of manicures. As you expand your skills, add specialty items like chrome powder, foil sheets, or French tip guides—but master the basics first before investing in advanced products.
When to Invest in Gel: If you do your nails weekly and struggle with chips, a gel system pays for itself in 2-3 months. The Beetles Gel Nail Polish Kit on Amazon (around $30) includes a UV lamp, base coat, top coat, and several colors. Gel manicures last 2-3 weeks with zero chipping, making them ideal for busy lifestyles. The learning curve is slightly steeper than regular polish, but online tutorials make it totally manageable for beginners.
Product Quality Matters: The difference between a $3 polish and an $9 polish is real—quality brands have better pigmentation (meaning fewer coats needed), smoother application, and longer wear time. Essie, OPI, Zoya, and Sally Hansen are drugstore-available brands that perform nearly as well as salon professional lines. Skip the $1 bargain bin polishes—they’re streaky, require 4+ coats, and chip within 24 hours, ultimately wasting more product and time.
Current Amethyst Nail Trends to Know
Gemstone-Inspired Finishes Are Everywhere The beauty world has fully embraced crystal and gemstone aesthetics, with amethyst leading the charge as one of the most wearable jewel tones. Nail artists are creating finishes that mimic the actual texture and dimension of real gemstones through layering techniques and specialty top coats. You can recreate this at home by layering sheer glitter polishes over solid amethyst bases or using texture powders mixed into clear polish.
Cool-Toned Purples Over Warm There’s been a distinct shift toward cooler, blue-based purples rather than warmer, red-based versions, making amethyst shades particularly on-trend. These cooler tones photograph better and tend to complement a wider range of skin tones and wardrobe colors. When shopping for polish, look for shades described as “blue-based purple,” “violet,” or “lilac” rather than “plum” or “berry” which read warmer.
Minimalist Application of Bold Colors Rather than going full-throttle with intense color, many nail enthusiasts are embracing amethyst through French tips, accent nails, or negative space designs. This approach lets you enjoy bold color in a more wearable, everyday-appropriate way that doesn’t overwhelm your look. It’s perfect for testing whether purple is “your” color without committing to ten fully purple nails.
Texture Mixing on One Hand Combining matte and glossy finishes on different nails creates visual interest without requiring complicated nail art designs or extensive artistic skills. Try painting all nails in glossy deep amethyst except your ring fingers, which you finish with matte top coat for instant dimension. This trend adds sophistication and keeps simple color manicures from feeling boring or one-dimensional.
Sheer Purple Overlays Rather than opaque amethyst shades, many people are layering sheer purple tints over nude bases for a softer, more natural look. Achieve this by mixing one drop of purple polish with two drops of clear top coat on a palette, or by applying one thin coat of a sheer purple polish. This creates a “your nails but better” effect that’s sophisticated and understated while still embracing the amethyst trend.
Metallic and Chrome Finishes Purple chrome and metallic finishes have exploded in popularity, turning classic amethyst shades into futuristic, eye-catching statements that photograph beautifully. The good news: chrome powder kits are now widely available for under $10, making this once-salon-only trend completely accessible for home use. The reflective quality means your nails literally change appearance as you move, creating endless visual interest without complicated nail art.
How to Choose the Right Amethyst Nail Shade
Consider Your Skin’s Undertones Cool-toned skin (pink or blue undertones) looks stunning with true amethyst and blue-based purples that enhance natural coloring without clashing. Warm-toned skin (yellow or golden undertones) should lean toward plum shades with slight red undertones for the most flattering effect.
To determine your undertones at home, look at the veins on your wrist: blue/purple veins indicate cool undertones, green veins indicate warm, and if you can’t tell, you’re likely neutral and can wear any shade beautifully.
Think About Your Nail Length Shorter nails look best with lighter amethyst shades or deep colors in matte finishes, which create the illusion of length without overwhelming small nail beds. Medium-length nails (extending 2-4mm past your fingertip) can handle any amethyst variation and are perfect for showcasing ombré or accent designs that need space to shine. Longer nails are ideal for dramatic amethyst shades and complex designs like chrome finishes or detailed foil patterns where you have more canvas to work with.
Match Your Lifestyle and Daily Activities High-shine glossy amethyst requires more maintenance and shows wear more quickly than matte or satin finishes, so consider your schedule before committing. If you work with your hands frequently (typing, cleaning, cooking), deeper amethyst shades hide chips better than lighter lavender tones that show every imperfection. Gel polish is worth the investment if you’re hard on your nails, as it withstands two weeks of heavy use without chipping.
Coordinate with Your Wardrobe Amethyst nails pair beautifully with neutrals (black, white, gray, navy) and create stunning contrasts that make both your outfit and nails pop. They also work surprisingly well with jewel tones like emerald green, sapphire blue, and ruby red for bold, saturated color combinations. Before committing to a shade, hold the polish bottle near your most-worn clothing items—if it creates a visual clash, choose a different purple tone.
Factor in the Season and Occasion Lighter lavender and icy amethyst shades feel fresh for spring and summer weddings and events, while deep plum and royal purple suit fall and winter perfectly. Special occasions call for dramatic, high-shine amethyst with metallic accents, while everyday wear benefits from more subtle variations that won’t feel overdone at the grocery store or school pickup.
Nail Maintenance & Longevity Tips for Amethyst Shades
Prevent Staining with Quality Base Coat Deep purple pigments can stain natural nails if applied directly without protection, leaving yellow or purple tints that take weeks to grow out. Always apply at least one coat of quality base coat—specifically look for ones labeled “stain-blocking” like CND Stickey Base Coat or Orly Bonder. For the darkest shades, apply two thin coats of base coat or use a white base coat underneath for maximum staining protection.
Protect Your Color from Fading Purple pigments are particularly susceptible to UV light damage, which can cause your beautiful amethyst shade to fade or turn muddy within days of application. Combat this by applying a UV-protective top coat like Essie Good to Go or by reapplying your regular top coat every 2-3 days to refresh the protective layer. When spending extended time in sun (beach days, outdoor events), consider wearing sunscreen on your hands or fingerless gloves to preserve your manicure’s vibrancy.
Maintain Cuticle Health for Professional Results Dry, ragged cuticles draw attention away from your gorgeous amethyst nails and make even perfect polish look unkempt and neglected. Apply cuticle oil daily—the best time is before bed when it can soak in overnight without being washed off. Try keeping a cuticle pen (Burt’s Bees makes an affordable one for $6) in your purse or nightstand to make this habit effortless. This simple routine also promotes stronger natural nail growth and prevents painful hangnails that ruin your manicure’s overall appearance.
Know When to Refresh Gel amethyst manicures typically last 2-3 weeks before requiring fills or removal, while regular polish needs refreshing every 5-7 days for optimal appearance. Watch for significant tip wear (where the color has worn off the edge), lifting at the cuticles (creating a gap), or obvious growth gaps that make your manicure look dated. It’s better to refresh slightly early than to walk around with obviously worn nails that detract from your polished appearance.
Handle Chips Strategically to Extend Wear Small chips in amethyst polish can often be concealed with careful touch-ups if you’ve saved the original bottle—apply a tiny amount just to the chip, let dry, then apply top coat over the entire nail to blend.
For more significant damage to one or two nails, convert to an accent nail design by removing polish from just the damaged nails and applying a complementary nude, silver, or gold shade. This extends your manicure’s life by 3-4 days without requiring a complete redo and actually creates an intentional-looking design.
Choose the Right Removal Method Never peel or pick at any polish (especially gel), as this removes layers of your natural nail and creates lasting damage that takes 3-4 months to fully grow out. For gel polish, soak cotton pads in acetone, place on each nail, wrap with aluminum foil, and wait 10-15 minutes before gently pushing off softened gel with a cuticle pusher or orange stick—no scraping required.
For regular polish, acetone-free removers are gentler on nails and cuticles, though pure acetone works faster for dark colors—mitigate drying by immediately applying cuticle oil after removal.
Troubleshooting Common Amethyst Nail Problems
Streaky Application Purple polishes, especially deeper shades, often appear streaky on the first coat. Solution: Accept that your first coat will look imperfect—apply it thin and even, let it dry completely (3-4 minutes), then apply a second thin coat. Most formulas need 2-3 coats for full opacity, and each layer builds on the last. Applying thick coats to compensate just creates bubbling and extends drying time.
Bubbles in Polish Those annoying tiny bubbles usually come from shaking your polish bottle before use. Solution: Roll the bottle between your palms instead of shaking to mix settled pigments. Also ensure you’re applying thin coats—thick polish traps air as it dries. If you’ve already applied bubbled polish, let it dry completely, gently buff the surface with a fine-grit buffer, and apply a fresh coat over top.
Quick Chipping at Tips If your amethyst nails chip at the tips within 24 hours, you’re likely not sealing the free edge properly. Solution: When applying each coat (base, color, and top), swipe your brush across the very tip of your nail after painting the top surface—this “caps” the edge and creates a protective seal. This one technique can double your manicure’s lifespan from 3 days to 6-7 days.
Polish Won’t Dry Purple pigments, especially in cheap formulas, can take forever to dry. Solution: Apply thinner coats and wait 2-3 minutes between layers. Use a quick-dry top coat like Seche Vite or spray drying drops (Sally Hansen Insta-Dri Spray, $6) immediately after finishing. Avoid running hands under cold water (an internet myth that doesn’t actually help)—instead, wait patiently for 15-20 minutes before touching anything.
Time to Try Your New Favorite Amethyst Look
You now have everything you need to create stunning amethyst nails at home—from the basic glossy looks that take 15 minutes to the advanced chrome and ombré designs that’ll have everyone asking where you got your nails done. Start with the techniques that match your current skill level, and don’t be afraid to experiment as you gain confidence.
Save this guide for reference before your next manicure, screenshot the specific looks you want to try, and remember that practice makes perfect—even professional nail techs had to start somewhere. Share this article with friends who are ready to level up their at-home nail game, and enjoy showing off your gorgeous amethyst nails!