15 Pastel Green Nails That Look So Elegant
Pastel green nails are having a major moment this spring, and it’s easy to see why. This soft, refreshing hue brings an instant dose of sophistication and vitality—perfect for the season of renewal.
Whether you’re drawn to minimalist mint or bold sage statements, pastel green offers incredible versatility while maintaining that effortlessly chic vibe we all crave.
Minimalist & Soft Pastel Green
1. Milky Mint Glaze
A sheer, milky pastel green with a glossy finish that creates a “your nails but better” effect. The translucent wash of color feels incredibly fresh and modern, like morning dew on spring leaves. This barely-there green works beautifully on short to medium almond or oval nails for a polished, natural look.
Why It Works for Spring: The sheer formula captures spring’s delicate energy while remaining office-appropriate and versatile enough for any outfit or occasion.
Pro Tip: Apply 2-3 thin coats for buildable opacity, and finish with a glass-like top coat to enhance that glazed donut effect.
How to Create This Look:
- Prep your nails: File to your desired shape, push back cuticles gently with a cuticle pusher
- Apply thin base coat: Let dry completely (2-3 minutes)
- First color coat: Apply ultra-thin layer of sheer pastel green, starting from the middle and pushing toward cuticle, then sides
- Wait 3 minutes between coats—this prevents bubbling
- Second and third coats: Build opacity gradually with thin layers
- Top coat: Apply thick, glossy top coat, capping the free edge
Product Recommendations:
- Budget: Essie “Mint Candy Apple” ($9) + Essie Gel Couture Top Coat ($10)
- Mid-Range: OPI “This Cost Me a Mint” ($11) + Seche Vite Top Coat ($10)
- Splurge: Olive & June “SM” sheer mint ($8) + their Super Glossy Top Coat ($8)
Common Mistakes to Avoid:
- Thick first coat (causes bubbling and uneven color)
- Skipping base coat (nails stain yellow-green)
- Not capping the tip (causes early chipping)
Beginner Hack: If you mess up, dip a small brush in acetone and clean up around cuticles before the polish dries completely.
2. Pistachio French Tips
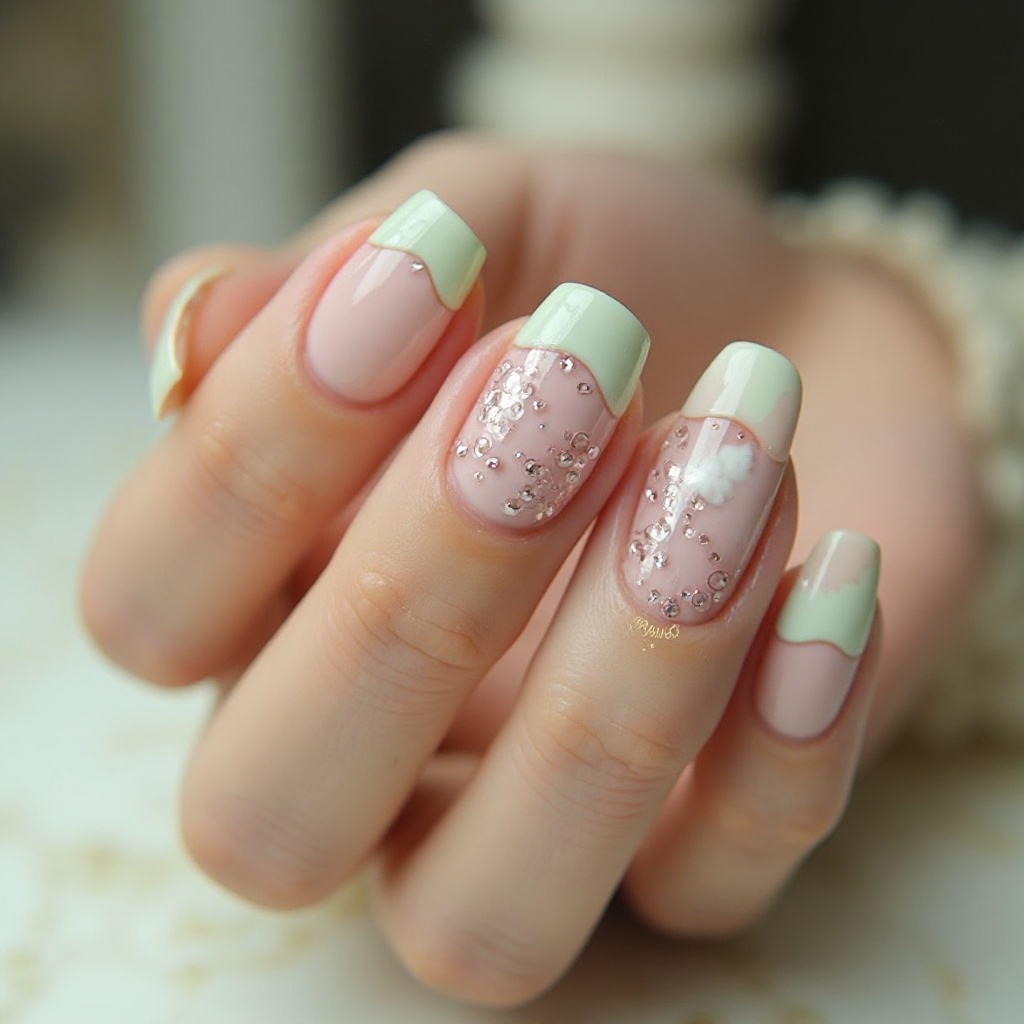
Classic French manicure reimagined with soft pistachio green tips instead of traditional white. The pale green creates a subtle twist on the timeless design, offering freshness without being too bold. It’s sophisticated enough for professional settings yet playful enough for weekend brunch dates.
Why It Works for Spring: French tips already elongate fingers, and the pastel green adds seasonal relevance while maintaining the clean, elegant aesthetic that makes French manis universally flattering.
Pro Tip: Use a striping brush for precise application, or try smile line guides for perfectly even tips—keep the green line thin for a modern, minimalist look.
Step-by-Step Instructions:
- Base preparation: Apply sheer pink or nude base on all nails (2 coats)
- Let dry completely: Wait 5-7 minutes
- Guide placement: Apply French tip guides 2-3mm from your nail tip (or go freehand if experienced)
- Tip application: Using a small brush, paint thin pistachio green line along the tip
- Remove guides carefully: While polish is slightly wet
- Clean up edges: Use cleanup brush dipped in acetone for crisp lines
- Seal: Apply top coat over entire nail
What You Need:
- Nude or sheer pink base polish
- Pistachio green polish (Essie “Going Guru” or OPI “How Does Your Zen Garden Grow”)
- French tip guides OR steady hand + detail brush
- Fine detail brush for cleanup
Make It Easier:
- Use French tip sticker guides ($3-5 on Amazon)
- Practice on one hand first
- Paint your dominant hand second when you’re more confident
Professional Alternative: If freehand feels impossible, try French tip press-ons in green ($8-12) and customize the length by filing.
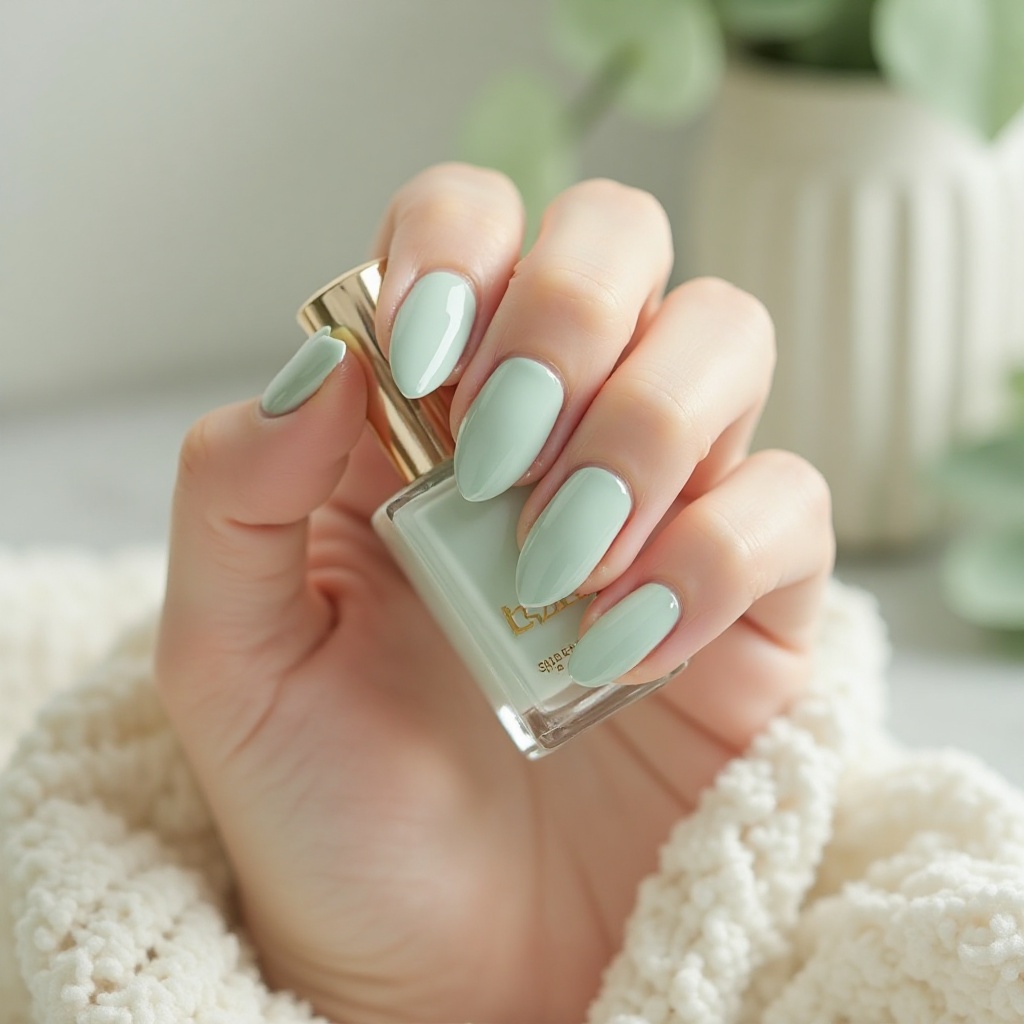
3. Matte Seafoam Nude
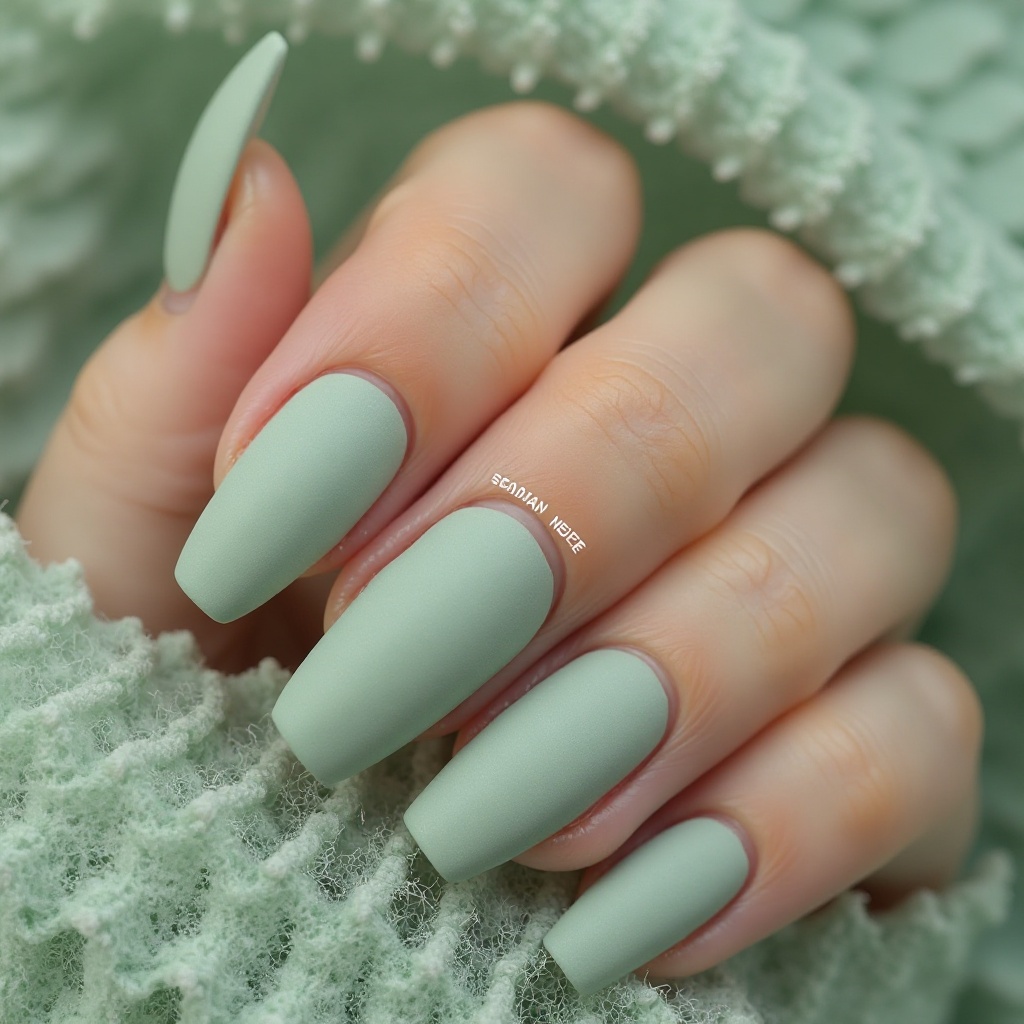
A muted seafoam green with nude undertones and a velvety matte finish that feels both earthy and elegant. This dusty pastel shade leans slightly gray-green, creating a sophisticated neutral that’s far more interesting than beige. The matte texture adds depth and makes the color appear softer and more wearable for everyday styling.
Why It Works for Spring: Matte finishes are trending this season, and this particular shade bridges the gap between neutral and colorful—perfect for transitioning your spring wardrobe.
Pro Tip: Apply a matte top coat over glossy polish for a smoother, longer-lasting finish, and use cuticle oil daily to prevent the matte surface from looking dry.
Complete Tutorial:
- Standard prep: Base coat + 2 coats muted seafoam green
- Wait 5 minutes for polish to fully dry
- Apply matte top coat: Use a different brush if possible to avoid contaminating your glossy top coat bottle
- Single stroke method: One smooth stroke per section—going back over matte creates streaks
- Let cure: 10 minutes untouched
Product Picks:
- Matte Polish Option: China Glaze “Refresh-Mint” ($7)
- Matte Top Coat: Essie Matte About You ($10) or Sally Hansen Big Matte Top Coat ($5)
Critical Matte Finish Tips:
- Don’t touch nails for at least 10 minutes after matte top coat (shows fingerprints easily)
- Apply cuticle oil around nails only, not on polish surface
- Matte shows imperfections—make sure your base coats are perfectly smooth
- Reapply matte top coat every 3-4 days to maintain finish
Longevity Hack: Matte polish lasts 4-6 days typically. When it starts looking worn, switch back to glossy top coat for a completely different look.
Cool-Toned Pastel Greens
4. Icy Mint Chrome
A cool-toned mint green with metallic chrome powder that shifts and reflects light like liquid mercury. The icy undertones make this shade feel futuristic and editorial, while the mirror-like finish adds instant drama. This look works beautifully on longer coffin or stiletto nails where the chrome can really shine.
Why It Works for Spring: Chrome finishes are dominating spring runways, and the cool mint tone feels refreshing without being juvenile—it’s grown-up pastel at its finest.
Pro Tip: Apply chrome powder over a no-wipe gel top coat for the smoothest application, buffing gently in circular motions until you achieve that perfect mirror shine.
Detailed Chrome Application Process:
What You Actually Need:
- Gel base coat
- Icy mint gel polish (2 bottles recommended for coverage)
- No-wipe gel top coat (CRITICAL—regular gel won’t work)
- Chrome powder in silver/mirror finish ($8-15 on Amazon)
- Silicone brush or eyeshadow applicator for buffing
- UV/LED nail lamp (48W minimum)
- Gel top coat (regular, for final seal)
The Process:
- Prep and base: Apply gel base coat, cure 30 seconds
- Color: 2-3 thin coats of mint gel polish, curing 60 seconds between each
- No-wipe top coat: This is where chrome adheres—cure 60 seconds
- Chrome application: Immediately after curing, use silicone brush to buff chrome powder onto nail in circular motions
- Buffing technique: Apply firm pressure—you’ll see the mirror effect develop
- Dust off excess: Use a fluffy brush to remove extra powder
- Seal: Apply thin layer of regular gel top coat (NOT no-wipe), cure 60 seconds
- Second seal coat: For longevity, apply another top coat layer, cure
Honest Reality Check:
- This takes practice—your first attempt won’t be perfect
- Chrome powder gets everywhere (do this over a paper towel)
- You MUST use gel polish for this (regular polish won’t work)
- Costs more upfront but lasts 2+ weeks
Budget-Friendly Alternative: Chrome press-on nails ($10-15) give you the same look without gel equipment.
5. Sage Green Jelly
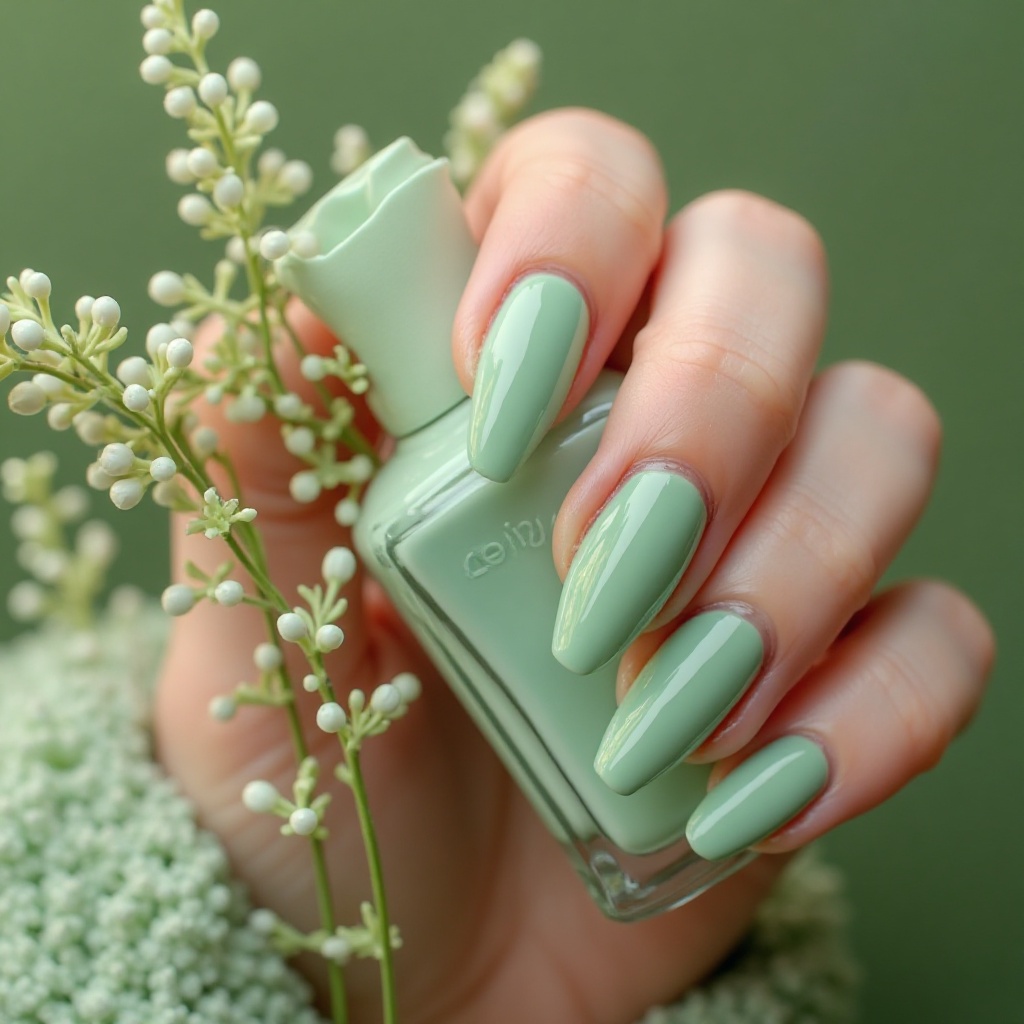
A translucent sage green with a jelly-like, squishy finish that creates beautiful depth when layered. The slightly gray-green tone feels herbaceous and natural, reminiscent of fresh garden herbs. Multiple coats build intensity while maintaining that gorgeous see-through quality that’s so Instagram-worthy.
Why It Works for Spring: Jelly finishes are having a renaissance, and sage green is the color of spring 2025—this combines both trends in one elegant package.
Pro Tip: Layer 3-4 coats for maximum depth and dimension, and consider adding pressed flowers or gold leaf between layers for a unique encapsulated design.
Creating the Perfect Jelly Effect:
- Start with clean, natural nails: The translucency means your nail bed shows through—make sure nails look healthy
- Skip base coat OR use clear base: Colored base coats ruin the jelly effect
- First coat: Very thin, almost sheer layer—don’t panic, it should look transparent
- Build slowly: Apply coats 3-4 minutes apart, letting each fully dry
- Coat 2, 3, and 4: Each adds depth without losing transparency
- Top coat: Thick glossy layer enhances the “squishy” jelly look
Best Jelly Polishes:
- Essie “Going Guru” (sage-ish jelly)
- ILNP jelly polishes (indie brand, $10-12)
- Cirque Colors “Eucalyptus” ($13)
Advanced Jelly Technique (Encapsulation):
- Apply 2 coats jelly polish
- While coat 2 is slightly wet, place pressed flowers or gold leaf
- Apply coat 3 over the design to “encapsulate”
- Final coat 4 seals everything
- Thick glossy top coat
Why This Is Worth The Wait: Jelly nails photograph beautifully and look expensive despite simple technique.
6. Mint Gradient Ombré
A seamless gradient that transitions from white at the cuticle to saturated pastel mint at the tips. The soft fade creates visual interest without requiring intricate nail art skills, and the color shift elongates fingers beautifully. This design works on any nail length but truly shines on medium to long lengths.
Why It Works for Spring: Ombré designs feel inherently fresh and modern, and the mint-to-white fade captures the essence of spring mornings and new beginnings.
Pro Tip: Use a makeup sponge to dab on the gradient, working quickly before the polish dries, and clean up edges with a small brush dipped in acetone.
Foolproof Ombré Method:
Supplies Needed:
- White polish
- Pastel mint polish
- Makeup sponge (cut into nail-width pieces)
- Small paper plate or aluminum foil
- Cleanup brush + acetone
- Liquid latex or petroleum jelly (for easier cleanup)
Step-by-Step:
- Protect your skin: Apply liquid latex or petroleum jelly around nails (this makes cleanup SO much easier)
- Base coat: Apply and let dry
- White base: Paint entire nail white (2 coats), let dry 5 minutes
- Create gradient on sponge: On your paper plate, paint a stripe of white, then mint, slightly overlapping
- Dab technique: Gently bounce sponge onto nail in a dabbing motion (don’t drag)
- Repeat: Dab 3-5 times per nail, letting sponge reload with fresh polish between nails
- Blend: The repeated dabbing creates the gradient
- Cleanup: Peel off liquid latex OR use cleanup brush with acetone around cuticles and sides
- Top coat: Thick glossy layer smooths the texture from sponging
Troubleshooting:
- Gradient too harsh? Use more overlapping polish on the sponge
- Sponge texture showing? Apply 2 coats of top coat to smooth
- Colors not blending? Work faster before polish dries on sponge
Time-Saving Hack: Do one hand completely before starting the second—rushing leads to mistakes.
Elegant Accent & Metallic Details
7. Pastel Green with Gold Foil Accent
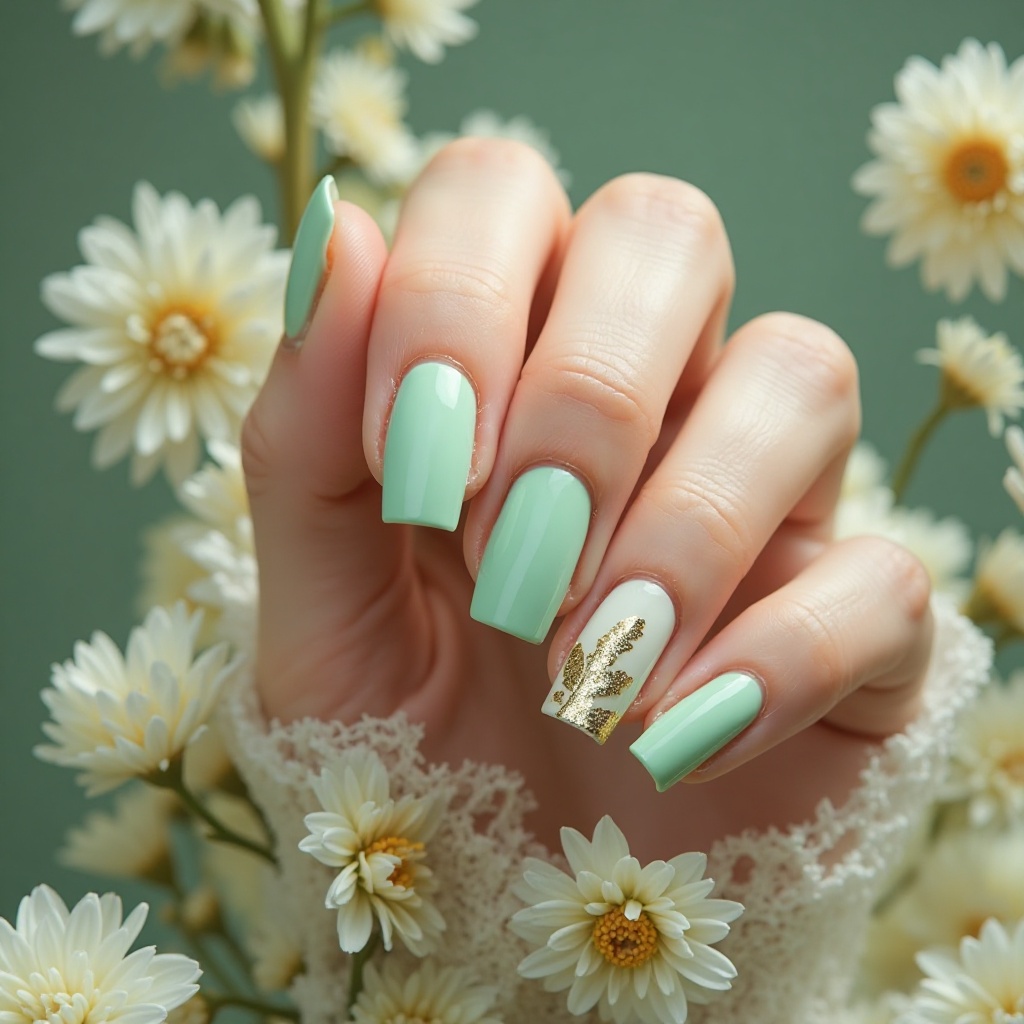
Soft pastel green base on all nails with delicate gold leaf foil applied to one or two accent nails. The metallic gold creates luxurious contrast against the muted green, adding just enough sparkle without overwhelming the look. The irregular foil patterns ensure each manicure is unique and organic-looking.
Why It Works for Spring: Gold and green are a classically elegant combination, and the foil adds texture and dimension that photographs beautifully for social media.
Pro Tip: Apply foil over tacky gel polish or foil adhesive, press firmly, then seal with top coat—use irregular torn pieces rather than full coverage for a more artistic effect.
Two Methods: Regular Polish vs. Gel
METHOD 1: Regular Polish (Easier)
What You Need:
- Pastel green polish
- Foil adhesive (nail glue works too)
- Gold leaf sheets or transfer foil
- Top coat
Steps:
- Paint all nails pastel green (2 coats), let dry completely
- On accent nails only: apply thin layer of foil adhesive
- Wait until adhesive turns clear/tacky (2-3 minutes)
- Tear small irregular pieces of gold foil
- Press foil firmly onto tacky adhesive (gold side up)
- Peel away backing gently
- Seal immediately with top coat
METHOD 2: Gel Polish (Longer-Lasting)
- Gel base coat, cure
- 2 coats pastel green gel, cure after each
- No-wipe gel top coat on accent nails only, cure
- Immediately press foil onto still-warm nail
- Seal with regular gel top coat, cure
Foil Application Secrets:
- Less is more—partial coverage looks more expensive
- Don’t try to fix mistakes—embrace the irregular pattern
- Press firmly with a finger, not a tool (warmth helps adhesion)
- Seal quickly before foil lifts
Product Recommendations:
- Gold leaf sheets: Amazon 10-pack ($6-8)
- Foil adhesive: Modelones ($7)
- Transfer foil: Beetles 12-color set ($9)
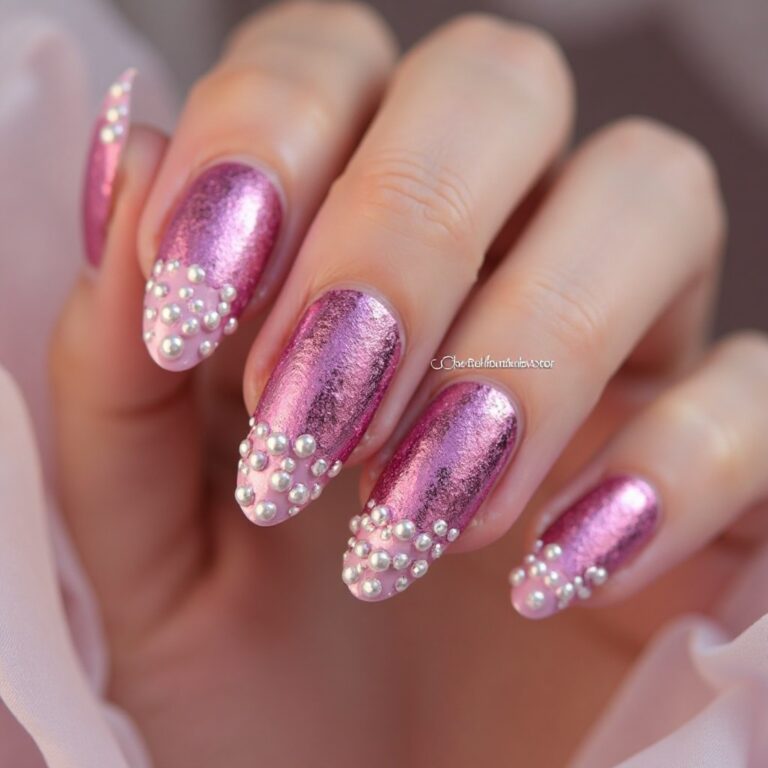
8. Mint with Pearl Accent Nail
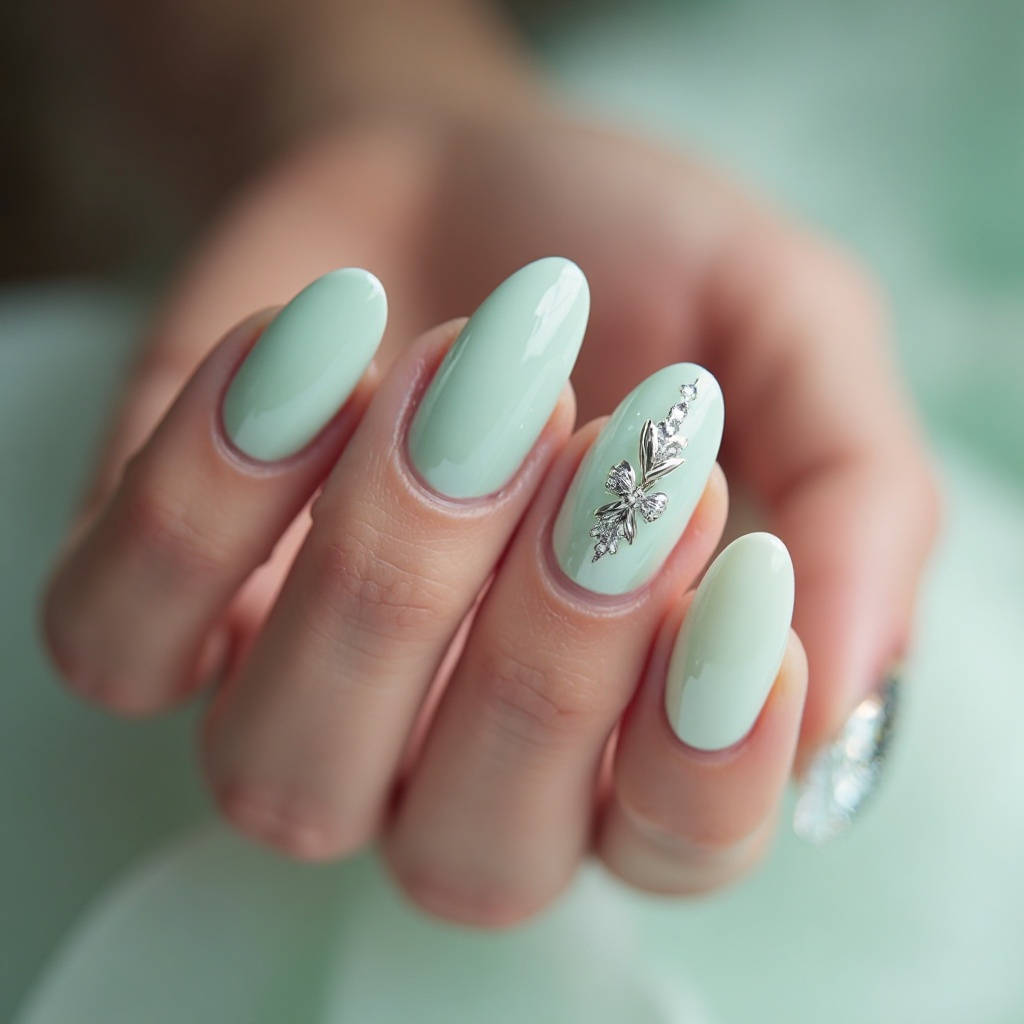
A soft mint green on nine nails with one accent nail featuring iridescent pearl or white chrome. The shimmer accent creates a focal point without requiring complex designs, and the pearl finish feels bridal-appropriate yet wearable. This combination is sophisticated enough for formal events but subtle enough for everyday wear.
Why It Works for Spring: Pearls and pastels are spring wedding season staples, and this design offers elegance with minimal effort—perfect for busy schedules.
Pro Tip: Choose your ring finger for the accent nail to draw attention to jewelry, and ensure your pearl powder is ultra-fine for the smoothest, most luxurious finish.
Creating the Pearl Effect:
Two Options:
OPTION A: Pearl Polish (Easiest)
- Paint all nails mint green (2 coats)
- Ring finger only: 2 coats iridescent pearl/white polish
- Top coat on all nails
Recommended Pearl Polishes:
- Essie “Blanc” (white with pearl)
- Sally Hansen “Shell We Dance”
- OPI “My Private Jet” (discontinued but similar options exist)
OPTION B: Pearl Powder (More Dramatic)
- Paint 9 nails mint, ring finger white
- While ring finger is slightly tacky, dust on pearl powder
- Buff gently with soft brush
- Seal with top coat
Ring Finger Placement Strategy:
- Right hand ring finger if right-handed (showcases your work)
- Left hand ring finger if you want to see it more often
- Both ring fingers for balanced look
Beginner-Friendly Shortcut: Buy a pearl accent nail sticker ($3-5) and apply over mint base—instant sophistication.
9. Pistachio with Silver Striping Tape
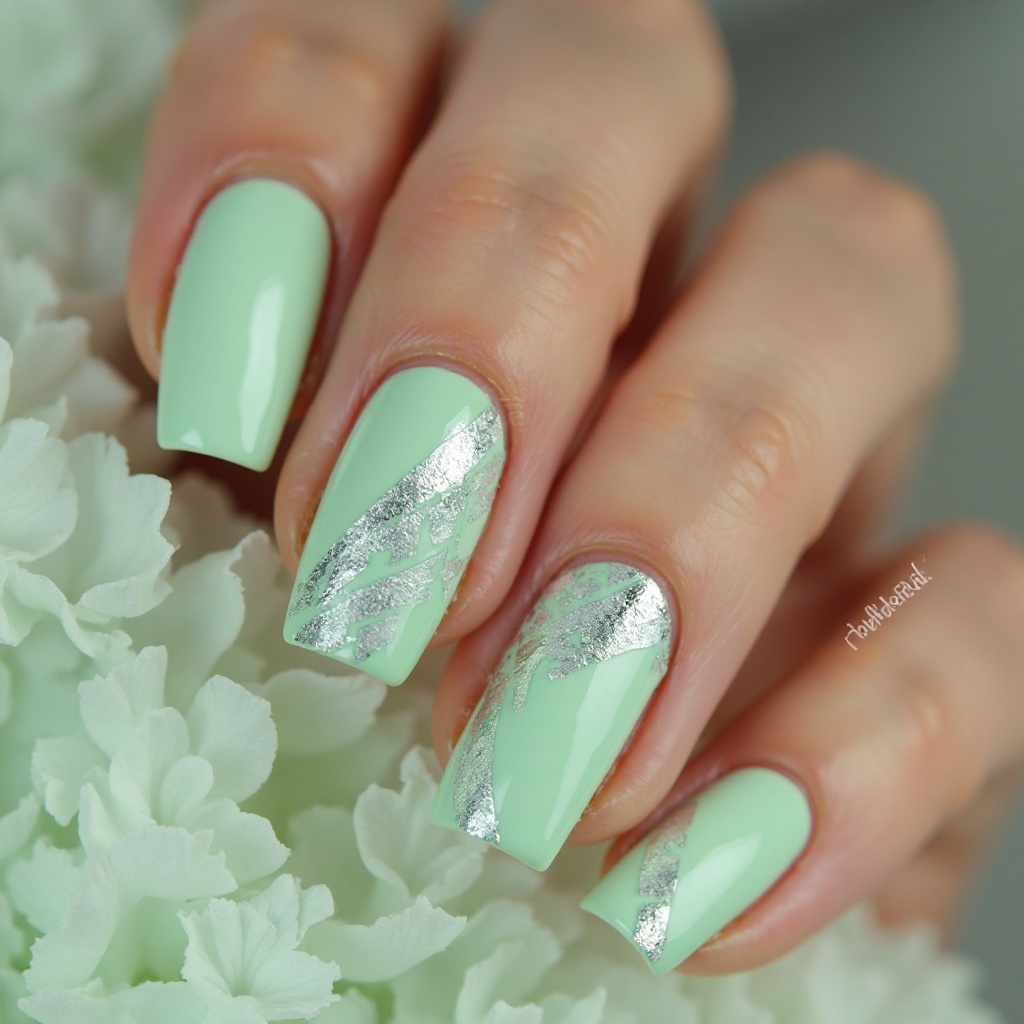
Creamy pistachio green base with thin silver striping tape creating geometric patterns or simple accent lines. The metallic silver adds modern edge to the soft pastel, and the clean lines create visual interest without busy-ness. This design works particularly well on square or squoval nail shapes.
Why It Works for Spring: Geometric nail art remains trendy, and the silver-green combination feels fresh and contemporary while staying wearable for professional environments.
Pro Tip: Apply striping tape over dried polish, then seal with top coat—for best adhesion, use gel polish and cure the tape under UV light before applying your final top coat.
Striping Tape Tutorial for Beginners:
Supplies:
- Pistachio green polish
- Silver striping tape (rolls, $3-5 for set)
- Small scissors
- Tweezers (makes placement easier)
- Top coat
Simple Designs to Try:
Design 1: Single Vertical Line
- Paint nails pistachio (2 coats), dry completely
- Cut striping tape to nail length
- Use tweezers to place tape vertically down center of 1-2 accent nails
- Press firmly to adhere
- Apply thick top coat over everything
Design 2: Geometric Triangles
- Paint base color
- Place 2-3 strips of tape at angles to create triangular sections
- Seal with top coat
Design 3: Minimalist Cuticle Accent
- Paint base color
- Place one horizontal stripe near cuticle line
- Top coat
Critical Tape Tips:
- Wait 10 minutes for base polish to dry fully before applying tape
- Use THICK top coat—thin top coat won’t secure tape properly
- Press tape edges down firmly before top coat
- Don’t reuse tape pieces—they lose adhesive
Longevity: This design lasts 5-7 days typically. Tape may lift at edges first—carry top coat for touch-ups.
Artistic & Textured Pastel Greens
10. Sage Green Marble
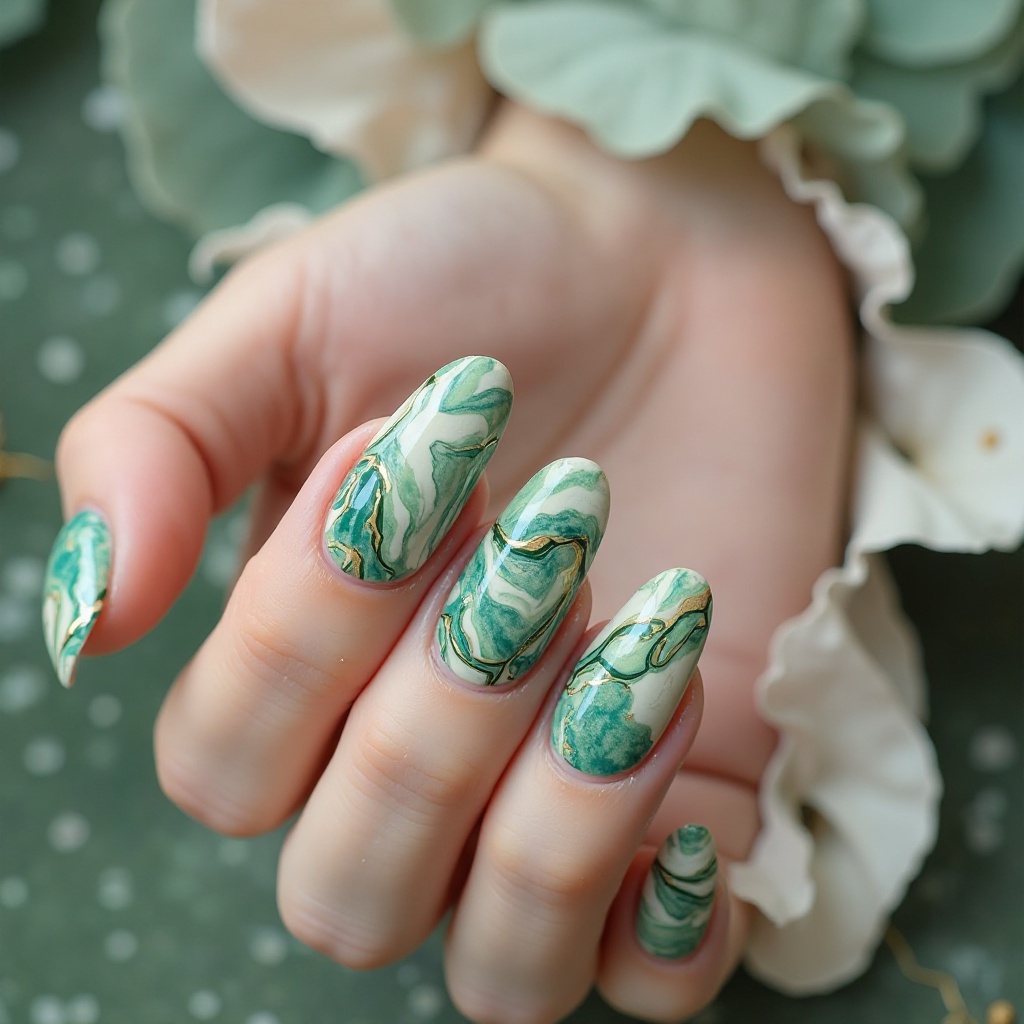
Swirling marble effect in varying shades of sage, mint, and white creating organic stone-like patterns. Each nail becomes a unique work of art with fluid, unpredictable veining that mimics natural marble. The sophisticated color palette makes this look feel expensive and custom despite being achievable at home.
Why It Works for Spring: Marble nails are timeless, and the green color story feels nature-inspired and fresh—perfect for spring’s organic, earthy aesthetic.
Pro Tip: Use a thin brush or toothpick to swirl colors together while wet, working quickly and resisting the urge to over-blend—marble should look natural and irregular.
Water Marble Technique (Advanced):
This is the classic method but requires practice:
- Fill small cup with room-temperature water
- Drop one drop of sage green polish into water
- Immediately drop white polish into the center
- Alternate drops (sage, white, sage, white) creating concentric circles
- Use toothpick to drag through circles creating marble pattern
- Tape fingers, dip nail through pattern
- Clean up water surface, remove tape
- Let dry completely before top coat
Easier Dry Marble Method:
- Base: Paint nail white, let dry
- Blob technique: Place small irregular dots of sage and mint green on nail
- Swirl immediately: Use thin brush or toothpick to drag colors into each other with swirling motions
- Work fast: You have about 20 seconds before polish starts drying
- Don’t over-mix: Stop when you see veining—too much swirling = mud
- Dry completely: Wait 10 minutes
- Top coat: Thick glossy layer
Marble Secrets:
- Practice on paper first to understand swirling motion
- Use contrasting polish consistencies (one thicker, one thinner)
- Room temperature affects how polish behaves
- Each nail will look different—that’s intentional
Realistic Expectation: Your first attempt will not look like Pinterest. Try 3-4 times to develop the technique.
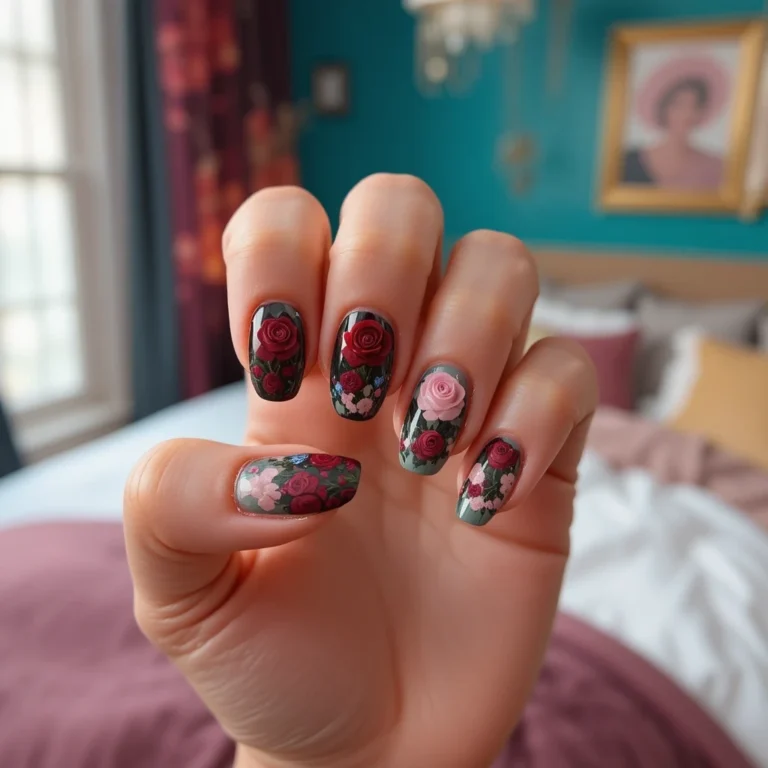
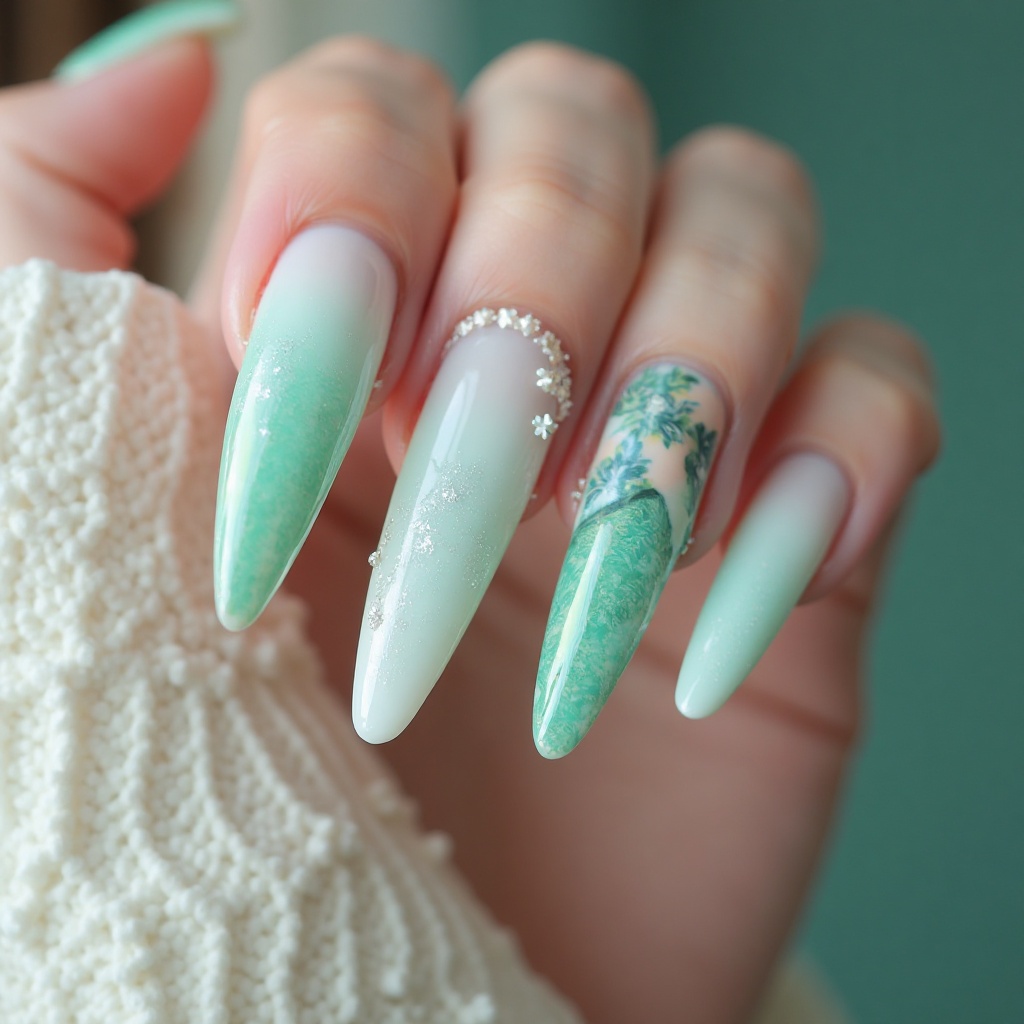
11. Textured Mint Garden
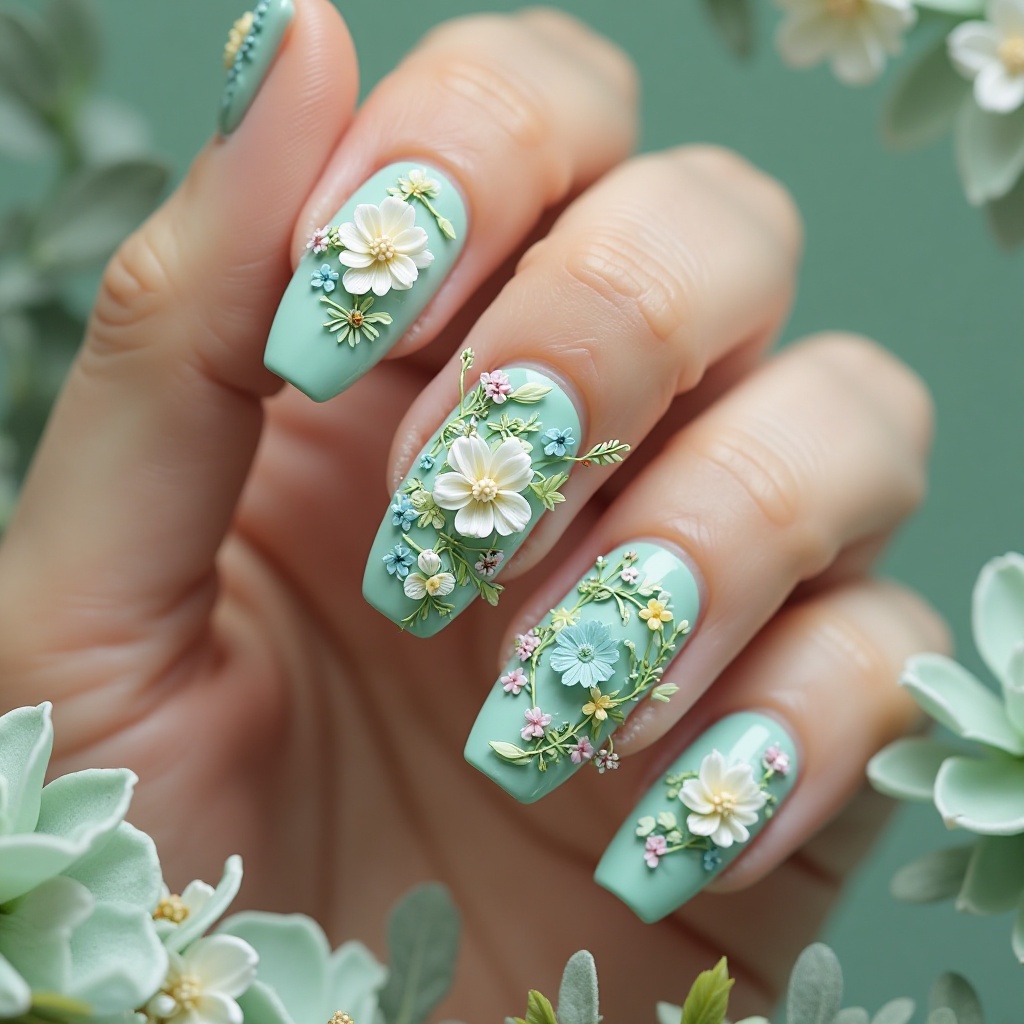
A pastel mint base with 3D floral embellishments, tiny dried flowers, or hand-painted botanical designs. The texture adds tactile interest, and the nature-inspired elements amplify spring’s garden party vibes. This maximalist approach works best on one or two accent nails while keeping others simple.
Why It Works for Spring: Floral designs are synonymous with spring, and the dimensional elements make your manicure feel like wearable art—conversation-starter worthy.
Pro Tip: Encapsulate dried flowers in clear gel for durability, or use water decals for easier application—seal everything with a thick layer of top coat to smooth the surface.
Three Methods Based on Skill Level:
METHOD 1: Water Decals (Easiest)
What You Need: Floral water decals ($4-8), mint polish, top coat
- Paint all nails mint (2 coats)
- Cut out desired decal designs
- Soak in water 15 seconds
- Slide decal off paper onto nail
- Position with tweezers
- Pat dry with tissue
- Seal with 2-3 coats thick top coat
METHOD 2: Dried Flowers (Intermediate)
Supplies: Pressed/dried flowers ($6-10), tweezers, gel top coat OR thick regular top coat
- Paint mint base
- While slightly tacky, position tiny dried flowers with tweezers
- Let dry completely (30 minutes)
- Apply THICK top coat layer to encapsulate
- Second thick top coat after first dries
- Third coat if flowers are still raised
METHOD 3: Hand-Painted (Advanced)
Supplies: Mint base, white/green/yellow detail polish, thin nail art brush
- Paint mint base, let dry
- Use thin brush to paint tiny flower shapes
- Simple 5-petal flowers work best
- Add white highlights
- Tiny green leaves
- Let dry completely
- Top coat
Making It Last:
- Dried flowers need THICK top coat or they’ll catch and lift
- Apply top coat every 2 days for textured designs
- Expect 5-7 day wear time maximum
12. Pistachio with White Abstract Lines
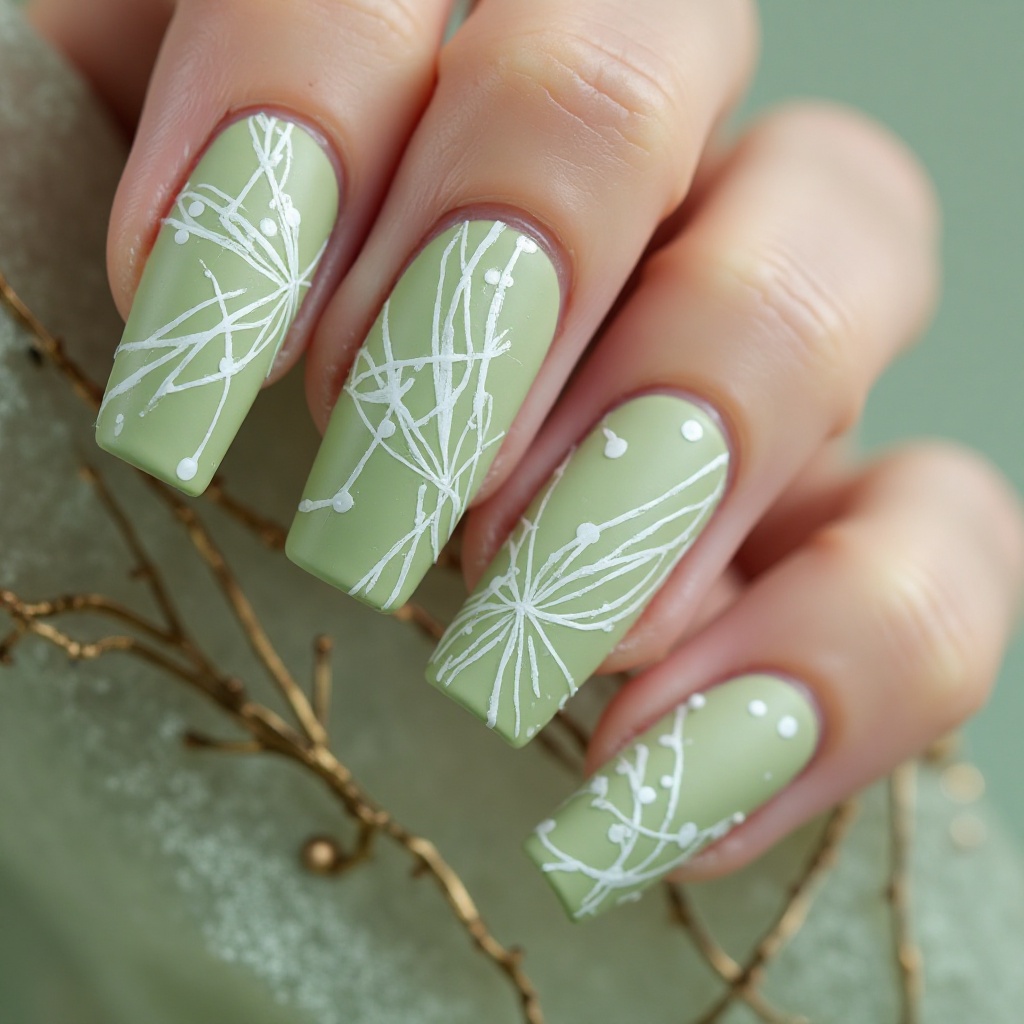
Soft pistachio green base with freehand white abstract lines, squiggles, or dots creating modern art-inspired patterns. The white-on-green contrast is crisp and clean, and the abstract nature means you don’t need perfect painting skills. This design feels youthful and creative while maintaining sophistication through color choice.
Why It Works for Spring: Abstract nail art is trending on Pinterest, and the playful design captures spring’s energetic spirit while remaining polished enough for adult wardrobes.
Pro Tip: Use a detail brush or dotting tool for precise lines, and don’t stress perfection—abstract art is meant to be imperfect and organic-looking.
Easy Abstract Art Tutorial:
What You Need:
- Pistachio polish
- White polish (or white nail art pen)
- Thin detail brush OR white nail art pen ($5-8)
- Dotting tool (optional)
Design Ideas by Difficulty:
EASIEST: Random Dots
- Paint pistachio base (2 coats), dry fully
- Use dotting tool or toothpick to create random white dots
- Vary sizes and placement
- Top coat
EASY: Simple Squiggles
- Pistachio base
- Use thin brush to paint random wavy lines
- Don’t worry about perfection
- Top coat
INTERMEDIATE: Abstract Faces
- Pistachio base
- Paint simple curved line for face outline
- Two dots for eyes
- Curved line for smile
- Top coat
Using a Nail Art Pen (Easier Than Brush):
- Shake pen well before use
- Test on paper first
- Apply light pressure for thin lines
- Heavy pressure for thicker lines
- Wipe tip if polish clumps
The “Imperfect is Perfect” Mindset:
- Wobbly lines look intentionally abstract
- Asymmetry is part of the design
- Each nail can have different pattern
- There’s no “wrong” way to do abstract art
Recommended White Products:
- Essie “Blanc” (white polish)
- Sally Hansen Nail Art Pen in white ($6)
- LA Colors Art Deco white liner ($3)
Bold & Saturated Pastel Greens
13. Electric Mint
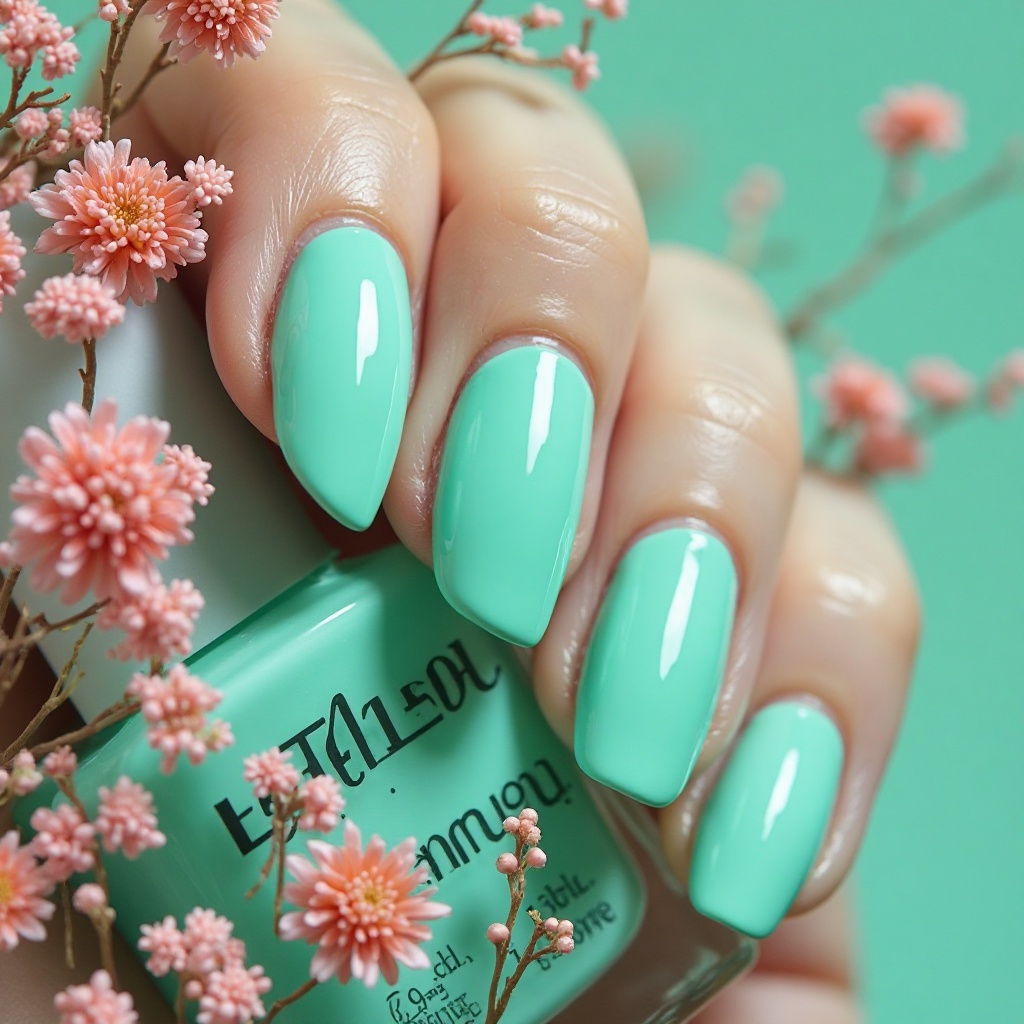
A vibrant, saturated pastel green that leans almost neon but maintains that soft pastel quality. This high-pigment shade makes a statement without going full neon, offering eye-catching color that still feels wearable. The glossy finish amplifies the color intensity and makes nails look healthy and vibrant.
Why It Works for Spring: Sometimes you want your nails to pop, and this shade delivers maximum impact while staying within the pastel family—perfect for festival season.
Pro Tip: Apply over white base polish to make the color truly pop, and use 2-3 thin coats rather than one thick coat to prevent bubbling and ensure even coverage.
Maximizing Bright Color Impact:
The White Base Trick:
- Base coat
- 2 coats white polish (this is your secret weapon)
- Let dry 5 minutes
- Now apply electric mint (only 1-2 coats needed)
- Top coat
Why This Works: White base makes pastel colors appear 50% more vibrant. Without white base, you’d need 4-5 coats of pastel green.
Application for Bright Colors:
- Thin is key: Bright colors show streaks if applied too thick
- First coat should be streaky: Don’t panic—this is normal
- Second coat evens it out: Applied in opposite direction
- Third coat (optional): Only if still uneven
- Top coat: Enhances vibrancy
Best Bright Mint Polishes:
- Essie “Turquoise & Caicos” (bright but pastel)
- China Glaze “Re-fresh Mint”
- OPI “Gelato on My Mind”
Longevity Tip: Bright pastels show chips more obviously. Reapply top coat every 2 days, and plan to repaint after 5-6 days.
14. Celery Green with Matte Top
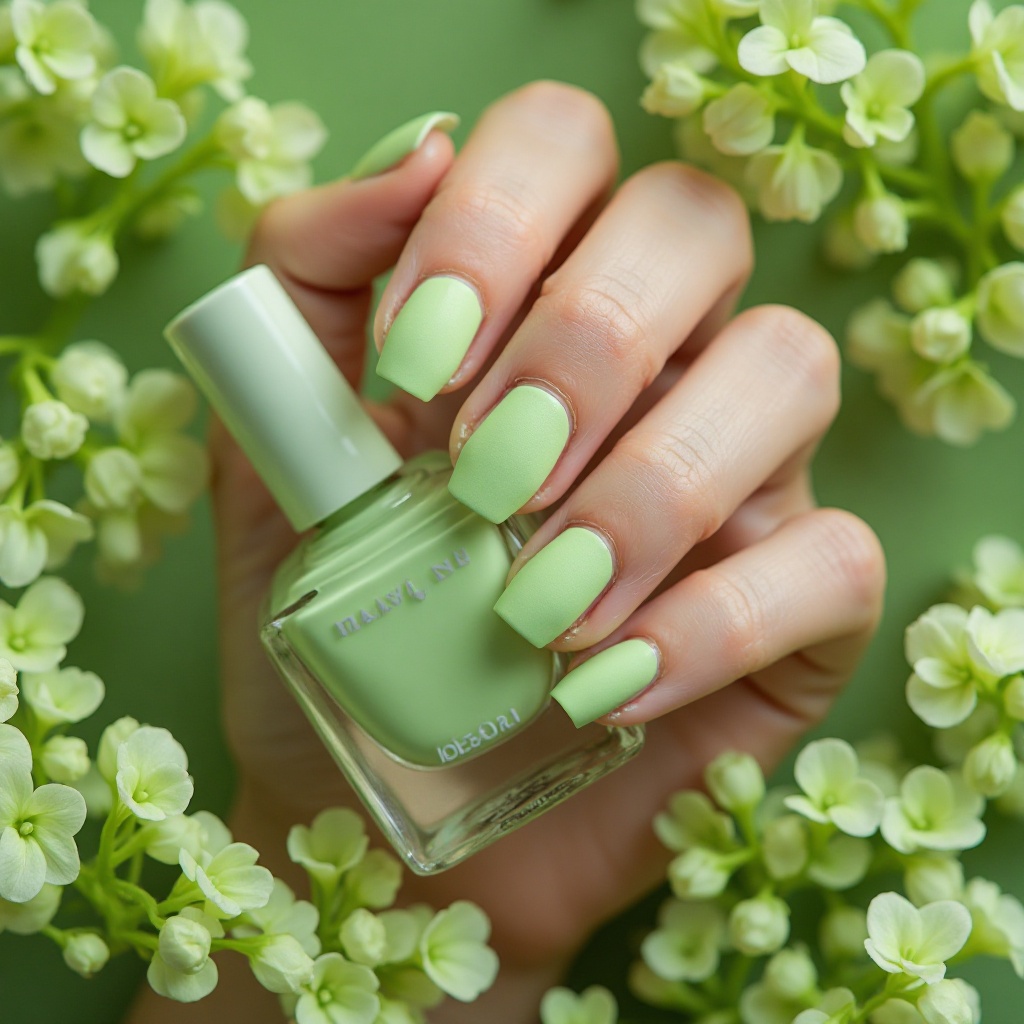
A unique yellow-toned pastel green reminiscent of fresh celery, finished with a matte top coat. This unconventional shade stands out from typical mint and sage options, offering a fresh perspective on green nails. The matte finish makes the unusual color feel sophisticated rather than loud.
Why It Works for Spring: Yellow-greens are unexpectedly flattering on many skin tones, and the matte finish keeps the bold color grounded and wearable for multiple occasions.
Pro Tip: This shade works best on short to medium square nails where the color can be appreciated without overwhelming your hands—balance bold color with simple shape.
Working with Yellow-Toned Greens:
Color Selection Tip: Hold the bottle against your wrist before buying. If it makes your skin look sallow or sickly, choose a cooler green.
Application Steps:
- Base coat (especially important with yellow tones—they stain)
- White base coat (optional but makes color pop)
- 2-3 coats celery green, thin layers
- Wait 7-10 minutes for complete drying
- Matte top coat in single, smooth strokes
Best Celery/Yellow-Green Polishes:
- OPI “How Does Your Zen Garden Grow”
- Essie “The More The Merrier”
- Sally Hansen Insta-Dri “Honeydew You Like It”
Styling This Bold Color:
- Keep nails short-medium (long nails = too much color)
- Square or squoval shapes look most modern
- Pair with neutral outfits to let nails be the statement
- Skip if your wardrobe is very warm-toned (clashes)
Maintenance: Matte celery green shows wear faster than dark colors. Plan for 4-5 day wear.
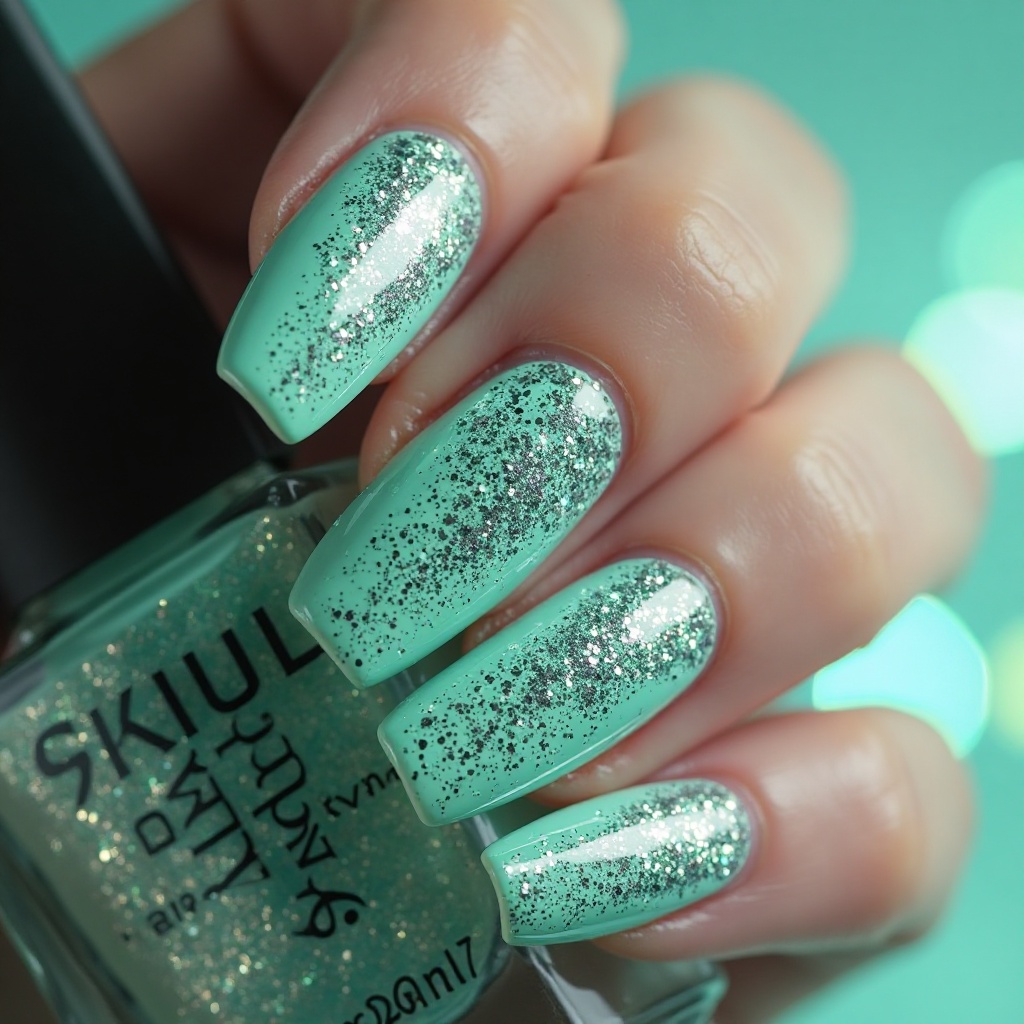
15. Seafoam Shimmer

A luminous seafoam green packed with fine silver shimmer particles that catch light with every movement. The shimmer adds dimension without looking glittery, creating a sophisticated sparkle that elevates the soft pastel base. This finish photographs beautifully and works for both day and evening wear.
Why It Works for Spring: Shimmer finishes add life and movement to pastels, preventing them from looking flat or chalky—the light-reflecting particles create depth and interest.
Pro Tip: Apply shimmer polish in thicker coats to maximize sparkle, and seal with a glossy top coat to enhance shine and extend wear time.
Shimmer Application Secrets:
Why Shimmer Polish Behaves Differently:
- Shimmer particles settle to bottom—MUST shake bottle vigorously
- Dries faster than regular polish
- Shows brush strokes if applied too thin
Proper Technique:
- Shake bottle for 30 seconds (not kidding—this matters)
- Base coat
- First color coat: medium-thick application (thicker than normal)
- Don’t brush over multiple times—shimmer streaks if overworked
- Wait 3 minutes
- Second coat: same technique
- Thick glossy top coat locks in shimmer and adds shine
Best Shimmer Seafoam Polishes:
- Essie “Where’s My Chauffeur” (subtle shimmer)
- Sally Hansen Complete Salon “Barracuda” (more sparkle)
- Sinful Colors “Mint Apple” (budget option, $3)
Shimmer vs. Glitter (Know the Difference):
- Shimmer: Fine particles, subtle sparkle, sophisticated
- Glitter: Large chunks, obvious sparkle, requires glitter removal method
Photography Tip: Shimmer looks AMAZING in photos. Tilt hands at different angles to catch light when taking pictures.
The Mint vs. Sage Identity Crisis
They’re Different Colors But Everyone Confuses Them
Ask for “pastel green nails” at a salon and watch your nail tech pull out 47 different bottles ranging from “basically blue” to “why is this yellow.” The pastel green spectrum is vast and confusing, and most people can’t articulate which green they actually want.
The Green Spectrum:
- Mint = Cool-toned, blue-leaning, icy
- Seafoam = In between, slightly gray
- Sage = Warm-toned, gray-green, earthy
- Pistachio = Warm-toned, yellow-green
- Celery = Yellow-green, almost chartreuse
Why This Matters: You might love mint green clothing but hate mint green nails. The undertones that work on fabric don’t always translate to your hands. Test the actual polish against your skin before committing, because “pastel green” could mean literally anything.
The Pinterest Problem: That perfect pastel green you saw on Instagram looks completely different in real life because phone screens shift colors. What looked like perfect sage in the photo might be straight-up yellow-green in person.
Pastel Green and the Professional Workplace Spectrum
Where Different Greens Land at Work
Not all pastel greens are created equal professionally. Some read as “fresh and polished,” others read as “am I about to talk to you about essential oils?”
Generally Safe for Conservative Offices:
- Sheer mint (barely there)
- Muted sage (sophisticated)
- Seafoam with nude undertones (neutral-adjacent)
- Pistachio French tips (classic with a twist)
Proceed with Caution:
- Electric mint (too bright)
- Chrome in any green (too flashy)
- Yellow-green/celery (too bold)
- Neon-adjacent pastels (definitely no)
Industry Breakdown:
- Finance/Law: Sheer only, nothing bold
- Healthcare: Check policy, usually limited
- Education: Most pastels fine, avoid neon
- Corporate: Depends on company culture
- Creative: Everything works
The Zoom Test: Your nails might look fine in person but glow weirdly on video calls. Test how your pastel green looks on camera before an important virtual meeting. Some greens read as highlighter-yellow on certain webcams.
The Skin Tone Math That Actually Matters
Why Undertone Matching Is Backwards With Green
Everyone says “match your undertones” but with pastel green, that advice is half wrong.
Cool-Toned Skin + Mint Green: Should work perfectly, right? Sometimes it actually washes you out because there’s TOO much harmony. You need contrast to look alive, not just more coolness.
Warm-Toned Skin + Sage Green: Should clash, right? It actually works beautifully because the contrast makes both your skin and the green look more vibrant.
The Real Rule:
- If you have yellow/warm undertones: Most pastel greens work
- If you have pink/cool undertones: Avoid yellow-greens, stick to mint/seafoam
- If you have olive skin: Literally every pastel green looks incredible on you (unfair but true)
Test This: Paint one nail. Look at your whole hand. If the green makes your skin look gray, sallow, or weird—wrong green. If it makes your skin look glowy and healthy—right green.
Pastel Green Across Seasons: The Surprising Truth
When It Works (And When It Doesn’t)
Spring (March-May): ✓ Obviously perfect ✓ Every shade works ✓ Peak pastel green season
Summer (June-August): ✓ Mint and seafoam work ✗ Sage can look too earthy for summer heat ✓ Goes with summer whites perfectly
Fall (September-November): ✓ Sage and muted greens work surprisingly well ✗ Bright mint feels wrong ✓ Pairs with fall earth tones
Winter (December-February): ✓ Icy mint looks intentionally frosty ✓ Sage with warm undertones works ✗ Bright pastels feel confused
The Exception: If you live somewhere without seasons (California, Florida), pastel green works year-round and nobody questions it.
The Length Where Pastel Green Stops Working
Nail Length Has a Breaking Point
Very Short (At or below fingertip): Pastel green can look juvenile or like you’re 12. To avoid this: Choose muted tones (sage, seafoam with gray), skip the bright mints, use matte finishes for sophistication.
Short-Medium (1-3mm past fingertip): Perfect. This is where pastel green looks most elegant and intentional. All shades work at this length.
Medium-Long (4-6mm past fingertip): Still works but requires confidence. Pastel green on long nails is a LOOK—you’re making a statement whether you mean to or not.
Very Long (7mm+): Pastel green starts looking costume-y unless you’re fully committed to a specific aesthetic. It reads as “nail art enthusiast” or “I have a very specific Instagram vibe.”
The Rule: The longer your nails, the more muted your pastel green should be. Bright mint on very long nails = too much. Muted sage on very long nails = editorial.
Chrome Pastel Green: The 3-Day Beauty Window
It Looks Amazing Until It Doesn’t
Chrome pastel green is stunning for approximately 72 hours. Then physics happens.
The Timeline:
- Day 1-2: Perfect, reflective, Instagram-ready
- Day 3: Still pretty good
- Day 4-5: Starting to dull and show fingerprints
- Day 6-7: Why does this look like old foil?
- Day 8+: Actively sad
What Kills Chrome Fast:
- Hand-washing (every wash dulls it slightly)
- Typing (friction removes shine)
- Phone use (oils from screen transfer)
- Literally touching anything
Is It Worth It? For events, photos, weekends = YES For everyday wear = Absolutely not For anyone with an actual life = Skip it
The Matte vs. Glossy Personality Test
What Your Finish Says About You
Glossy Pastel Green: “I’m put-together and like things to be clean and shiny. I reapply my lip gloss. I own a hairbrush.”
Matte Pastel Green: “I follow trends. I probably have strong opinions about coffee. My Instagram aesthetic is CURATED.”
Chrome Pastel Green: “I will absolutely be the center of attention whether I planned it or not. My nails are a conversation piece.”
Jelly Finish: “I’m into weird nail art stuff. I’ve watched YouTube tutorials. I understand what ‘encapsulated design’ means.”
Not saying any of these are wrong—just saying they communicate different things.
What Actually Goes With Pastel Green Nails
Color Coordination Reality Check
Works Perfectly:
- White (obvious)
- Cream/beige (elegant)
- Denim (any wash)
- Black (surprising but chic)
- Other pastels (pink, lavender, yellow)
- Navy (unexpected winner)
Absolutely Doesn’t Work:
- Red (looks muddy together)
- Orange (unless you’re doing a specific retro thing)
- Brown (undertone chaos)
- Neon anything (sensory overload)
Jewelry Situation:
- Silver = Yes
- Gold = Depends on your green (warm greens yes, cool greens maybe)
- Rose gold = With sage yes, with mint no
The Chip Pattern Problem
Pastel Green Shows Damage Weird
Unlike dark colors where chips are obvious, pastel green chips create this translucent edge situation that looks like your nails are… growing green? It’s hard to describe but it’s not cute.
Where It Chips First:
- Tips (obviously)
- Sides of nails (from typing)
- Around cuticles (from growth)
Best Defense:
- Wrap the tips with every layer
- Use gel (regular polish chips Day 2)
- Keep nails short-medium length
- Reapply top coat every other day
When to Just Remove It: If you have visible chips on 3+ nails, just start over. Trying to patch pastel green never works—the color never matches exactly and you can always see the repair line.
Pastel Green DIY: Realistic Expectations
What You Can Actually Do at Home
Successfully DIY-able:
- Solid pastel green color (any shade)
- Matte top coat application
- Sheer/jelly layering
- Simple French tips
Harder Than It Looks:
- Chrome finish (powder is tricky)
- Perfect ombré (blending is an art)
- Geometric designs (steady hand required)
Just Go to the Salon:
- Anything with 3D elements
- Complex nail art
- Perfect marble effects
- Intricate line work
The Honesty: Your DIY pastel green will look “fine.” Not amazing, not terrible, just fine. Which is actually okay for everyday wear. But if you want it to look like those Pinterest photos, you need a professional.
The Seasonal Identity Crisis
Pastel Green Doesn’t Know What Season It Is
Most nail colors have a season. Burgundy = fall/winter. Coral = summer. But pastel green is having an existential crisis about when it belongs.
The Confusion:
- It’s in all the “spring nails” articles
- But also in “fresh winter colors” lists
- Works for summer
- Somehow doesn’t look totally wrong in fall
Why This Happens: Pastel green can read as:
- Botanical/fresh (spring)
- Icy/cool (winter)
- Light/airy (summer)
- Earthy/muted (fall)
It’s the most seasonally confused color, which actually makes it the most versatile. You can wear pastel green whenever and just vibe-check which undertone makes sense for the current season.
When Pastel Green Just Doesn’t Work
Scenarios to Skip It
Skip If:
- You have very yellow nail beds (green emphasizes yellow)
- You’re wearing all warm autumn colors (clashes)
- You work somewhere very conservative (reads too trendy)
- You have very dry, textured hands (pastels emphasize texture)
- You’re doing outdoor manual labor (shows dirt immediately)
Choose Something Else:
- Very yellow nails = Try lavender or pink instead
- Warm wardrobe = Try terracotta or warm nudes
- Conservative setting = Gray or nude
- Texture concerns = Dark colors hide more
The Maintenance Reality
What Pastel Green Actually Requires
Daily:
- Cuticle oil (morning and night)
- Hand cream reapplication
- Check for chips
Every 2-3 Days:
- Fresh top coat application
- Chip inspection and repair
Weekly:
- Remove if showing significant wear
- Start fresh if needed
The Honest Timeline:
- Gel: 10-14 days before looking rough
- Regular: 3-5 days maximum
- Chrome: 5-7 days before sad
Pastel green requires MORE maintenance than dark colors because damage shows differently and more noticeably.
Just Pick a Green and Commit
Pastel green nails are beautiful. They’re also slightly high-maintenance, seasonally confused, and workplace-questionable depending on your green.
If you’re overthinking which pastel green to choose, just go with muted sage or seafoam. They work for everyone, everywhere, all year. The safe choice is still a good choice.
Or just get regular mint and see what happens. It’s nail polish—worst case scenario, you remove it in a week and try something else.