24+ January Dip Nails Ideas Fresh Winter Manicure Designs
January is the month for fresh starts, and your nails should reflect that same energy. Dip powder manicures are the ultimate choice for winter because they last 3-4 weeks without chipping, strengthen your natural nails, and handle cold weather like a champ.
No more worrying about your polish cracking in freezing temps or fading after one hand wash.
This month is all about clean elegance, subtle shimmer, and colors that complement winter’s muted palette. From barely-there nudes to moody jewel tones, these 24+ January dip nail ideas will keep your fingertips looking polished and intentional all month long.
Minimalist & Nude January Dip Nails Ideas
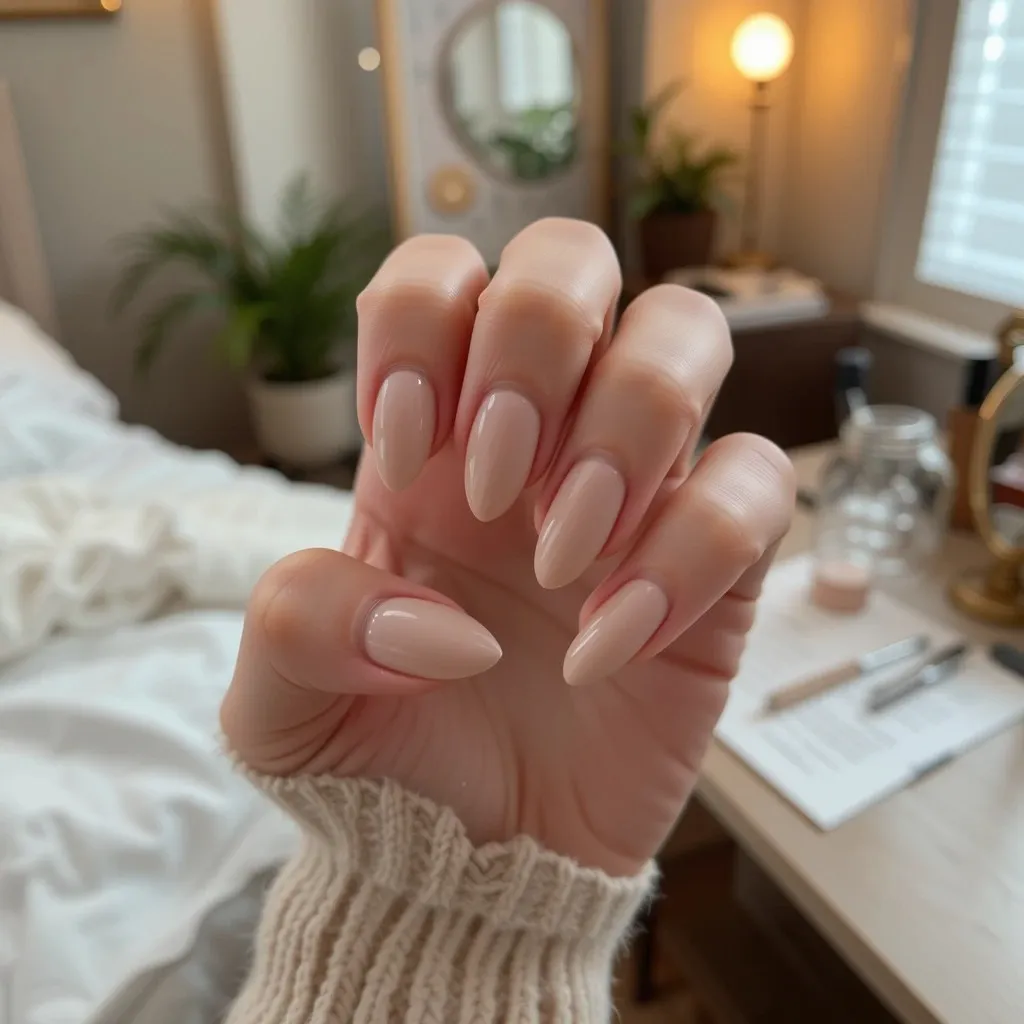
1. Vanilla Latte Nude
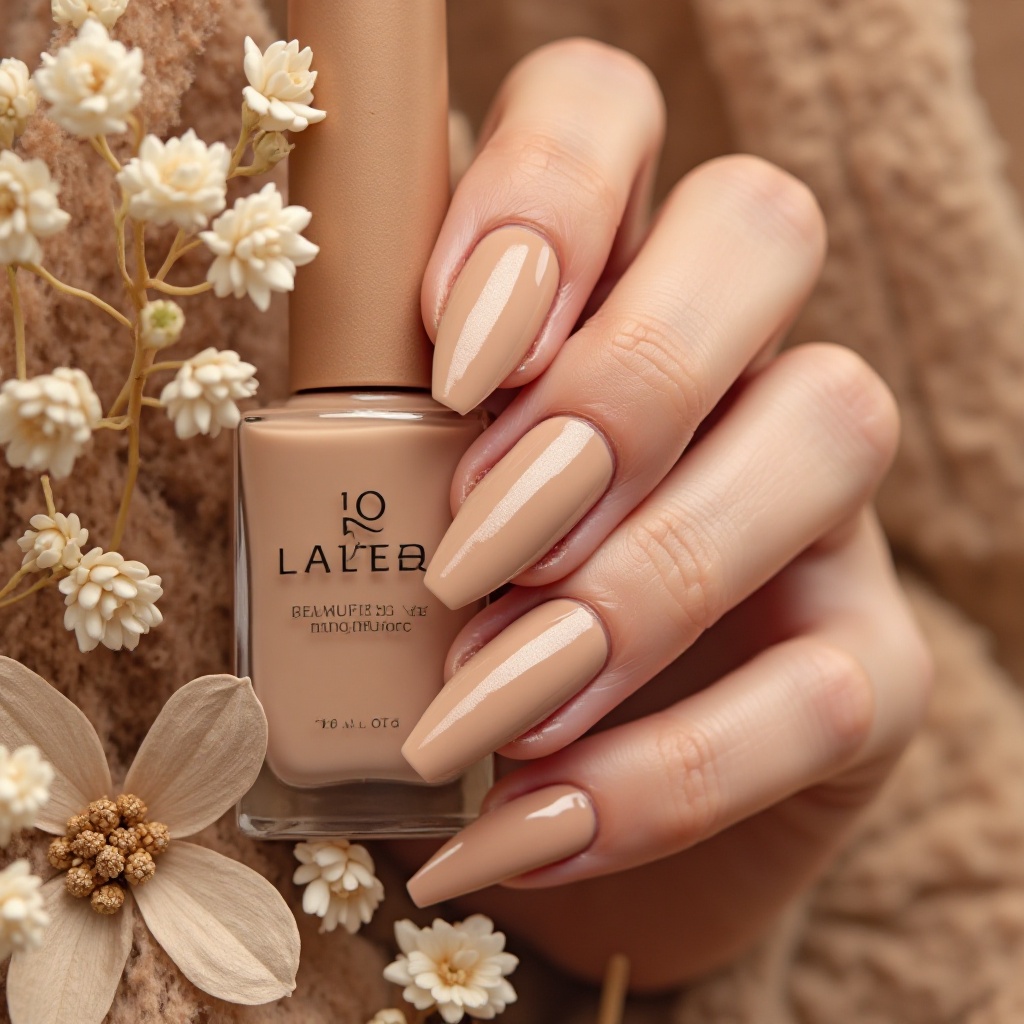
Warm beige with creamy undertones that mimics your favorite coffee order. This shade flatters every skin tone and delivers that expensive, understated elegance January craves. The neutral base works as the perfect canvas for everyday wear while still looking intentional and polished.
Why It Works for January: Professional enough for work environments, versatile enough for everything else, and pairs beautifully with winter neutrals like camel, cream, and oatmeal.
Pro Tip: Choose a glossy finish to prevent the color from looking flat. Almond or oval nail shapes make this shade look extra polished and elongate your fingers.
How to Create This Look
- Prep nails by pushing back cuticles, filing to your desired shape (almond or oval recommended), and buffing the surface to remove shine.
- Clean nails thoroughly with rubbing alcohol or nail dehydrator to remove all oils.
- Apply a thin layer of dip base coat to one nail, avoiding the cuticle area (leave 1mm gap).
- Dip the nail into vanilla/beige dip powder at a 45-degree angle. Tap off excess powder.
- Repeat steps 3-4 for a second coat to achieve full opacity and richness.
- Brush away all loose powder, then apply activator generously. Wait 2 minutes.
- File and shape edges, then buff the surface completely smooth.
- Wipe clean with alcohol, apply second activator coat, wait 2 minutes.
- Apply two thin coats of glossy top coat, capping the free edge each time.
- Finish with cuticle oil massaged into the nail beds and cuticles.
Recommended Products
- Budget-Friendly: Beetles Gel “Latte” or “Nude Beige” ($8-12), Modelones Dip Powder in “Creamy Nude” ($9)
- Mid-Range: Revel Nail Dip Powder “D125 Toffee” or “D11 Cashmere” ($12-15), Kiara Sky Dip Powder “D403 Bare Elegance” ($14)
- Professional: OPI Powder Perfection “Samoan Sand” or “Tiramisu for Two” ($16-18), SNS Gelous Dip “LC01 Bare Nude” ($18)
- Top Coat: Kiara Sky Dip Essentials Glossy Top Coat, Revel Nail Gel Top Coat
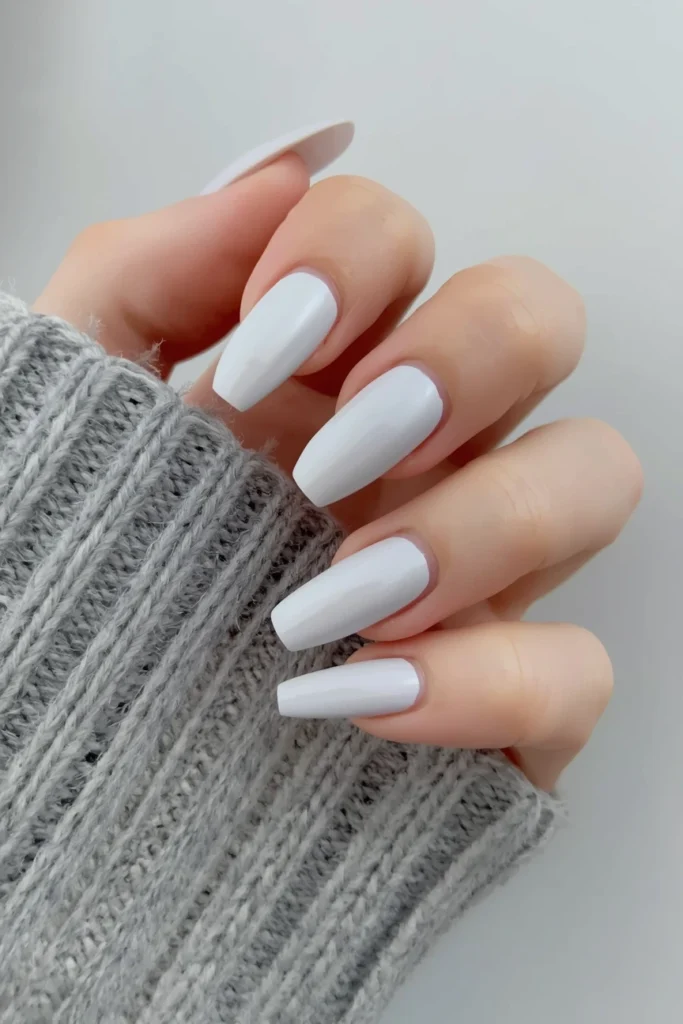
2. Milky Glass Finish
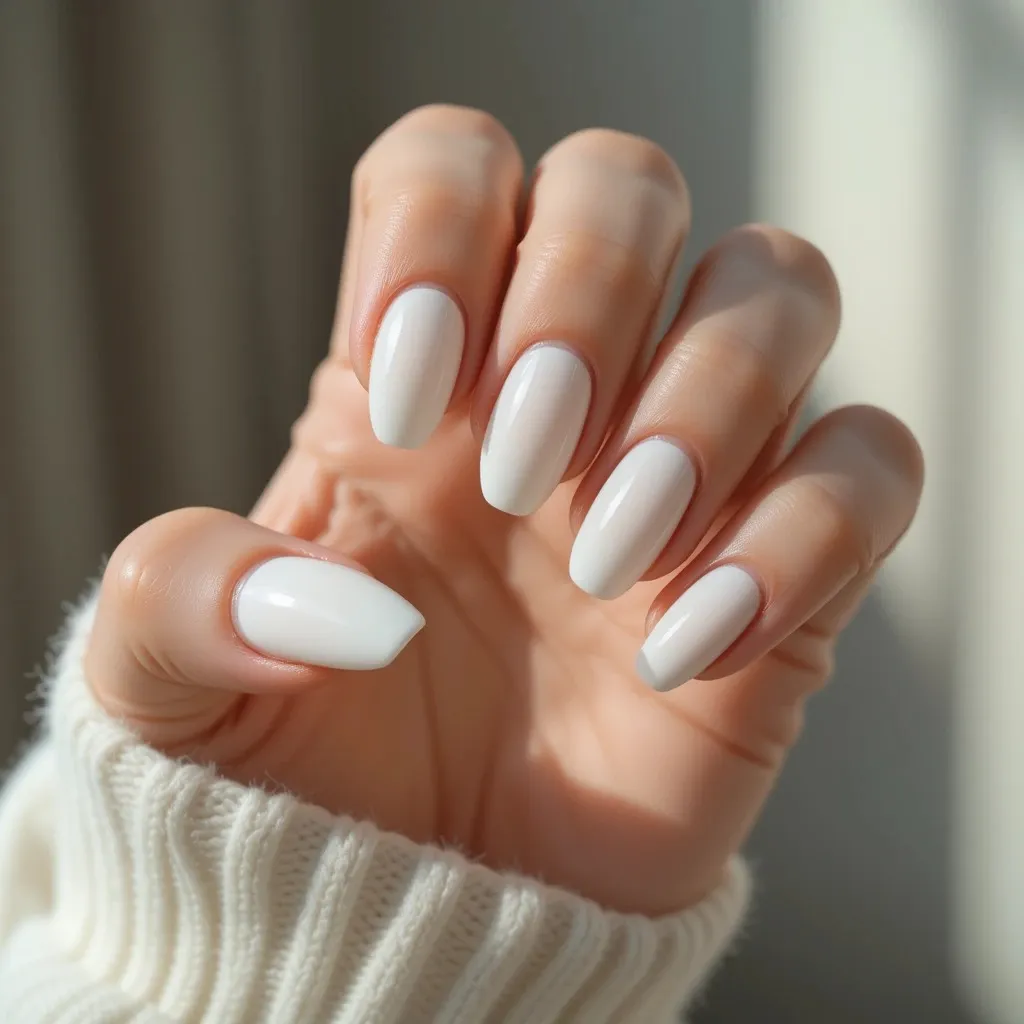
Sheer milky white that lets your natural nail peek through with a translucent, glass-like effect. This shade creates that coveted glazed look that’s been dominating social media. The opacity is buildable, so you control whether you want barely-there coverage or something more substantial.
Why It Works for January: Embodies that clean slate, new year aesthetic while staying wearable and soft. It’s fresh without being stark, and the sheer quality makes it appropriate for any setting.
Pro Tip: Apply 3 thin coats for buildable opacity rather than 2 thick ones. This shade looks stunning on shorter nails and square shapes.
How to Create This Look
- Complete standard nail prep (push cuticles, file to square or squoval shape, buff, clean with alcohol).
- Apply base coat and dip into sheer white/milky powder. The first coat will be very transparent.
- Apply second coat—you’ll see more coverage but still some natural nail showing through.
- For the glazed effect, stop at 2 coats. For more opacity, apply a third thin coat.
- Brush away powder, apply activator, wait 2 minutes.
- File and buff smooth—this step is crucial for the glass-like finish.
- Wipe clean, apply second activator, wait 2 minutes.
- Apply glossy top coat in two thin layers—the shine is essential for the glass effect.
- Finish with cuticle oil for that ultra-glossy, healthy look.
Recommended Products
- Budget-Friendly: Beetles Gel “Milky White” ($9), Modelones “Sheer White” or “Pearl White” ($8-10)
- Mid-Range: Revel Nail “D1 Snow” or “D234 Opal” ($13-15), Kiara Sky “D401 Milk Bath” ($14)
- Professional: OPI Powder Perfection “Alpine Snow” (apply sheer) ($17), SNS “AC01 Pearl” ($18)
- Key Product: Super glossy top coat is essential—try Kiara Sky Beyond Gloss or Revel Nail Gel Top Coat
3. Soft Taupe Matte
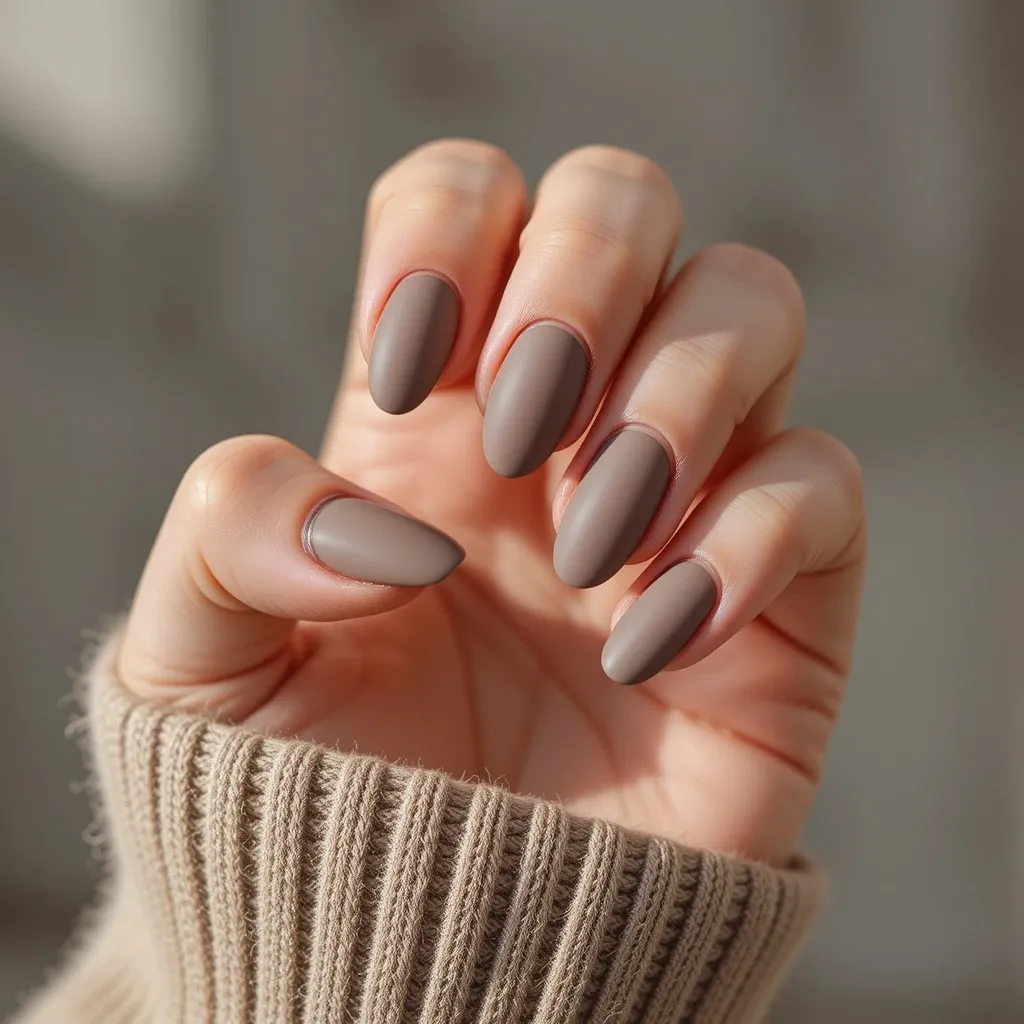
Medium taupe in a velvety matte finish that feels cozy and refined. The earthy tone grounds any outfit and transitions seamlessly from office to evening. This shade has enough depth to avoid looking washed out but stays neutral enough to be a true everyday color.
Why It Works for January: Matte finishes feel seasonally appropriate and cozy, while taupe is winter’s most wearable neutral that never looks boring.
Pro Tip: Seal with a quality matte topcoat and buff nails smooth beforehand so the finish looks even and luxurious.
How to Create This Look
- Prep nails thoroughly, buffing the surface extra smooth (matte finishes show imperfections more than glossy).
- Clean with alcohol and ensure nails are completely dry.
- Apply base coat and dip into taupe powder. This color may need 2-3 coats for full opacity.
- Repeat dipping process for second and third coats if needed.
- Brush away excess powder and apply activator. Wait full 2 minutes.
- File edges and buff surface completely smooth—spend extra time here as any texture will show through matte.
- Wipe thoroughly with alcohol to remove all dust.
- Apply second activator coat, wait 2 minutes.
- Apply matte top coat in one thin, even layer. Avoid going over the same area twice as this creates streaks.
- Let dry completely (3-5 minutes) before touching. Apply cuticle oil around edges only, not on nail surface.
Recommended Products
- Budget-Friendly: Beetles Gel “Taupe” or “Soft Brown” ($9-11), Modelones “Greige” ($9)
- Mid-Range: Revel Nail “D38 Stella” or “D119 Portobello” ($13-15), Kiara Sky “D408 You Mocha Me Crazy” ($14)
- Professional: OPI Powder Perfection “Taupe-less Beach” or “Berlin There Done That” ($17), SNS “BD01 Taupe” ($18)
Matte Top Coat: Kiara Sky Matte Top Coat ($12), Revel Nail Matte Gel Top ($11)—this is non-negotiable for the look
4. Almond Cream
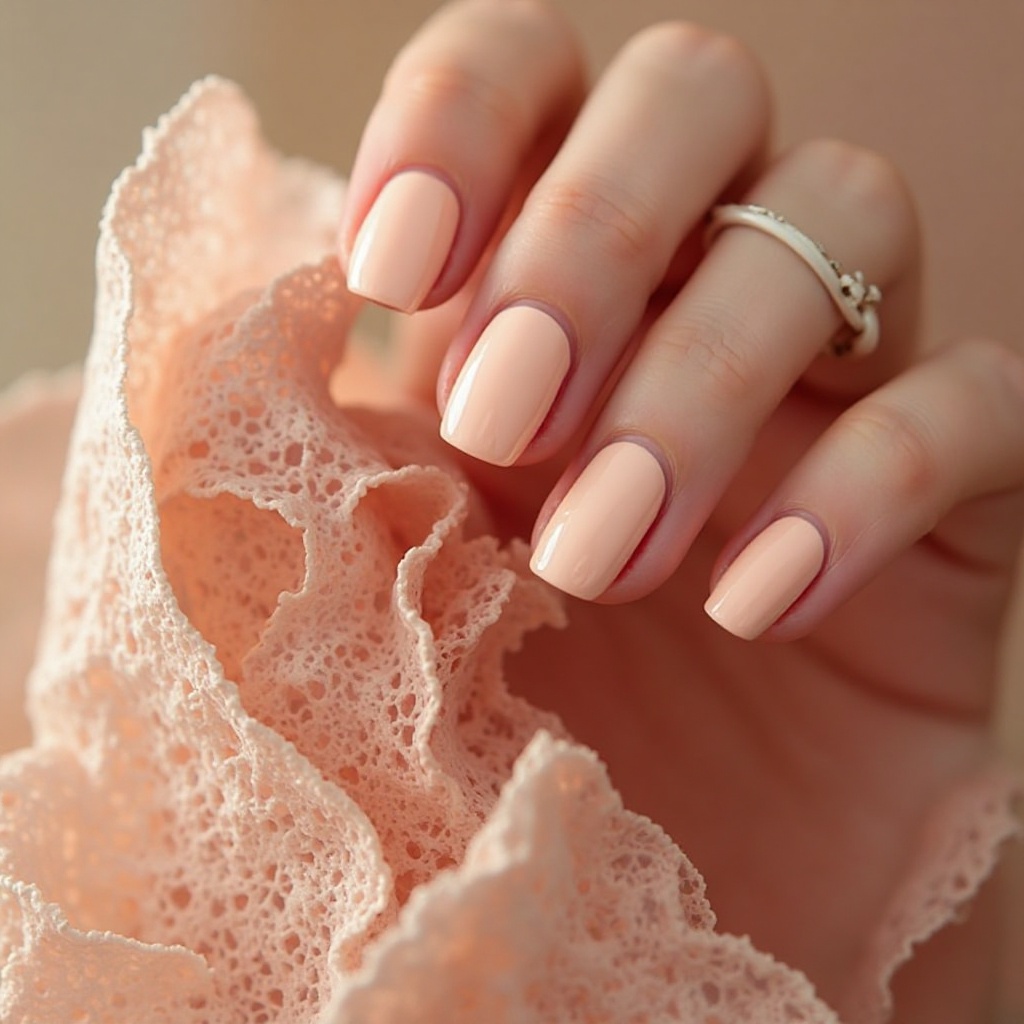
Pale peachy-nude that adds just a whisper of warmth without going orange. This shade makes nails look naturally healthy and well-maintained, like you just got a professional hand treatment. It has enough pigment to even out your natural nail bed while maintaining that “your nails but better” effect.
Why It Works for January: Perfect for those fresh-start moments when you want polish without making a bold statement. Ideal for minimalists and anyone returning to the office after the holidays.
Pro Tip: Pair with cuticle oil daily to maintain that healthy, hydrated appearance. Works best on medium to long almond nails.
How to Create This Look
- Prep nails and file into almond shape (rounded tip that comes to a soft point).
- Push back cuticles gently—this shade shows cuticle work clearly, so take your time.
- Buff and clean nails with alcohol.
- Apply base coat and dip into peachy-nude powder. First coat will be sheer.
- Apply 2-3 coats total until you achieve even coverage that looks natural.
- Brush away powder, apply activator, wait 2 minutes.
- File and refine the almond shape, making sure both sides are symmetrical.
- Buff surface smooth, wipe clean, apply second activator.
- Apply glossy top coat in two thin layers, capping the pointed free edge.
- Massage cuticle oil into nail beds daily to maintain that fresh, healthy look.
Recommended Products
- Budget-Friendly: Beetles Gel “Peachy Nude” or “Almond” ($9), Modelones “Nude Pink” ($8-10)
- Mid-Range: Revel Nail “D12 Carla” or “D94 Honey” ($13), Kiara Sky “D404 Bare to Dare” ($14)
- Professional: OPI Powder Perfection “Bubble Bath” or “Put It in Neutral” ($17), SNS “LC08 Almond” ($18)
- Cuticle Care: CND SolarOil ($9), Cuccio Cuticle Oil ($8)—apply daily for best results
5. Glazed Sheer Pink
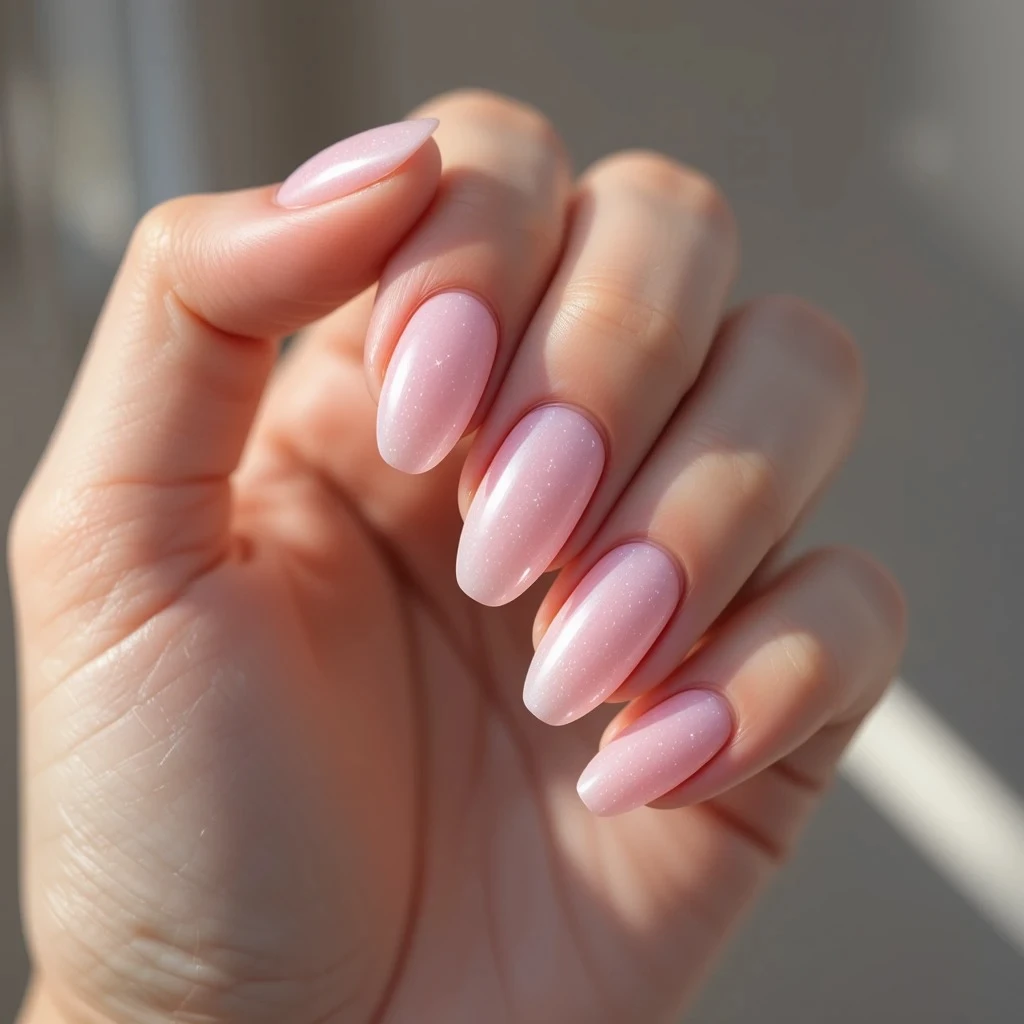
Translucent pink with subtle pearl shimmer that catches light like morning frost on glass. This gives the glazed donut effect without the commitment. The pink tone adds just enough color to brighten your complexion while the shimmer creates dimension and movement.
Why It Works for January: Adds visual interest while staying minimal and office-appropriate. The shimmer feels special without being over-the-top for everyday wear.
Pro Tip: Layer over a nude base for more opacity, or apply sheer for that signature glazed look. Round or oval shapes enhance the glossy effect.
How to Create This Look
- Prep nails and file to round or oval shape for maximum glazed effect.
- For more opacity: Apply one coat of nude/beige dip powder as a base, then proceed with pink shimmer.
- For true glazed effect: Skip base color and go straight to sheer pink shimmer powder.
- Apply base coat and dip into sheer pink shimmer powder at 45-degree angle.
- Apply 2-3 thin coats of the shimmer—build gradually rather than applying thick layers.
- Tap off excess shimmer gently to avoid losing the sparkle particles.
- Apply activator carefully, wait 2 minutes.
- File edges and buff surface gently—don’t over-buff or you’ll remove shimmer.
- Apply second activator, wait 2 minutes.
- Apply 2-3 coats of super glossy top coat—the high shine is what creates the “glazed donut” effect. The more gloss, the better.
Recommended Products
- Budget-Friendly: Beetles Gel “Sheer Pink Pearl” or “Pink Shimmer” ($10-12), Modelones “Glazed Pink” ($9)
- Mid-Range: Revel Nail “D238 Pearl” or “D9 Priscilla” with shimmer ($14-16), Kiara Sky “D565 Pink Spark” ($14)
- Professional: OPI Powder Perfection “Pearl of Wisdom” ($17), SNS “AC29 Shimmer Pink” ($18)
- Essential: Ultra-glossy top coat—Kiara Sky Beyond Gloss ($13) or Revel Gel Top Coat ($12) for maximum shine
6. Mushroom Beige
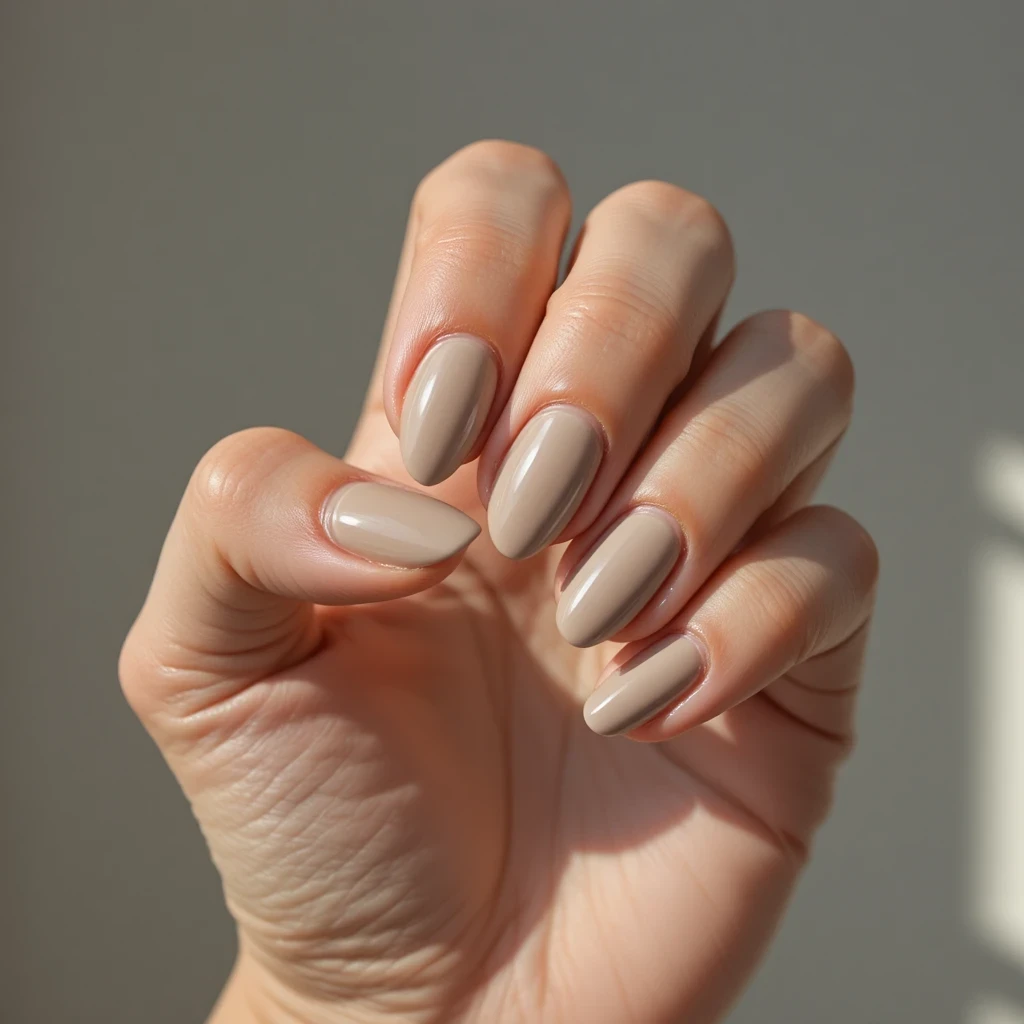
Cool-toned greige that sits perfectly between gray and beige. This sophisticated neutral works as a chameleon, adapting to whatever you pair it with. The cool undertones prevent it from reading too warm or looking like a sad beige that washes you out.
Why It Works for January: The cool undertones complement winter’s muted color palette and look incredibly chic with black, white, and gray outfits.
Pro Tip: This shade photographs beautifully and looks more expensive in person. Try it on short to medium squoval nails for a modern editorial vibe.
How to Create This Look
- Prep nails and file to squoval shape (square with rounded corners).
- Buff surface and clean thoroughly with alcohol.
- Apply base coat and dip into greige/mushroom powder—this color is pigmented and may need only 2 coats.
- Repeat for second coat to ensure even, full coverage.
- Brush away excess powder, apply activator, wait 2 minutes.
- File edges to perfect the squoval shape and buff surface smooth.
- Wipe clean with alcohol, apply second activator, wait 2 minutes.
- Apply glossy top coat in 2 thin coats for a polished, expensive-looking finish.
- Finish with cuticle oil.
Recommended Products
- Budget-Friendly: Beetles Gel “Mushroom” or “Cool Greige” ($9-11), Modelones “Greige” ($9)
- Mid-Range: Revel Nail “D38 Stella” or “D115 Giselle” ($13-15), Kiara Sky “D407 The Simple Life” ($14)
- Professional: OPI Powder Perfection “Berlin There Done That” or “Icelanded a Bottle of OPI” ($17), SNS “BD05 Greige” ($18)
Cool-Toned January Dip Nails
7. Soft Gray Elegance
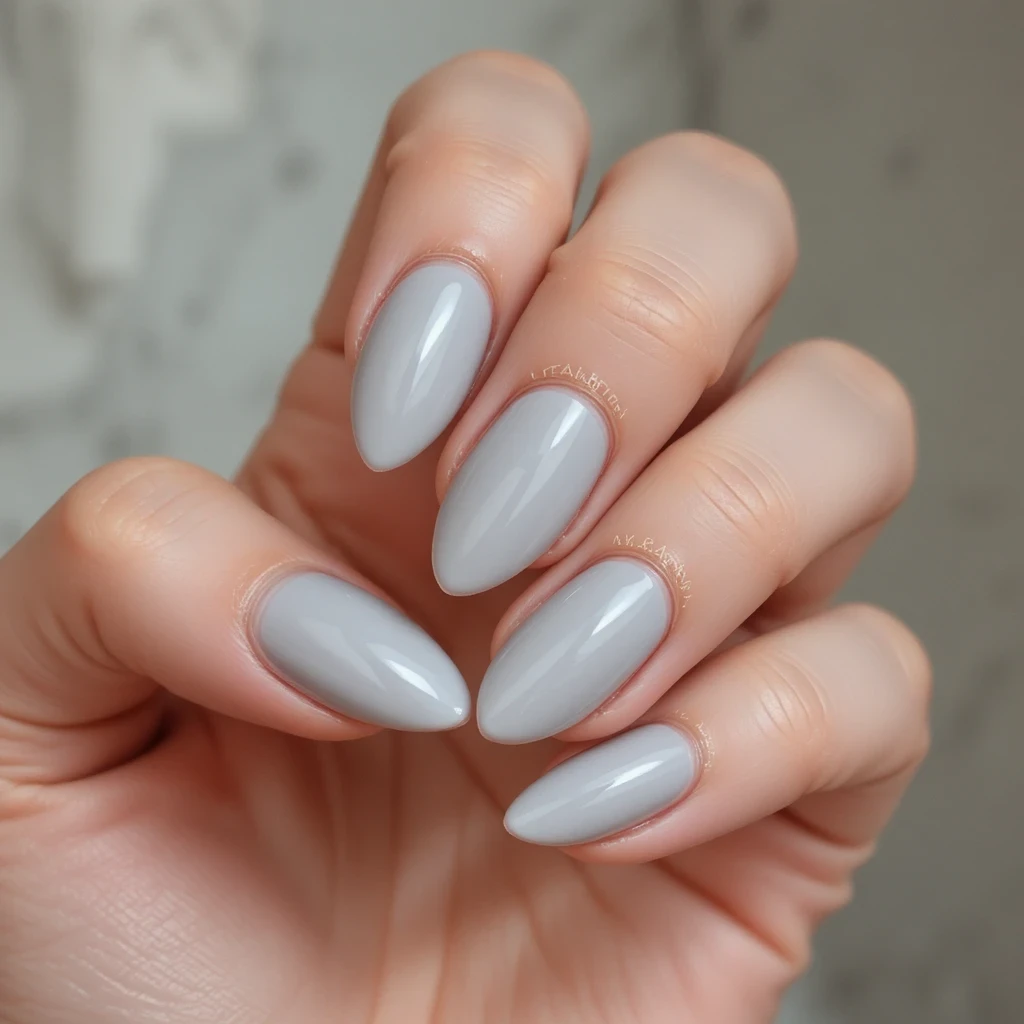
Light dove gray with neutral undertones that reads sophisticated and modern. This shade walks the line between edgy and elegant perfectly. It’s gray enough to feel current but soft enough to work in professional settings without raising eyebrows.
Why It Works for January: Gray is winter’s signature color, and this soft version feels fresh rather than moody or depressing. It coordinates with winter wardrobes effortlessly.
Pro Tip: Choose a satin finish instead of full matte for a more forgiving look that hides minor imperfections and surface irregularities.
How to Create This Look
- Complete standard nail prep with extra attention to smooth buffing.
- Apply base coat and dip into light gray powder. This color usually needs 2-3 coats for solid coverage.
- Repeat dipping for even, opaque color.
- Apply activator, wait 2 minutes, then file and buff smooth.
- Wipe clean, apply second activator, wait 2 minutes.
- For satin finish: Apply one coat glossy top coat, then one coat matte top coat. This creates a soft satin sheen that’s more forgiving than pure matte.
- Alternatively: Use only glossy top coat for a sleek, modern look.
Recommended Products
- Budget-Friendly: Beetles Gel “Soft Gray” or “Dove Gray” ($9), Modelones “Light Gray” ($8-10)
- Mid-Range: Revel Nail “D42 Vivian” or “D180 Sweet Gray” ($13), Kiara Sky “D555 City Never Sleeps” ($14)
- Professional: OPI Powder Perfection “Engage-meant to Be” or “Taupe-less Beach” ($17), SNS “LV19 Dove Gray” ($18)
- For Satin Finish: Layer Kiara Sky Glossy + Matte Top Coat
8. Icy Blue Shimmer
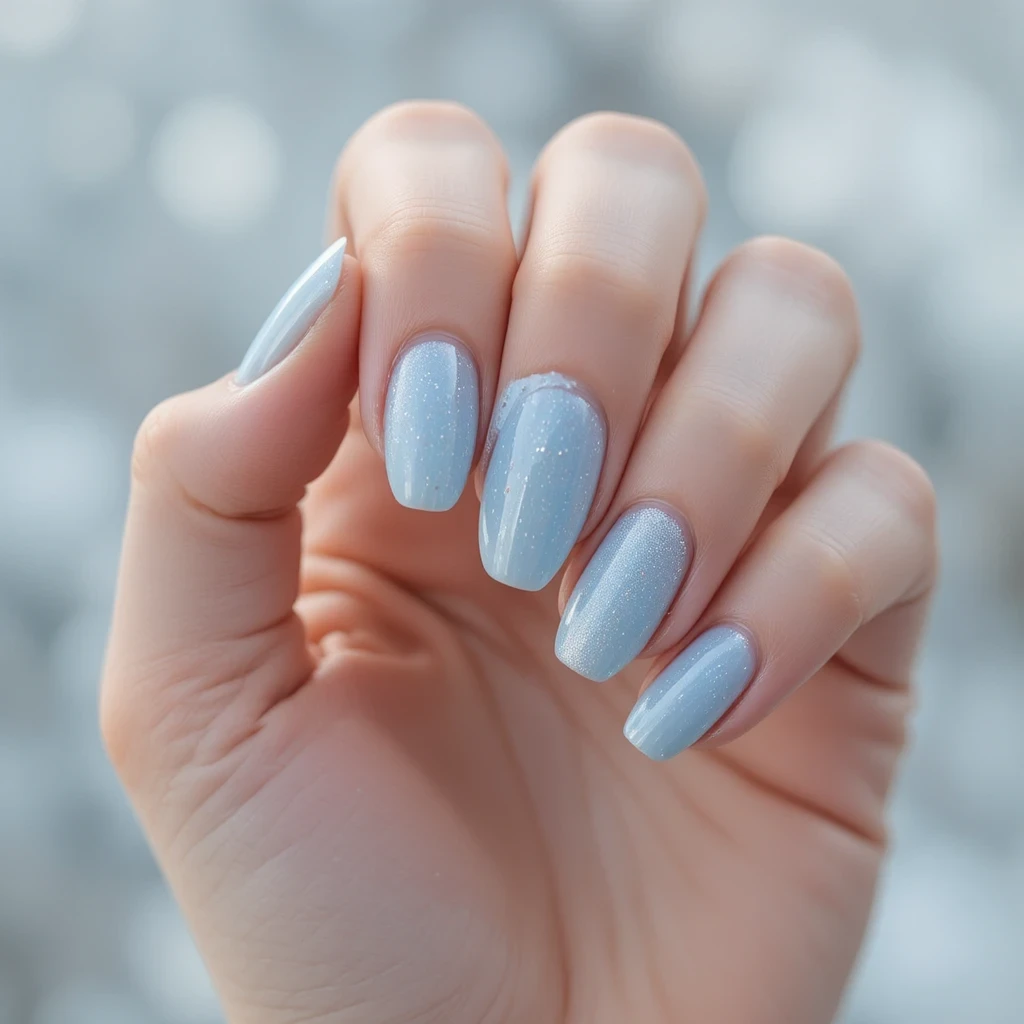
Pale blue with silver micro-shimmer that mimics frozen winter mornings. Delicate enough to wear anywhere but interesting enough to get compliments. The shimmer particles are fine enough that they don’t look chunky or juvenile, creating a sophisticated frosty effect.
Why It Works for January: Captures the essence of winter without looking costume-y or themed. The shimmer adds just enough sparkle without screaming “holiday nails.”
Pro Tip: Apply shimmer shades in thin layers to prevent chunky buildup. Short to medium squoval nails show off the shimmer beautifully.
How to Create This Look
- Prep nails and file to short or medium squoval shape.
- Apply base coat thinly and dip into icy blue shimmer powder.
- Tap off excess gently—shimmer powders require light tapping to preserve sparkle.
- Apply 2-3 thin coats for buildable color and shimmer. Thin layers prevent the glitter from looking chunky.
- Apply activator carefully, wait 2 minutes.
- File edges and buff lightly—be gentle to preserve the shimmer particles.
- Wipe clean, apply second activator, wait 2 minutes.
- Apply glossy top coat in 2 thin layers to enhance the shimmer and create a glass-like finish.
Recommended Products
- Budget-Friendly: Beetles Gel “Ice Blue Shimmer” or “Frozen” ($10-12), Modelones “Blue Glitter” ($9)
- Mid-Range: Revel Nail “D239 Frost” or “D264 Ice Queen” ($14-16), Kiara Sky “D570 Blue Shimmer” ($15)
- Professional: OPI Powder Perfection “Did You See Those Mussels?” or “Ski Teal We Drop” (light application) ($17), SNS “LC23 Ice Blue” ($18)
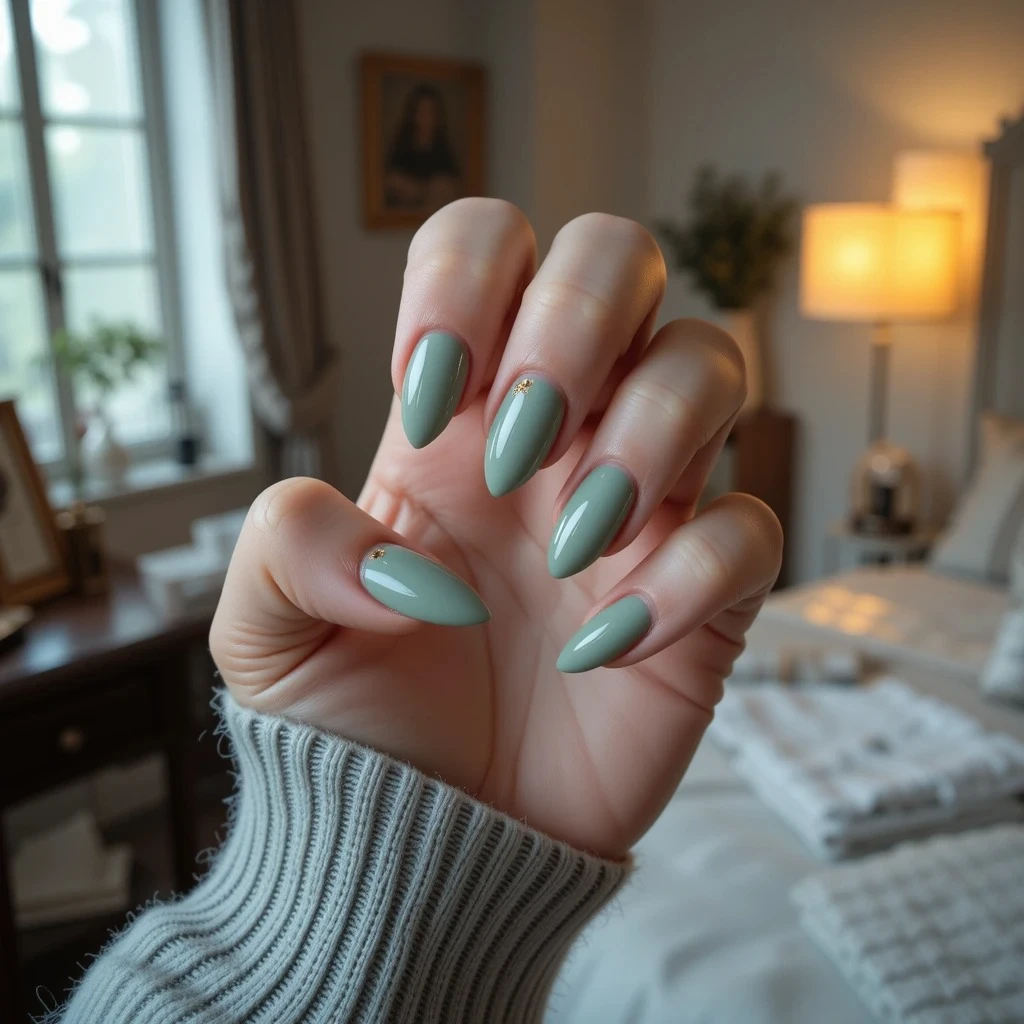
9. Dusty Sage Green
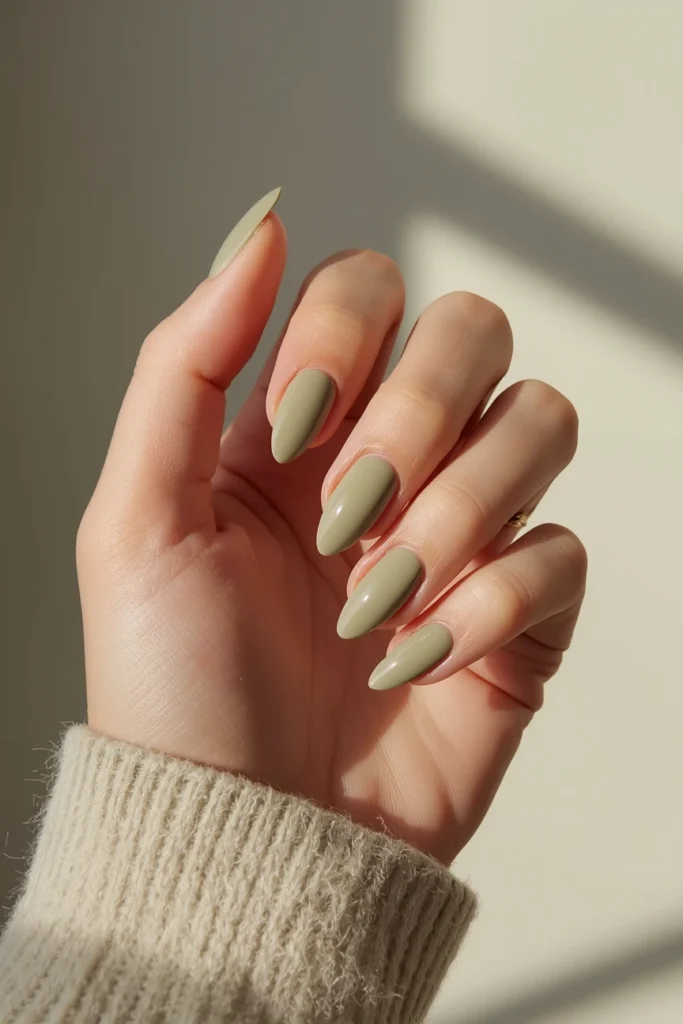
Muted olive-sage that brings an earthy, organic vibe to your nails. This shade feels grounding and calming during hectic January schedules. The dusty quality keeps it from looking too bright or summery, making it perfect for winter’s subdued palette.
Why It Works for January: Green tones are trending in winter fashion, and this dusty version coordinates with your winter wardrobe effortlessly without competing for attention.
Pro Tip: Try a matte finish on sage for a modern twist, or keep it glossy for classic appeal. Oval nails elongate fingers nicely with this color.
How to Create This Look
- Prep nails and file to oval shape for an elongating effect.
- Apply base coat and dip into dusty sage/olive powder—this color is usually well-pigmented.
- Apply 2 coats for full, even coverage.
- Brush powder, apply activator, wait 2 minutes.
- File edges and buff smooth.
- Wipe clean, apply second activator, wait 2 minutes.
- For modern look: Apply matte top coat. For classic look: Apply glossy top coat.
Recommended Products
- Budget-Friendly: Beetles Gel “Sage Green” or “Dusty Olive” ($9-11), Modelones “Sage” ($9)
- Mid-Range: Revel Nail “D156 Eden” or “D220 Olive” ($13-15), Kiara Sky “D606 Olive You” ($14)
- Professional: OPI Powder Perfection “Suzi: The First Lady of Nails” or “Olive for Green” ($17), SNS “359 Sage” ($18)
10. Steel Blue Chrome
Medium steel blue with a reflective chrome finish that shifts in different lighting. Bold enough to stand out, cool enough to stay wearable. The chrome creates a mirror-like effect that’s eye-catching but still feels polished and intentional rather than flashy.
Why It Works for January: Chrome finishes are having a major moment, and blue-gray tones feel seasonally perfect for winter. It’s unexpected but totally appropriate.
Pro Tip: Chrome shows every surface flaw, so prep nails thoroughly with buffing and proper base application. Keep your nail length short to medium for easiest maintenance.
How to Create This Look
- Prep nails with extra attention—buff surface completely smooth as chrome shows every imperfection.
- Apply base coat and dip into steel blue or gray-blue powder. Apply 2 coats for solid base color.
- Apply activator, wait 2 minutes, then buff surface perfectly smooth—this is critical for chrome.
- Wipe clean, apply second activator, wait 2 minutes.
- Apply no-wipe gel top coat (must be gel, not regular dip top coat).
- While gel top coat is tacky, use silicone applicator or eyeshadow brush to rub chrome powder onto nail in circular motions.
- Buff chrome powder until you achieve mirror-like shine.
- Brush away excess chrome powder gently.
- Apply another layer of no-wipe gel top coat to seal the chrome.
- Cure or let dry according to top coat instructions.
Recommended Products
- Base Color – Budget: Beetles Gel “Steel Blue” or “Slate Gray” ($9-11)
- Base Color – Mid-Range: Revel Nail “D42 Vivian” or Kiara Sky “D555 City Never Sleeps” ($13-14)
- Chrome Powder: Kiara Sky Chrome Powder in Blue or Silver ($10), Born Pretty Mirror Powder ($7-9)
- No-Wipe Gel Top Coat: Kiara Sky No-Wipe Top Coat ($13), Modelones No-Wipe Gel ($9)—essential for chrome application
- Applicator: Silicone nail art tool or soft eyeshadow brush
11. Cloud Gray Cream
Pale gray-white that looks like winter clouds. Soft, neutral, and endlessly versatile for mixing and matching with any outfit. This shade has enough gray to feel intentional but stays light enough to keep your hands looking bright and fresh.
Why It Works for January: Light gray offers more visual interest than white while staying just as clean and minimal. It’s the perfect compromise color.
Pro Tip: This shade photographs beautifully for social media content. Pair with silver jewelry to complete the monochromatic winter look.
How to Create This Look
- Complete standard nail prep, ensuring cuticles are pushed back cleanly.
- Clean with alcohol and let dry.
- Apply base coat and dip into pale gray powder—this color may need 3 coats for full opacity.
- Repeat dipping process 2-3 times until color is even and opaque.
- Brush away powder, apply activator, wait 2 minutes.
- File edges and buff surface smooth.
- Wipe clean, apply second activator, wait 2 minutes.
- Apply 2 coats of glossy top coat for a creamy, polished finish.
- Finish with cuticle oil.
- Style tip: Pair with silver rings and bracelets for Instagram-worthy photos.
Recommended Products
- Budget-Friendly: Beetles Gel “Pale Gray” or “Cloud” ($9), Modelones “Light Gray” ($8-10)
- Mid-Range: Revel Nail “D180 Sweet Gray” ($13), Kiara Sky “D482 Gray-T Kisses” ($14)
- Professional: OPI Powder Perfection “Engage-meant to Be” ($17), SNS “LV08 Cloud” ($18)
12. Frosted Lavender
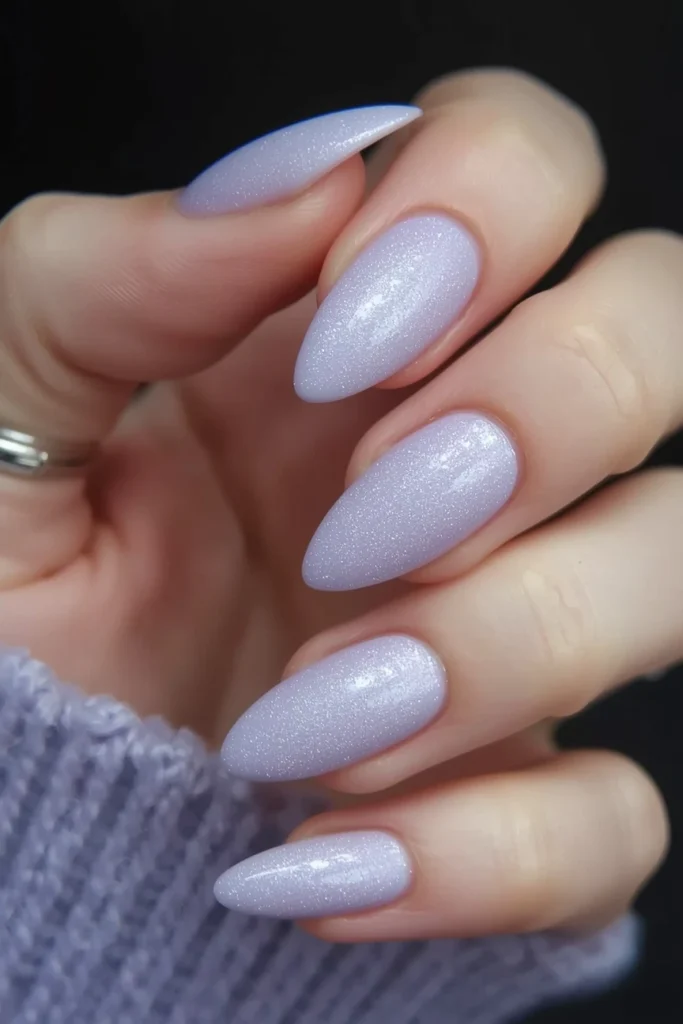
Pale lavender with a subtle silver shimmer that feels ethereal and romantic. This unexpected pastel works surprisingly well in winter when applied in dip powder. The cool undertones and shimmer prevent it from reading too spring-like or juvenile.
Why It Works for January: Offers a soft alternative to traditional winter colors while still feeling seasonally appropriate and fresh. It’s different without being difficult to wear.
Pro Tip: Keep the finish glossy to prevent the lavender from looking chalky or faded. This shade looks best on medium to long nails.
How to Create This Look
- Prep nails and file to medium or long length for best effect.
- Buff surface and clean with alcohol.
- Apply base coat and dip into frosted lavender shimmer powder.
- Apply 2-3 thin coats—lavender can look patchy with thick application.
- Tap off excess gently to preserve shimmer particles.
- Apply activator, wait 2 minutes.
- File edges and buff lightly—don’t over-buff or you’ll lose the shimmer.
- Wipe clean, apply second activator, wait 2 minutes.
- Apply 2 coats of high-gloss top coat—shine prevents lavender from looking chalky.
- Finish with cuticle oil for a polished, romantic look.
Recommended Products
- Budget-Friendly: Beetles Gel “Lavender Shimmer” or “Frosted Purple” ($10-12), Modelones “Lavender Glitter” ($9)
- Mid-Range: Revel Nail “D261 Lavender” ($14), Kiara Sky “D571 Lavender Shimmer” ($15)
- Professional: OPI Powder Perfection “Do You Lilac It?” ($17), SNS “LC16 Lavender” ($18)
Deep & Moody January Dip Nails
13. Deep Plum
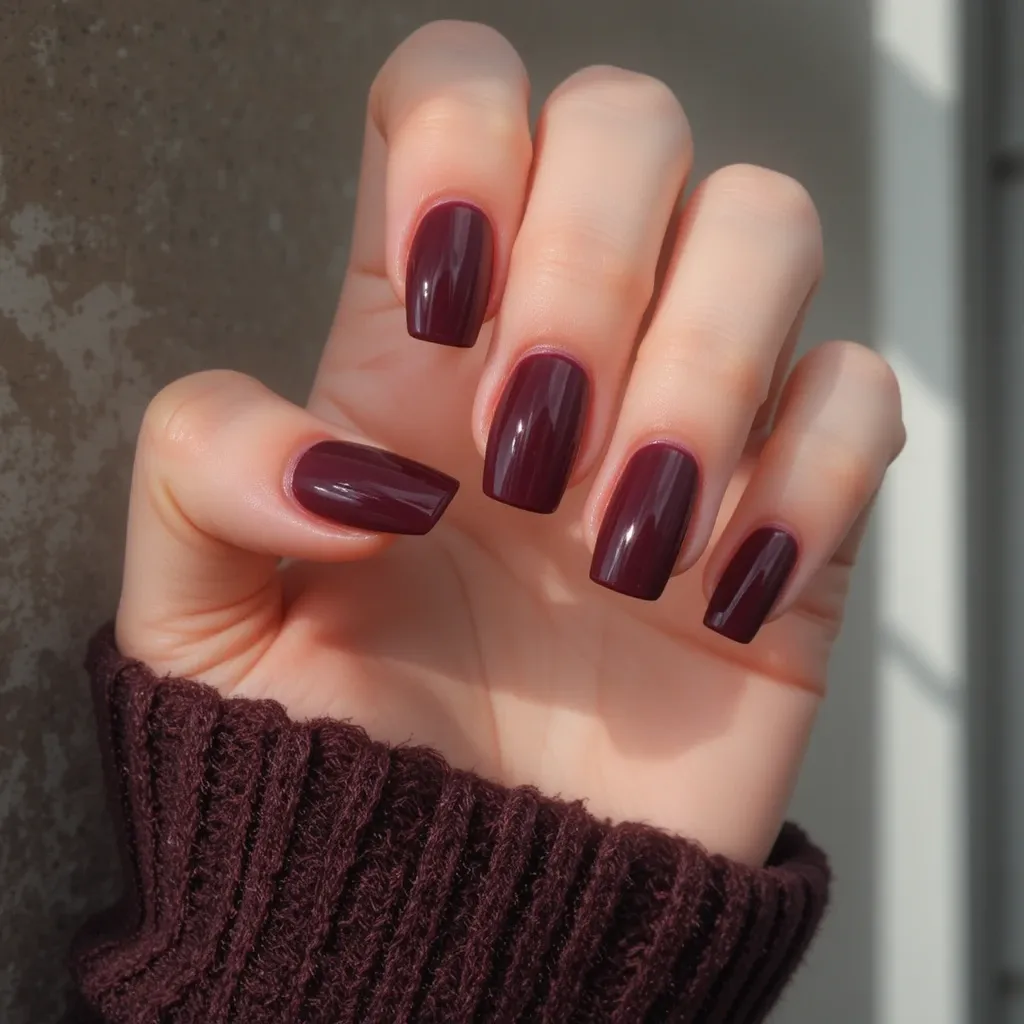
Rich burgundy-plum that feels luxurious and vampy without going full gothic. This shade has enough warmth to avoid looking harsh against winter skin tones. The depth makes it feel expensive and intentional, like you planned this manicure specifically for your winter aesthetic.
Why It Works for January: Dark jewel tones feel cozy and elegant during winter months, and plum is more wearable than black for everyday situations.
Pro Tip: Apply 2-3 coats for full opacity and rich color payoff. This color looks stunning on longer nails but works on any length with a glossy finish.
How to Create This Look
- Prep nails thoroughly—dark colors show application mistakes, so ensure edges are clean.
- Clean nails with alcohol and let dry completely.
- Apply base coat carefully, leaving 1mm gap at cuticle line. Dark colors make mistakes more visible.
- Dip nail into deep plum powder at 45-degree angle, hold for 2-3 seconds.
- Repeat for 2-3 coats until you achieve deep, rich color. Dark shades need multiple coats for full opacity.
- Brush away excess powder thoroughly—any loose powder will show in the finish.
- Apply activator, wait full 2 minutes.
- File edges carefully and buff surface completely smooth. Dark colors show texture.
- Wipe clean thoroughly, apply second activator, wait 2 minutes.
- Apply 2 coats of glossy top coat for maximum richness and depth. Dark colors look stunning with high shine.
Recommended Products
- Budget-Friendly: Beetles Gel “Deep Plum” or “Burgundy” ($9-11), Modelones “Plum Wine” ($9)
- Mid-Range: Revel Nail “D52 Anna” or “D171 Crimson” ($13-15), Kiara Sky “D505 Purple Spark” ($14)
- Professional: OPI Powder Perfection “Lincoln Park After Dark” or “Black Cherry Chutney” ($17), SNS “LC21 Plum” ($18)
- Essential: High-gloss top coat to maximize the rich, jewel-tone effect
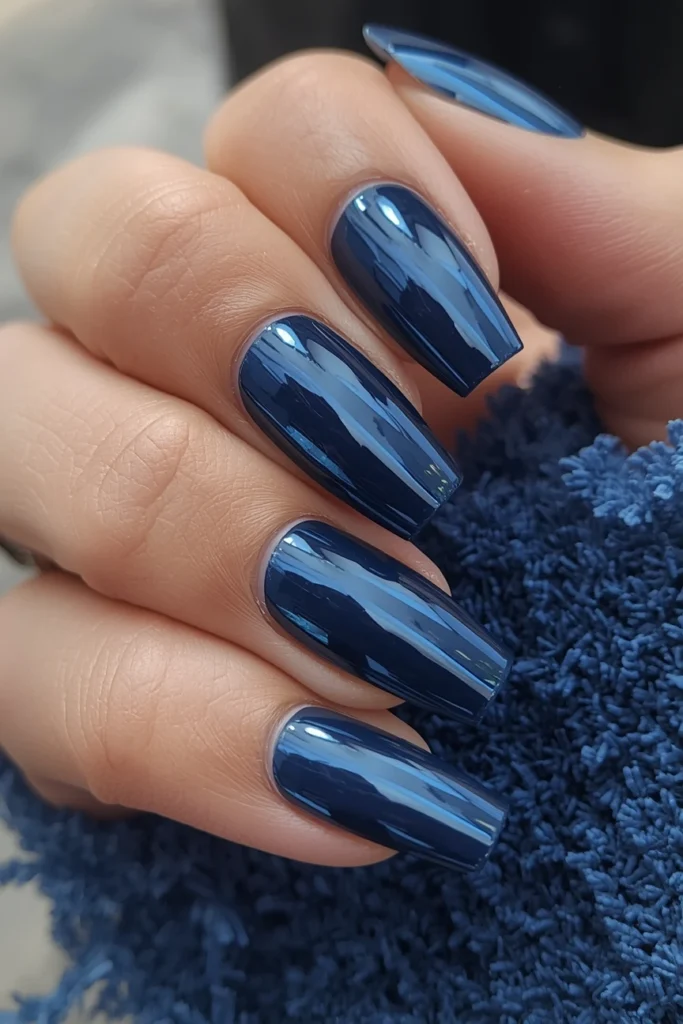
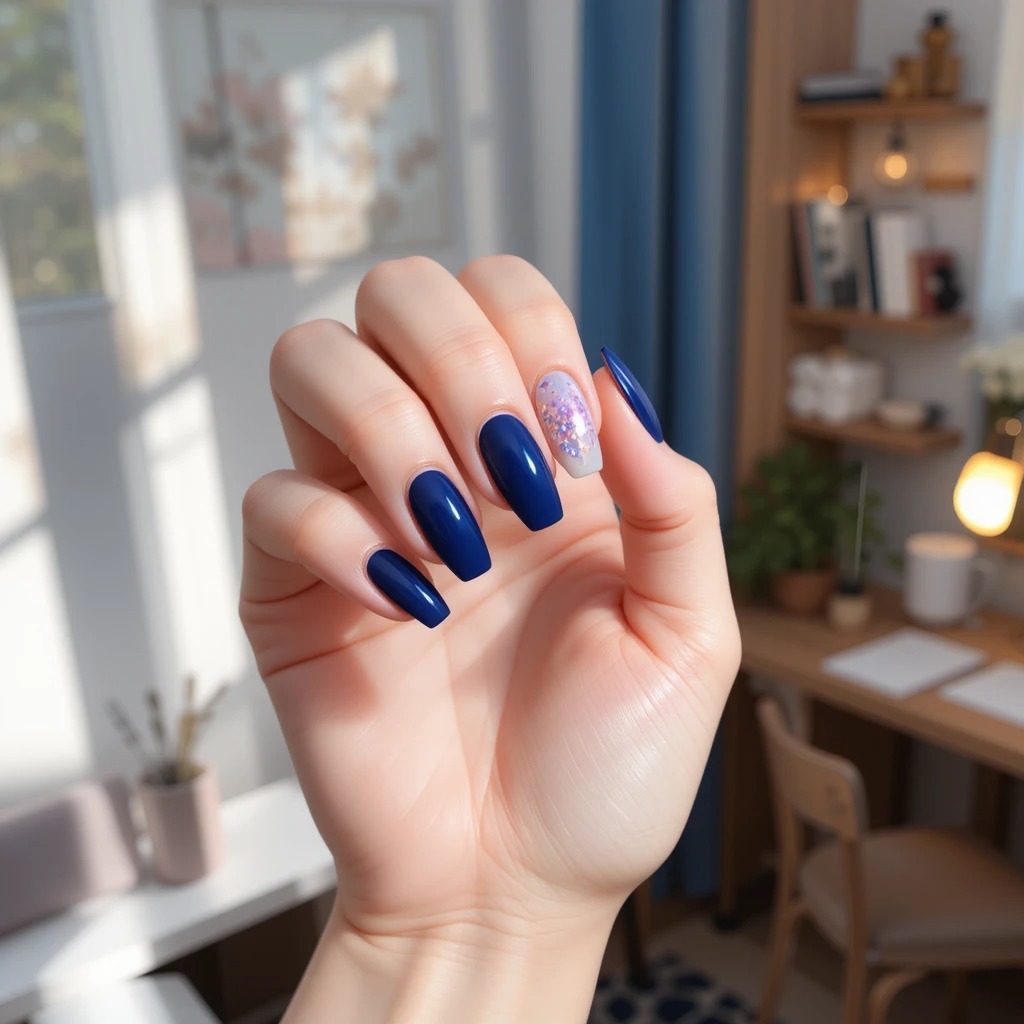
14. Midnight Navy
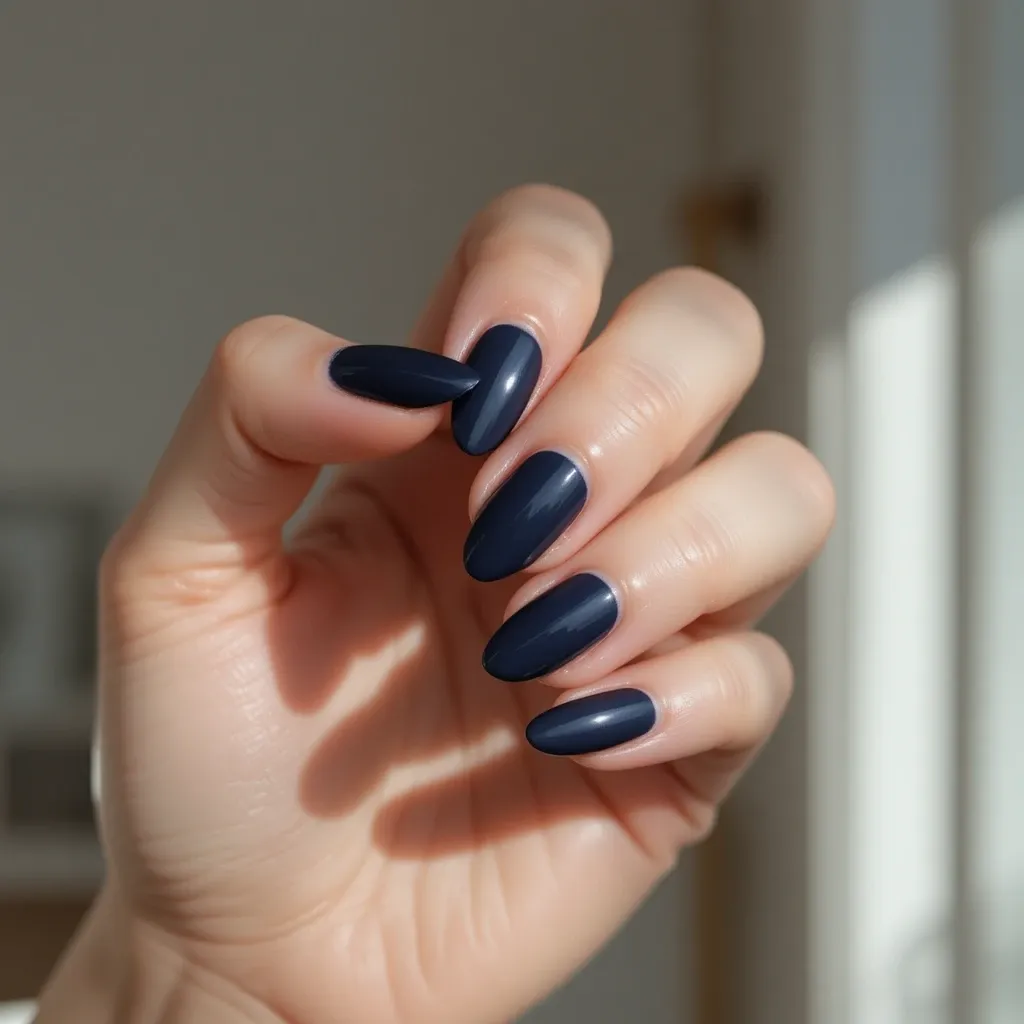
Deep navy blue that reads almost black in low light but shows rich blue undertones in sunlight. Classic and unexpectedly versatile for both casual and formal settings. The depth gives it sophistication while the blue keeps it from feeling as severe as true black.
Why It Works for January: Navy is winter’s sophisticated alternative to black—just as polished but more interesting and slightly softer on the eyes.
Pro Tip: Navy shows chips more visibly than lighter shades, so make sure your dip application reaches the sidewalls properly for maximum longevity.
How to Create This Look
- Prep nails meticulously—dark colors show every mistake, so ensure clean cuticle lines.
- Buff and clean with alcohol, let dry completely.
- Apply base coat carefully to sidewalls and free edge—this prevents chipping.
- Dip into midnight navy powder. Apply 2-3 coats for deep, rich color.
- Ensure powder reaches all edges and sidewalls—gaps will show.
- Brush away excess thoroughly, apply activator, wait full 2 minutes.
- File edges carefully and buff surface completely smooth.
- Wipe clean, apply second activator, wait 2 minutes.
- Apply 2 coats glossy top coat, making sure to cap the free edge thoroughly.
- Apply cuticle oil daily to maintain professional appearance.
Recommended Products
- Budget-Friendly: Beetles Gel “Midnight Navy” or “Deep Blue” ($9-11), Modelones “Navy Blue” ($9)
- Mid-Range: Revel Nail “D53 Avery” or “D149 Navy” ($13-15), Kiara Sky “D502 Navy Blue” ($14)
Professional: OPI Powder Perfection “Russian Navy” or “Yoga-ta Get This Blue” ($17), SNS “LC06 Navy” ($18)
15. Chocolate Truffle
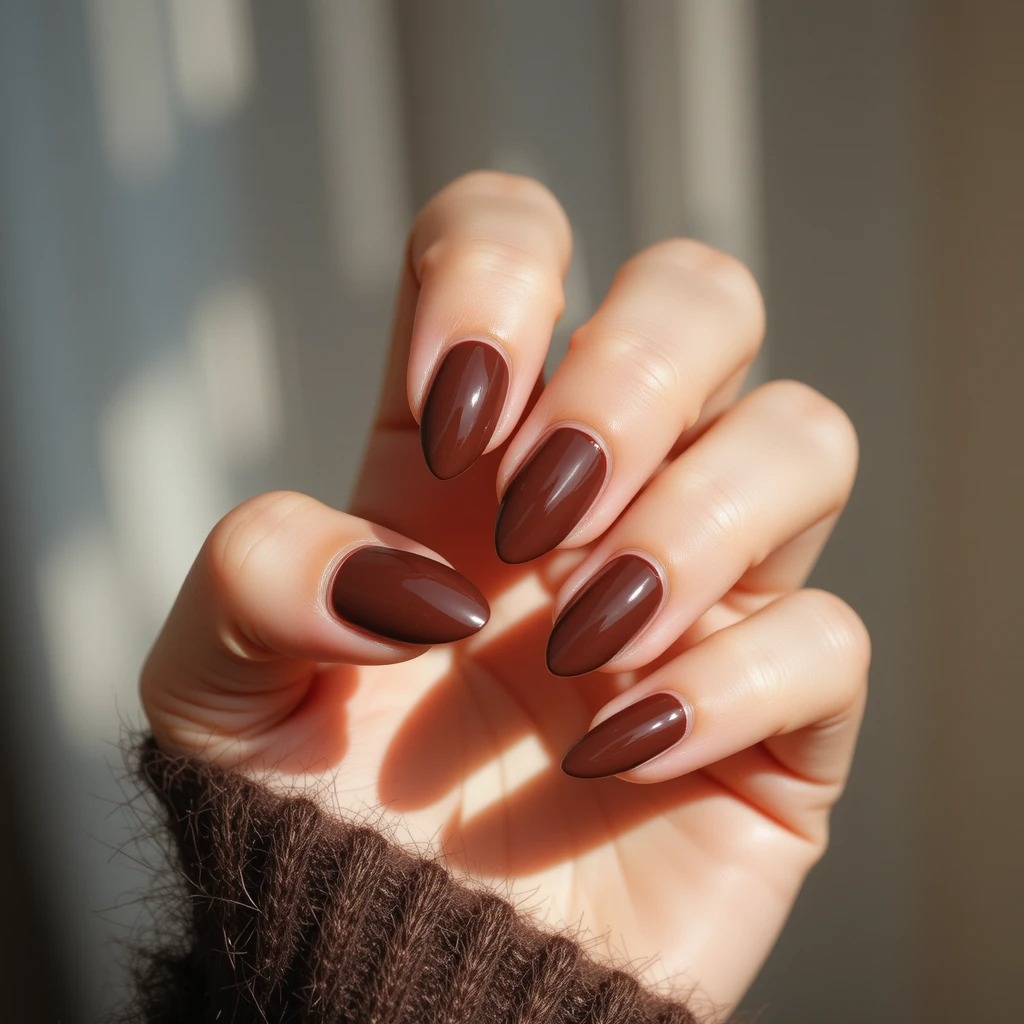
Warm deep brown with subtle red undertones. This shade looks expensive and goes with literally everything in your winter closet. The richness feels indulgent while the brown keeps it grounded and wearable for daily life.
Why It Works for January: Brown tones are having a major resurgence, and this rich version feels modern, elevated, and totally unexpected in the best way.
Pro Tip: Choose a glossy finish to prevent the color from looking muddy or flat. Works beautifully on all nail shapes, especially rounded styles.
How to Create This Look
- Prep nails and file to round or oval shape for a softer look with this warm color.
- Buff and clean thoroughly with alcohol.
- Apply base coat and dip into chocolate brown powder.
- Apply 2-3 coats for rich, deep brown without any streaking.
- Brush powder, apply activator, wait 2 minutes.
- File and buff surface until completely smooth—brown can look muddy if not buffed well.
- Wipe clean, apply second activator, wait 2 minutes.
- Apply 2-3 coats of high-gloss top coat—the shine makes brown look luxurious instead of dull.
- Finish with cuticle oil.
- Style tip: Pair with gold jewelry for a warm, expensive look.
Recommended Products
- Budget-Friendly: Beetles Gel “Chocolate” or “Deep Brown” ($9-11), Modelones “Brown” ($9)
- Mid-Range: Revel Nail “D115 Giselle” or “D171 Crimson” ($13-15), Kiara Sky “D509 Chocolate Delight” ($14)
Professional: OPI Powder Perfection “Chocolate Moose” or “Espresso Your Style” ($17), SNS “LC11 Chocolate” ($18)
16. Oxblood Red
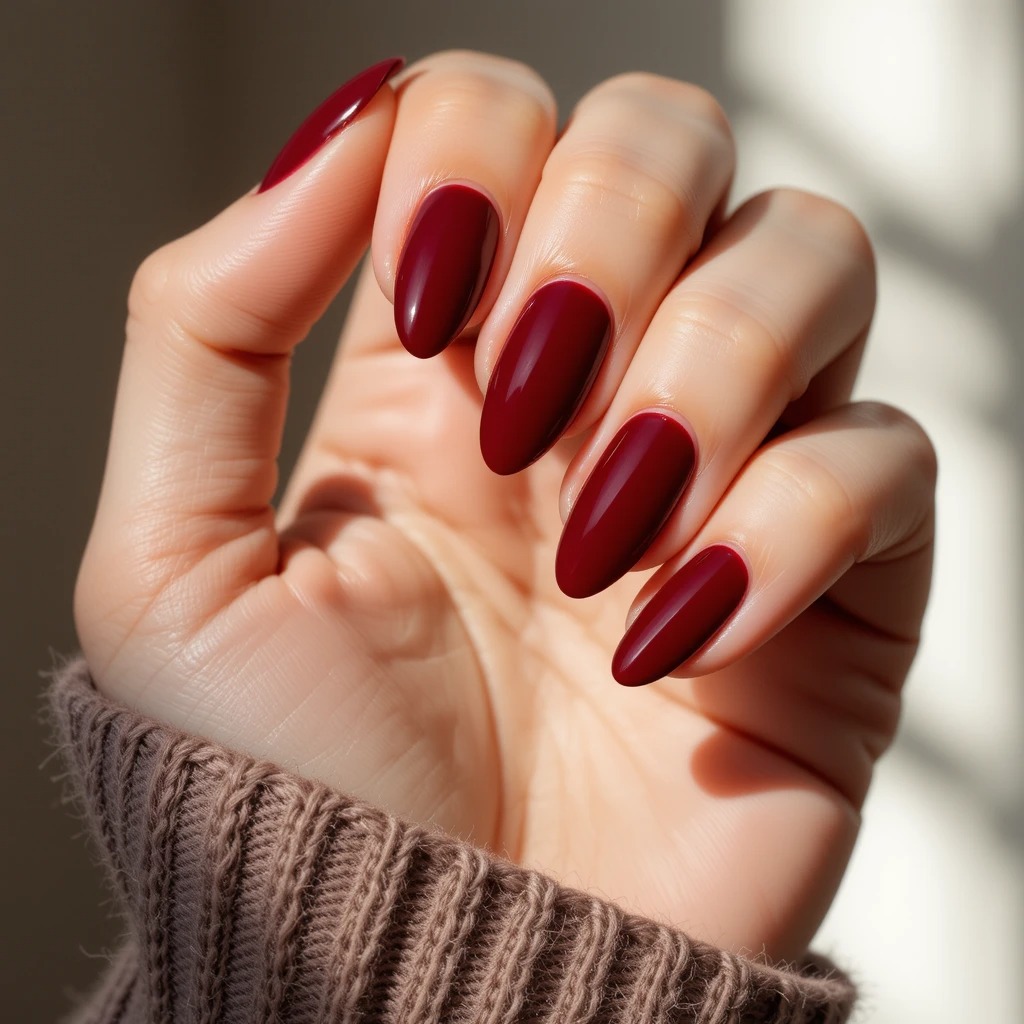
Deep brick-red that’s darker than classic red but not as purple as burgundy. Striking without screaming for attention at every meeting. This shade has enough depth to feel moody and winter-appropriate but maintains that red warmth that makes it feel bold.
Why It Works for January: Red tones carry over from holiday season but this deeper version feels appropriate for the new year and work environments.
Pro Tip: Apply carefully near cuticles—dark shades show application mistakes more than light colors. Squoval or almond shapes look polished with this bold color.
How to Create This Look
- Prep nails carefully and file to squoval or almond shape.
- Push cuticles back cleanly—this color shows sloppy cuticle work.
- Buff and clean with alcohol, let dry completely.
- Apply base coat with precision, leaving 1mm gap at cuticle line.
- Dip into oxblood/brick red powder. Apply 2-3 coats for rich depth.
- Brush away excess, apply activator, wait 2 minutes.
- File edges carefully—dark reds show filing mistakes. Buff smooth.
- Wipe clean, apply second activator, wait 2 minutes.
- Apply 2 coats glossy top coat for maximum shine and depth.
- Finish with cuticle oil to perfect the polished look.
Recommended Products
- Budget-Friendly: Beetles Gel “Oxblood” or “Brick Red” ($9-11), Modelones “Dark Red” ($9)
- Mid-Range: Revel Nail “D52 Anna” or “D71 Ruby” ($13-15), Kiara Sky “D504 Red Haute” ($14)
- Professional: OPI Powder Perfection “Got the Blues for Red” or “Black Cherry Chutney” ($17), SNS “LC12 Oxblood” ($18)
17. Smoky Charcoal
Dark charcoal gray that’s softer than black but just as dramatic. Edgy meets elegant in this versatile winter shade. The gray undertones make it less harsh than black while still delivering that moody, sophisticated vibe you want from a dark manicure.
Why It Works for January: When you want impact without the commitment of jet black, charcoal delivers that moody winter vibe perfectly.
Pro Tip: Try this in a matte finish for maximum edge, or go glossy for a sleeker look. Short nails look particularly chic in dark charcoal.
How to Create This Look
- Prep nails—charcoal looks especially chic on short nails, so don’t feel you need length.
- Buff surface extra smooth (especially if doing matte finish).
- Clean with alcohol and let dry.
- Apply base coat and dip into charcoal gray powder.
- Apply 2-3 coats for deep, opaque charcoal without patchiness.
- Brush powder, apply activator, wait 2 minutes.
- File and buff surface completely smooth—dark colors show texture.
- Wipe clean, apply second activator, wait 2 minutes.
- For edgy look: Apply matte top coat in one even layer.
- For sleek look: Apply 2 coats glossy top coat.
Recommended Products
- Budget-Friendly: Beetles Gel “Charcoal” or “Dark Gray” ($9-11), Modelones “Charcoal Gray” ($9)
- Mid-Range: Revel Nail “D144 Charcoal” ($13), Kiara Sky “D558 Charcoal Couture” ($14)
- Professional: OPI Powder Perfection “Dark Side of the Mood” ($17), SNS “LC20 Charcoal” ($18)
- Finish Options: Kiara Sky Matte Top Coat for edgy, or regular Glossy Top for sleek
18. Forest Green Velvet
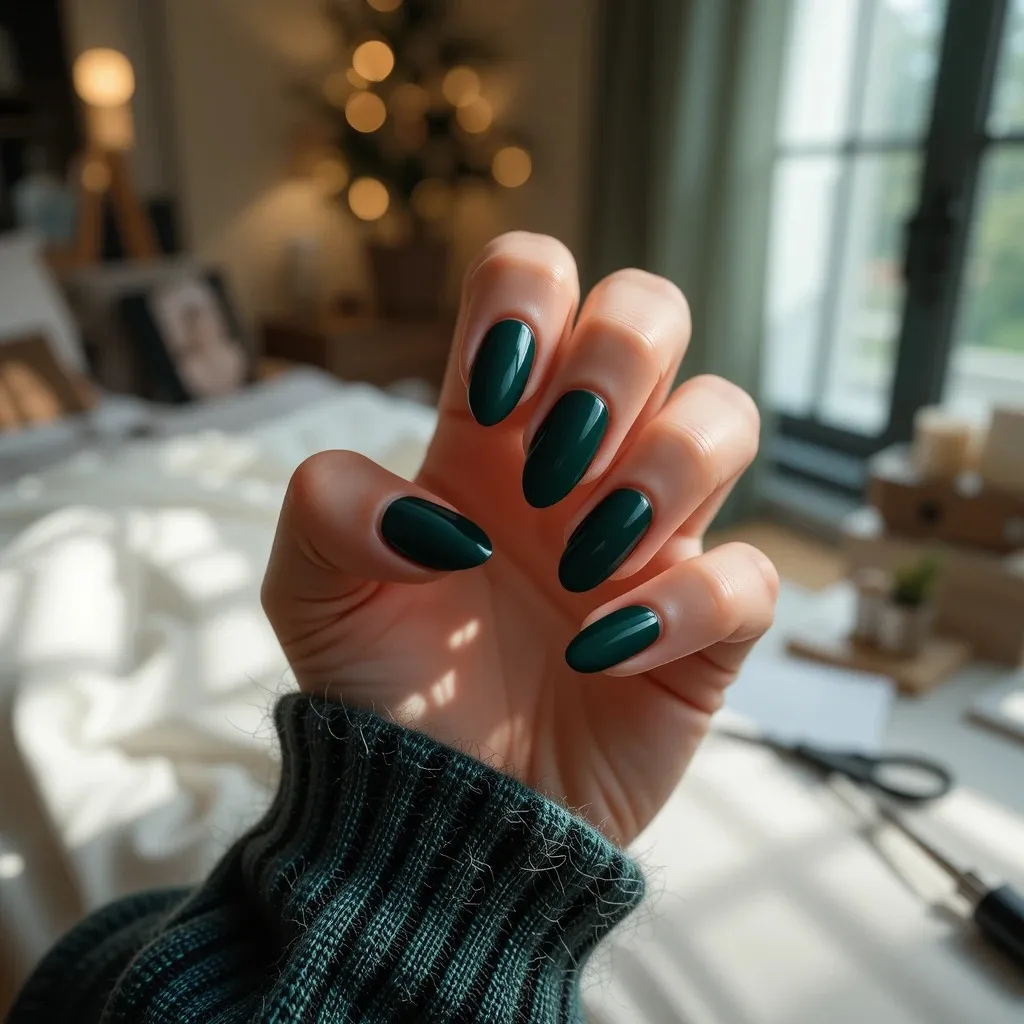
Deep emerald-forest green that feels rich and jewel-toned. This shade brings unexpected sophistication and pairs beautifully with gold jewelry. The depth keeps it from looking too bright or summery, making it feel grounded and luxurious for winter.
Why It Works for January: Green is a refreshing alternative to typical winter darks like burgundy and navy, and this deep version feels cozy rather than bright.
Pro Tip: Apply with a satin or matte finish for a luxurious velvet effect. Medium to long nails show off the richness of this color best.
How to Create This Look
- Prep nails and file to medium or long length to showcase this jewel tone.
- Buff surface smooth and clean with alcohol.
- Apply base coat and dip into deep forest/emerald green powder.
- Apply 2-3 coats for rich, saturated green color.
- Brush powder, apply activator, wait 2 minutes.
- File edges and buff surface completely smooth for velvet effect.
- Wipe clean, apply second activator, wait 2 minutes.
- For velvet effect: Apply one coat glossy + one coat matte for satin finish.
- For classic look: Apply 2 coats glossy top coat.
- Style with gold rings and bracelets for luxurious winter aesthetic.
Recommended Products
- Budget-Friendly: Beetles Gel “Forest Green” or “Emerald” ($9-11), Modelones “Dark Green” ($9)
- Mid-Range: Revel Nail “D103 Eden” or “D220 Olive” (darker) ($13-15), Kiara Sky “D608 In the Tropics” ($14)
- Professional: OPI Powder Perfection “Envy the Adventure” or “Stay Off the Lawn” ($17), SNS “368 Forest Green” ($18)
Elegant Accent & Chrome January Dip Nails
19. Nude with Silver Chrome Accent
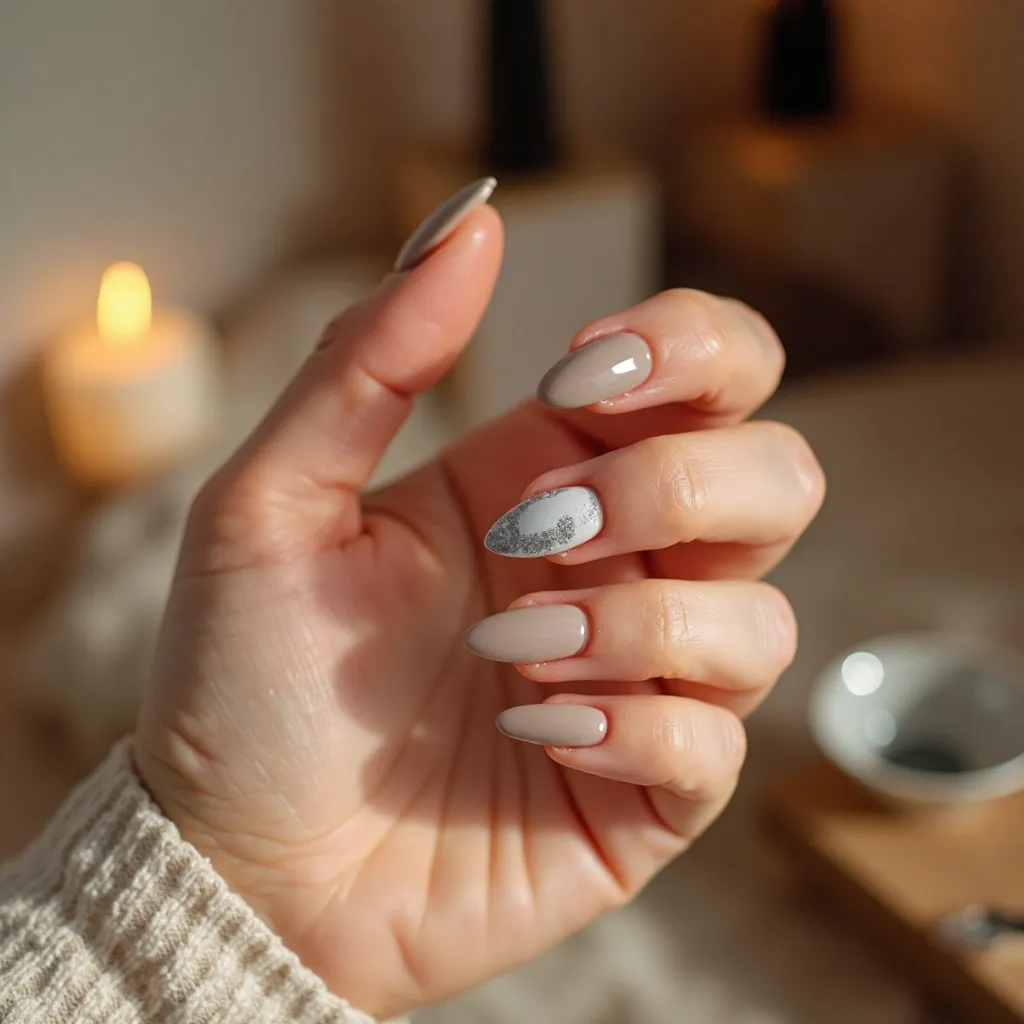
Creamy nude base on most nails with one chrome silver accent nail per hand. The contrast is eye-catching without being overwhelming or unprofessional. This design gives you the versatility of nude nails with just enough sparkle to keep things interesting and visually dynamic.
Why It Works for January: Gives you the best of both worlds—wearable neutrals for daily life plus a touch of winter sparkle for visual interest.
Pro Tip: Place the chrome accent on your ring finger for a classic look, or try the middle finger for something more modern and unexpected.
How to Create This Look
- Prep all nails with standard process.
- Apply creamy nude dip powder to ALL nails first (2-3 coats for opacity).
- Complete activator, filing, buffing for all nails. Apply second activator.
- Apply regular glossy top coat to all nude nails. Set aside.
- For accent nails (one per hand—ring or middle finger): Apply no-wipe gel top coat instead.
- While gel top coat is tacky, rub silver chrome powder onto accent nails with silicone tool in circular motions.
- Buff chrome powder to mirror shine, brush away excess.
- Seal chrome accent nails with another layer of no-wipe gel top coat.
- Let cure/dry completely.
- Apply cuticle oil to all nails.
Recommended Products
- Nude Base – Budget: Beetles Gel “Nude Beige” ($9), Modelones “Creamy Nude” ($9)
- Nude Base – Mid-Range: Revel Nail “D11 Cashmere” ($13), Kiara Sky “D403 Bare Elegance” ($14)
- Chrome Powder: Kiara Sky Silver Chrome Powder ($10), Born Pretty Mirror Powder Silver ($7)
- No-Wipe Gel Top Coat: Kiara Sky No-Wipe ($13) or Modelones No-Wipe Gel ($9)
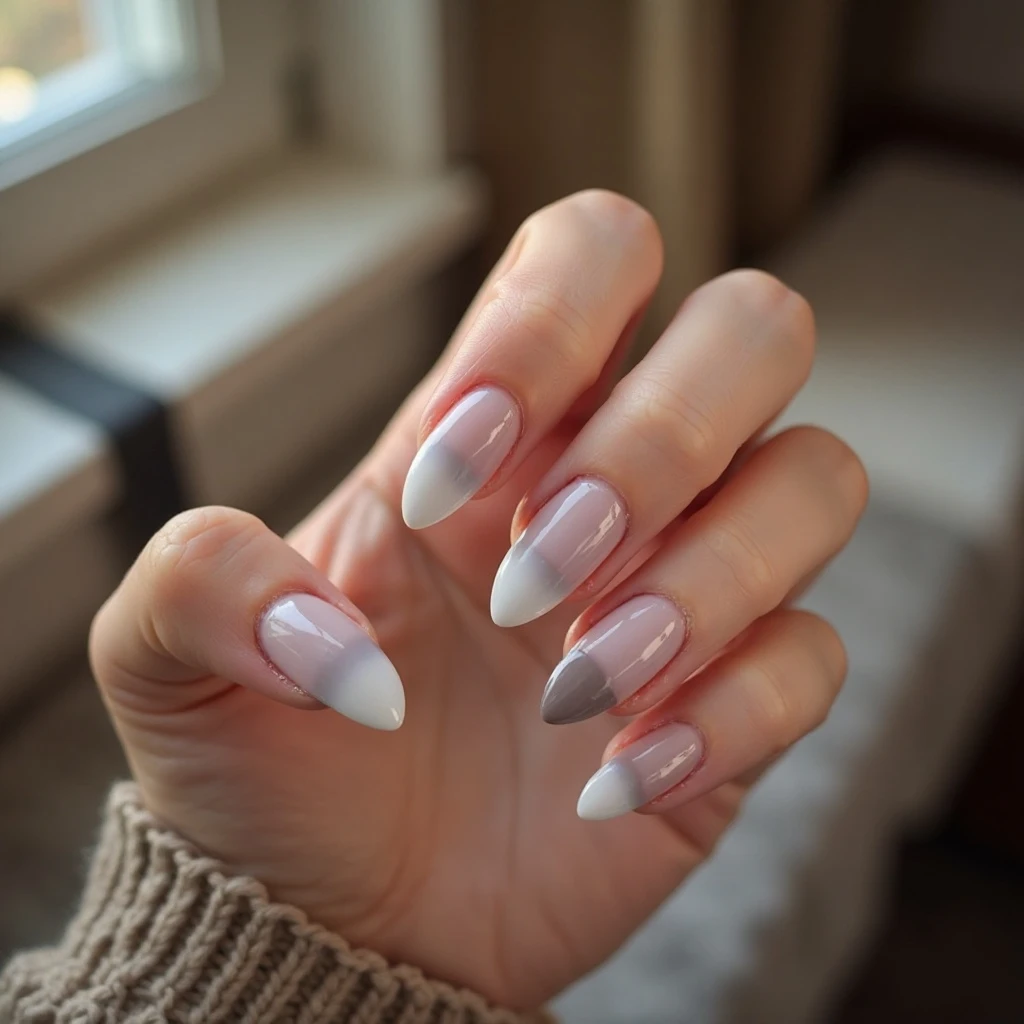
20. French Tips with Gray Twist
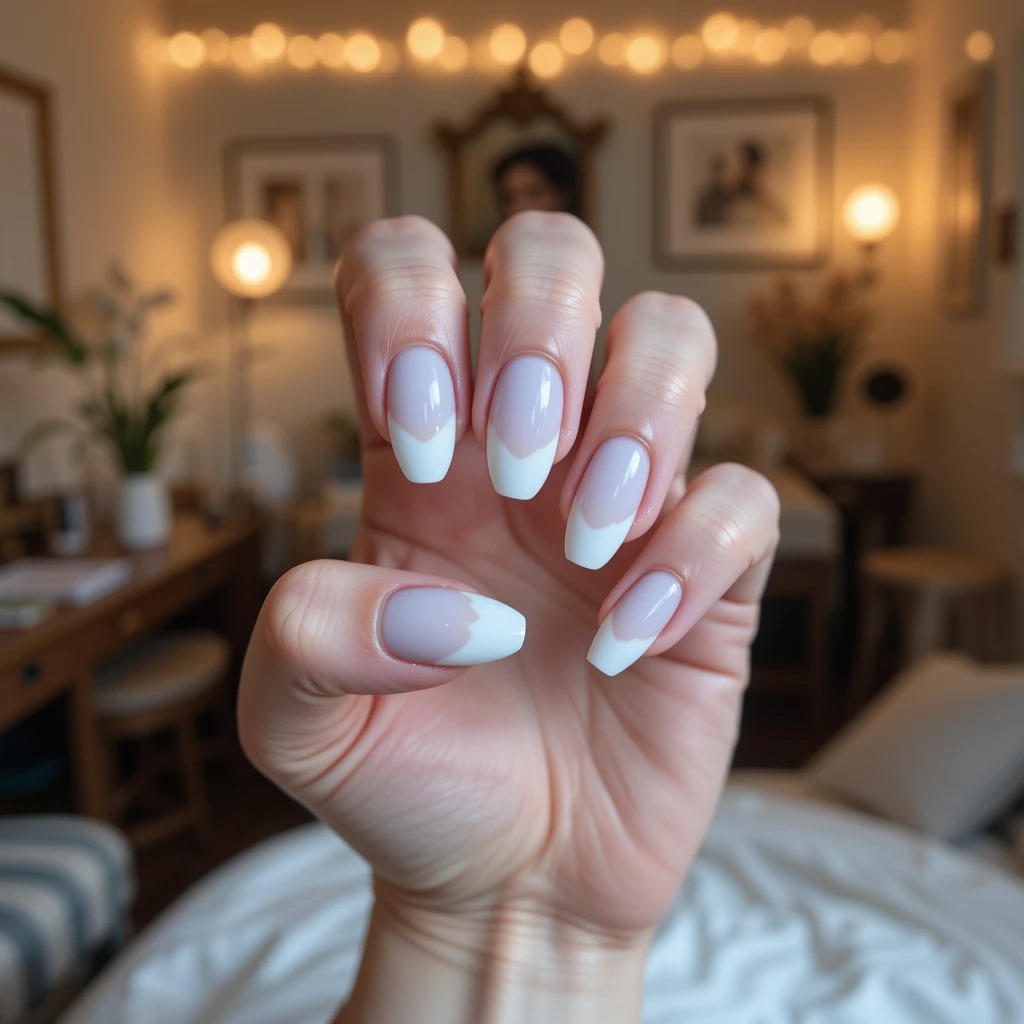
Milky white base with soft gray tips instead of traditional white. Modern and clean with a subtle edge that updates the classic French manicure. The gray tips feel fresh and current while maintaining the timeless elegance that makes French manicures so popular.
Why It Works for January: Offers the timeless elegance of French tips but feels fresh and current for the new year. It’s familiar yet unexpected.
Pro Tip: Keep the tip line thin and precise for a delicate look. This design works best on almond or oval shapes for that elongating effect.
How to Create This Look
- Prep nails and file to almond or oval shape for classic French look.
- Apply base coat and dip entire nail into milky white/sheer pink powder. Apply 2 coats.
- Brush powder, apply activator, wait 2 minutes.
- File and buff base color smooth.
- Apply second activator, wait 2 minutes.
- Using nail guides/stickers or steady hand, apply base coat to just the tip (smile line).
- Dip tip into light gray powder at angle. Keep tips thin and delicate.
- Repeat for second coat on tips if needed for even coverage.
- File the smile line smooth if needed, apply activator, wait 2 minutes.
- Apply 2 coats glossy top coat over entire nail, capping the free edge.
Recommended Products
- Base Color – Budget: Beetles Gel “Milky White” ($9), Modelones “Sheer Pink” ($9)
- Base Color – Mid-Range: Revel Nail “D1 Snow” ($13), Kiara Sky “D401 Milk Bath” ($14)
- Gray Tip Color: Any light gray from your brand (Beetles “Soft Gray,” Revel “D180,” Kiara Sky “D482”)
- Tools: French tip nail guides/stickers for clean lines ($3-5)
21. Matte Nude with Glossy Accent
Soft matte nude on all nails except one glossy accent nail per hand. The texture contrast creates visual interest without adding color. This is perfect for anyone who loves minimalism but wants something more than a simple solid color.
Why It Works for January: Perfect for minimalists who want something interesting but not loud. The mixed finish adds dimension while staying completely neutral.
Pro Tip: Use the exact same color in both finishes for a cohesive look. Choose your accent nail strategically—ring or middle finger works best.
How to Create This Look
- Prep all nails with extra smooth buffing (matte shows texture).
- Apply same nude dip powder to ALL nails (2-3 coats).
- Complete activator, filing, buffing for all nails—make sure surface is perfectly smooth.
- Apply second activator to all nails, wait 2 minutes.
- Apply matte top coat to 8 nails (all except one per hand—choose ring or middle finger).
- Apply glossy top coat to 2 accent nails (one per hand).
- Wait for matte to dry completely before applying cuticle oil (only around edges, not on matte nails).
- The contrast in finish creates subtle visual interest while keeping the look minimal.
Recommended Products
- Nude Color – Budget: Beetles Gel “Nude Beige” or “Almond” ($9)
- Nude Color – Mid-Range: Revel Nail “D11 Cashmere” ($13), Kiara Sky “D403 Bare Elegance” ($14)
- Matte Top Coat: Kiara Sky Matte Top Coat ($12), Revel Nail Matte Gel Top ($11)
- Glossy Top Coat: Your regular dip top coat
22. Icy Blue with Chrome Tips
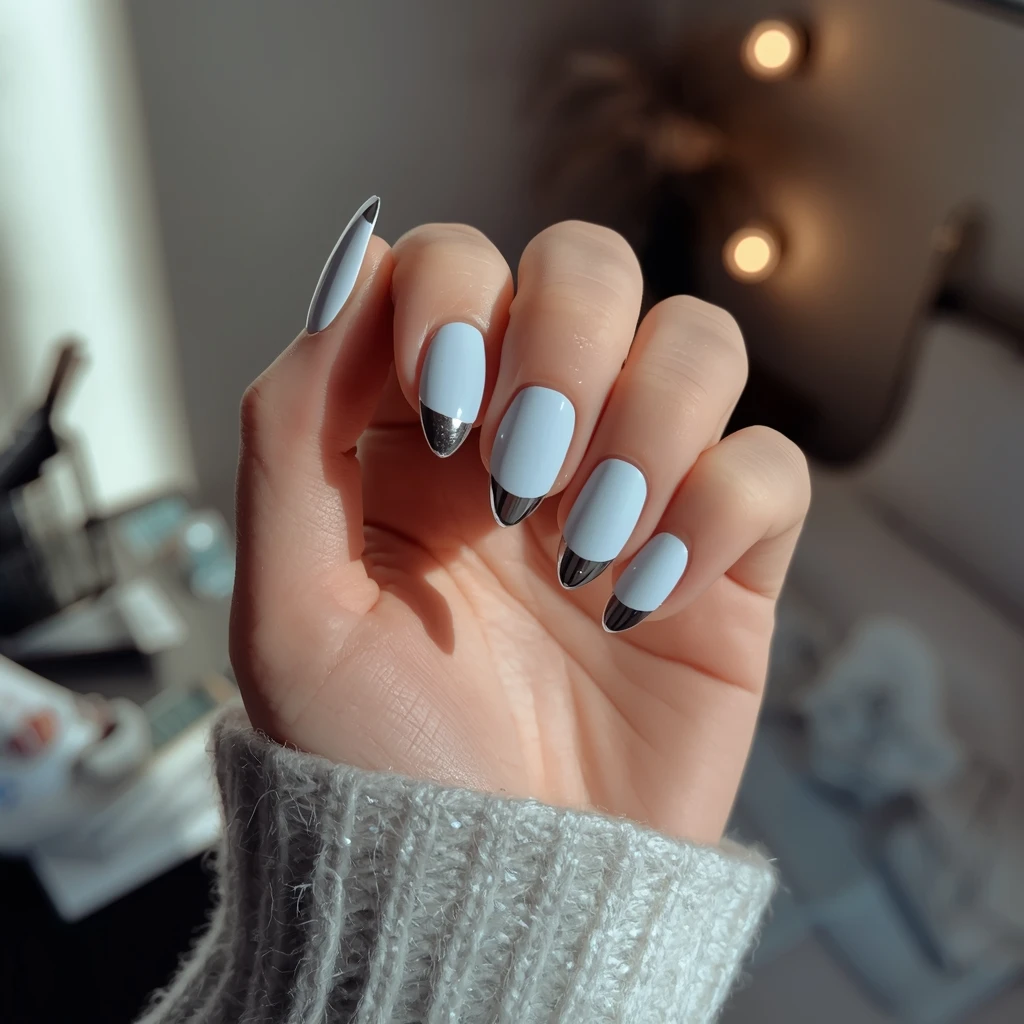
Pale icy blue base with chrome silver tips on each nail. This creates a frozen, winter wonderland effect that’s surprisingly wearable. The chrome tips catch light beautifully and add just enough drama to elevate a simple pale blue into something special.
Why It Works for January: Captures winter’s essence with that frosty blue-and-silver combination that feels both elegant and seasonal without being costume-y.
Pro Tip: Keep the chrome tips thin for a delicate look rather than thick tips that overwhelm the base color. This design photographs incredibly well.
How to Create This Look
- Prep nails thoroughly—chrome shows imperfections.
- Apply icy blue/pale blue dip powder to all nails (2-3 coats for solid base).
- Apply activator, file, buff smooth, apply second activator.
- Apply no-wipe gel top coat to entire nail.
- While tacky, apply silver chrome powder to JUST the tips (about 1/4 of nail) using silicone tool.
- Buff chrome on tips to mirror shine, creating a gradient from blue to chrome.
- Use small brush to softly blend the transition line between blue and chrome.
- Brush away excess chrome powder.
- Seal entire nail with another layer of no-wipe gel top coat.
- Let cure/dry completely.
Recommended Products
- Icy Blue Base – Budget: Beetles Gel “Ice Blue” ($10), Modelones “Pale Blue” ($9)
- Icy Blue Base – Mid-Range: Revel Nail “D239 Frost” ($14), Kiara Sky “D570 Blue Shimmer” (without shimmer) ($14)
- Chrome Powder: Kiara Sky Silver Chrome ($10), Born Pretty Mirror Silver ($7)
- No-Wipe Gel Top: Kiara Sky No-Wipe ($13)
23. Sage Green with Gold Accent
Muted sage green on most nails with one gold chrome accent nail. The warm-cool combination feels balanced and sophisticated. The gold adds warmth that prevents the look from feeling too cool-toned or sterile.
Why It Works for January: The earthy sage keeps things grounded while the gold adds just enough warmth and luxury for winter without looking holiday-themed.
Pro Tip: Choose a dusty sage rather than bright green for best results. Gold chrome looks particularly rich against muted green tones.
How to Create This Look
- Prep all nails with standard process.
- Apply dusty sage/olive green dip powder to ALL nails (2 coats).
- Complete activator, filing, buffing, second activator for all nails.
- Apply regular glossy top coat to 8 nails (all except one per hand).
- For accent nails (ring or middle finger): Apply no-wipe gel top coat.
- While tacky, rub gold chrome powder onto accent nails with silicone tool.
- Buff to mirror shine, brush away excess.
- Seal gold accent nails with another layer of no-wipe gel top coat.
- Let cure/dry.
- Style with gold jewelry for a cohesive warm-meets-cool aesthetic.
Recommended Products
- Sage Base – Budget: Beetles Gel “Sage Green” ($9), Modelones “Olive” ($9)
- Sage Base – Mid-Range: Revel Nail “D156 Eden” ($13), Kiara Sky “D606 Olive You” ($14)
- Gold Chrome Powder: Kiara Sky Gold Chrome ($10), Born Pretty Gold Mirror Powder ($7-9)
- No-Wipe Gel Top: Kiara Sky or Modelones No-Wipe
24. Soft Gray Ombré
Light gray fading into white from cuticle to tip. The gradient effect is subtle and creates a soft, dimensional look. This gives you the interest of nail art without requiring any special skills or precision—just smooth blending.
Why It Works for January: Ombré feels polished without being too trendy, and the gray-to-white palette is perfectly winter-appropriate and versatile.
Pro Tip: Blend the transition zone thoroughly for a seamless gradient. This design works on any nail length but looks especially elegant on medium to long nails.
How to Create This Look
- Prep nails—ombré looks best on medium to long nails.
- Apply base coat to entire nail, dip entire nail in light gray powder. First coat.
- Second coat: Apply base coat to entire nail, dip 3/4 of nail (from cuticle) in light gray.
- Third coat: Apply base coat to tip half of nail, dip just the tip (about 1/3) in white powder.
- Use soft brush to gently blend transition zones in small circular motions while powder is still loose.
- Brush away excess powder, apply activator, wait 2 minutes.
- File edges and buff surface—pay special attention to blending the gradient smooth.
- Wipe clean, apply second activator, wait 2 minutes.
- Apply 2 coats glossy top coat for smooth, seamless gradient effect.
- Finish with cuticle oil.
Recommended Products
- Gray – Budget: Beetles Gel “Soft Gray” ($9)
- Gray – Mid-Range: Revel Nail “D180 Sweet Gray” ($13), Kiara Sky “D482 Gray-T Kisses” ($14)
- White – Any Brand: Beetles “Snow White” ($9), Revel “D1 Snow” ($13), Kiara Sky white ($14)
- Tool: Soft makeup brush or clean nail brush for blending
25. Milky White with Nude Accent
Sheer milky white on most nails with one nude accent nail per hand. The tonal variation is subtle but adds depth and interest. This is ideal for anyone who wants the clean look of white nails but craves just a touch more dimension.
Why It Works for January: Keeps the clean, fresh vibe of an all-white manicure but adds dimension through the nude accent without going full contrast.
Pro Tip: Choose a nude that’s only slightly warmer or darker than the milky white for that barely-there contrast that looks intentional and expensive.
How to Create This Look
- Prep all nails with standard process.
- Apply milky white dip powder to 8 nails (all except one per hand). Use 3 thin coats for buildable sheer coverage.
- Apply warm nude/beige dip powder to 2 accent nails (one per hand—ring or middle finger). Use 2-3 coats.
- Apply activator to all nails, wait 2 minutes.
- File edges and buff all nails smooth.
- Wipe clean, apply second activator to all nails, wait 2 minutes.
- Apply glossy top coat to all nails—the shine enhances the subtle contrast.
- Finish with cuticle oil for that expensive, polished look.
Recommended Products
- Milky White – Budget: Beetles Gel “Milky White” ($9)
- Milky White – Mid-Range: Revel Nail “D1 Snow” or “D234 Opal” ($13), Kiara Sky “D401 Milk Bath” ($14)
- Nude Accent – Budget: Beetles “Latte” or “Nude Beige” ($9)
- Nude Accent – Mid-Range: Revel “D11 Cashmere” ($13), Kiara Sky “D403 Bare Elegance” ($14)
26. Navy with Pearl Chrome
Deep navy base with a pearl chrome accent nail that shifts between white, pink, and blue. The iridescent effect is mesmerizing. The pearl chrome adds a magical, light-catching quality that elevates the deep navy into something truly special.
Why It Works for January: Combines winter’s dark moody tones with a magical shimmer that catches light beautifully during gray winter days.
Pro Tip: Pearl chrome needs perfect application to show its true color-shifting effect. Buff nails thoroughly and apply chrome powder with a silicone tool for best results.
How to Create This Look
- Prep all nails with extra smooth buffing—pearl chrome shows every flaw.
- Apply deep navy dip powder to ALL nails (2-3 coats for rich color).
- Complete activator, filing, buffing (extra smooth), second activator for all nails.
- Apply regular glossy top coat to 8 nails.
- For accent nails (one per hand): Apply no-wipe gel top coat.
- While tacky, rub pearl/unicorn chrome powder onto accent nails using silicone applicator in circular motions.
- Buff thoroughly until you see the iridescent color-shift from multiple angles.
- Brush away excess powder gently.
- Seal pearl chrome accent nails with another layer of no-wipe gel top coat.
- Let cure/dry—the pearl effect will be most visible in natural light.
Recommended Products
- Navy Base – Budget: Beetles Gel “Midnight Navy” ($9-11)
- Navy Base – Mid-Range: Revel Nail “D53 Avery” ($13), Kiara Sky “D502 Navy Blue” ($14)
- Pearl Chrome Powder: Kiara Sky Pearl Chrome/Unicorn Chrome ($12), Born Pretty Chameleon/Pearl Powder ($8-10)
- No-Wipe Gel Top: Kiara Sky No-Wipe ($13)—essential for chrome
- Tool: Silicone nail art tool or soft eyeshadow applicator for best chrome application
January Dip Nails That Actually Fit Real Life
Most nail articles talk about trends — this section helps readers choose what actually works for their daily routines.
Best January Dip Nails for Busy Weeks
January is packed with work resets, school schedules, and routine-building. These dip nail styles stay polished even when you don’t have time for touch-ups.
Best options:
- Milky whites with sheer coverage
- Neutral nudes with glossy finishes
- Soft gray or greige tones
- Matte taupe shades
Why this matters:
These colors hide minor growth, scratches, and everyday wear better than bold or high-contrast designs.
Low-Maintenance Colors That Hide Regrowth
Not all colors age the same over 3–4 weeks.
Colors That Grow Out Gracefully
- Sheer pinks
- Creamy beiges
- Soft ombré fades
- Light gray blends
Colors That Show Growth Faster
- Dark navy
- Jet black
- High-contrast French tips
- Bright chromes
This helps readers avoid regret two weeks later.
How Lighting Changes Your January Dip Nails (Most People Ignore This)
Winter lighting is very different from summer — and it affects how dip colors look.
Indoor vs. Outdoor Winter Lighting
Short days and artificial lighting can:
- Make cool tones look flatter
- Deepen dark shades
- Reduce sparkle visibility
Tip:
If you’re choosing shimmer or chrome, opt for fine micro-shimmer rather than chunky glitter for a more elegant effect under indoor lighting.
Nail Colors That Look Better in Photos
For anyone posting on Pinterest, Instagram, or product listings:
Best Dip Colors for Winter Photography
- Milky white
- Soft gray
- Nude beige
- Icy blue
- Light ombré designs
These shades reflect light evenly and reduce harsh shadows from winter light.
Matching January Dip Nails to Your Personal Aesthetic
Instead of “skin tone” advice, this helps readers connect nails to identity and style.
Nail Colors by Style Personality
Minimal & Clean Girl Aesthetic
- Milky white
- Sheer nude
- Soft pink glaze
- Light gray
Cozy & Neutral Lover
- Vanilla beige
- Mushroom greige
- Soft taupe matte
- Almond cream
Bold but Polished
- Oxblood red
- Forest green
- Navy with chrome accent
- Deep plum
Readers instantly see themselves in these categories.
Winter Dip Nail Mistakes That Shorten Wear Time
This section adds problem-solving value, which most articles miss.
Common January Dip Nail Mistakes
- Skipping cuticle prep
- Applying dip too thick in cold weather
- Using matte topcoat without sealing edges
- Letting hands freeze without gloves
Small Fixes That Make a Big Difference
- Warm hands before application
- Apply thinner layers than usual
- Seal sidewalls carefully
- Oil cuticles before bed, not just mornings
This makes the article feel expert-level.
How to Make One January Dip Manicure Feel Like Multiple Looks
Perfect for readers on a budget or selling PDF value.
Change the Look Without Reapplying Dip
- Add chrome powder after week one
- Switch from glossy to matte topcoat
- Add one accent nail later
- File length shorter mid-wear
Best Base Colors for This Trick
- Nude beige
- Soft gray
- Milky white
- Pale pink
One manicure, multiple styles.
When to Change Your January Dip Nails (Even If They Still Look Fine)
This feels different and practical.
Signs Your Dip Nails Are Past Their Prime
- Stress at the cuticle line
- Loss of flexibility
- Hair catching near the base
- Thick edges from growth
Why it matters:
Ignoring these signs leads to breaks, cracks, and natural nail damage — especially in winter.
Final Thoughts (New Ending Angle)
January dip nails don’t need to be dramatic to feel beautiful. The best winter manicures are the ones that fit your lifestyle, grow out gracefully, and still make your hands look polished weeks later.
Instead of chasing trends, focus on shades and finishes that work with your routine, your wardrobe, and winter’s reality. A well-chosen dip color should feel effortless — not high maintenance.
Pin your favorite styles, save the tips that matter most to you, and step into the new year with nails that actually keep up.