12 Stunning Alaska Nails Ideas for a Cool Frosty Look
Alaska nails are designs inspired by the raw, dramatic landscapes of the Last Frontier—think aurora borealis swirls, glacial blue-greens, snowy mountain silhouettes, and the deep inky skies of the midnight wilderness.
They’re the nail equivalent of standing on a frozen tundra at 2 AM watching green light ripple across the sky: unexpected, a little wild, and completely unforgettable.
12 Alaska Nail Design Ideas
1. Aurora Dreams
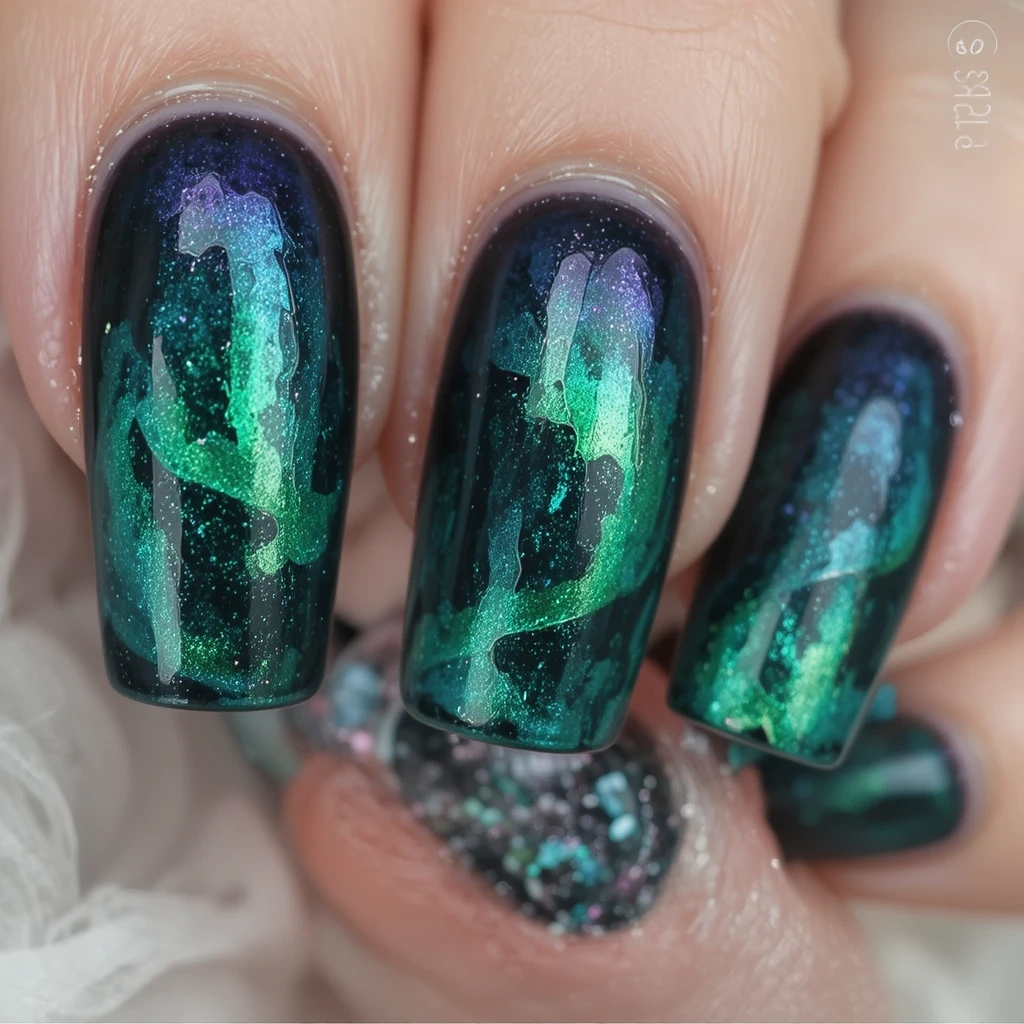
A deep charcoal base with sweeping green, teal, and violet foil transfers that mimic the ripple and fold of real northern lights. The colors overlap at the nail tips and fade toward the cuticle like light dissolving into a dark sky. Ethereal, cosmic, and honestly unlike anything most people have seen on nails in person.
Difficulty: Intermediate Time to complete: 50 minutes Best for: Anyone who wants a manicure that genuinely stops people mid-conversation. Why it works: The foil creates actual metallic depth that regular polish can’t replicate—it catches light the way the real aurora does. What makes it different: Most aurora nails use polish only; the foil transfer gives this a three-dimensional shimmer that looks almost backlit.
Time and difficulty: 50 minutes, Intermediate — the sponge gradient base is beginner-level, but timing the foil adhesive takes practice.
2. Glacial Tip French
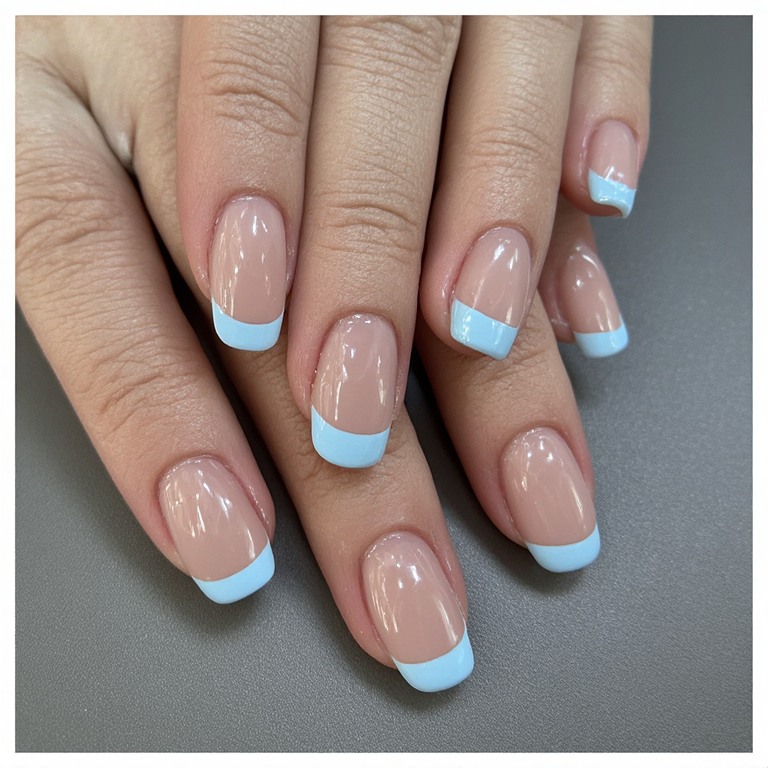
A sheer nude or pale blush base with tips painted in an icy, semi-translucent white-blue that fades into the nail rather than creating a hard French line. Think melting glacier edge rather than classic salon French. The effect is cool-toned, clean, and more interesting than standard white tips.
Difficulty: Beginner Time to complete: 25 minutes Best for: Professional environments where you still want something a little unusual. Why it works: The icy blue tips read as polished and understated until the light hits them at an angle. What makes it different: The sheer quality of the tip color makes it look like the nail itself has taken on a glacial translucency.
Time and difficulty: 25 minutes, Beginner — nail guides make the line forgiving.
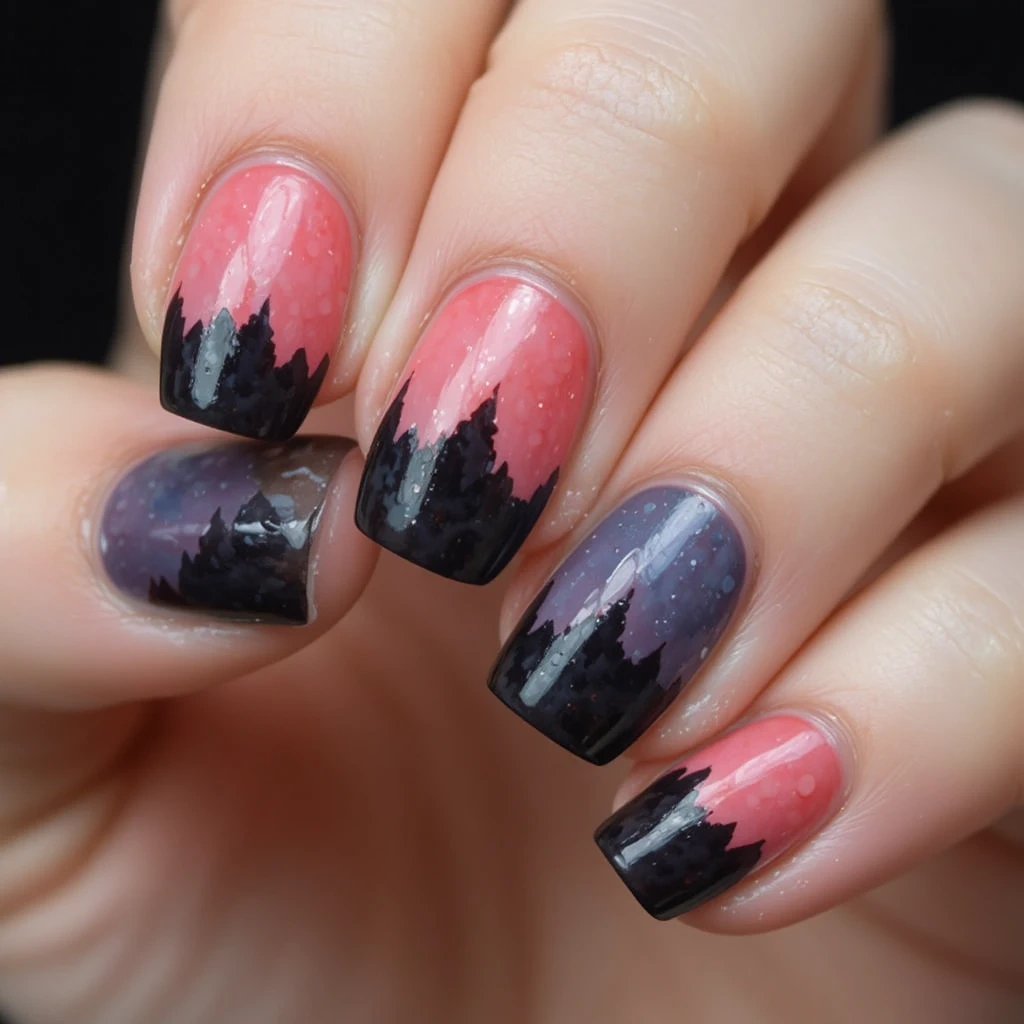
3. Midnight Forest
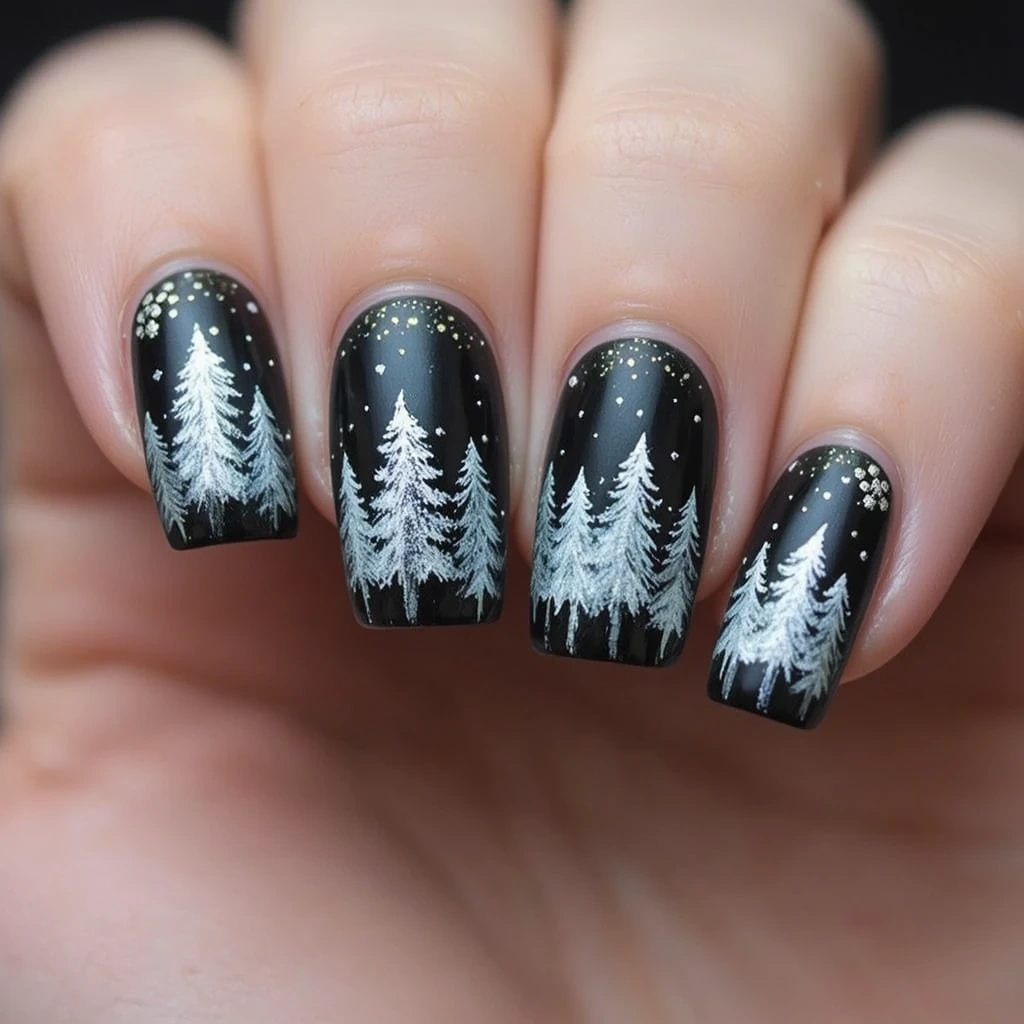
A nearly-black deep green base with hand-painted white and silver spruce tree silhouettes along the nail tips, rising like a treeline against a dark winter sky. Occasional silver dot snowflakes scattered above the trees. Moody, graphic, and very wearable in fall or winter.
Difficulty: Intermediate Time to complete: 60 minutes Best for: People with steady hands who want something botanical and dramatic. Why it works: The contrast between dark base and bright silhouettes is extremely sharp—it looks intentional and almost architectural. What makes it different: The irregular, hand-drawn quality of the trees makes each nail slightly different, which looks more natural than a stamped version.
DIY At Home:
- Base: Zoya ‘Hunter’ ($10, Zoya.com) — a deep forest green that leans almost black
- Trees: Born Pretty liner brush + white nail art paint ($5, Amazon)
- Snowflakes: Silver striping tape dots or a dotting tool dipped in OPI ‘My Favorite Ornament’ ($11, Ulta)
- Simplification: Use stamping plate Maniology m051 for the tree design if hand-painting feels too advanced
Product recommendation: Born Pretty liner brush — the 0.3mm tip is the only way I’ve gotten clean tree lines without the edges bleeding.
4. Iceberg Color Block
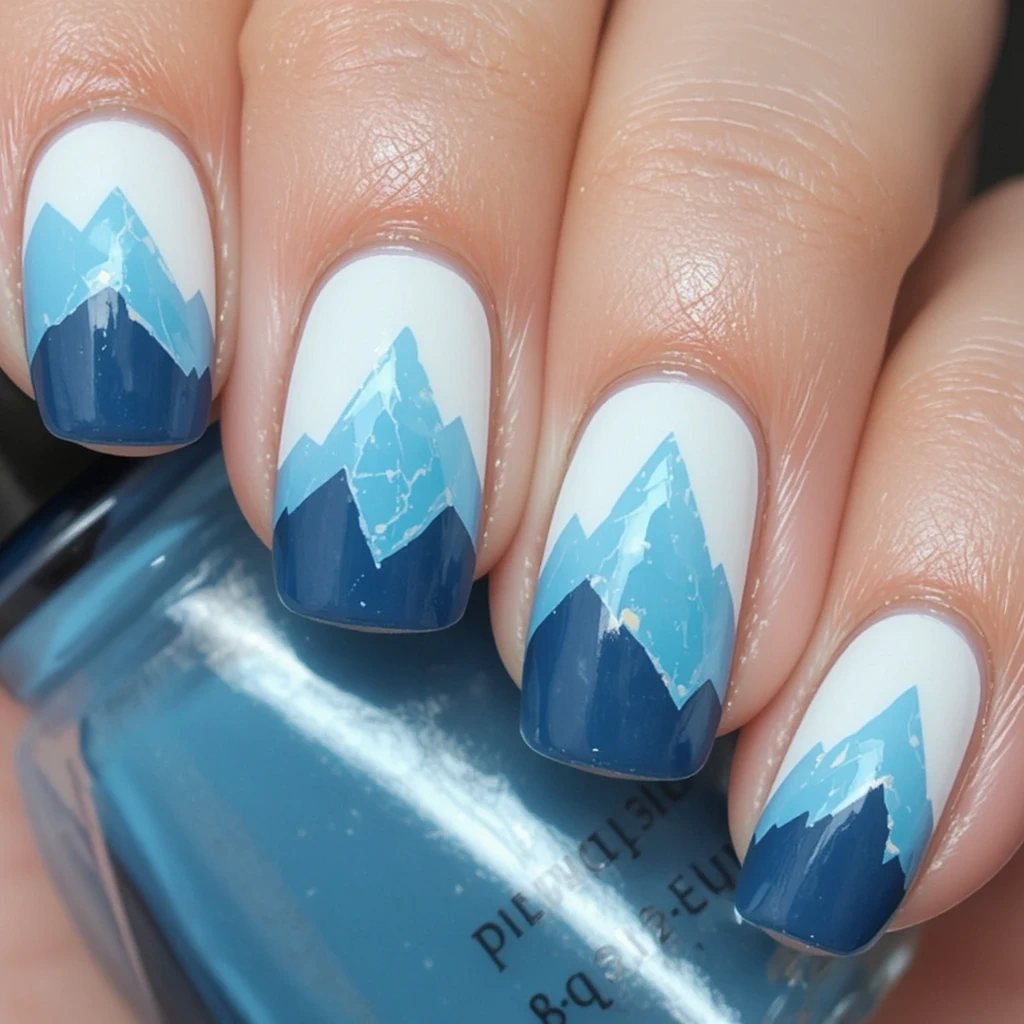
Bold geometric color blocking in glacier white, arctic blue, and deep slate gray that mimics the faceted surfaces of an iceberg above and below the waterline. Each nail has one or two sharp diagonal or horizontal color divisions. Modern, graphic, and completely beginner-friendly.
Difficulty: Beginner Time to complete: 30 minutes Best for: Anyone who wants a modern, editorial look without any freehand painting. Why it works: Geometric blocking is incredibly forgiving—the vinyls do the hard work and the colors are bold enough to carry the design. What makes it different: The specific color combination (not just white and blue, but adding the gray “below waterline” tone) is what actually makes this read as iceberg rather than generic geometric.
DIY At Home:
- Colors: OPI ‘Alpine Snow’ ($11), Zoya ‘Yuna’ ($10), Essie ‘Chinchilly’ ($10 at Target)
- Nail vinyls: Nail Vinyls Geometric Shapes pack ($7, Amazon) for clean dividing lines
- Top coat: Seche Vite to prevent vinyl edge lifting
Time and difficulty: 30 minutes, Beginner — the vinyls handle all the precision.
5. Northern Lights Ombré
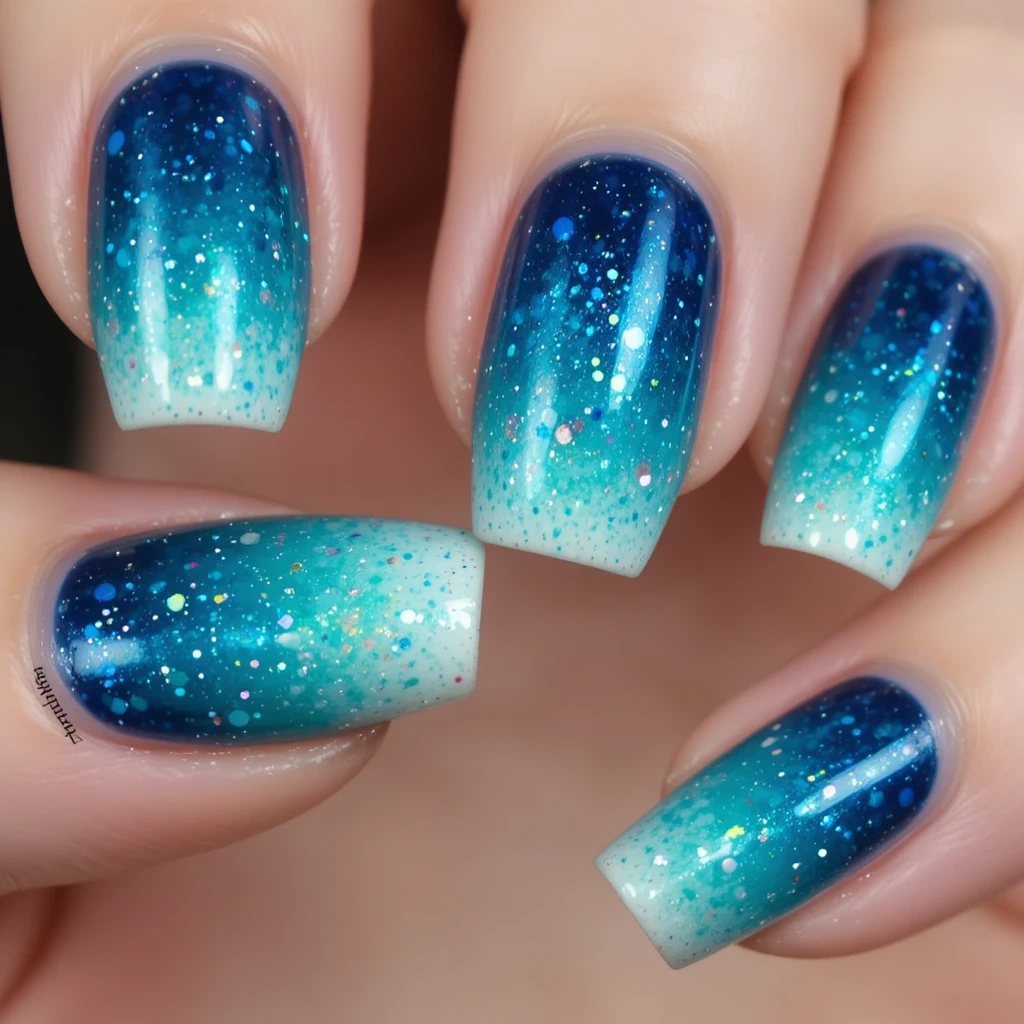
A gradient running from deep indigo at the cuticle through electric teal to a pale mint or white at the tips, with a fine holographic glitter scatter throughout that catches light like stars in a northern sky. The gradient is applied by sponge and the glitter is pressed in before the top coat seals it.
Difficulty: Beginner–Intermediate Time to complete: 40 minutes Best for: Someone who wants aurora energy without the complexity of foil transfers. Why it works: The three-tone gradient creates real depth, and the fine glitter scatter gives movement without being gaudy. What makes it different: Most ombré nails use two colors—the three-step indigo-to-mint progression is what actually reads as aurora rather than just a gradient.
DIY At Home:
- Colors: Sally Hansen ‘Commander in Chic’ ($8, Walmart), OPI ‘Don’t Teal Me’ ($11, Ulta), Zoya ‘Yuna’ ($10)
- Glitter: Born Pretty Fine Holographic Glitter in ‘AB’ finish ($6, Amazon) — the AB (aurora borealis) finish has a color-shifting quality perfect for this
- Sponge: Any cosmetic wedge sponge works; cut it smaller for more precise blending
Product recommendation: Born Pretty AB holographic glitter — the color-shift in this specific finish means the glitter reads differently in every light, which is exactly the point.
6. Frosted Tundra
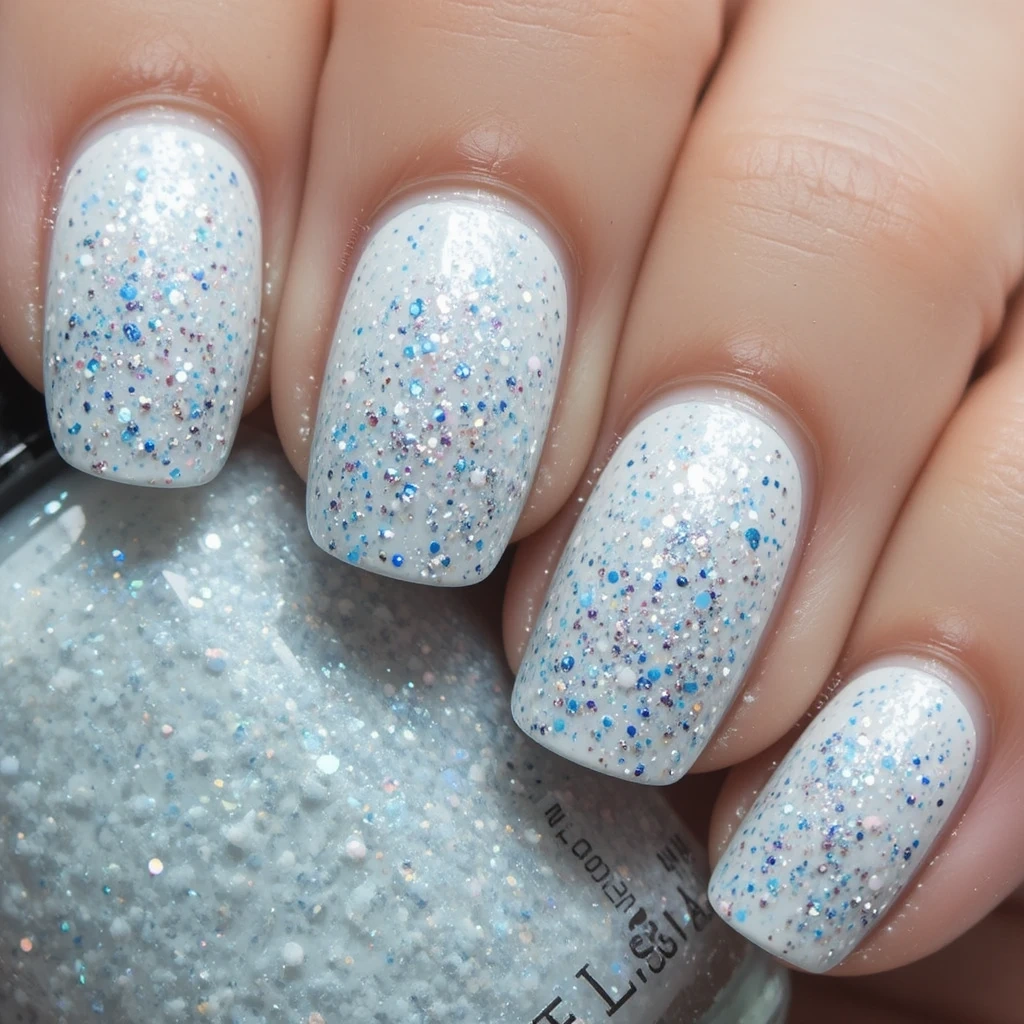
White-based nails with a rough, matte finish and a dusting of micro-glitter that creates the effect of frost crystals on snow. Very simple base, but the texture is everything—the combination of matte top coat over shimmer polish produces a finish that looks genuinely three-dimensional.
Difficulty: Beginner Time to complete: 20 minutes Best for: Winter holiday parties or anyone who wants something subtle but visually interesting up close. Why it works: The contrast between the matte surface and the glitter particles underneath creates an almost crystalline depth. What makes it different: The matte top coat is what makes this design—without it, it’s just white glitter nails. With it, it reads like actual frost.
DIY At Home:
- Base: OPI ‘My Favorite Ornament’ ($11, Ulta) — white with silver micro-glitter
- Top coat: Essie Matte About You ($10, Target) — the best consumer matte top coat I’ve tested; others pill or cloud
Product recommendation: Essie Matte About You — cheaper matte top coats I’ve tried either go too flat (removes all shimmer visibility) or stay slightly tacky.
7. Mountain Ridge Silhouette
A layered sunset or midnight sky gradient base with dark mountain silhouettes stamped across the lower half of each nail. The contrast between the sky gradient (pinks and purples for sunset, navy and black for midnight) and the sharp black ridge line is graphic and dramatic. Looks extremely complex; is actually intermediate level with the right plate.
Difficulty: Intermediate Time to complete: 55 minutes Best for: Stamping enthusiasts who want a nature scene that looks hand-painted. Why it works: The mountain profile is universally recognizable and the layering trick—lighter gradient fading into a darker base at the tip—creates real depth. What makes it different: Most mountain nail art uses hand-painting; the stamping technique produces sharper, more consistent ridge lines across all ten nails.
DIY At Home:
- Sky gradient: OPI ‘From Here to Eternity’ pink + Essie ‘Midnight Cami’ navy, sponge blended
- Stamping polish: Maniology Black Stamping Polish ($9, Maniology.com) — regular polish is too thin to transfer cleanly
- Stamping plate: Maniology m051 (mountain range design)
- Stamper: VAGA Stamper and Scraper ($8, Amazon) — the squishy clear head picks up fine detail better than the firm silicone ones
Product recommendation: Maniology’s own black stamping polish — I’ve tried regular polish on plates and the transfer is always partial. Dedicated stamping polish is not optional here.
8. Polar Bear Accent
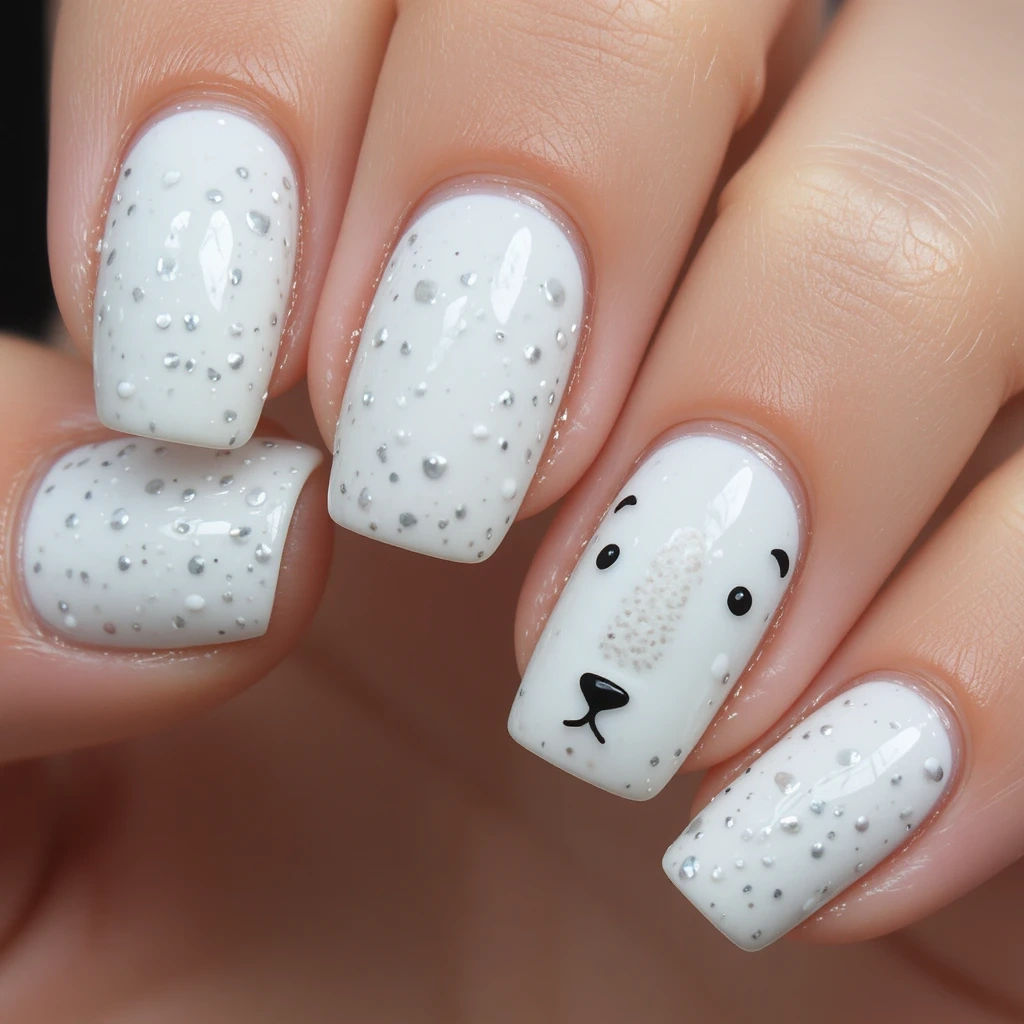
Nine nails in a clean arctic white or pale gray, with one accent nail (typically the ring finger) featuring a simple hand-drawn polar bear face in white-on-white with black detail eyes and nose. Subtle and charming rather than cartoonish. Best executed in gel for a smooth, even white that doesn’t streak.
Difficulty: Intermediate (for the accent nail art) / Beginner (for the base nails) Time to complete: 35 minutes Best for: Anyone who wants one piece of character nail art without committing the whole hand to it. Why it works: The white-on-white technique means the bear reads as a texture rather than a flat drawing—sophisticated rather than cutesy. What makes it different: Most animal accent nails use very bright, cartoonish colors; keeping this monotone white makes it wearable for adults.
DIY At Home:
- Base: Zoya ‘Purity’ ($10, Zoya.com) — the cleanest, most streak-free white I’ve found in regular polish
- Bear details: Black nail art paint and Born Pretty liner brush
- Simplification: Bear face nail decals are available on Etsy ($4-6 for a sheet of 20) if hand-painting feels too advanced
Product recommendation: Zoya Purity — white polish is notoriously streaky and I’ve tested seven formulas. This is the only one that covers in two coats without streaks.
9. Snowstorm Abstract
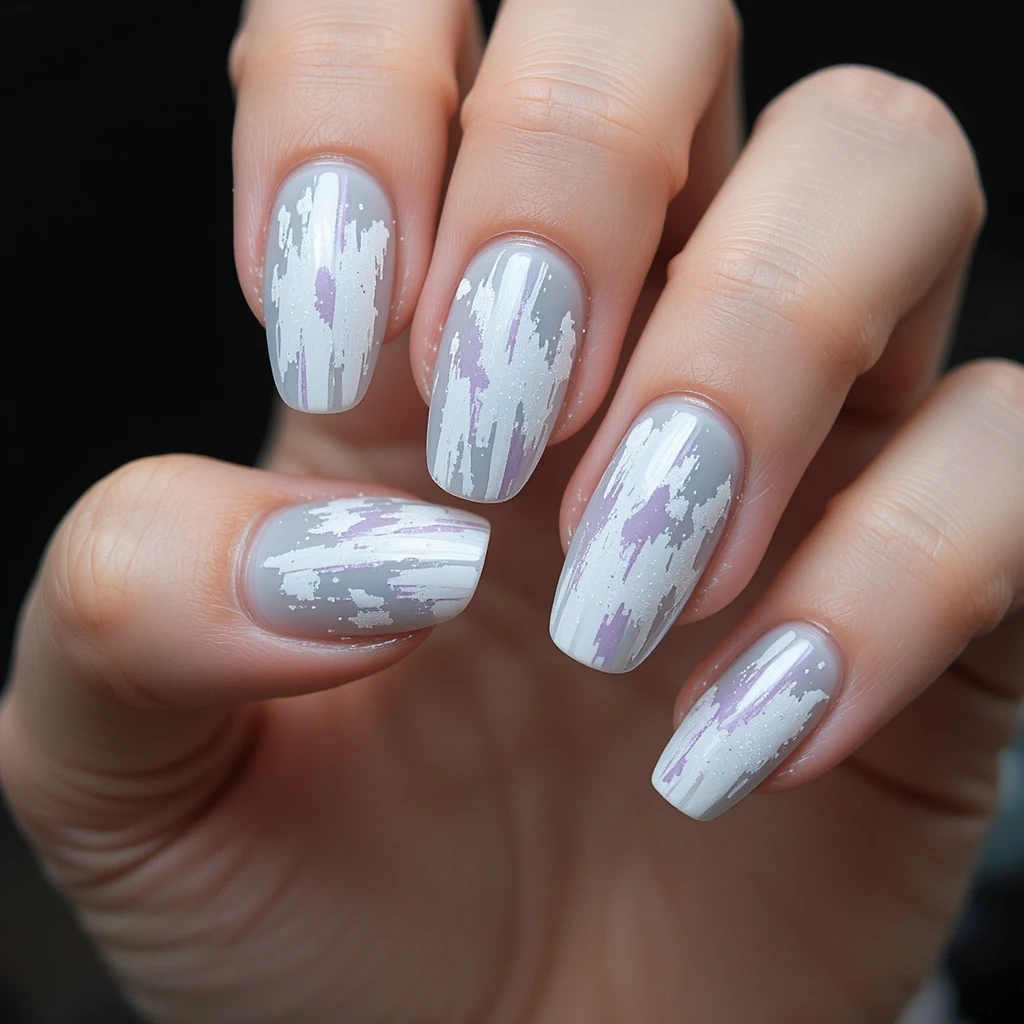
Abstract white brushstroke nails on a pale gray or lavender-gray base—gestural, sweeping strokes in white gel or acrylic paint that overlap and blur at the edges, mimicking blowing snow or a white-out condition. Very modern and editorial-looking. Also genuinely one of the most relaxing designs to execute because imperfection is the point.
Difficulty: Beginner Time to complete: 25 minutes Best for: People who feel intimidated by “precise” nail art—this design rewards loose brushwork. Why it works: The abstract quality makes every nail unique and the pale color palette reads as expensive and deliberate. What makes it different: This is the one design where you should NOT try to be careful—the freer the brushstrokes, the better it looks.
DIY At Home:
- Base: Essie ‘Chinchilly’ ($10, Target) — the gray-lavender is perfect and doesn’t compete with white strokes
- Strokes: White acrylic nail paint + medium flat brush (Born Pretty set includes a good one)
- Seal with Seche Vite immediately — the paint dries fast and can streak if you wait
Time and difficulty: 25 minutes, Beginner — intentionally imperfect.
10. Deep Sea Denali
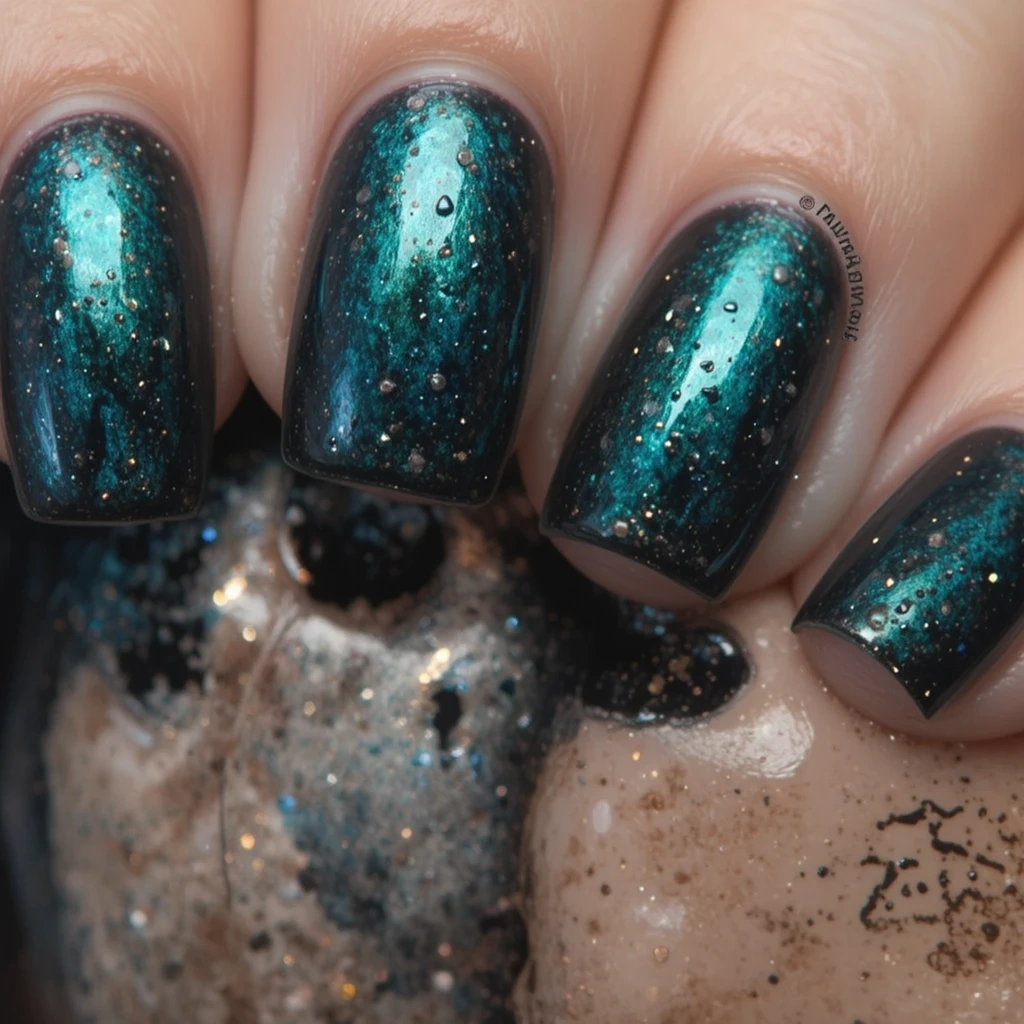
Deep teal-black base with a very subtle duochrome or oil-slick top coat that produces flashes of green, blue, and bronze depending on the angle. Inspired by the water off the Alaskan coast in certain light conditions—nearly black but alive with color underneath. Very wearable, very mysterious.
Difficulty: Beginner Time to complete: 20 minutes Best for: Anyone who wants drama without obvious nail art—this design does everything through color alone. Why it works: The duochrome finish means the nails look completely different in artificial light versus sunlight, which creates a constant sense of discovery. What makes it different: Most deep-tone nails read as flat in low light; the duochrome makes this design work in every setting.
DIY At Home:
- Base: China Glaze ‘Liquid Leather’ ($9, Sally Beauty)
- Duochrome top coat: Cirque Colors ‘Pinnacle’ ($16, cirquecolors.com) — a teal-to-bronze duochrome that’s genuinely unlike anything at drugstore price points
- Can layer Pinnacle over any dark base you prefer
Product recommendation: Cirque Colors Pinnacle — this is the one product in this article I’d say is worth ordering specifically. The duochrome shift is real and significant, not subtle or disappointing like cheaper versions.
11. Moose & Pine Stamped
A warm rust-brown or amber base (the colors of Alaskan fall foliage) with stamped black moose and pine tree silhouettes, one or two per nail. Classic and illustration-like. The warm tones make this the most approachable Alaska design—it doesn’t read as “cold weather only” and works well in fall.
Difficulty: Intermediate Time to complete: 45 minutes Best for: Fall nail enthusiasts who want nature art without the typical pumpkin and leaf options. Why it works: The amber-and-black combination is graphic and warm simultaneously—striking without being harsh. What makes it different: The moose silhouette is specific to Alaska and the Pacific Northwest in a way that spruce trees alone aren’t—it grounds the design in a particular place.
DIY At Home:
- Base: Zoya ‘Leeanne’ ($10, Zoya.com) — a warm coppery amber
- Stamping: Maniology m051 plate (moose and pine designs) + Maniology black stamping polish
- Stamper: VAGA clear stamper ($8, Amazon)
Product recommendation: Maniology m051 — the moose design on this plate has enough detail in the antlers that the transfer reads as a real illustration rather than a blob.
12. Ice Cave Holographic
Pale blue-white nails with a holographic top coat that produces a rainbow prism effect in direct light—like standing inside a glacier cave with light refracting through ice walls. The holographic is not subtle; it’s a full spectrum-flash effect. In low light the nails look clean and icy; in direct sunlight they’re prismatic.
Difficulty: Beginner Time to complete: 20 minutes Best for: Anyone who wants maximum visual impact with minimal technique—this is two products and a top coat. Why it works: The pale blue base keeps the holographic from looking garish; it enhances the prismatic quality rather than clashing with it. What makes it different: Holographic over a deep or bright base reads as “party nail”—holographic over an icy pale blue reads as intentional and almost ethereal.
DIY At Home:
- Base: Zoya ‘Yuna’ ($10, Zoya.com)
- Holographic top coat: ILNP Ultra Holographic Top Coat ($10, ilnp.com) — the scatter in this formula is finer than competitors and the holo effect is visible in indirect light, not just direct sun
- Avoid using Seche Vite over ILNP holo top coat—it can dull the effect
Product recommendation: ILNP Ultra Holo Top Coat — this is the one holo formula where the effect reads in office lighting rather than only in a sunbeam. The difference from cheap versions is significant.
Essential Tools & Products
The Basics (Under $35 Total)
- OPI Nail Envy Base Coat ($11 at Ulta) — The rubberized formula grips polish better than cheaper bases. My aurora nails last at least 3 extra days with this versus the CVS brand I used to buy.
- Essie ‘Midnight Cami’ ($10 at Target) — The deepest, most accurate midnight navy I’ve found at drugstore price. One coat coverage, which matters when you’re adding art on top.
- Zoya ‘Yuna’ ($10 at Zoya.com) — A frosty periwinkle-silver that captures glacial light better than anything I’ve tested near this price point.
- Seche Vite Top Coat ($8 at Sally Beauty) — Seals everything with a glass-like finish in 5 minutes. Essential when you’ve just spent 45 minutes painting tiny spruce trees.
The Game-Changers
- Twinkled T Aurora Foil Set ($14 on Amazon) — Three foil sheets in emerald, violet, and gold that, when layered on a tacky base, create the most accurate aurora effect I’ve achieved without hand-painting. This changed everything for me.
- Born Pretty Nail Art Brush Set ($8 on Amazon) — The ultra-thin liner brush (0.3mm) is the only thing I trust for mountain silhouettes and pine tree details. The set includes six brushes and the liner alone is worth the price.
Stamping Plates (Don’t Cheap Out Here)
- Maniology m051 Nature Plate ($12 at Maniology.com) — Includes pine trees, mountain ridges, snowflakes, and wildlife outlines. The etching depth is consistent enough that you actually get a clean transfer, unlike the $3 plates that skip half the design.
Pros and Cons
Pros
✅ The color palette (navy, teal, white, forest green) works for almost every skin tone
✅ Aurora and mountain designs get genuine compliments from people who notice nails
✅ The moodier colorways (midnight navy, deep teal) are workplace-appropriate while still being interesting
✅ Most Alaska palettes work year-round—not seasonal the way coral or red holly designs are
✅ The abstract designs (snowstorm, iceberg color block) are genuinely beginner-friendly
✅ The aesthetic lends itself to both minimalist (glacial tip) and maximalist (aurora foil) interpretations
✅ Deep jewel tones in this palette hide wear and minor chips much better than pastels
Cons
❌ Aurora and mountain silhouette designs take 45–60 minutes minimum—this is not a quick polish night
❌ Foil transfers have a learning curve: you will mess up the timing on your first two or three attempts
❌ Stamping requires dedicated stamping polish—regular polish transfers blurry, and discovering that mid-project is frustrating
❌ The holographic designs (ice cave, northern lights) show fingerprints and surface scratches more than matte finishes
❌ Deep navy and teal bases can stain lighter nail beds if you skip a base coat
❌ The Cirque and ILNP specialty products are only available online, not at drugstores, which means planning ahead
Real Wear Test
I wore the Aurora Dreams design (charcoal base + foil transfer) for two weeks as my main manicure:
Days 1–3: Completely pristine. The foil had a mirror-like quality and everyone who noticed asked if they were gel extensions. No chips, no lifting.
Days 4–7: Tiny tip wear began on my dominant hand’s index finger—always first to go. The foil was still intact everywhere else. In certain angles the foil had a slight “settled” appearance, less sharp than day one.
Days 8–10: Three nails showed visible tip wear on the dominant hand. The non-dominant hand still looked close to new. I applied a thin layer of Seche Vite and it bought me three more days.
Days 11–14: The foil began lifting at the tip on two nails. Reapplication wasn’t worth it at this stage. Still received a compliment on day 13, so they hadn’t fully degraded.
Verdict: Realistically, 10 days of looking good, 14 days of looking acceptable. For a design that takes 50 minutes, I’d say that’s fair. If you do this in gel rather than regular polish, I’d expect 14 clean days and 18 acceptable.
Common Mistakes
Mistake #1: Rushing the Foil Adhesive
What it looks like: Patchy, incomplete foil transfer with see-through gaps in the design.
Why it happens: The adhesive needs to reach a specific tackiness—if you press the foil too early, it grabs everywhere randomly; too late and nothing transfers.
The fix:
- Apply adhesive in a thin, even layer
- Set a timer for exactly 60 seconds
- Press foil sheet down firmly, hold 5 seconds, peel back at a low angle
- If it doesn’t transfer cleanly, let it sit another 15 seconds and try again
How well it works: Once you nail the timing on your first practice nail, it’s consistent. This is a one-time learning curve, not an ongoing struggle.
Mistake #2: Skipping Base Coat Before Dark Colors
What it looks like: Greenish or blue-gray staining on the nail bed after removal.
Why it happens: The deep pigments in navy, teal, and forest green penetrate the nail plate over days of wear.
The fix:
- Apply two thin coats of OPI Nail Envy before any color
- The damage from existing staining fades in 2–3 weeks with no treatment needed
How well it works: Base coat is a complete prevention. If you’re already stained, time is your only fix.
Mistake #3: Using Regular Polish for Stamping
What it looks like: Blurry, incomplete stamp transfers with missing sections of the design.
Why it happens: Regular polish is too runny to sit on the plate’s engraved lines without spreading and losing definition.
The fix:
- Use only dedicated stamping polish (Maniology, Bundle Monster, etc.)
- Apply to plate, scrape at a 45-degree angle in one firm stroke
- Pick up with stamper immediately—don’t wait
How well it works: Complete fix. This is a product issue, not a technique issue.
Mistake #4: Applying Matte Top Coat Over a Wet Design
What it looks like: Streaky, uneven matte finish with some sections still shiny.
Why it happens: Matte top coat needs the layer beneath it to be completely dry to adhere evenly.
The fix:
- Wait a full 10 minutes after your last polish layer before applying matte top coat
- Apply in one direction only, don’t go back and forth
- If streaks appear, leave it—additional passes make it worse. Let it dry and apply a second thin coat
How well it works: The one-direction rule eliminated about 80% of my streaking issues.
Mistake #5: Making the Gradient Too Wide on Short Nails
What it looks like: A muddy, blended mess where two gradient colors meet, with no clean transition visible.
Why it happens: Trying to blend three colors across a 10mm nail with a full-size sponge doesn’t leave room for any individual color to breathe.
The fix:
- On short nails, use a maximum of two gradient colors
- Cut your sponge into a 1cm strip so only a small section contacts the nail
- Do more layers of light stippling rather than fewer heavy ones
How well it works: Two-color gradients on short nails look intentional and clean. Three colors on short nails almost always look muddy.
FAQs
How do I prevent the foil from peeling up after a day or two? Seal it with a generously applied top coat that fully covers the foil edges all the way to the nail tip—if any foil edge is uncovered, water and daily wear will find it. Reapply top coat every three days.
Can I do Alaska nails if I have very warm or olive skin tones? Yes—lean toward the amber and forest green designs (Moose & Pine, Midnight Forest, Deep Sea Denali) which complement warm undertones better than the icy blue-white designs that photograph beautifully on cool skin but can read slightly gray on warm tones.
Why does my stamped design look blurry on the nail but clear on the plate? You’re waiting too long between loading the stamper and applying it to your nail—the polish on the stamper starts to dry in about 3–4 seconds. Load, then immediately roll onto the nail in one fluid motion.
What’s the easiest Alaska design for a complete beginner? Iceberg Color Block, specifically because nail vinyls do all the hard work and the color palette requires no blending or detail painting. You can produce a genuinely impressive result your first attempt.
How long should I wait between Alaska manicures? Give your nails 2–3 days bare between sets, especially if you’ve been wearing dark polish. Apply cuticle oil twice daily during breaks. The wait feels annoying but it reduces brittleness and the polish lasts longer on a hydrated nail.
Conclusion
Alaska nails ideas range from a quick 20-minute glacial French tip to a 60-minute hand-painted forest scene—there’s genuinely a design here for every skill level and patience threshold. If you’re starting out, I’d suggest the Iceberg Color Block using nail vinyls and the three colors listed—it’s quick to execute, genuinely striking, and teaches you clean polish application without any intimidating freehand work.
Once you’re comfortable with that, the Northern Lights Ombré is a natural next step that introduces gradient sponging. Most importantly, expect your first aurora foil attempt to be imperfect—mine was, and so is everyone’s. The timing clicks by attempt three and then it just works.