13 Brown Nail Art Ideas That Actually Look Good
Brown nails are any manicure built around brown tones — from pale latte and warm nude to deep espresso, chocolate, and mocha. They’re not just a fall thing, despite what every seasonal roundup tells you. Browns work year-round because they read as a neutral, but with far more personality than beige or blush.
13 Brown Nail Art Ideas
1. Solid & Minimalist Browns
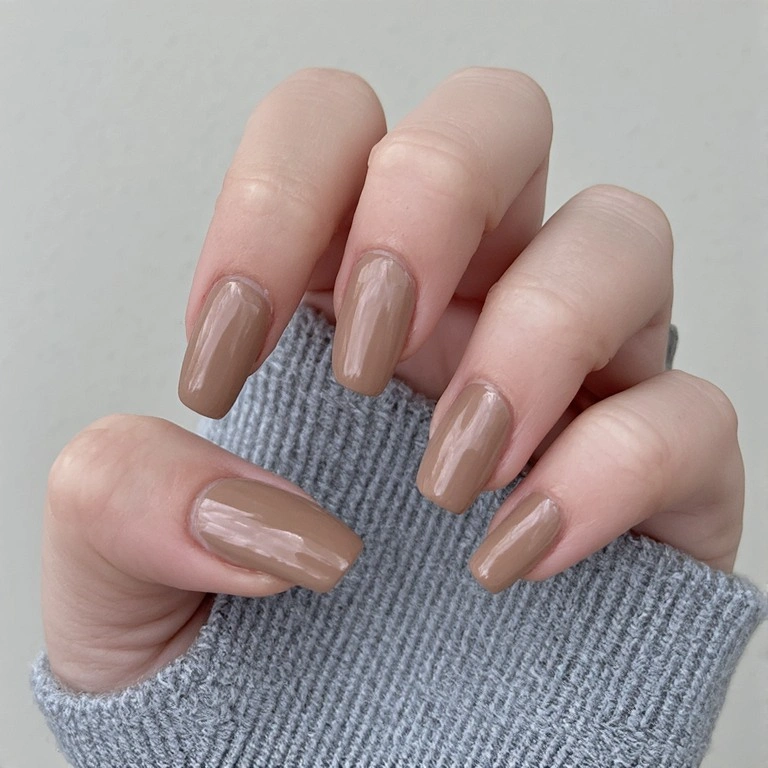
1. Latte Solid
A creamy, warm mid-tone brown — think the color of a flat white with a lot of milk. Slightly peachy undertone, semi-glossy finish, clean and effortless. Looks like “my nails but better” rather than obviously painted.
Difficulty: Beginner Time: 15 minutes Best for: Anyone who wants polished nails without visible effort Why it works: Neutral enough to go with everything, interesting enough to notice What makes it different: The warmth of the undertone keeps it from reading as gray or ashy
2. Espresso Solid
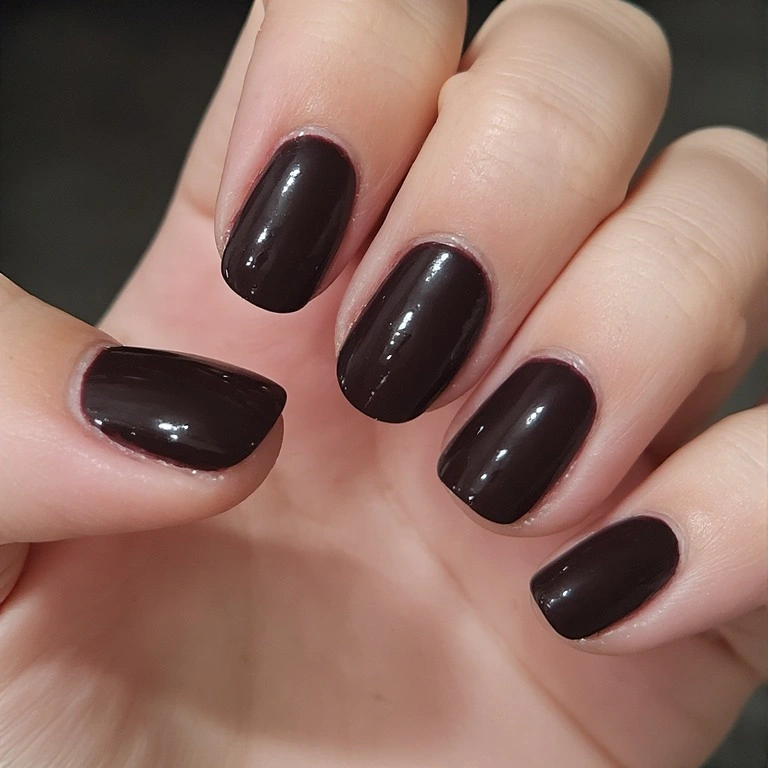
A near-black dark brown — deep, rich, and glossy. Looks different in every light, shifting from almost-black indoors to a warm chocolate in the sun.
Difficulty: Beginner Time: 15 minutes Best for: Anyone who loves dark nails but wants something softer than black Why it works: Dark nails visually lengthen the fingers; brown is less harsh than pure black What makes it different: The warmth prevents it from looking goth — it reads as “expensive” instea
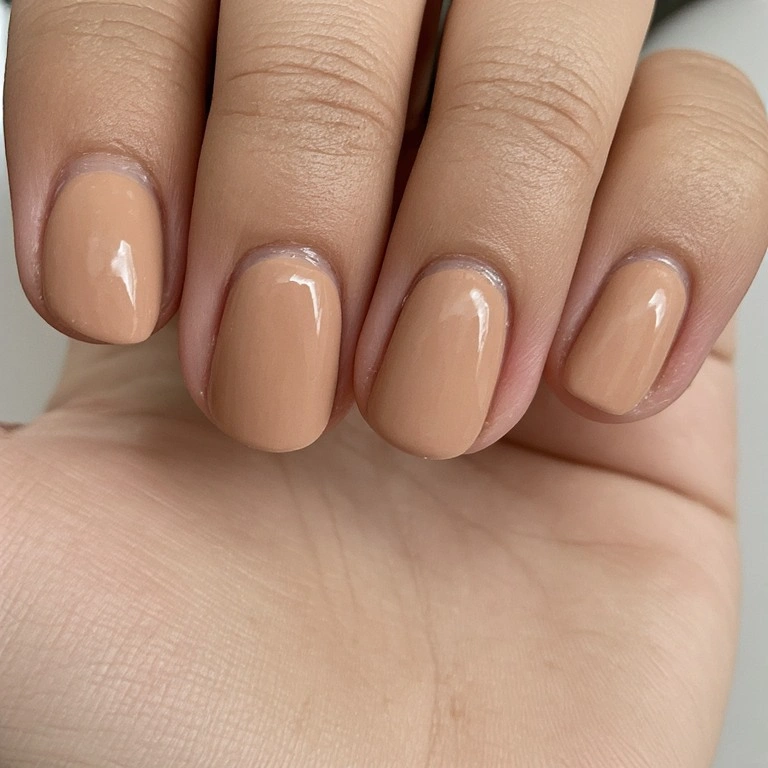
3. Nude-Brown Minimalist
The exact midpoint between nude and brown — close to skin tone but with just enough warmth to be visible. Ultra-clean, almost invisible finish that makes nails look perfectly manicured without much color.
Difficulty: Beginner Time: 15 minutes Best for: Offices, weddings, any situation where you want perfect-looking nails that don’t read as a “nail color” Why it works: Matches most skin tones without washing them out What makes it different: The brown undertone reads more sophisticated than plain nude
2. French Tip Variations
4. Brown French Tip
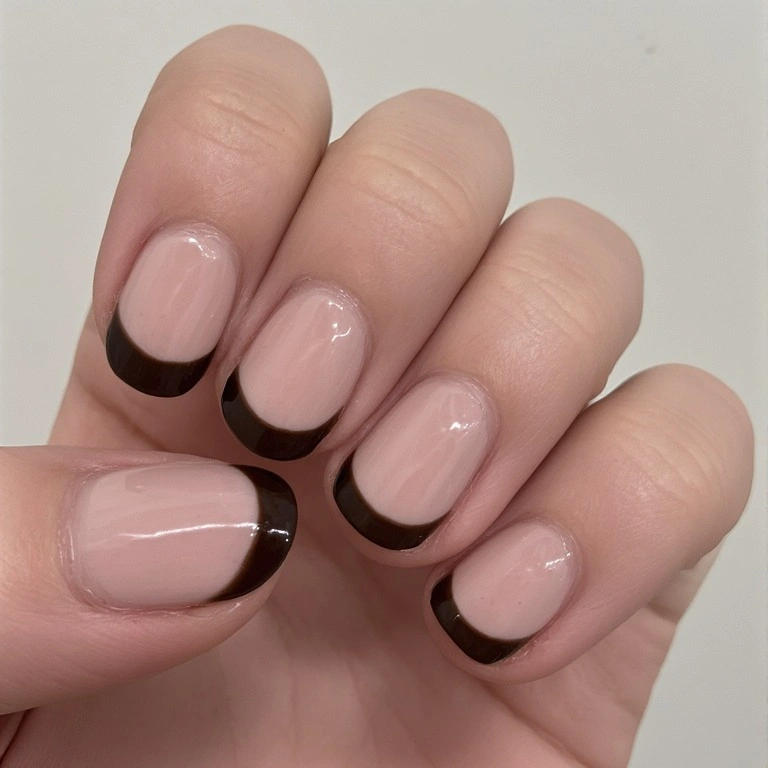
A classic French manicure with a warm chocolate or espresso tip instead of white. Clean, sharp tip line, sheer or lightly tinted base, brown crescent at the free edge.
Difficulty: Beginner–Intermediate Time: 25 minutes Best for: Anyone who loves the French look but finds white tips too stark Why it works: The brown tip is more forgiving than white — tiny imperfections in the tip line are much less visible What makes it different: Looks modern rather than traditionally “French manicure”
5. Café Con Leche Reverse French
The base is a warm espresso brown, and the tip is a lighter latte or cream. The opposite of a traditional French. The contrast is gentler than a classic reverse French because both shades are in the same color family.
Difficulty: Intermediate Time: 35 minutes Best for: People who want something creative but still office-appropriate Why it works: The reverse direction feels fresh without being costume-y What makes it different: Staying within the brown family makes it feel cohesive, not chaotic
6. Gold-Lined French
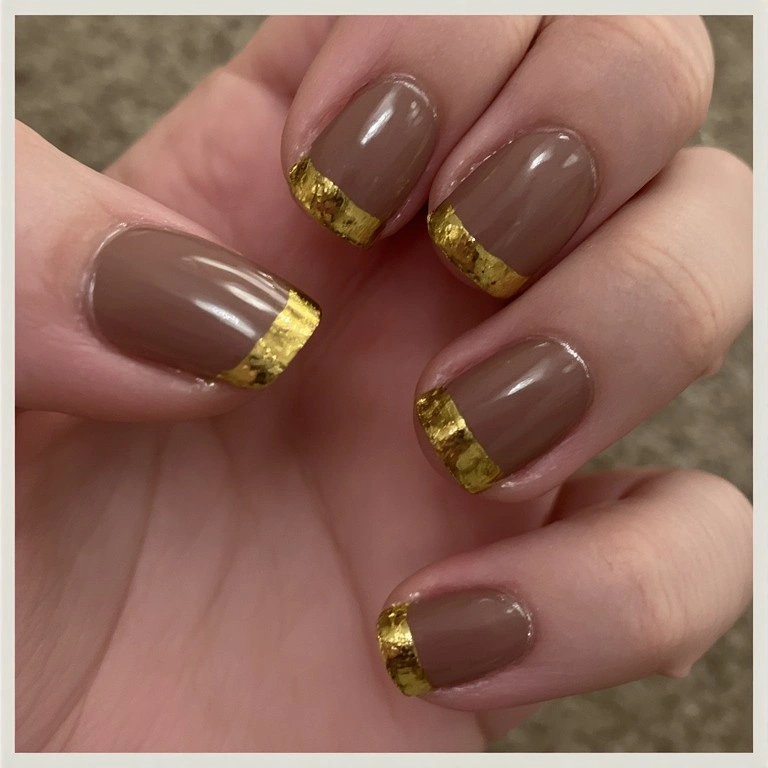
A sheer brown or nude-brown base with a thin gold stripe painted exactly where the tip meets the nail bed — not on the tip itself, just the line.
Difficulty: Intermediate Time: 30 minutes Best for: Special occasions, anyone who wants nail art that photographs beautifully Why it works: Gold against brown is one of the most flattering combinations, full stop What makes it different: The gold line replaces the traditional white, making it look custom and editorial
3. Texture & Finish Designs
7. Matte Espresso
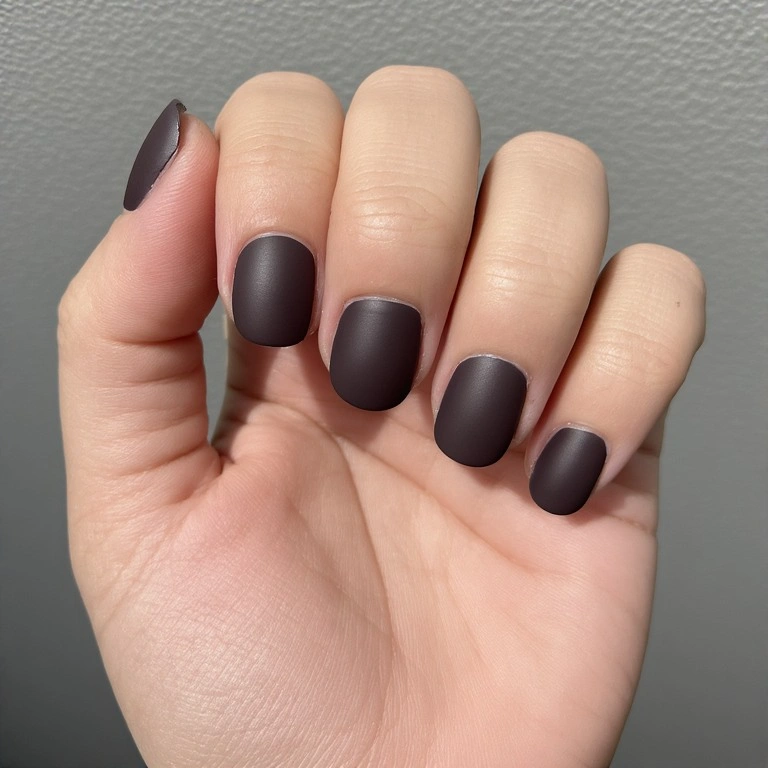
Deep dark brown, fully matte — no shine at all. Velvety, modern, and surprisingly dramatic for how simple it is.
Difficulty: Beginner Time: 20 minutes Best for: Anyone who wants a current, editorial look with almost zero effort Why it works: Matte finishes make colors look more saturated and intentional What makes it different: The absence of shine is the design — it’s a statement through restraint
8. Brown Suede (Dry Brush Texture)
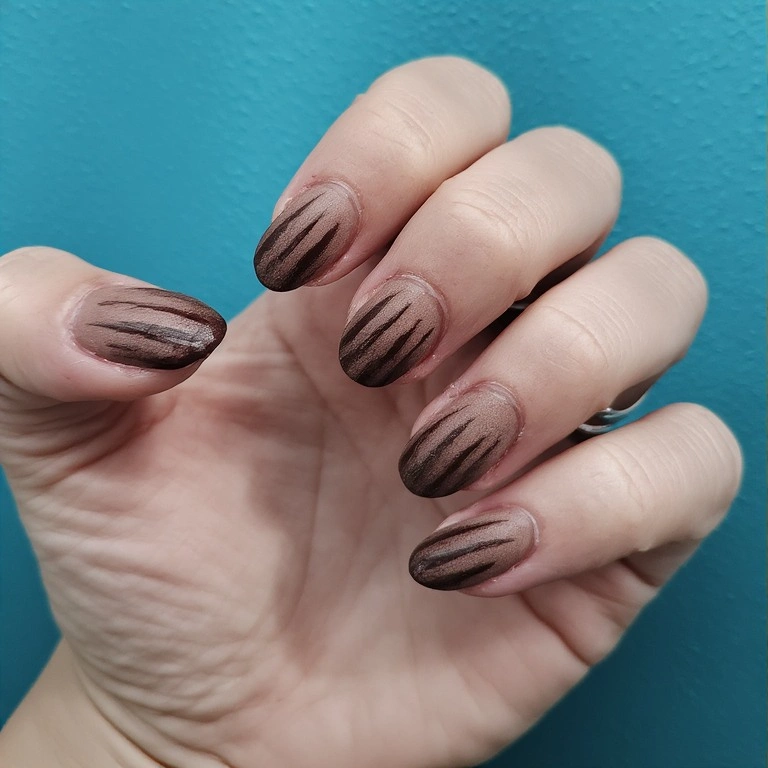
An espresso or chocolate base with a dry-brushed lighter brown dragged across it. The result looks like brushed suede fabric — textured, dimensional, completely unique.
Difficulty: Intermediate Time: 40 minutes Best for: Anyone comfortable with basic nail art who wants something genuinely different Why it works: The organic, imprecise texture is actually forgiving — there’s no such thing as a “wrong” dry brush stroke What makes it different: No two nails will look identical, which makes the set look artisanal
9. Metallic Brown
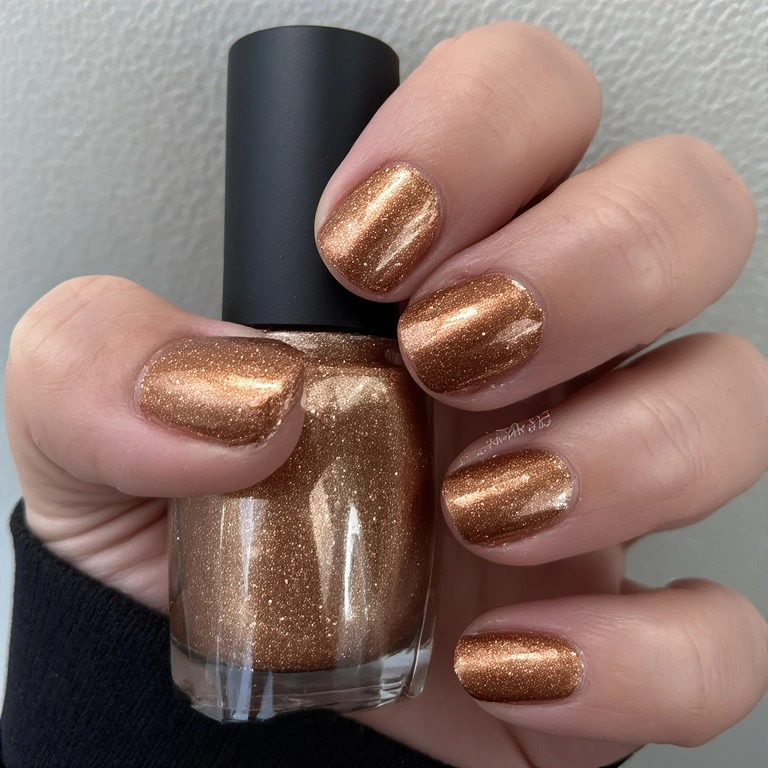
A full-coverage metallic polish in warm copper-brown or bronze. Catches the light and shifts between brown, copper, and gold depending on the angle.
Difficulty: Beginner Time: 20 minutes Best for: Fall and winter, holidays, evenings out Why it works: Metallics apply like regular polish but look like professional chrome work What makes it different: The warm copper-brown tone makes it feel less “party nail” and more everyday-wearable
4. Nail Art & Patterns
10. Brown Tortoiseshell
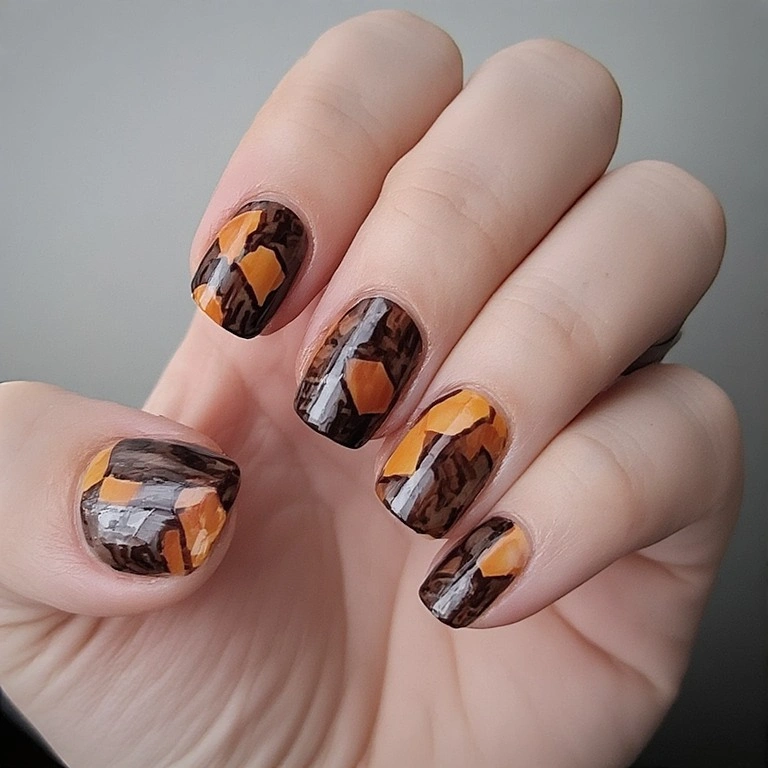
An amber-to-espresso tortoiseshell pattern — layered brown tones with dark espresso patches and warm amber showing through underneath. Looks like high-end resin jewelry.
Difficulty: Intermediate Time: 50 minutes Best for: Anyone who wants a complex-looking design that’s actually achievable at home Why it works: The irregular, organic shapes mean nothing needs to be perfect What makes it different: Tortoiseshell in brown tones reads as luxurious in a way that, say, tortoiseshell in cool tones doesn’t
The key is keeping everything wet enough to blend. Work one nail at a time.
11. Brown Marble
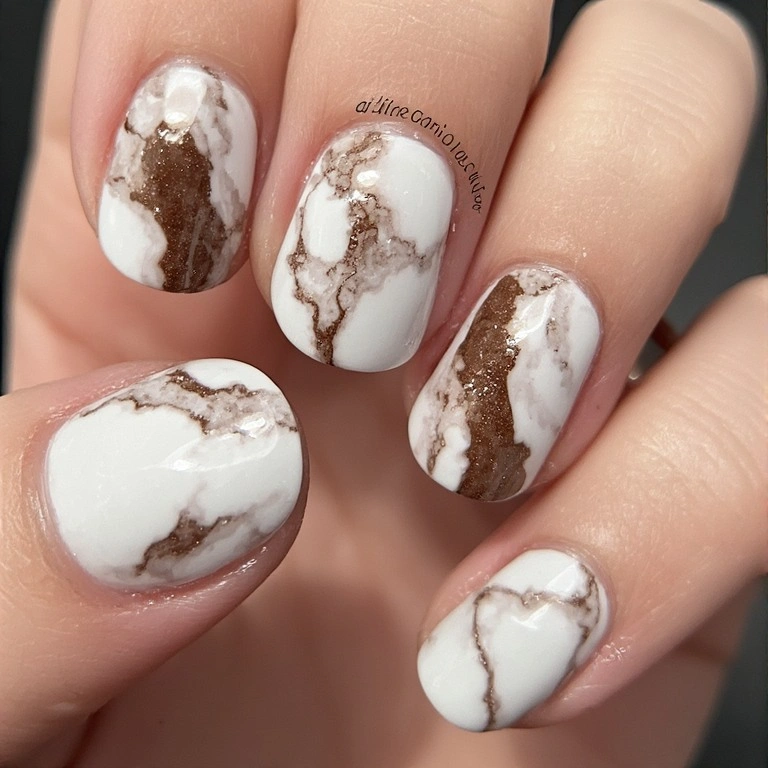
A white or cream base with brown veining — like classic marble but with warm brown tones instead of gray. Looks more organic and earthy than traditional marble nails.
Difficulty: Intermediate Time: 55 minutes Best for: People who love marble nails but want something warmer and less stark Why it works: The irregular veining is naturally imperfect, which makes it accessible What makes it different: Using brown instead of gray for the veins creates a more natural, stone-like effect
12. Gold Foil on Dark Brown
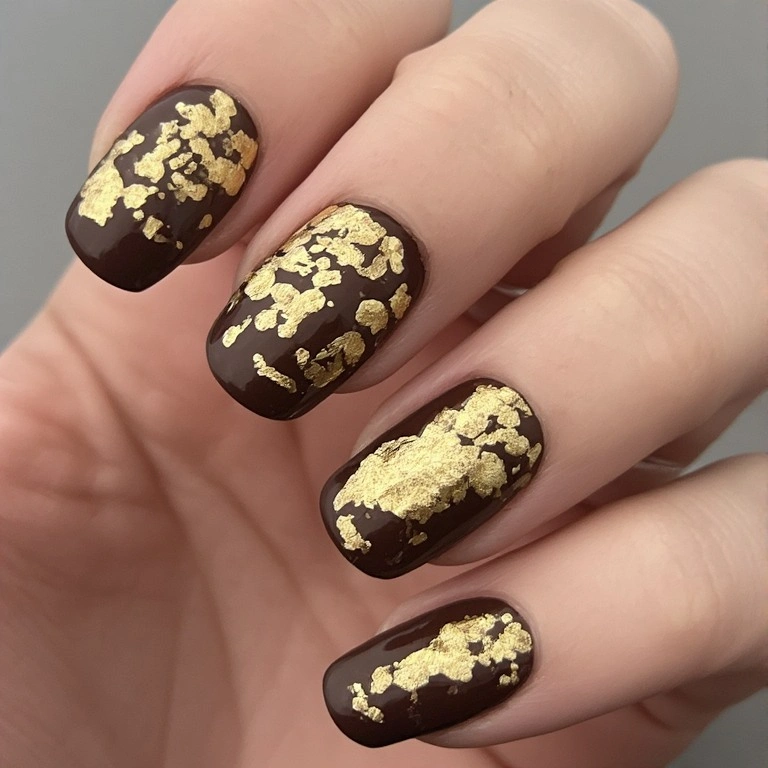
A full espresso base with irregular patches of gold foil pressed on. The dark background makes the gold look deeper and more antique than on light shades.
Difficulty: Beginner–Intermediate Time: 35 minutes Best for: Special occasions, anyone who wants maximum impact with minimal tools Why it works: The contrast between matte dark brown and metallic gold is visually striking and photographs beautifully What makes it different: The dark background reads as more editorial than the standard light-pink foil base
13. Brown Negative Space
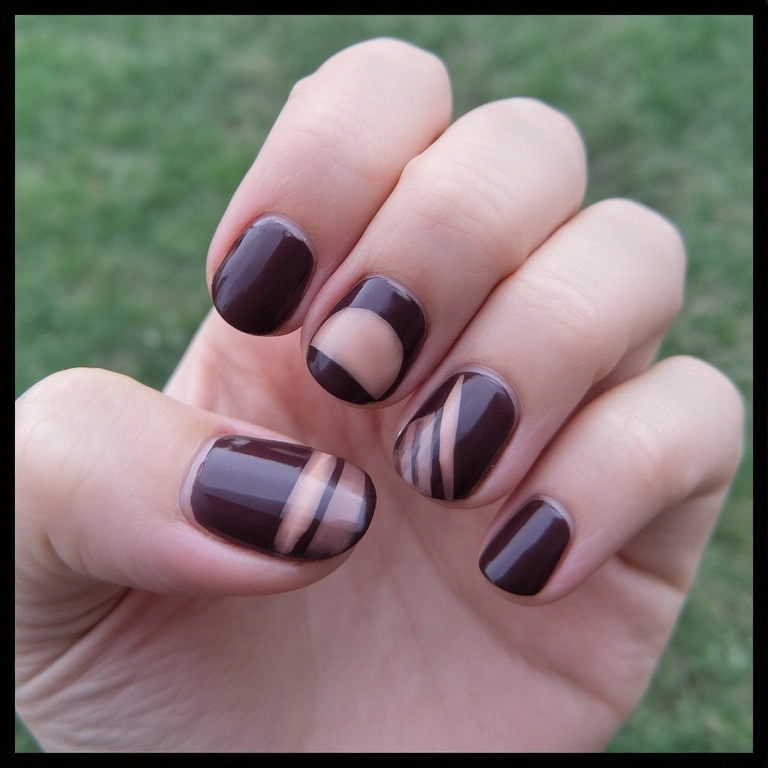
Clean espresso polish with an unpainted strip or geometric cutout — a bare line across the nail, a bare half-moon at the base, or a diagonal bare strip. The unpainted area is part of the design.
Difficulty: Intermediate Time: 40 minutes Best for: People who want something genuinely modern without heavy nail art skills Why it works: Negative space designs look intentional and high-concept with minimal materials What makes it different: Most people assume the unpainted area is a mistake — until they look closer
Pros and Cons of Brown Nails
Pros
✅ Works in every season — not just fall
✅ Flatters every skin tone (with the right undertone selection)
✅ Reads as a neutral — appropriate for offices, events, and casual wear
✅ Dark browns hide regrowth better than lighter shades
✅ Less yellowing of nail polish remover staining than red or dark blue
✅ Pairs naturally with almost every outfit color
✅ Available at every price point — good browns exist from $5 to $20
Cons
❌ Warm browns can oxidize to orange on some skin tones — always swatch before committing
❌ Lighter browns show every chip almost immediately
❌ Tortoiseshell and marble designs take 45–60 minutes minimum
❌ Cheap brown formulas streak badly — quality actually matters more here than with other colors
❌ Very dark espresso can stain nails if used without a base coat
❌ Brown gels can cure slightly different than the bottle color — test nail is essential
Real Wear Test
I wore OPI “Squeaker of the House” (a warm mid-tone brown) in regular polish for 10 days to see exactly what happens.
Day 1–2: Perfect. Glossy, no chips, color is rich and even.
Day 3–4: Still looking good. Minor tip wear on my dominant hand — the ring finger and index finger showed the first faint whitening at the very edge of the tip. Not visible from a distance.
Day 5–7: Visible tip chips on two fingers of my dominant hand. Nails still look intentionally polished from any distance, but up close the wear is obvious. I got three compliments in this window, which tells you something.
Day 8–10: Real chips, not just tip wear. The non-dominant hand held up better — four nails were still nearly perfect. Both thumbs looked rough. The regrowth wasn’t visible because brown is close enough to my natural nail color that the gap blended in. This is a genuine advantage over bright or dark nails.
Verdict: 7 days looks great; 10 days is the outer limit before it starts looking tired. If you seal the tips properly on day one and apply a thin fresh top coat on day 4, you can push to 10–12 days without embarrassment.
Common Brown Nail Mistakes
Mistake 1: Skipping Base Coat with Dark Browns
What it looks like: Yellow or orange staining on the natural nail after removal — sometimes it takes weeks to fade.
Why it happens: Dark pigments in espresso and chocolate shades bond to the nail surface without a barrier.
The fix: Always use Orly Bonder or any rubberized base coat before dark browns. If staining has already happened, buff lightly and apply a brightening base coat (OPI Natural Nail Base Coat, $12) — it won’t remove the stain but it masks it for the next few manicures while it grows out.
How well it works: The prevention is 100% effective. The fix is partial — staining fades in 2–4 weeks naturally.
Mistake 2: Applying Brown Too Thick
What it looks like: Visible brush strokes, a lumpy surface, and a top layer that’s dry while the bottom is still wet — causing dents and wrinkles for hours.
Why it happens: Brown polishes are often more pigmented and slower-drying than lighter colors, so the instinct is to apply one thick coat instead of two thin ones.
The fix:
- Pour out excess polish from the brush back into the bottle
- Apply in thin, fast strokes from base to tip
- Wait 90 seconds between coats — longer than you think you need
- If you’ve already applied thick and it’s wrinkling, let it dry completely (2+ hours), then apply a thin coat of the same color to smooth the surface, then top coat
How well it works: Prevention is easy once you internalize “thin coats.” Fixing a wrinkled manicure is possible but takes an extra hour.
Mistake 3: Using a Cool-Toned Brown on Warm Skin Tones
What it looks like: The nail looks greenish or muddy against the skin — not cohesive.
Why it happens: Browns with gray or purple undertones fight with warm skin tones instead of complementing them.
The fix: Swatch on your actual nail before committing. Warm skin tones almost always look better with red-brown, orange-brown, or golden-brown undertones. Cool skin tones can carry the gray-brown and taupe-brown shades. If you’re unsure, mid-tone warm browns (the “latte” range) are genuinely universal.
How well it works: Fully effective — the right undertone makes a huge difference.
Mistake 4: Tortoiseshell Blending Too Late
What it looks like: Hard, defined edges between the brown colors instead of the blended, organic look of real tortoiseshell.
Why it happens: Waiting too long between layers. Each color needs to be blended while the previous coat is still tacky, not after it’s dried.
The fix: Work one nail at a time and blend colors within 60–90 seconds of application. If it dries before you blend, let it cure fully, then apply a thin layer of clear top coat to re-wet the surface slightly, and try blending again. Results won’t be as seamless but are better than dry-blending.
How well it works: Prevention is everything here. The fix is partially effective.
Mistake 5: Foil Not Sticking
What it looks like: Foil comes off the sheet but doesn’t transfer to the nail, or transfers only in tiny fragments.
Why it happens: The tacky coat was either too dry or too wet. Foil needs a specific level of tackiness — not liquid, not fully cured.
The fix: Let the tacky coat sit for exactly 60 seconds after application before pressing foil. Press firmly for 3–5 seconds before pulling back. If foil still won’t transfer, apply a second thin layer of tacky coat and wait again.
How well it works: Once you find the right timing, foil application is very reliable.
FAQs
Can I wear brown nails in summer? Yes — lighter browns (latte, nude-brown, caramel) actually do very well in summer. They’re less stark than neons and pair naturally with bronzed skin. I wear mid-tone brown almost more in summer than fall.
Why does my brown polish always look orange on my nails? The polish has a red or orange undertone that’s amplifying your skin’s warmth. Try a brown with more gray or taupe in it — Essie “Chinchilly” ($10 at Ulta) is a cooler brown that reads true on warm skin tones.
How do I keep brown nails from looking muddy? Two coats of quality polish over a white or neutral base coat keeps the color clean. Applying brown over a bare or yellowish nail is what creates the muddy effect.
What’s the easiest brown nail art design for a complete beginner? The gold foil accent nail — paint nine nails in espresso and press foil flakes on one accent nail. Total time: 30 minutes, and even imperfect foil placement looks intentional.
How long should I wait between brown manicures? At least 24–48 hours of going bare between manicures. This lets the nail plate breathe and re-hydrate. If you’re wearing gel or dark polish frequently, a weekly application of cuticle oil and a biotin supplement (check with your doctor) help prevent brittleness over time.
Conclusion
Brown nail art range from a barely-there nude-brown for work to an espresso tortoiseshell that takes an hour and looks gallery-worthy — there’s genuinely a version for every skill level and every occasion.
If you’re starting out, I’d suggest trying the solid latte with a metallic accent nail using the foil method, which is forgiving and looks much more complex than it is.
Once you’re comfortable with that, the tortoiseshell is the natural next step — it uses the same layering instinct but pushes the technique further.
Give yourself a few practice rounds before expecting perfection; the first time I tried tortoiseshell it looked like a bruise, and the fifth time it looked like something from a nail account I’d saved on Pinterest.