12 Creative Mountain Nail Ideas for Unique Nail Art Looks
Mountain nails are one of those rare nail art themes that work for literally everyone — whether you want something quiet and minimalist for the office or a full aurora-borealis drama moment for a special event.
I’ve been doing mountain nail art for a few years now, and in this guide I’m sharing 12 actual designs I’ve tried, with honest assessments of difficulty, time, and what makes each one worth attempting
What Are Mountain Nails?
Mountain nails are any nail art design featuring mountain silhouettes, peaks, ridgelines, or alpine scenery — ranging from a single minimalist line drawing to a full multi-layer landscape with pine trees, snow caps, and aurora skies.
The style sits somewhere between nature-inspired nail art and landscape painting on a tiny canvas. Because mountain shapes are essentially just triangles, they’re surprisingly approachable even for beginners — though the advanced versions will genuinely test your patience.
Essential Tools & Products
The Basics (Under $30 Total)
Orly Bonder Base Coat ($9 at Sally Beauty) — This is the one item I’d never skip. It creates a rubberized layer that flexes with your nail instead of cracking. My mountain nail manicures last 4–5 days longer with Orly Bonder compared to drugstore base coats that go on rigid and start peeling at the edges within 48 hours.
Essie Gel Couture Top Coat ($12 at Target) — You don’t need a UV lamp for this one. It gives a glossy gel-like finish that also helps seal the edges of your painted mountain shapes so they don’t chip from the tips first. I’ve tried four or five top coats and this is the one I keep going back to.
Seche Vite Fast-Dry Top Coat ($9 on Amazon) — If you’re in a hurry, Seche Vite dries to the touch in under a minute. The trade-off is that it can shrink a tiny bit as it dries and pull away from the edges on detailed art. I use this one when I’m doing simple silhouettes, and the Essie Gel Couture when I’ve put real time into a design.
Fine Detail Nail Art Brush Set ($8 on Amazon, brands like Makartt or Born Pretty) — A basic brush set gets you 90% of the way there. The liner brush (usually called a “striping brush”) is what you’ll use for mountain outlines, tree silhouettes, and the line art designs. I burned through three cheap sets before I realized they were the reason my lines looked wobbly.
The Game-Changers
Bundle Monster Stamping Kit ($15–$22 on Amazon) — If freehand painting genuinely isn’t working for you, nail stamping plates are a completely legitimate shortcut. Bundle Monster makes plates specifically for nature and landscape themes. The result looks hand-painted to anyone who isn’t looking very closely.
OPI GelColor Base + Top Coat ($18 each at Ulta) — If you have a UV lamp at home, switching to gel completely transforms how long mountain nail art lasts. I got 12 days out of a gel mountain manicure before it started lifting, versus 5–6 days with regular polish.
The Thin Detail Brush (Don’t Cheap Out Here)
Artisan Pro Detail Brush ($6 at Michaels, or the Makartt 15-piece set on Amazon for $10) — The cheapest nail brushes shed bristles into your wet polish, which ruins delicate mountain lines instantly. Spend a couple of extra dollars and get brushes where the bristles are properly crimped into the handle. I learned this after ruining a perfectly good aurora borealis design with a rogue bristle.
12 Mountain Nail Design Ideas
1. Blue Ridge Silhouette
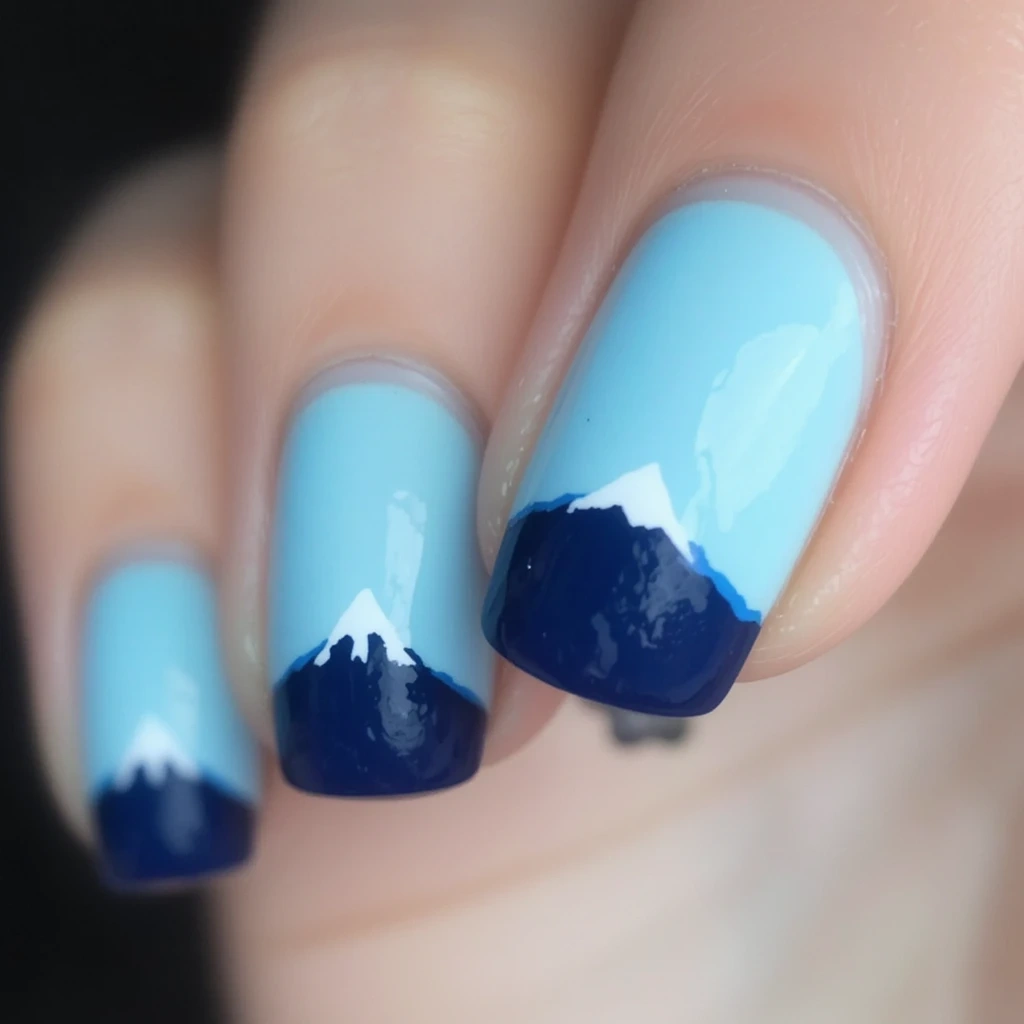
A single navy-blue mountain range painted over a soft sky-blue base, with a tiny white triangle at each peak tip for snow. Clean, calm, and works on any nail length. The color combination reads as genuinely intentional rather than “I found a stamping plate.”
Difficulty: Beginner Time to complete: 20 minutes Best for: Anyone trying mountain nail art for the first time who wants a result they’ll actually want to wear to work. Why it works: The blue-on-blue color family reads as cohesive without being boring, and the white snow caps add a detail that makes it look more considered. What makes it different: Most beginner silhouette tutorials use black on white or black on nude. Using navy on sky blue is softer and more wearable.
2. Sunset Peak Ombré
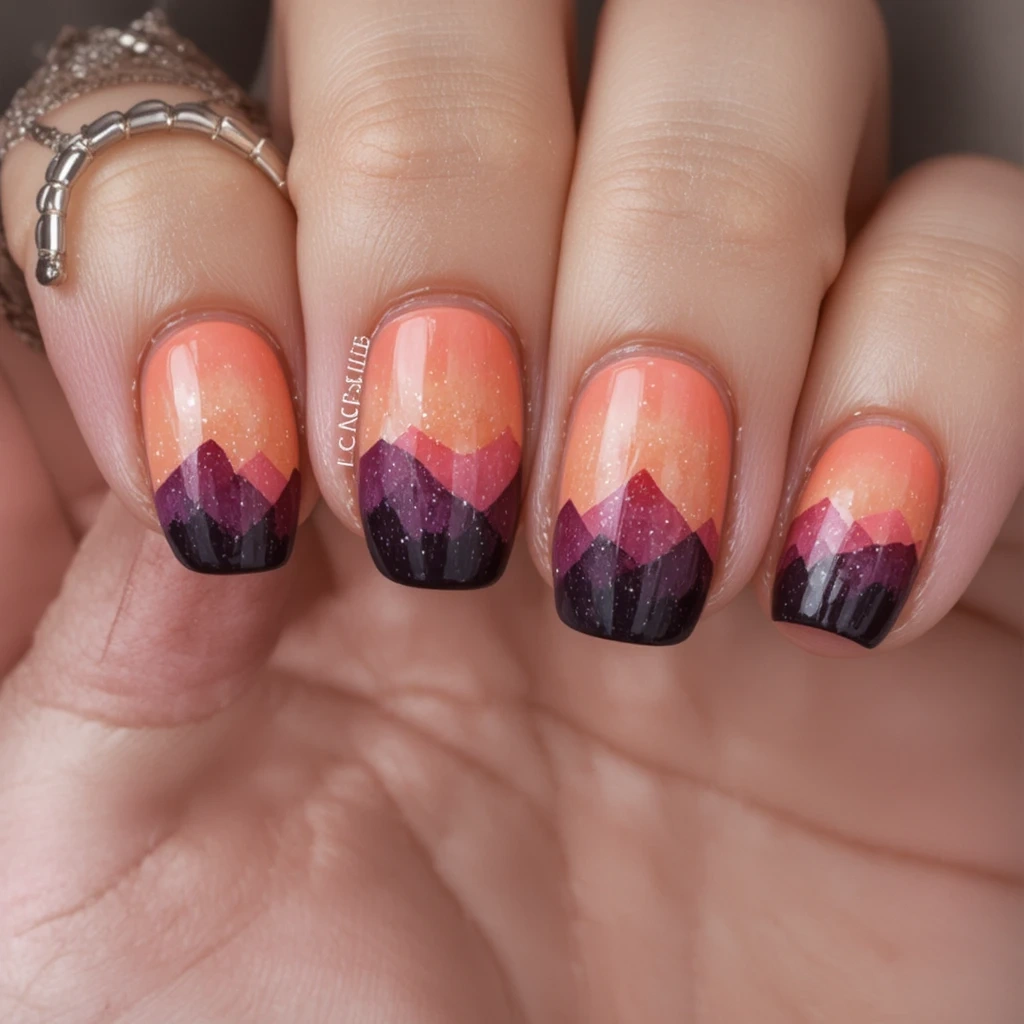
A warm peach-to-rose ombré background with deep plum mountain silhouettes. The contrast between the warm sky and the cool-dark mountains is what makes this one feel sophisticated rather than crafty. It reads like a real alpine sunset.
Difficulty: Intermediate Time to complete: 35 minutes Best for: Someone comfortable with a sponge gradient who wants something that photographs well. Why it works: Warm and cool tones in the same design create visual tension that makes it interesting to look at. What makes it different: Most “sunset nails” use orange and pink. The plum mountains anchor this one and keep it from reading as too sweet.
3. Minimalist Line Art
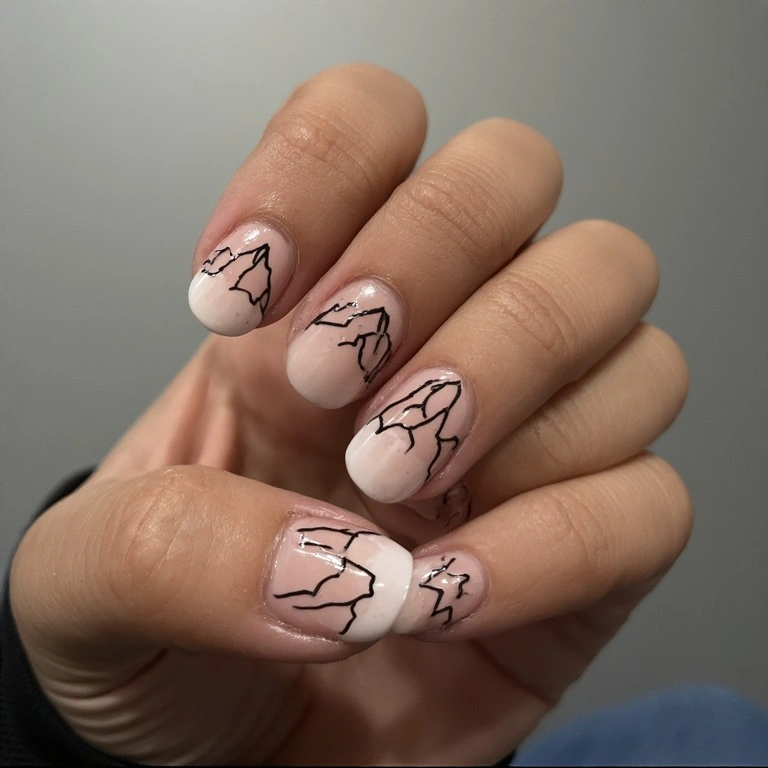
A single, fine uncolored line drawing of a mountain peak over a nude or off-white base. No fill, no shading — just the outline. This one looks like it belongs in a design studio rather than a nail salon, and it’s the most office-appropriate design in this list.
Difficulty: Intermediate (steady hand required) Time to complete: 30 minutes Best for: Anyone who prefers understated nail art and has a professional environment where heavy nail art isn’t appropriate. Why it works: Negative space is doing all the work here. The simplicity is the statement. What makes it different: Every other mountain nail design fills in the mountain. This one doesn’t, and that restraint is what makes it stand out.
4. Snowy Pine Forest
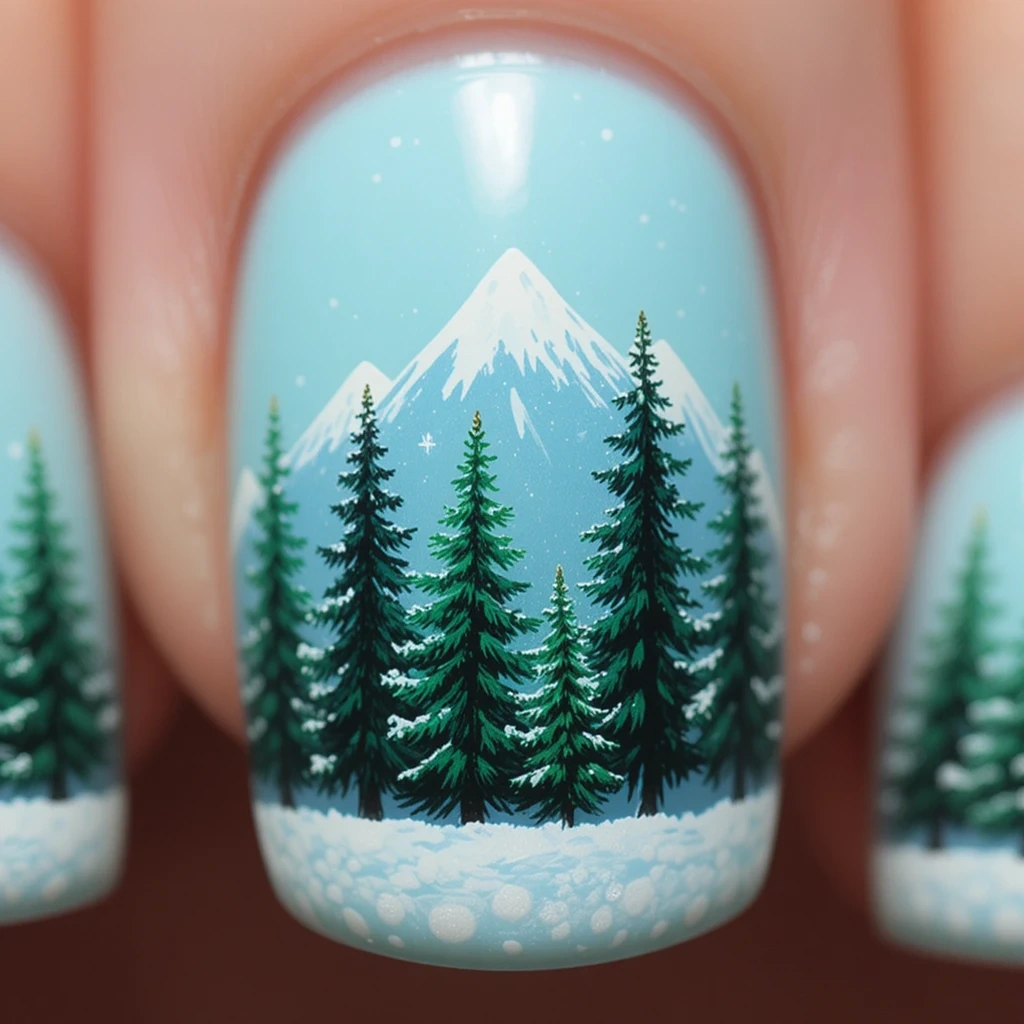
Deep forest-green pine trees standing in front of a white snow-capped mountain on an icy pale blue base. Snow at the bottom covers the lower quarter of the nail. It’s the most detailed design in this list and also one of the most rewarding to finish.
Difficulty: Advanced Time to complete: 50 minutes Best for: Someone who enjoys the process of nail art as much as the result, and has at least a few manicures of experience behind them. Why it works: The layering — sky, mountain, trees, snow — creates genuine depth that makes the nails look almost illustrated. What makes it different: The white snow ground at the bottom is the detail most people skip. It frames the design and makes the trees read as actually standing in a landscape.
5. Earthy Terracotta Peaks
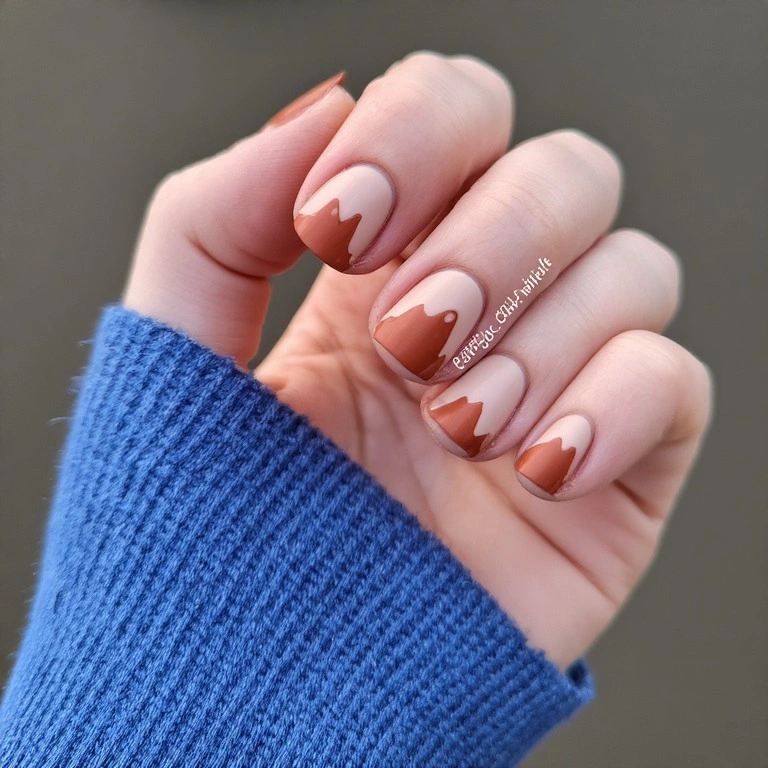
Rust and burnt-sienna mountain shapes on a warm sand nude base. Matte top coat is essential here — the clay-like finish is the whole point. This palette reads as very “Pacific Southwest” and pairs naturally with warm-toned outfits.
Difficulty: Beginner Time to complete: 25 minutes Best for: Anyone who doesn’t love the typical blue mountain palette and wants something that feels more earthy and textured. Why it works: The terracotta-on-nude color family is warm and cohesive in a way that feels current without being trendy. What makes it different: The matte finish on a mountain design is uncommon — most mountain nails use glossy or shimmer top coats. Matte makes this one feel more grounded.
6. Aurora Borealis Summit
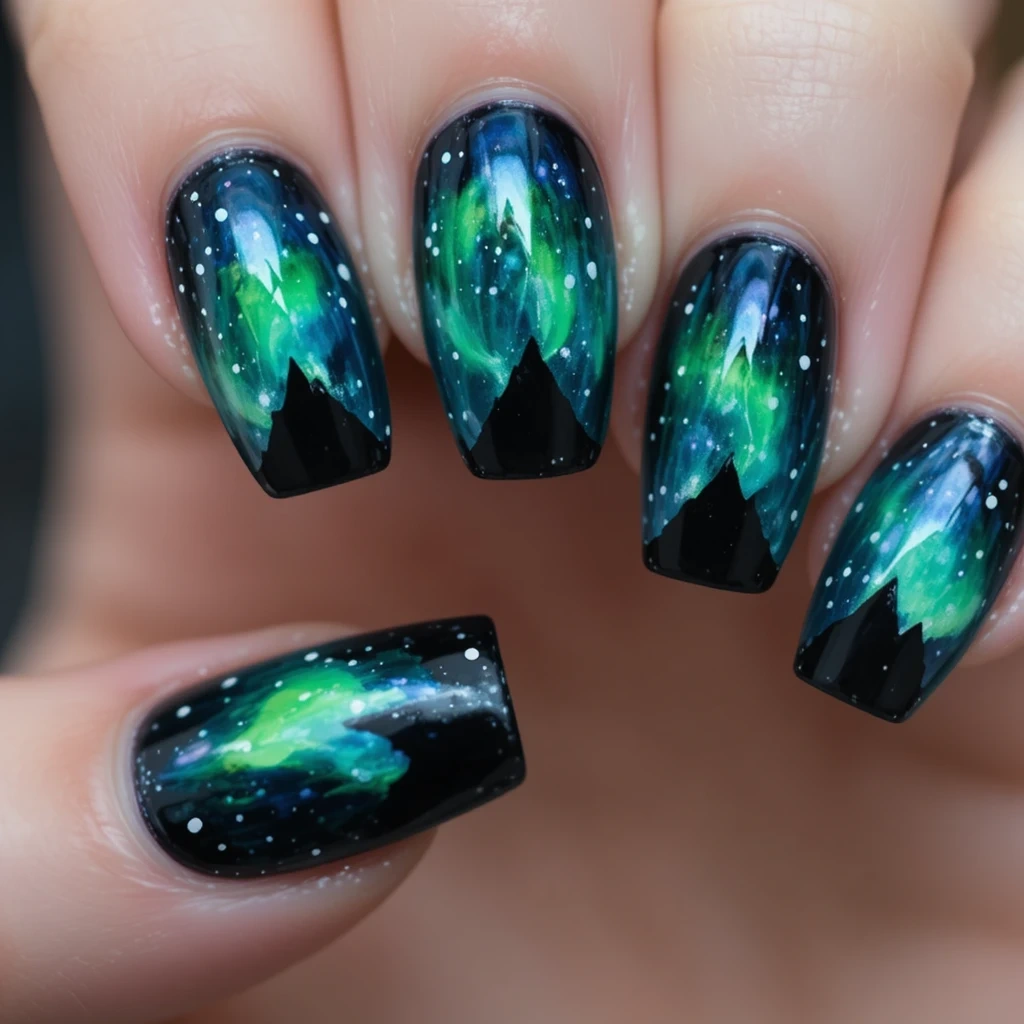
A near-black midnight base with semi-transparent green and purple aurora wisps painted above a solid black mountain silhouette. Tiny white dots for stars finish it off. This is the design that gets the most comments.
Difficulty: Advanced Time to complete: 55 minutes Best for: Special occasions, events, or anyone who wants a conversation-starter design. Why it works: Dark nail art photographs extremely well, and the contrast between the glowing aurora and the black silhouette is dramatic in a way that doesn’t feel costume-y. What makes it different: Most aurora nail art uses glitter or holographic polish. Painting the aurora in semi-transparent streaks of regular nail polish looks more realistic and considered.
7. Golden Hour Layered
Multiple dark brown mountain ranges at different heights over a warm amber-to-gold gradient sky. The lightest mountain is at the back (smallest, most yellow), and the darkest is in the foreground. Deeply warm and cozy.
Difficulty: Intermediate Time to complete: 40 minutes Best for: Fall and winter manicures. This one looks especially good with burgundy or camel-toned outfits. Why it works: The warm amber gradient + layered recession technique creates genuine visual depth that rewards a second look. What makes it different: This is the warmest palette in this list. Every other mountain design uses cool blues or neutrals — this one feels like an open fire.
8. Watercolor Wash
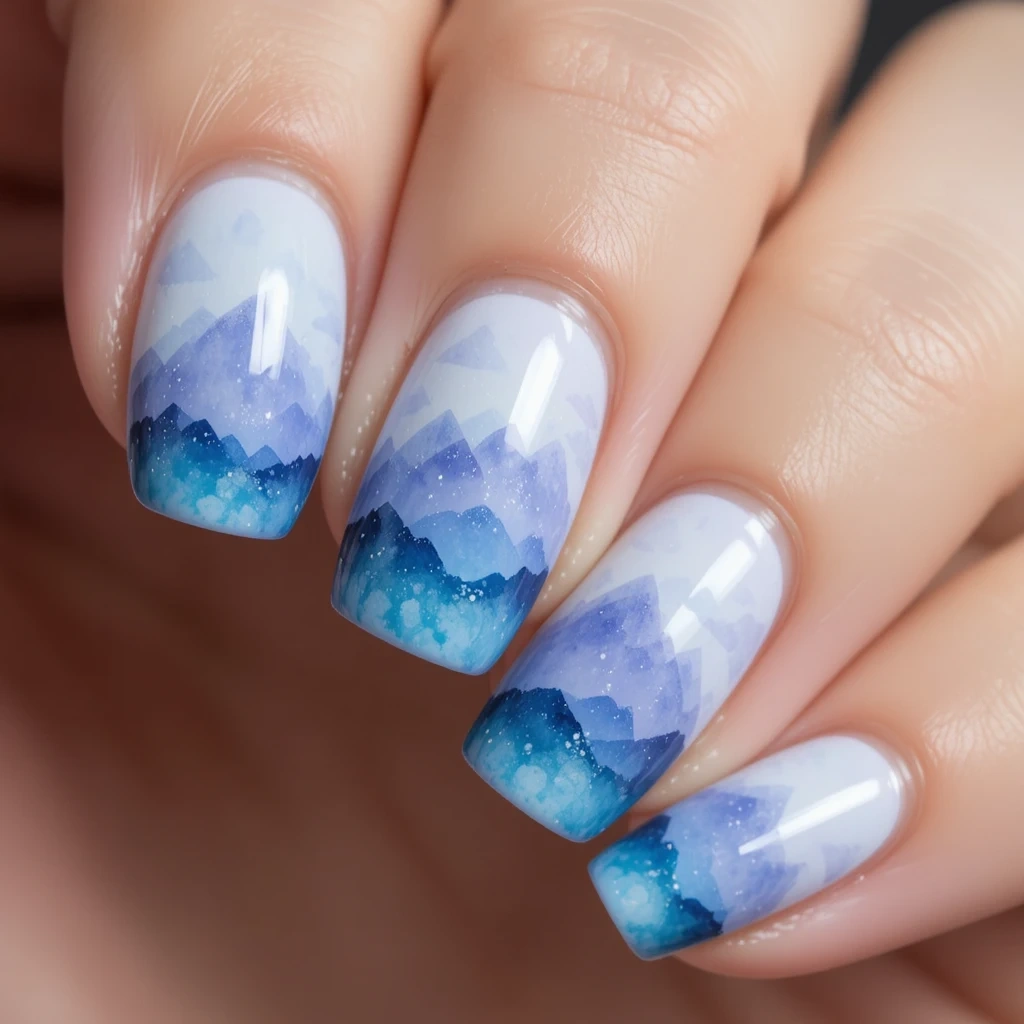
Soft overlapping blue and lavender washes building a hazy mountain impression — no hard edges, no outlines. The design looks like it was painted with a watercolor brush, which is exactly the technique used.
Difficulty: Intermediate Time to complete: 35 minutes Best for: Anyone with an artistic sensibility who prefers impressionistic nail art over graphic, defined shapes. Why it works: The softness and lack of hard lines makes this design feel delicate and painterly in a way that’s genuinely unusual for nail art. What makes it different: There is no “correct” version of this design. Every nail looks slightly different, which is actually the point.
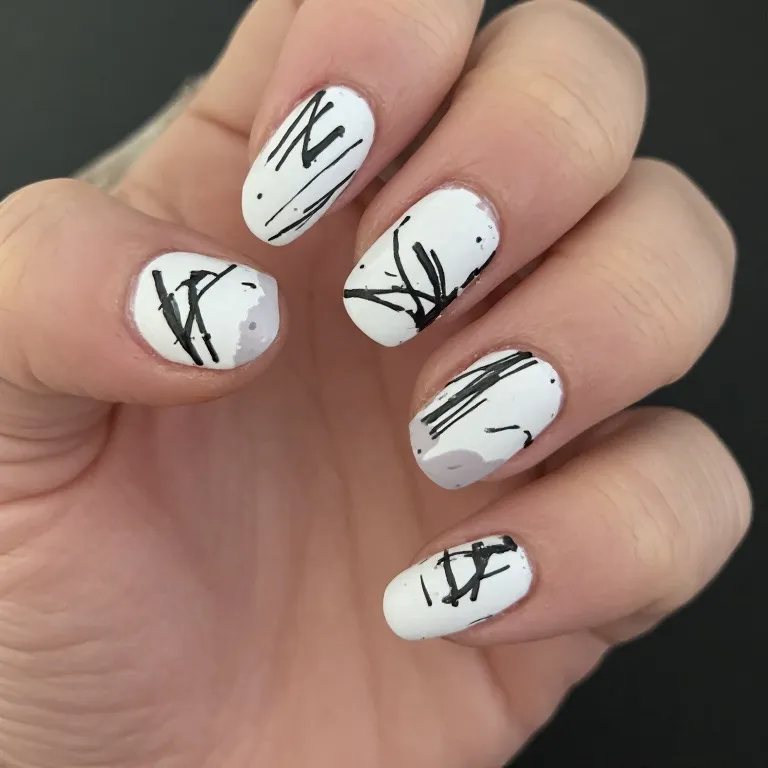
9. Black & White Graphic
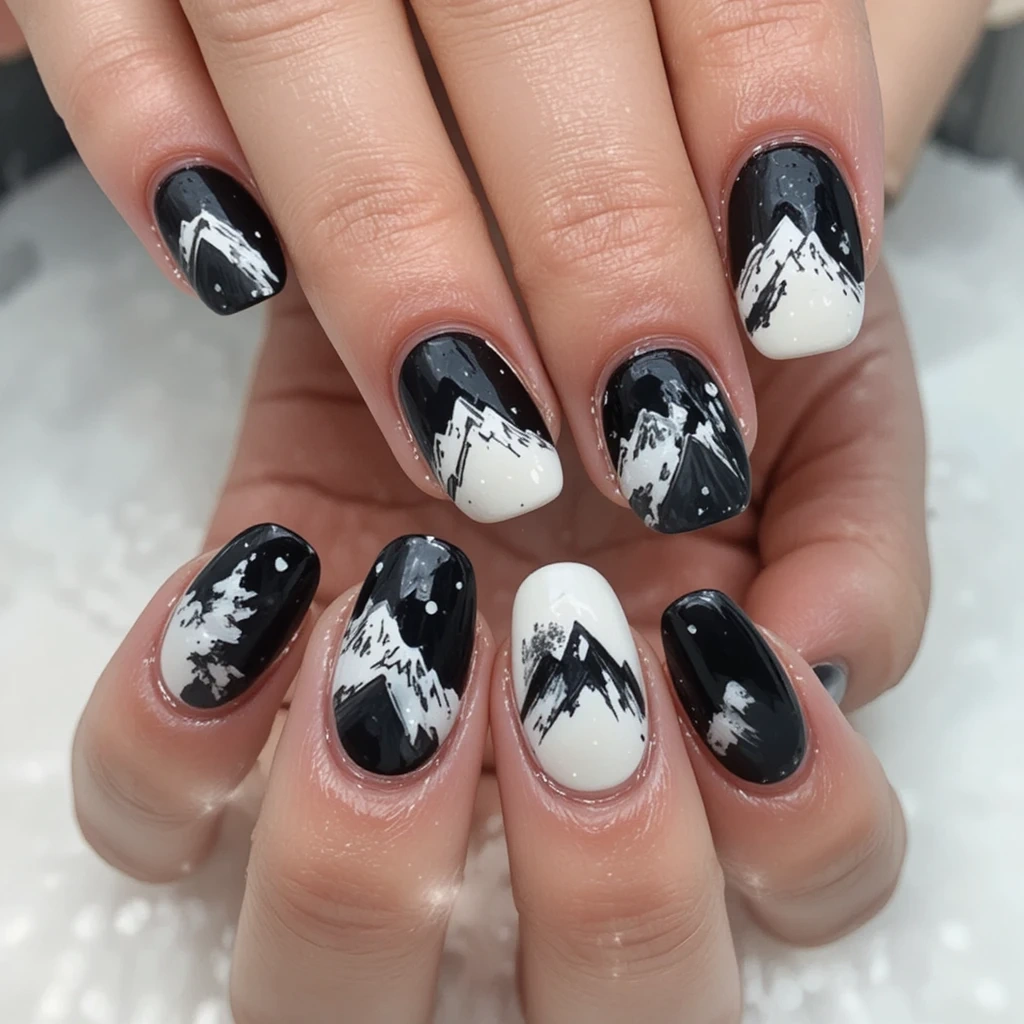
Alternating black and white nails — black base with white mountain shapes, white base with black mountain shapes. High-contrast, editorial, and one of the most striking mountain designs for anyone who doesn’t love color.
Difficulty: Beginner Time to complete: 25 minutes Best for: Minimalists, people who find colorful nail art too loud, and anyone whose wardrobe is mostly black and white anyway. Why it works: The alternating nails create rhythm and interest without needing color. It looks more intentional than a full set of identical nails. What makes it different: The inversion — same design, swapped colors on alternating nails — is a classic graphic design trick that works just as well on a 2cm canvas.
10. Sage & Stone
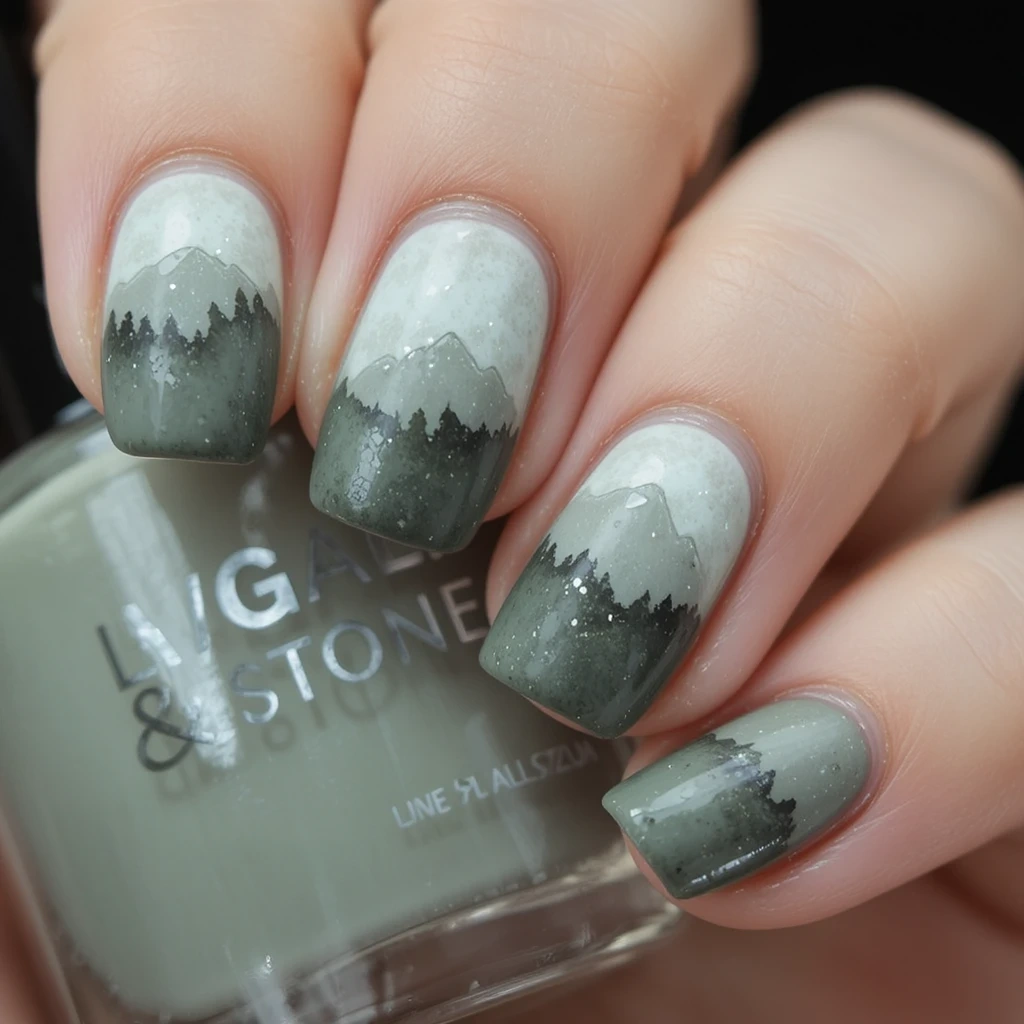
Muted sage green base with olive-toned mountain layers in a soft, foggy Pacific-Northwest palette. Understated and nature-forward — probably the most “every day” mountain nail in this list.
Difficulty: Beginner Time to complete: 22 minutes Best for: People who want mountain nail art that doesn’t read as obviously “mountain nail art” — just a beautiful, earthy manicure. Why it works: The monochromatic green family is restful and easy to wear. It doesn’t compete with anything you’re wearing. What makes it different: Most mountain nails use color contrast for impact. This one uses tone-on-tone contrast instead, which is rarer and more sophisticated.
11. Geometric Faceted
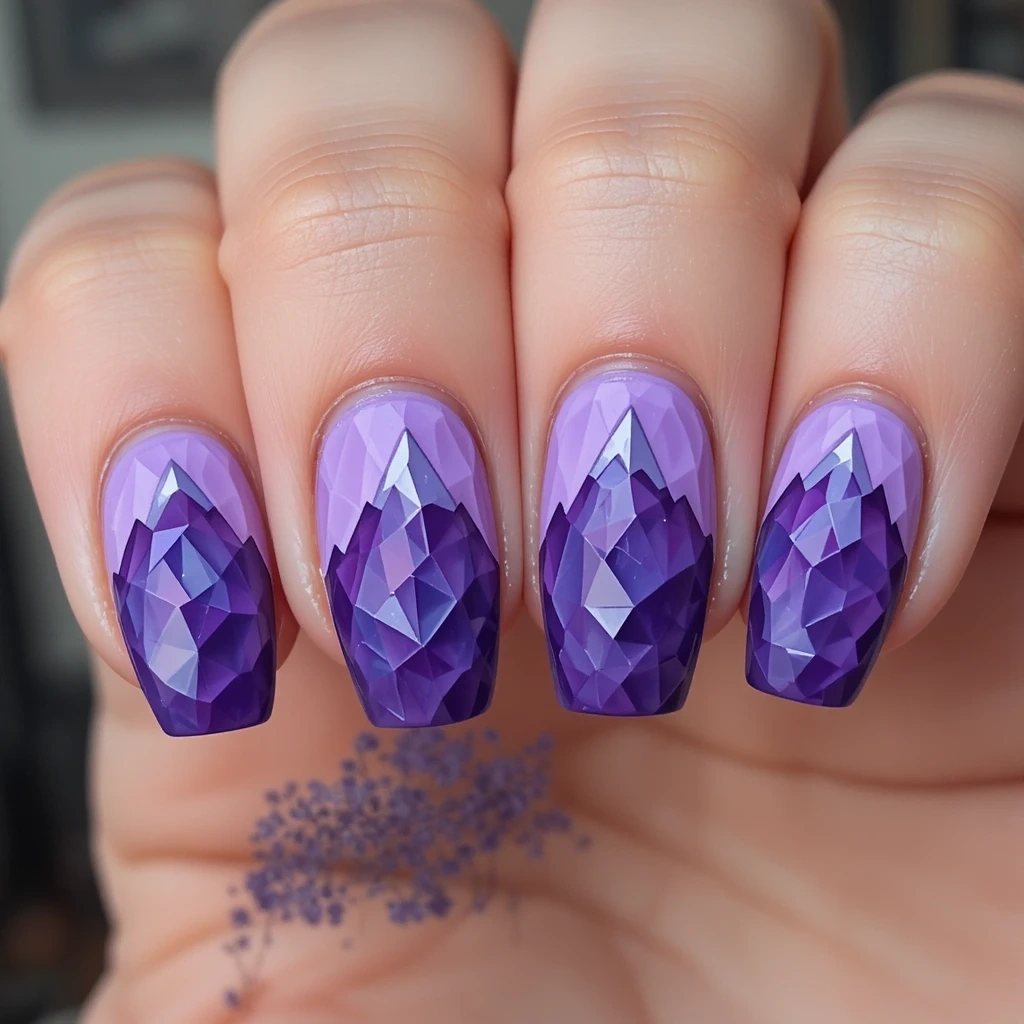
Low-poly diamond-faceted mountain shapes in lilac and deep purple, giving a crystal or gemstone effect on each nail. Each “face” of the mountain is a slightly different shade, creating the illusion of a 3D angular form.
Difficulty: Advanced Time to complete: 60 minutes Best for: Experienced nail art enthusiasts who like geometric design and don’t mind precision work with a very thin brush. Why it works: Low-poly design is a well-established aesthetic from digital art and design.
It translates surprisingly well to nail art because nails are small enough that just 3–4 polygon faces read as faceted. What makes it different: Every other design in this list is a flat silhouette or a painterly effect. This one has implied geometry and 3D form.
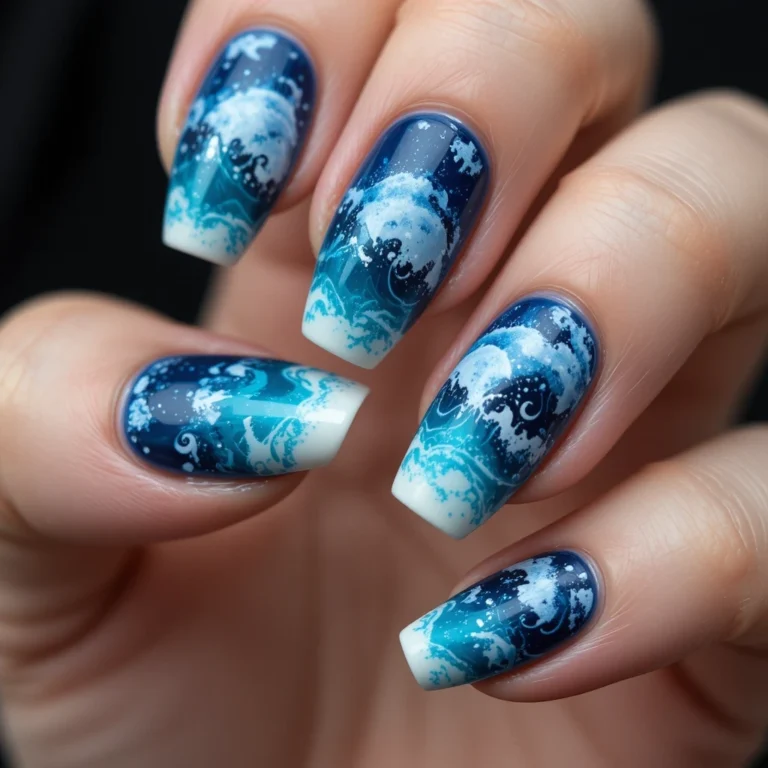
12. Misty Forest Gradient
Multiple receding mountain layers in cool blue-grey tones with atmospheric depth — like looking through morning fog over a valley. Each layer is progressively darker toward the foreground and lighter toward the horizon.
Difficulty: Intermediate Time to complete: 40 minutes Best for: Anyone who wants a design that looks complex but is mostly just patience rather than fine motor skill. Why it works: Atmospheric perspective (lighter = farther away) is one of the oldest tricks in painting. It works on nails exactly as well as it works on a canvas. What makes it different: This is the most “landscape painting” feeling of all the designs here. It actually looks like you looked out a window and painted what you saw.
Pros and Cons of Mountain Nails
Pros
✅ Works at every skill level — single silhouettes are genuinely beginner-accessible
✅ Enormous color palette range — cool blues, warm ambers, earthy neutrals, dramatic darks
✅ Scales naturally with nail length — works on short, medium, and long nails
✅ Versatile enough for everyday wear (minimalist versions) or special events (aurora, geometric)
✅ The mountain shape (triangles) is forgiving — slight irregularity reads as natural, not as a mistake
✅ Pairs well with every season — snowy peaks in winter, earthy terracotta in fall, sunset ombré in summer
✅ No stamping plates or special tools required for most designs
Cons
❌ Fine detail designs (forest, aurora, geometric) require 45–60+ minutes minimum — this isn’t a “quick paint on your lunch break” situation
❌ Layered designs require waiting for each layer to dry — rushing this is the number one reason they look muddy
❌ Line art designs are unforgiving — wobbly mountain outlines are immediately visible on a design with no fill to hide imperfections
❌ The aurora and geometric designs have a steep first-attempt learning curve — expect your first try to look rough
❌ Short nails limit the detail level significantly — the Snowy Pine Forest and Misty Gradient designs both need at least a medium nail length to read properly
❌ Complex designs chip at the tips first — if you use your hands a lot, the intricate edge work deteriorates within 3–4 days without proper sealing
Real Wear Test: What Happens After Two Weeks
I wore the Misty Forest Gradient design (regular polish, Orly Bonder base + Essie Gel Couture top coat) for 14 days and tracked what happened.
Days 1–3: Perfect. The gradient looked clean, the mountain edges were crisp, and I got two comments from coworkers. No chips, no lifting.
Days 4–6: Small tip wear on my dominant hand — the index finger and middle finger showed the most wear. Not chips exactly, more like the glossy top coat starting to dull at the very tip. Not visible from a normal viewing distance.
Days 7–9: One actual chip on my right thumb, right at the corner where I catch things. The layer under it (the gradient) exposed slightly. I sealed it with a quick swipe of top coat, which mostly hid it. Regrowth started becoming visible at the base — about 1mm of bare nail.
Days 10–12: The gradient was still largely intact, but the tip wear was more pronounced. The design started to look “tired” rather than “maintained.” A second person asked about my nails, but they were looking at them fresh. I was noticing the wear more than they were.
Days 13–14: Regrowth was clearly visible — about 2mm — and the tips on three nails were visibly chipped rather than just worn. I removed them at Day 14.
Verdict: Seven to nine days is the sweet spot for regular polish on a detailed mountain manicure. It looks excellent through Day 7, acceptable through Day 9, and noticeably worn by Day 11–12. If you want it looking fresh for a specific event, do it 1–2 days before, not the morning of.
Maintenance Tips
Days 1–7: Protection Phase
Apply a thin layer of top coat over the entire nail — including the tip edge — every other day. I use Seche Vite for this because it dries fast enough that I can do it while watching something and not worry about smudging. This single habit adds 2–3 days to my mountain manicure lifespan.
Avoid prolonged hot water exposure for the first 24 hours. Hot water softens the polish and makes it more likely to peel at the edges — I learned this after a long shower ruined a gel-free design that had been perfect for two hours.
Days 8–14: Preservation Phase
Apply cuticle oil every evening — I use CND SolarOil ($10 at Sally Beauty) because the nozzle is thin enough to apply precisely without flooding the nail. Dry cuticles pull away from the nail and create a gap where the polish lifts. Keeping the cuticle area hydrated prevents this.
If you get a small chip, seal it immediately with top coat rather than waiting. A fresh chip has clean edges that bond well. A three-day-old chip has started lifting and top coat just traps moisture underneath.
Days 15–21: Decision Phase
This is when you need to assess honestly: are these still looking good, or are they just “fine”? I try to remove them at the first day they stop looking good rather than pushing to a specific day count. Polish that’s starting to look bad makes your hands look neglected, which defeats the purpose.
General Maintenance (All Phases)
Wear gloves for cleaning, dishes, and gardening. This is the advice every nail person gives and that I genuinely ignored for a year. Then I wore gloves for one manicure’s full lifespan and my wear time went from 5 days to 9 days. Dish soap is genuinely destructive to nail polish.
Keep a small bottle of top coat in your bag for emergency chip repair. I use a mini Seche Vite ($5 at Ulta) because it’s the smallest I’ve found.
Common Mistakes (And How to Fix Them) {#mistakes}
Mistake 1: Painting Over a Tacky Base Coat
What it looks like: The mountain color drags and blends into the base color, creating a smeared or muddy edge instead of a clean silhouette.
Why it happens: Standard nail polish feels dry to the touch after 5 minutes but is still soft underneath for up to 30 minutes. The striping brush drags through this soft layer.
The fix:
- Wait a full 10–15 minutes after your last base coat layer before painting any nail art
- If you’re impatient, use a fast-dry drop (INM Out the Door drops, $5 at Sally Beauty) on the base coat before starting
How well it works: Completely preventable with patience. If you’ve already made the mistake and it looks smeared, remove and start over — there’s no saving a blended silhouette
Mistake 2: Mountain Lines That Look Shaky
What it looks like: The mountain outline has visible wobbles or hesitation marks instead of clean, confident lines.
Why it happens: Painting slowly and carefully — which feels right — actually makes line art worse. Slow, hesitant brush strokes wobble more than fast, confident ones.
The fix:
- Rest your painting hand on the table — don’t hold it in the air
- Practice the stroke on a piece of paper or a plastic bag first
- Paint in one continuous motion — don’t stop and restart mid-line
How well it works: After 3–4 practice runs on paper, most people find their lines improve significantly. The first attempt is almost always the worst.
Mistake 3: Muddy Layered Mountains
What it looks like: The multiple mountain ranges blend into each other and lose the sense of depth you were going for.
Why it happens: Painting a new layer over one that isn’t fully dry, or using too much polish on the brush.
The fix:
- Wait 8–10 minutes between each mountain layer
- Use less polish on the brush — dip, wipe off most of it on the bottle rim, then paint
- Load the back layers with a tiny drop of top coat mixed in to make them slightly more transparent
How well it works: Fully preventable with patience. The layered recession technique is basically impossible to execute when you’re rushing.
Mistake 4: Bubbling Top Coat
What it looks like: Small raised bumps in the top coat surface, most visible in certain lighting.
Why it happens: Applying top coat too quickly over nail art that isn’t fully set, or shaking the top coat bottle before use.
The fix:
- Roll the top coat bottle between your palms — never shake it
- Let the nail art dry for at least 20–30 minutes before top coat
- Apply top coat in smooth, light strokes — thick application traps air underneath
How well it works: Rolling vs. shaking made a noticeable difference for me. Bubbles went from occasional to almost never.
Mistake 5: Chipping at the Tips Within 48 Hours
What it looks like: Small chips or flakes at the very free edge of the nail within the first two days.
Why it happens: The tip of the nail takes the most impact but often gets missed or under-coated.
The fix:
- “Cap” the free edge on every layer — base coat, color coats, and top coat — by dragging the brush across the very tip of the nail
- Orly Bonder specifically helps here more than other base coats because of the flexible rubberized formula
How well it works: Capping the tips consistently extended my tip-wear from 2–3 days to 5–6 days before the first chip. It’s the single highest-impact habit change I’ve made.
Mountain Nail FAQ
How do I stop my mountain nail art from looking amateurish? The biggest upgrade is using acrylic nail art paint instead of regular nail polish for the mountain shapes. Acrylic paint dries faster, doesn’t pull when you stroke over it, and gives crisper edges. Golden Rose and Apple Barrel both make nail-safe acrylic in small bottles for $2–$4.
Can I do mountain nails on very short nails? Yes — the Blue Ridge Silhouette, Minimalist Line Art, and Black & White Graphic all work well on short nails. The designs that don’t translate are the ones with detailed foreground elements (pine trees, layered gradients) that need a larger surface area to read clearly.
Why do my mountain silhouettes look flat and uninteresting? Usually it’s because the mountain and base colors are too similar in value (lightness/darkness), even if they’re different hues. A dark mountain on a light base, or vice versa, creates much more visual contrast than a medium blue mountain on a medium-light blue base.
What’s the easiest mountain nail design for someone who has never done nail art before? Earthy Terracotta Peaks (No. 5) is my recommendation for absolute beginners — the terracotta-on-sand palette is forgiving because both colors are warm and earthy, so imperfect edges look organic rather than messy. Plus matte top coat hides small inconsistencies in the finish.
How long should I wait between mountain manicures? I give my nails at least 2–3 days of no polish between detailed mountain manicures. The polish and removal process (especially if you’re using acetone) dries out the nail plate. During the break, I apply CND SolarOil twice daily and that’s enough to keep my nails from getting brittle or peeling.
Conclusion
Mountain nail ideas range from a 20-minute beginner silhouette to a 60-minute faceted geometric that requires genuine patience and practice — there’s genuinely a version of this for every skill level and preference.
If you’re starting out, I’d suggest the Blue Ridge Silhouette or the Earthy Terracotta Peaks using the single silhouette technique, and wearing them for a week to see if the mountain aesthetic feels like something you want to develop further.
Once you’re comfortable with the basics, the Misty Forest Gradient is the most rewarding step-up — the layering technique unlocks almost everything else on this list. Most importantly, don’t aim for perfection on your first mountain manicure. My first line art attempt looked like a seismograph reading. The fifth attempt is what I’d actually call mountain nails.