14 Beautiful Forest Nail Ideas for Earthy and Cozy Nail Looks
What are forest nail ideas? They’re nail designs inspired by the textures, colors, and living things you’d find on a walk through the woods — think moss gradients, mushroom art, birch bark patterns, pine silhouettes, and earthy duochromes. Not just “green nails,” but something that genuinely looks like it belongs in the trees.
Essential Tools & Products
The Basics (Under $35 Total)
Orly Bonder Base Coat ($9 at Sally Beauty) — This creates a rubberized layer that flexes with your nail instead of cracking. My forest nails — especially the ombre ones — last 4–5 days longer with this versus any drugstore base coat. The flexibility matters because dark and layered polish tends to chip at the edges first.
Seche Vite Fast-Dry Topcoat ($10 at Ulta) — For glossy designs, this is the only topcoat I use. One thin coat and polish is dry to the touch in under a minute. For matte designs, swap this for the Sally Hansen Matte topcoat ($8) — a single coat transforms any gloss finish.
A makeup sponge ($4 for a bag, any drugstore) — Essential for any ombre or gradient look. Cut a small piece off and use the torn edge for blending. You go through a lot of these, so buy a bag.
A thin nail art brush ($6–8, Amazon or Born Pretty Store) — The $2 ones from discount stores flex and fray. A decent liner brush with a fine tip is the difference between mushroom gills that look intentional and ones that look like scratches.
The Game-Changers
Nail art mixing medium ($8, Born Pretty Store) — Mix a drop of this into your polish before painting and it extends the drying time by 30–60 seconds. This sounds small but it’s the entire reason watercolor and wet-on-wet techniques work. Without it you’re racing the clock.
A dotting tool set ($5–6, Amazon) — Two-sided tools with different sized balls. I use these constantly: mushroom spore dots, flower centers, birch bark marks. A toothpick works in a pinch but it doesn’t give you a clean circle.
Polishes (Don’t Cheap Out Here)
The colors that matter most for forest nails are in the forest green, dark brown, and earthy duochrome families. Generic drugstore greens tend toward either neon or grey-toned — neither reads as “forest.” These are the specific shades I reach for:
ZOYA Feather ($10 at ZOYA.com) — A warm taupe that’s the perfect neutral base for mushroom and botanical designs. It photographs beautifully and doesn’t fight with art painted on top.
Essie Serene Green ($10 at Target) — A proper forest green. Not teal, not olive, not grass. It reads as the inside of a pine forest in one coat.
ILNP Harvest Moon ($12.50 at ilnp.com) — A duochrome that shifts between olive and copper. I’ve not found a drugstore equivalent that comes close. Worth every cent for the lichen texture design.
Gelish Forest Escape ($17 at Sally Beauty, gel) — For anyone doing gel at home, this is the darkest forest green in their range. Two coats over black base gives an inky depth that regular polish just doesn’t match.
15 Forest Nail Designs
Woodland & Moss
1. Deep Moss Ombre

A soft gradient from pale sage at the base to deep forest green at the tips, finished with a matte topcoat. It looks like velvety moss growing on a stone wall — earthy and quietly beautiful without being precious.
Difficulty: Beginner
Time: 25 minutes
Best for: Anyone wanting a low-maintenance nature look for everyday wear.
Why it works: The matte finish is what elevates this from “just green nails” to something that reads as intentionally textural.
What makes it different: Most green ombres go light-to-dark tip, which looks graphic. Going base-to-tip mimics how moss actually grows — denser and deeper as you move outward.
Key product: Sally Hansen Matte Topcoat. Without it this reads as a basic green ombre. With it, it reads as moss.
2. Mushroom Spore Details
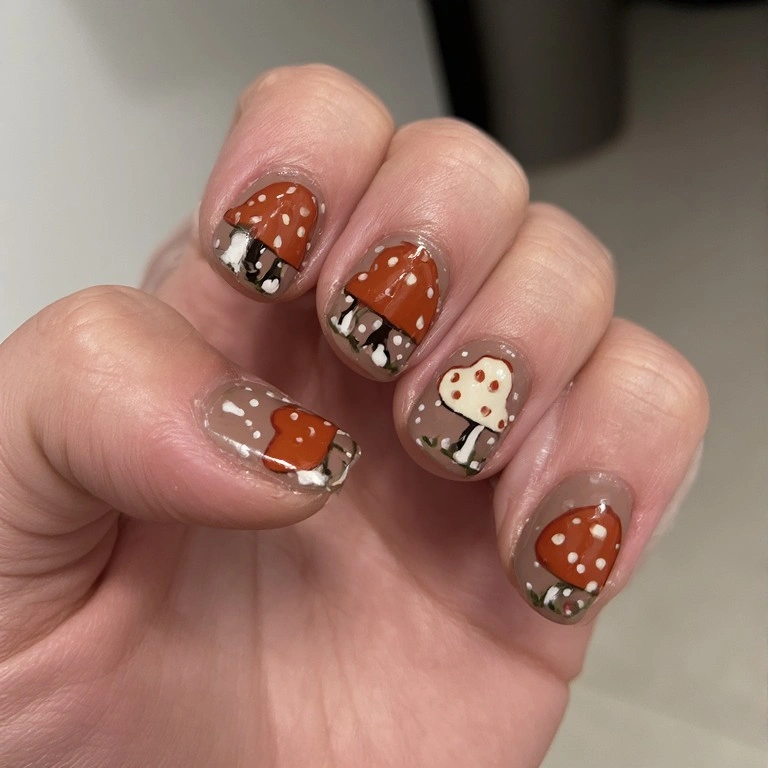
Warm taupe nails with hand-painted mushroom silhouettes in rust and cream, with tiny dot clusters around each mushroom mimicking spore prints. Whimsical without being cartoonish.
Difficulty: Intermediate
Time: 45 minutes
Best for: Cottagecore enthusiasts who want something unique without loud colors.
Why it works: The spore dots add a layer of biological accuracy that makes it feel considered rather than just “cute mushroom art.”
What makes it different: Most mushroom nail art shows the classic red toadstool. These reference the more subtle tan-and-rust forest mushrooms you’d actually find on a trail.
Key product: A two-sided dotting tool set. The small end makes perfect spore dots — toothpicks leave scratchy ovals instead of clean circles.
3. Pine Needle Tips

Forest green french tips with ultra-fine parallel lines drawn through them to mimic pine needle clusters. Clean, graphic, and nature-coded without being literal.
Difficulty: Beginner
Time: 20 minutes
Best for: Minimalists who want nature-inspired nails that stay work-appropriate.
Why it works: French tips are already a familiar, neat format — adding the needle lines gives it just enough personality without changing the overall silhouette.
What makes it different: Regular french tips with a single green tip can look generic. The parallel lines are what make it specifically pine-inspired.
Key product: Kiss Nail Art Guides ($4 at Walmart). These adhesive stencils give you a perfect tip line without freehand skills.
4. Birch Bark Negative Space
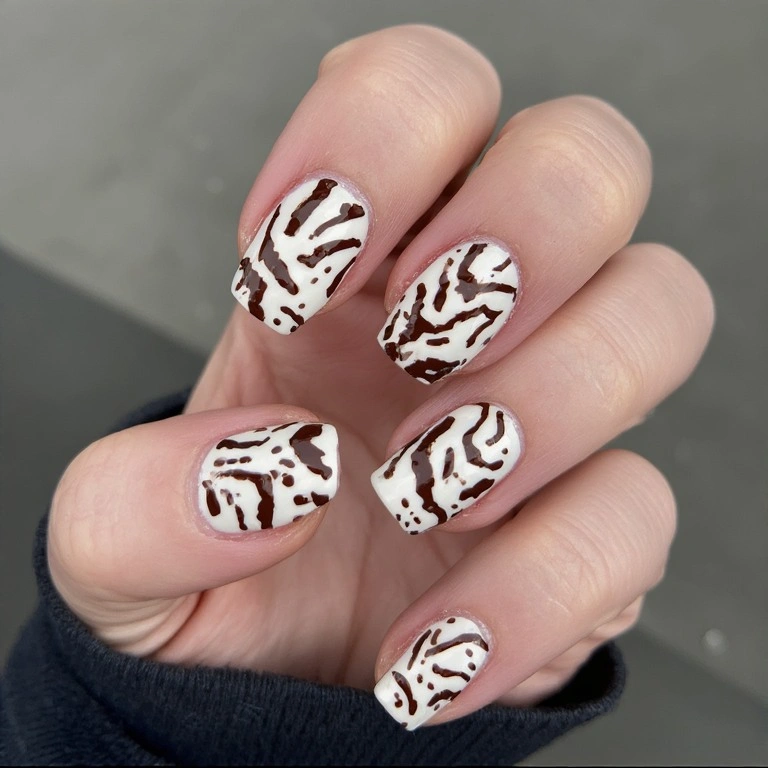
Pale cream base with 3–4 irregular curved marks per nail in dark brown, referencing birch tree bark. Strategic gaps leave the natural nail visible. Graphic, modern, and distinctly forest-coded.
Difficulty: Intermediate
Time: 35 minutes
Best for: People who love minimalist nail art with a story behind it.
Why it works: Birch bark has a very specific visual language — those horizontal dark lines against pale bark — and nails are the perfect small canvas for it.
What makes it different: Where most botanical nail art is delicate and floral, this is stark and architectural.
Key product: A fine liner brush. The marks need to taper at the ends to look natural — you can’t get that from a regular brush.
Night Forest & Drama
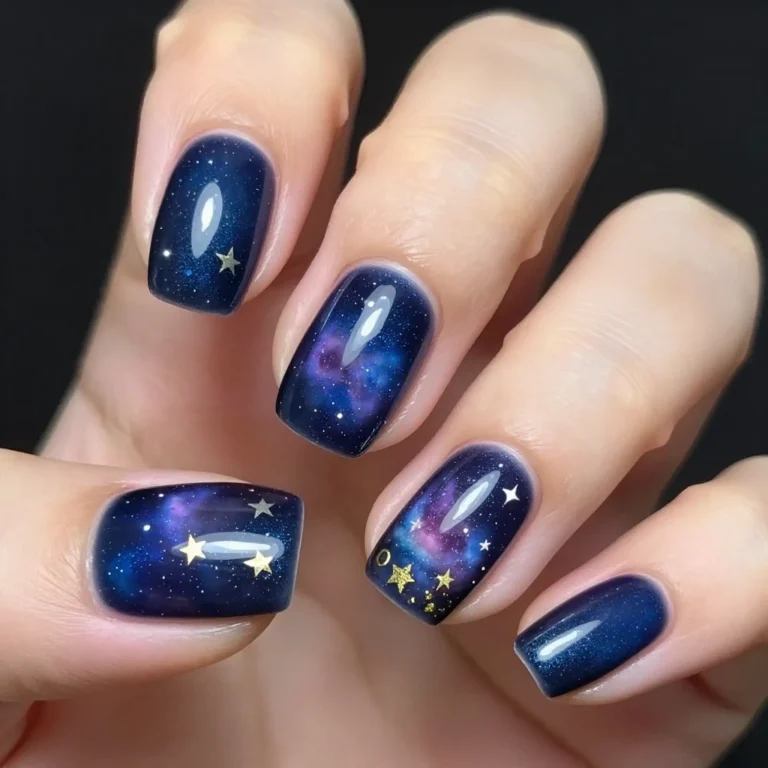
5. Aurora Through Pines
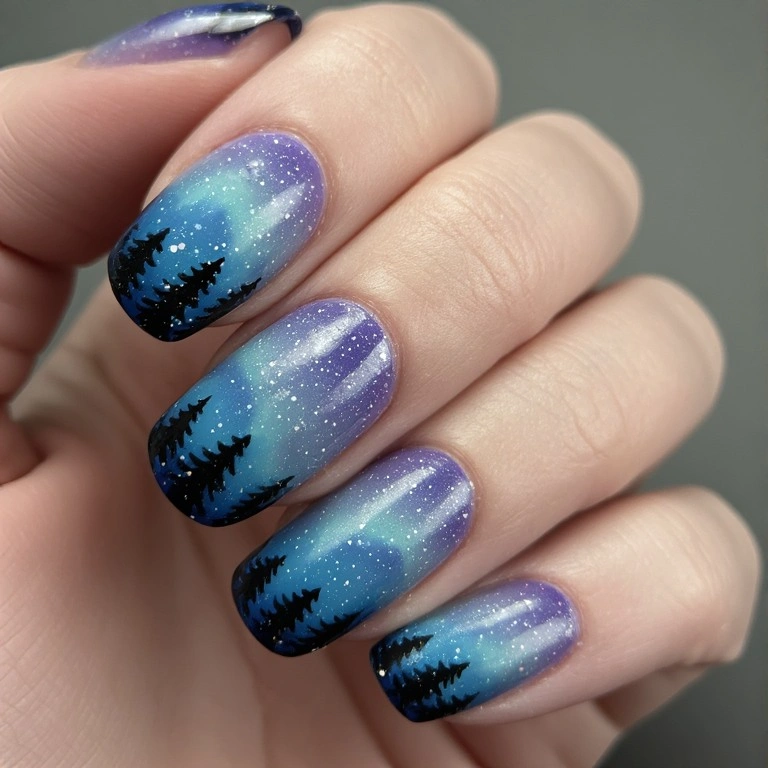
Deep navy base with sheer teal and lavender layered for an aurora borealis effect, with tiny black pine silhouettes at the base anchoring the dreamy sky. The most photographed design in this list.
Difficulty: Advanced
Time: 60 minutes
Best for: Special occasions, holiday parties, or anyone obsessed with the northern lights.
Why it works: The contrast between the hard geometric pine shapes and the soft blended aurora creates genuine visual tension.
What makes it different: Most aurora nail tutorials just show the shimmer. Adding the pine silhouettes at the base gives it a specific sense of place.
Key product: A fan brush. Pressing the tips against the nail rather than painting gives you the spiked, irregular silhouette that reads as pine — a liner brush gives too-perfect triangles.
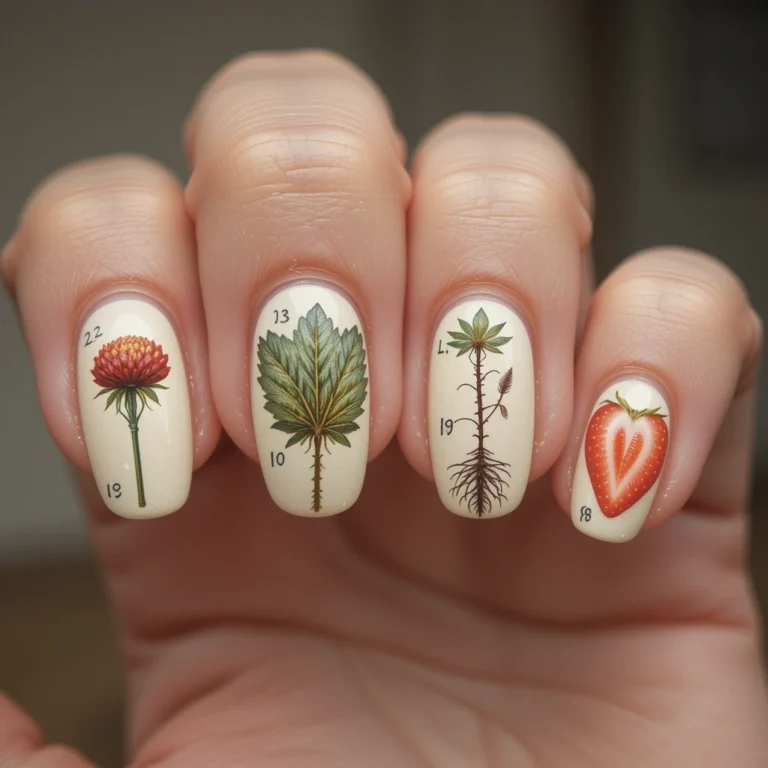
6. Fern Frond Stamp
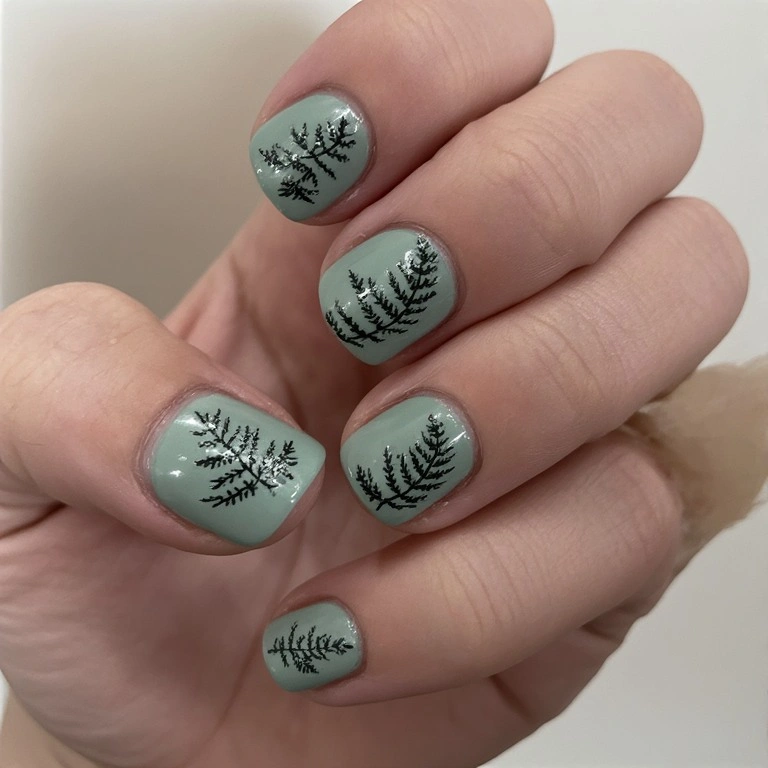
Soft olive or sage base with a single fern frond stamped or painted across the nail. Botanical illustration vibes — like wearing a pressed plant specimen.
Difficulty: Beginner
Time: 20 minutes
Best for: Spring and summer occasions, garden parties, anyone who loves botanical prints.
Why it works: A single motif on a muted base has a restraint that reads as genuinely sophisticated rather than trying too hard.
What makes it different: Ferns have a specific symmetrical branching structure that stamps beautifully — more distinctive than a generic leaf.
Key product: Born Pretty Store BPX-L019 stamp plate. The fern etching on this one captures the pinnate structure properly — cheaper plates tend to have simplified, vague leaf shapes.
7. Dark Forest Gel Soak
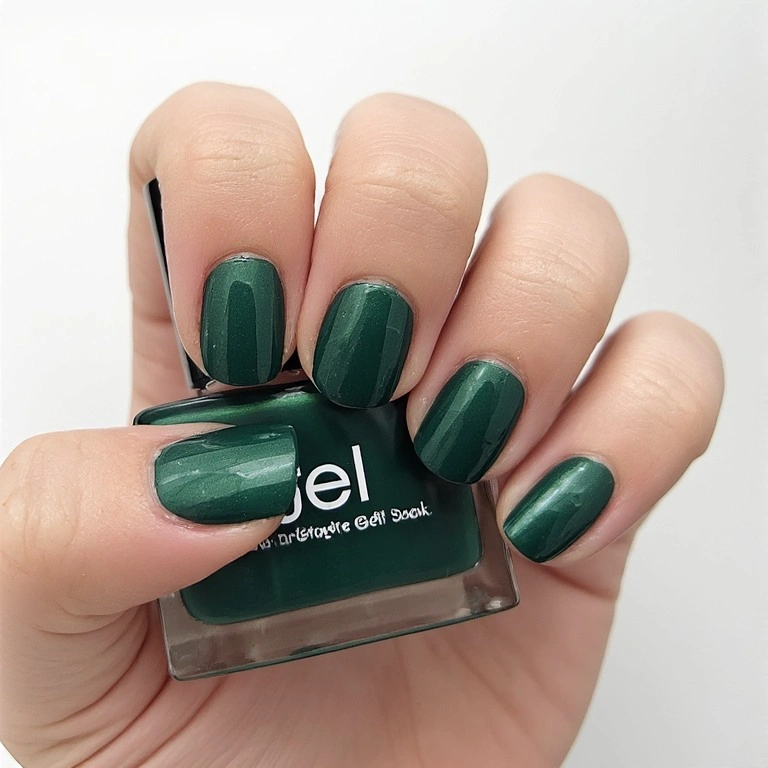
A single deep, inky forest green in a high-gloss gel finish. No art, no embellishment — just the perfect moody shade that references the forest without explaining itself.
Difficulty: Beginner
Time: 15 minutes
Best for: Everyday wear for people who want something sophisticated and dark without going fully black.
Why it works: This color sits in the uncanny space between black and green — outdoors it reads as forest green, under office lighting it reads almost charcoal. Endlessly wearable.
What makes it different: Unlike lighter forest greens, this shade doesn’t require any special occasion or outfit to make sense. It just works.
Key product: Gelish Forest Escape. I’ve tried mixing other dark greens to get this shade and nothing lands quite the same. The formula is also one of the more self-leveling gels I’ve used, which helps on uneven nail surfaces.
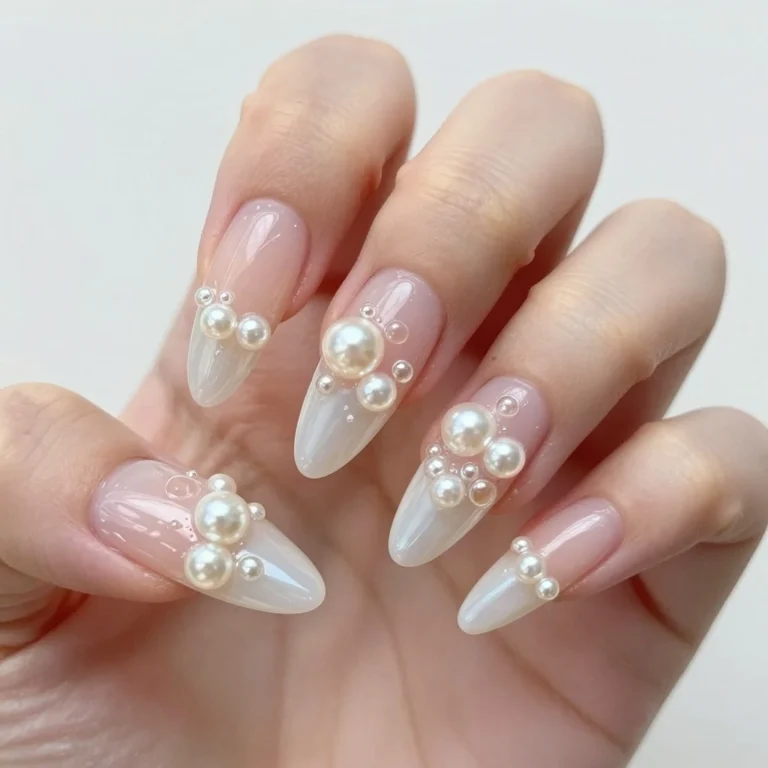
8. Pressed Wildflower Resin
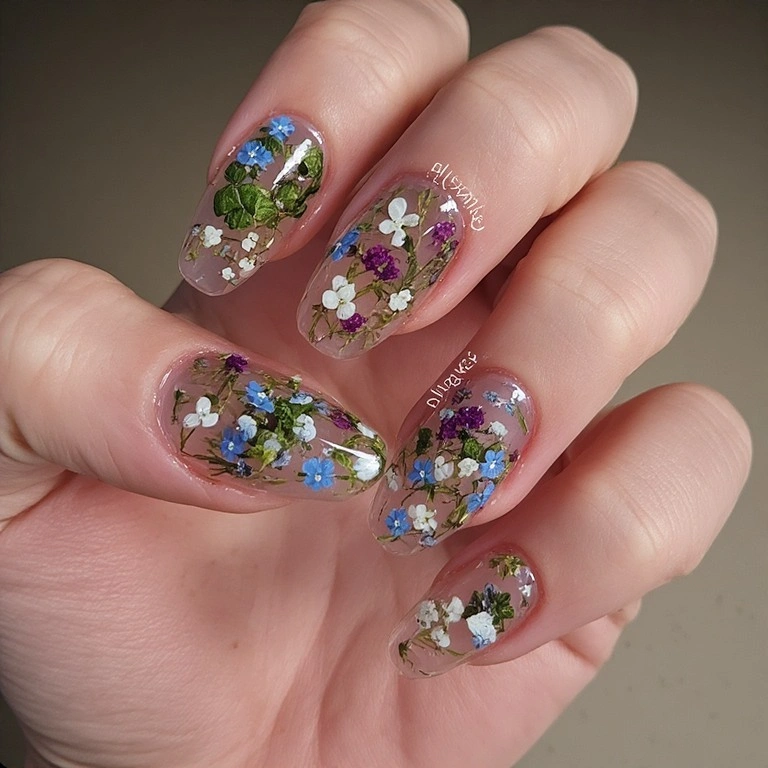
Clear or pale pink jelly base with tiny dried wildflowers — baby’s breath, forget-me-nots, or pressed clover — encased inside gel. Like wearing a small terrarium.
Difficulty: Advanced
Time: 90 minutes
Best for: Weddings, spring events, people who love 3D nail art and have patience to practice.
Why it works: Real botanical materials in a clear medium feel genuinely luxurious in a way that printed or painted flowers don’t.
What makes it different: No other technique gives you actual organic material on your nail. It’s technically a different category from nail art.
Key product: Makartt Nail Extension Gel ($14 on Amazon). Thicker than regular gel topcoat, self-levels around the flower, and stays clear after curing. Thin topcoat gels yellow slightly at this thickness.
Earthy Textures
9. Lichen Texture Duochrome
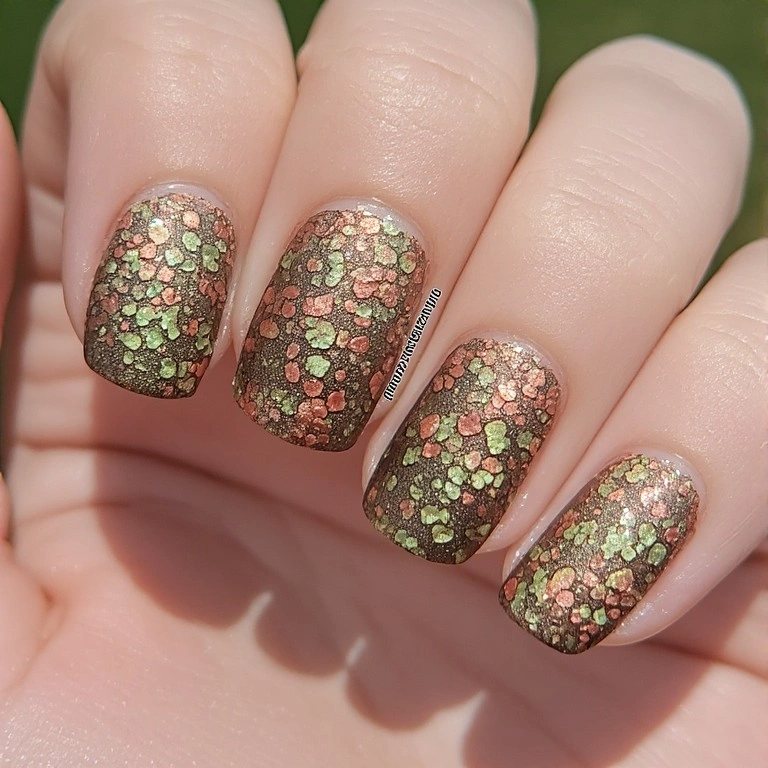
A shifting duochrome that flips between mossy olive and burnished copper depending on angle — mimicking the iridescent quality of lichen in morning light.
Difficulty: Intermediate
Time: 40 minutes
Best for: People who want something unusual that’s hard to categorize — not obviously “forest nails” but unmistakably earthy.
Why it works: The color shift does the work. You don’t need art or technique — the polish itself is the statement.
What makes it different: Duochrome polishes usually go in a bright direction (blue-purple, red-gold). An olive-copper shift is rarer and reads as genuinely organic rather than glam.
Key product: ILNP Harvest Moon. I’ve tried Cirque Colors Cascade and it’s a close second, but Harvest Moon has a warmer copper end that leans more genuinely lichen-like.
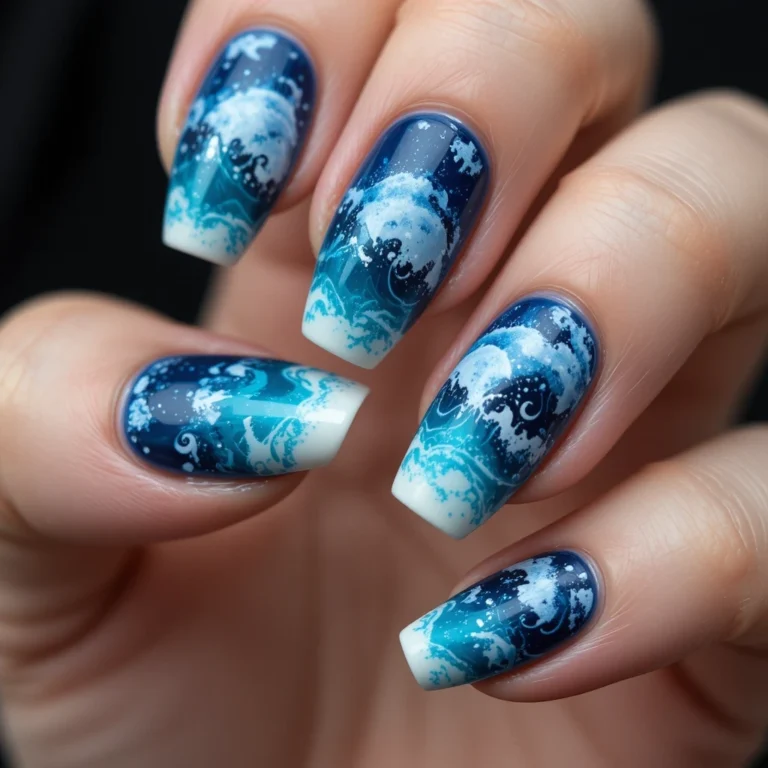
10. Misty Forest Watercolor
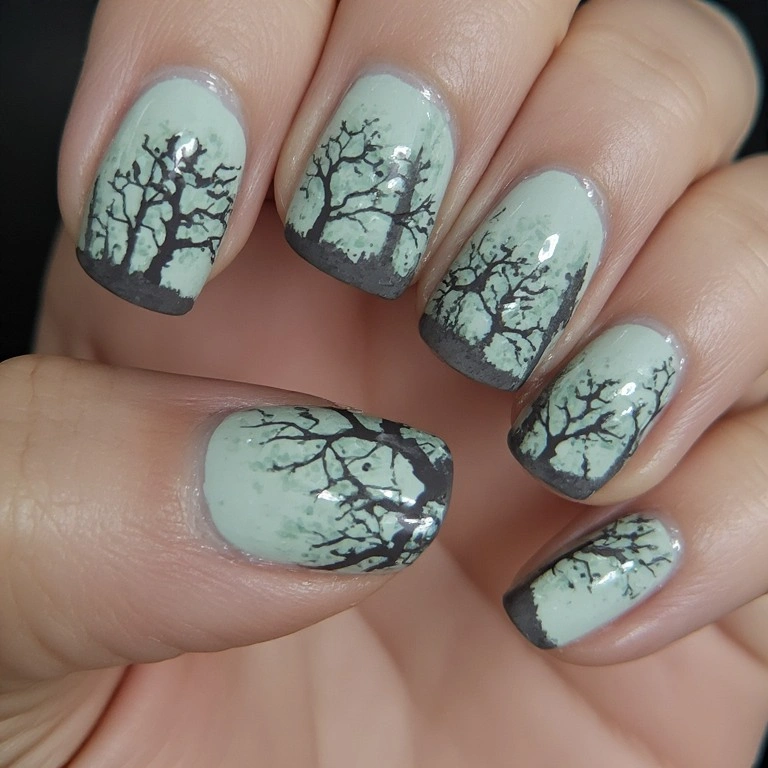
Diluted grey-green and soft teal layered wet-on-wet for a watercolor wash, with overlapping muted tree silhouettes fading into the color. Painterly and dream-like.
Difficulty: Advanced
Time: 55 minutes
Best for: People with some nail art experience who want a statement set for photos or events.
Why it works: The unpredictability of wet-on-wet blending means each nail looks genuinely unique — something you can’t get from stamping or precise freehand.
What makes it different: Most watercolor nail tutorials show bright, saturated colors. A grey-green palette reads as specifically forest — mist, overcast light, wet leaves.
Key product: Nail Art Mixing Medium from Born Pretty Store ($8). Without it you have maybe 10–15 seconds of blending time per nail. With it you have closer to 40.
11. Snail Trail Shimmer
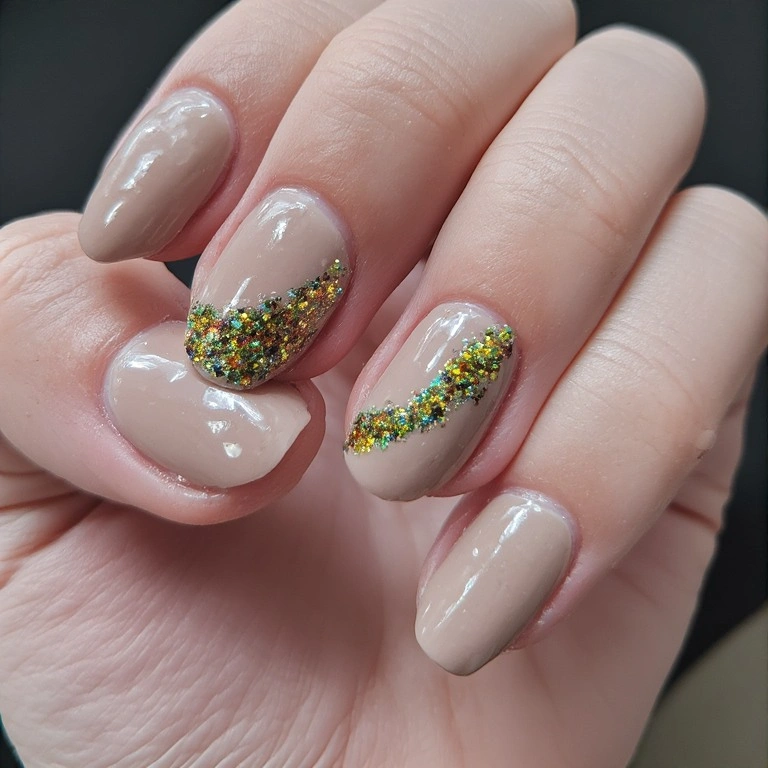
Soft earthy nude base with a single iridescent glitter streak curving across the nail — referencing the shimmer a snail leaves across a leaf.
Difficulty: Beginner
Time: 20 minutes
Best for: People who love subtle whimsy — a conversation starter for anyone who notices it.
Why it works: The curving trail across the nail gives it movement and a sense of narrative. It feels alive in a way that static glitter art doesn’t.
What makes it different: Glitter nail art usually covers the whole nail. One deliberate streak reads as intentional art rather than sparkle for sparkle’s sake.
Key product: OPI Nail Glitter Topcoat in Silver. It’s sheer enough to trail naturally without looking like a bar of glitter and the particle size catches light like actual snail trail iridescence.
12. Thunderstorm on Bark
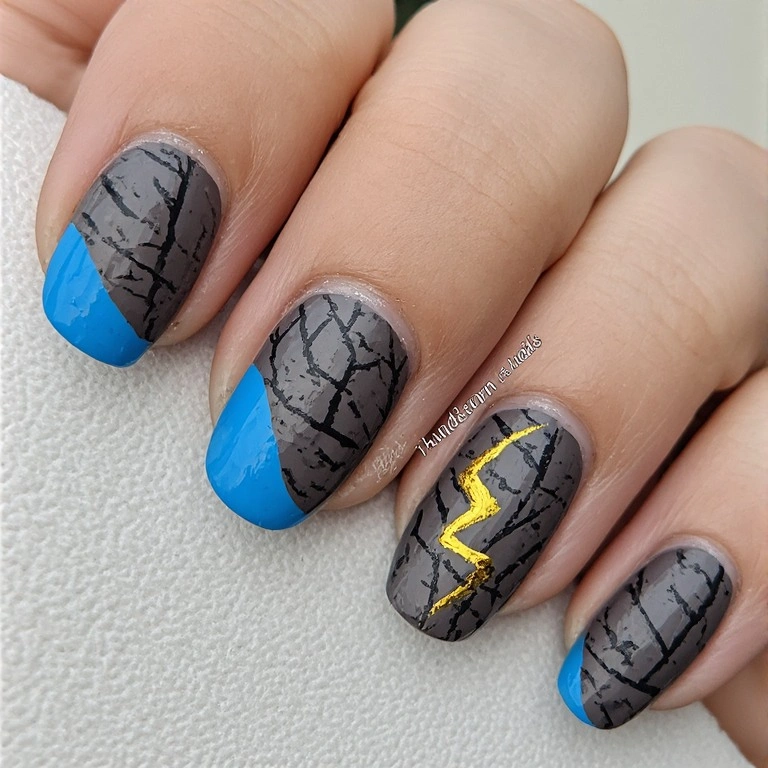
Dark espresso or grey-brown base with bark texture lines and a single gold or electric blue lightning bolt stamped or hand-painted across the nail.
Difficulty: Intermediate
Time: 40 minutes
Best for: Edgier nail lovers, Halloween-adjacent looks, thunderstorm aesthetics.
Why it works: The contrast between the organic bark texture and the geometric bolt creates genuine visual tension. Two different vocabularies on the same nail.
What makes it different: Storm nail art usually relies on nail stickers or printed decals. Painting the bolt yourself over a textured base feels more raw and crafted.
Key product: OPI I Color You Bold. Gold that’s bright enough to show up on dark polish without needing a white base underneath.
Statement & Whimsy
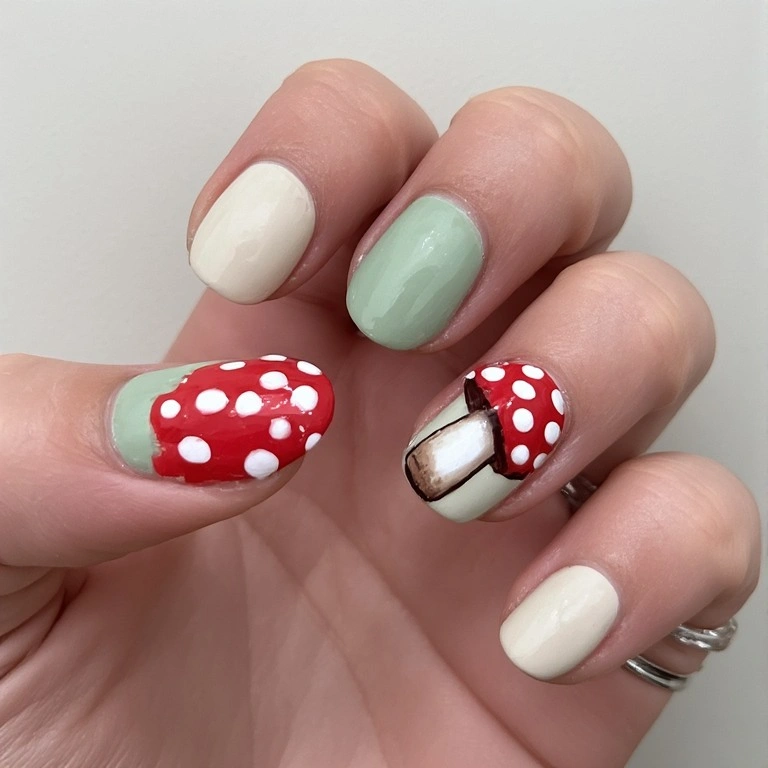
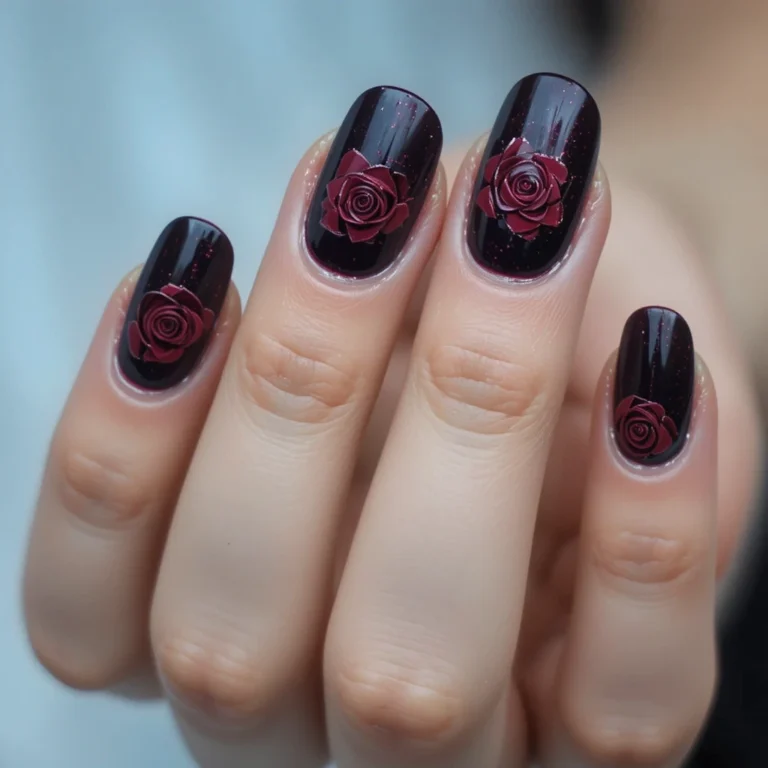
13. Toadstool Red Cap Accent
Four nails in neutral cream or sage, with one accent nail featuring a detailed Amanita muscaria mushroom — the red cap with white dots.
Difficulty: Advanced
Time: 65 minutes
Best for: Cottagecore devotees, mushroom obsessives, anyone who wants one show-stopper accent nail.
Why it works: The Amanita is one of the most iconically recognizable images in nature. On a single nail surrounded by neutrals, it reads immediately and memorably.
What makes it different: Most mushroom accent nails show a simplified cartoon. A well-painted Amanita with the rounded cap, gills, ring, and speckled pattern looks like an illustration rather than nail art.
Key product: A fine detail brush and a toothpick — two different tools for two jobs. The spots look cleanest from a toothpick, and the gills/stem details need a proper brush.
14. Acorn and Leaf Scatter
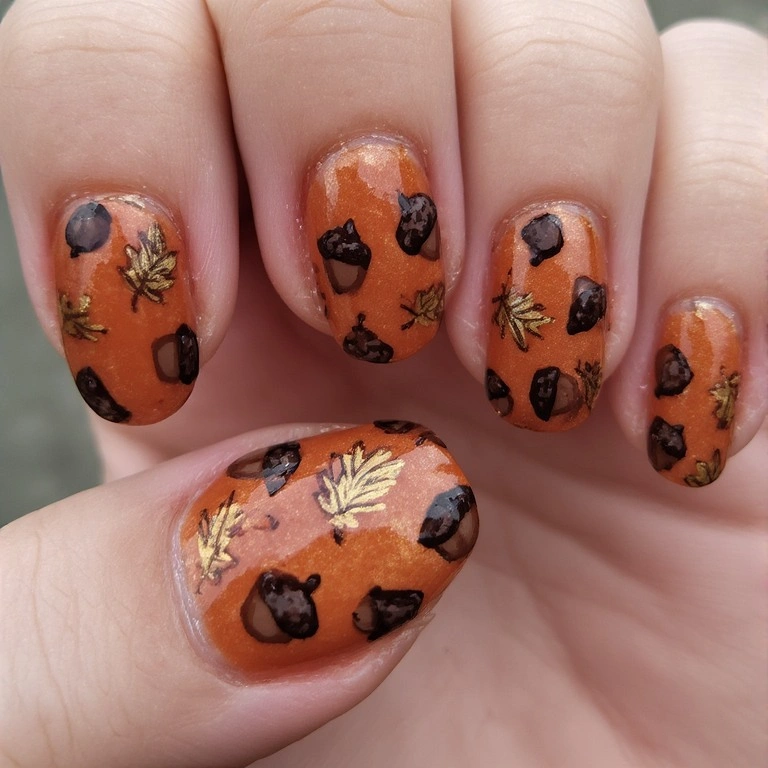
Warm amber or rust base scattered with tiny hand-painted acorns and oak leaves in brown and gold. Like wearing leaves fallen on the forest floor.
Difficulty: Intermediate
Time: 50 minutes
Best for: Autumn manicure lovers, Thanksgiving, anyone with patience for tiny details.
Why it works: The randomness of the scatter is part of the charm — it looks different on every nail and doesn’t feel rigidly composed.
What makes it different: Most autumn nail art shows leaves in flat, graphic shapes. Acorns add a three-dimensional, specific quality — you can only be in autumn if there are acorns.
Key product: Essie Mochachino. It’s a warm mid-brown that reads as both acorn body and oak leaf in one bottle — you only need one dark color for the detail work.
Pros and Cons of Forest Nails
Pros
✅ The color palette is genuinely wearable across all seasons — deep greens, earthy browns, and taupe work year-round without looking seasonal-costume.
✅ Forest nail art tends to photograph exceptionally well. Earthy tones work in both warm and cool lighting, and organic motifs give photos something to look at.
✅ There’s a design at every skill level — a single coat of dark green is beginner, the pressed wildflower resin is advanced, and everything in between exists.
✅ The color palette pairs well with autumn and winter wardrobes particularly — it doesn’t clash with the jewel tones and neutrals common in cold-weather dressing.
✅ Many forest nail looks lean muted and understated, which means they’re more office-appropriate than a lot of detailed nail art.
✅ Learning nature-inspired brush techniques (freehand leaves, bark lines, grass strokes) transfers to other nail art styles. You’re building skills that apply broadly.
✅ The earthy duochromes and shimmer finishes in this palette tend to look expensive — ILNP Harvest Moon reads as a high-end manicure to most people who see it.
Cons
❌ The forest green color family is deceptively varied. “Forest green” means something different at every brand — some read as hunter green, some as olive, some as teal. You often need to buy and test in person rather than guessing from a swatch.
❌ Dark polishes show tip wear faster than light polishes. On a dark forest green, even minor chipping at the free edge is highly visible.
❌ The pressed wildflower resin design takes 90 minutes minimum, requires specific gel products, and takes 3–5 practice attempts before it looks clean. Be honest with yourself about whether you’ll actually do that before committing to it as a tutorial goal.
❌ Ombre and gradient designs use a lot of polish per session — you go through bottles faster than with single-color manicures.
❌ The watercolor technique is genuinely unpredictable. Some attempts look incredible. Some look muddy and muddle-colored. You can’t fully control the outcome, which is either charming or frustrating depending on your personality.
❌ Very dark manicures (the dark forest gel soak, aurora through pines) can stain nails slightly over time if you’re not consistent with a base coat.
Real Wear Test: What Happens After Two Weeks
I tested the dark forest gel soak and the pressed wildflower resin back-to-back to see how each actually held up.
Gel soak — Day 1–3: Flawless. The inky green looked exactly as it did coming out of the lamp. No shrinkage, no lifting.
Gel soak — Days 4–8: Still perfect. This is gel’s sweet spot — the stage where regular polish would already be showing tip wear. I got three compliments in this window.
Gel soak — Days 9–12: A tiny lift appeared at the edge of my dominant hand’s index finger — the one that does the most work. Nothing visible, but I could feel it catching slightly.
Gel soak — Day 14: Grew out visibly at the cuticle on all nails. The color gap was maybe 1.5–2mm. Looked fine in low light, obvious in good light. I removed on day 16.
Verdict for gel soak: Realistically 10–14 days of looking great. The last few days are a judgment call based on how much your nails grow.
Wildflower resin — Day 1–4: Extraordinary. The flowers looked three-dimensional and luminous. This was my best-looking manicure in recent memory.
Days 5–8: Slight lifting on one edge of my thumb — the one that catches on everything. The flower itself was still perfectly encased.
Days 9–11: The lifted edge started catching on fabric. I applied a thin bead of clear gel and cured it with a travel lamp to re-seal it, which bought me another 3 days.
Day 14: Two nails had visible lifting. The flowers themselves remained intact inside the gel but the edge seal was compromised on both.
Verdict for wildflower resin: The art lasts longer than the seal. Realistically 10–12 days before you need to either repair or remove. Not a low-maintenance option, but worth every minute of those first 10 days.
Maintenance Tips
Days 1–7: Protection Phase
Apply cuticle oil twice daily — morning and before bed. This isn’t just for cuticle health; hydrated nail beds flex more, which means less stress on the seal between polish and nail. I keep a Burt’s Bees Lemon Butter Cuticle Cream ($6) at my desk and one by my bed.
Wear rubber gloves for dishes and cleaning from day one. Not just after the first 24 hours — always. Hot water and cleaning products start degrading the topcoat almost immediately, and the cumulative effect across a week is significant.
Seal your tips each time you apply topcoat. Run the brush edge-first across the free edge of each nail, not just across the surface. This wraps the topcoat around the edge where chipping starts.
Days 8–14: Preservation Phase
Apply a fresh thin coat of topcoat every 3 days. Not a thick coat — thin. Thick topcoat coats can cause bubbling and actually peel the underlying polish if you’re not careful. A thin layer refreshes the shine and seals any micro-cracks before they become chips.
For gel: if you notice a small lift starting, resist the urge to peel. Apply a tiny amount of nail glue to the lifted edge, press down for 30 seconds, and let it dry fully before doing anything with your hands. This repair can extend your gel manicure by another 3–5 days.
Days 15+: Decision Phase
By this point you’re maintaining rather than preserving. If the design looks good, keep up with topcoat and oil. If it’s starting to show regrowth or obvious wear, this is the time to remove properly rather than letting it deteriorate further.
General Maintenance (All Phases)
Avoid using your nails as tools — opening cans, peeling labels, prying things open. I learned this one the expensive way after a perfectly preserved toadstool accent nail departed in a single prying motion on a Post-it package.
Type with the pads of your fingers rather than your nail tips if you can. It feels unnatural at first but becomes habit quickly and genuinely extends manicure life.
Common Mistakes and How to Fix Them
Mistake 1: The Muddy Ombre
What it looks like: Instead of a clean gradient between two colors, you get a brownish-grey smear where the colors join.
Why it happens: The sponge had too much polish on it, or you went over the join too many times, or the two colors you chose don’t blend harmoniously (certain greens and browns fight each other rather than mixing).
The fix:
- Wait for the muddy area to dry completely.
- Dab a thin layer of the lighter of your two colors over the problem area to brighten it.
- Blend lightly with a dry sponge — just one or two dabs.
- Seal immediately.
How well it works: Partial fix. It rarely looks as clean as a fresh ombre, but it brings it back to acceptable. Next time, do a test blend on paper first to see if your two colors work together.
Mistake 2: Glitter That Won’t Lie Flat
What it looks like: Scattered glitter particles that stick up from the surface, creating a rough, bumpy texture instead of a smooth finish.
Why it happens: The glitter was applied to dry polish, or the base layer was too thin, or you used chunky loose glitter that needs more medium to sink.
The fix:
- Apply a generous coat of clear gel or thick topcoat over the raised glitter.
- Don’t cure or dry immediately — let it settle for 60 seconds so the medium flows around the particles.
- Cure or dry normally.
- Repeat if needed.
How well it works: Usually effective. Two thick clear coats smooth out most glitter textures completely.
Mistake 3: Bleeding Nail Art
What it looks like: Fine painted lines or dots that spread into the base color, creating fuzzy edges.
Why it happens: You painted onto a base coat that wasn’t fully dry. “Dry to the touch” is not the same as “ready for detail work” — that takes 20–30 minutes minimum for regular polish.
The fix:
- Wait for the bleed to dry completely.
- Use a small brush dipped in acetone to clean up the edge — this only works while the bleed is fresh-ish (within 24 hours).
- Repaint the detail over the cleaned edge.
How well it works: Good on clean, hard-edged motifs like the bark marks or lightning bolt. Less effective on delicate gradient work where the acetone cleanup disturbs the surrounding color.
Mistake 4: Peeling Stamped Designs
What it looks like: The stamped design starts lifting from the corners within a day or two, usually peeling off in one piece.
Why it happens: The stamping polish wasn’t dry before you applied topcoat. Topcoat applied too soon traps moisture and creates a separation layer.
The fix:
- Let stamped designs dry for at least 3 minutes before any topcoat application.
- Apply the first topcoat as a thin, light stroke — pressing hard or going over wet topcoat can pull the stamped image.
- Second coat after the first is dry.
How well it works: Prevention is the fix here. Once a stamp starts peeling, there’s no repair that looks clean — remove and redo.
Mistake 5: Flat-Looking Duochrome
What it looks like: Your duochrome polish looks like a regular single-color rather than shifting between two colors.
Why it happens: You applied it over a light base. Duochrome polishes need a black base to show the shift — on cream, nude, or pale bases, the second color simply doesn’t appear.
The fix:
- Apply two thin coats of black polish.
- Let dry fully.
- Apply your duochrome over the black.
How well it works: Completely effective. The shift on ILNP Harvest Moon over black is dramatic — over cream it looks like a regular olive polish.
FAQs
How do I stop dark forest green polish from staining my nails?
Apply two coats of base coat rather than one, and use a specifically stain-blocking formula — Duri Rejuvacote ($12 at Ulta) works well. The staining comes from pigment molecules in dark polish seeping through a thin base layer directly onto the nail surface. Two coats of a thick base creates enough of a barrier that staining is minimal even with prolonged wear.
Can I do forest nails on short nails?
Most of them, yes. The designs that work best short are: moss ombre, pine needle tips, birch bark marks, dark forest soak, lichen duochrome, fern stamp, mushroom spore details, and snail trail shimmer. The one to skip is the forest floor gradient coffin — the color story requires enough nail length to show three distinct zones.
Why does my pressed wildflower design keep lifting at the edges?
The most common cause is applying the encapsulation gel in one thick coat rather than in two or three thinner layers with full curing between each. A single thick coat cures unevenly — the surface cures before the underneath, and the stress causes edge lifting. Thin layers, full curing, then the next thin layer. It adds time but it’s the difference between a design that lasts 12 days and one that lifts on day 4.
What’s the easiest forest nail design for complete beginners?
The dark forest gel soak if you have a gel lamp, or the pine needle tips if you’re working with regular polish. Both involve either no art at all (the gel soak is just polish in the right shade) or a single simple technique that builds fast. I’d give either one to someone who has never done nail art before without hesitation.
How long should I wait between forest nail manicures?
At minimum, give your nails two to three days bare between gel manicures — not because the polish damages them, but because the acetone removal process is mildly dehydrating and nails benefit from time with cuticle oil and no product. For regular polish, the break can be shorter: one day is fine. I usually do one overnight bare with cuticle oil applied before bed, then start fresh the next morning.
Conclusion
Forest nail designs range from a 15-minute single-color gel to a 90-minute pressed botanical set — there’s genuinely a version for every skill level and occasion. If you’re starting out, I’d suggest trying the moss ombre with a makeup sponge and a matte topcoat first — it looks impressive, the technique is forgiving, and it’ll teach you the sponge blending that underlies a lot of the other designs here.
Once you’re comfortable with that, the mushroom spore details or birch bark marks are the natural next step. The pressed wildflower resin is worth attempting eventually, but it’s genuinely better to approach it after you have a few successful gel encapsulation attempts behind you.
Don’t expect perfection on the first try — my first ombre looked like a muddy swamp and my first pressed flower was half-buried at a 45-degree angle. Each one got better.