25 Summer Acrylic Nails: Bold, Fun & Trendy Shapes
Summer acrylic nails are a set of artificial nail extensions — or overlays on your natural nails — made from a liquid-and-powder acrylic mixture, then shaped, buffed, and painted with whatever design screams warm-weather energy. Think coral ombré, fruit slices, neon French tips, and sculptured coffin shapes that regular polish could never achieve.
They’re longer-lasting than gel, more customizable than press-ons, and genuinely the go-to choice when you want your nails to look intentional all summer without touching them up every four days.
How to Choose the Best Summer Acrylic Design
For your first time: Go with a medium-length square or squoval shape — not too long, not too short — and pick one solid bright color with a single accent nail. You’ll save time, spend less, and still look great without overwhelming a new tech.
If you have a professional job: Almond nails in a nude-pink or sheer coral are your best friends. They read polished and intentional without being distracting on a Zoom call. Avoid anything longer than your fingertip in length.
If you want something for a special event: Coffin nails with a chrome or mirror powder finish, or a custom 3D floral design, are worth the extra time and cost. Book a minimum of 90 minutes and bring inspo photos.
If you’re comfortable with nail art: Stiletto nails with hand-painted gradient designs, or abstract art in bold summer palettes (neon yellow into hot pink, or aqua into white), let you go as creative as you want.
If you have short natural nails: Almond or oval acrylic overlays (no extension) give you shape without the awkward transition period. A short coffin works too and looks incredibly clean.
If you change your mind often: Avoid 3D embellishments, gems, or chunky nail art — these are nearly impossible to modify partway through a grow-out, and removal requires a full soak. Stick to flat designs with polish you can actually top-coat between appointments.
Summer Acrylic Nails – 5 Bold Design Ideas
1. Neon Sunset Ombré Acrylics
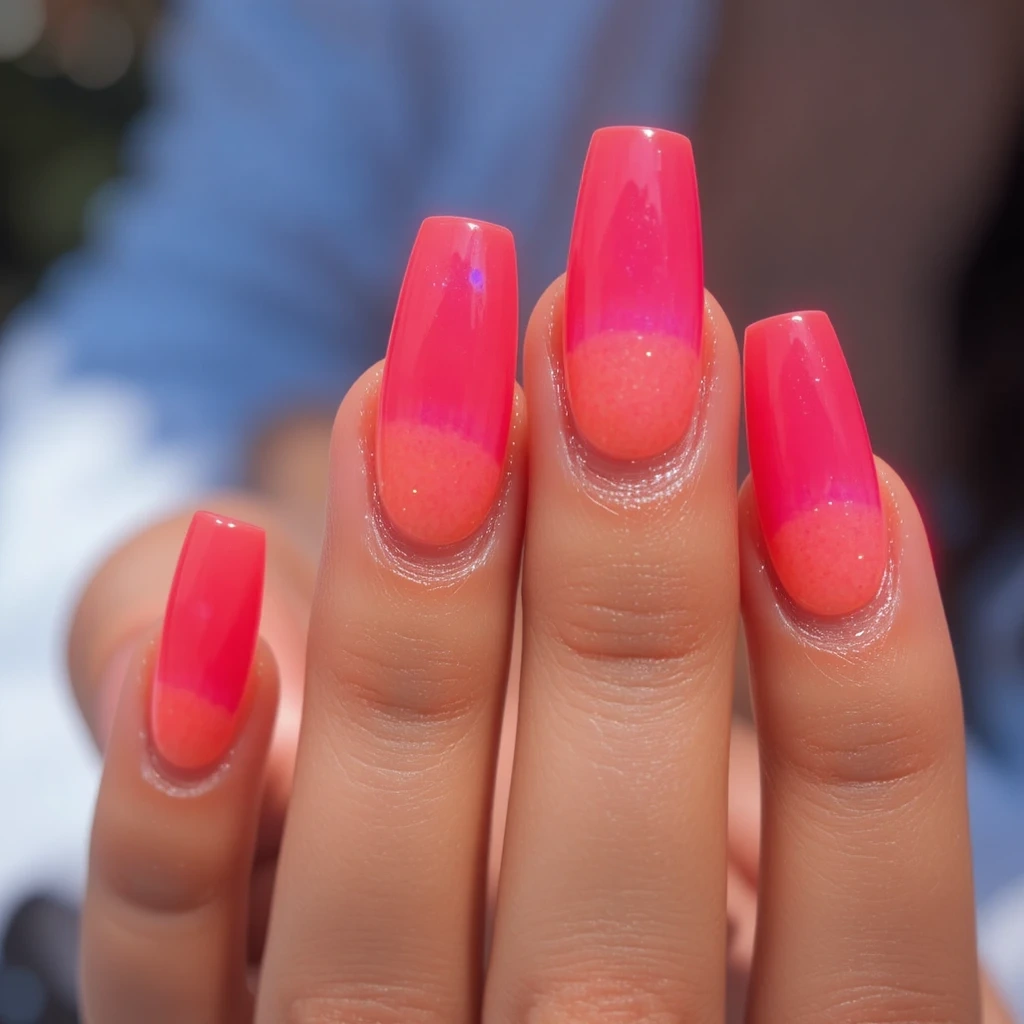
A gradient that moves from blazing orange at the cuticle through hot coral into electric pink at the tip — finished with a glossy top coat that amplifies every shade in direct sun. The finish is saturated and high-impact, catching light like a sunset over water. Think Ibiza beach bar, not office break room.
Difficulty: Intermediate Time to complete: 75 minutes Best for: Anyone who wants their nails to be the first thing people notice at an outdoor event. Why it works: Warm neons photograph strikingly on all skin tones because the high saturation creates contrast without needing any nail art skills beyond blending. What makes it different: Unlike a standard ombré that fades to white, this stays within the warm family — so it looks intentional even when the gradient isn’t perfectly blended.
DIY At Home:
- Acrylic base in natural/clear
- OPI GelColor in “The Thrill of Brazil” ($13, Ulta) for the orange
- Kiara Sky Gel in “Neon Coral” ($8, Amazon) for the middle
- OPI GelColor in “Pink Flamenco” ($13, Ulta) for the tip
- Sponge ombré technique with a small makeup wedge before curing
- Difficulty: Intermediate — the blend needs to happen fast before gel tacks
Product recommendation: Young Nails Protein Bond ($12, Sally Beauty) — this primer specifically prevents lifting at the sides where sweat from summer activities accumulates. Standard primers miss this.
2. White Cloud Nail with Gold Foil Accents
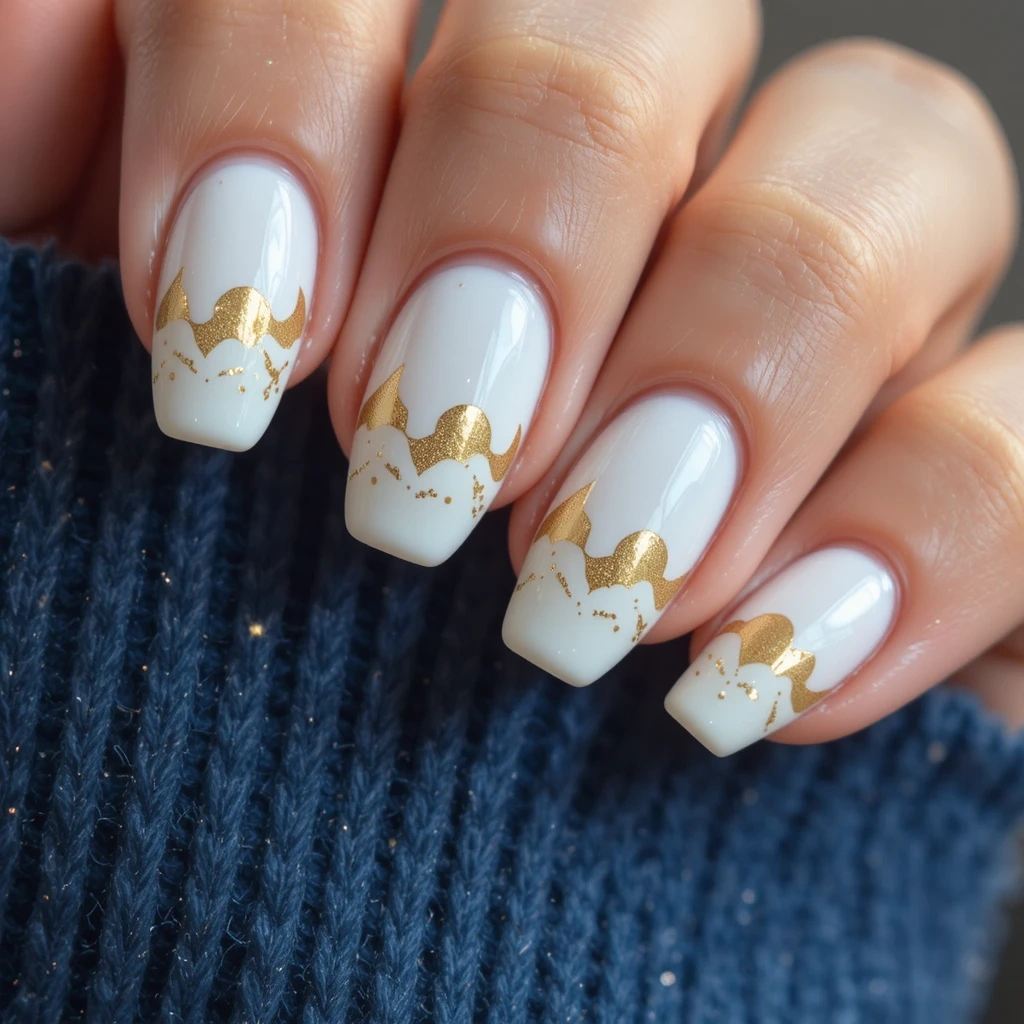
A soft milky-white acrylic base scattered with irregular patches of 24k gold transfer foil — like looking at clouds backlit by sun. The finish alternates between matte on the white and mirror-bright on the foil. The overall effect is quiet luxury: minimal but impossible to ignore.
Difficulty: Beginner Time to complete: 50 minutes Best for: The person who wants something sophisticated that works for brunch, a wedding, and the beach in the same weekend. Why it works: The contrast of matte white and bright metallic foil is visually striking without requiring any drawing or painting skills. What makes it different: Most foil nail designs use silver — gold over white reads warmer and more elevated, and it photographs beautifully in natural light.
DIY At Home:
- Apply white gel or acrylic
- While base is still slightly tacky (don’t cure yet), press Born Pretty Gold Transfer Foil ($6 for 5 rolls, Amazon) onto random sections and peel back slowly
- Seal with non-wipe gel top coat and cure for 60 seconds
- Difficulty: Beginner — the foil does the work, you just place it
Product recommendation: Born Pretty Transfer Foil Glue Gel ($5, Amazon) — applying foil without dedicated adhesive gel leads to patchy transfer. This gel creates a consistent tack that the foil bonds to evenly.
3. Clear Acrylic with Pressed Flower Encapsulation
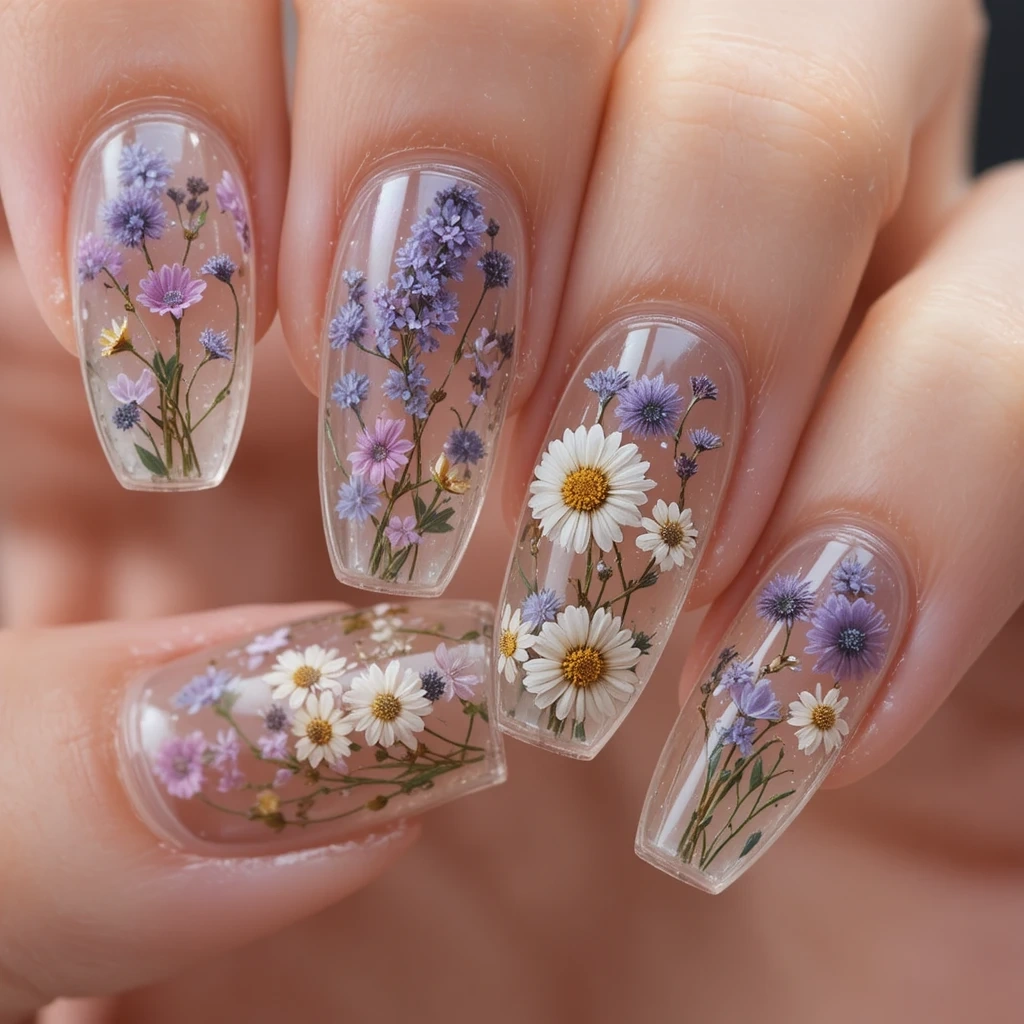
Translucent acrylic nails with tiny dried flowers — lavender, baby’s breath, and mini daisies — sealed inside the acrylic layer itself, suspended like specimens in glass. The flowers show depth depending on the angle of light. Up close it looks botanical and hand-crafted; from a distance it reads like a delicate print.
Difficulty: Advanced Time to complete: 90 minutes Best for: Someone who wants truly one-of-a-kind nails and has at least basic acrylic experience. Why it works: Encapsulation creates a three-dimensional effect that flat nail art can’t replicate, and every single nail looks slightly different because the flowers are placed by hand. What makes it different: Pressed flower nails have been trending since 2022 but most tutorials use stickers — this is actual botanical material inside the acrylic, which means no two sets ever look exactly the same.
DIY At Home:
- Order pre-dried pressed flowers (Born Pretty Dried Flower Set, $7, Amazon — includes 12 variety types)
- Apply first clear acrylic layer, let cure to 80%
- Place flower with tweezers, press gently
- Apply second thin clear layer over the top and seal
- Difficulty: Advanced — timing the cure window correctly takes practice
Product recommendation: Mia Secret Clear Acrylic Powder ($8, Sally Beauty) — crystal-clear transparency is essential here. Any cloudiness will muddy the floral effect and make flowers look gray rather than preserved.
4. French Tip Acrylics with Neon Smile Lines
A classic French manicure structure — natural or sheer pink base with a bright tip — except the smile line is drawn in neon yellow, electric green, or hot orange instead of white. The tip itself might be clear or nude, making the neon line the entire statement. Clean, architectural, and summer-specific.
Difficulty: Intermediate Time to complete: 60 minutes Best for: Someone who loves structure but wants to feel playful rather than corporate. Why it works: The French shape reads neat and polished, but the neon line does enough work that you don’t need any other design element. It’s effortful-looking but genuinely simple. What makes it different: Neon smile lines are harder to find pre-done — most salons default to white — which makes this feel custom even when it isn’t.
DIY At Home:
- Use a thin liner brush with OPI GelColor in “I Just Can’t Cope-acabana” (neon yellow, $13, Ulta)
- Or Kiara Sky “Neon Life” collection (full set $45, available on Kiara Sky website) for full range of neon options
- Practice the smile line on a nail tip before attempting on your actual nails
- Difficulty: Intermediate — the line needs a steady hand, but mistakes wipe off before curing
Product recommendation: Makartt Thin Nail Art Liner Brush Set ($8, Amazon) — a brush that’s too thick makes the smile line look amateurish. The size 00 brush in this set gives you actual control.
5. Glazed Donut Acrylics
A sheer, milky-pink or beige base with an intense chrome powder buffed on top, creating a mirror-wet finish that looks like a glazed pastry. The effect is called “chrome” or “aurora” and it shifts between silver, pink, and lilac depending on the light. It’s been all over TikTok since 2023 and still looks fresh.
Difficulty: Intermediate Time to complete: 55 minutes Best for: Anyone who wants to look polished with minimal design work — this is technically nail art but it looks like a high-end gel manicure. Why it works: The chrome powder creates an optical effect that’s impossible to achieve with regular polish, and the sheer base makes it wearable for virtually any occasion. What makes it different: Unlike solid chrome nails which can look costume-y, the sheer pink base underneath makes this look like skin with a glow, not a metal finger.
DIY At Home:
- Base: OPI GelColor in “Bubble Bath” ($13, Ulta) — the sheerest pink available
- Chrome powder: Modelones Chrome Powder in “Rose Gold Pearl” ($7, Amazon) — buff on with a silicone-tipped applicator over a NO-WIPE top coat (this is critical — standard top coat prevents bonding)
- Use Born Pretty No-Wipe Gel Top Coat ($9, Amazon)
- Difficulty: Intermediate — the chrome step is fast but unforgiving if the top coat has wipe residue
Product recommendation: Modelones Chrome Powder ($7, Amazon) — cheap chrome powders from unknown brands come out dusty and gray. This one gives a true mirror finish with two passes.
Summer Almond Nails – 5 Soft & Chic Ideas
1. Sheer Peach Almond with Gold Rim
A near-transparent peach gel layer over almond-shaped acrylics — similar to a jelly finish — with a micro-thin line of gold gel tracing the tip like an inside edge. Subtle enough for Monday meetings, interesting enough for Saturday dinners.
Difficulty: Intermediate Time to complete: 50 minutes Best for: Professional women who want vacation energy in their everyday manicure. Why it works: Almond nails elongate fingers naturally, and a sheer finish keeps them from reading as “costume-y” in formal settings. What makes it different: The gold rim inside the tip — not on top — is a detail that reads as custom even though it only adds five minutes.
DIY At Home:
- Base: DND Gel Polish in “Queen of Peach” ($10, Amazon)
- Gold line: Makartt Nail Art Gel Liner in Gold ($7, Amazon) — draw a thin line just inside the tip edge before curing
- Finish with a glossy top coat for maximum depth
- Difficulty: Intermediate — the liner step is easier on almond shapes than square because the curve guides your brush
Product recommendation: DND Gel Polish ($10 per color, Amazon) — the formula self-levels perfectly on almond shapes, which is harder than it sounds with curved tips.
2. French Almond with Lilac Ombré Base
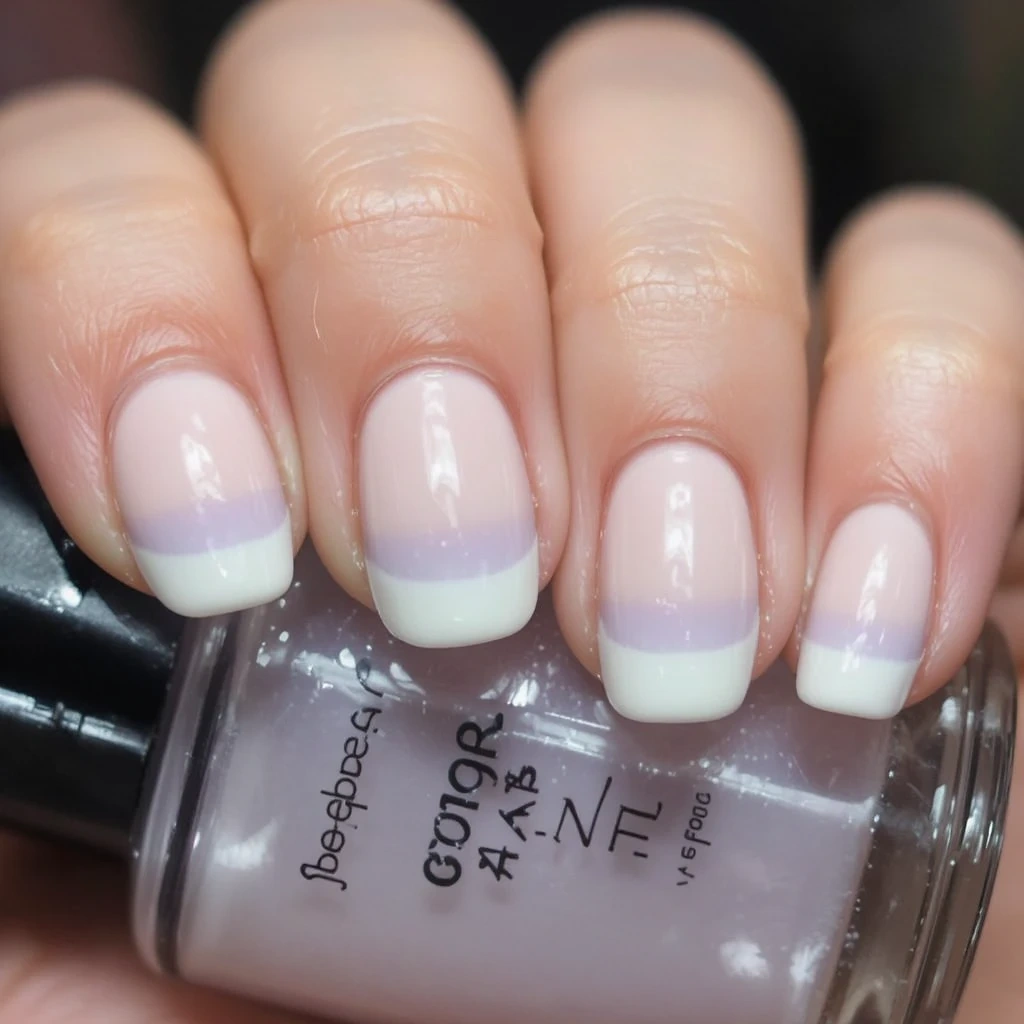
The base of the nail fades from a pale cream at the cuticle into soft lilac at the mid-nail, meeting a clean white French tip. The gradient is subtle — you’d have to look closely to see where one color ends — but it adds dimension that a plain French tip lacks.
Difficulty: Intermediate Time to complete: 65 minutes Best for: A bride or wedding guest who wants a romantic look without committing to anything overtly floral. Why it works: Lavender and white is an eternally classic summer color pairing, and the ombré adds effort without adding visual noise. What makes it different: Most French ombré tutorials go pink-to-white. This goes cream-to-lilac-to-white, which is less commonly seen and more original.
DIY At Home:
- Cream base: OPI GelColor “Tiramisu For Two” ($13, Ulta)
- Lilac: Essie Gel Couture “Tulle Me Something” ($12, Ulta) — light enough to sponge-blend without going opaque
- White tip: standard white gel with a flat French tip brush
- Difficulty: Intermediate — three-color blending takes patience on a first attempt
Product recommendation: Essie Gel Couture ($12 per color, Ulta) — the sheer formula in the light shades makes sponging a soft ombré achievable without the muddy result you get from fully-opaque polishes.
3. Marble Almond in White and Warm Taupe
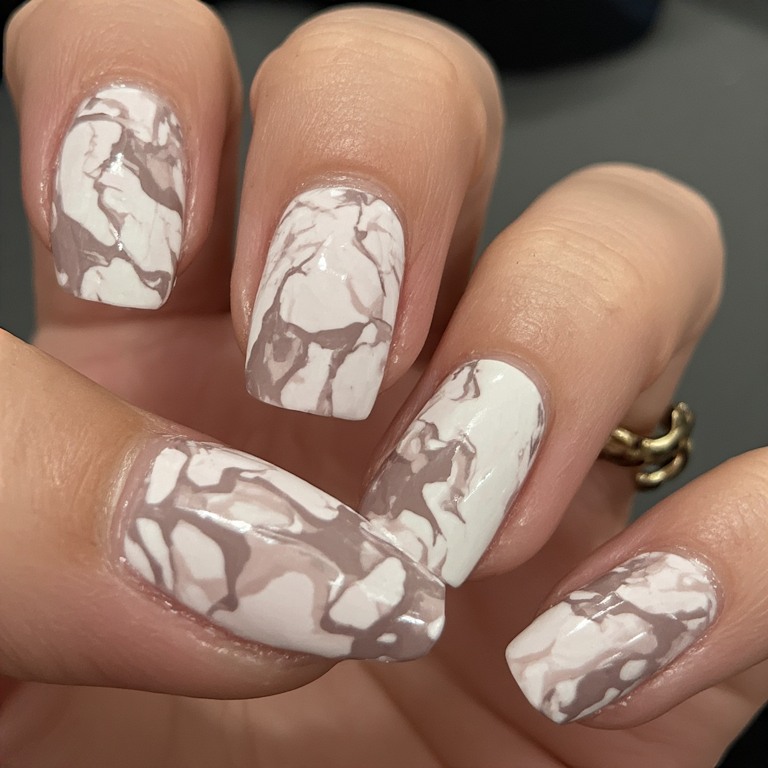
A white gel base with taupe and greige veining hand-drawn using a fine liner brush, then blurred slightly with a fan brush before top coating. The result looks like a high-end stone surface in nail form — sophisticated, neutral, and endlessly complimentary with summer jewelry.
Difficulty: Advanced Time to complete: 80 minutes Best for: Someone who loves home décor aesthetics (think Beni Ourain rugs, travertine tiles) and wants nails that feel like an extension of that sensibility. Why it works: Marble has been a nail trend for years and doesn’t feel dated on almond shapes because the elongated silhouette keeps it fashion-forward rather than kitschy. What makes it different: Warm taupe veining instead of the typical gray produces a cozier, more personal result that reads less like a stock image and more like an actual stone.
DIY At Home:
- White gel base: Morgan Taylor Gel in “White Tip” ($9, Amazon)
- Veining: Born Pretty Nail Art Liner Gel in Taupe/Brown ($7, Amazon) — draw irregular branching lines with a very light hand
- Blur: drag a dry fan brush lightly across veins before curing to soften
- Difficulty: Advanced — the blur step takes a specific touch; practice on a nail tip first
Product recommendation: Makartt Fan Brush for Nail Art ($8, Amazon) — the blurring step is what makes marble look authentic rather than drawn-on. Any fan brush works in theory, but the bristles on this one are soft enough to blur without smearing completely.
4. Nude Almond with Micro Floral Detail
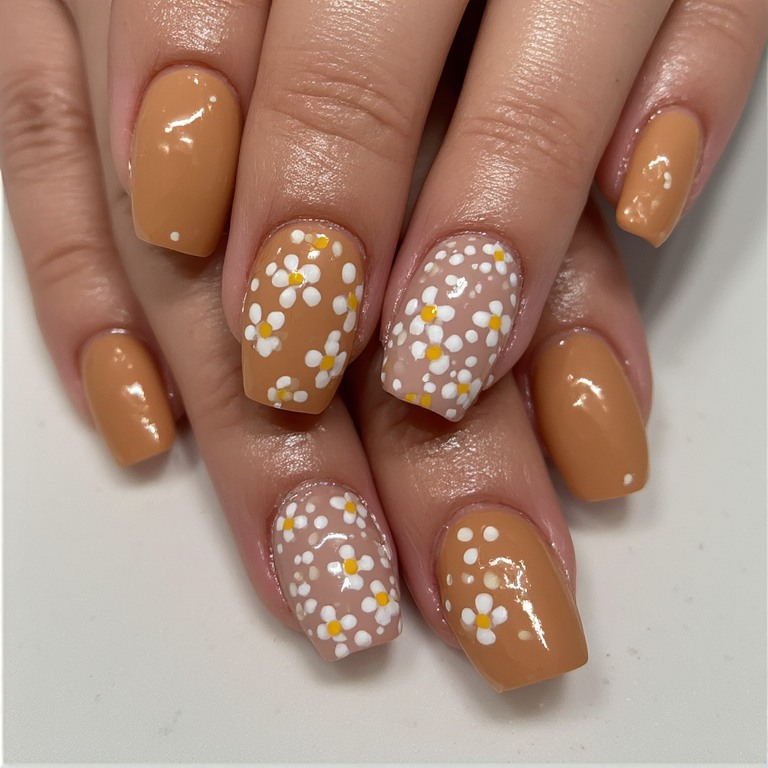
A warm nude or caramel base across most nails, with two accent nails featuring hand-painted mini flowers — tiny four-petal blooms in white with a yellow dot center, dotted across the nail like a scattered field. The flowers are small enough that they read as texture rather than illustration.
Difficulty: Intermediate Time to complete: 70 minutes Best for: Someone who wants nail art that’s noticeable but not loud — these nails photograph beautifully without screaming for attention. Why it works: Micro florals on a neutral base feel organic and effortless, the way a linen shirt with a subtle print works better than a bold one. What makes it different: Painting small flowers is intimidating but it’s actually more forgiving than large ones — at a small scale, slight imperfections read as charm.
DIY At Home:
- Base: OPI GelColor “Pale to the Chief” ($13, Ulta) — a warm sand-nude that flatters most skin tones
- Flowers: Makartt Liner in White + dotting tool for centers ($8 combined, Amazon)
- Practice one flower off-nail before starting — get confident with the five-dot petal pattern
- Difficulty: Intermediate with practice
Product recommendation: Makartt Dotting Tool Set ($6, Amazon) — the center dot of a micro flower makes or breaks the design, and you need a tool that deposits a clean consistent dot. The small-end on this set is exactly right.
5. Terracotta and Cream Abstract Almond
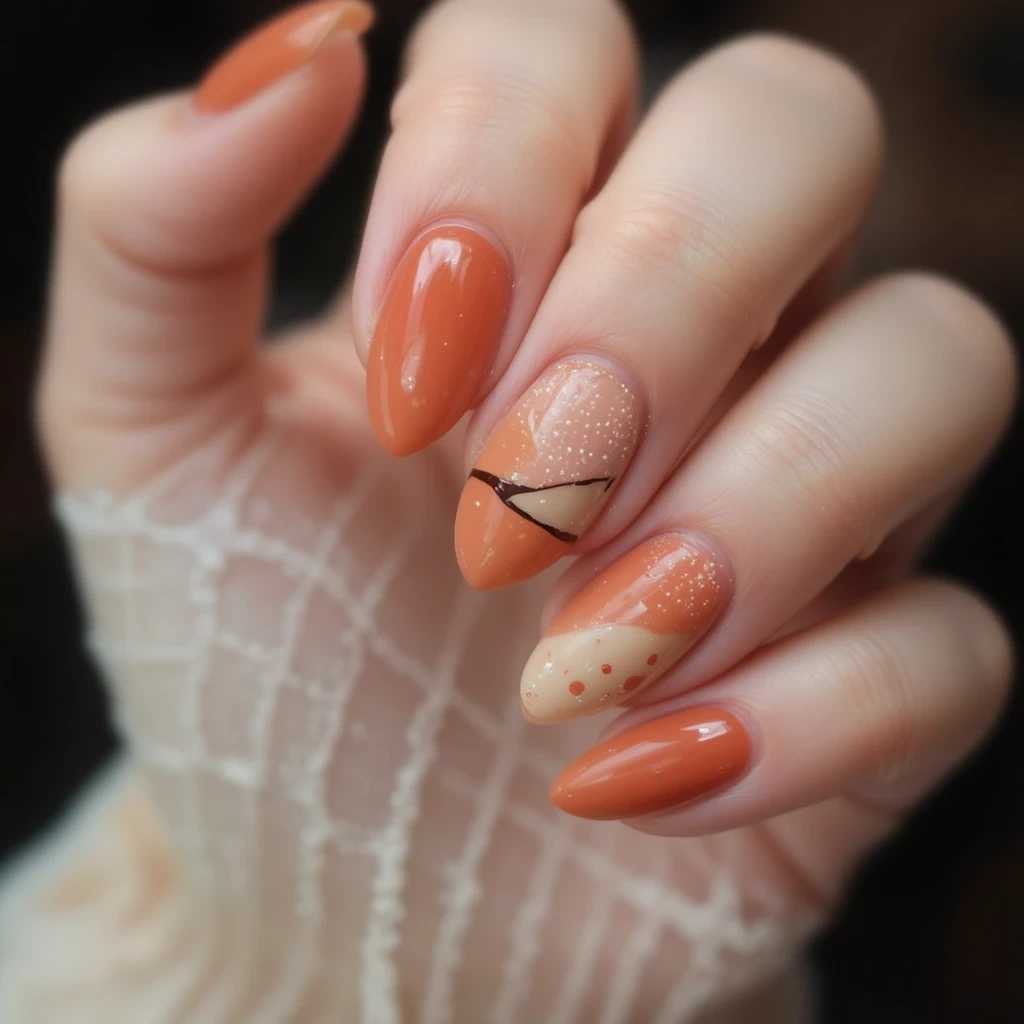
A base that alternates terracotta and cream — some nails fully terracotta, some fully cream, one accent nail with an abstract curved line splitting both colors like a horizon. The palette is warm and earthy, heavily influenced by Moroccan and Mediterranean color sensibility.
Difficulty: Beginner to Intermediate Time to complete: 55 minutes Best for: Someone who wants something artistic but doesn’t have artistic skill — the “abstract line” is basically just one brushstroke. Why it works: Terracotta was massive in interior design and fashion and it translates beautifully onto nails, especially almond shapes where the warm tone complements the elongated silhouette. What makes it different: Two-tone sets with a single design element are often more effective than complex full-nail art because the simplicity looks deliberate rather than lazy.
DIY At Home:
- Terracotta: Zoya Gel Polish “Adel” ($10, Zoya website) — one of the truest terracotta shades available without mixing
- Cream: OPI GelColor “Bubble Bath” ($13, Ulta)
- Abstract line: a single swipe of terracotta on the cream nail with a flat brush, curved slightly at the top
- Difficulty: Beginner-friendly — there’s no “wrong” way to draw an abstract line
Product recommendation: Zoya Gel Polish ($10 per bottle, Zoya website) — the terracotta shades in mainstream brands tend to pull orange or pink. Zoya’s “Adel” is genuinely earthy and true-to-tone.
Summer Nails Coffin Shape – 5 Dramatic Ideas
1. Hot Pink Coffin with Chrome Tip
A saturated hot pink gel base on coffin-shaped acrylics with the top third of each nail dipped in silver chrome powder, creating a chrome French effect. The line between pink and chrome is clean and hard-edged. It’s dramatic, Y2K-influenced, and impossible to photograph badly.
Difficulty: Intermediate Time to complete: 60 minutes Best for: Festival season, birthday weekends, any occasion where you want to be photographed. Why it works: Hot pink and chrome silver is a color combination that’s been dominating nail content on Instagram and TikTok since 2024, and coffin shapes give it the right architectural proportions. What makes it different: Most chrome tip designs use gold. Silver chrome on hot pink reads fashion-forward and slightly harder-edged — less bridal, more editorial.
DIY At Home:
- Base: Kiara Sky Gel “Passion” ($8, Kiara Sky website) — a true hot magenta-pink
- Chrome: BORN PRETTY Holographic Chrome Powder in Silver ($7, Amazon)
- Mask off the pink section with tape, apply chrome to tip only
- Cure in no-wipe top coat first, then buff chrome, then re-seal
- Difficulty: Intermediate — the tape masking makes the line clean even for beginners
Product recommendation: Kiara Sky Gel Polish ($8 per bottle, Kiara Sky website) — the pigmentation in this formula is unusually intense for a single-coat coverage, which matters because coffin shapes need consistent color across the wide surface.
2. Black and White Negative Space Coffin
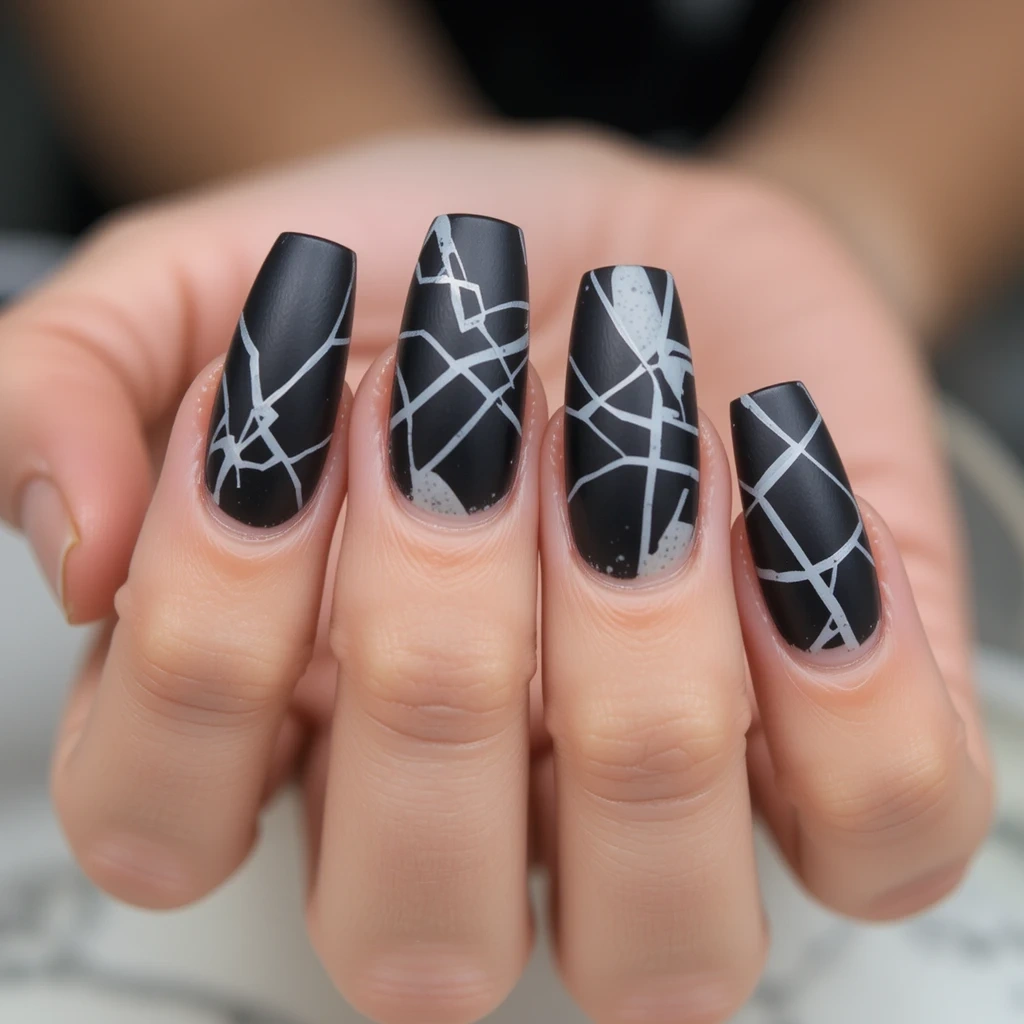
A matte black base with sections of the nail left bare (just buffed acrylic) as negative space, with thin white geometric lines — diagonals, crosses, or grids — connecting the painted and bare sections. The result is graphic, architectural, and summer-defiant.
Difficulty: Intermediate Time to complete: 70 minutes Best for: Someone who prefers a darker aesthetic even in summer, or wants nails that stand out without being “summery.” Why it works: Negative space designs look intentional and high-concept on coffin shapes because the long, straight sides of the coffin give geometric lines somewhere to go. What makes it different: Most negative space designs use a light nude base — going matte black flips the contrast and creates something much more striking.
DIY At Home:
- Tape off negative space sections before applying black gel
- Black gel: Beetles Gel Polish “Black Cat” ($8, Amazon) — deep matte-finish black
- White lines: Makartt Nail Liner in White ($6, Amazon) applied after black cures
- Matte top coat over entire nail: OPI Matte Top Coat ($12, Ulta)
- Difficulty: Intermediate — tape placement requires a plan before you start
Product recommendation: OPI Matte Top Coat ($12, Ulta) — matte top coats vary enormously in how “true” matte they go. This one kills all shine completely, which is essential for the graphic aesthetic of this design.
3. Ocean Ombré Coffin in Turquoise to White
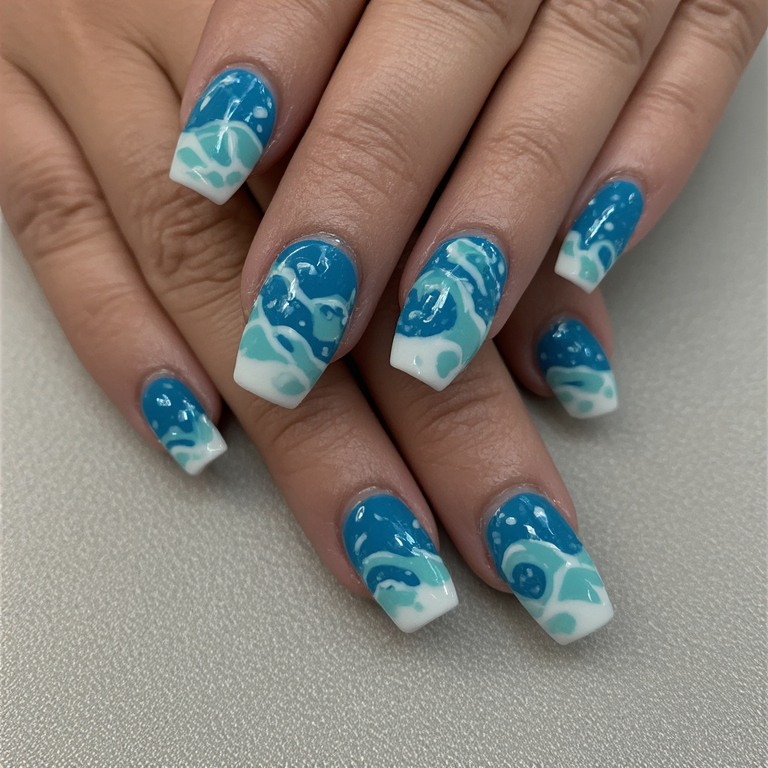
A gradient that starts at deep ocean teal at the cuticle, lightens through aqua and seafoam, and reaches near-white at the coffin tip. Finished with a glossy top coat, the nails look like a cross-section of shallow Caribbean water. The shape of the coffin mimics a literal wave.
Difficulty: Intermediate Time to complete: 65 minutes Best for: Beach vacations, summer birthday sets, anyone whose color palette runs coastal. Why it works: Cool blues and greens are perennially popular in summer because they photograph well against sun-tanned skin and feel visually cooling in hot weather. What makes it different: The coffin tip landing on near-white creates a natural “break” that mimics seafoam — most ocean ombré tutorials stop at pale aqua and miss this effect.
DIY At Home:
- Teal base: OPI GelColor “Hardcourt in Court” ($13, Ulta)
- Aqua mid: CND Shellac “Aqua Rush” ($13, Amazon)
- White tip blend: mix a drop of white into the aqua on a palette and sponge gradually
- Difficulty: Intermediate — the three-stage gradient needs patience between layers
Product recommendation: CND Shellac ($13 per color, Amazon) — the fluidity of CND gel polish makes it easier to blend than thicker formulas. The pigment suspension allows for smoother color transitions on the sponge.
4. Checkerboard Coffin in Neon Yellow and White
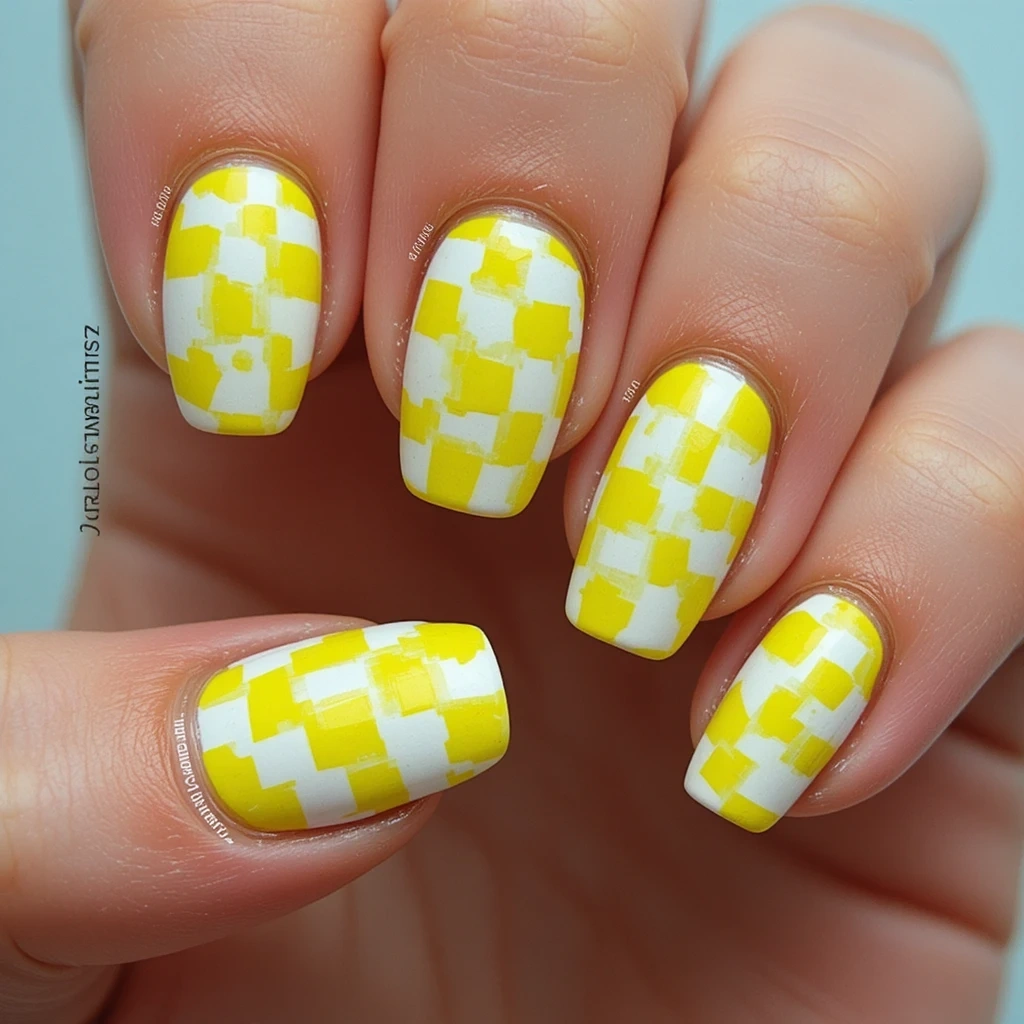
A classic checkerboard pattern in electric yellow and bright white covering the entire coffin nail surface. The grid is hand-painted or applied using striping tape as a guide. Bold, graphic, and specifically summer — this is the nail equivalent of a vintage beach towel.
Difficulty: Intermediate Time to complete: 80 minutes Best for: The person who doesn’t do anything halfway — bold in fashion choices, travels to the right places, has strong opinions about music. Why it works: Checkerboard has been one of the defining nail patterns of 2023–2025, and on coffin nails the wide surface area gives the grid room to breathe and look intentional. What makes it different: Most checkerboard sets use black and white. Yellow and white is softer, sunnier, and more original while using the same graphic structure.
DIY At Home:
- Striping tape method: apply white base, let cure, then lay thin tape strips in a grid pattern, paint yellow over entire surface, remove tape immediately before curing
- Yellow: OPI GelColor “Exotic Birds Do Not Twitter” ($13, Ulta) — neon with enough opacity for single coverage
- Alternatively: use Maniology’s Checkerboard Stamping Plate ($12, Maniology website) for a faster version
- Difficulty: Intermediate — the tape method requires steady hands for straight lines; stamping makes it beginner-accessible
Product recommendation: Maniology Stamping Plate M083 ($12, Maniology website) — if you want the checkerboard to look crisp without tape, stamping is the answer. This specific plate has a coffin-nail checkerboard that fits the shape perfectly.
5. Tortoiseshell Coffin Nails
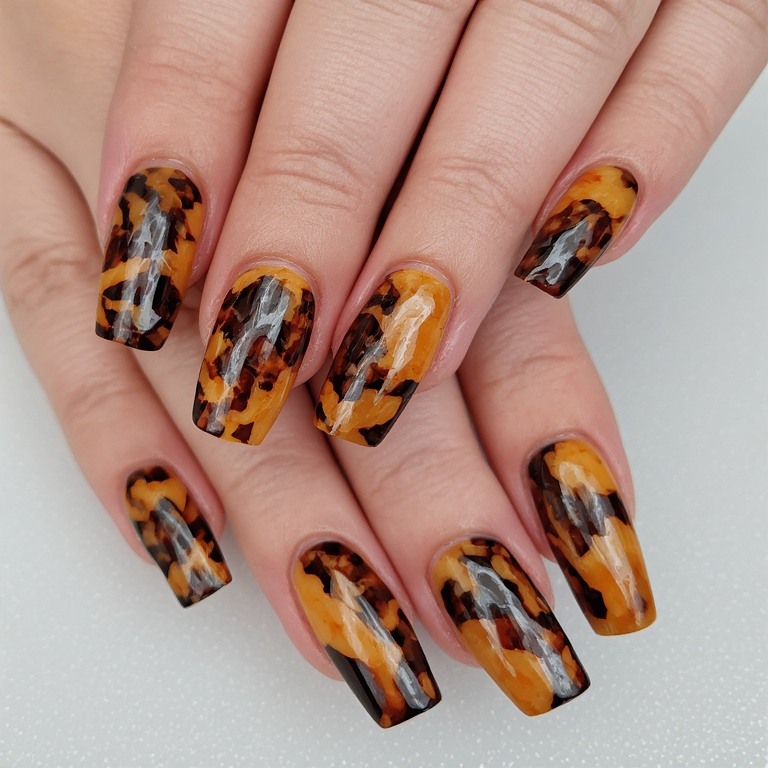
A warm amber and brown tortoiseshell pattern — irregular patches of honey, caramel, dark brown, and a translucent orange-gold — across all nails with a high-gloss top coat that makes them look like actual resin. The coffin shape emphasizes the length and gives the pattern room to develop properly.
Difficulty: Advanced Time to complete: 90 minutes Best for: Someone who wants nail art that looks handmade and organic rather than digital-graphic. Why it works: Tortoiseshell has never fully left trend, and it looks particularly strong in summer when warm tones work with tanned skin. The coffin shape adds a modern edge to a classic pattern. What makes it different: Done well, tortoiseshell is the nail art equivalent of a vintage accessory — it looks expensive in a way that solid colors don’t quite achieve.
DIY At Home:
- Amber base: OPI GelColor “Don’t Pretzel My Buttons” ($13, Ulta)
- Dark patches: a mix of brown and black gel applied with an old or splayed brush in irregular, angular blobs — the messier the better
- Orange-gold accent: Kiara Sky “Blaze” applied sparsely within amber sections
- Blend edges before curing with a dry brush
- Difficulty: Advanced — tortoiseshell looks complex but the “rules” are loose: patch size and spacing matter more than precision
Product recommendation: Beetles Gel Polish Tortoiseshell Kit ($16, Amazon) — includes three correctly-proportioned shades specifically formulated to blend together, which removes most of the guesswork about color mixing ratios.
Bright Summer Nails – 5 Color-Forward Ideas
1. Neon Rainbow Gradient (One Color Per Finger)
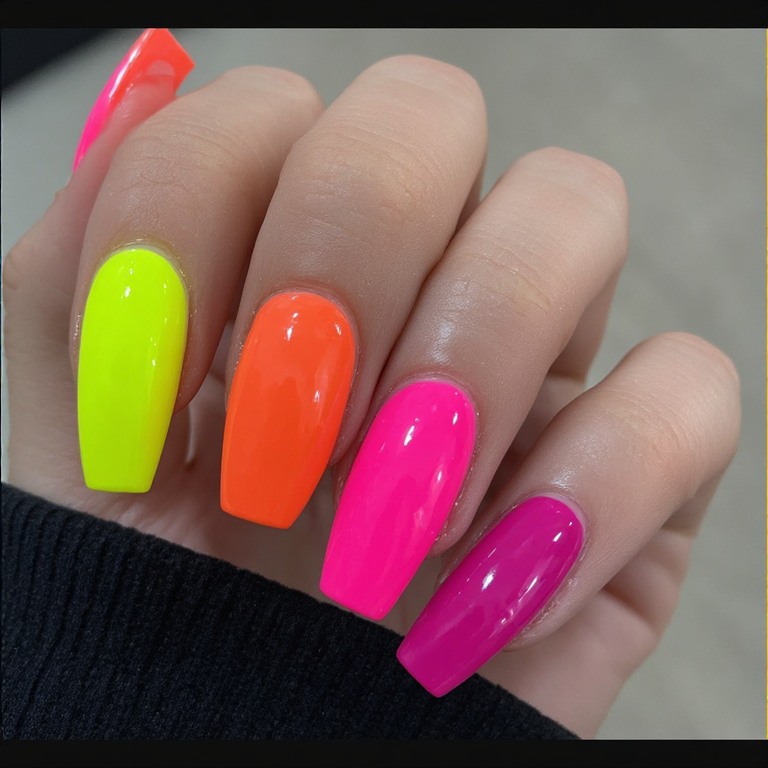
Each finger on one hand gets a different neon: yellow, orange, coral, hot pink, and magenta — all full-coverage gel over medium-length square or coffin acrylics. Together they form a gradient across your hand when your fingers are side-by-side. Individually they each stand alone. Joyful, maximalist, impossible to be sad while wearing them.
Difficulty: Beginner Time to complete: 55 minutes (shorter per nail since there’s no blending) Best for: Anyone who’s been playing it safe with nails and is ready to commit to something genuinely fun. Why it works: Multi-color sets look effortful but are actually simpler to execute than ombré, because each nail gets one solid color. What makes it different: The rainbow flows across your hand as a gradient rather than random colors — this detail elevates it from “miscellaneous neon” to “deliberate design.”
DIY At Home:
- Kiara Sky Neon Collection: “Neon Life” 5-piece set ($38, Kiara Sky website) — these five colors are already gradient-ordered and all in the same neon intensity family
- Difficulty: Beginner — if you can paint nails, you can do this
Product recommendation: Kiara Sky “Neon Life” collection ($38 for 5, Kiara Sky website) — the key is consistent saturation across all five shades. Mixing brands means some shades will be more neon than others and the gradient effect falls apart.
2. Electric Blue with White Negative Space Swirls
An electric cobalt or royal blue base with organic white swirl designs painted on two accent nails — loose, imperfect curves that look hand-done because they are. The remaining nails are solid blue, so the swirls don’t feel overwhelming.
Difficulty: Intermediate Time to complete: 60 minutes Best for: Someone who wants the visual interest of nail art without covering every nail in design work. Why it works: Cobalt blue is one of the strongest colors in a summer palette, and white swirls provide contrast without competing — they feel like foam on a wave. What makes it different: Swirls done with a loose hand look intentionally artistic; done too carefully they look stiff. This is a case where imperfect is better.
DIY At Home:
- Base: OPI GelColor “Eurso Euro” ($13, Ulta) — a proper cobalt without any purple or green pull
- Swirls: Makartt White Gel Liner ($6, Amazon) — work with a light, quick hand and avoid going over lines twice
- Difficulty: Intermediate — swirls require confidence, not precision
Product recommendation: Makartt Gel Nail Art Liner in White ($6, Amazon) — the gel formula holds a clean line and doesn’t sink into the base color the way regular polish does on gel nails.
3. Citrus Slice Nail Art
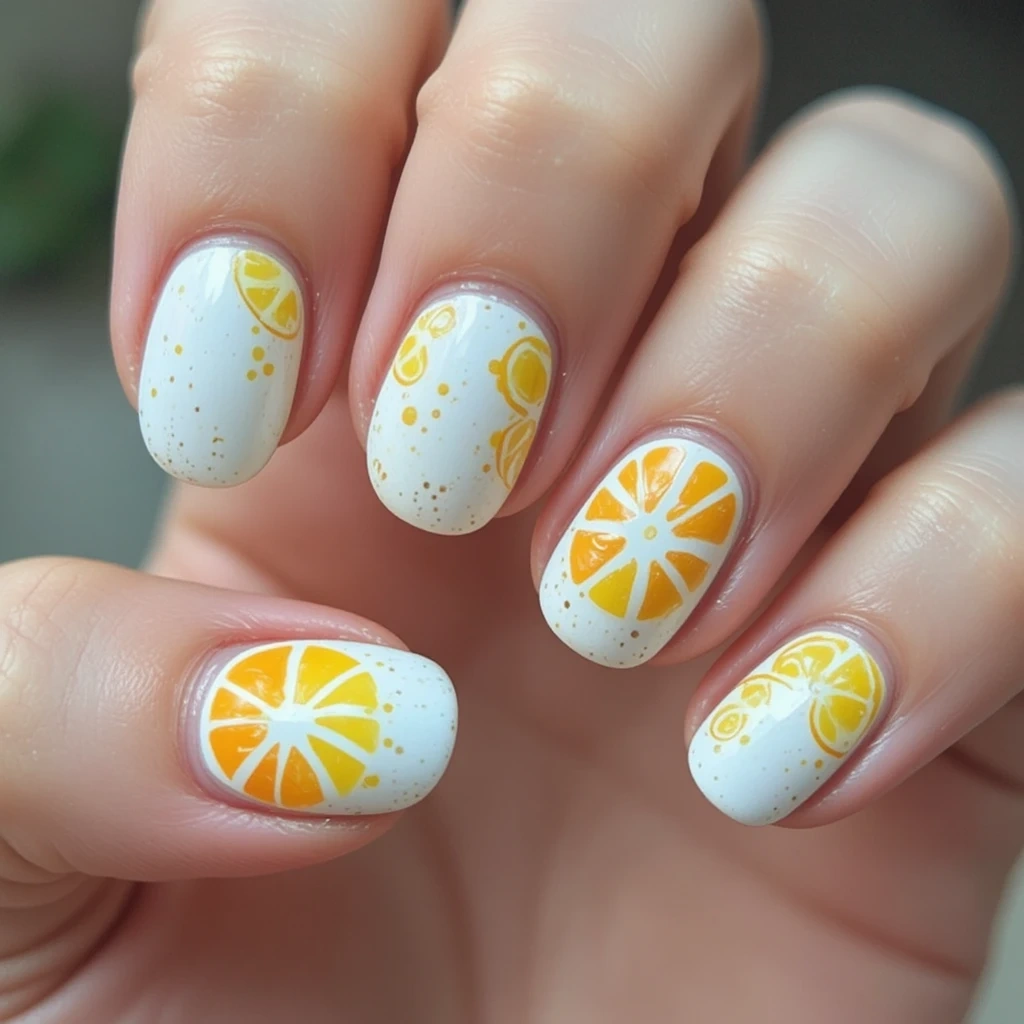
A white or pale yellow base with hand-painted orange, lemon, or lime slice cross-sections on accent nails — the half-circle fruit with segments fanning out from the center, outlined in a slightly darker tone. Playful, summer-specific, and immediately recognizable.
Difficulty: Intermediate Time to complete: 75 minutes Best for: Destination weddings, pool parties, or any situation where you want your nails to be a conversation starter. Why it works: Fruit nails are peak-summer nail art and they translate immediately — no one needs to ask what the design is, which gives them an energy that abstract art doesn’t always have. What makes it different: Painting citrus slices on one or two accent nails while keeping the rest simple keeps this from looking like a child’s craft project.
DIY At Home:
- White base: OPI GelColor “Alpine Snow” ($13, Ulta)
- Orange slice: paint a half-circle in “Toucan Do It If You Try” OPI orange, add thin white lines radiating from center for segments, outline with a dark amber liner
- Lemon alternative: yellow base with pale yellow slice, white segments, thin black outline
- Difficulty: Intermediate — the segments require a fine brush but don’t need to be perfectly even; slight irregularity looks more realistic
Product recommendation: Born Pretty Nail Art Pen in Dark Brown ($6, Amazon) — the outline of the citrus segment defines the entire design. A too-thin pen gets lost; a too-thick one looks blocky. This size splits the difference.
4. Hot Coral with White French V-Tip
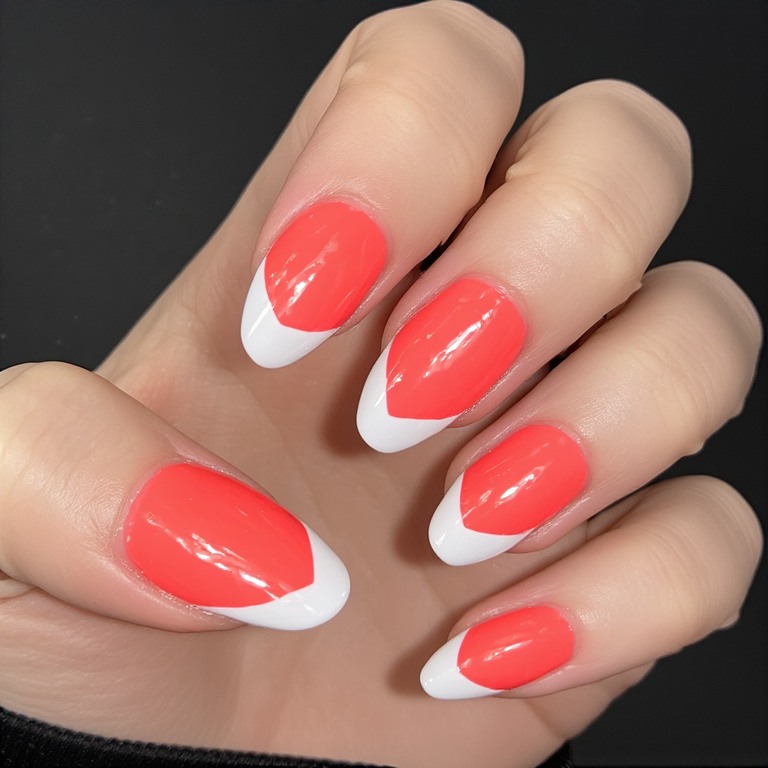
A saturated hot coral base — somewhere between a tangerine and a watermelon — with a sharp V-shaped French tip in bright white, also called a “swallow tail” or “butterfly” tip. The V cuts inward from both sides of the nail and meets in the center like an inverted chevron. Bold and geometric.
Difficulty: Intermediate Time to complete: 55 minutes Best for: Someone who loves a French tip but finds the classic straight smile line boring. Why it works: The V-tip creates movement and visual interest from a static design — your eye follows the line from corner to center and back, which makes the nail look dynamic even when your hand is still. What makes it different: V-tips require more precision than regular French tips, which gives them a custom, salon-exclusive look even when done at home.
DIY At Home:
- Coral base: Kiara Sky “Vacay Mode” ($8, Kiara Sky website) — a warm coral that doesn’t pull orange
- V-tip: tape both sides of the V angle using striping tape, paint white, remove tape before curing
- Practice the tape angle on paper first — the V should be shallow, not a deep pointed spike
- Difficulty: Intermediate — tape placement determines everything
Product recommendation: BORN PRETTY Striping Tape ($5, Amazon) — standard tape leaves fuzzy edges on gel. This nail-specific tape is thin enough to create a clean line without the residue that regular masking tape leaves.
5. Two-Toned Neon Green and Pink Split Nails
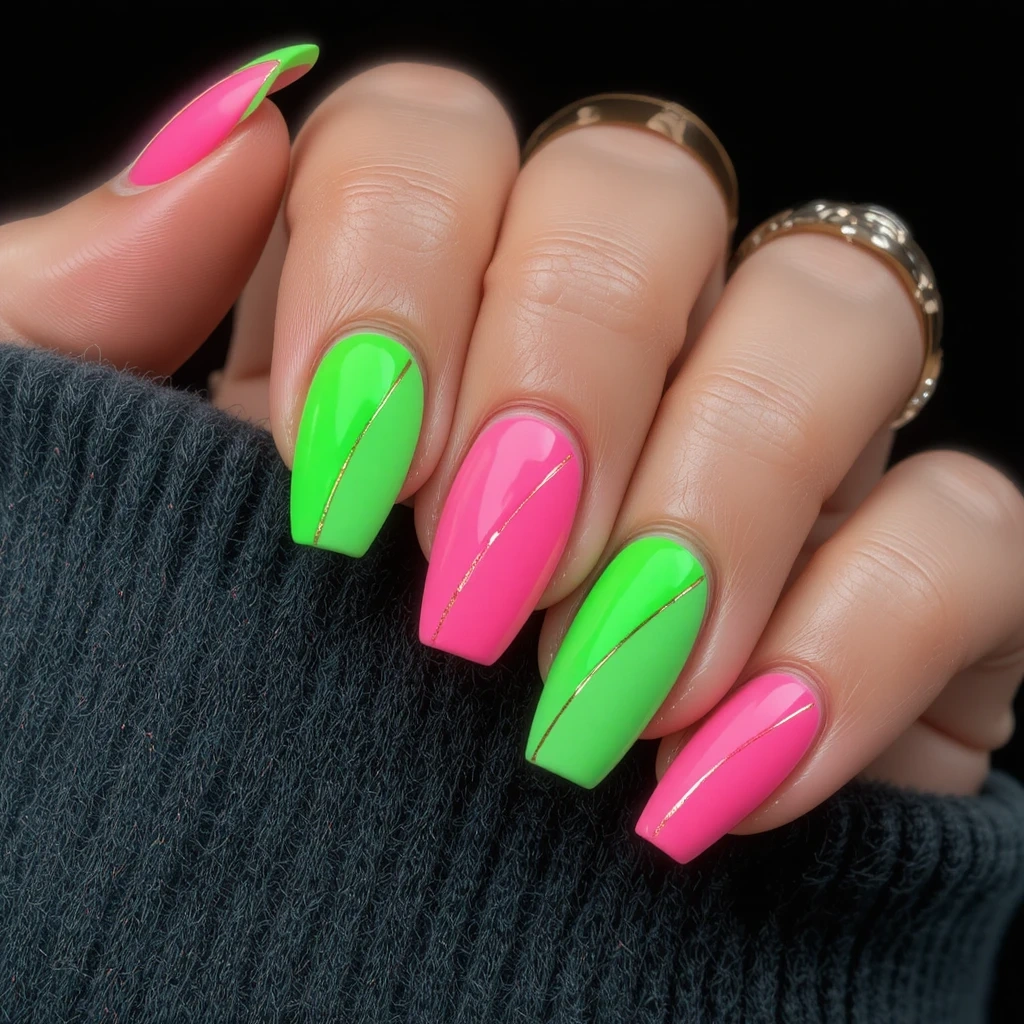
The nail is split diagonally — one half neon green, one half neon pink — with a thin gold or black line exactly on the diagonal. Some nails go green-dominant, some go pink-dominant, alternating across the hand. It’s bold, intentional, and specifically summer 2025.
Difficulty: Intermediate Time to complete: 60 minutes Best for: Festival-goers, fashion students, or anyone whose Pinterest board has a “maximalist” folder. Why it works: Split nails work because the contrast between colors creates immediate visual drama, and the diagonal line reads as a design decision rather than a mistake. What makes it different: The color pairing of neon green and neon pink is chromatic opposites in the neon family — they vibrate against each other in a way that analogous colors don’t.
DIY At Home:
- Use striping tape to mask the diagonal on each nail, alternate which side gets which color
- Green: OPI GelColor “I’m Sooo Swamped!” ($13, Ulta)
- Pink: OPI GelColor “Shorts Story” ($13, Ulta)
- Thin gold line on the diagonal: Makartt Gold Liner Gel ($7, Amazon)
- Difficulty: Intermediate — tape management on curved nails takes a steady hand
Product recommendation: OPI GelColor ($13 per bottle, Ulta) — for a design that’s all about color, the vibrancy of OPI’s neon gels is noticeably better than budget alternatives. The pigment doesn’t look washed out under top coat, which cheaper neons often do.
Fun Summer Nails – 5 Playful Ideas
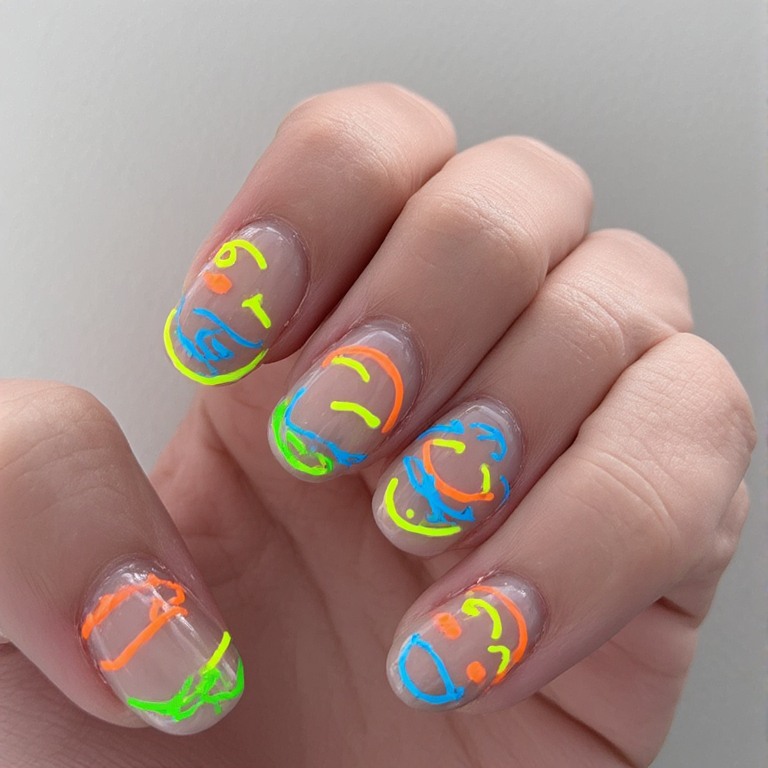
1. Smiley Face Accent Nails on Bright Yellow

All nails in matte neon yellow except one or two accent nails featuring a single large smiley face in black — two dot eyes and a curved line mouth, drawn directly on the yellow surface. No fuss, no complexity, immediate serotonin.
Difficulty: Beginner Time to complete: 40 minutes Best for: A mood lift, a vacation set, or anyone who has decided that life is short and nails should be fun. Why it works: A smiley face on a yellow nail is one of the few truly happy nail designs — it doesn’t require interpretation. People will smile back at your nails. What makes it different: Using matte top coat rather than glossy over the yellow makes the smiley face pop more because the flatness of the matte surface makes the black lines read crisper.
DIY At Home:
- Yellow: OPI GelColor “I Just Can’t Cope-acabana” ($13, Ulta) — a matte-finish neon
- Smiley face: Makartt Black Liner Gel ($6, Amazon) — draw two dots and a U-shape curve with a thin liner brush
- Matte top coat over everything: OPI Matte Top Coat ($12, Ulta)
- Difficulty: Beginner — you drew smiley faces at age six and those count
Product recommendation: OPI Matte Top Coat ($12, Ulta) — the specific texture of matte over neon yellow changes the whole energy of the design. Glossy yellow looks fun; matte yellow looks intentional.
2. Watermelon Nails (Pink Base with Seed Detail)
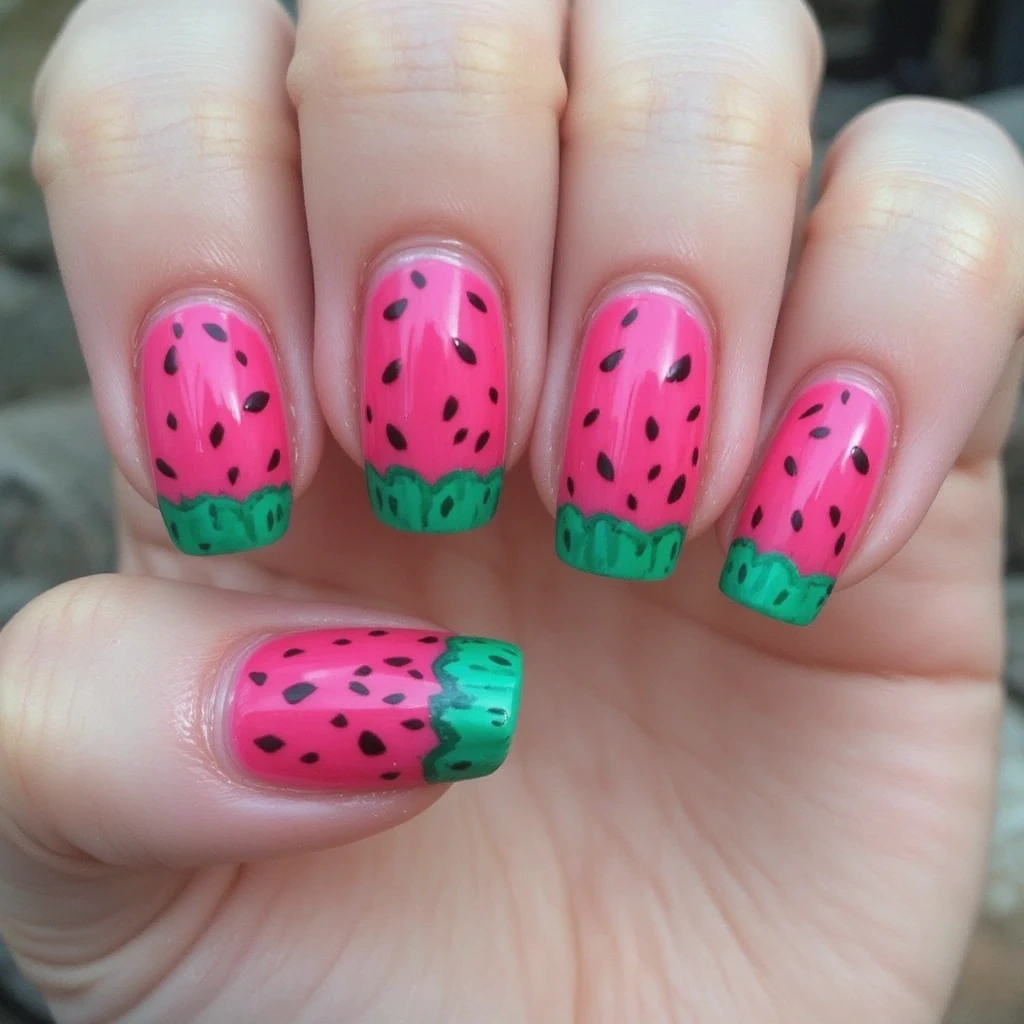
A bright watermelon pink base across all nails with tiny hand-painted black seed shapes scattered naturally on two accent nails, a thin green band painted at the very tip to represent the rind. Cheerful, summer-specific, and never fails to get compliments.
Difficulty: Beginner to Intermediate Time to complete: 50 minutes Best for: Kids’ birthday parties, beach days, or anyone who just genuinely likes watermelon as an aesthetic. Why it works: Watermelon is one of those universally happy summer symbols — people respond to it the same way they respond to a sun emoji. Positive and immediate. What makes it different: The green tip (rind detail) is what makes this identifiable rather than just “pink nails with dots.” It’s a small detail that completes the metaphor.
DIY At Home:
- Pink: OPI GelColor “Strawberry Margarita” ($13, Ulta) — sits exactly between pink and red, the right watermelon tone
- Seeds: dotting tool with black gel — place 3-5 per accent nail at slight angles, not in rows
- Green tip: thin stripe of “Jade is the New Black” OPI gel at the very tip
- Difficulty: Beginner — the seeds are dots, the tip is one brushstroke
Product recommendation: Makartt Dotting Tool Set ($6, Amazon) — for perfectly round seed shapes, a dotting tool beats a brush every time. The small end on this set makes seeds that look like actual watermelon seeds in proportion.
3. Retro Daisy Nails on Pastel Blue
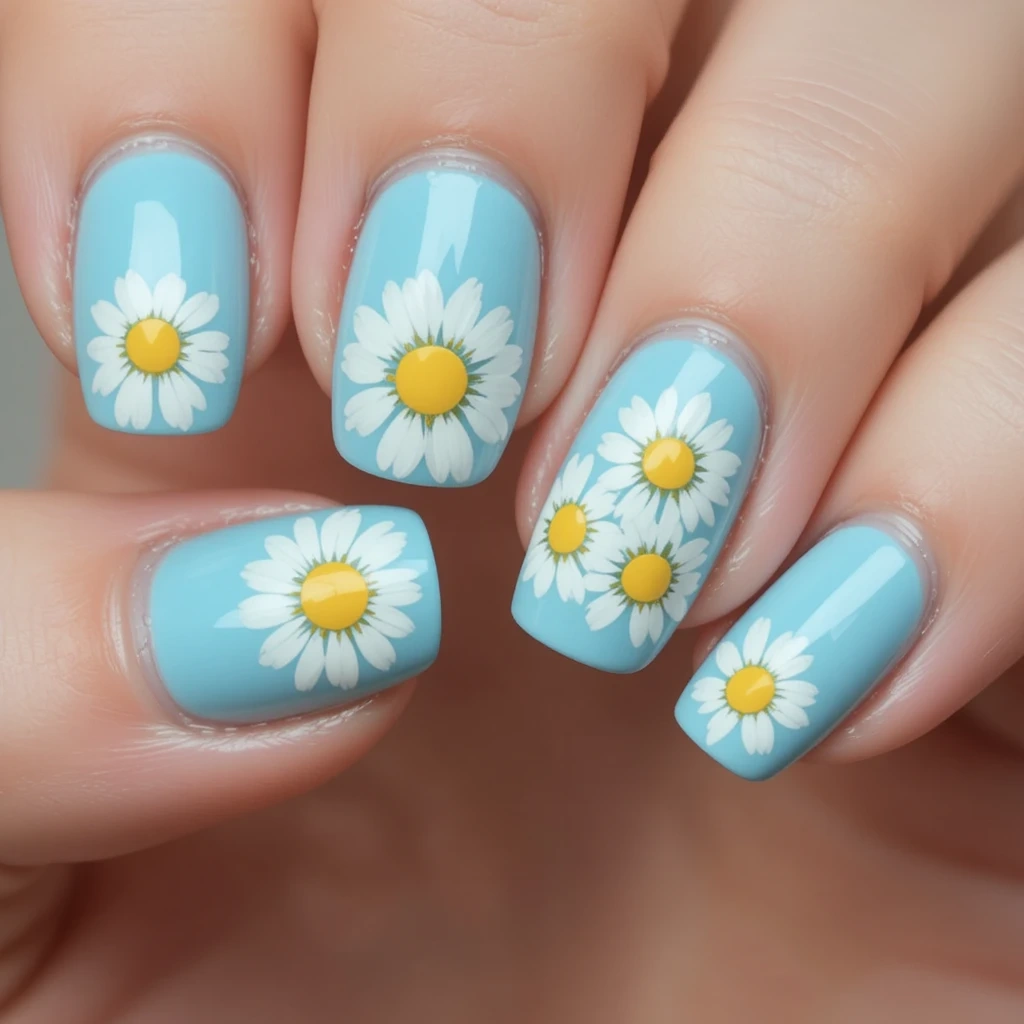
A pastel sky-blue base across all nails, with retro-style daisies — five rounded white petals with a sunshine yellow center — hand-painted on one or two accent nails. The daisies should be slightly oversized and perfectly centered to get the vintage-poster look.
Difficulty: Intermediate Time to complete: 65 minutes Best for: Cottagecore fans, anyone who has a sunflower or daisy reference somewhere in their home, summer festival season. Why it works: Retro daisies on pastel blue is one of the enduring summer nail aesthetics — it references 70s design without being kitsch because the execution stays clean. What makes it different: The size of the daisy matters — a daisy that’s too small looks decorative, one that fills the nail looks intentional and graphic.
DIY At Home:
- Blue: CND Shellac “Ice Bar” ($13, Amazon) — a true pastel sky blue without grey undertones
- White petals: five oval strokes fanning out from center — practice on a nail tip first
- Yellow center: a large dot from a dotting tool in “I Just Can’t Cope-acabana” yellow
- Difficulty: Intermediate — the petal strokes need a slightly thick brush tip for the right shape
Product recommendation: Beetles Nail Art Brush Set 15-piece ($12, Amazon) — the fan/petal brush in this set specifically matches the shape of a daisy petal, making the five-stroke method much easier than using a round brush.
4. Palm Tree Silhouette on Sunset Gradient
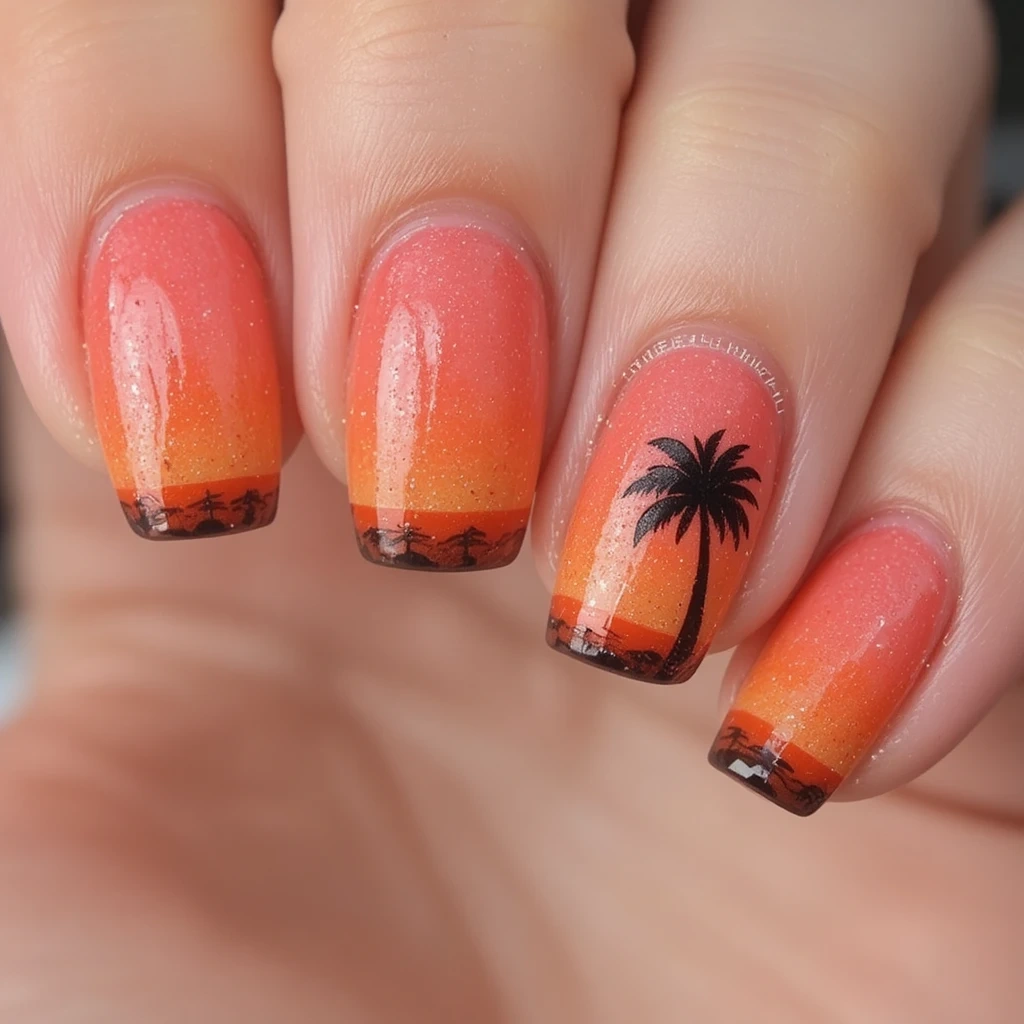
A gradient base moving from peach to coral to burnt orange — a sunset in miniature — with a black silhouette of a palm tree and a small half-circle sun painted on one accent nail. Simple, recognizable, and deeply satisfying to look at.
Difficulty: Intermediate Time to complete: 70 minutes Best for: Anyone who’s about to or just returned from somewhere with actual palm trees. Also anyone who just wishes they were. Why it works: Silhouette nail art is easier than it looks because you don’t need internal detail — the palm tree is a trunk line and some radiating fronds, and the brain fills in the rest. What makes it different: The sunset gradient under the silhouette gives the art context and atmosphere. Without it, a palm tree on a nude nail is just a tree.
DIY At Home:
- Gradient: sponge technique using OPI peach, coral, and amber gels
- Silhouette: Makartt Black Liner Gel ($6, Amazon) — trunk is a slightly curved vertical line, fronds are short diagonal strokes from the top
- Sun: half-circle drawn on the horizon line with the same black liner
- Difficulty: Intermediate — the silhouette is forgiving; palm trees are supposed to look windswept
Product recommendation: Makartt Black Gel Liner ($6, Amazon) — for silhouette work you need a liner that goes on clean, stays put, and doesn’t bleed into the gradient base before you cure. This one cures immediately and doesn’t spread.
5. Candy Stripe Nails in Pink and White
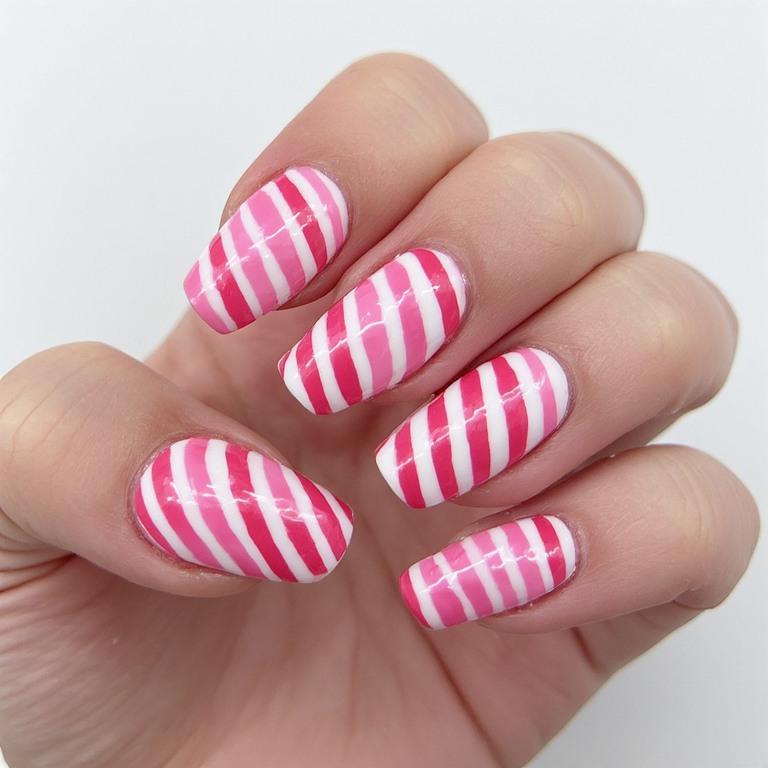
A candy cane-inspired diagonal striping pattern in warm pink and white across all nails — horizontal stripes angled at 45 degrees, alternating colors with equal widths. Executed on coffin or almond shapes with high gloss, these look like actual wrapped sweets.
Difficulty: Intermediate Time to complete: 65 minutes Best for: Someone whose summer aesthetic is “maximum fun” and who finds all-solid-color nails a little boring. Why it works: Stripe patterns are graphic and clean, and they look particularly striking on longer nail shapes where the stripe has room to repeat more than once across the surface. What makes it different: Diagonal stripes rather than vertical ones create movement — your eye travels up and across the nail rather than just down, which makes the hand look more dynamic in motion.
DIY At Home:
- Tape method: apply white base, cure, lay parallel strips of BORN PRETTY Striping Tape ($5, Amazon) at 45 degrees, paint pink over the whole nail, remove tape before curing — this reveals clean white stripes
- Pink: OPI GelColor “I Think in Pink” ($13, Ulta)
- Glossy top coat for the “wrapped candy” effect
- Difficulty: Intermediate — tape angles need to be consistent across all nails; do one nail at a time rather than taping all then painting all
Product recommendation: BORN PRETTY Striping Tape ($5, Amazon) — the tape width in this set creates stripes that are proportionally correct for most nail sizes. Wider tape makes stripes that look clunky; this width is right.
Essential Tools & Products
The Basics (Under $40 Total)
Mia Secret Acrylic Powder in Cover Pink ($8 at Sally Beauty) — A self-leveling powder that covers imperfections and works as both a base and an extension. The coverage is more forgiving than pure clear powders when you’re learning, and it photographs beautifully under summer light.
Mia Secret Liquid Monomer ($12 at Sally Beauty) — This has a lower MMA content than a lot of cheap Amazon alternatives, so it’s safer on the nail bed and doesn’t lock as hard as a rock. I’ve tried cutting corners with off-brand monomers before and the result lifted within days.
Makartt Acrylic Nail Kit ($20 on Amazon) — For anyone doing this at home, this starter kit includes a kolinsky brush, nail forms, and a file set. The brush isn’t salon-grade, but it gets the job done for overlay and short extension work.
The Game-Changers
OPI Nail Envy Nail Strengthener ($15 at Ulta) — Apply this to your natural nails two to three days before your appointment as a prep treatment. I started doing this after a particularly rough set left my nails thin, and the difference in how well the acrylic bonded was noticeable within one set.
Cuccio Naturale Cuticle Oil ($12 on Amazon) — Acrylic dries out the skin around your nails fast, especially in summer when AC and sun are already depleting moisture. This oil has a pump applicator, which means you’re actually going to use it daily instead of losing the cap and forgetting about it for three weeks.
Nail Primers (Don’t Cheap Out Here)
Gelish pH Bond Nail Primer ($10 at Sally Beauty) — Skip this and your acrylic will start lifting at the cuticle by week one, especially in summer when your hands sweat more. This primer dehydrates the nail plate just enough for the acrylic to grip without over-stripping. One coat, let it dry completely, don’t touch it — that’s all it takes. I learned the hard way that “any dehydrator will do” is a lie that costs you a $60 set.
Pros and Cons of Summer Acrylic Nails
Pros:
✅ Last 3–5 weeks between fills, versus 1–2 weeks for regular polish
✅ Holds up to pool water, salt water, and daily handwashing better than any other nail system
✅ Creates a nail shape and length that would be impossible on short natural nails
✅ The wide, flat surface of coffin and almond shapes gives nail artists a proper canvas for detailed work
✅ Can be filled rather than completely removed — you get weeks more wear without starting over
✅ Structural strength means long nails don’t flex and break the way natural nails do
✅ Color options are limitless because any gel polish applies on top of the acrylic base
Cons:
❌ Full set takes 90–120 minutes minimum at a salon — this is a real time commitment
❌ Removal requires acetone soaking for 20–40 minutes, and rushing the process damages natural nails
❌ Salons charge $45–$80 for a new set, plus $25–$40 for fills every 3 weeks
❌ The acrylic powder smell during application is strong — poorly ventilated salons make this unpleasant
❌ Your natural nails will be thinner than usual during the growing-out process after removal
❌ Chips from the tip are not cleanly repairable — a chip in an acrylic tip requires either a fill or a nail tip replacement
❌ Not DIY-friendly until you’ve practiced 10+ times — the learning curve is steeper than gel
Real Wear Test: What Happens After 3 Weeks
I had a coffin set done mid-June — hot coral with chrome tips, medium-long length — and kept notes on what I noticed over three weeks of regular summer activity: daily beach visits, cooking, pool time, and general use.
Days 1–5: Perfect. The chrome tips caught every angle of light and I got at least three unsolicited compliments. No lifting, no chips. The coral gel was exactly the shade I’d chosen.
Days 6–10: First sign of grow-out at the cuticle — a small gap between the acrylic and my natural nail. Not visible unless I looked for it. One nail had a tiny lift beginning on the right side, probably because I pushed that cuticle too much at the start. No actual chips yet.
Days 11–15: The grow-out gap was more visible on shorter fingers where the base nail grows faster. The chrome had slightly dulled on two nails where I’d been using them to tap on a keyboard — the buffed surface scuffs with friction over time. Still looking good overall; at a glance these were still a solid manicure.
Days 16–21: Three nails had visible grow-out that I was actively trying to not look at. One nail had a hairline crack near the tip that I sealed with gel top coat to prevent it spreading — this worked for about four more days. The coral color itself showed no fading, which impressed me. Two nails had minor tip wear that created an uneven edge I could feel but not see.
Verdict: These looked great for 10 days, very good for 14 days, acceptable for 18 days, and honestly needed a fill by day 19. Three weeks is pushing it in summer; a two-week fill appointment is more realistic if you want to maintain the appearance. The chrome tip fades faster than a standard colored tip — I’d say chrome extends to about 10 days at its best.
Maintenance Tips
Days 1–7: Protection Phase
Apply Cuccio Naturale Cuticle Oil ($12, Amazon) every morning and before bed. Acrylic draws moisture from the skin around the nail, and dryness leads to lifting along the edges. This isn’t optional — I doubled my manicure lifespan once I made cuticle oil a non-negotiable daily habit.
Avoid picking at any small snags or hangnails with your other nails. Every time you catch an edge, you risk mechanical lifting at the acrylic-to-natural nail seal. Use a nail file to gently smooth any rough spots.
Do not open cans, packages, or lids with your nail tips. I know this sounds obvious but summer means beer cans and food packaging and it’s where most early damage starts.
Days 8–14: Preservation Phase
Apply a fresh layer of gel top coat at home every five to six days. Cure under a portable LED lamp (Beetles Mini LED Lamp, $15, Amazon) for 60 seconds. This refreshes the gloss and seals any micro-cracks developing at the tip before they extend into the nail.
Every three days, check the sidewalls and cuticle area for early lifting. If you see a gap beginning, clean it with a cuticle pusher, dry completely, and apply a tiny amount of nail glue (IBD 5 Second Nail Glue, $7, Amazon) under the lifted section. Press firmly for 20 seconds.
Keep your hands moisturized with a non-greasy lotion. Summer sun and AC strip hand moisture faster than any other season, and dry skin around the nail leads to earlier cuticle lifting.
Days 15–21: Decision Phase
By week three you have two options: book a fill appointment or start fresh. I lean toward a fill if the nail art was complex and the shape is still good. If the design looks significantly faded or the grow-out is beyond a centimeter, starting fresh is usually worth the investment.
Do not attempt to “fix” a cracked acrylic nail at home past day 14. A crack that’s reached the side wall needs professional attention or removal — home patch jobs tend to trap moisture and create lifting that spreads.
General Maintenance (All Phases)
Wear rubber gloves for dishes and cleaning — pool water and dish soap are the two fastest ways to accelerate lifting. I keep a pair of latex gloves under my kitchen sink specifically for this reason.
Use a cuticle pusher (not a metal one — glass is better) every four days to gently push back growth. This makes the nail look cleaner between appointments without filing.
Never file back and forth on acrylic — always file in one direction from side to center. Back-and-forth motion creates friction heat that can loosen the adhesive bond.
Common Mistakes & How to Fix Them
Mistake 1: Skipping Primer Before Application
What it looks like: Nails start lifting from the cuticle within the first week, especially on the thumb and pinky where the nail bed curves.
Why it happens: Natural nail oils prevent the acrylic from bonding properly. Without a dehydrator and primer, there’s nothing to cut through that barrier.
The fix:
- Remove all existing polish and clean nails with a dehydrating wipe (IDB Prep Dry nail wipe, $6, Amazon)
- Apply Gelish pH Bond primer ($10, Sally Beauty) in one thin coat
- Wait a full 60 seconds for it to dry completely — don’t rush this
- Apply your acrylic over the dry primer surface
How well it works: Completely preventable when done correctly. A primer-and-dehydrator routine extends the initial bond from “maybe a week” to a consistent three-plus weeks.
Mistake 2: Applying Gel Color Too Thick
What it looks like: Color looks streaky in some spots and has a thick, lumpy appearance. Edges peel early because the thick layer can’t flex with the nail.
Why it happens: Gel polish needs thin, even layers. A thick coat doesn’t cure evenly from edge to edge, leaving soft spots that peel.
The fix:
- Wipe most of the product off the brush before applying — you want barely a visible film on the brush
- Apply two thin coats rather than one thick coat
- Cure 30 seconds per layer under LED lamp
- Cap the edge of the nail (paint a thin stripe over the very tip) to prevent peeling at the edge
How well it works: Once you develop the feel for “thin enough,” this stops completely. The first five sets are the learning curve.
Mistake 3: Filing Too Aggressively After Fill
What it looks like: Nails look thin and flexible near the fill area. Can see the natural nail through the acrylic in certain light.
Why it happens: Overfiling during a fill thins the acrylic layer, especially near the cuticle where the product is naturally thinner.
The fix:
- Use a 180-grit file (not 100-grit) for the surface work during fills
- File only the product, not the nail plate itself — stop when you feel any flexibility under the file
- Apply a thin fresh layer of acrylic over the fill zone to restore thickness before finishing
How well it works: This is a long-term skill issue rather than a quick fix. Avoid high-grit files at home and ask your nail tech specifically to “go light on filing” if you’ve had thinning before.
Mistake 4: Forcing Chrome Powder Over Tacky Top Coat
What it looks like: The chrome looks dusty and uneven with patches that won’t reflect light and areas where the powder has clumped.
Why it happens: Chrome powder needs a specific no-wipe gel top coat to bond. Standard top coats leave a tacky residue that acts as a filter between the powder and the nail surface.
The fix:
- Remove the current top coat with acetone and start the chrome step over
- Apply Born Pretty No-Wipe Gel Top Coat ($9, Amazon) instead
- Cure for 60 seconds
- Immediately buff chrome powder with a silicone-tipped applicator using small circular motions
- Apply a second thin no-wipe top coat to seal and cure again
How well it works: 100% effective when the no-wipe formula is correct. If the chrome is still dusty after this, the chrome powder itself may be low quality.
Mistake 5: Not Capping the Free Edge on Extensions
What it looks like: Tips chip from the edge of the nail rather than from the surface, and the chip creates a rough edge that catches on everything.
Why it happens: If the gel or acrylic doesn’t wrap around and seal the very tip of the extension, that edge is exposed and vulnerable to impact chipping.
The fix:
- On every layer — base coat, color, and top coat — swipe the brush across the very edge of the nail tip to seal it
- This takes three to five seconds per nail and eliminates almost all tip chipping
- If chips have already happened, file the edge smooth, apply a thin acrylic repair layer, and re-seal the edge
How well it works: Prevents the problem entirely when done consistently. Already-chipped edges can be temporarily smoothed but the underlying gap in the seal will allow future chipping in the same spot.
Summer Acrylic Nails FAQs
Can I swim in a pool or ocean with acrylic nails? Yes, but frequent and prolonged exposure to water is the main cause of early lifting. Rinse your hands with clean fresh water after pool or ocean time, dry thoroughly, and apply cuticle oil within an hour. Occasional swimming is fine — daily three-hour pool sessions will accelerate lifting regardless of how good the application was.
How often should I get a fill in summer? Every two to three weeks is standard, but summer heat and activity tends to push people toward the two-week end of that range. Sweat, sunscreen, and water use combine to stress the bond faster than in cooler months. If you’re going on vacation, book a fill before you leave — trying to maintain acrylics through a two-week trip without a fill is an exercise in frustration.
Can I remove acrylic nails at home without damaging my natural nails? You can, but it requires patience. Clip as much length as possible first, file the shiny surface completely, soak cotton in 100% pure acetone (not nail polish remover — it needs to be pure acetone), wrap each finger in foil, and wait 20–30 minutes without rushing. Forcing or peeling lifts your natural nail layer with the product. Beetles Pure Acetone ($8, Amazon) is affordable and effective.
Why do my acrylics keep yellowing in summer? Sun exposure is the most common cause — UV light yellows clear and light-colored acrylic over time. Using gel polish on top of your acrylic (rather than leaving the acrylic exposed) prevents this. If the yellowing is coming from inside the nail, it may be a fungal issue from moisture trapped under a lifted section — see a dermatologist if that’s the case.
What’s the easiest summer acrylic design for a complete beginner doing this at home? One solid bright color in a gel formula over a medium square shape with no nail art. Something like OPI GelColor “Toucan Do It If You Try” (orange) or “Shorts Story” (pink) — just color, no design. Once that feels comfortable, add a single accent nail with a chrome powder effect, which is technically simple but looks impressive.
Conclusion
Summer acrylic nails range from a simple bright-coral coffin set you can have done in an hour to a fully hand-painted encapsulated floral with chrome tips that takes an afternoon — there’s a version for every skill level, budget, and aesthetic.
If you’re starting out, I’d suggest trying a medium-length almond shape in one of the neon or coral gel polishes above, keeping it simple, and focusing on your prep work (primer, capping the edge) before worrying about design. Once that holds well, add one accent nail with a foil or chrome detail and see how it feels.
Most importantly, your first set won’t be perfect — mine certainly wasn’t — but every set teaches you something that makes the next one noticeably better.