12 Stunning Blue Nail Designs for Trendy Manicure Inspiration
Blue nail Designs are any manicure where blue is the star of the show — from barely-there baby blue to deep, inky navy to electric cobalt. The shade range is genuinely huge, which is why “blue nails” means something different to everyone who asks for them.
It’s one of the most universally flattering nail colors because the cool tone complements almost every skin tone.
12 Cute Blue Nail Designs for Soft and Stylish Looks
Category 1: Classic & Wearable
1. Classic Navy Cream
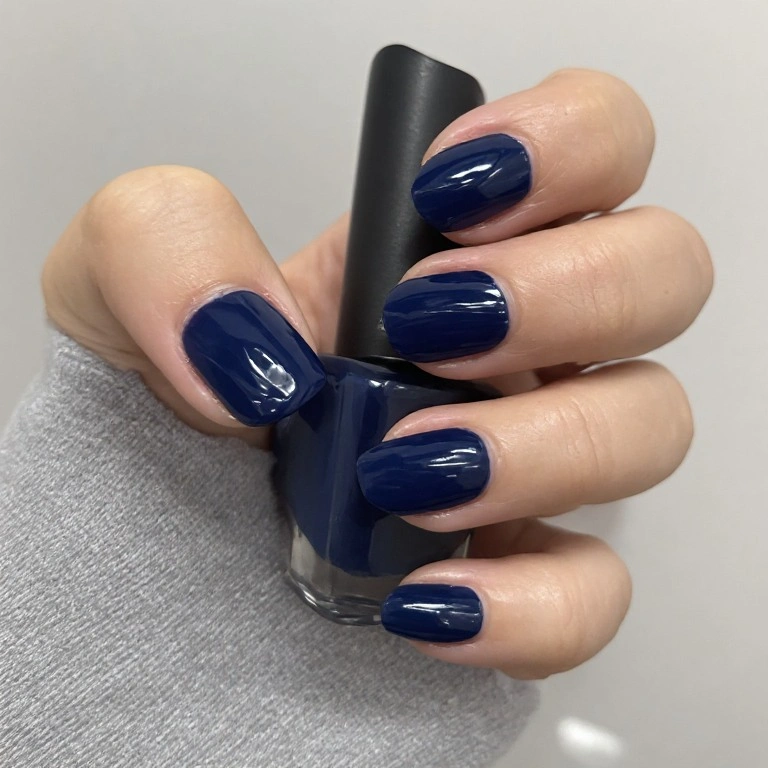
Deep, saturated navy in a glossy cream finish. No shimmer, no sparkle — just a clean, solid color that looks intentional and polished. The kind of shade that makes your hands look put-together even when everything else is chaotic.
Difficulty: Beginner Time to complete: 15 minutes Best for: Anyone starting out with blue nails or anyone who needs a reliable everyday look Why it works: Navy reads as neutral in the same way black does, but with more personality. It goes with everything. What makes it different: The finish matters hugely here — glossy cream navy looks sophisticated, while the same color in matte or shimmer reads completely differently.
Essential product: OPI Russian Navy. I’ve tried three other navies at similar price points and they all skew slightly purple in certain lights. This one stays true navy.
2. Denim Blue Matte
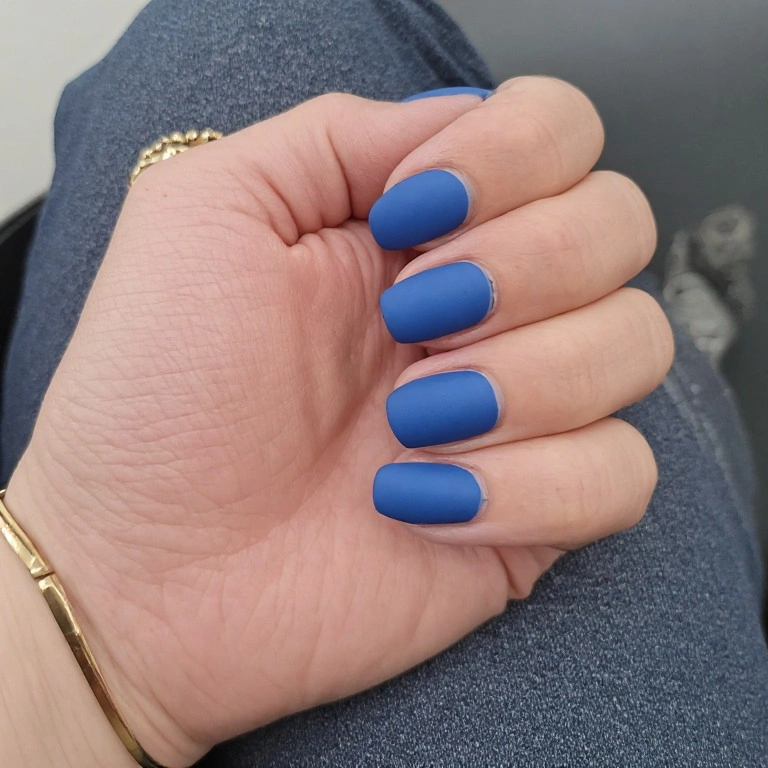
A medium, slightly washed-out blue in a flat matte finish. It looks more like fabric than nail polish — casual, modern, and surprisingly versatile. Paired with gold jewelry it looks expensive.
Difficulty: Beginner Time to complete: 20 minutes Best for: Anyone who finds glossy nails too formal or “done” Why it works: The matte finish tones down the color so it doesn’t compete with your outfit. What makes it different: Matte navy looks completely different from glossy navy — same color, totally different vibe.
Essential product: Essie Matte About You. It works over any glossy polish and transforms it instantly. Much more reliable than matte polishes sold as-is, which tend to be streaky.
Category 2: Soft & Pretty
3. Baby Blue Cloud
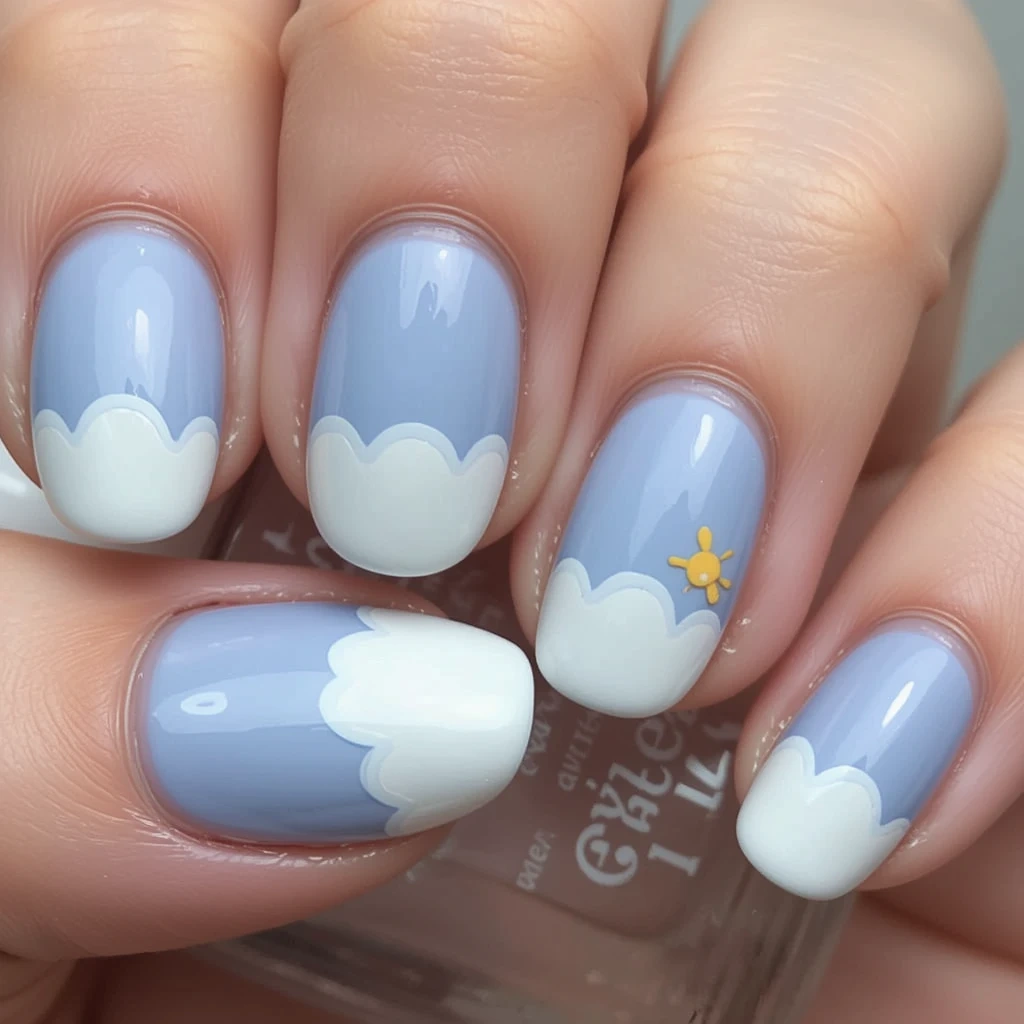
Soft periwinkle base with fluffy white clouds hand-painted near the tips. The clouds don’t need to be perfect — slightly irregular shapes look more realistic. Add a tiny yellow dot (the sun peeking out) on one accent nail if you want to take it further.
Difficulty: Intermediate Time to complete: 40 minutes Best for: Spring and summer, anyone who loves whimsical nail art Why it works: The contrast between the blue base and white clouds is strong enough to read clearly even on small nails. What makes it different: Unlike most nail art that requires precision, cloud nails actively look better when they’re soft and organic.
Essential product: A nail art pen with a fine tip for the cloud edges. A regular polish brush is too wide and creates blobs instead of soft forms.
4. Sky Blue French
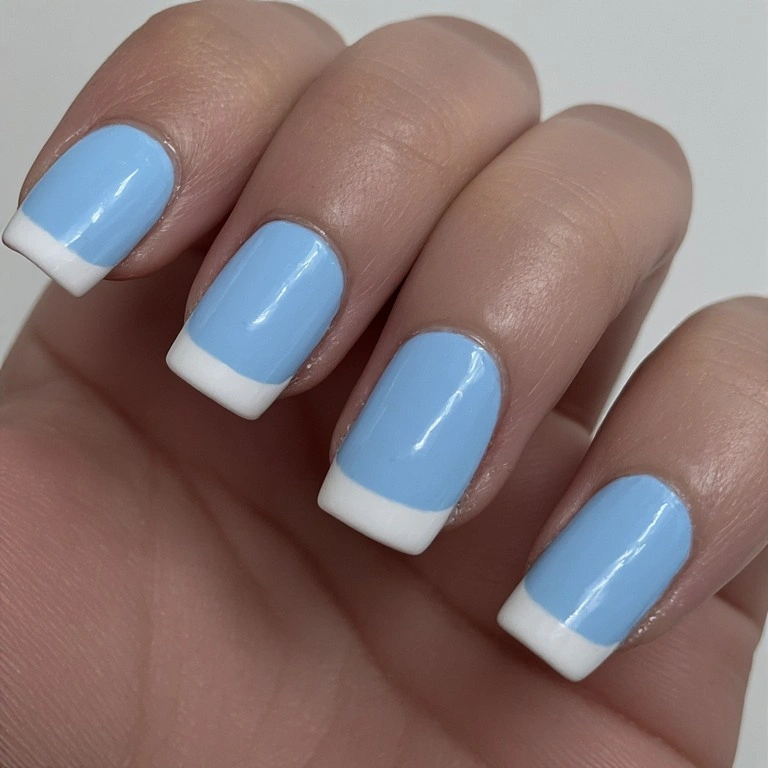
Classic French manicure structure — natural or pale blue body, clean white tip — but with a soft sky blue base instead of the traditional nude pink. Modern, clean, and works for occasions where you need to look polished without going bold.
Difficulty: Intermediate Time to complete: 30 minutes Best for: Professional settings, weddings, events where you want a manicure that reads as neat rather than artistic Why it works: The blue-white pairing is softer and less stark than classic French, so it flatters more nail shapes. What makes it different: Most French manicures look dated. The blue base updates it without losing the clean structure.
Essential product: French manicure tip guides. Without them, freehand white tips are extremely difficult to make look even. These little stickers peel off and leave a perfectly straight line.
5. Icy Blue Glitter
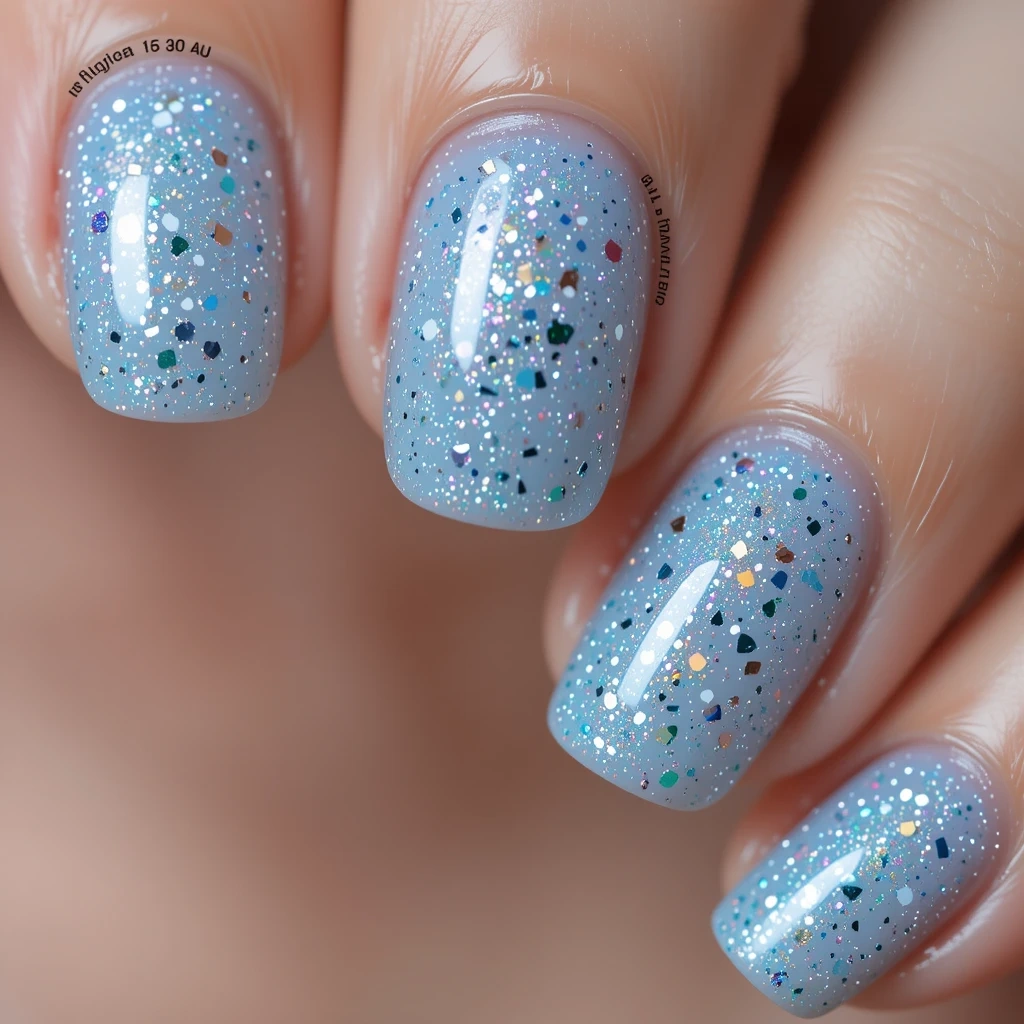
Sheer, pale blue jelly base with holographic micro-glitter throughout. Looks like crushed ice or packed snow catching the light. The jelly base is important — it gives the glitter depth rather than sitting flat on the surface.
Difficulty: Beginner Time to complete: 20 minutes Best for: Winter months, holiday parties, anyone who wants sparkle without committing to a full glitter nail Why it works: The holographic glitter catches every light source differently, so the nails look constantly alive. What makes it different: The jelly (slightly translucent) base makes the glitter look three-dimensional instead of flat.
Essential product: ILNP holographic polishes. The particle size is noticeably finer than drugstore holographic polishes, which means the reflection looks smooth rather than chunky.
Category 3: Bold & Striking
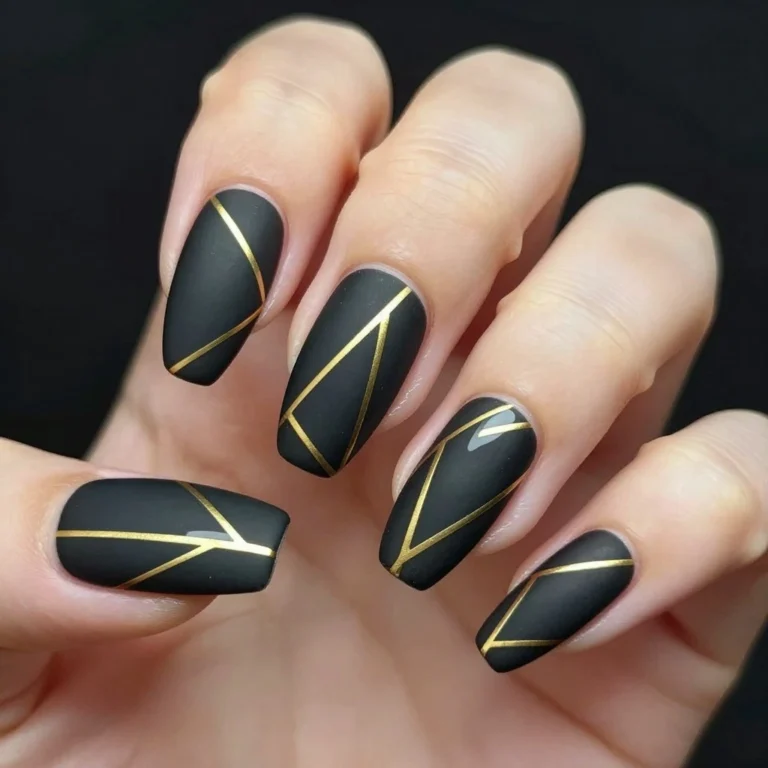
6. Cobalt Geometric
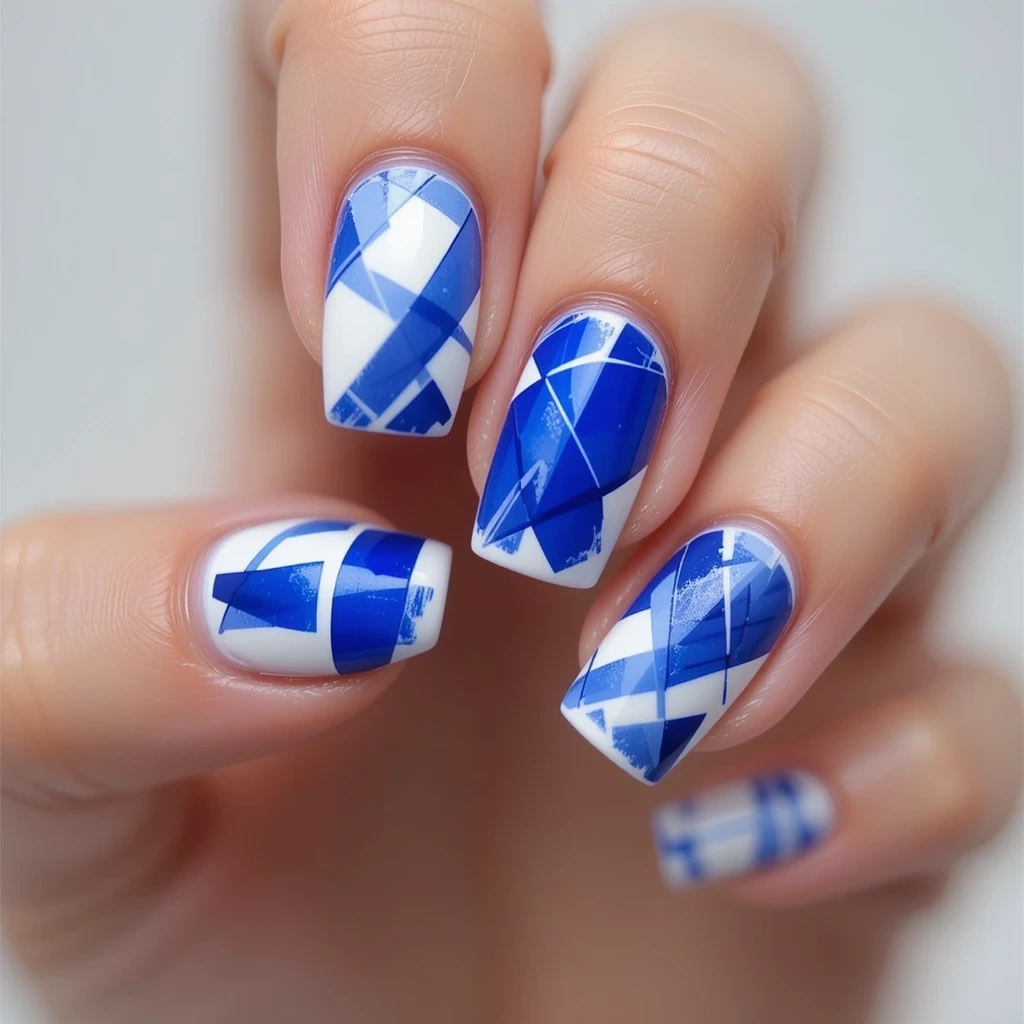
White base with bold cobalt blue shapes — triangles, rectangles, diagonal color blocks — applied using nail tape as a stencil. Graphic and editorial. Looks like something from a design magazine.
Difficulty: Intermediate Time to complete: 45 minutes (including base coat dry time for tape) Best for: Creative industries, occasions where you want to make an impression, anyone comfortable with a little patience Why it works: The high contrast between white and cobalt is extremely clean and modern. What makes it different: The geometric structure makes it look intentional and designed, not just painted.
Essential product: Thin nail striping tape. Wide tape creates thick lines between sections; 1mm tape gives you architectural precision
7. Blue Butterfly
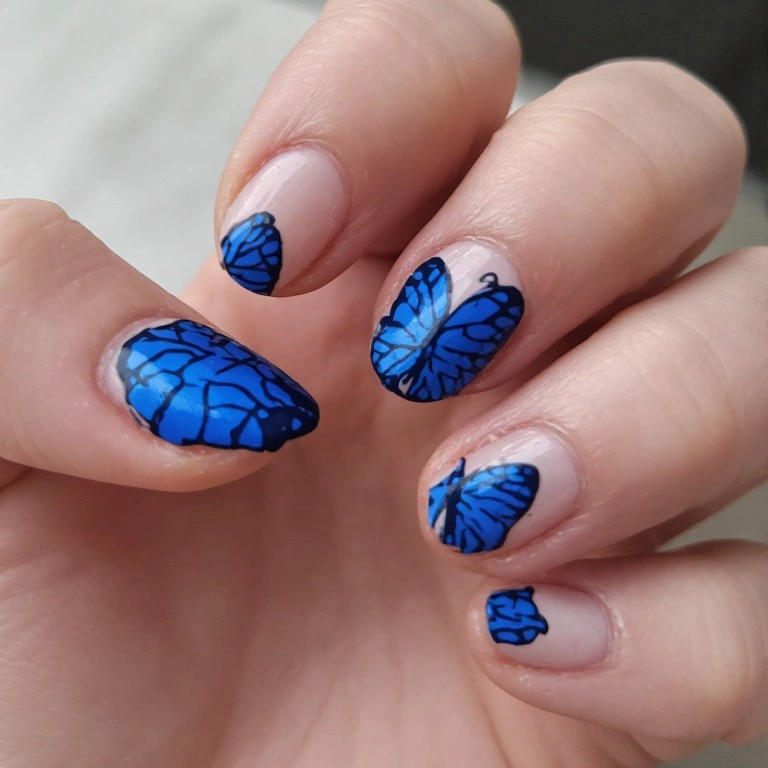
Nude or sheer pink base with a blue butterfly painted or stamped on one or two accent nails. The butterfly sits on the nail almost like a decal. Cobalt wings with darker navy shading look the most realistic.
Difficulty: Intermediate Time to complete: 40 minutes Best for: Spring, someone who wants nail art without committing all ten nails to a design Why it works: Nail art on one or two accent nails looks intentional and balanced; it doesn’t overwhelm the hand. What makes it different: The translucency of the wings — painting a slightly lighter shade at the center of each wing — gives it depth a simple flat design doesn’t have.
Essential product: If hand-painting, Modelones nail art brushes ($9 on Amazon). The ultra-thin liner brush is what creates the fine vein detail in the wings.
Category 4: Advanced & High-Impact
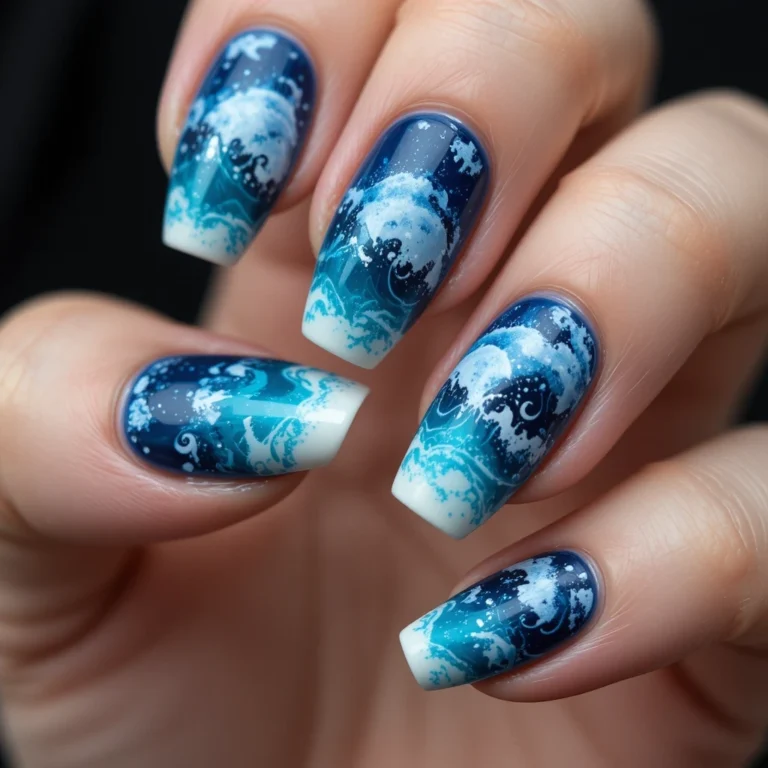
8. Ocean Ombre
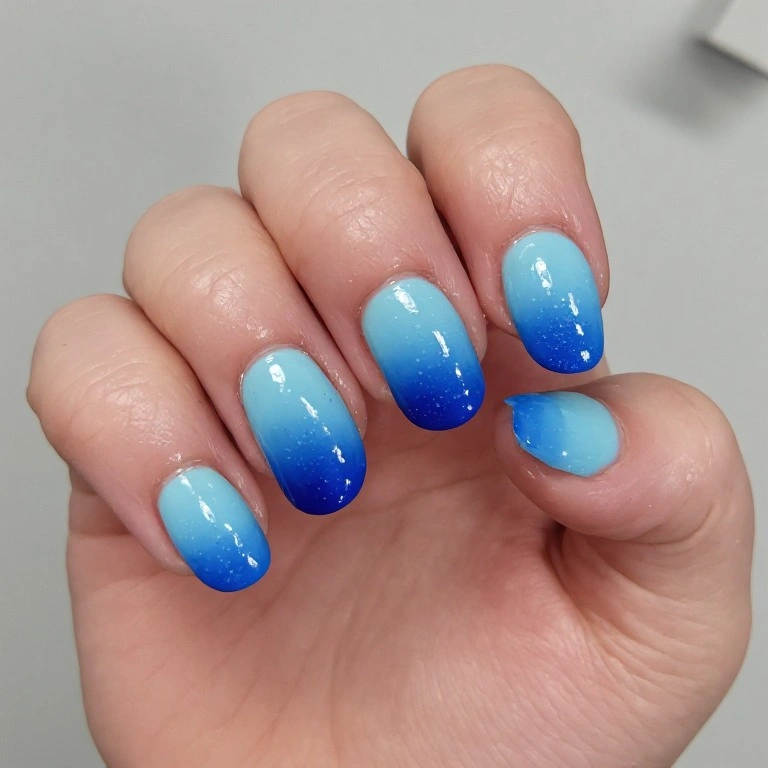
Pale sky blue at the cuticle blending into deep cobalt at the tip. The gradient is achieved with a makeup sponge — two polish colors applied side by side on the sponge, then dabbed onto the nail in layered passes.
Difficulty: Intermediate Time to complete: 35 minutes Best for: Summer, anyone who wants a gradient look without chrome or gel equipment Why it works: Gradient nails visually elongate the finger because the eye follows the color transition from base to tip. What makes it different: The ombre works in one color family (blue to blue), which looks more sophisticated than a two-color contrast gradient.
Essential product: The two-polish color pairing matters more than anything else here. Using shades that are too similar makes the gradient invisible; using shades too different (like white to navy) creates a stark line instead of a blend.
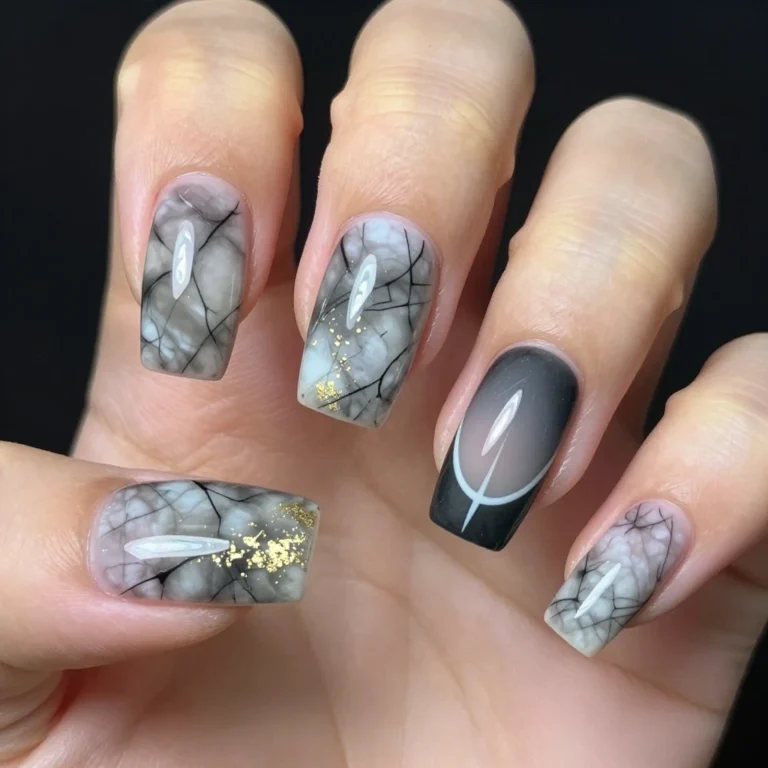
9. Blue Marble
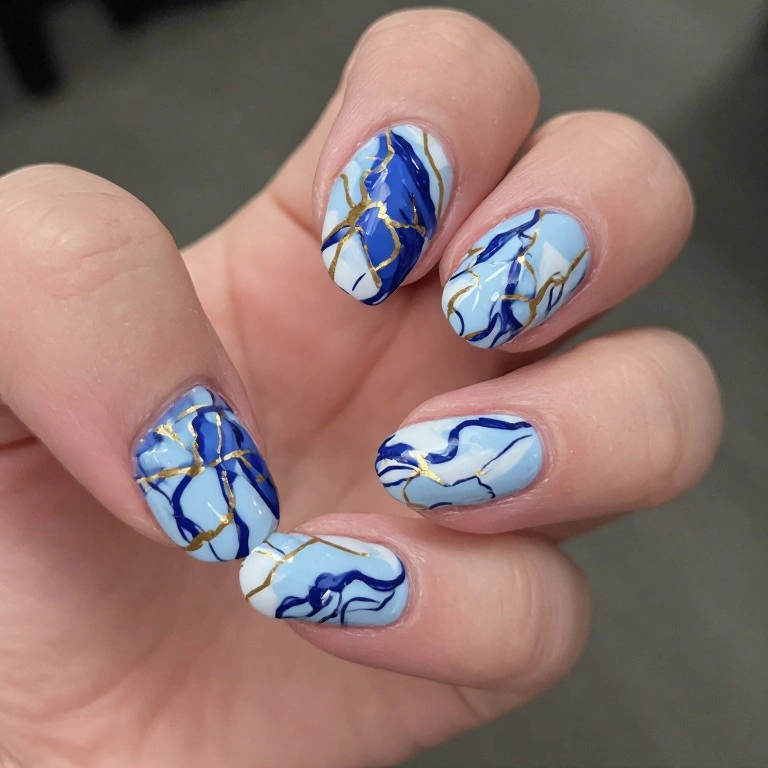
White or pale blue base with veining painted in deep navy, cobalt, and gold. No two nails look the same. The veining is done freehand with a thin brush or a water-marbling technique where you drop polish into water and dip the nail.
Difficulty: Advanced Time to complete: 60 minutes Best for: Special occasions, someone who wants a genuinely artistic result Why it works: Marble looks expensive because people associate it with high-end surfaces. On nails, the effect stops people mid-conversation. What makes it different: The thin, wandering gold vein line is what separates this from a basic blue-and-white swirl. That line is the whole secret.
Essential product: Gold nail art liner pen. A regular gold polish is too thick and opaque for this. The liner pen gives you the thin, wandering line that makes marble look authentic.
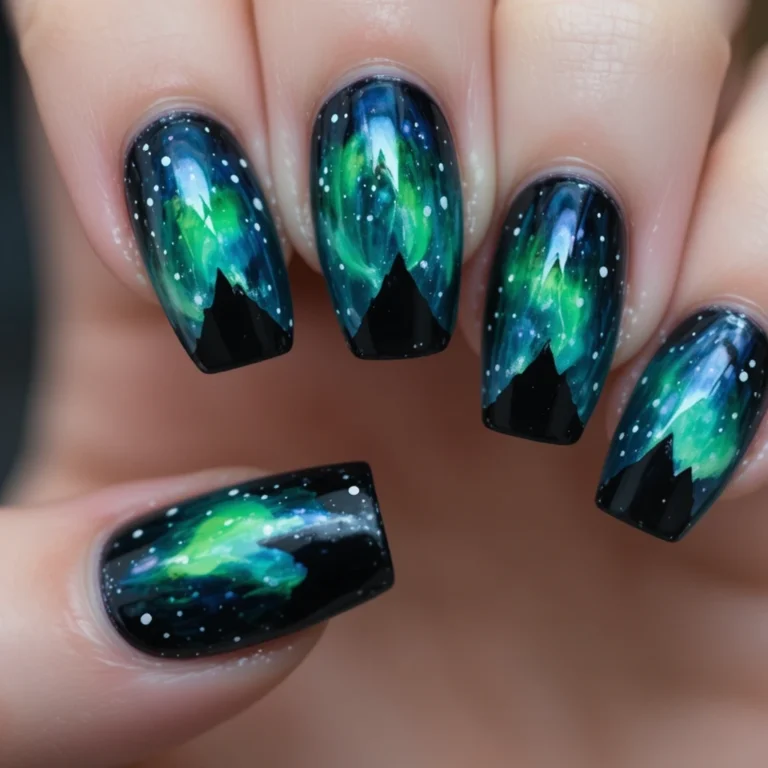
10. Midnight Chrome
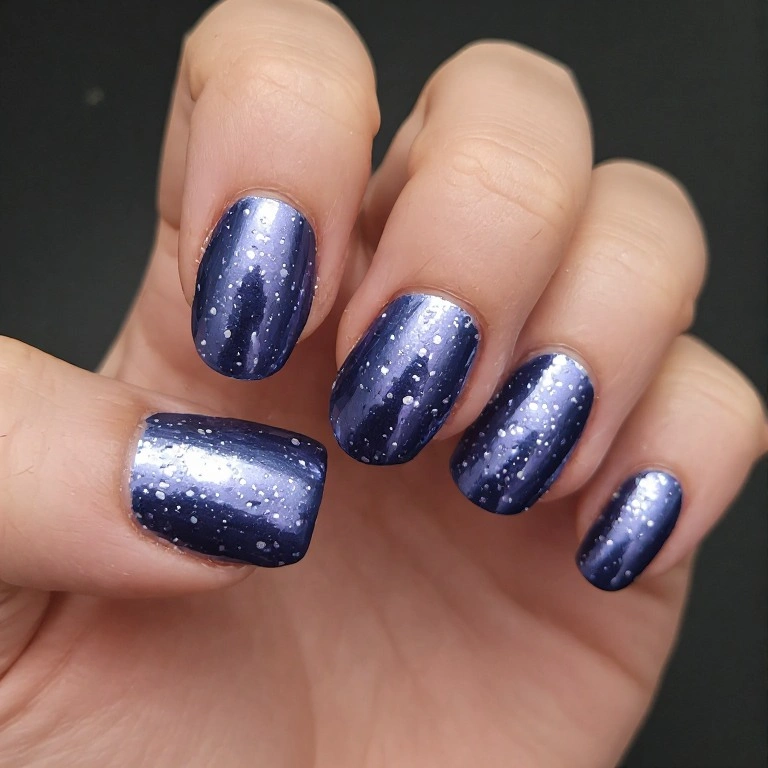
Deep navy gel base with chrome powder rubbed in after curing for a mirror-like metallic finish. This is the most dramatic option on the list and the one that requires the most specialized products.
Difficulty: Advanced Time to complete: 50 minutes Best for: Evening events, anyone who wants their nails to look genuinely remarkable Why it works: Mirror chrome on dark navy looks like liquid metal — it doesn’t read as nail polish at all. What makes it different: Chrome powder on a dark base reflects the color of the base underneath. Navy chrome looks entirely different from chrome over nude or over red.
Essential product: A no-wipe gel top coat specifically — regular gel top coat leaves a tacky layer that ruins the chrome. Beetles No Wipe Top Coat ($8) gives you the smooth surface the powder needs to adhere to.
11. Sapphire Foil
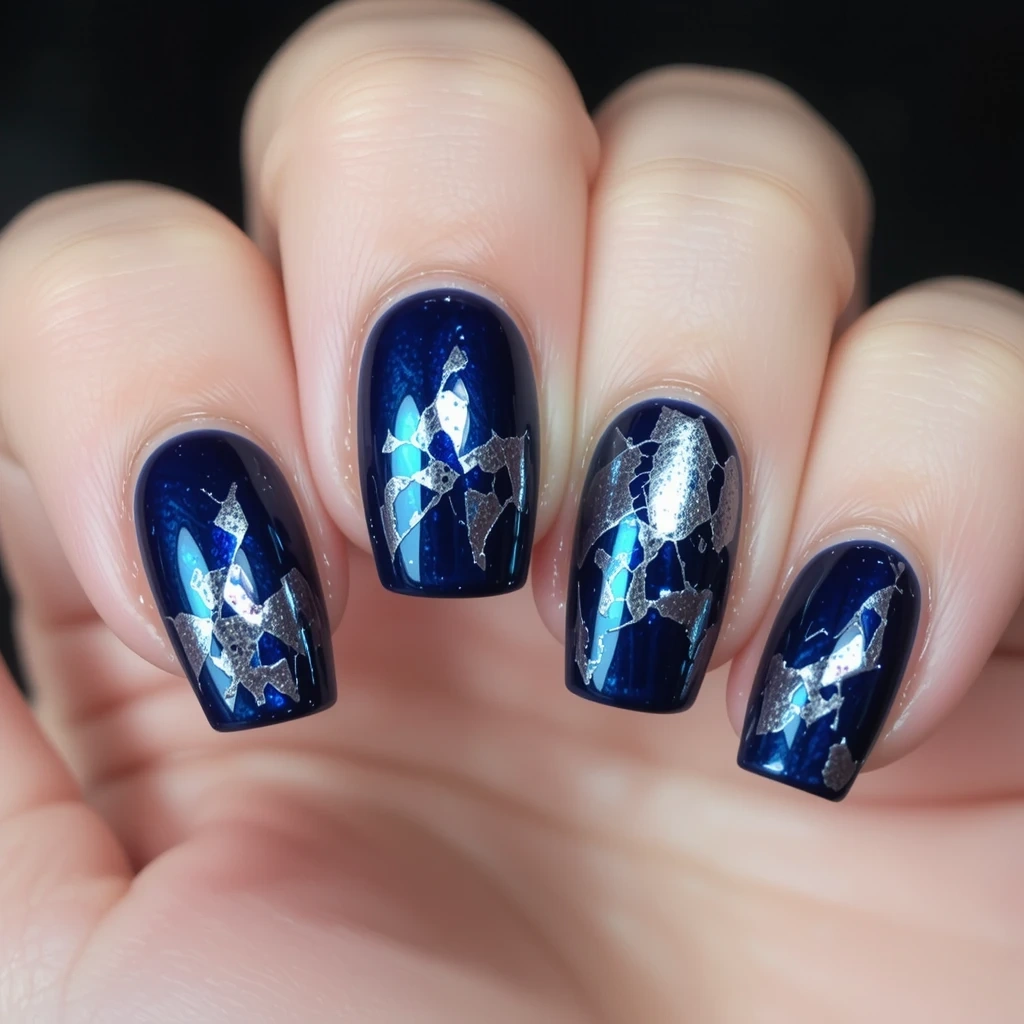
Dark navy base with metallic transfer foil applied in irregular patches. The foil tears naturally, creating shards and edges that look intentional. The result is raw and textural in a way that’s completely different from chrome.
Difficulty: Intermediate Time to complete: 35 minutes Best for: Fashion-forward looks, anyone who wants something edgy without going full chrome Why it works: The irregular foil placement looks organic rather than manufactured. Every nail looks slightly different. What makes it different: Unlike chrome (which is even and perfect), foil is deliberately imperfect. That unpredictability is the whole appeal.
Essential product: The foil adhesive glue. Without it, foil doesn’t transfer. The key is waiting for the glue to go from white to clear and slightly tacky before pressing the foil on — I ignored this timing instruction my first three tries and got nothing.
12. Blue Aura
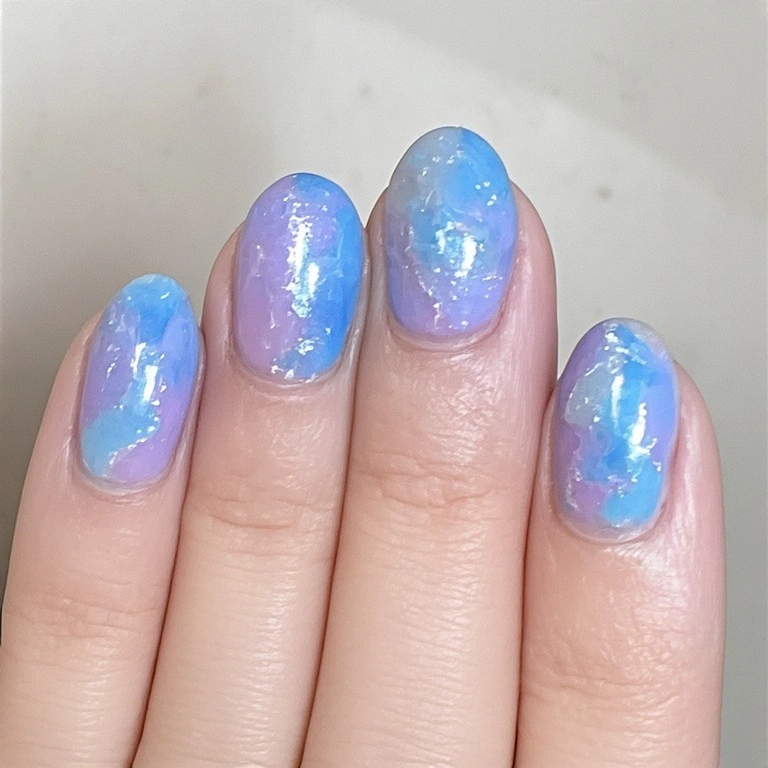
A soft, blended effect where multiple shades of blue (and sometimes lilac or purple) are sponged onto the nail in overlapping patches to create a glowing, ethereal gradient. No hard lines — just color melting into color.
Difficulty: Intermediate Time to complete: 35 minutes Best for: Anyone drawn to the “aura nails” trend, someone who wants a soft but artistic result Why it works: The blurry, soft-focus quality of the gradient looks almost like light rather than nail polish. What makes it different: Unlike standard ombre (which goes tip to base in a straight gradient), aura nails have color coming from the center outward, or from one corner, creating a glow effect.
Essential product: A white or light gray base coat. I skipped this once and the aura colors looked muddy. The light base makes each shade of blue pop and keeps the gradient from going gray.
Pros and Cons of Blue Nails
Pros
✅ Blue complements almost every skin tone. Warm skin tones look great with cobalt and royal blue; cool skin tones are flattered by navy and steel blue; neutral tones can wear the entire spectrum.
✅ The shade range is enormous. “Blue nails” can mean baby blue, sky blue, cobalt, royal, navy, slate, teal-adjacent blue, or electric blue. You’ll never run out of variations.
✅ Navy reads as a professional-appropriate alternative to neutral. In workplaces where red or neon is inappropriate, navy sits in a comfortable middle ground.
✅ Blue photographs exceptionally well. If your nails end up in photos, blue — especially navy and cobalt — has a rich contrast that reads well on camera without appearing harsh.
✅ Works year-round. Pastels and icy blues fit spring and summer; navy and midnight chrome suit fall and winter. You don’t need to put it away seasonally.
✅ Pairs naturally with silver and gold jewelry. Cool tones like navy look sharp with silver; warmer cobalt or royal blue goes beautifully with gold.
✅ Staining is less visible. Light-colored nails show yellow staining quickly. Dark blues hide discoloration naturally — a practical advantage if you skip base coat occasionally.
Cons
❌ Deep blues stain nails yellow without base coat. Skip the base coat once with a saturated navy and your nails will have a blue-yellow tinge for a week after removal.
❌ Tip wear shows quickly on dark shades. Chips or tip wear on navy or cobalt are very visible. If you do physical work with your hands, expect touch-ups every 2–3 days.
❌ Chrome and foil designs require additional products. You can’t just use nail polish. Chrome requires gel equipment (lamp, gel base, no-wipe top coat). Foil requires adhesive glue. Budget $30–$60 for a proper setup.
❌ Blue marble takes a genuine skill investment. The first two or three attempts will not look like the reference photo. If you want this design for a specific event, practice at least a week before.
❌ Matte top coat adds an extra step and extra cost. If you want denim matte or navy matte, you need a separate matte top coat. It also reactivates with any oils from your hands, so you’ll notice fingerprints more easily.
❌ Some cobalt shades pull green in certain lights. This is a formulation issue specific to some brands. Always swatch a cobalt on your nail and check it in daylight before committing to a full manicure.
Common Blue Nail Mistakes (And How to Fix Them)
Mistake 1: Blue Polish Staining the Nail
What it looks like: After removing dark blue polish, your nails have a yellow-blue tinge or a faint blue shadow that doesn’t come off with remover.
Why it happens: The pigments in saturated dark polishes — especially navy — penetrate the top layers of the nail plate over time, especially without a base coat.
The fix:
- Buff the nail surface lightly with a fine grit buffer (220 grit) — this removes the stained top layer
- Soak nails in lemon juice for 5 minutes — the mild acid helps lift discoloration
- Apply a whitening base coat (OPI Natural Nail Base Coat, $11) before your next color application
- Wait 1–2 weeks before wearing dark polish again on affected nails
How well it works: The buffing removes most staining. Severe cases take 2–3 weeks to fully fade as the nail grows out. Prevention (base coat every time) is far easier than the fix.
Mistake 2: Streaky Polish Application
What it looks like: Visible brush strokes or uneven color — lighter patches running across the nail.
Why it happens: Using too much polish on the brush at once, or going back over a stroke before the polish has leveled itself.
The fix:
- Wipe one side of the brush on the bottle neck before applying
- Use three strokes per nail only: one down the center, one down each side
- Don’t drag the brush back over an area you’ve already covered — the partially-dried polish will pull and streak
- Apply a second thin coat once the first is touch-dry (2 minutes)
How well it works: Completely fixes the problem. The three-stroke method is the single most useful thing I learned about nail polish application.
Mistake 3: Foil or Chrome That Won’t Stick
What it looks like: You press the foil onto the nail and very little transfers — or nothing at all.
Why it happens: For foil: the adhesive glue wasn’t tacky enough when you pressed. For chrome: the gel top coat wasn’t cured as a no-wipe formula, leaving a sticky inhibition layer that prevents proper chrome adhesion.
The fix for foil:
- Apply glue, then wait until it goes from white to fully clear and slightly sticky — usually 60–90 seconds
- Press foil firmly with a silicone tool, not your fingertip (natural oils interfere)
- Peel quickly rather than slowly
The fix for chrome:
- Use a no-wipe gel top coat specifically — regular gel top coat won’t work
- Cure fully under UV (60 seconds)
- Rub chrome powder in circular motions with an eyeshadow applicator
How well it works: Once you get the timing right for foil adhesive, the transfer is consistent. Chrome is reliable once you have the right top coat.
Mistake 4: Bubbles in the Polish
What it looks like: Tiny round bumps or craters in the dried polish surface.
Why it happens: Shaking the polish bottle before use, applying in a warm humid environment, or applying coats before the previous one is dry.
The fix:
- Roll the bottle between your palms instead of shaking
- Apply in a cool, dry environment (not a steamy bathroom)
- Wait at least 2 minutes between coats
- If bubbles appear on a finished nail, lightly buff the surface once fully dry and apply a fresh top coat
How well it works: Rolling instead of shaking eliminates most bubble issues entirely. I used to get bubbles on every single manicure until I switched to rolling.
Mistake 5: Tip Peeling on Ombre Nails
What it looks like: The gradient layers at the tip lift and peel away as one unit within 2–3 days.
Why it happens: Ombre requires many layers of polish applied quickly via sponge. The accumulated thickness at the tips is significant, and if each layer isn’t thin enough, the whole stack doesn’t bond properly.
The fix:
- Use less polish on the sponge — blot it more before applying
- Seal each set of sponge passes with a swipe of top coat before doing the next set
- Cap the very tip (run top coat along the edge of the nail, perpendicular to the surface) on every coat
How well it works: Capping the tip makes the biggest difference. This creates a sealed edge rather than an open edge where peeling starts.
Blue Nail FAQs
How do I stop navy polish from looking purple on my nails? This happens when the polish formula pulls warm — often in certain lighting or over certain base coats. Test the shade in natural daylight before committing to a full manicure. OPI Russian Navy and Essie “Midnight Cami” stay true navy in most lights. If the shade you already own keeps pulling purple, a cool-toned (slightly gray) base coat can neutralize the warm shift.
Can I do chrome nails without a UV lamp? No, not properly. Chrome powder requires a gel surface (specifically a no-wipe gel top coat) to adhere to. Regular polish stays slightly flexible when dry, and the chrome powder won’t bond to it — you’ll get a dull, uneven result. The minimum setup is a UV or LED lamp ($15–$25 for a basic one on Amazon) plus gel base and no-wipe gel top coat.
Why do my blue nails fade to a gray-green color by day five? Two possible causes: the polish formula is low quality and the pigment breaks down with exposure to UV light, or your top coat has a warm/yellow tint that shifts the blue. Fix this by using a color-protecting top coat (Seche Vite is my reliable choice) and storing your polish away from direct sunlight. If it still happens, the polish itself is the problem — upgrade to OPI or Essie.
What’s the easiest blue nail art for complete beginners? Baby blue cloud nails using decals rather than hand-painting. Apply your base coat, let it dry, press a cloud sticker decal, and seal with top coat. The whole process takes 20 minutes and looks like intentional nail art. Born Pretty nail decals on Amazon have a large selection of cloud designs for around $6.
How long should I wait between blue manicures to avoid staining? If you’re using dark shades (navy, cobalt), give your nails at least 3–5 days bare between manicures. This lets the nail plate breathe and any minor staining fade. Always use a base coat, and if you’re doing repeated dark manicures, a ridge-filling base coat (OPI Ridge Filler, $11) adds an extra layer between the pigment and your nail. One week bare between very dark manicures is ideal if you’re dealing with repeated staining.
Conclusion
Blue nails span a genuinely enormous range — from a five-minute navy cream that’s more versatile than black to a sixty-minute marble that stops people in their tracks. There’s no wrong place to start. If you’re new to all of this,
I’d suggest picking up OPI Russian Navy and Seche Vite and doing nothing but two clean coats — it’s one of the best-looking manicures you can do at home, and it’ll give you the confidence to try the ombre or geometric designs next.
Once you’ve got the basics, the sponge gradient is the most satisfying next step: it looks complicated, it isn’t, and it makes people ask which salon you went to.